Article

A Deep Learning Approach to Classify and Detect Defects in the Components Manufactured by Laser Directed Energy Deposition Process

1
Department of Computer Science and Engineering, Birla Institute of Technology Mesra, Ranchi 835215, India
2
School of Computing, Engineering and Intelligent Systems, Ulster University, Magee Campus, Northland Road, Derry/Londonderry BT48 7JL, Northern Ireland, UK
*
Author to whom correspondence should be addressed.
Machines 2023, 11(9), 854; https://doi.org/10.3390/machines11090854
Submission received: 19 July 2023 / Revised: 16 August 2023 / Accepted: 23 August 2023 / Published: 25 August 2023
(This article belongs to the Special Issue Additive Manufacturing of Machine Components)

Abstract

:
This paper presents a deep learning approach to identify and classify various defects in the laser-directed energy manufactured components. It mainly focuses on the Convolutional Neural Network (CNN) architectures, such as VGG16, AlexNet, GoogLeNet and ResNet to perform the automated classification of defects. The main objectives of this research are to manufacture components using the laser-directed energy deposition process, prepare a dataset of horizontal wall structure, vertical wall structure and cuboid structure with three defective classes such as voids, flash formation, and rough textures, and one non-defective class, use this dataset with a deep learning algorithm to classify the defect and use the efficient algorithm to detect defects. The next objective is to compare the performance parameters of VGG16, AlexNet, GoogLeNet and ResNet used for classifying defects. It has been observed that the best results were obtained when the VGG16 architecture was applied to an augmented dataset. With augmentation, the VGG16 architecture gave a test accuracy of 94.7% and a precision of 80.0%. The recall value is 89.3% and an F1-Score is 89.5%. The VGG16 architecture with augmentation is highly reliable for automating the defect detection process and classifying defects in the laser additive manufactured components.

1. Introduction

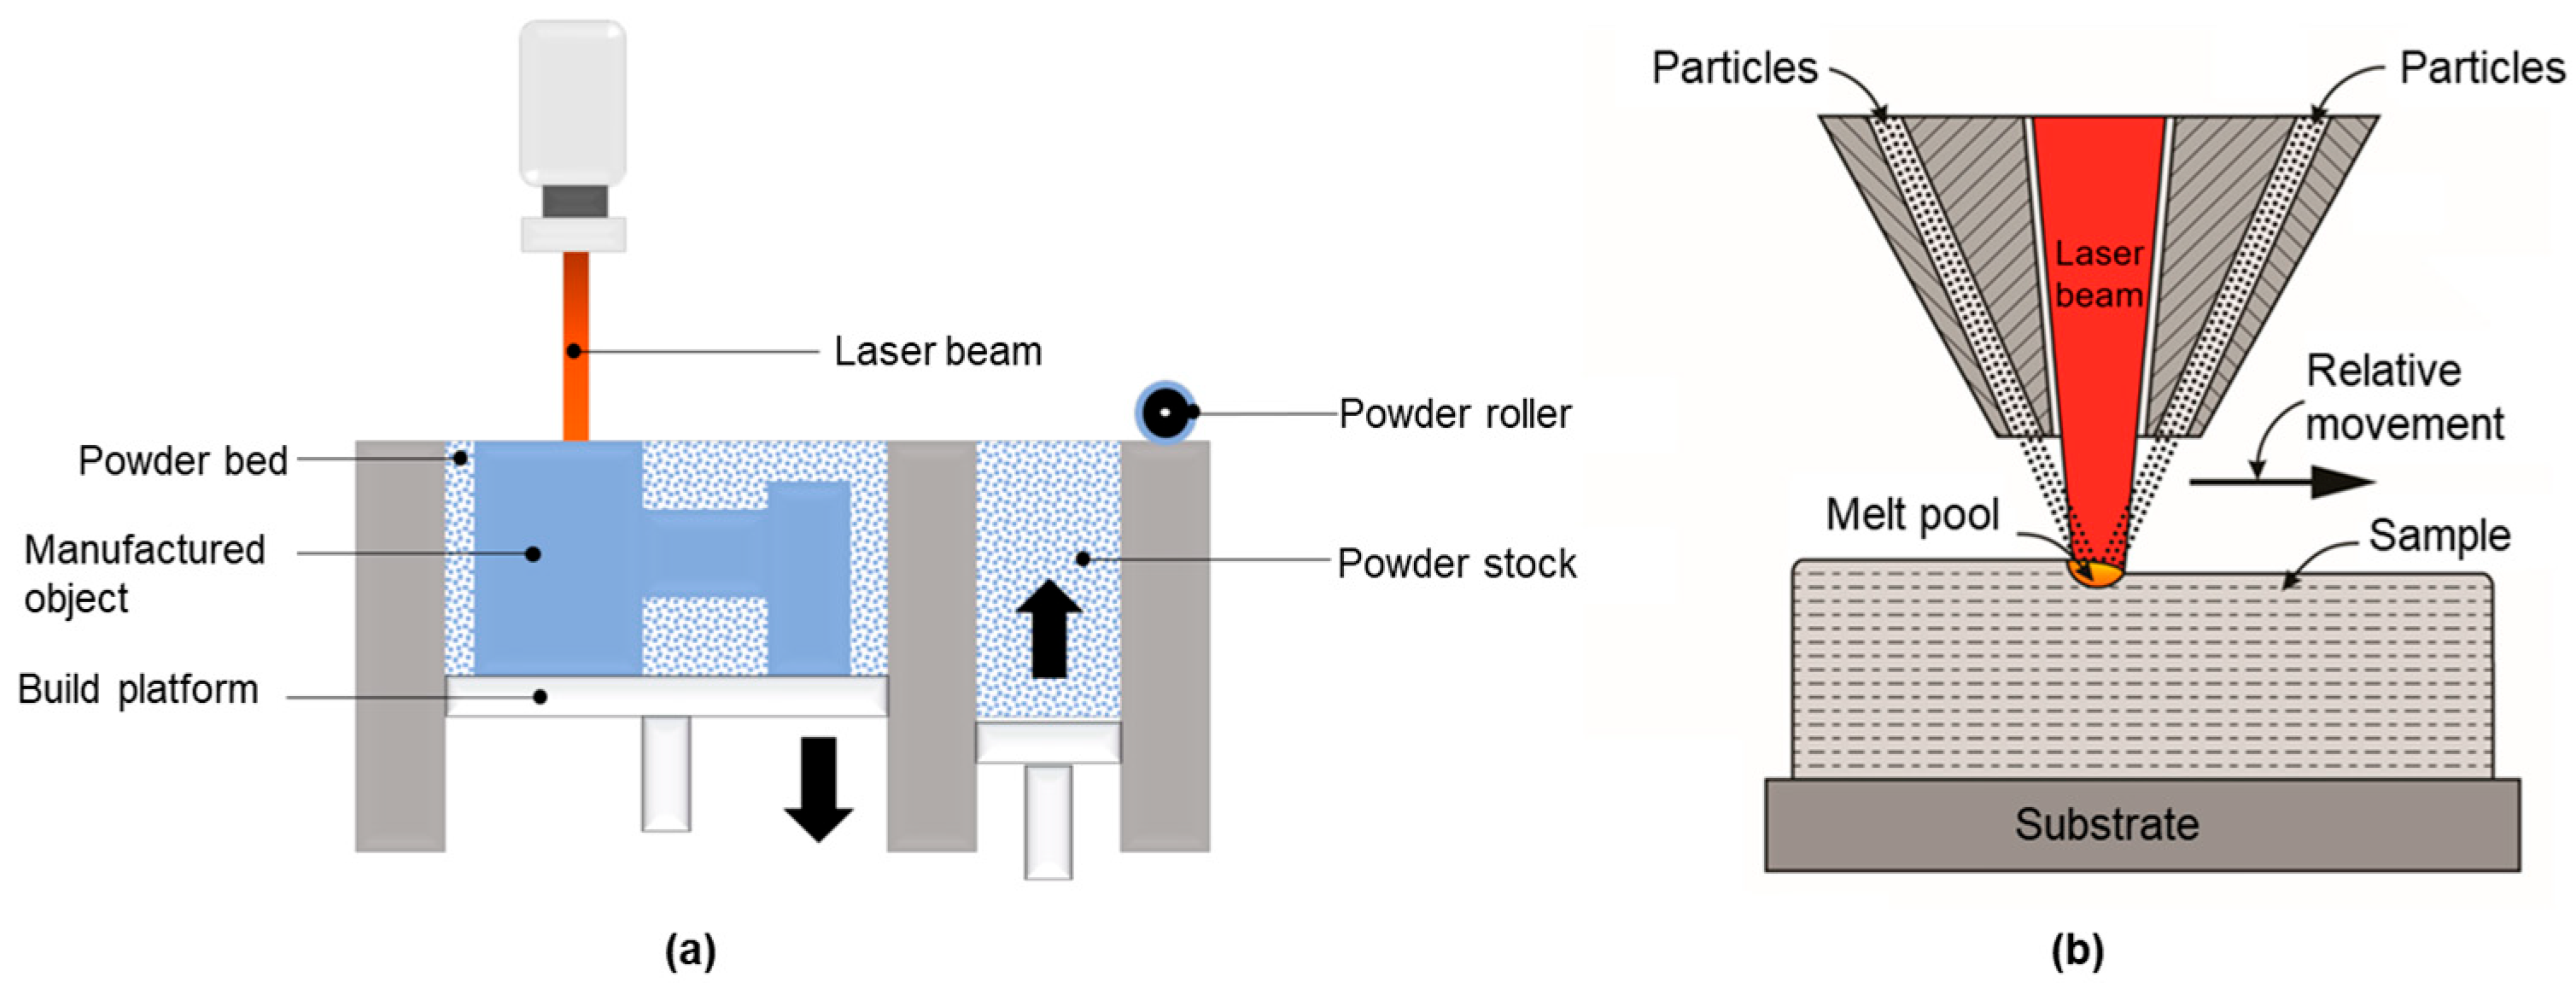
Additive manufacturing (AM) of metallic material is the process by which 3D components can be built in a layer upon layer fashion. The material deposition is carried out directly by using the 3D model of the part to be manufactured. The metal AM industry is a growing sector and is using processes such as powder bed fusion, directed energy deposition, binder jetting, and sheet lamination. The industry’s most used metal AM process is the Powder Bed Fusion (PBF) process. It utilizes a laser or electron beam for selectively melting a powder which leads to the deposition of metal layers. This powder is spread over the build platform in the build chamber. Melting is carried out as a cyclical process; once a cycle is completed, a new layer is spread over the build platform using a recoater blade, roller, or rake. Figure 1a depicts the schematic view of the PBF process. On the other hand, the Directed Energy Deposition (DED) process is also attracting the attention of AM industries. DED processes such as laser-based and arc-based are developed for the AM industries. In the DED process, heat sources such as a laser and arc are used to melt the metallic deposition material. The melted deposition material is deposited layer by layer which manufactures components additively. These processes provide flexibility of deposition material such as in wire and powder form. Figure 1b depicts the schematic view of powder-based DED process. The main difference between PBF and DED is the method of depositing the deposition material. In PBF, the deposition material is spread over the substrate material while in DED it is blown through a nozzle. Another difference is, that the PBF is preferred for manufacturing complex geometries while DED is used for simple geometries. Defects in parts manufactured through the PBF process are inclusions, cracks, porosity, incomplete fusion, etc. These defects are formed due to irregularities or contaminations during powder recoating, poor interaction between laser and material, and partial solidification [1]. These defects are of concern among researchers and manufacturers owing to their negative effects on the mechanical properties of manufactured parts [2,3,4]. However, the defects in the components manufactured by the DED process are flash formation, voids, cracks, porosity, surface lines, and high surface roughness. So, whether it is the PBF process or the DED process, defects in the deposition are the main problem, and solving this is quite complicated and challenging.

1.1. Imaging Defects

A common approach to minimizing defects in the laser-based depositions process is monitoring melt pool geometries. Monitoring melt pools using IR cameras can provide an overall insight into processes and parts. However, the most challenging thing in IR cameras is the emissivity calibration of the melt pool resulting in complications in the analysis [7]. Another method involves capturing images by using postprocessing techniques. The defects can be located either by destructive or non-destructive postprocessing techniques. In destructive, manufactured samples are cross-sectioned at certain locations, and then by using metallographic procedures the samples are prepared and the defects are captured using optical imaging [8]. In Non-Destructive Testing (NDT), the X-ray Computed Tomography (X-CT) of the sample is carried out to locate the defects within the manufactured components [9]. Spierings et al. [10] explained in detail the features of CT scanning, metallographic imaging, and Archimedes method, which are primarily used to analyse the porosity in the PBF build components. It has been identified that when compared to the Archimedes method, the detection of voids using CT images is dependent on the threshold size selected for voids detections, i.e., setting a higher value of threshold to bypass the detection of smaller voids. In another study carried out by Wits et al. [11], comparative inspection results are highlighted using three techniques, i.e., the CT method, the microscopic method, and the Archimedes method. It has been ascertained that all these methods predict the same porosities, but there is an added advantage in using the CT scanning technique that enables the quantification of part porosity. Kim and Saldana [12] used a CT scan to locate the porosity within the internal thin-walled structure made of IN625 using a laser-based DED process. For a similar AM process, Kersten et al. [13] inspected the orientation of thin-walled structures using the CT scanning technique. They investigated the effect of wall orientation on mechanical properties in which the CT scanning technology was used for capturing the thin wall orientation for various combinations of process parameters. Zheng et al. [14] used X-CT scanning technology to understand the evolution of defects in the 316L SS components manufactured by the laser-DED process. Using X-CT, they precisely captured the pores and spatial distance between them. In NDT, eddy current testing is another way to capture the defects within the components. Saddoud et al. [15] used an eddy testing method to capture defects within the components manufactured by the laser PBF process. It was found that the method can detect surface and shallow defects in a conductive material. For a similar process, Gelatko et al. [16] used eddy current sensors on the artificially generated defects in samples made up of 316L stainless steel. The study found that the testing method not only detected the defects but also helped in characterising the shape and size of defects. Harkin et al. [8] used both NDT and the destructive characterisation method to capture the lack of fusion defects. In NDT, XCT scan, and destructive characterisation, the optical imaging method was used. The research work by Kobryn et al. [17] investigated the effect of process parameters of the laser-based directed energy deposition process on internal defects such as porosity. They used a metallographic procedure to capture the lack of fusion and gas pores within the components. Using a similar metallographic procedure, Galarraga et al. [18] captured the lack of fusion and gas porosity in the components manufactured by the electron beam-based powder bed fusion process.

1.2. Classification and Detection of Defects

Along with capturing the images of internal and external defects, their detection, categorisation, and analysis are important. Aminzadeh and Kurfess [19] developed the defect detection methodology in an additively manufactured part. They used visual inspection sensors which were operated online and thereafter coupled the sensors with different classifiers such as Support Vector Machines (SVM’s) or Neural Networks. The execution of Supervised machine learning was carried out in two steps. In the first step, the system training was executed, which means the set of data with known labels was trained which estimates the parameters of the classification scheme. The SVM classification requirement of the training step is to create a decision boundary capable of separating the data sets based on trained data sets with labels [20]. In the second step, the data sets for the classification of boundaries are tested by creating labels based on the prediction made by the classification scheme. Performance assessment of the classification scheme is executed based on comparing metrics such as false-negative rate and false-positive rate obtained for trained labels and predicted labels of the test data set. Guo et al. [21] captured the porosity defect in the thin-walled structure built by the laser metal deposition using a pyrometer. Furthermore, they applied a deep learning model on the thermal images captured by the pyrometer dataset to predict the porosity in the depositions. Cui et al. [22] proposed a Convolution Neural Network (CNN) model to inspect internal and surface defects such as porosity, lack of fusion, and cracks. They used this CNN model to classify the defects with automatic defect recognition more accurately. Garcia–Moreno [23] developed an artificial vision methodology to quantify the porosity with high accuracy suitable for any additive manufacturing process. The methodology was divided into three steps, first was image soothing using filters, second was segmenting the pores using Hough transform and third was automatic classification of the defects. The proposed approach was validated on the defects formed during the manufacture of components using the laser metal deposition process. For the PBF process, Zhang et al. [24] proposed a CNN model that can classify and detect the melt pool, plume, and spatter during the deposition process. The advantage of the methodology was that it reduced the computation time by saving the image processing step and making the algorithm more suitable for online monitoring of the process.
From the past literature, it can be concluded that machine learning/deep learning algorithms can be used to detect and classify defects from large-sized datasets of images captured using post-processing methodology. However, exploring the potential of deep learning in the field of additive manufacturing, this paper presents a deep learning methodology that can automatically classify and detect defects in the components obtained from the laser-directed energy deposition process. The objectives of the present research work are as follows:
  • To use laser-directed energy deposition process to manufacture horizontal wall structures, vertical wall structures and cuboid structures using different combinations of process parameters followed by cross-sectioning of the manufactured structures to capture images for a dataset.
  • To prepare a dataset of horizontal wall structure, vertical wall structure and cuboid structure with three defective classes such as rough textures, flash formation, and voids, and one non-defective class.
  • Identify a deep learning algorithm capable of classifying defective and non-defective components and detecting different defects in the components manufactured by the laser-directed energy deposition process.
  • Investigate and compare the performance parameters of various deep learning models such as VGG16, AlexNet, GoogLeNet and ResNet used for classifying and detecting defects.

2. Materials and Methods

This section describes the process of deposition, and process parameters used for the laser DED process. It also includes details of image acquisition instruments and the deep learning models used to classify and identify defects in the additively manufactured components.

2.1. Experimental and Acquisition of Image

In the present work, the components were additively manufactured with Inconel 625 deposition material in powder form. The deposition material has been deposited on the mild steel substrate by using the laser DED process. Figure 2 represents the experimental setup of the laser DED process used at Magod Fusion Technologies Pvt. Ltd., Pune, India. The horizontal wall structure, vertical wall structure and cuboid structure as depicted in Figure 3a–c, respectively were additively manufactured using the laser DED process. The process parameters of the manufacturing process are described in Table 1.
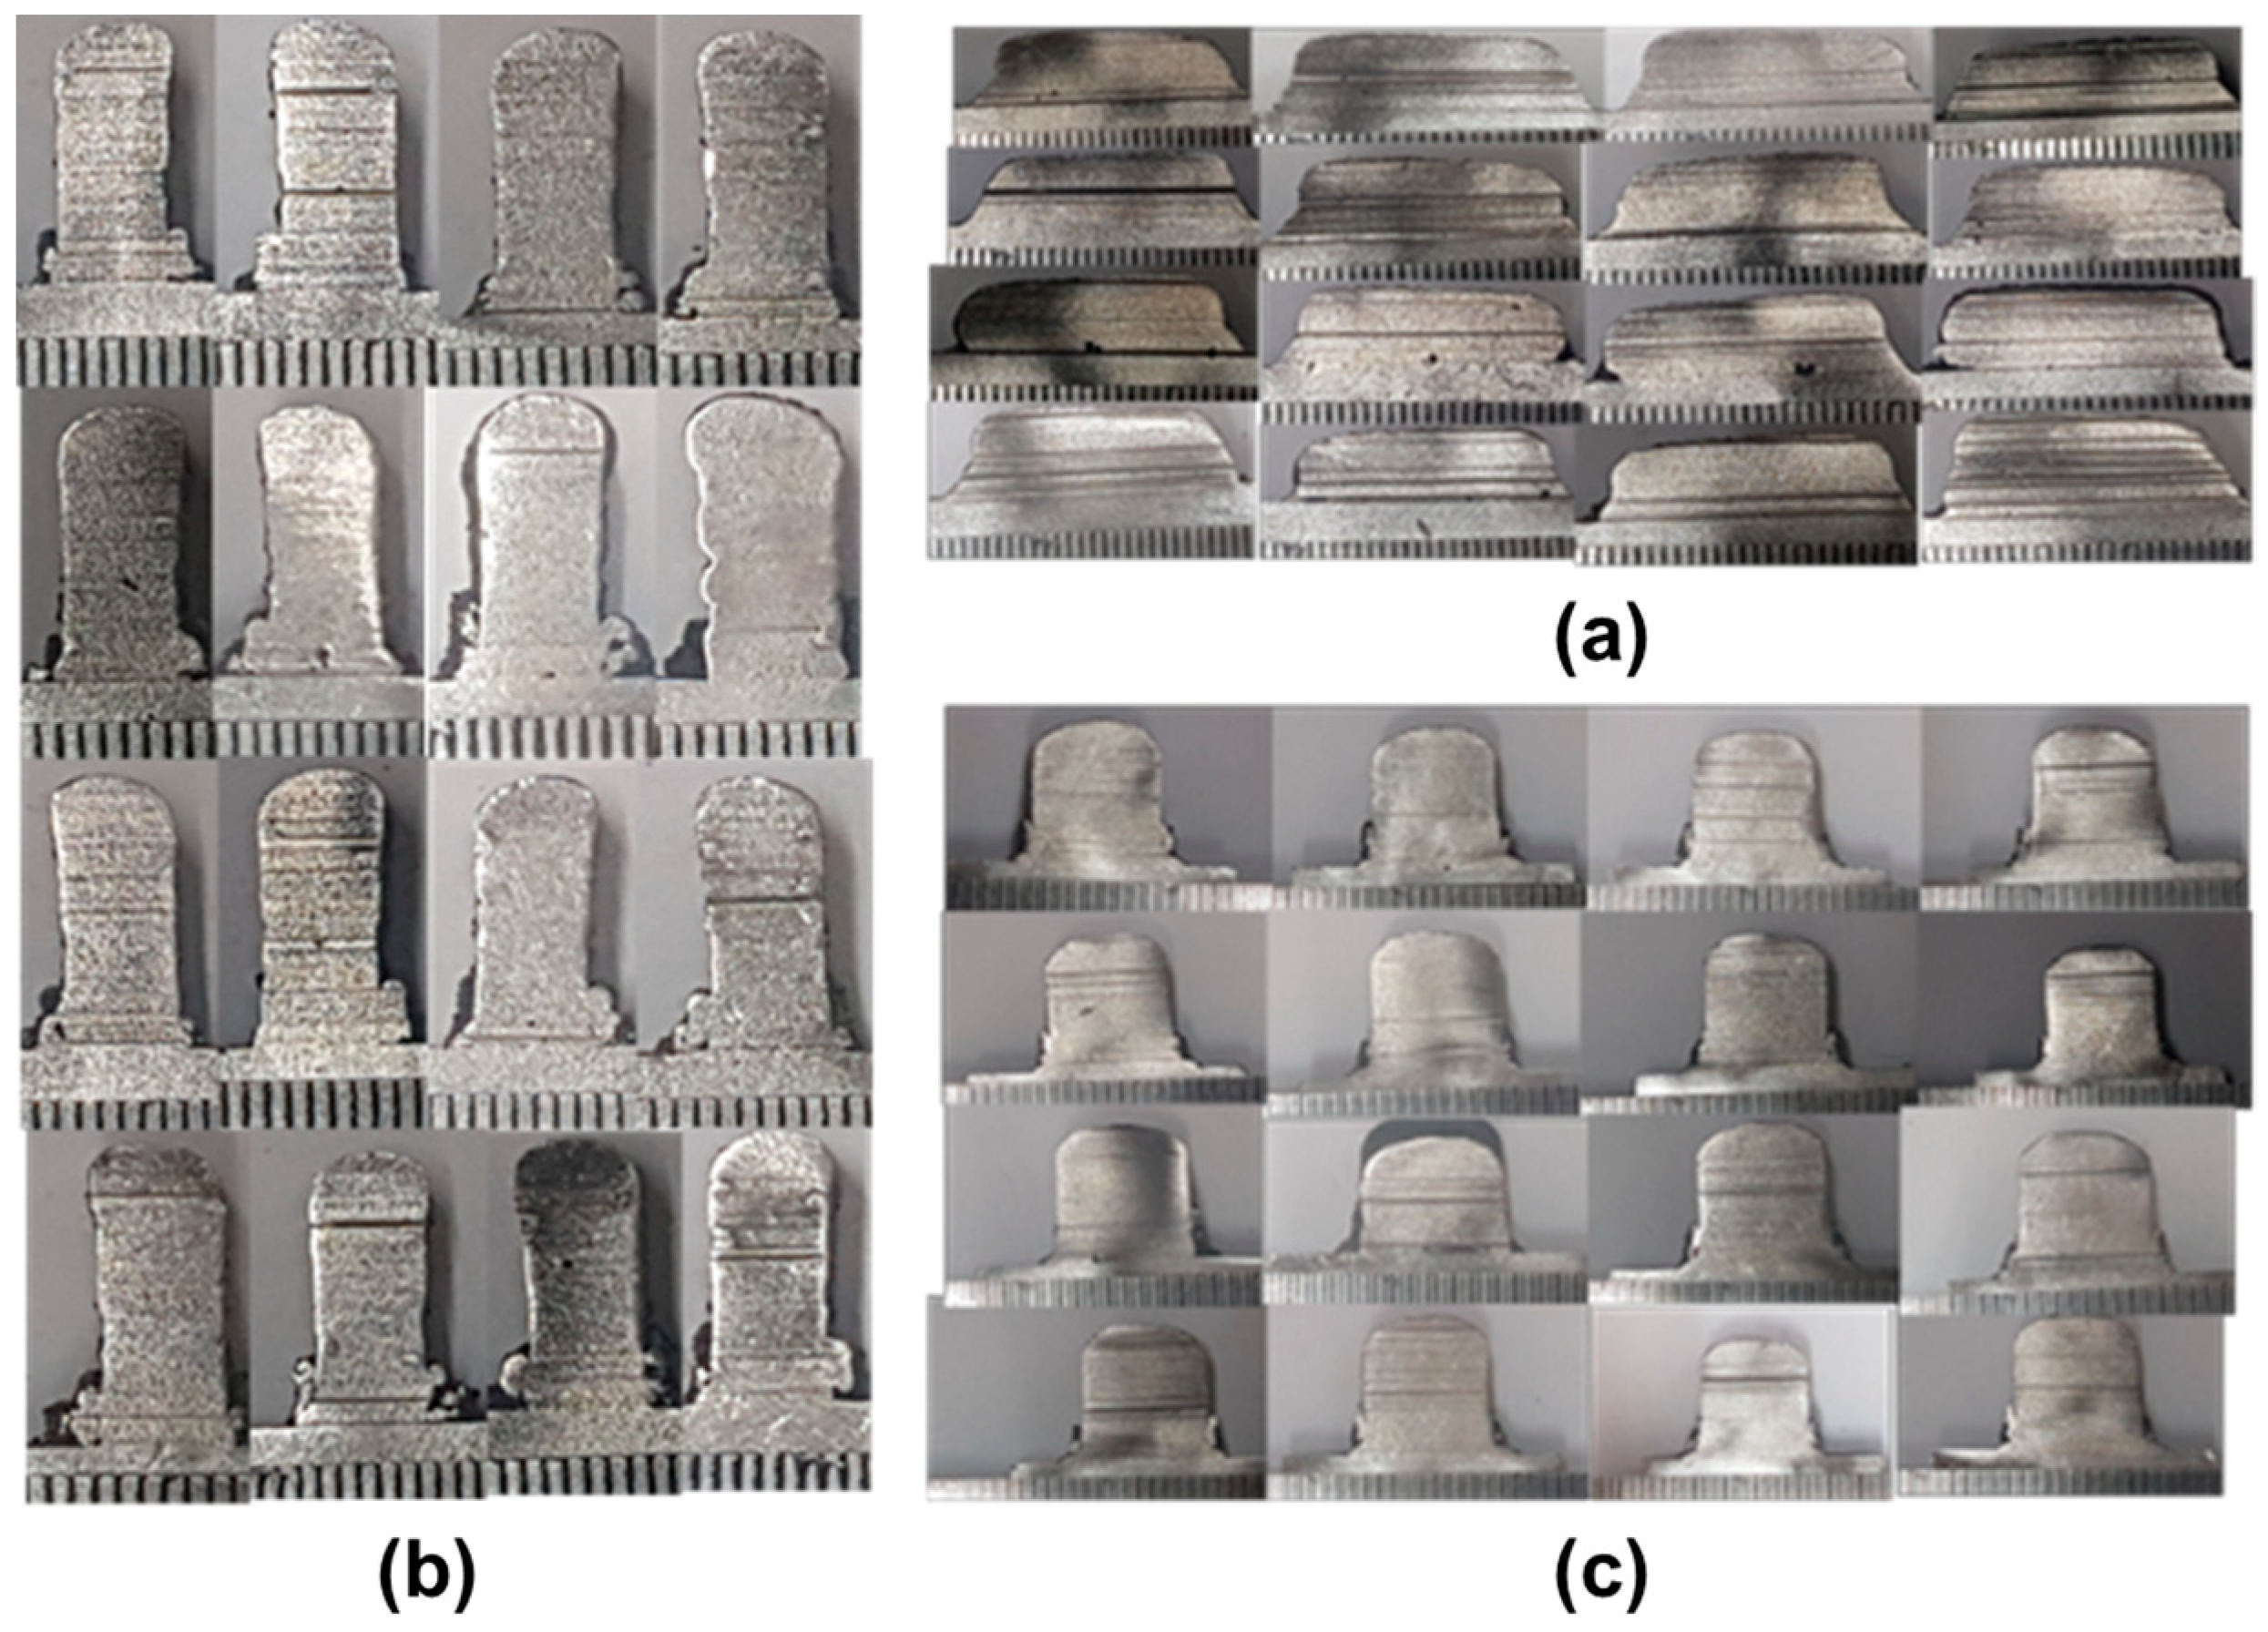
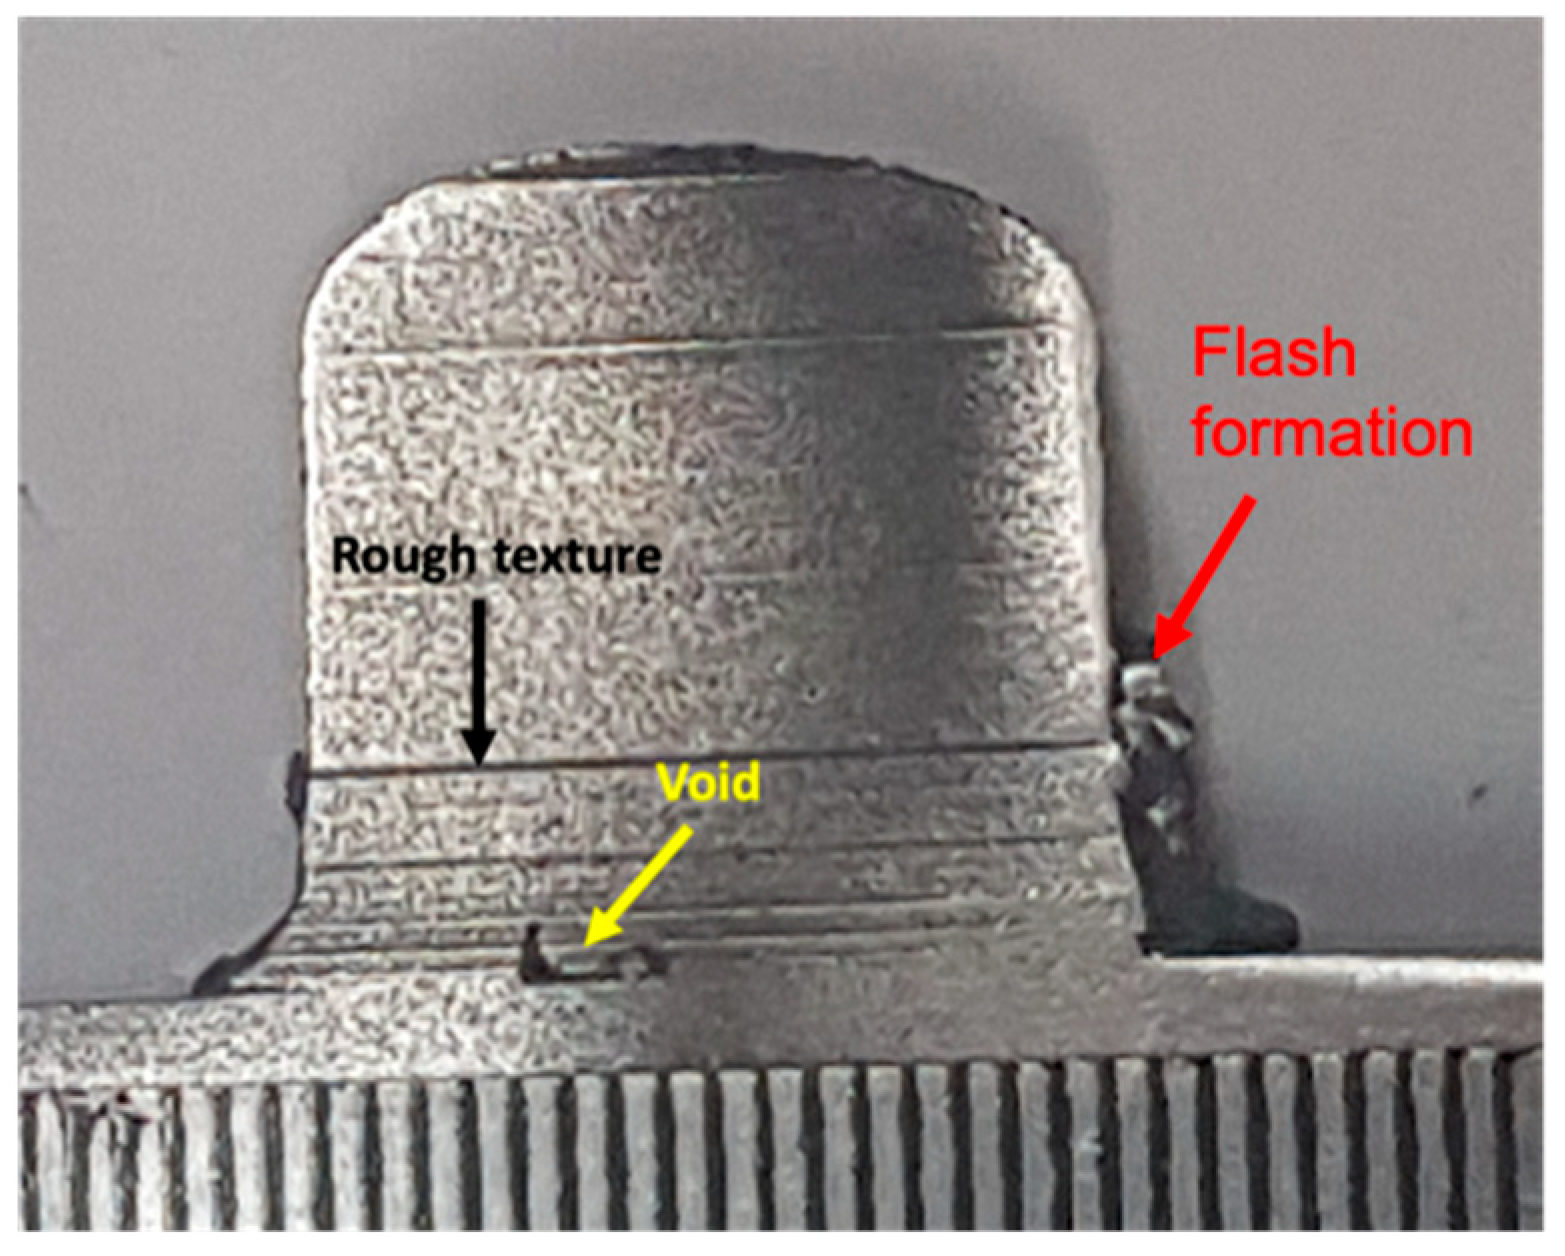
The type of dataset images captured in this work is by using a post-processing technique. After the depositions were executed, an electro-discharge machine was used to cross-section the samples along the height. These sectioned samples are used for imaging purposes. To eliminate the effects of shadow, these samples are kept on a flat plate with a grey background. A Canon (Model 1500 D) camera is used for image acquisition under natural light conditions. The camera and the surface plate are kept parallel during image acquisition to avoid asymmetricity. Sectioned samples for the acquisition of images of deposition geometry are represented in Figure 4a–c, respectively, for horizontal wall structure, vertical wall structure and cuboid structure. Figure 5 shows three defects such as void, rough texture, and flash formation in the manufactured components.

2.2. Dataset

The dataset generated comprises 6127 images of deposition geometries. Images with different anomalies arising during acquisition or unfavorable light conditions (extraneous images) were withdrawn from the set. After that, images in good condition were distributed manually amongst three defective classes, i.e., void, rough texture, flash formations, and one non-defective class, using the expertise and knowledge of the manufacturing process. Each class consists of 1500 images therefore, the final dataset consisted of 6000 images combined over all classes. To standardize the data ranges and enhance the data modelling process, pre-processing of the numerical dataset was executed using Z-score data normalization [26]. Z-score data normalization is represented in Equation (1).
X Z N = X o M X S X
where, Xo is the intensity of each pixel in an original input image, XZN is normalized pixel intensity for an input image, MX is the mean pixel intensity of the entire original input image and SX is the standard deviation of pixel intensity in an original input image.
Subsequently, random distribution of the normalized dataset into three subsets was executed. Three sets prepared are a training set (70%) which is used for training the model, a testing set (15%) for model testing, and a validation set (15%) for model validation. The images of the deposition geometry dataset have been pre-processed according to the method suggested by Patil et al. [27]. To focus only on the area of interest with the maximum possible relevant information following pre-processing steps were performed:
  • Conversion RGB to grayscale
  • Gaussian filter applied to enhance image pixel intensity.
  • Resize the image

2.3. Deep Learning Model

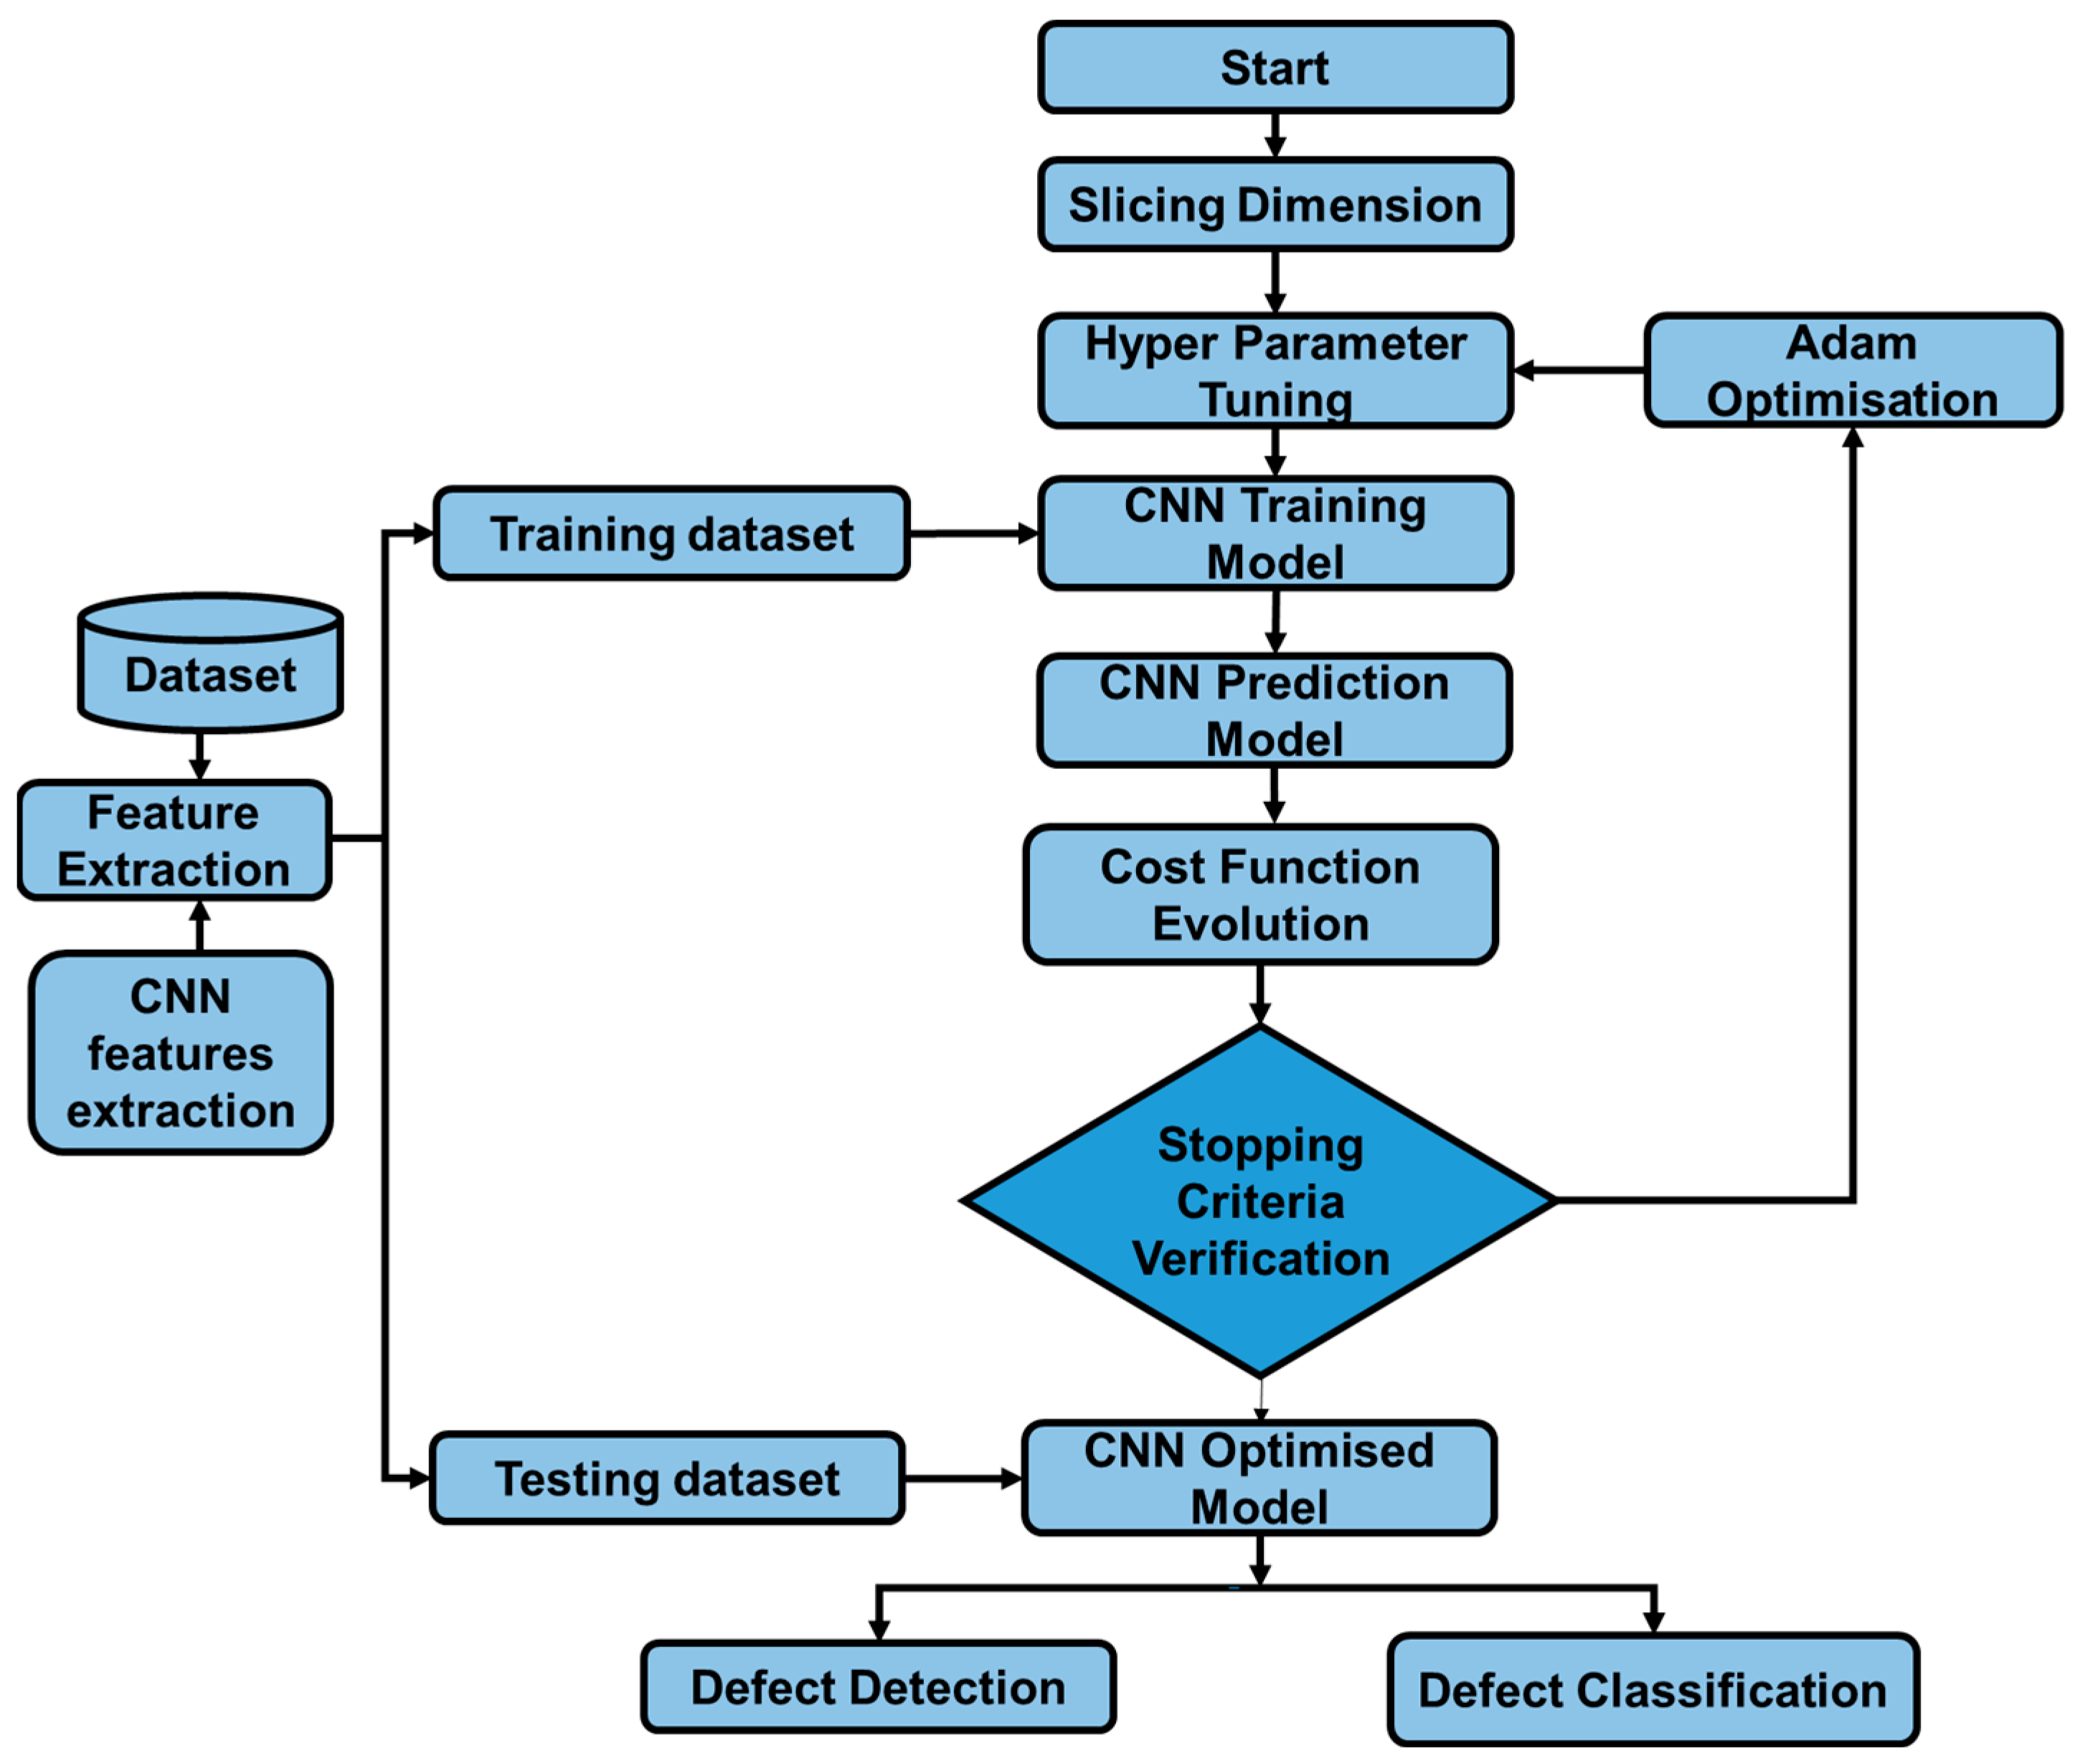
The flow diagram of the methodology adopted to classify and detect defects has been presented in Figure 6.
The structure of the model as shown in Figure 6 is divided into two separate modules:
  • Computational analysis of images within the dataset
  • Defect classification and detection model.
For computational analysis, the dataset is a very important element. In this work the dataset has been considered in two ways, the first is without augmented dataset, in which the dataset is considered in its original state. The second is with the augmented dataset, in which the dataset is artificially modified using an existing dataset. Data augmentation was executed as a regulatory measure to prevent the model from overfitting training data [28]. In data augmentation, several operations on images such as rescaling with a factor of 1/227, flipping the image horizontally, and zooming on the specific area of interest were carried out. The next step is slicing dimensions also known as blockwise slicing of the images. In blockwise slicing, the block corresponding to a sample size of 224 × 224 pixels is prepared. In the pre-processing of the image data, hyperparameter settings were important for training the CNN models. The classification model exhibiting the best performance for images of laser DED-manufactured components was obtained after numerous iterations and combinations of hyperparameters. The values were compared with the values of the hyperparameters presented for metal additive manufacturing processes in the past literature [29]. Table 2 lists CNN model hyperparameters used in the current work. The adaptive moment estimation (Adam) optimizer has been used to estimate the adaptive learning rate for each weight in the neural network. Patience defines the number of epochs to wait before learning rate decay and early stopping.

2.3.1. Convolutional Neural Network and Architectures Used in This Work

The approach of Machine Learning (ML) toward image recognition is a two-step process. Feature extraction is the first step that attempts to extract relevant data structures with the help of different algorithms from the raw image data. Classification is the second step in which using ML algorithm attempts are made to bring out a pattern capable of mapping the data structures with the target variable, provided that extraction of these patterns has been executed during feature extraction for learning. Each stage comprises three layers in CNN: Convolution layer, Rectified Linear Unit (ReLU) layer, and Max Pooling. The images in the dataset are usually presented in the matrix having pixels/numbers. To extract the features from the image using mathematical operation, the convolution layer plays a very significant role. Detection of the local conjunction of features of the previous layer and mapping its appearance on a feature map is the prime task of the convolution layer. In CNN, ReLU is used to increase the prediction accuracy of the models. It is similar to an activation function applied through the layers of neurons. It is a specific type of implementation used to combine non-linearity and rectification layers which help to overcome the problem of vanishing gradient. Preservation of features detected in a small representation is the aim of the pooling operation, which it does by discarding less significant data at the cost of spatial data. Spatial data is a type of data that stores information related to the shape, size, and location of the features within images. There are three types of pooling, minimum pooling, average pooling, and maximum pooling. In Max pooling, with each pooling layer spatial size of interesting features of the input image is reduced to half of its size. After Max pooling, the model becomes robust to small variations in the location of features in the previous layer. The final step is connecting all neurons in the CNN model. This is executed by mapping the last activation volume using a fully connected layer on a class of probability distribution at the output.
The CNN models used in the present research work for training and prediction are VGG16, AlexNet, GoogLeNet and ResNet. VGG 16 architecture was originally designed and developed by Simonyan and Zisserman [30]. Figure 7 represents the structure of the VGG16 network architecture. This architecture is a pre-trained CNN model developed by the Visual Geometry Group (VGG) of Oxford University. To recognise the object this model uses sixteen network layers [31] and this increases the depth of current CNN architectures. The size of the input image is 224 × 224 pixels with 3 channels i.e., RGB. The input image is passed through the 64 filters of the convolution layer with each filter of 3 × 3 pixels. Images are passed from a block of convolution layers with a convolution step size of 1 pixel. The red block represents the input image from the previous layer while the blue block represents the processing of the image within the layers. After the convolution layer, the image passes through five layers of max pooling with 128, 256, 512, 512, and 512 filter sizes in each max pooling layer. The window size of the max pooling layer is 2 × 2 pixels embedded with a convolution step of 2 pixels for compressing spatial representation of input images. After the Max pooling layer, the VGG16 model has three fully connected layers out of which the first two layers consist of 4096 neurons and the third connected layer used for classification consists of 1000 neurons for different classes. At last layer of the VGG16 model is a softmax layer with 1000 neurons.
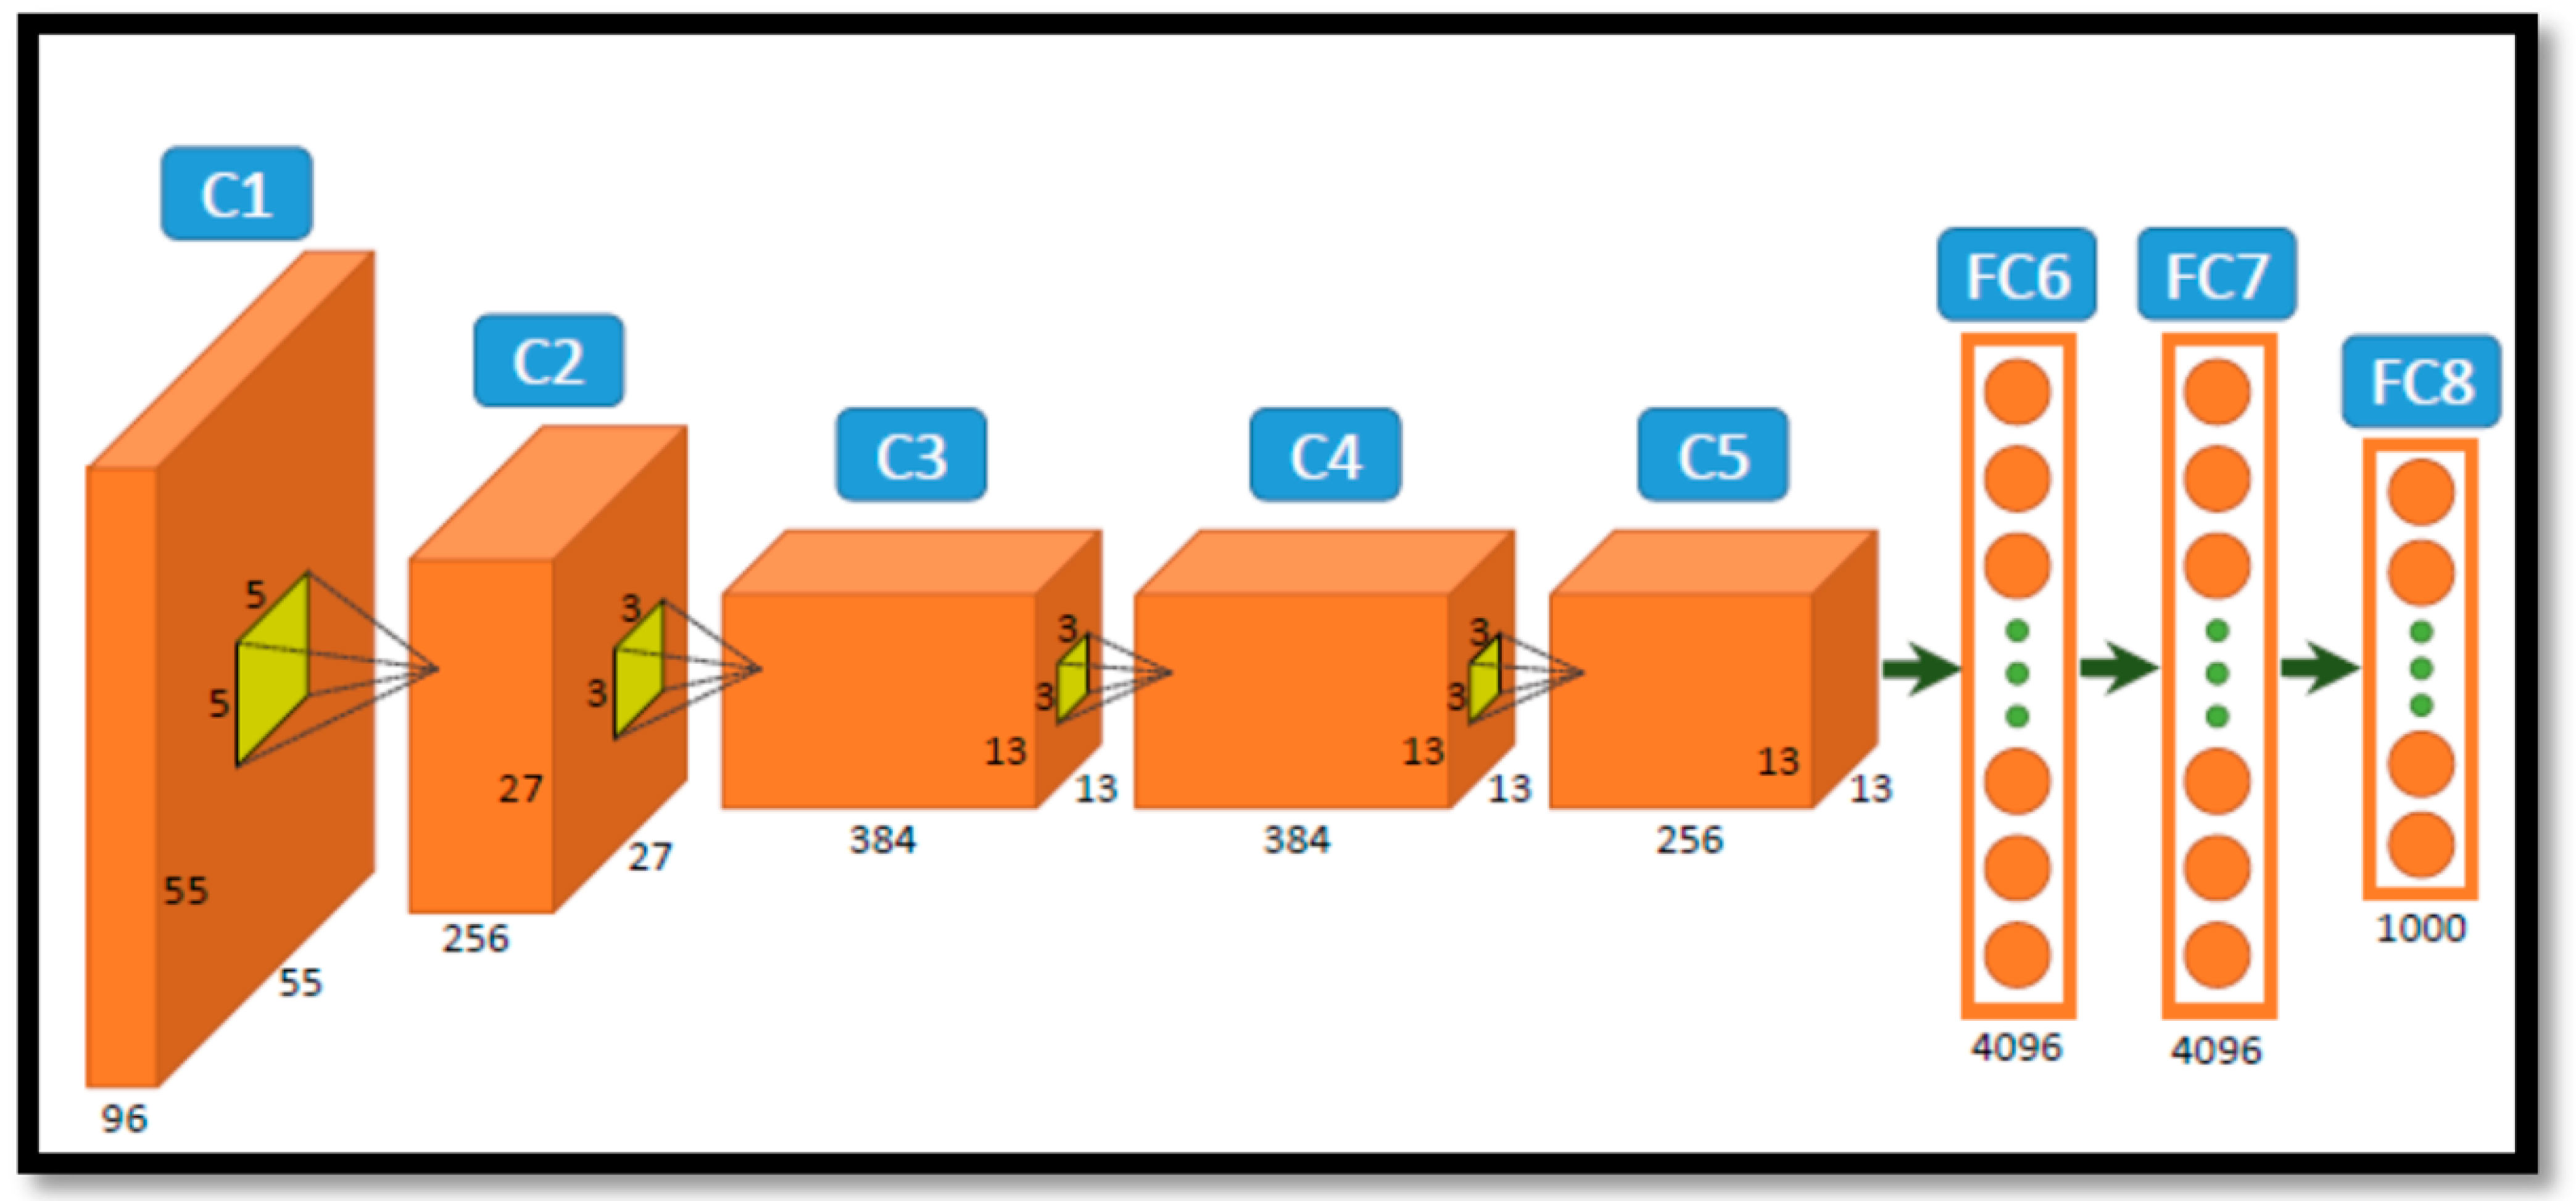
Krizhevsky [32] proposed a deep learning model by the name AlexNet, which is also a variant of CNN. This model has eight layers, of which five are convolutional layers, following which there are three fully connected layers. Max pooling layers also follow some convolutional layers of the model. The network uses the ReLU function as an activation function that exhibits better performance than the tanh and sigmoid functions. In five convolutional layers, the network contains filters or kernels having sizes 5 × 5, 3 × 3, 3 × 3, and 3 × 3. Figure 8 represents the structure of the AlexNet network architecture.
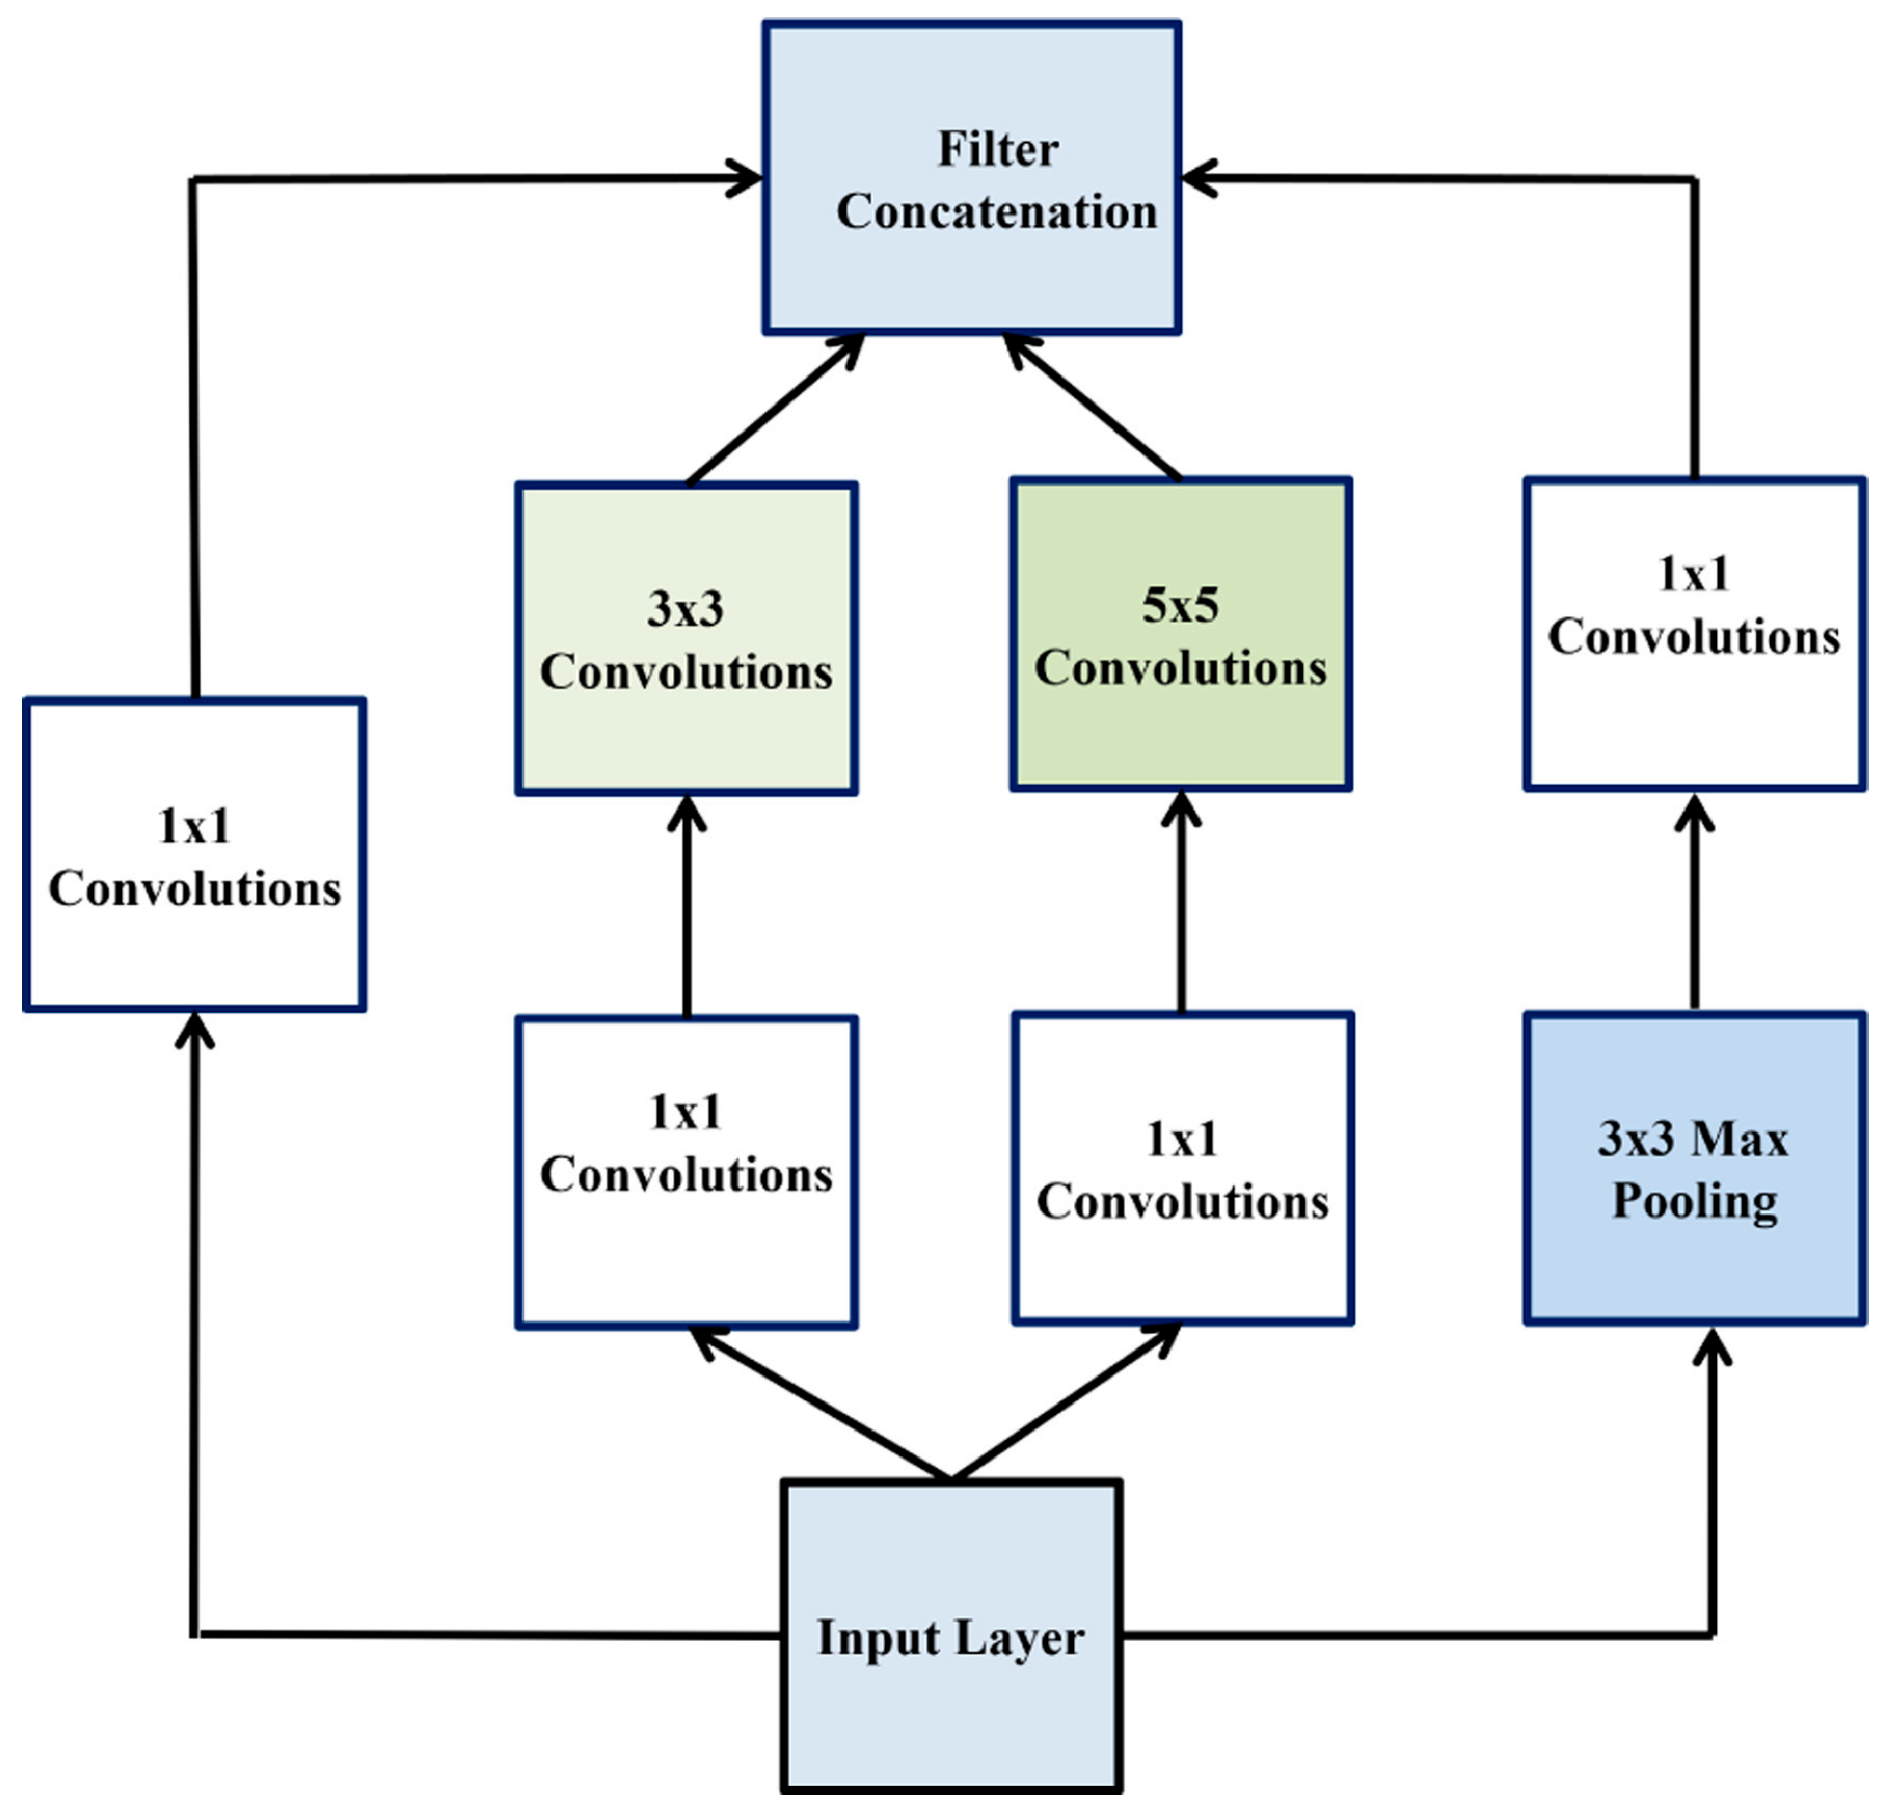
Szegedy et al. [34] proposed GoogLeNet architecture as shown in Figure 9 and is slightly different from CNN. It has an increased number of units called the inception module, which has the size of 1 × 1, 3 × 3 and 5 × 5 in each convolution layer. To make the architecture computationally more efficient, the inception module with dimensionality reduction has been added to the architecture. Within this inception module, a series of Gabor filters having different sizes are added to GoogleNet architecture to handle multiple scales.
In a deep CNN architecture, a vanishing gradient problem could occur if more layers are stacked. Due to the vanishing gradient, the deep learning model showed worse performance while training and testing and caused overfitting even though intermediate initialization and normalization were used to handle the problem. Some researchers [36,37] used a pre-trained shallower network as additional layers with the deep learning model to solve the vanishing gradient problem. This resulted in an integrated performance when the deep learning model and pre-trained shallower networks were operated at the same level. On the other hand, He et al. [38] developed a ResNet architecture to solve the vanishing gradient problem. The developed architecture consists of 3 × 3 convolutional layers stacked residual blocks as shown in Figure 10.

2.3.2. Transfer Learning

Training of the CNN model requires a lot of data and is also computationally time-consuming. Often prediction of results becomes difficult or less accurate when the CNN models are applied to less amount of data. To overcome this Transfer learning (TL) method is adopted. TL is a complex prediction technique in which features of the CNN model that were earlier trained were used for initializing the training of the CNN model, which is used for classification. Tsiakmaki et al. [39] also state that using features generated from a trained CNN model based on a large dataset for initializing a CNN model on a small data set is an effective machine-learning method. Implementation of this method is usually informative even in cases where a new classification differs by large from the classification on which the original model was trained. In the present study, the top layer of the used CNN model is pre-trained using the TL approach to obtain better results for features extraction from the images of the desired dataset. The VGG16, AlexNet, GoogLeNet and ResNet models used in this are pre-trained on the ImageNet database. It contains more than a million high-resolution images and is capable of classifying 1000 different classes within the ImageNet dataset.

3. Results and Discussion

3.1. Defects Classification

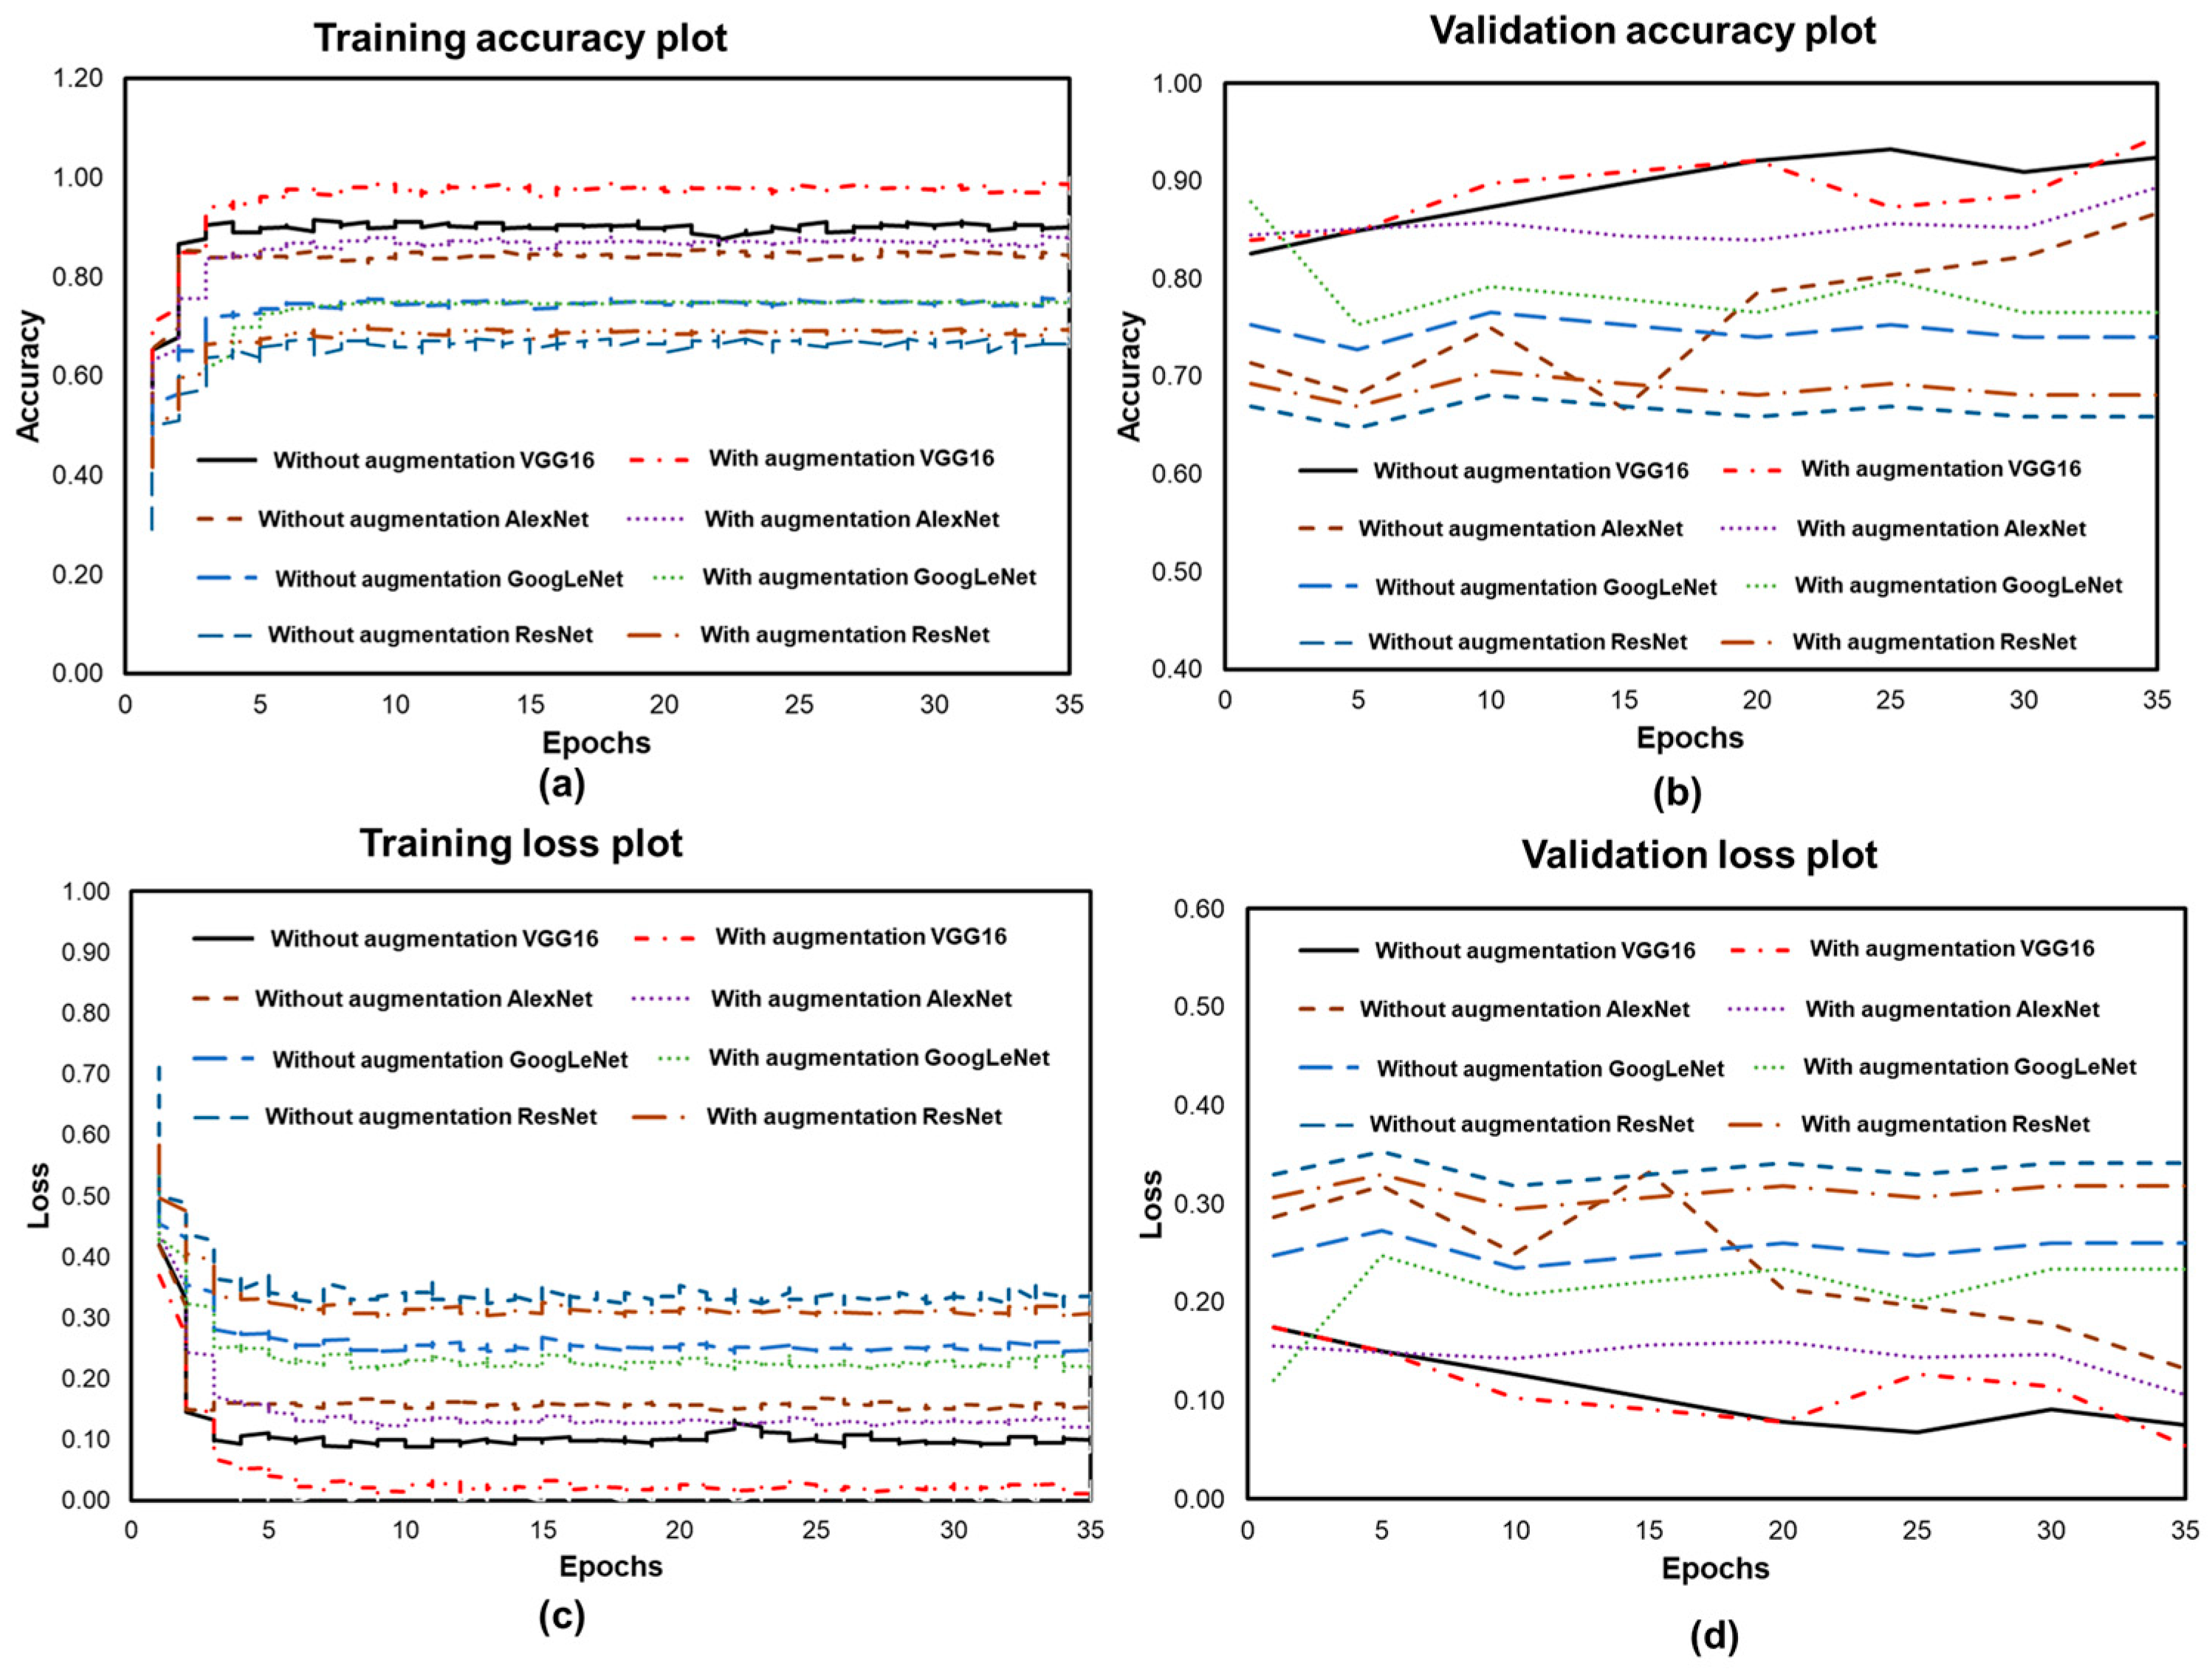
VGG16, AlexNet, GoogLeNet and ResNet architectures are used in the current work for the classification of defects. For each architecture, one set without applying data augmentation and another set with data augmentation is used. The resultant CNN architectures are trained using training data and validated using validation data. Training of the pre-trained network and the classifier is executed with the data in the first stage, while in the second, optimisation is carried out using renewed training and fine-tuning. Figure 11 represents the variation of accuracy and loss on the two settings performed on training data and validation data during the process of fine-tuning. After the variants of the CNN models used in this study were trained, optimised, and validated, they were used for examining image data. The same data set was utilized in both the models and in all settings.
In the first setting i.e., without data augmentation, the training accuracy of VGG16, AlexNet, GoogLeNet and ResNet architecture was 0.92, 0.85, 0.73 and 0.62, respectively, as represented in Figure 11a. The respective training loss was 0.08, 0.15, 0.27 and 0.38 as represented in Figure 11c. The validation accuracy of the VGG16, AlexNet, GoogLeNet and ResNet models is 0.91 0.82, 0.76 and 0.66, respectively, as represented in Figure 11b. The respective validation loss is 0.09, 0.18, 0.24 and 0.34 as represented in Figure 11d. In the second experimentation with data augmentation, VGG16, AlexNet, GoogLeNet and ResNet model training accuracy is 1.00, 0.89, 0.72 and 0.67, respectively, as represented in Figure 11a, and respective training loss was 0.00, 0.11, 0.28 and 0.33 as represented in Figure 11c. The validation accuracy of the VGG16, AlexNet, GoogLeNet and ResNet models is 0.947, 0.89, 0.78 and 0.69, respectively, as represented in Figure 11b. The respective validation loss is 0.053, 0.11, 0.22 and 0.31 as represented in Figure 11d.
After the training and validation of the models, the testing process has been carried out. The testing dataset consists of 15% unseen images from the actual dataset. Therefore, a total of 900 images were used for testing purposes out of which 225 images were equally divided in each class. A Confusion Matrix (CM) is a special matrix used to summaries a classification task. CM is used to compare the features predicted by models against the features in the actual class. Table 3 represents a CM for three defective classes such as voids, flash formation, and rough textures, and one non-defective class in the dataset. This table shows the correct and incorrect classification of the number of images in the test dataset with respect to the features in the images of the actual dataset. The diagonal values presented in bold in the table represent the number of images with correct classified features while the off-diagonal presents the number of images in certain classes that have been incorrectly classified. The confusion matrix derives all performance matrices listed in this section. TP refers to True Positive, TN refers to True negative, FP refers to False Positive, and FN refers to False Negative. Performance parameters used for ascertaining model effectiveness are F1 Score, Recall, Precision and Accuracy, as shown in Equations (2)–(5). Table 4 represents the result of all performance parameters, with the best value highlighted in bold.
A c c u r a c y = T P + T N T P + T N + F P + F N
P r e c i s i o n = T P T P + F P
R e c a l l = T P T P + F N
F 1   S c o r e = 2 T P 2 T P + F P + F N
Figure 12 represents a comparative analysis of all performance parameters. It can be seen that in the first setting, which is without data augmentation, the VGG16 model delivers the best results. Using VGG16, an accuracy of 0.924 is achieved better than the accuracy achieved using AlexNet, GoogLeNet and ResNet over the same dataset without augmentation. Similar is the outcome of other performance metrics, proving that a better classification is achieved using VGG16 over AlexNet, GoogLeNet and ResNet in the first setting. The results obtained for the second setting resonate with the first setting in terms of the classification model. Through the direct comparison of accuracies, it is evident that the VGG16 model performs better than AlexNet, GoogLeNet and ResNet in the second setting as well. From Table 4, it is seen that VGG16 exhibits an accuracy of 0.947, quite above the accuracies obtained through the AlexNet, GoogLeNet and ResNet. The precision value obtained with VGG16 is 0.890, which signifies the number of times the system is correct when classifying an image as defective. It is significantly higher than 0.792, 0.857 and 0.778 obtained with AlexNet, GoogLeNet and ResNet, respectively. On the other hand, the recall value is 0.893 with VGG16, 0.767 with AlexNet, 0.853 with GoogLeNet and 0.767 with ResNet, which represents the fraction of times the system can correctly detect defects out of all the images with the defect. The VGG16 model gave better results compared to another model used in current research because the VGG16 model has approx. 138 million model parameters which is a very large number. These parameters are relatively distributed over a few layers (as shown in Figure 7) which help in carrying out an in-depth analysis of each image in the dataset. VGG16 model with data augmentation gave good accuracy because it avoids overfitting and generalizes the examined models.
However, it is also recommended that recall always be considered with precision; for instance, in some cases, having high precision and low recall indicates precise but incomplete classification. Owing to this calculation of the F1-score (harmonic mean between precision and recall) was also executed, which measures the robustness and preciseness of the model’s performance on test data. A high F1-score indicates a high-performing model. Therefore, the VGG 16 model (F1-score 0.895), the AlexNet model (F1-score 0.789), the GoogLeNet model (F1-score 0.855) and the ResNet model (F1-score 0.770) indicates an effective and better classification of defects using images of components manufactured using the laser additive manufacturing process.
Figure 13 depicts the 64 feature maps for three defective classes and one non-defective class captured by the VGG16 model. The above results revealed the performance of the VGG16 model and found that the VGG16 is capable of classifying defects more accurately than any other models used in this study. Therefore, 64 feature maps obtained through the first convolution layer of VGG16 have been selected and presented in Figure 13. The maps give a better understanding by visualising the feature extractions executed by the model. From the feature maps images, it has been observed that the features required for classification such as flash formation, rough texture, void, and non-defective are extracted and can be easily seen through the features maps. The irregular shape in flash formation was distinguished from the voids which were round in shape. The images in the other convolution layers are very difficult to interpret due to high dimensional information therefore the feature maps from other convolution layers are not included.

3.2. Defect Detection

The VGG16 model applied to the augmentation dataset classified the defects with high accuracy, the same model has been selected for the defect detection process. For defect detection blockwise image slicing approach is adopted. The process of image slicing is detailed in Figure 14a. In blockwise image slicing, the image of each structure is divided into blocks corresponding to size 224 × 224 pixels as shown in the middle figure of Figure 14a. Each image block is scanned for defects and based on classification results the block of the image is highlighted with a coloured box. For example, if the presence of a flash formation defect is predicted by the model in the image block, then the cyan-coloured box as shown in Figure 14b will highlight the defect at the location in the original image. Similarly, the void defect is highlighted by a red coloured box, as represented in Figure 14c,d. The rough texture defect is highlighted by a green coloured box as shown in Figure 14c,d. The computational time required for detection and highlighting images with coloured boxes for one image block is around 3 s; therefore, detecting defects for a complete large-sized image requires about 624 s. The defect detection results for the horizontal wall structure, vertical wall structure and cuboid structure carried out using the VGG16 model are depicted in Figure 14b–d. This figure indicates good classification results achieved by the proposed approach. In Figure 14b, only a flash formation defect in the vertical wall structure is seen. In Figure 14c, void and rough texture defects are only observed in horizontal wall structures. Similar defects are also observed in the cuboid structure in Figure 14d.
The algorithm proposed in this study can automatically differentiate between defective and non-defective components manufactured using the laser DED process. The methodology adopted for deep learning can be relied upon to automate the defect detection process and classify three defect classes such as void, flash formation and rough texture and one non-defective class in laser additive manufactured components. The proposed VGG16 deep learning approach detected defects more accurately, the method requires further tuning considering complex geometries and other categories of defects.

4. Conclusions

This paper reports a deep learning approach to identify and classify the defects in the laser DED manufactured components. The algorithm proposed in this study can be used to automatically differentiate between defective and non-defective components manufactured by the additive manufacturing process. Based on these, the following conclusions are drawn:
  • The proposed robust methodology for deep learning is highly reliable for automating the defect detection process and classifying defects such as void, flash formation and rough texture in laser additive manufactured components.
  • The different deep learning models such as VGG16, AlexNet, GoogLeNet and ResNet used to classify defects, showed good applicability for the additive manufactured horizontal wall structure, vertical wall structure and cuboid structure.
  • The VGG16 CNN architecture achieved the best results and outperformed the results of the other CNN architectures. With augmentation, the VGG16 approach obtained a test accuracy of 0.947, as well as a precision of 0.890, a recall of 0.893, and an F1-Score of 0.895.
  • The VGG16 model gave a good F1-score (F1-score 0.895) compared to other CNN models, this indicates that a VGG16 gave an effective and better classification of defects using images of components manufactured using the laser additive process.
  • Although the proposed deep learning approach detected defects more accurately, the method requires further tuning considering complex geometries and other categories of defects.

Author Contributions

Conceptualization, D.B.P. and A.N.; methodology, D.B.P., A.N. and S.N.; software, D.B.P., A.N. and S.M.; validation, D.B.P. and A.N.; formal analysis, D.B.P., A.N., S.M. and S.N.; investigation, D.B.P., A.N.; resources, A.N.; data curation, D.B.P.; writing—original draft preparation, D.B.P.; writing—review and editing, D.B.P., A.N., S.M. and S.N.; supervision, A.N. and S.M. All authors have read and agreed to the published version of the manuscript.

Funding

This research received no external funding.

Data Availability Statement

Contact the corresponding authors for code and data availability.

Acknowledgments

Authors would like to extend their gratitude to Special Issue Editors and reviewers for their valuable comments and suggestions.

Conflicts of Interest

The authors declare no conflict of interest.

References

  1. Sames, W.J.; List, F.A.; Pannala, S.; Dehoff, R.R.; Babu, S.S. The metallurgy and processing science of metal additive manufacturing. Int. Mater. Rev. 2016, 61, 315–360. [Google Scholar] [CrossRef]
  2. Gong, H.; Rafi, K.; Gu, H.; Janaki Ram, G.; Starr, T.; Stucker, B. Influence of defects on mechanical properties of Ti-6Al-4V components produced by selective laser melting and electron beam melting. Mater. Des. 2015, 86, 545–554. [Google Scholar] [CrossRef]
  3. Nikam, S.H.; Jain, N.K. Laser-Based Repair of Damaged Dies, Molds, and Gears. In Advanced Manufacturing Technologies: Materials Forming, Machining and Tribology, 1st ed.; Gupta, K., Ed.; Springer International Publishing: Cham, Switzerland, 2017; pp. 137–159. [Google Scholar] [CrossRef]
  4. Liu, Q.; Elambasseril, J.; Sun, S.; Leary, M.; Brandt, M.; Sharp, P. The effect of manufacturing defects on the fatigue behaviour of Ti-6Al-4V specimens fabricated using selective laser melting. Adv. Mater. Res. 2014, 891–892, 1519–1524. [Google Scholar] [CrossRef]
  5. Pal, R.; Basak, A. Linking Powder Properties, Printing Parameters, Post-Processing Methods, and Fatigue Properties in Additive Manufacturing of AlSi10Mg. Alloys 2022, 1, 149–179. [Google Scholar] [CrossRef]
  6. Arias-González, F.; Rodríguez-Contreras, A.; Punset, M.; Manero, J.M.; Barro, Ó.; Fernández-Arias, M.; Lusquiños, F.; Gil, F.J.; Pou, J. In-Situ Laser Directed Energy Deposition of Biomedical Ti-Nb and Ti-Zr-Nb Alloys from Elemental Powders. Metals 2021, 11, 1205. [Google Scholar] [CrossRef]
  7. Tapia, G.; Elwany, A. A Review on Process Monitoring and Control in Metal-Based Additive Manufacturing. J. Manuf. Sci. Eng. Trans. ASME 2014, 136, 060801. [Google Scholar] [CrossRef]
  8. Harkin, R.; Wu, H.; Nikam, S.; Yin, S.; Lupoi, R.; Walls, P.; McKay, W.; McFadden, S. Evaluation of the role of hatch-spacing variation in a lack-of-fusion defect prediction criterion for laser-based powder bed fusion processes. Int. J. Adv. Manuf. Technol. 2023, 126, 659–673. [Google Scholar] [CrossRef]
  9. Khanzadeh, M.; Chowdhury, S.; Tschopp, M.A.; Doude, H.R.; Marufuzzaman, M.; Bian, L. In-Situ monitoring of melt pool images for porosity prediction in directed energy deposition processes. IISE Trans. 2018, 51, 437–455. [Google Scholar] [CrossRef]
  10. Spierings, A.; Schneider, M.; Eggenberger, R. Comparison of density measurement techniques for additive manufactured metallic parts. Rapid Prototyp. J. 2011, 17, 380–386. [Google Scholar] [CrossRef]
  11. Wits, W.; Carmignato, S.; Zanini, F.; Vaneker, T. Porosity testing methods for the quality assessment of selective laser melted parts. CIRP Ann. Manuf. Technol. 2016, 65, 201–204. [Google Scholar] [CrossRef]
  12. Kim, M.J.; Saldana, C. Thin wall deposition of IN625 using directed energy deposition. J. Manuf. Process. 2020, 56, 1366–1373. [Google Scholar] [CrossRef]
  13. Kersten, S.; Praniewicz, M.; Kurfess, T.; Saldana, C. Build Orientation Effects on Mechanical Properties of 316SS Components Produced by Directed Energy Deposition. Procedia Manuf. 2020, 48, 730–736. [Google Scholar] [CrossRef]
  14. Zheng, B.; Haley, J.C.; Yang, N.; Yee, J.; Terrassa, K.W.; Zhou, Y.; Lavernia, E.J.; Schoenung, J.M. On the evolution of microstructure and defect control in 316L SS components fabricated via directed energy deposition. Mater. Sci. Eng. A 2019, 764, 138243. [Google Scholar] [CrossRef]
  15. Saddoud, R.; Sergeeva-Chollet, N.; Darmon, M. Eddy Current Sensors Optimization for Defect Detection in Parts Fabricated by Laser Powder Bed Fusion. Sensors 2023, 23, 4336. [Google Scholar] [CrossRef]
  16. Geľatko, M.; Hatala, M.; Botko, F.; Vandžura, R.; Hajnyš, J. Eddy Current Testing of Artificial Defects in 316L Stainless Steel Samples Made by Additive Manufacturing Technology. Materials 2022, 15, 6783. [Google Scholar] [CrossRef] [PubMed]
  17. Kobryn, P.A.; Moore, E.H.; Semiatin, S.L. The effect of laser power and traverse speed on microstructure, porosity, and build height in laser-deposited Ti-6Al-4V. Scr. Mater. 2000, 43, 299–305. [Google Scholar] [CrossRef]
  18. Galarraga, H.; Lados, D.A.; Dehoff, R.R.; Kirka, M.M.; Nandwana, P. Effects of the microstructure and porosity on properties of Ti-6Al-4V ELI alloy fabricated by electron beam melting (EBM). Addit. Manuf. 2015, 10, 47–57. [Google Scholar] [CrossRef]
  19. Aminzadeh, M.; Kurfess, T. Layerwise Automated Visual Inspection in Laser Powder-Bed Additive Manufacturing. In Proceedings of the ASME 2015 International Manufacturing Science and Engineering Conference, Charlotte, NC, USA, 8–12 June 2015. [Google Scholar] [CrossRef]
  20. Cortes, C.; Vapnik, V. Support-Vector Networks. Mach. Learn. 1995, 20, 273–297. [Google Scholar] [CrossRef]
  21. Guo, W.; Tian, Q.; Guo, S.; Guo, Y. A physics-driven deep learning model for process-porosity causal relationship and porosity prediction with interpretability in laser metal deposition. CIRP Ann. 2020, 69, 205–208. [Google Scholar] [CrossRef]
  22. Cui, W.; Zhang, Y.; Zhang, X.; Li, L.; Liou, F. Metal Additive Manufacturing Parts Inspection Using Convolutional Neural Network. Appl. Sci. 2020, 10, 545. [Google Scholar] [CrossRef]
  23. Garcıa-Moreno, A.-I. Automatic quantification of porosity using an intelligent classifier. Int. J. Adv. Manuf. Technol. 2019, 105, 1883–1899. [Google Scholar] [CrossRef]
  24. Zhang, Y.; Soon, Y.D.; Fuh, J.Y.H.; Zhu, K. Powder-bed fusion process monitoring by machine vision with hybrid convolutional neural networks. IEEE Trans. Ind. Inform. 2020, 16, 5769–5779. [Google Scholar] [CrossRef]
  25. Patil, D.B.; Nigam, A.; Mohapatra, S. Image processing approach to automate feature measuring and process parameter optimizing of laser additive manufacturing process. J. Manuf. Process. 2021, 69, 630–647. [Google Scholar] [CrossRef]
  26. Singh, D.; Singh, B. Investigating the impact of data normalization on classification performance. Appl. Soft Comput. 2020, 97, 105524. [Google Scholar] [CrossRef]
  27. Patil, D.B.; Nigam, A.; Mohapatra, S. Automation of geometric feature computation through image processing approach for single-layer laser deposition process. Int. J. Comput. Integr. Manuf. 2020, 33, 895–910. [Google Scholar] [CrossRef]
  28. Shorten, C.; Khoshgoftaar, T. A survey on Image Data Augmentation for Deep Learning. J. Big Data 2019, 6, 60. [Google Scholar] [CrossRef]
  29. Westphal, E.; Seitz, H. A machine learning method for defect detection and visualization in selective laser sintering based on convolutional neural networks. Addit. Manuf. 2021, 41, 101965. [Google Scholar] [CrossRef]
  30. Simonyan, K.; Zisserman, A. Very deep convolutional networks for large-scale image recognition. In Proceedings of the International Conference on Learning Representations ICLR, San Diego, CA, USA, 7–9 May 2015. [Google Scholar]
  31. Shin, H.; Roth, H.; Gao, M.; Lu, L.; Xu, Z.; Nogues, I.; Yao, J.; Mollura, D.; Summers, R. Deep convolutional neural networks for computer-aided detection: CNN architectures, dataset characteristics and transfer learning. IEEE Trans. Med. Imaging 2016, 35, 1285–1298. [Google Scholar] [CrossRef]
  32. Krizhevsky, A.; Sutskever, I.; Hinton, G.E. ImageNet Classification with Deep Convolutional Neural Networks, Advances in Neural Information Processing Systems. In Proceedings of the 25th International Conference on Neural Information Processing Systems, Lake Tahoe, NV, USA, 3–6 December 2012. [Google Scholar]
  33. Samir, S.; Emary, E.; El-Sayed, K.; Onsi, H. Optimization of a pre-trained AlexNet model for detecting and localizing image forgeries. Information 2020, 11, 275. [Google Scholar] [CrossRef]
  34. Szegedy, C.; Liu, W.; Jia, Y.; Sermanet, P.; Reed, S.; Anguelov, D.; Erhan, D.; Vanhoucke, V.; Rabinovich, A. Going deeper with convolutions. In Proceedings of the IEEE Conference on Computer Vision and Pattern Recognition (CVPR), Boston, MA, USA, 7–12 June 2015. [Google Scholar]
  35. Khan, S.U.; Islam, N.; Jan, Z.; Din, I.U.; Joel, J.P.; Rodrigues, C. A novel deep learning based framework for the detection and classification of breast cancer using transfer learning. Pattern Recognit. Lett. 2019, 125, 1–6. [Google Scholar] [CrossRef]
  36. Huang, G.; Sun, Y.; Liu, Z.; Sedra, D.; Weinberger, K.Q. Deep Networks with Stochastic Depth. In Computer Vision—ECCV 2016, 1st ed.; Leibe, B., Matas, J., Sebe, N., Welling, M., Eds.; Lecture Notes in Computer Science; Springer International Publishing: Cham, Switzerland, 2016; Volume 9908, pp. 646–661. [Google Scholar] [CrossRef]
  37. Pandiyan, V.; Drissi-Daoudi, R.; Shevchik, S.; Masinelli, G.; Le-Quang, T.; Logé, R.; Wasmer, K. Deep transfer learning of additive manufacturing mechanisms across materials in metal-based laser powder bed fusion process. J. Mater. Process. Technol. 2022, 303, 117531. [Google Scholar] [CrossRef]
  38. He, K.; Zhang, X.; Ren, S.; Sun, J. Deep residual learning for image recognition. In Proceedings of the IEEE Conference on Computer Vision and Pattern Recognition (CVPR), Las Vegas, NV, USA, 27–30 June 2016. [Google Scholar]
  39. Tsiakmaki, M.; Kostopoulos, G.; Kotsiantis, S.; Ragos, O. Transfer learning from deep neural networks for predicting student performance. Appl. Sci. 2020, 10, 2145. [Google Scholar] [CrossRef]
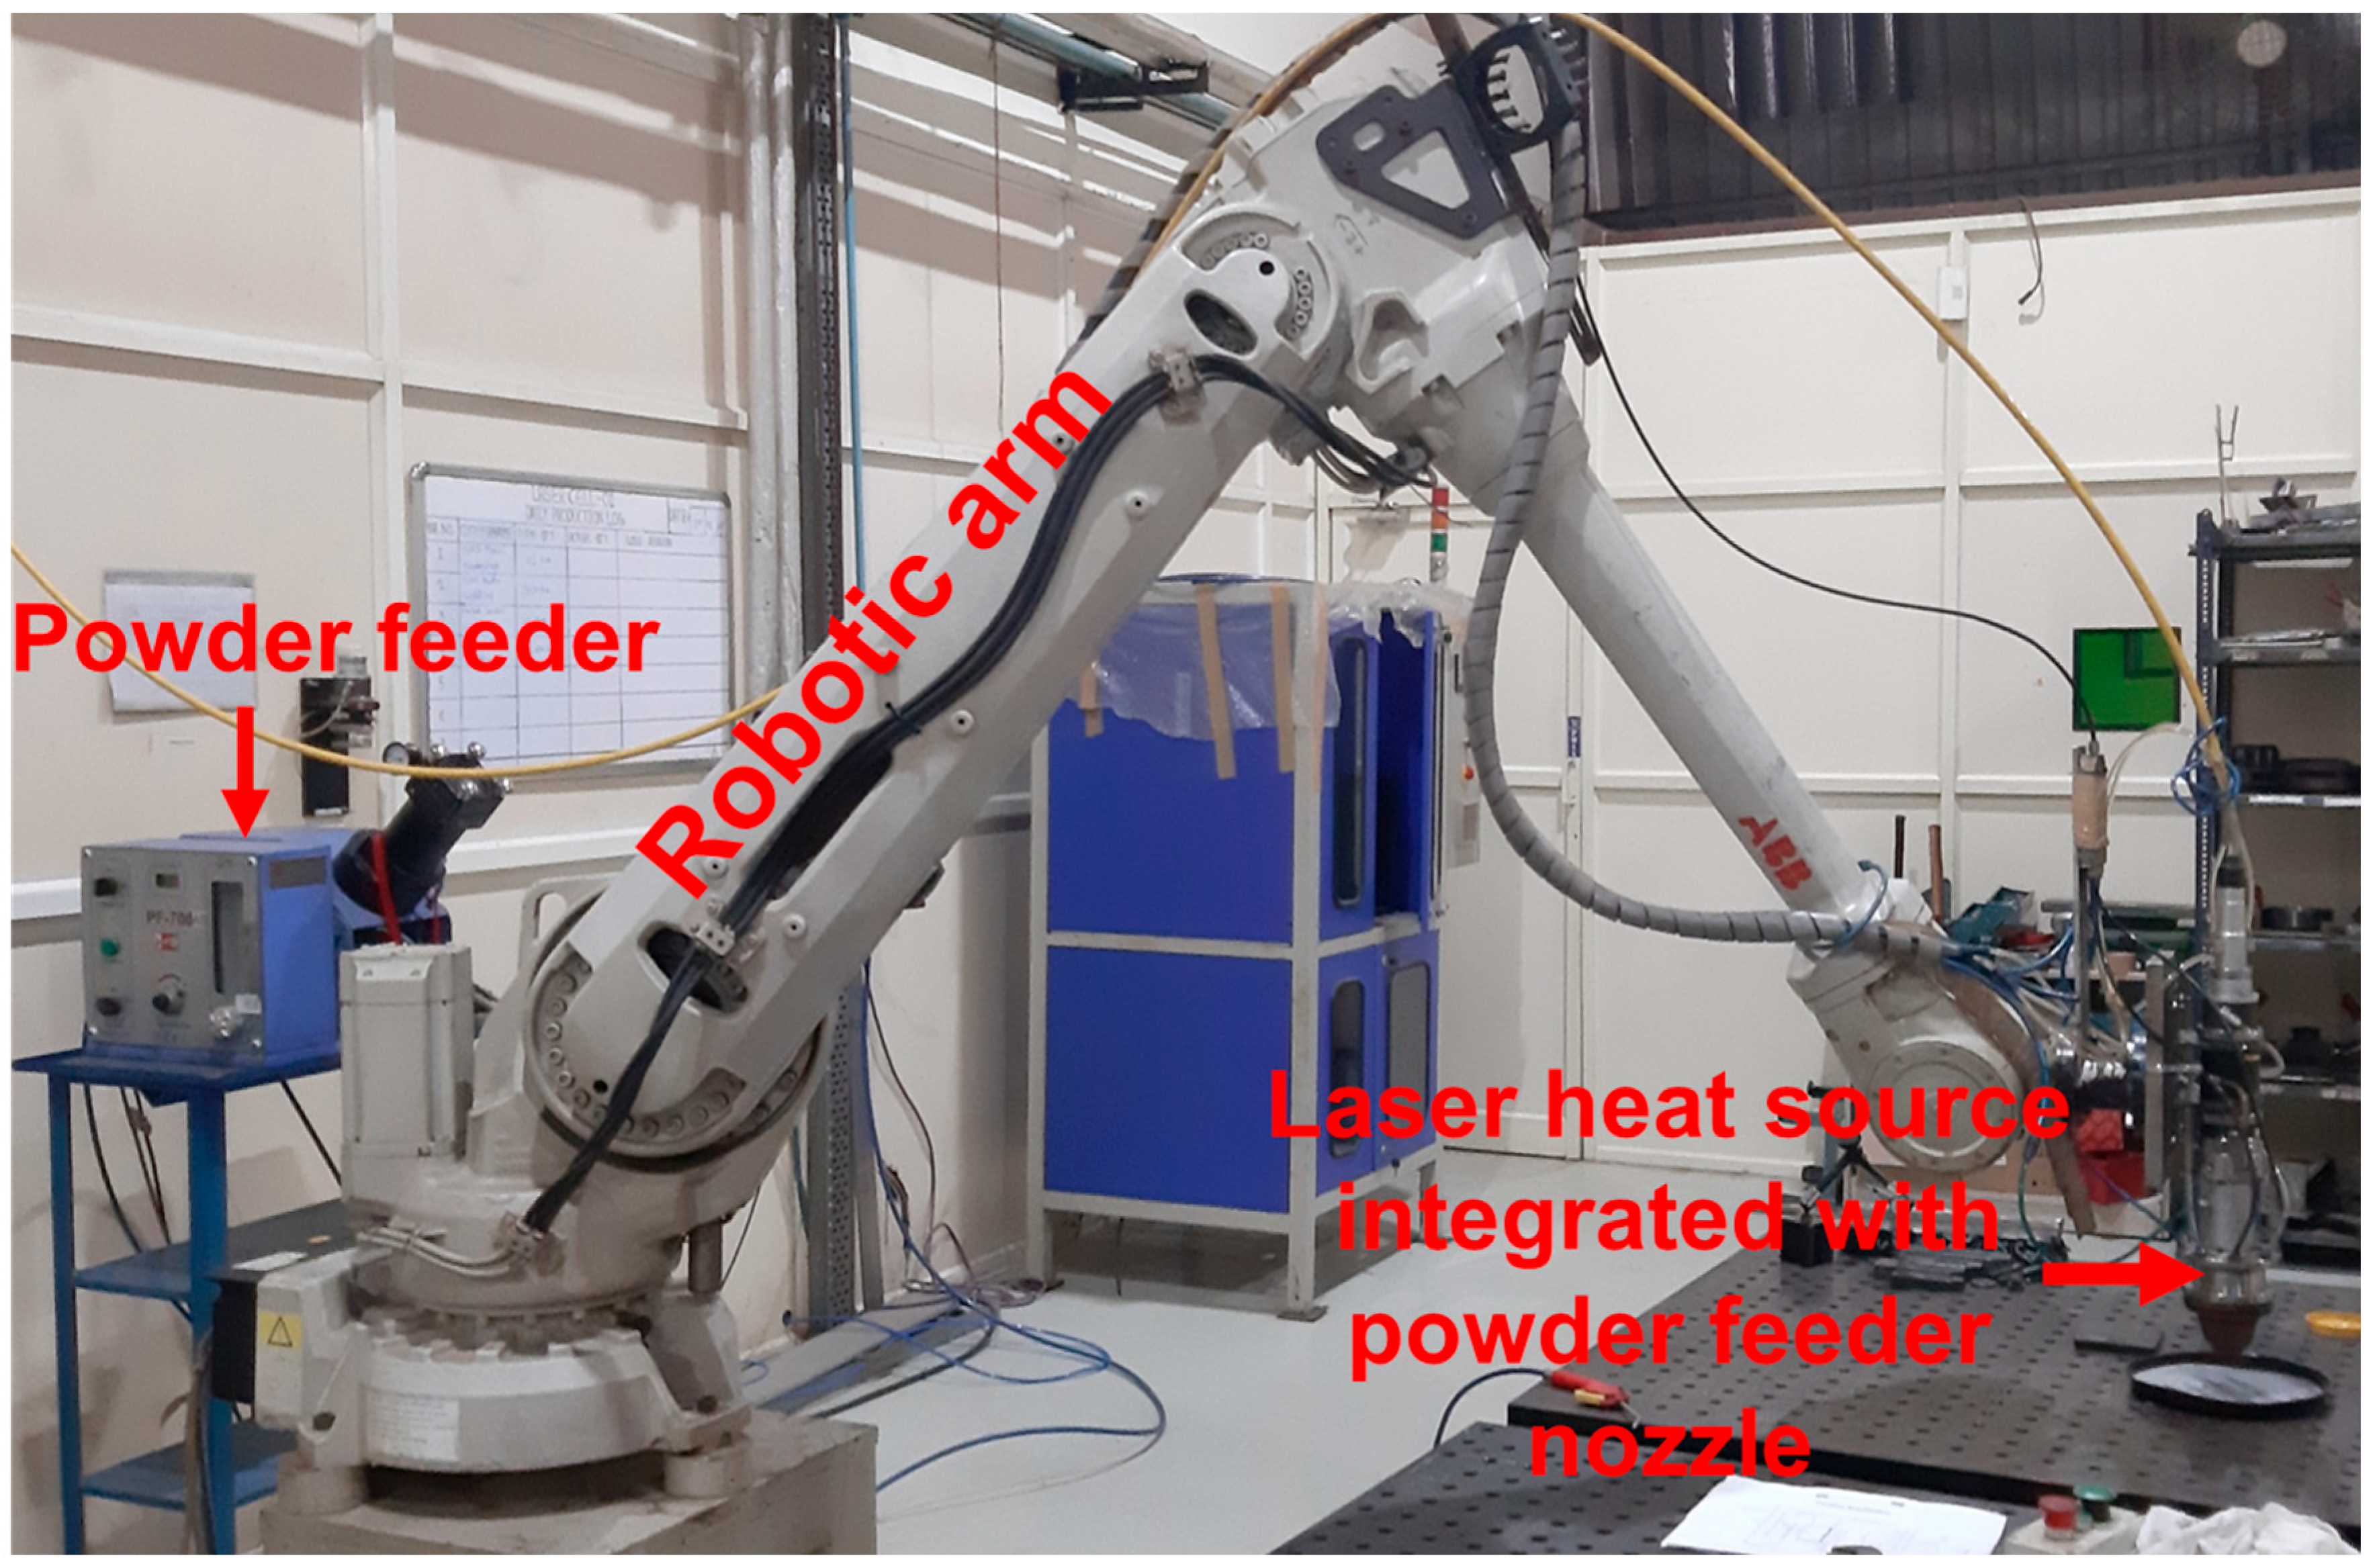
Figure 1. Schematic view of (a) PBF [5] and (b) laser-DED process [6].
Machines 11 00854 g001
Figure 2. Laser additive manufacturing setup used for building experimental components [25].
Machines 11 00854 g002
Figure 3. 3D geometry of the Laser additive manufactured components (a) horizontal wall structure [25], (b) vertical wall structure [25] and (c) cuboid structure.
Machines 11 00854 g003
Figure 4. Cross-section of the sample images (a) horizontal wall structure [25], (b) vertical wall structure [25] and (c) cuboid structure.
Machines 11 00854 g004
Figure 5. Various defects in laser additive manufactured components.
Machines 11 00854 g005
Figure 6. Workflow adopted in the present study.
Machines 11 00854 g006
Figure 7. The architecture of the VGG16 CNN model [29].
Machines 11 00854 g007
Figure 8. The overall architecture of AlexNet [33].
Machines 11 00854 g008
Figure 9. The architecture of GoogLeNet [35].
Machines 11 00854 g009
Figure 10. The architecture of ResNet [35].
Machines 11 00854 g010
Figure 11. Accuracy and loss of VGG16, AlexNet, GoogLeNet and ResNet architecture. (a) training accuracy plot (b) validation accuracy plot (c) training loss plot (d) validation loss plot.
Machines 11 00854 g011
Figure 12. Performance measure result comparison (a) without and (b) with augmentation.
Machines 11 00854 g012
Figure 13. Visualisation of the 64 feature maps of three defective and one non-defective class captured by the first convolution layer of the VGG16 model.
Machines 11 00854 g013
Figure 14. Defect detection result (a) block-wise image slicing process (b) defect detection in vertical wall structure (c) horizontal wall structure (d) cuboid structure.
Machines 11 00854 g014
Table 1. Process parameters.
Laser power800 W to 1100 W
Powder feed rate5 g/min to 10 g/min
Heat Source travel rate500 mm/min to 700 mm/min
Laser spot diameter2 mm
Hatch spacing1 mm
Slicing thickness1 mm
Scan patternZigzag
Table 2. CNN Hyperparameters.
Cost FunctionLearning RateOptimizerNo. EpochsBatch SizeLearning Rate DecayEarly Stopping
Binary cross-entropy0.0001Adam
β1 = 0.85
β2 = 0.988
3548Patience = 8Patience = 32
Table 3. Confusion matrix.
Without AugmentationWith Augmentation
VoidFlash FormationRough TextureNon DefectiveVoidFlash FormationRough TextureNon Defective
VGG-1619016127203769
14188815321057
1371951014719212
1715818511811195
AlexNet18218141118915138
241541928221801013
181617615121518612
222512166252717156
GoogLeNet19315891951398
22163142681931113
18211671913918914
19251017181315189
ResNet128383029159192324
301422132181732113
273013632101318616
322932132121816179
Table 4. Performance parameters for the examined CNN architectures for the classification and detection of defects.
SettingsModelAccuracyPrecisionRecallF1-Score
Without augmentationVGG160.9240.8430.8440.849
Alex net0.8760.7600.7470.746
GoogLeNet0.8820.7830.7910.768
ResNet0.8010.6040.6000.596
With augmentationVGG160.9470.8900.8930.895
Alex net0.8990.7920.7670.789
GoogLeNet0.9280.8570.8530.855
ResNet0.8860.7780.7670.770
Disclaimer/Publisher’s Note: The statements, opinions and data contained in all publications are solely those of the individual author(s) and contributor(s) and not of MDPI and/or the editor(s). MDPI and/or the editor(s) disclaim responsibility for any injury to people or property resulting from any ideas, methods, instructions or products referred to in the content.