Article

Experimental Assessment of Hole Quality and Tool Condition in the Machining of an Aerospace Alloy

1
School of Engineering, Edith Cowan University, Joondalup, WA 6027, Australia
2
Department of Mechanical Engineering, CECOS University of Information Technology and Emerging Sciences, Peshawar 25000, Pakistan
3
Department of Mechanical Engineering, University of Engineering and Technology, Peshawar 25000, Pakistan
4
School of Mechanical and Design Engineering, University of Portsmouth, Portsmouth PO1 3DJ, UK
*
Author to whom correspondence should be addressed.
Machines 2023, 11(7), 726; https://doi.org/10.3390/machines11070726
Submission received: 10 June 2023 / Revised: 5 July 2023 / Accepted: 7 July 2023 / Published: 9 July 2023
(This article belongs to the Special Issue Recent Advances in Smart Design and Manufacturing Technology)

Abstract

:
This paper deals with an experimental investigation of hole quality in Al2024-T3, which is one of the aerospace alloys used in aircraft fuselage skin due to its high level of resistance to fatigue crack propagation. The experiments are conducted with 6 mm uncoated carbide and HSS drill bits using a CNC machine under dry conditions and different drilling parameters. The characteristics of the hole quality are investigated in terms of its perpendicularity, cylindricity, circularity and hole size. An ANOVA (analysis of variance) and Pareto charts are used to analyze the effects of the drilling parameters on the hole quality. The hole quality is also assessed using a digital microscope to observe the formation of hole burrs. Moreover, scanning electron microscopy is also used to investigate the inside-hole surface defects. Further investigations are carried out using optical microscopy to inspect the post-drilling tool condition at high drilling parameters. The results show that hole quality reduces as the feed rate and spindle speed increase. However, from the ANOVA results and Pareto charts, the influence of the feed rate on the hole quality is found to be insignificant. At the same time, the type of drill bit material shows the highest percentage of contribution affecting the hole quality, following the spindle speed. The HSS drill bit shows more adhesion and built-up edges than the uncoated carbide drill bit. There were more burrs formed at the hole edges when the holes were drilled with uncoated HSS drill bits. In the same way, the SEM analysis reveals more surface deformation and damage defects inside the hole walls of holes drilled using the uncoated HSS drill bit.

1. Introduction

There is no doubt about how important it is to perform drilling operations in various industries to make a profit and survive in today’s very competitive market because most industrial products in our daily lives incorporate holes generated via drilling operations. Figure 1 shows the importance of drilling in all machining processes in various industries [1]. However, the drilling process becomes challenging when many holes are required, like in the aerospace industry [2]. For instance, in aircraft bodies, about 80% of fatigue cracks are because of poor connecting holes, and 50–90% of fractures in aging planes are due to fatigue fractures of fastener holes [3]. Hence, to ensure high-precision structural integrity in aerospace alloys, the quality of holes drilled in aluminum is significantly important [4,5]. Furthermore, the major problems in the drilling process include high cutting forces, low hole quality, tool wear, etc., which require selecting the appropriate tool, increasing the cost for the manufacturing sectors [6,7]. The built-up edge is also one of the problems associated with dry drilling that ultimately affects the tool and thus reduces the hole quality; however, drilling in dry conditions is environmentally friendly as it reduces the environmental effect of coolants [8,9]. Hence, to achieve a long tool life and high dimensional accuracy, drilling performance is therefore dependent on a variety of variables, including tool geometry, tool materials, drilling parameters such as the spindle speed (n) and feed rate (f), the type of drilling machine, and the absence or presence of coolants [10,11]. Therefore, researchers are interested in optimizing/investigating these important drilling parameters to maximize productivity.
Previously, Dahnel et al. [12] performed drilling experiments on the tool wear on Al7075 using tungsten carbide tools with n values of 4000, 6000, and 8000 rpm and f values from 0.01 to 0.10 mm/rev. It was concluded in their study that a lower spindle speed could reduce heat generation; hence, the lower cutting speed was recommended for dry drilling Al7075. Islam and Boswell [13] used high-speed steel (HSS) tools to determine the effect of drilling parameters and cooling methods on the quality of holes drilled in Al6061. The investigation was carried out by measuring the surface roughness, diameter error, and circularity. The cooling methods included cryogenic drilling, flood drilling, and minimum-quality lubrication (MQL). The study concluded that diameter error was highly affected by the cooling method, followed by the surface roughness and circularity. MQL drilling produced good surface roughness and dimensional accuracy. In contrast, the circularity was best achieved using cryogenic drilling. Khunt et al. [14] assessed the drilling performance of AA6063. The experiments were performed using HSS drill bits. Different cutting environments, including flood, MQL-sunflower, dry, flood cooling, and MQL-castor oil, were selected to measure torque, surface roughness, and axial thrust. The results concluded that surface roughness was improved with vegetable MQL, while the torque and axial thrust were reduced. Luo et al. [15] established a finite element model using different spindle and feed speeds to drill Al7075-T6. They concluded that an increase in the feed speed resulted in high axial force and torque. Similarly, the thickness of the uncut chips also increased. Furthermore, the numerical simulation showed a higher tool temperature field at the main cutting edge than at the cross edge. Pramanik et al. [16] worked on drilling Al6061-T6 in three different conditions, including liquid nitrogen (LN2), compressed air and MQL, to identify their impact on chip formation, the quality of holes, active peak power, and surface roughness. The study concluded that cooling techniques had a negligible impact on active power consumption. Additionally, the coolant’s impact on the chip thickness ratio and surface roughness was unclear. However, the surface roughness increased as the speeds and feeds increased, while the chip thickness ratio increased with speed and decreased with the feed. In a study by Banerjee et al. [17], 102° and 115° point angles were recommended for the minimum burr height and thickness when drilling aluminum using high-speed steel (HSS) drill bits. Regarding the previous studies on Al2024, the selection of various drilling parameters is provided in Table 1.
Hence, studies in the literature are limited to other drilling process parameters, cooling techniques, or materials. There is also a lack of studies investigating the significant characteristics of hole quality. Therefore, this study evaluates important hole characteristics, including circularity, hole size, perpendicularity, and cylindricity. The analysis was carried out using different types of drill bit materials, spindle speeds, and feed rates. The results were then evaluated using Pareto charts and an analysis of variance (ANOVA). The study also included further experiments to examine the post-drilling tool conditions at high drilling parameters and the burrs around the hole edges using optical microscopy. A further examination of the quality of holes was performed using scanning electron microscopy to investigate any defects inside the drilled hole surfaces.

2. Materials and Methods

Al2024-T3 and a CNC machine were used for drilling experiments. CNC machines are high-volume production machines used for achieving high levels of productivity without compromising quality. Uncoated HSS and uncoated carbide drill bits with a size of 6 mm were mounted on the CNC machine to drill holes in the Al2024-T3. The drilling experiments were repeated three times, and each time, a new drill bit was used for the accuracy of the results. Hence, a total of 27 holes were drilled under dry conditions. The workpiece material, drilling parameters, and experimental details are provided in Table 2.
The HSS and carbide drills are the most frequently used drill bits in industries, based on the application. A likely explanation for selecting HSS drill bits is that they are less expensive, commonly used, robust, and durable. They are also tough and heat-resistant. In contrast, carbide drills are extremely hard, with a greater heat dissipation rate, and are considered the toughest compared to other drill bits [23]. In addition, the 6 mm size is a commonly used tool size range for aerospace alloys. At the same time, a high helix angle was previously suggested to achieve high-quality holes during the drilling of Al20254-T3 [24]. Furthermore, according to the machinery handbook [25], the feed rate should be 0.05–0.15 mm/rev when a twist drill with a size of 3.175–6.35 mm is used. Finally, Al2024-T3 was selected because it is a highly used aluminum alloy in the aerospace industry, where millions of holes are required. Hence, the drilling process and geometric tolerances are of great interest [26].
A coordinate measuring machine (CMM) was used to measure perpendicularity, circularity, cylindricity, and hole size to investigate hole quality. It is worth noting that CMMs are mostly used in the automotive, aerospace and defense industries to measure geometric features of parts [27]. Afterwards, at a confidence interval of 95%, the impacts of the drilling parameters on the hole quality characteristics were evaluated using an ANOVA.
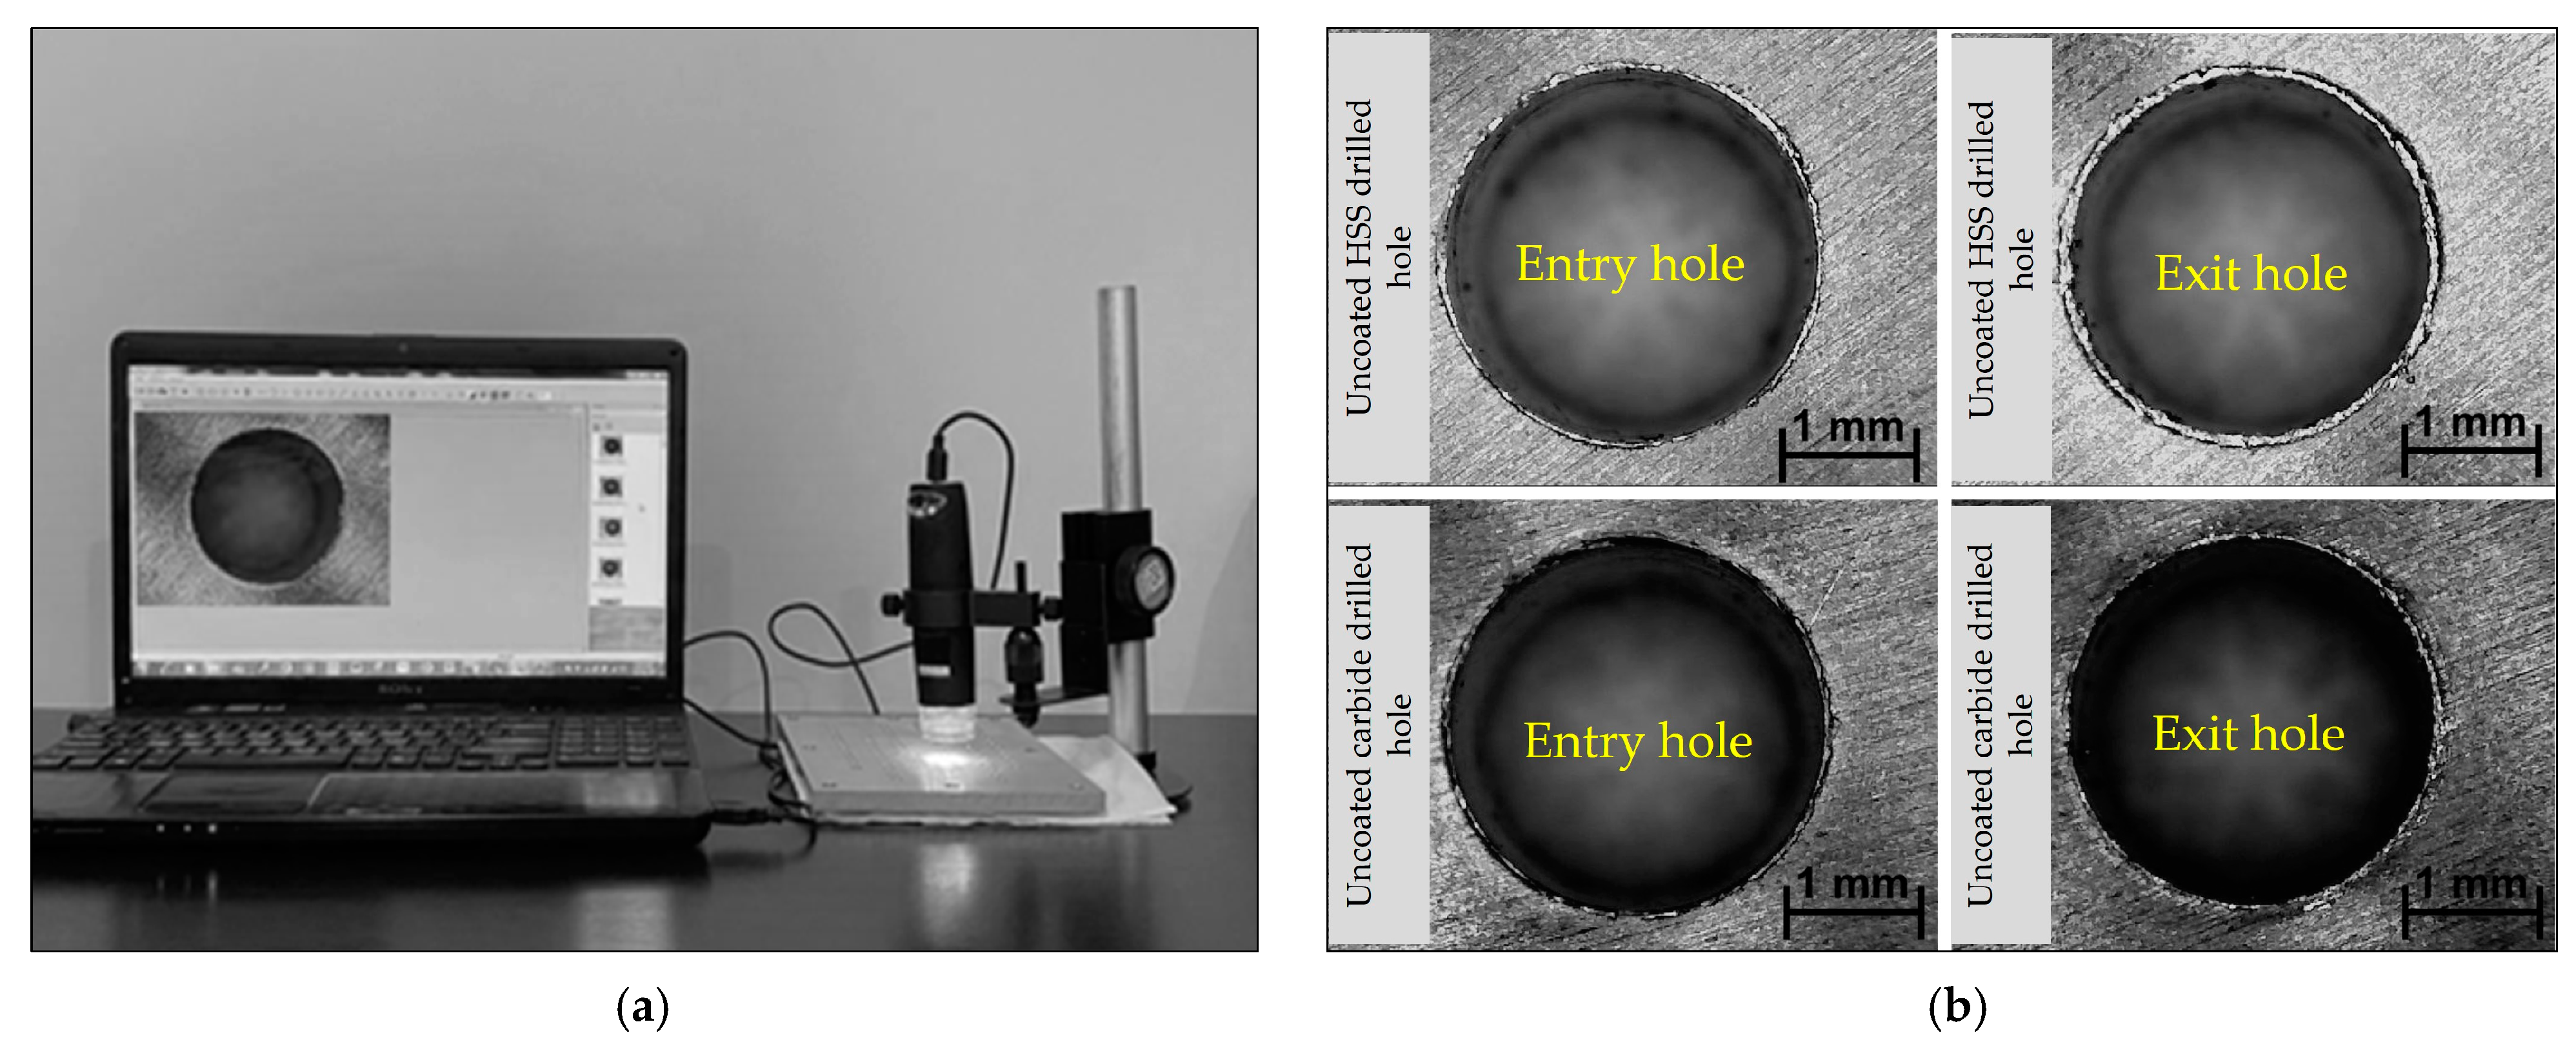
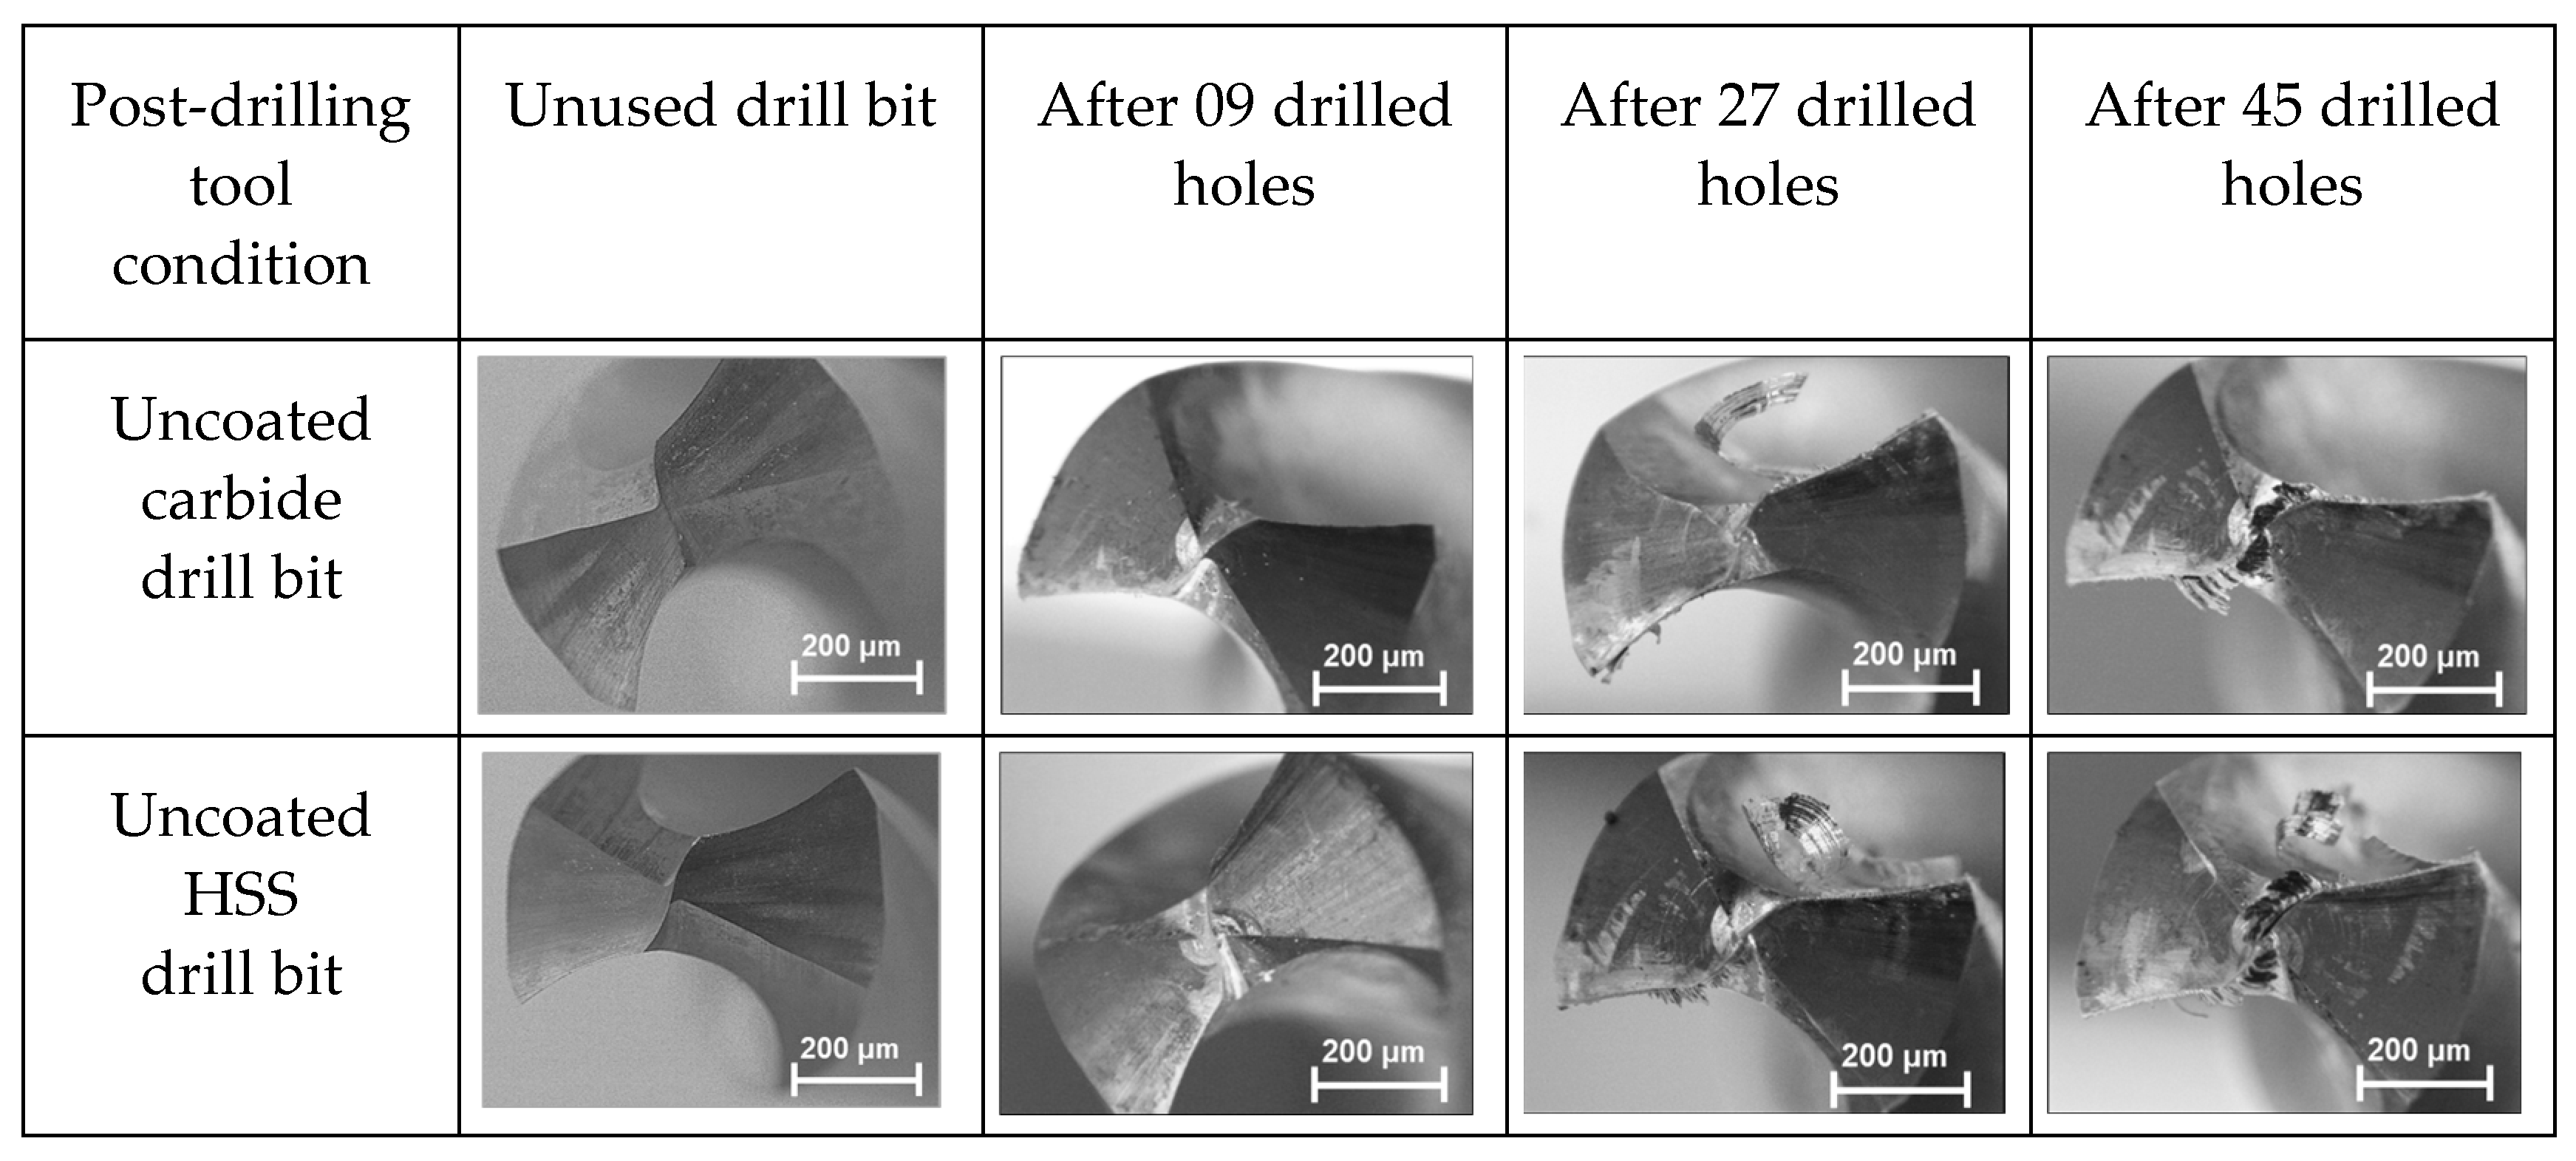
The study also included additional experiments to examine the post-drilling tool conditions for each drill bit at high spindle speed of 3500 rpm and feed rate of 0.14 mm/rev. The investigation was carried out using optical microscopy after 9, 27, and 45 holes, and a comparison was made between the built-up edges generated on each drill bit. Afterwards, scanning electron microscopy (SEM) was used to examine the holes. The study also included the examination of the burrs around the holes using a digital microscope. Further examinations of the top and bottom hole edges and the inside surface defects of the holes were performed via SEM.

3. Experimental Results and Analysis of Variance

3.1. Hole Deviation and Circularity

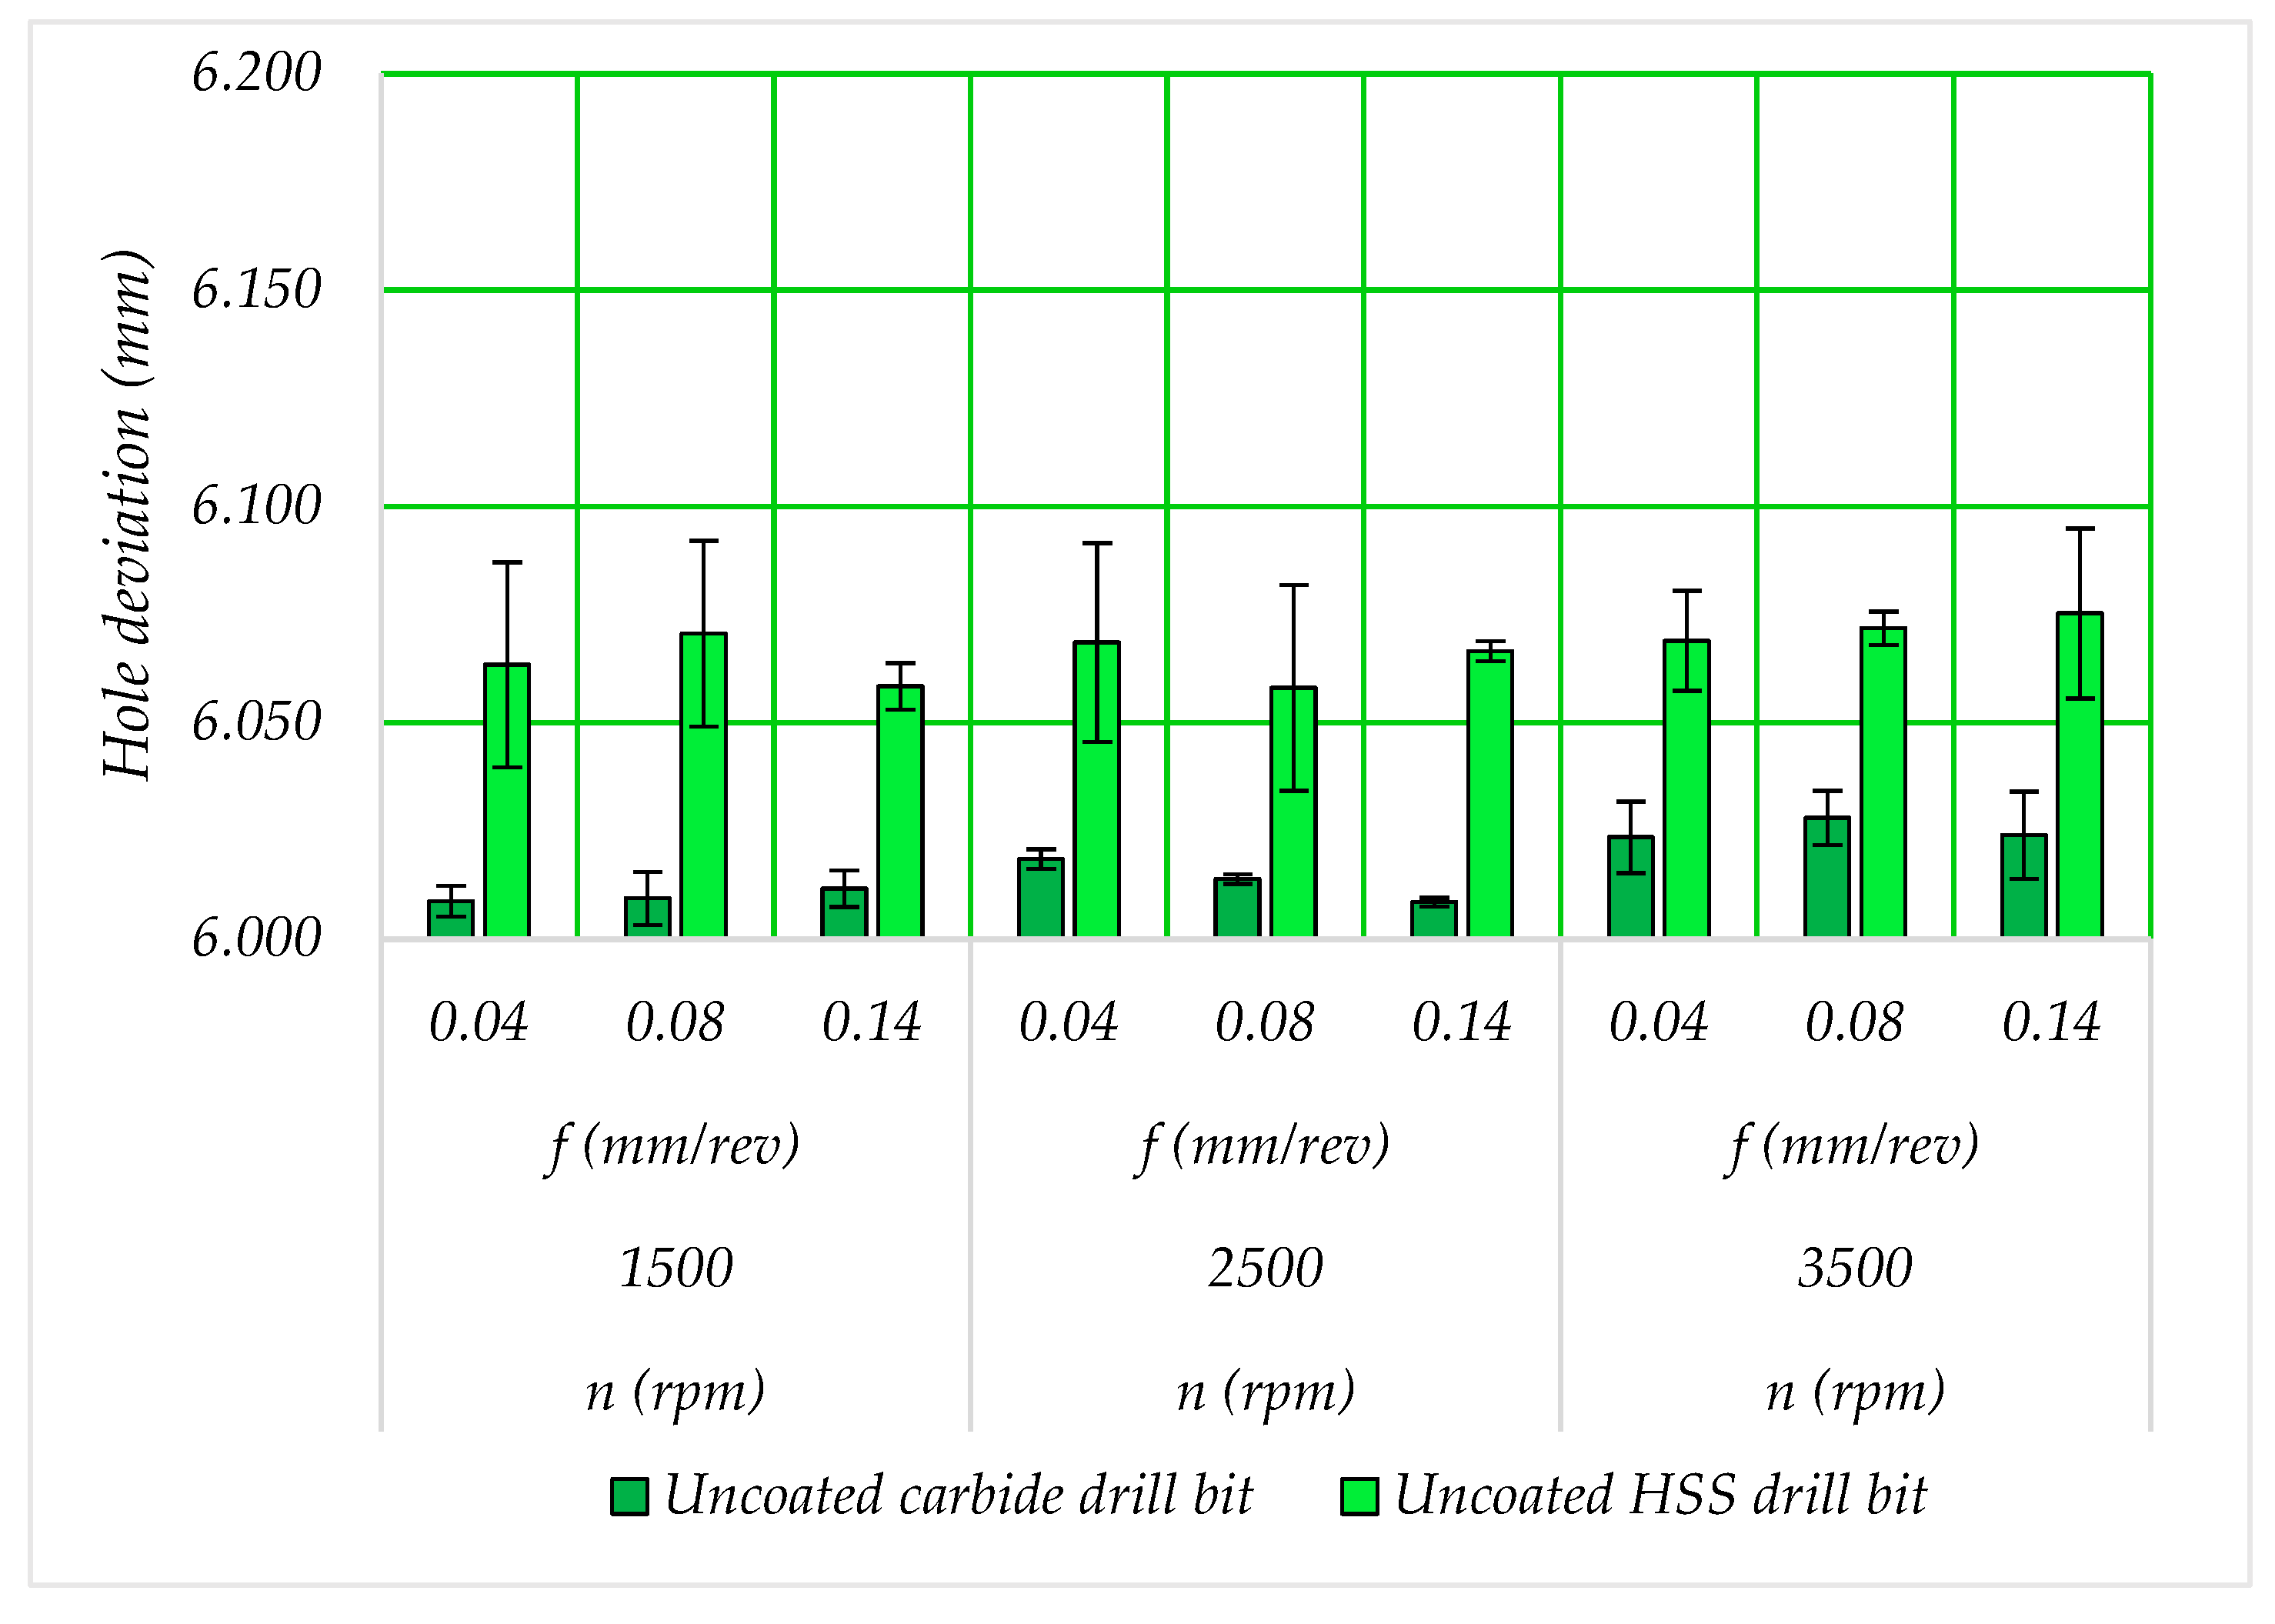
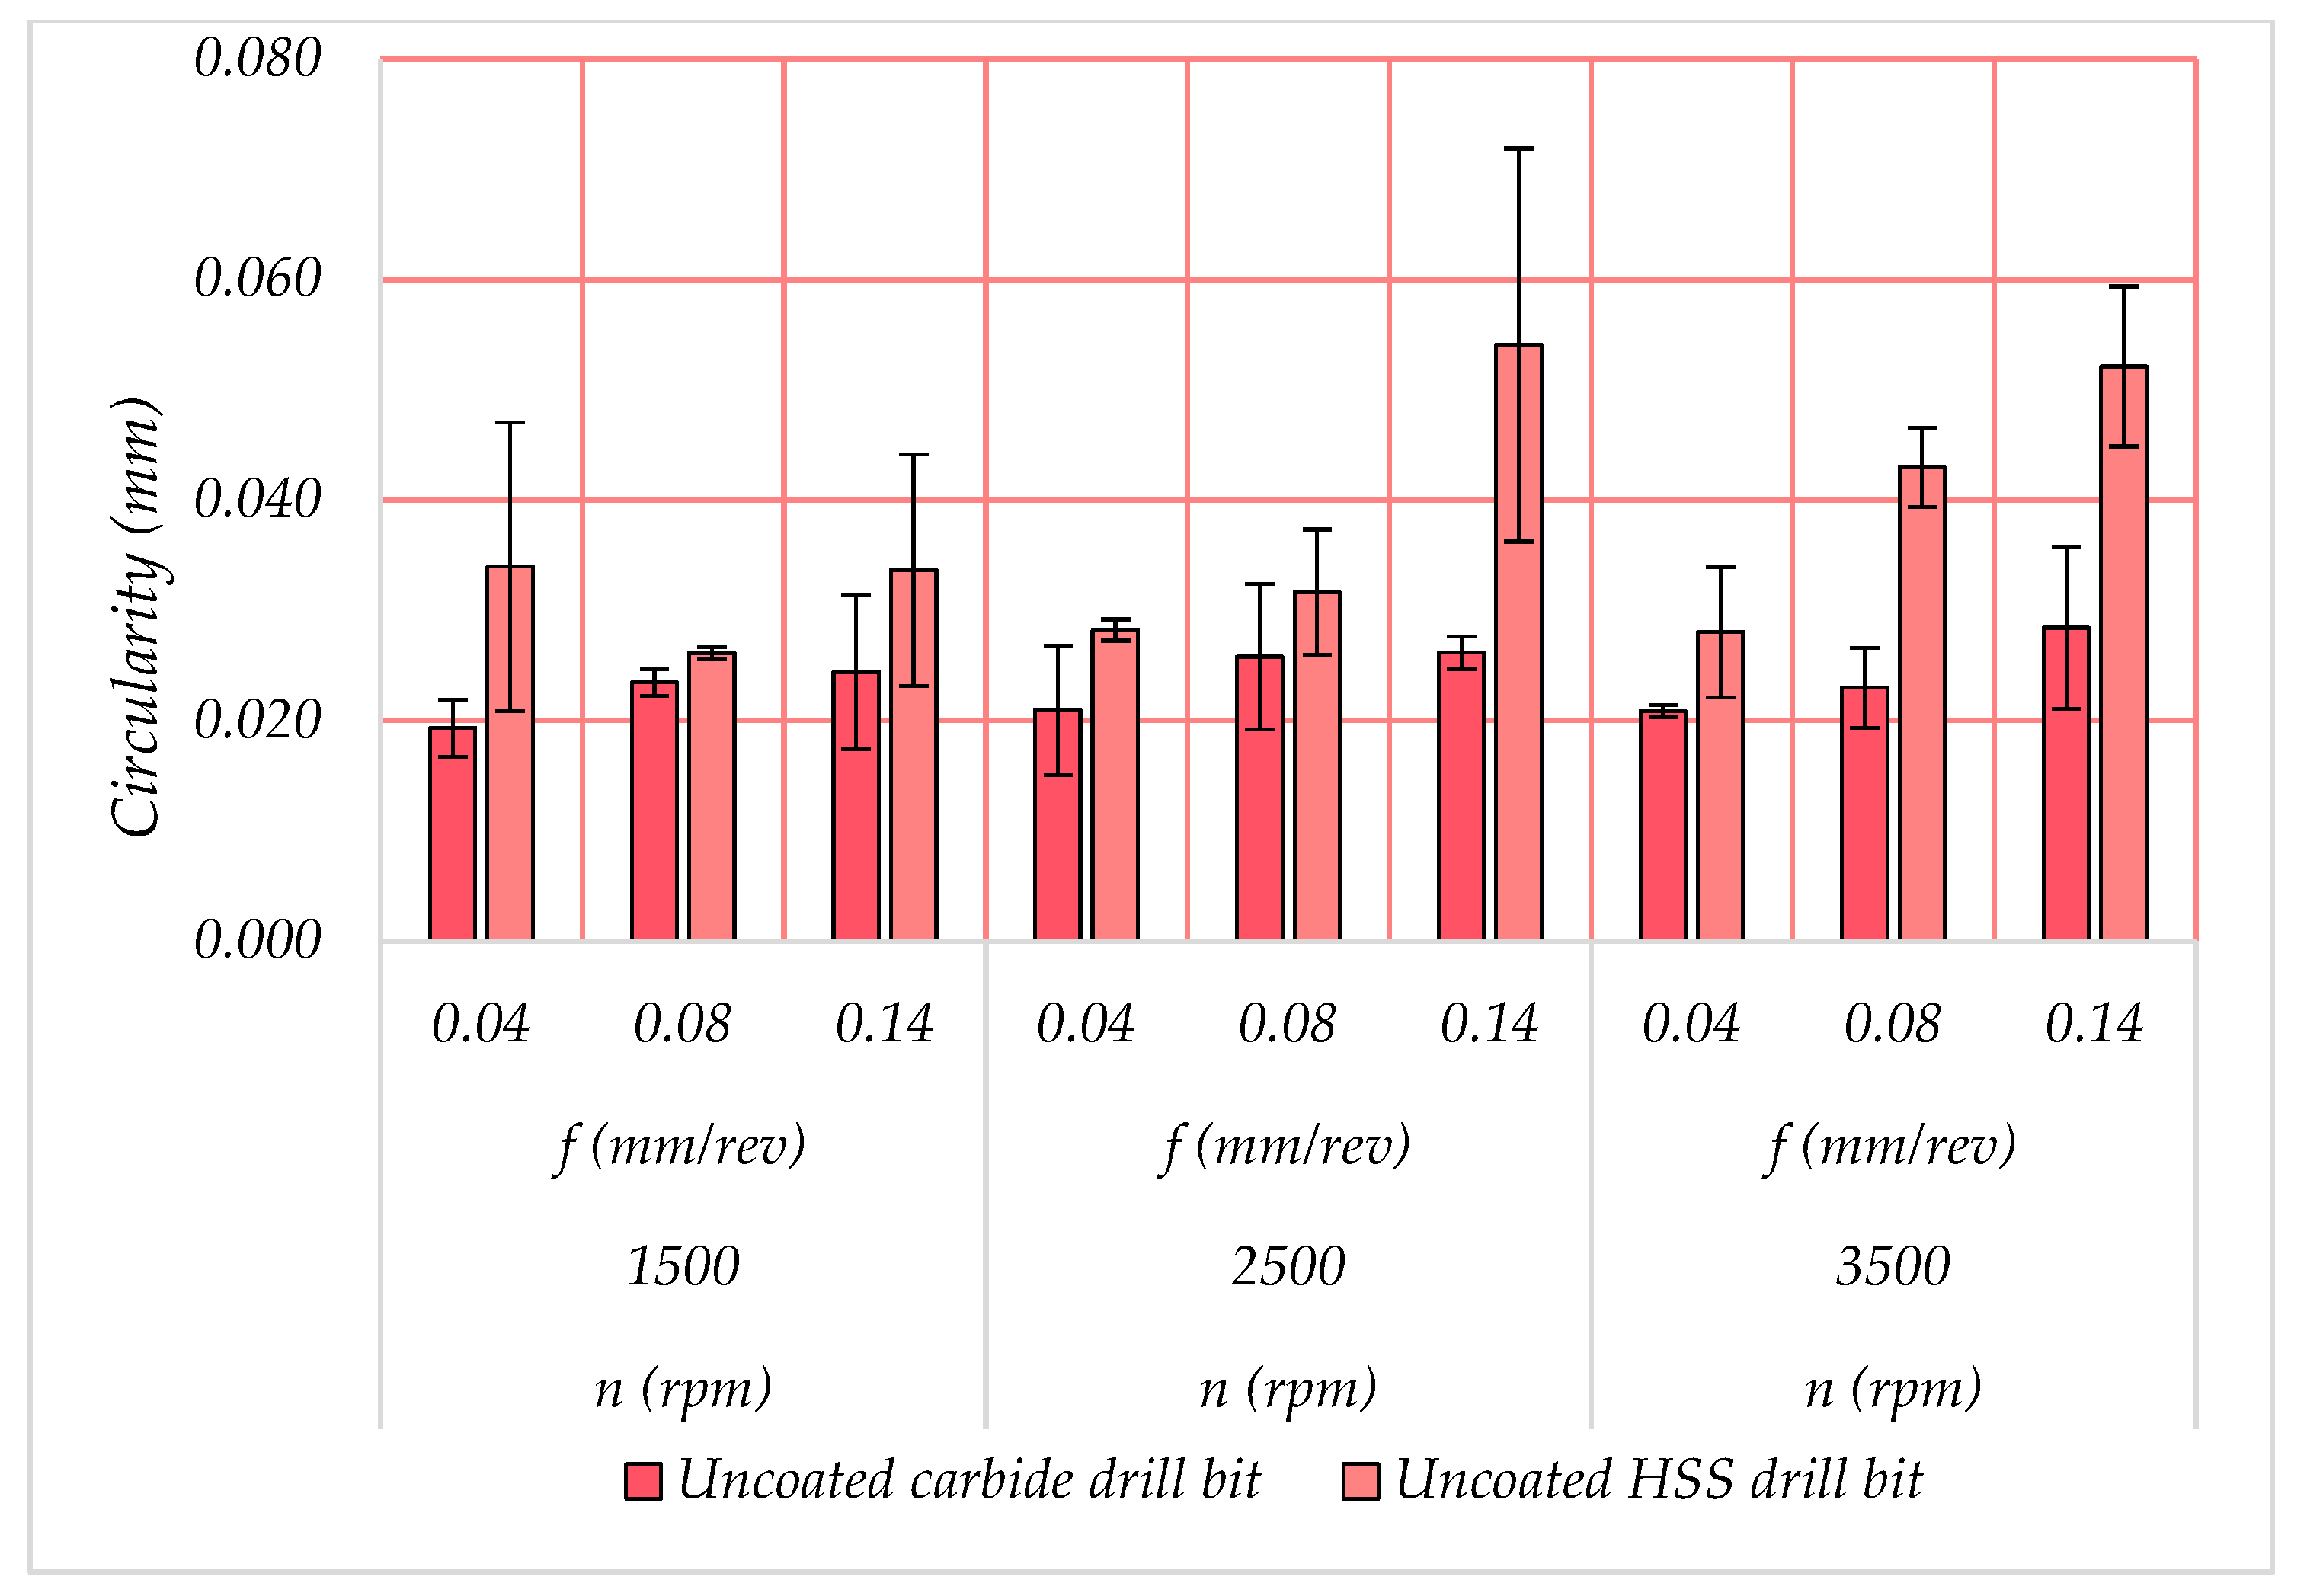
Figure 2 and Figure 3 show the average hole size and circularity using the uncoated HSS and uncoated carbide drill bits with different spindle speeds and feed rates. In general, the results show that hole deviation and circularity increase as the spindle speed and feed rate increase. At the same time, the uncoated carbide drills produced holes with lesser deviations from the hole’s nominal size and fewer errors in circularity. The hole deviation from the nominal size (6 mm) for the uncoated HSS drill bit ranged from 6.0581 mm to 6.0753 mm, while for the uncoated carbide drill bits, the minimum value obtained was 6.0086 mm, while the maximum was 6.0281 mm. Similarly, the circularity ranged from 0.0261 to 0.0541 mm for the uncoated HSS drill bits. In contrast, it ranged from 0.0193 to 0.0284 mm when the carbide drill bits were used. In the current study, the ANOVA was used at a 95% confidence interval, so only those values with a p-value of less than 0.05 were considered significant. Therefore, the results in Table 3 indicate that the greatest impact on hole size and circularity was achieved by the drill bit materials. The drill bit’s material type affected the hole size by 94.10% and the circularity by 45.07%. The spindle speed’s influence on the hole size was 3.75%, while none of the other parameters affected the hole size and circularity in the 95% confidence interval.

3.2. Cylindricity and Perpendicularity

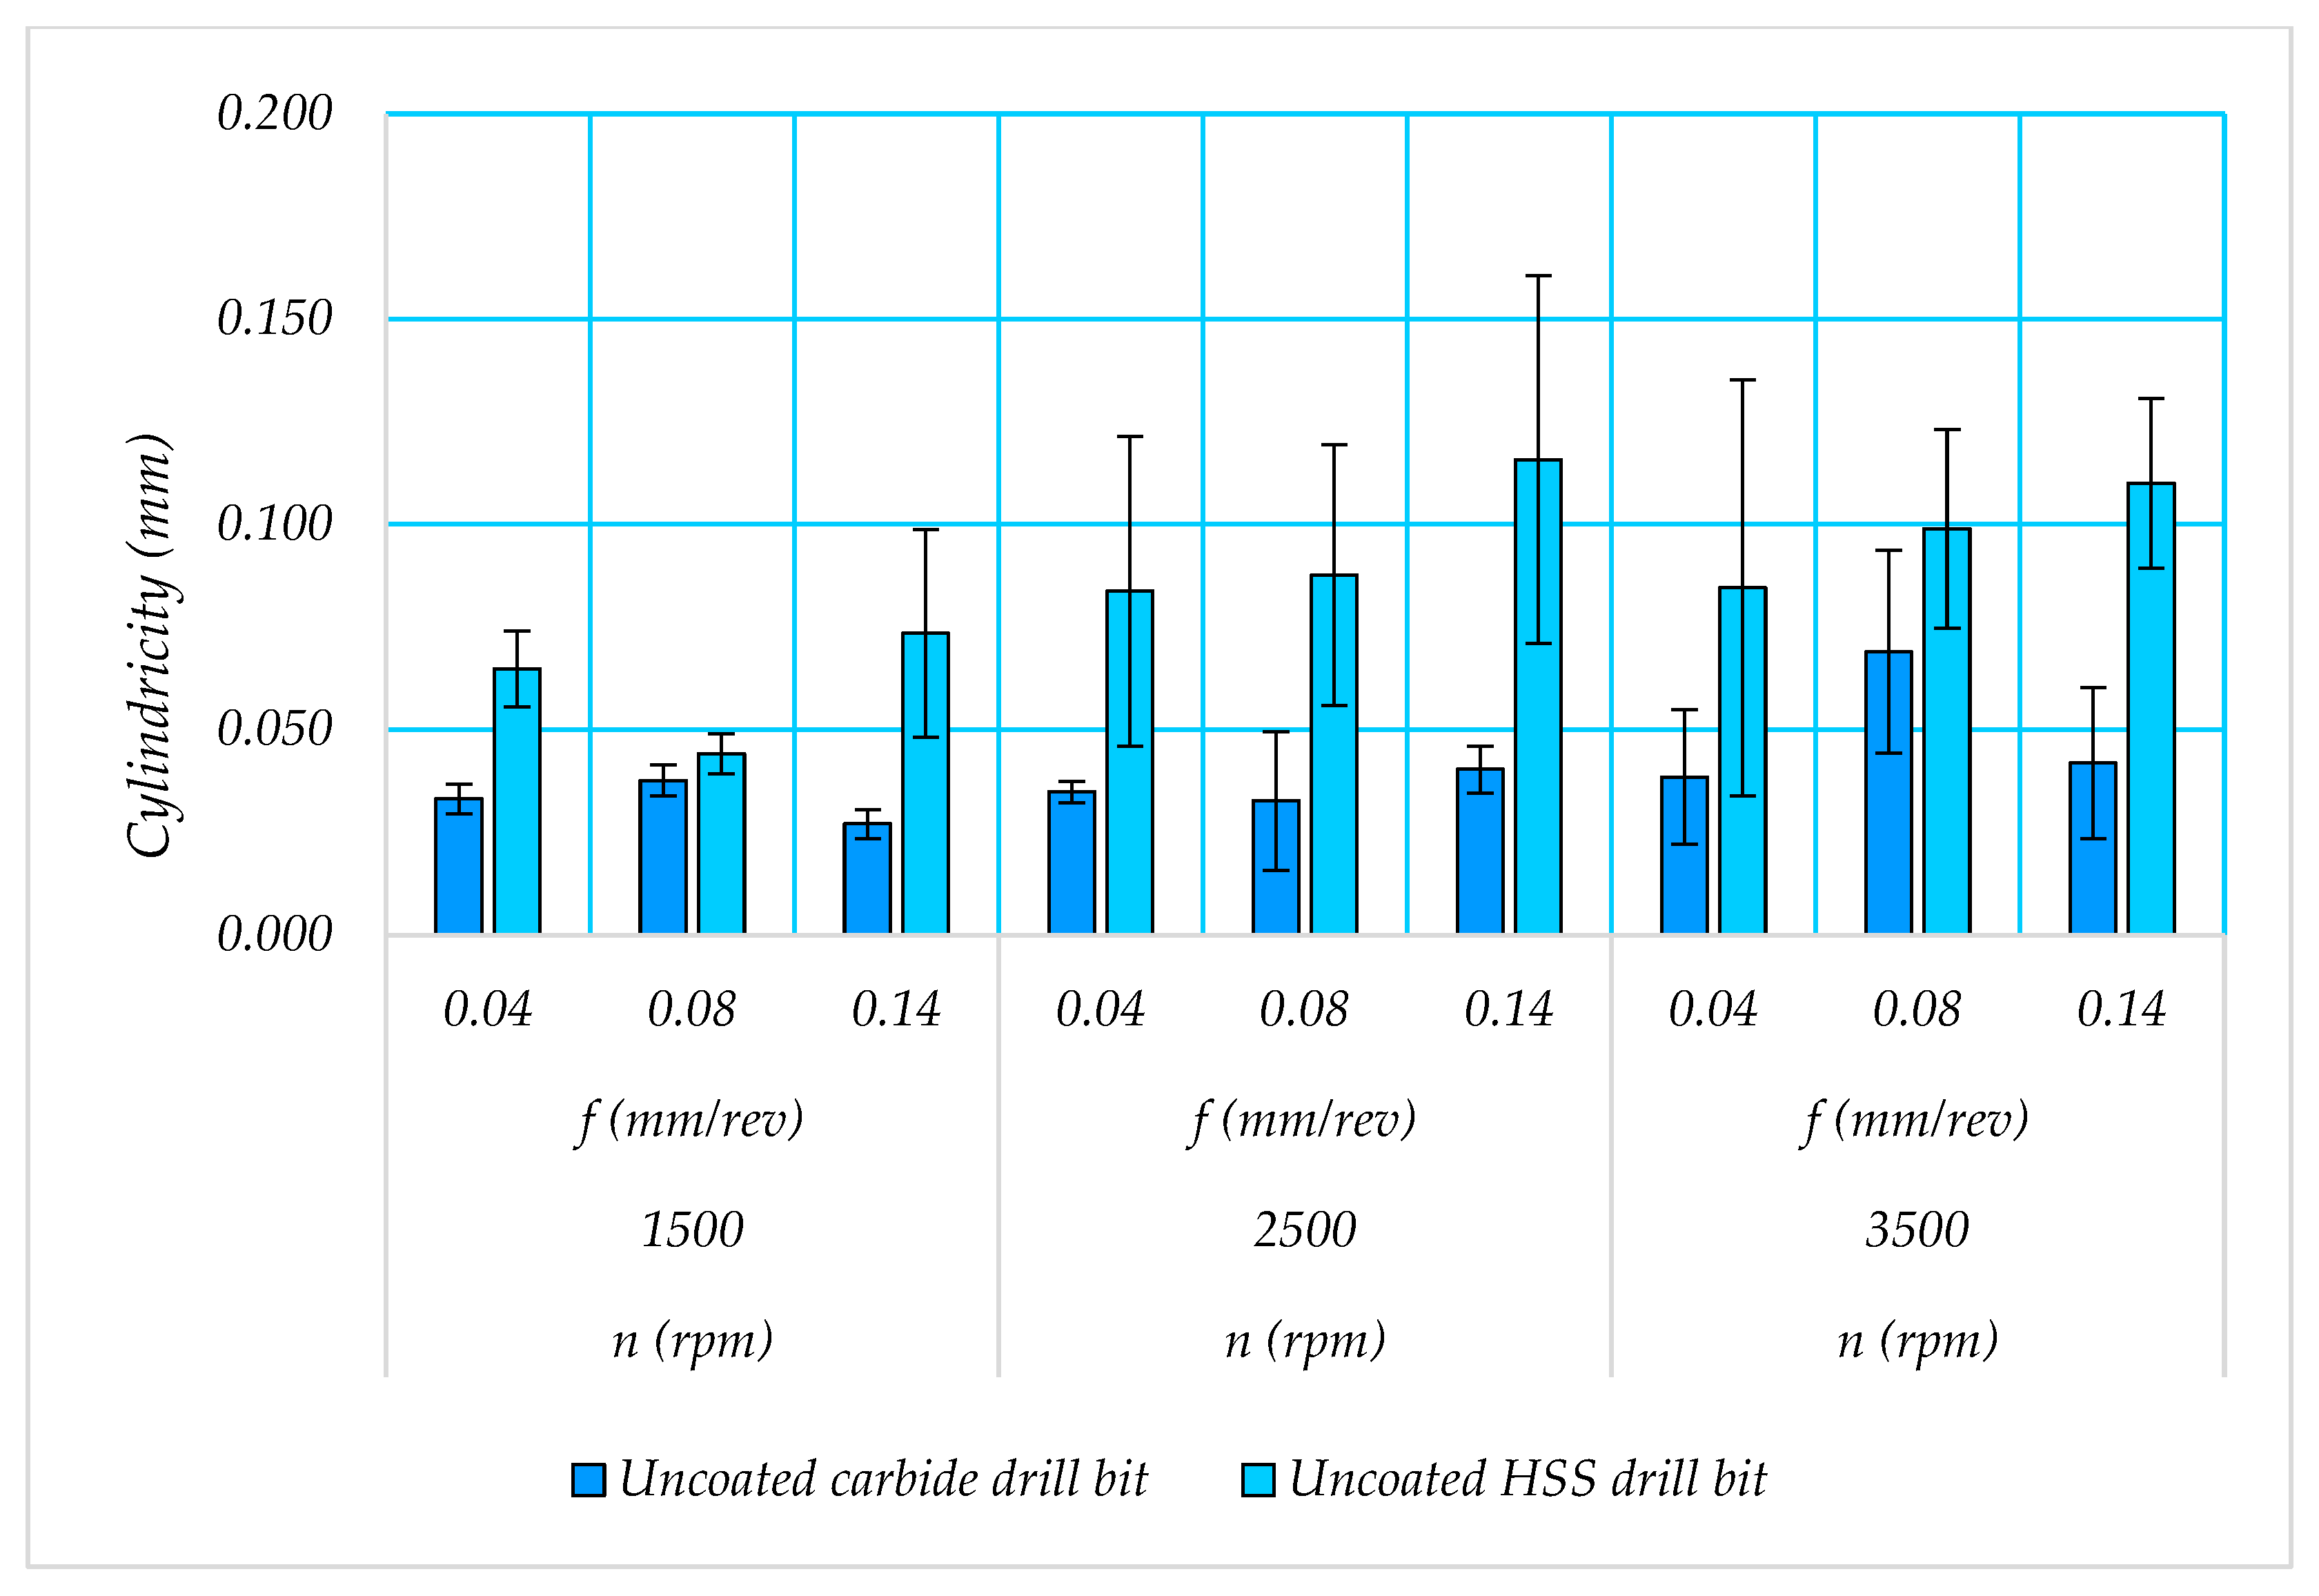
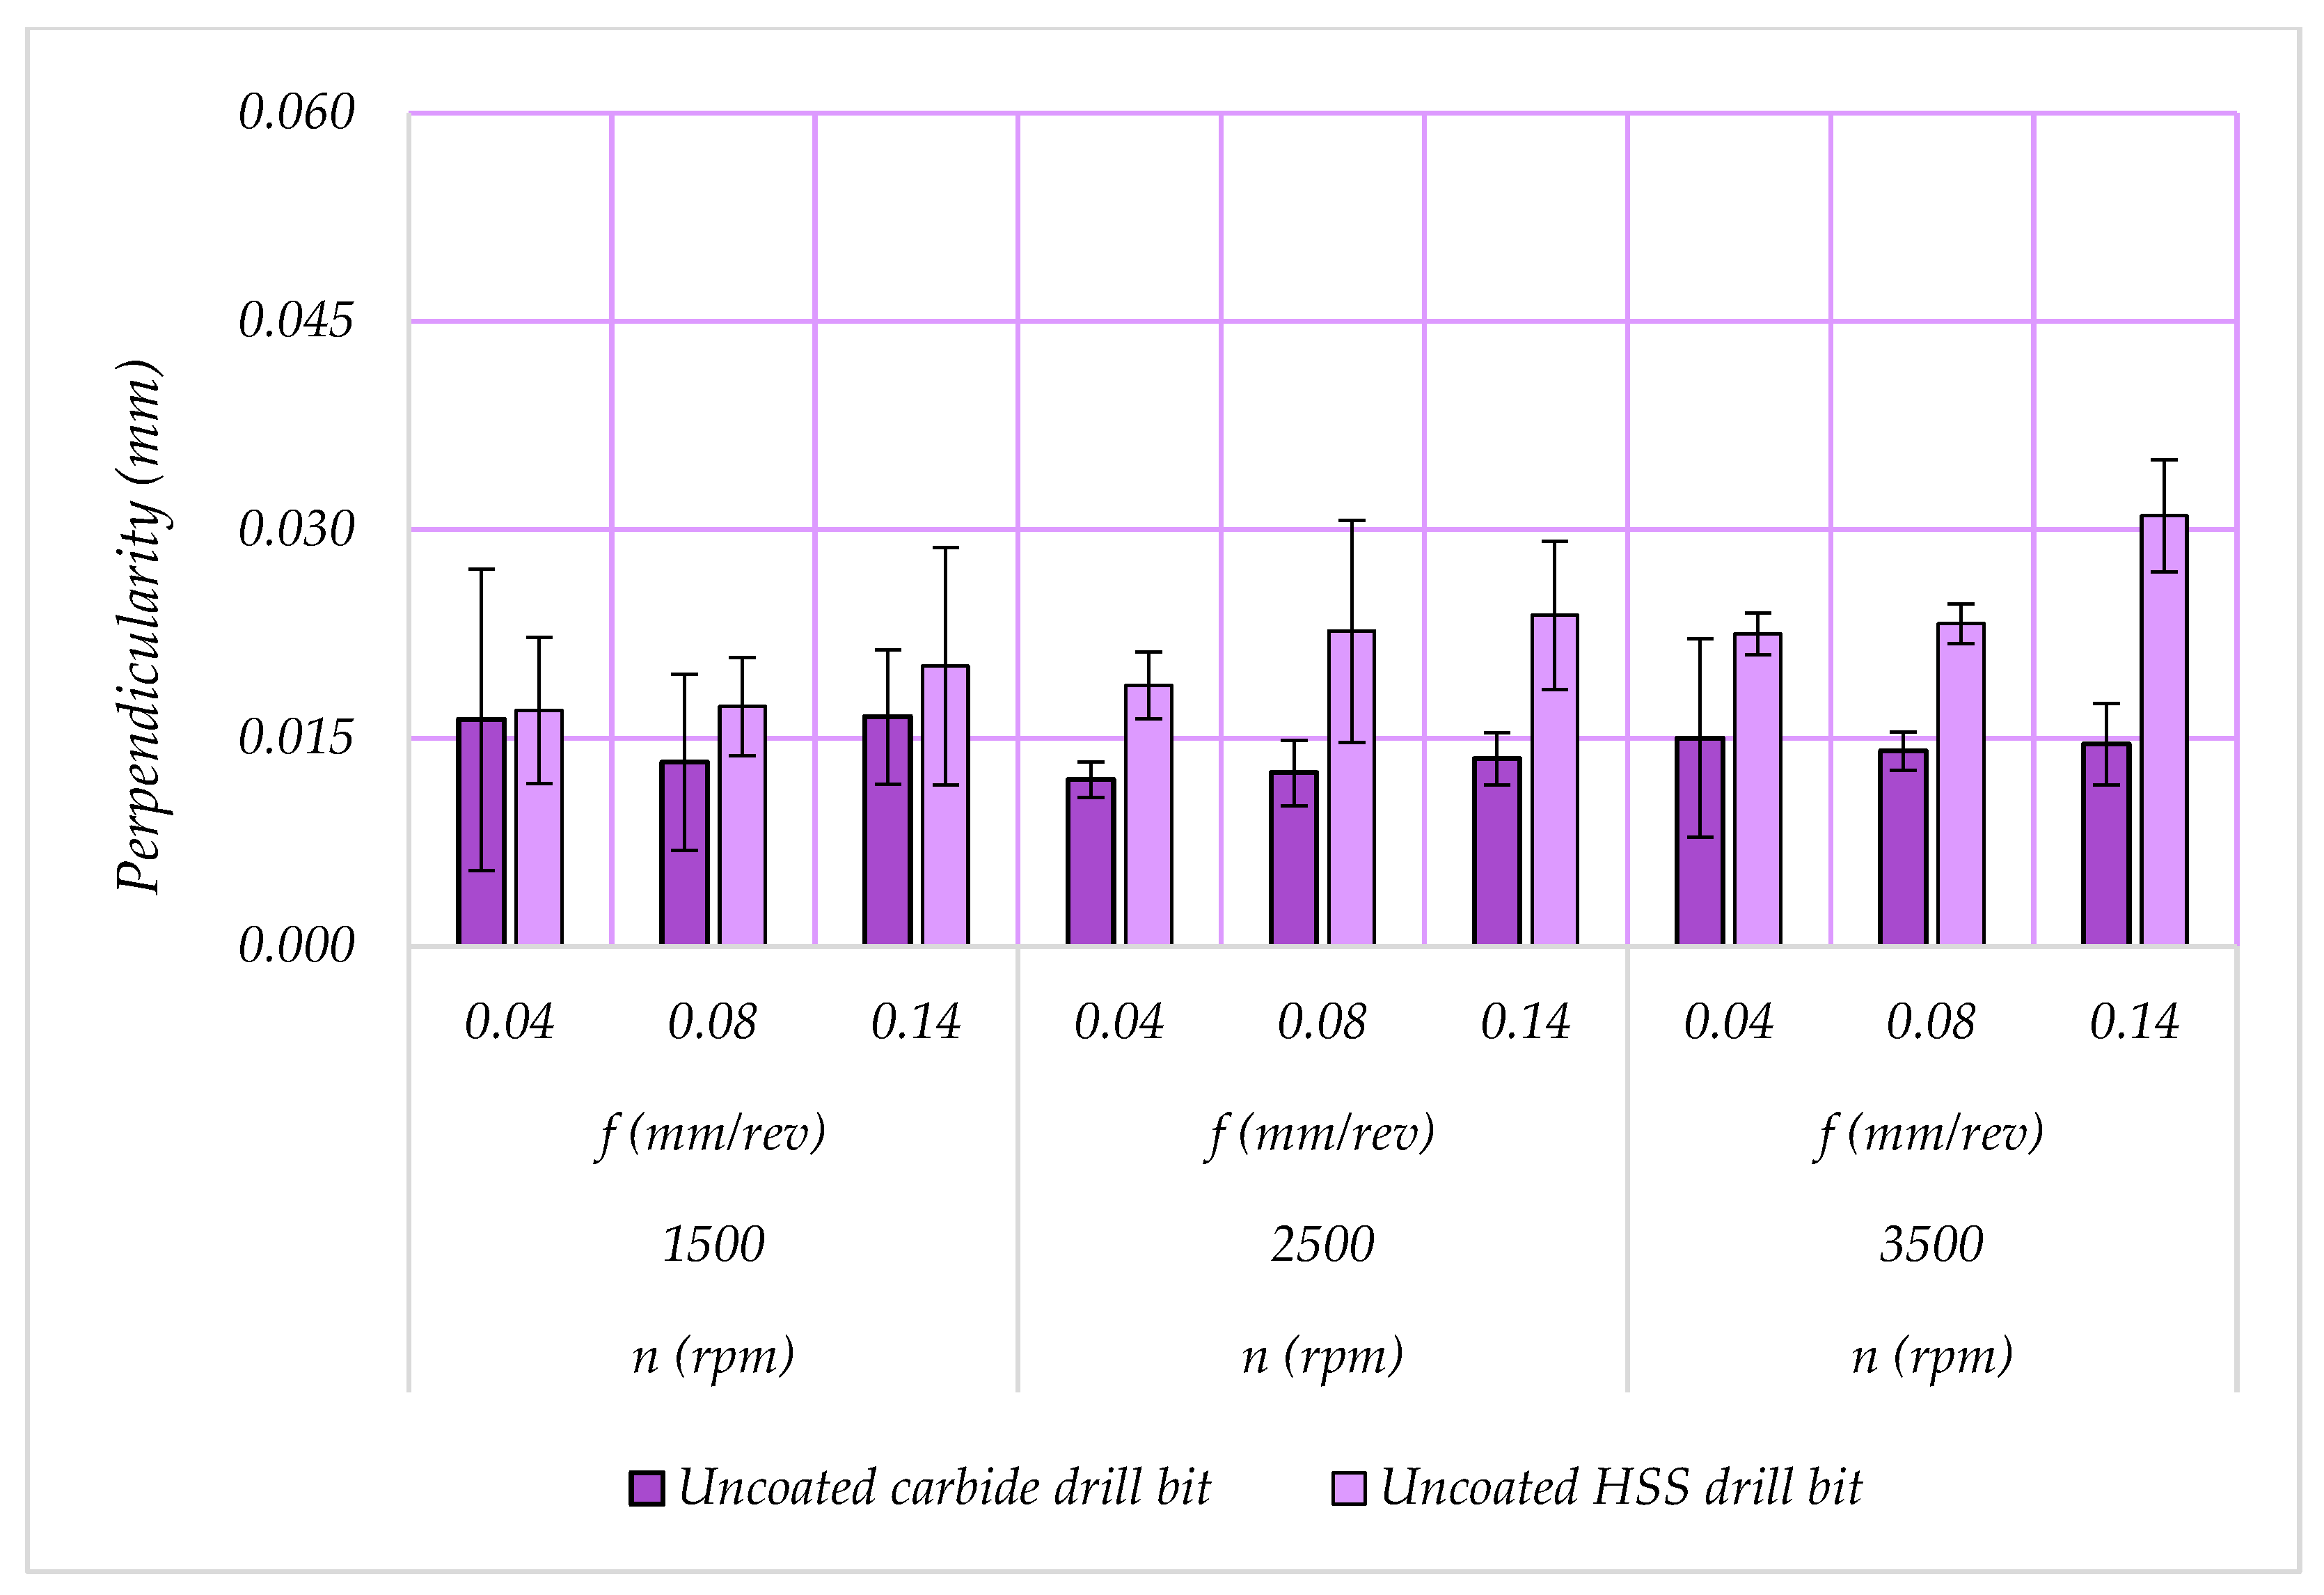
In the current study, the cylindricity and perpendicularity increased with increases in the drilling parameters. However, a significant impact on both cylindricity and perpendicularity was found based on the type of drill bit material used, as shown in Figure 4 and Figure 5. The uncoated HSS drill bit holes have greater cylindricity and perpendicularity than the uncoated carbide drill bit holes. Hence, when using the carbide drill bits, the lowest cylindricity and perpendicularity values produced were 0.0271 mm and 0.0120 mm. Likewise, the ANOVA result in Table 4 indicates that the impact of drill bit material on the cylindricity was 64.35%, while the impact on perpendicularity was 61.08%. Furthermore, the spindle speed had an impact of 16.17% on cylindricity and 8.92% on perpendicularity. However, the feed rate showed an insignificant contribution in affecting the cylindricity and perpendicularity in this study at the confidence interval of 95%. Moreover, in the two-way interactions, the combination of drill type and spindle speed had an influence of 5.32% on the cylindricity. In comparison, the combined effect of drill type and feed rate had an impact of 5.78% on the cylindricity. At the same time, in the two-way interactions, only the drill type and spindle affected perpendicularity, with a 13.06% contribution. Hence, it is concluded that the drill bit material plays a significant role during the drilling process in affecting the hole quality characteristics.

4. Discussion

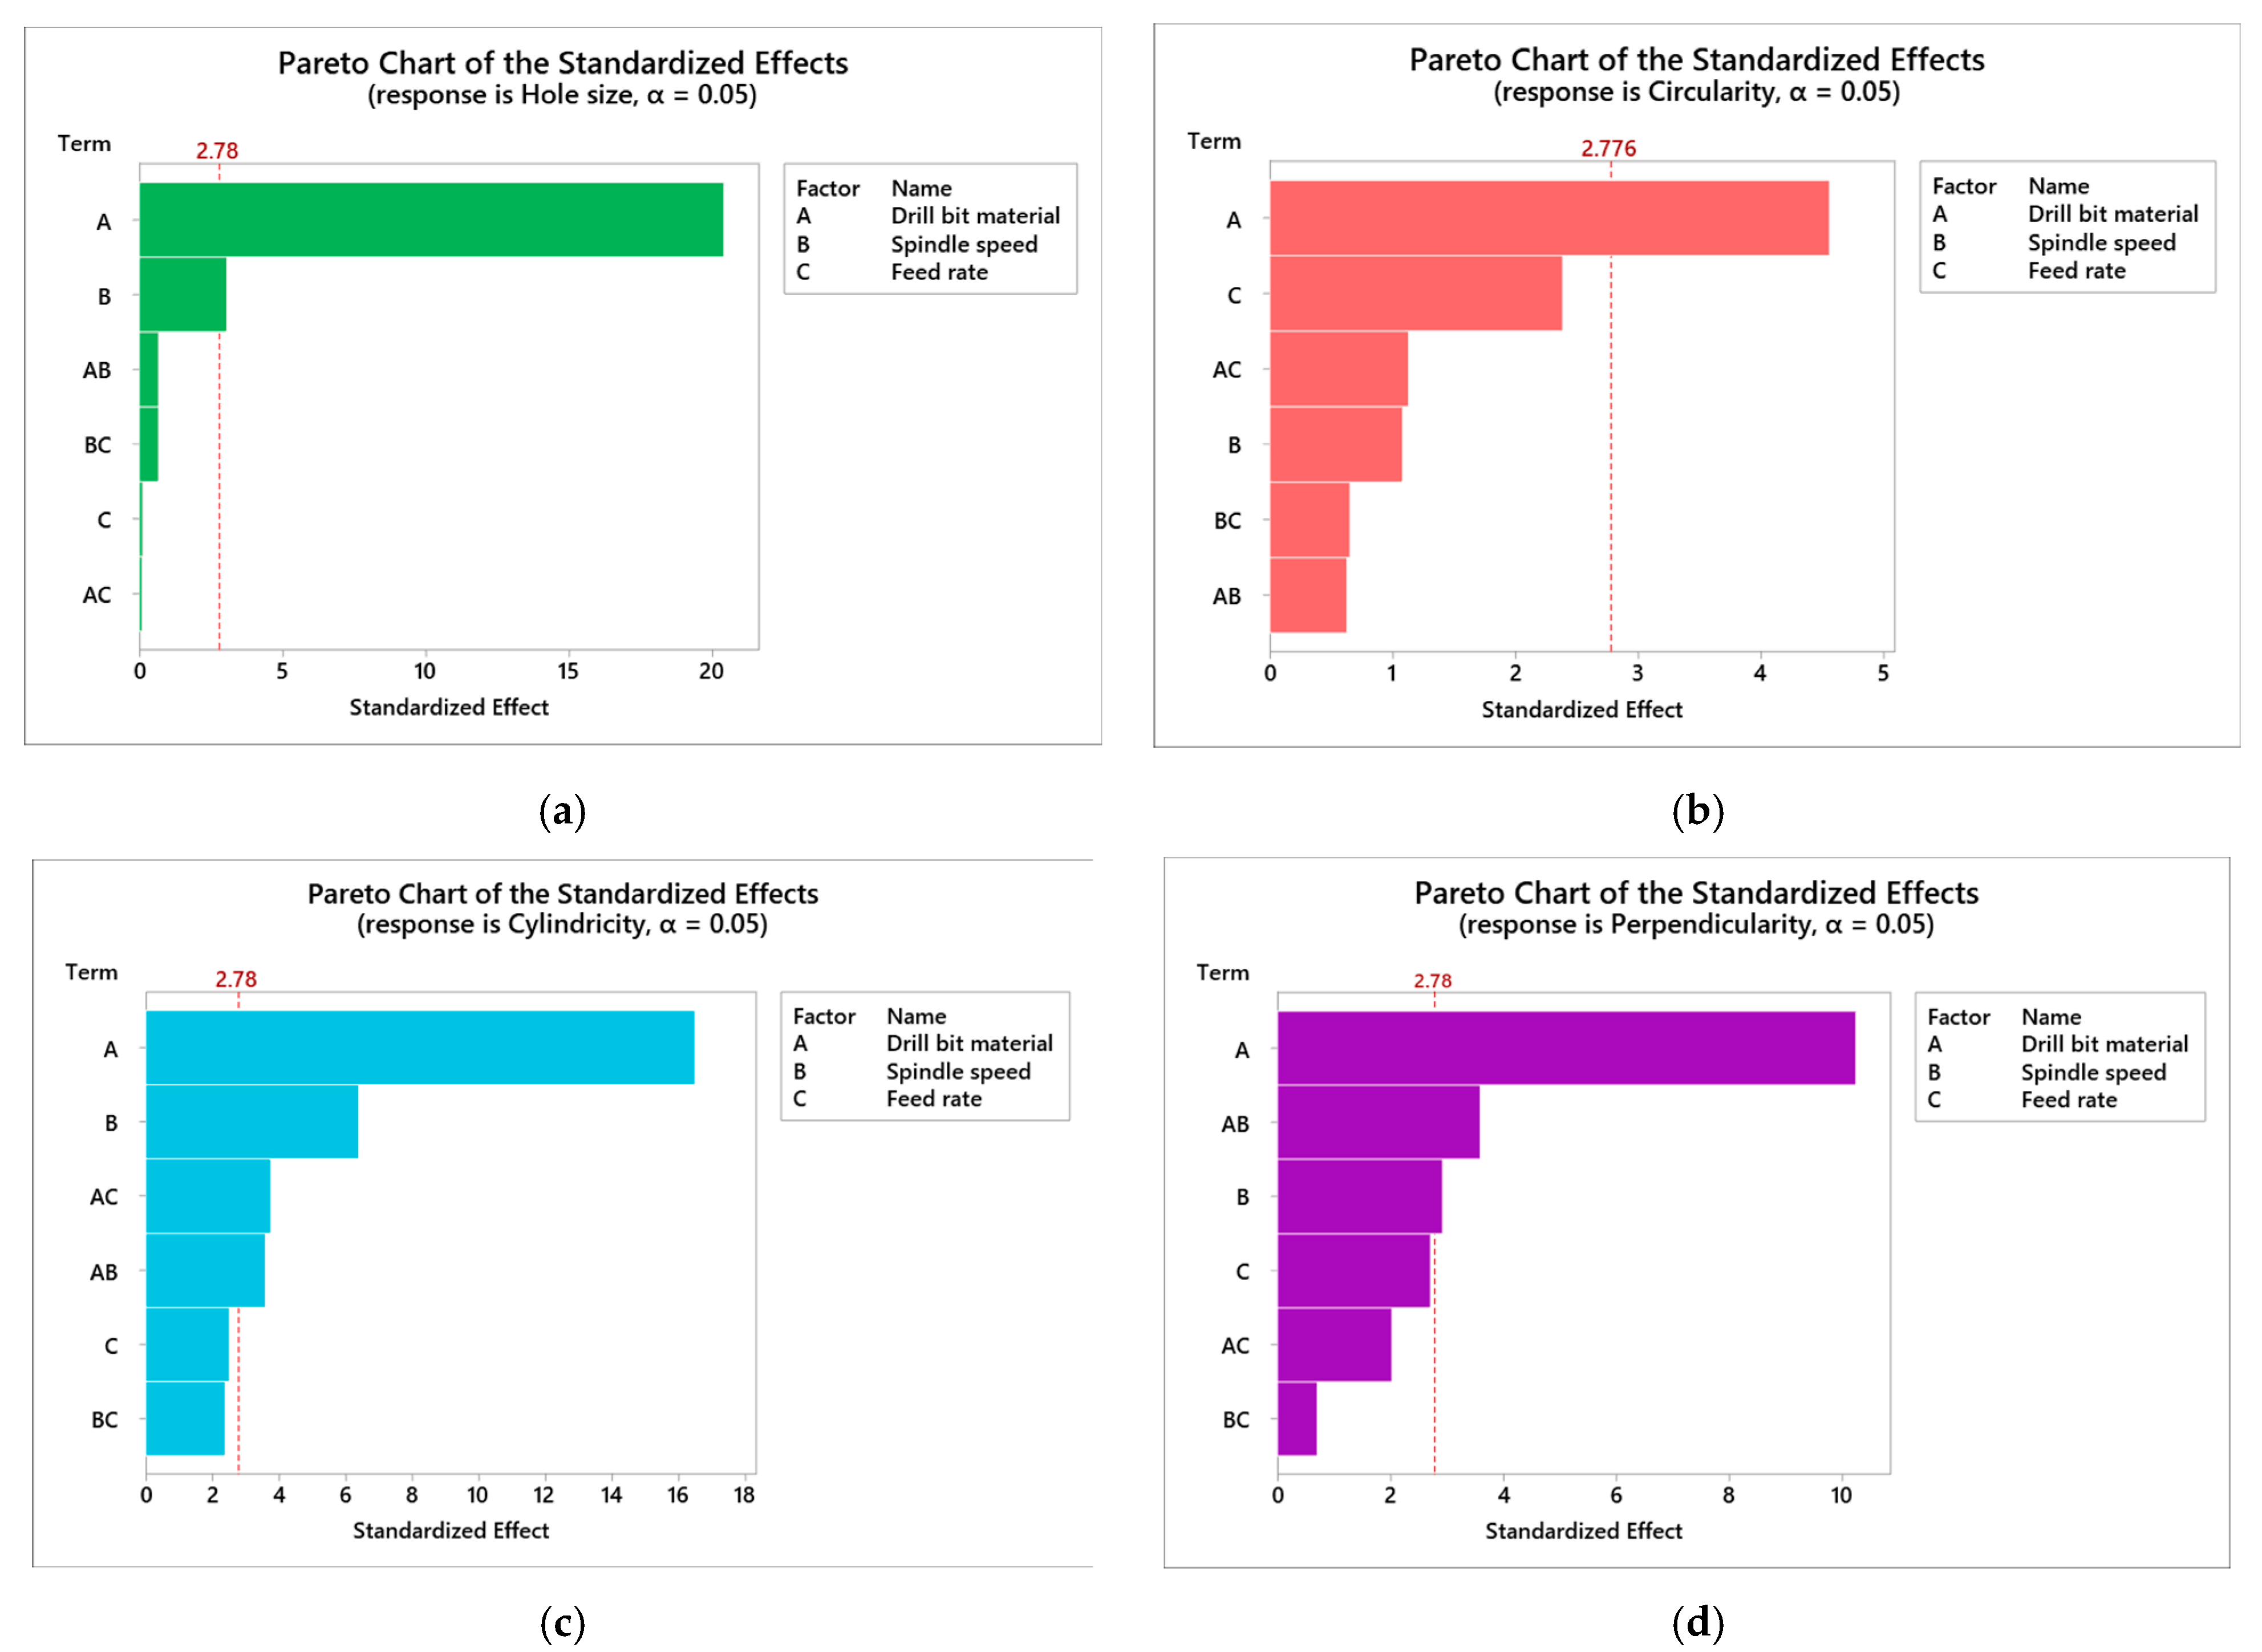
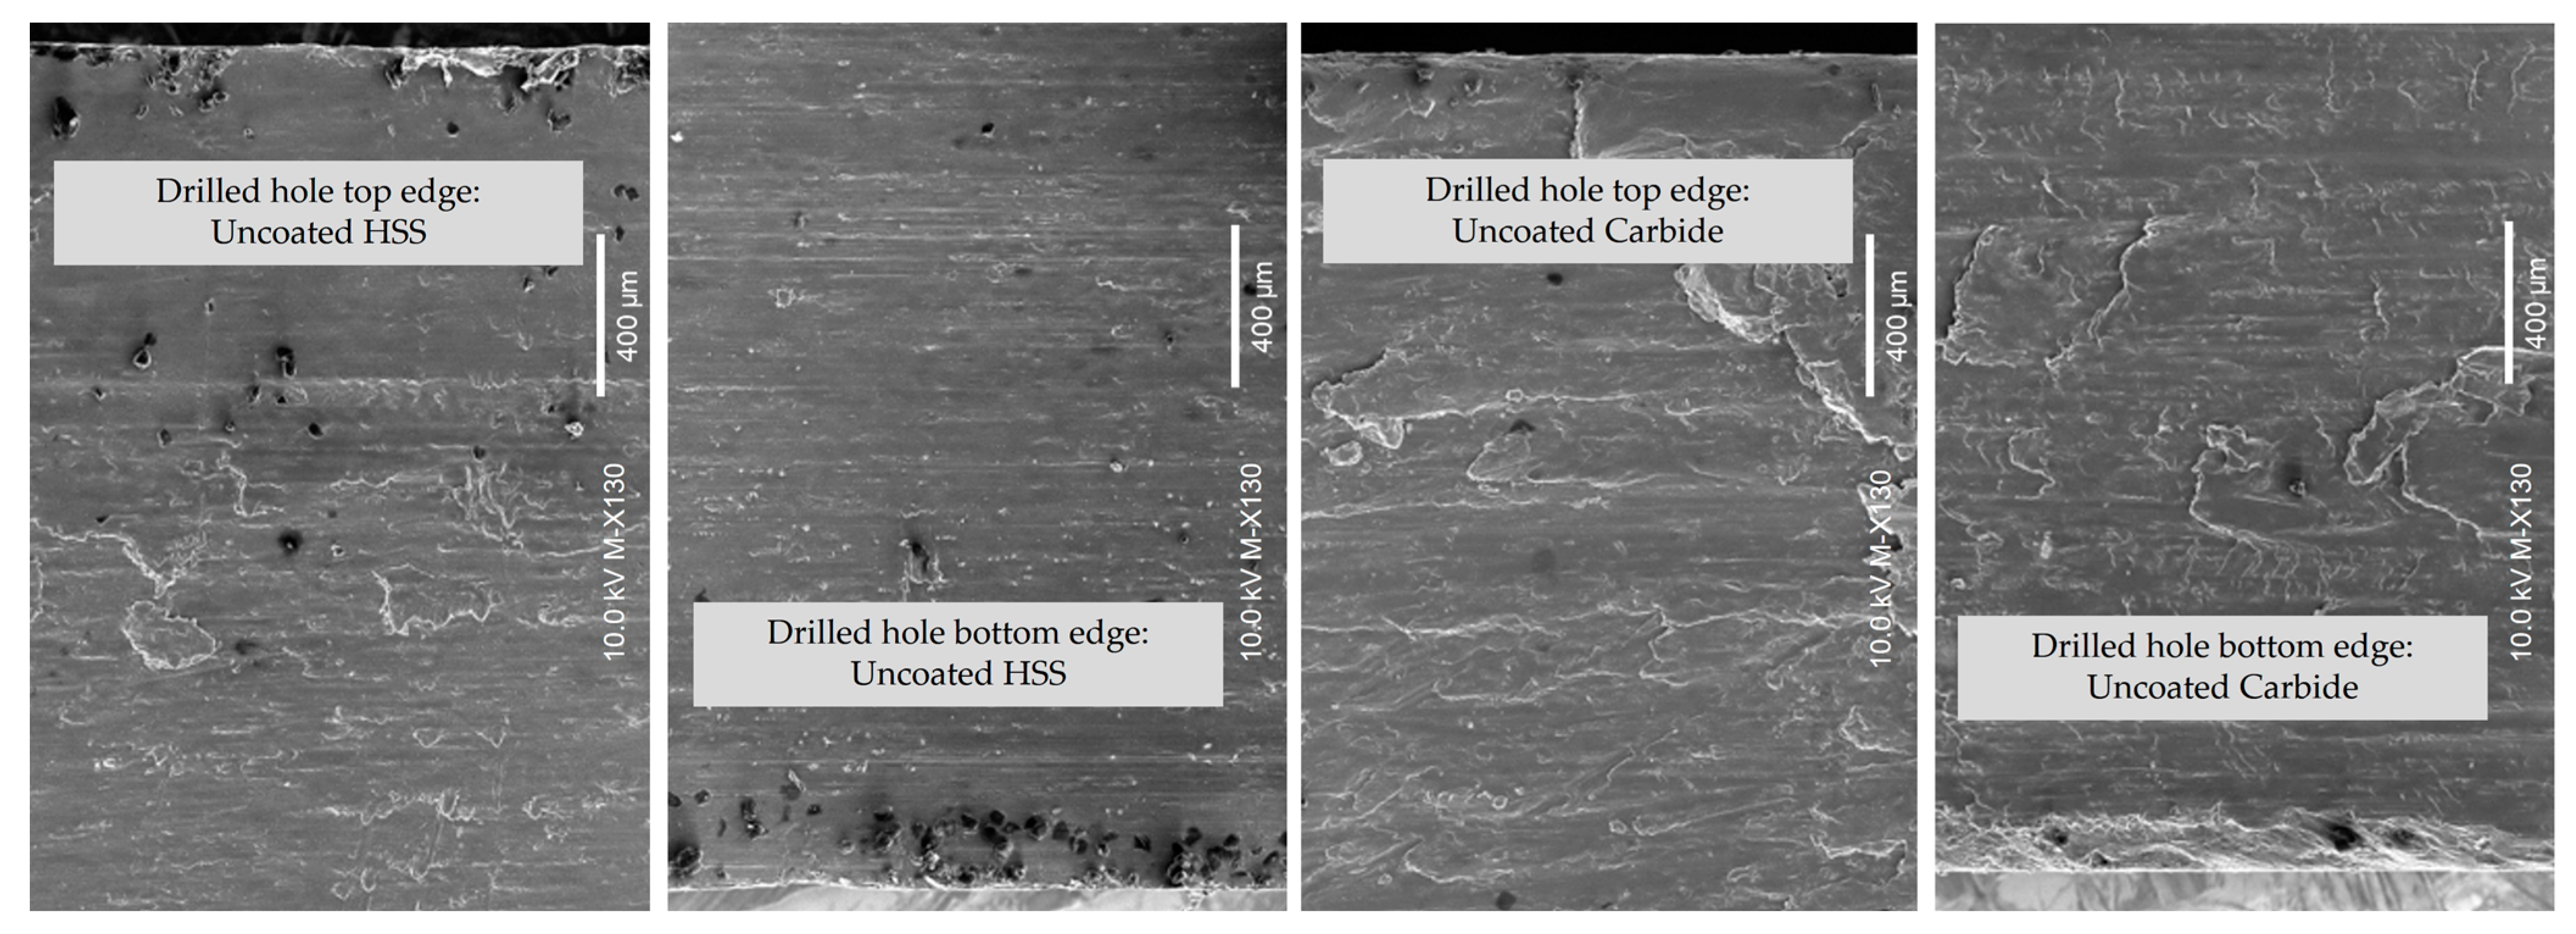
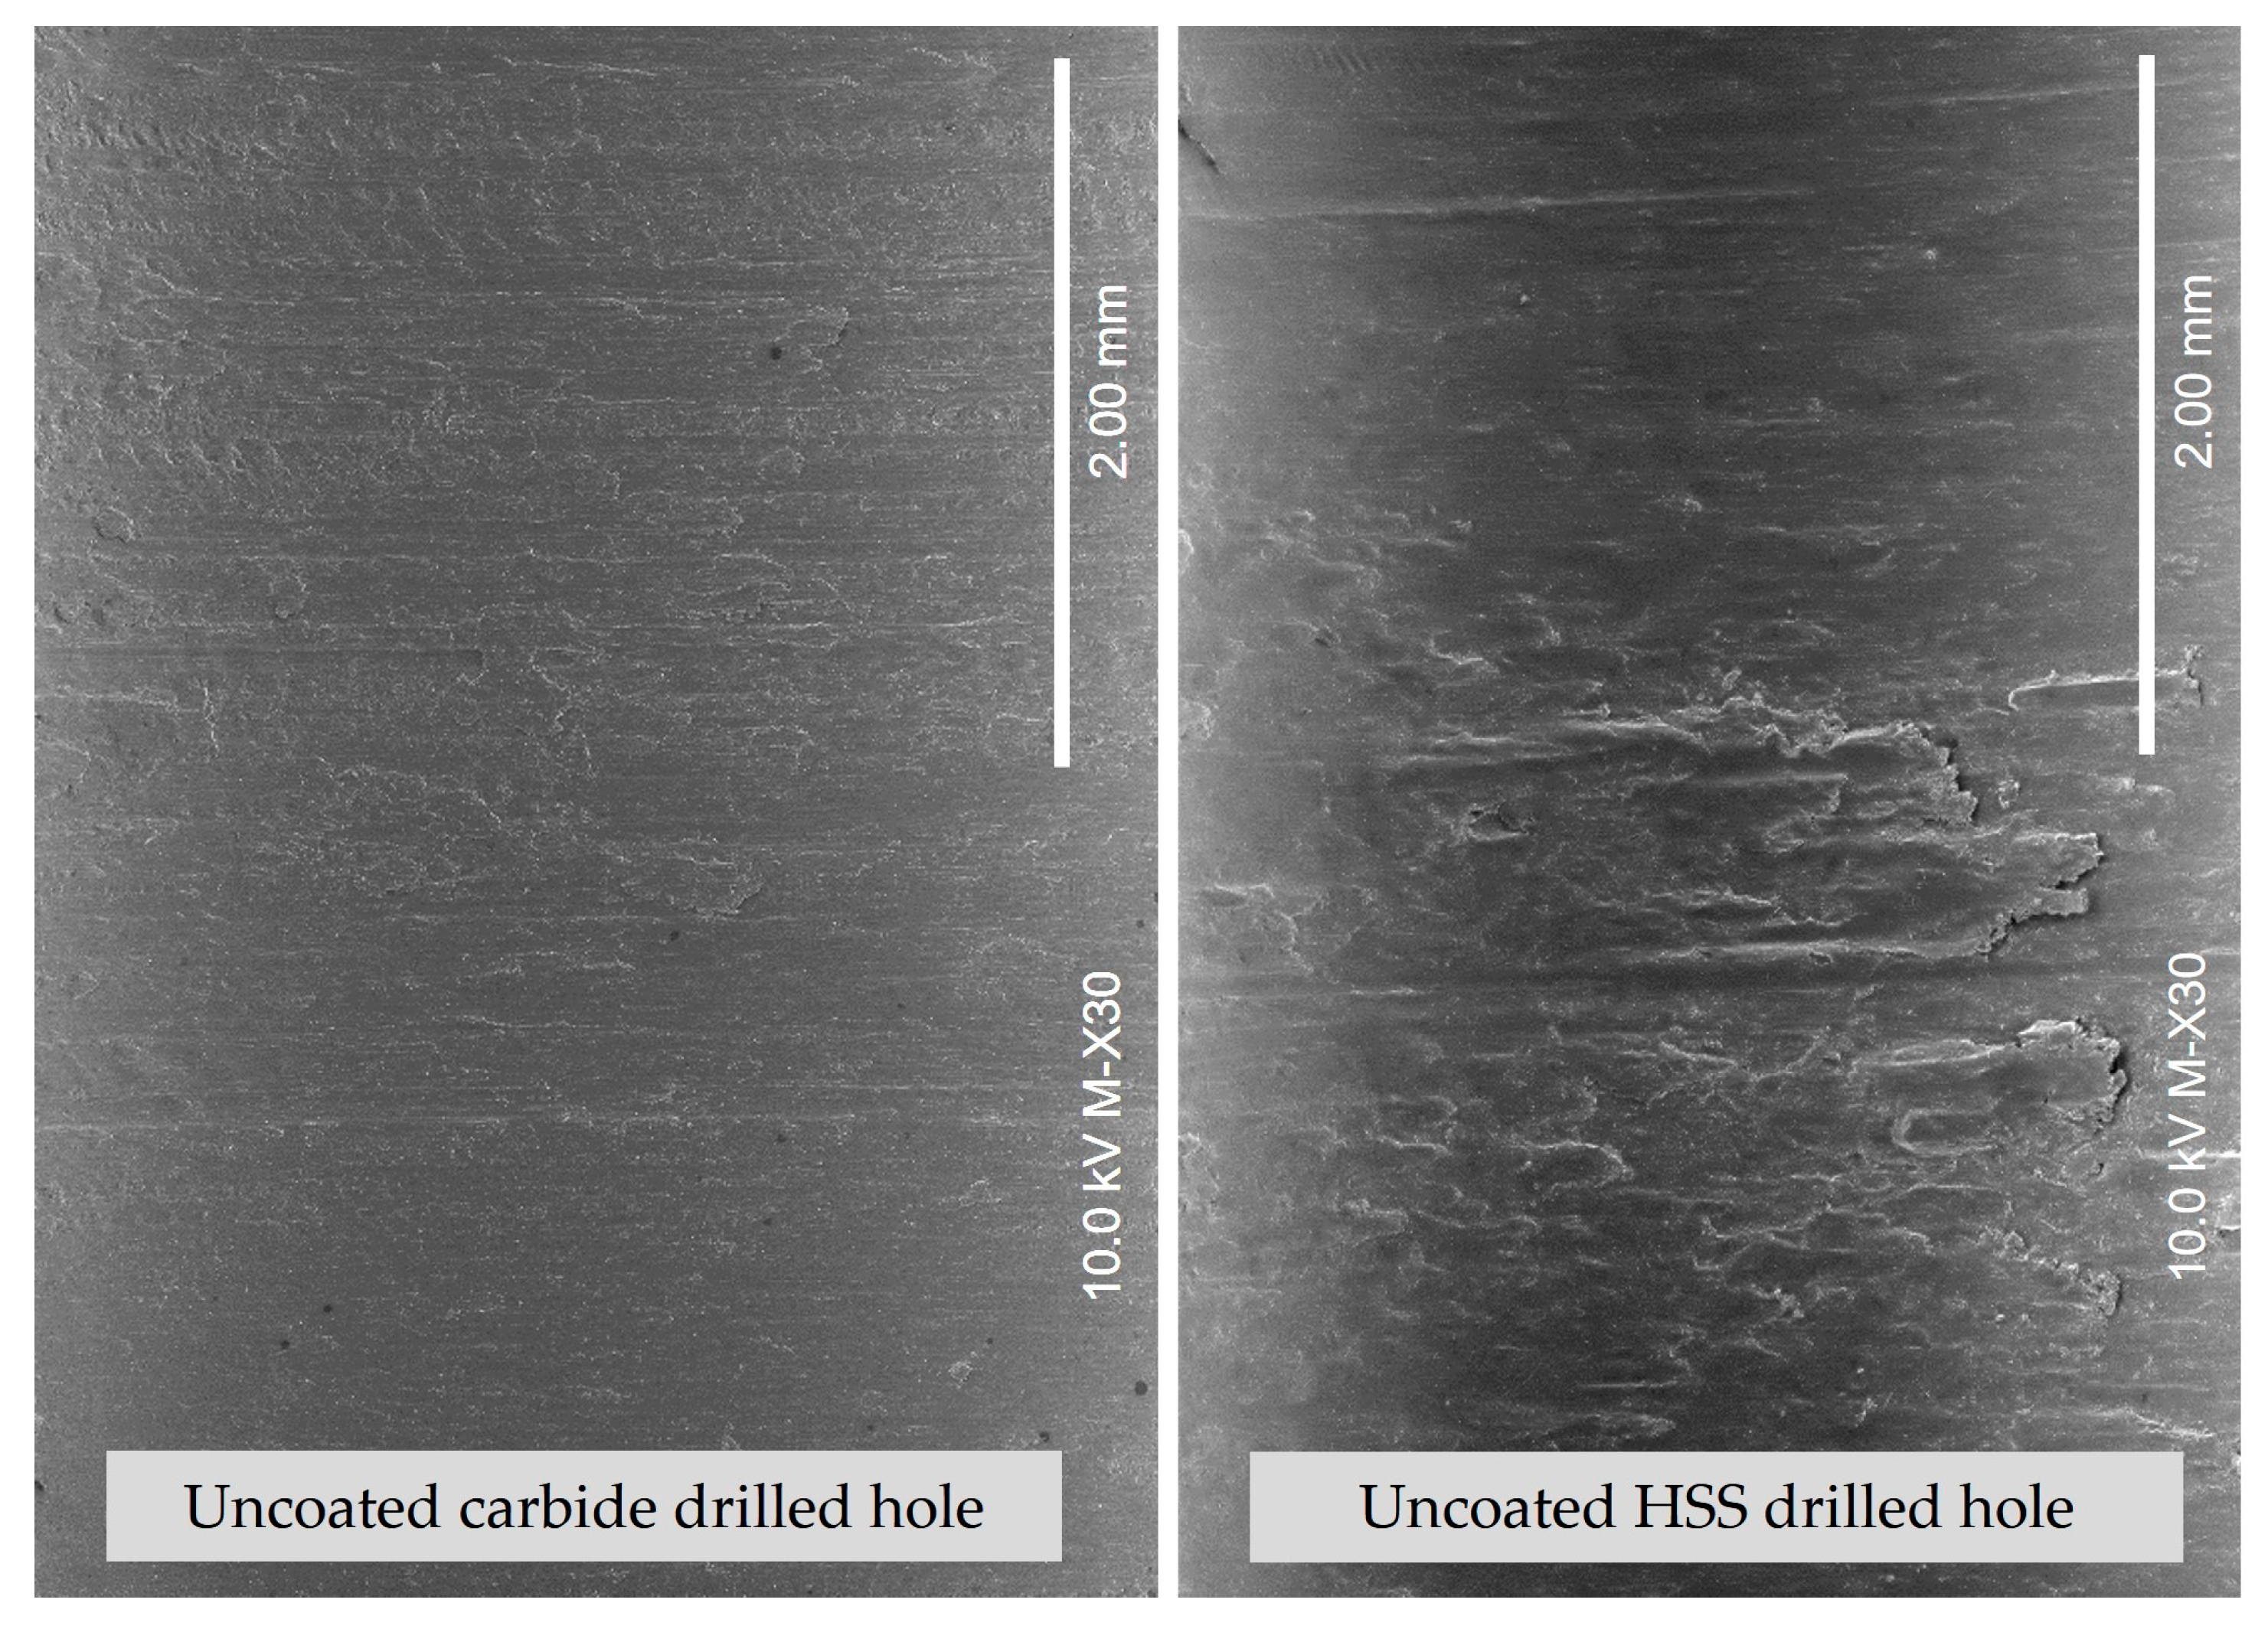
In the current study, the quality of hole characteristics reduces with increases in the spindle speed and feed rate. However, at a 95% confidence interval, the ANOVA results concluded that the most influencing parameter affecting the hole quality was the type of drill bit material, followed by the spindle speed. In contrast, the influence of the feed rate on the quality of the holes was found to be insignificant. This could also be confirmed by the Pareto chart, as provided in Figure 6. Additionally, the uncoated carbide drill bit showed low perpendicularity, low circularity, low cylindricity, and a low level of deviation of the hole from the nominal size compared to the results produced by the uncoated HSS drill bits. One of the reasons for this might be the formation of fewer burrs around the entry and exit sides of the holes produced by the uncoated carbide drill bits. Thus, the burrs around the holes were observed using an optical microscope, as shown in Figure 7a, which is an additional method apart from using the profile meters [24]. Hence, the formation of burrs is provided in Figure 7b. Further details can be found in Appendix A. It is also worth noting that in this study, the burrs at the edges of the holes were small and did require further processing, such as de-burring. However, the burrs can affect the geometric tolerances and might be affected by the drilling parameters. Hence, the material was further examined using scanning electron microscopy at the entry and exit sides of the hole edges, as shown in Figure 8. The SEM examination was also extended to the inside hole surface, which revealed that the surface deformation, damage defects, and chip adhesion were more visible in the holes drilled with uncoated HSS drill bits, as provided in Figure 9. It is also worth mentioning that previously [24], the uncoated carbide drill bits also performed better than the uncoated HSS drill bits in the process of drilling Al2023-T3. However, that study was based on a multi-hole drilling approach to investigate thrust force, burr formation, surface roughness, chips analysis, and tool conditions.
Another reason for the better hole quality was the formation of a lower built-up edge (BUE) on the holes drilled with carbide drill bits. This was mainly due to the greater strength, higher hardness, and lower coefficient of friction of the carbide drill bits when compared to the uncoated HSS drill bits [24]. Furthermore, it has also been reported that high machining parameters tend to increase the temperature at the drilling zone because of the high friction and material removal rate. Hence, the material softens and undergoes plastic deformation, which causes the material to accumulate at the cutting tool, resulting in adhesion and built-up edges [28]. Previous studies have reported that high machining parameters also contribute to increasing the tool wear, deformation effects, and the quality of holes [29]. In addition, the Pareto chart in Figure 6 indicated that the second influencing factor on the hole quality was the spindle speed in this study. Therefore, additional drilling experiments were performed to compare the post-drilling tool conditions with respect to the built-up edges. Hence, a high spindle speed of 3500 rpm and a high feed rate of 0.14 mm/rev in the current drilling parameters were selected, and post-drilling conditions were investigated after 9, 27, and 45 holes were drilled. Figure 10 shows the optical microscopy images taken using each drill bit, which shows a high BUE generated on the uncoated HSS drills. It is worth mentioning that as the number of holes increases, there might be high tool work friction, resulting in a high level of energy consumption and generating higher thrust force [30]. Consequently, there are more chances of affecting the hole dimensions due to a high BUE. Hence, the SEM mid-hole surface analysis was carried out after 9, 27 and 45 holes were drilled with uncoated HSS and carbide drills, as shown in Figure 11. It is also noteworthy that the hole quality might be affected by other parameters like vibration, machine dynamics, the drilling temperature, etc. [27], which were not the scope of this study.

5. Conclusions

In the current study, Al2024-T3 was used for drilling experiments, and a comparison was made between uncoated HSS and carbide drill bits used with varying drilling process parameters. The investigations were based on the hole quality; however, the study was further extended to examine the tool conditions at high drilling parameters in combination with SEM analysis of the holes at the different locations. Hence, the results obtained in this study can help the scientific community and industry in selecting high-quality drilled holes. The following conclusions were made based on the above investigations.
The quality of holes with respect to hole size, cylindricity, circularity, and perpendicularity increase as the spindle speed and feed rate increase. However, ANOVA results indicated that the type of drill bit material showed the highest influence on the hole quality. The spindle speed was the second-most influencing factor affecting the hole quality. In contrast, the feed rate showed an insignificant impact on the hole quality at the confidence interval of 95% for the selected drilling parameters.
The burrs formed around the edges of holes produced by the uncoated carbide drill bits at high drilling parameters were found to be fewer than those produced by the HSS drill bits. Furthermore, the SEM images showed less surface deformation and damage defects on the hole walls drilled by the uncoated carbide drill bits. The experimental results also concluded that the uncoated carbide drill bits produced more high-quality holes than the uncoated HSS drill bits because of their high strength and resistance to wear. Similarly, the adhesion and built-up edges on the uncoated carbide drill bits were less than the uncoated HSS drill bits at high drilling parameters. Therefore, it is concluded that the drill bit materials play a significant role during the process of drilling Al2024-T3 in affecting the hole quality characteristics. Hence, drill bits with excellent wear resistance and a high degree of hardness are recommended for improving tool life.

Author Contributions

Conceptualization, M.A., M.T.-R. and K.G.; methodology, M.A. and A.S.; validation, M.A., M.T.-R. and K.G.; investigation, M.A. and K.G.; writing—original draft preparation, M.A., M.Z.Z. and A.S.; writing—review and editing, M.A., M.Z.Z. and K.G. All authors have read and agreed to the published version of the manuscript.

Funding

This research received no external funding.

Institutional Review Board Statement

Not applicable.

Informed Consent Statement

Not applicable.

Data Availability Statement

The data presented in this study are available on request.

Conflicts of Interest

The authors declare no conflict of interest.

Appendix A. Entry and Exit Hole Burrs at Varying Drilling Parameters

Machines 11 00726 i001

References

  1. Rivero, A.; Aramendi, G.; Herranz, S.; de Lacalle, L.L. An experimental investigation of the effect of coatings and cutting parameters on the dry drilling performance of aluminium alloys. Int. J. Adv. Manuf. Technol. 2006, 28, 1–11. [Google Scholar] [CrossRef]
  2. Xu, J.; Kolesnyk, V.; Li, C.; Lysenko, B.; Peterka, J.; Gupta, M.K. A critical review addressing conventional twist drilling mechanisms and quality of CFRP/Ti stacks. J. Mater. Res. Technol. 2023, 24, 6614–6651. [Google Scholar] [CrossRef]
  3. Yuan, P.; Lai, T.; Li, Y.; Han, W.; Lin, M.; Zhu, Q.; Liu, Y.; Shi, Z. The attitude adjustment algorithm in drilling end-effector for aviation. Adv. Mech. Eng. 2016, 8, 1687814016629348. [Google Scholar] [CrossRef] [Green Version]
  4. Adin, M.Ş. Performances of cryo-treated and untreated cutting tools in machining of AA7075 aerospace aluminium alloy. Eur. Mech. Sci. 2023, 7, 70–81. [Google Scholar] [CrossRef]
  5. Selvakumar, S.J.; Muralidharan, S.M. Performance analysis of drills with structured surfaces when drilling CFRP/AA7075 stack under MQL condition. J. Manuf. Process. 2023, 89, 194–219. [Google Scholar] [CrossRef]
  6. Habib, N.; Sharif, A.; Hussain, A.; Aamir, M.; Giasin, K.; Pimenov, D.Y.; Ali, U. Analysis of Hole Quality and Chips Formation in the Dry Drilling Process of Al7075-T6. Metals 2021, 11, 891. [Google Scholar] [CrossRef]
  7. Habib, N.; Sharif, A.; Hussain, A.; Aamir, M.; Giasin, K.; Pimenov, D.Y. Assessment of Hole Quality, Thermal Analysis, and Chip Formation during Dry Drilling Process of Gray Cast Iron ASTM A48. Eng 2022, 3, 301–310. [Google Scholar] [CrossRef]
  8. Dahnel, A.N.; Fauzi, M.H.; Raof, N.A.; Mokhtar, S.; Khairussaleh, N.K.M. Tool wear and burr formation during drilling of aluminum alloy 7075 in dry and with cutting fluid. Mater. Today Proc. 2022, 59, 808–813. [Google Scholar] [CrossRef]
  9. Gupta, M.K.; Niesłony, P.; Korkmaz, M.E.; Kuntoğlu, M.; Królczyk, G.; Günay, M.; Sarikaya, M. Comparison of Tool Wear, Surface Morphology, Specific Cutting Energy and Cutting Temperature in Machining of Titanium Alloys under Hybrid and Green Cooling Strategies. Int. J. Precis. Eng. Manuf.-Green Technol. 2023, 1–14. [Google Scholar] [CrossRef]
  10. Ghasemian Fard, M.; Baseri, H.; Zolfaghari, A. Experimental investigation of the effective parameters and performance of different types of structural tools in drilling CFRP/AL alloy stacks. J. Compos. Mater. 2022, 56, 4461–4471. [Google Scholar] [CrossRef]
  11. Soori, M.; Arezoo, B. Cutting tool wear minimization in drilling operations of titanium alloy Ti-6Al-4V. Proc. Inst. Mech. Eng. Part J J. Eng. Tribol. 2023, 237, 1250–1263. [Google Scholar] [CrossRef]
  12. Dahnel, A.N.B.; Raof, N.A.; MK, N.K.; Mokhtar, S. The effect of cutting parameters on tool wear in drilling aluminium 7075. Test Eng. Manag. 2020, 83, 1274–1280. [Google Scholar]
  13. Islam, M.N.; Boswell, B. Effect of cooling methods on hole quality in drilling of aluminium 6061-6T. IOP Conf. Ser. Mater. Sci. Eng. 2016, 114, 012022. [Google Scholar] [CrossRef]
  14. Khunt, C.P.; Makhesana, M.A.; Patel, K.M.; Mawandiya, B.K. Performance assessment of vegetable oil-based minimum quantity lubrication (MQL) in drilling. Mater. Today Proc. 2021, 44, 341–345. [Google Scholar] [CrossRef]
  15. Luo, H.; Fu, J.; Wu, T.; Chen, N.; Li, H. Numerical Simulation and Experimental Study on the Drilling Process of 7075-t6 Aerospace Aluminum Alloy. Materials 2021, 14, 553. [Google Scholar] [CrossRef] [PubMed]
  16. Pramanik, A.; Basak, A.K.; Prakash, C.; Shankar, S.; Chattopadhyaya, S. Sustainability in drilling of aluminum alloy. Clean. Mater. 2022, 3, 100048. [Google Scholar] [CrossRef]
  17. Banerjee, B.; Dhar, A.K.; Bhattacharjee, S.; Mahato, N.K. Process Parameters Optimization in Drilling Using Taguchi Method. In Proceedings of the Recent Trends in Product Design and Intelligent Manufacturing Systems, Singapore, 30–31 December 2021; pp. 701–708. [Google Scholar]
  18. Aamir, M.; Giasin, K.; Tolouei-Rad, M.; Ud Din, I.; Hanif, M.I.; Kuklu, U.; Pimenov, D.Y.; Ikhlaq, M. Effect of Cutting Parameters and Tool Geometry on the Performance Analysis of One-Shot Drilling Process of AA2024-T3. Metals 2021, 11, 854. [Google Scholar] [CrossRef]
  19. Kang, J.; Yao, E. Study On Burrs And Hole Quality Of Drilling AA2024 Plates Based On FEM And Experimental Investigation. J. Appl. Sci. Eng. 2022, 26, 911–921. [Google Scholar] [CrossRef]
  20. Giasin, K.; Hodzic, A.; Phadnis, V.; Ayvar-Soberanis, S. Assessment of cutting forces and hole quality in drilling Al2024 aluminium alloy: Experimental and finite element study. Int. J. Adv. Manuf. Technol. 2016, 87, 2041–2061. [Google Scholar] [CrossRef]
  21. Ashrafi, S.A.; Davoudinejad, A.; Barzani, M.M.; Salehi, P. Investigation into effect of tool wear on drilling force and surface finish while dry drilling aluminum 2024. Adv. Mater. Res. 2012, 548, 387–392. [Google Scholar] [CrossRef]
  22. Kurt, M.; Bagci, E.; Kaynak, Y. Application of Taguchi methods in the optimization of cutting parameters for surface finish and hole diameter accuracy in dry drilling processes. Int. J. Adv. Manuf. Technol. 2009, 40, 458–469. [Google Scholar] [CrossRef]
  23. Benchmarkabrasives. HSS VS Cobalt VS Carbide Drill Bits: What to Choose. Available online: https://benchmarkabrasives.com/blogs/news/hss-vs-cobalt-vs-carbide-drill-bits-what-to-choose (accessed on 30 June 2023).
  24. Aamir, M.; Tolouei-Rad, M.; Giasin, K.; Vafadar, A. Feasibility of tool configuration and the effect of tool material, and tool geometry in multi-hole simultaneous drilling of Al2024. Int. J. Adv. Manuf. Technol. 2020, 111, 861–879. [Google Scholar] [CrossRef]
  25. Oberg, E. Machinery’s Handbook 29th Edition-Full Book; Industrial Press: New York, NY, USA, 2012. [Google Scholar]
  26. Aamir, M.; Giasin, K.; Tolouei-Rad, M.; Vafadar, A. A review: Drilling performance and hole quality of aluminium alloys for aerospace applications. J. Mater. Res. Technol. 2020, 9, 12484–12500. [Google Scholar] [CrossRef]
  27. Mohammadi, F.; Mirhashemi, M.; Rashidzadeh, R. A Coordinate Measuring Machine with Error Compensation in Feature Measurement: Model Development and Experimental Verification. Int. J. Adv. Manuf. Technol. 2022. [Google Scholar] [CrossRef]
  28. Mydin, N.M.M.; Dahnel, A.N.; Raof, N.A.; Khairussaleh, N.M.; Mokhtar, S. Comparison of Tool Wear Mechanisms During Drilling of Aluminium Alloy 7075 in Dry and Chilled Air Conditions. J. Sci. Technol. 2022, 14, 67–74. [Google Scholar] [CrossRef]
  29. Musavi, S.H.; Sepehrikia, M.; Davoodi, B.; Niknam, S.A. Performance analysis of developed micro-textured cutting tool in machining aluminum alloy 7075-T6: Assessment of tool wear and surface roughness. Int. J. Adv. Manuf. Technol. 2022, 119, 3343–3362. [Google Scholar] [CrossRef]
  30. Ramulu, M.; Branson, T.; Kim, D. A study on the drilling of composite and titanium stacks. Compos. Struct. 2001, 54, 67–77. [Google Scholar] [CrossRef]
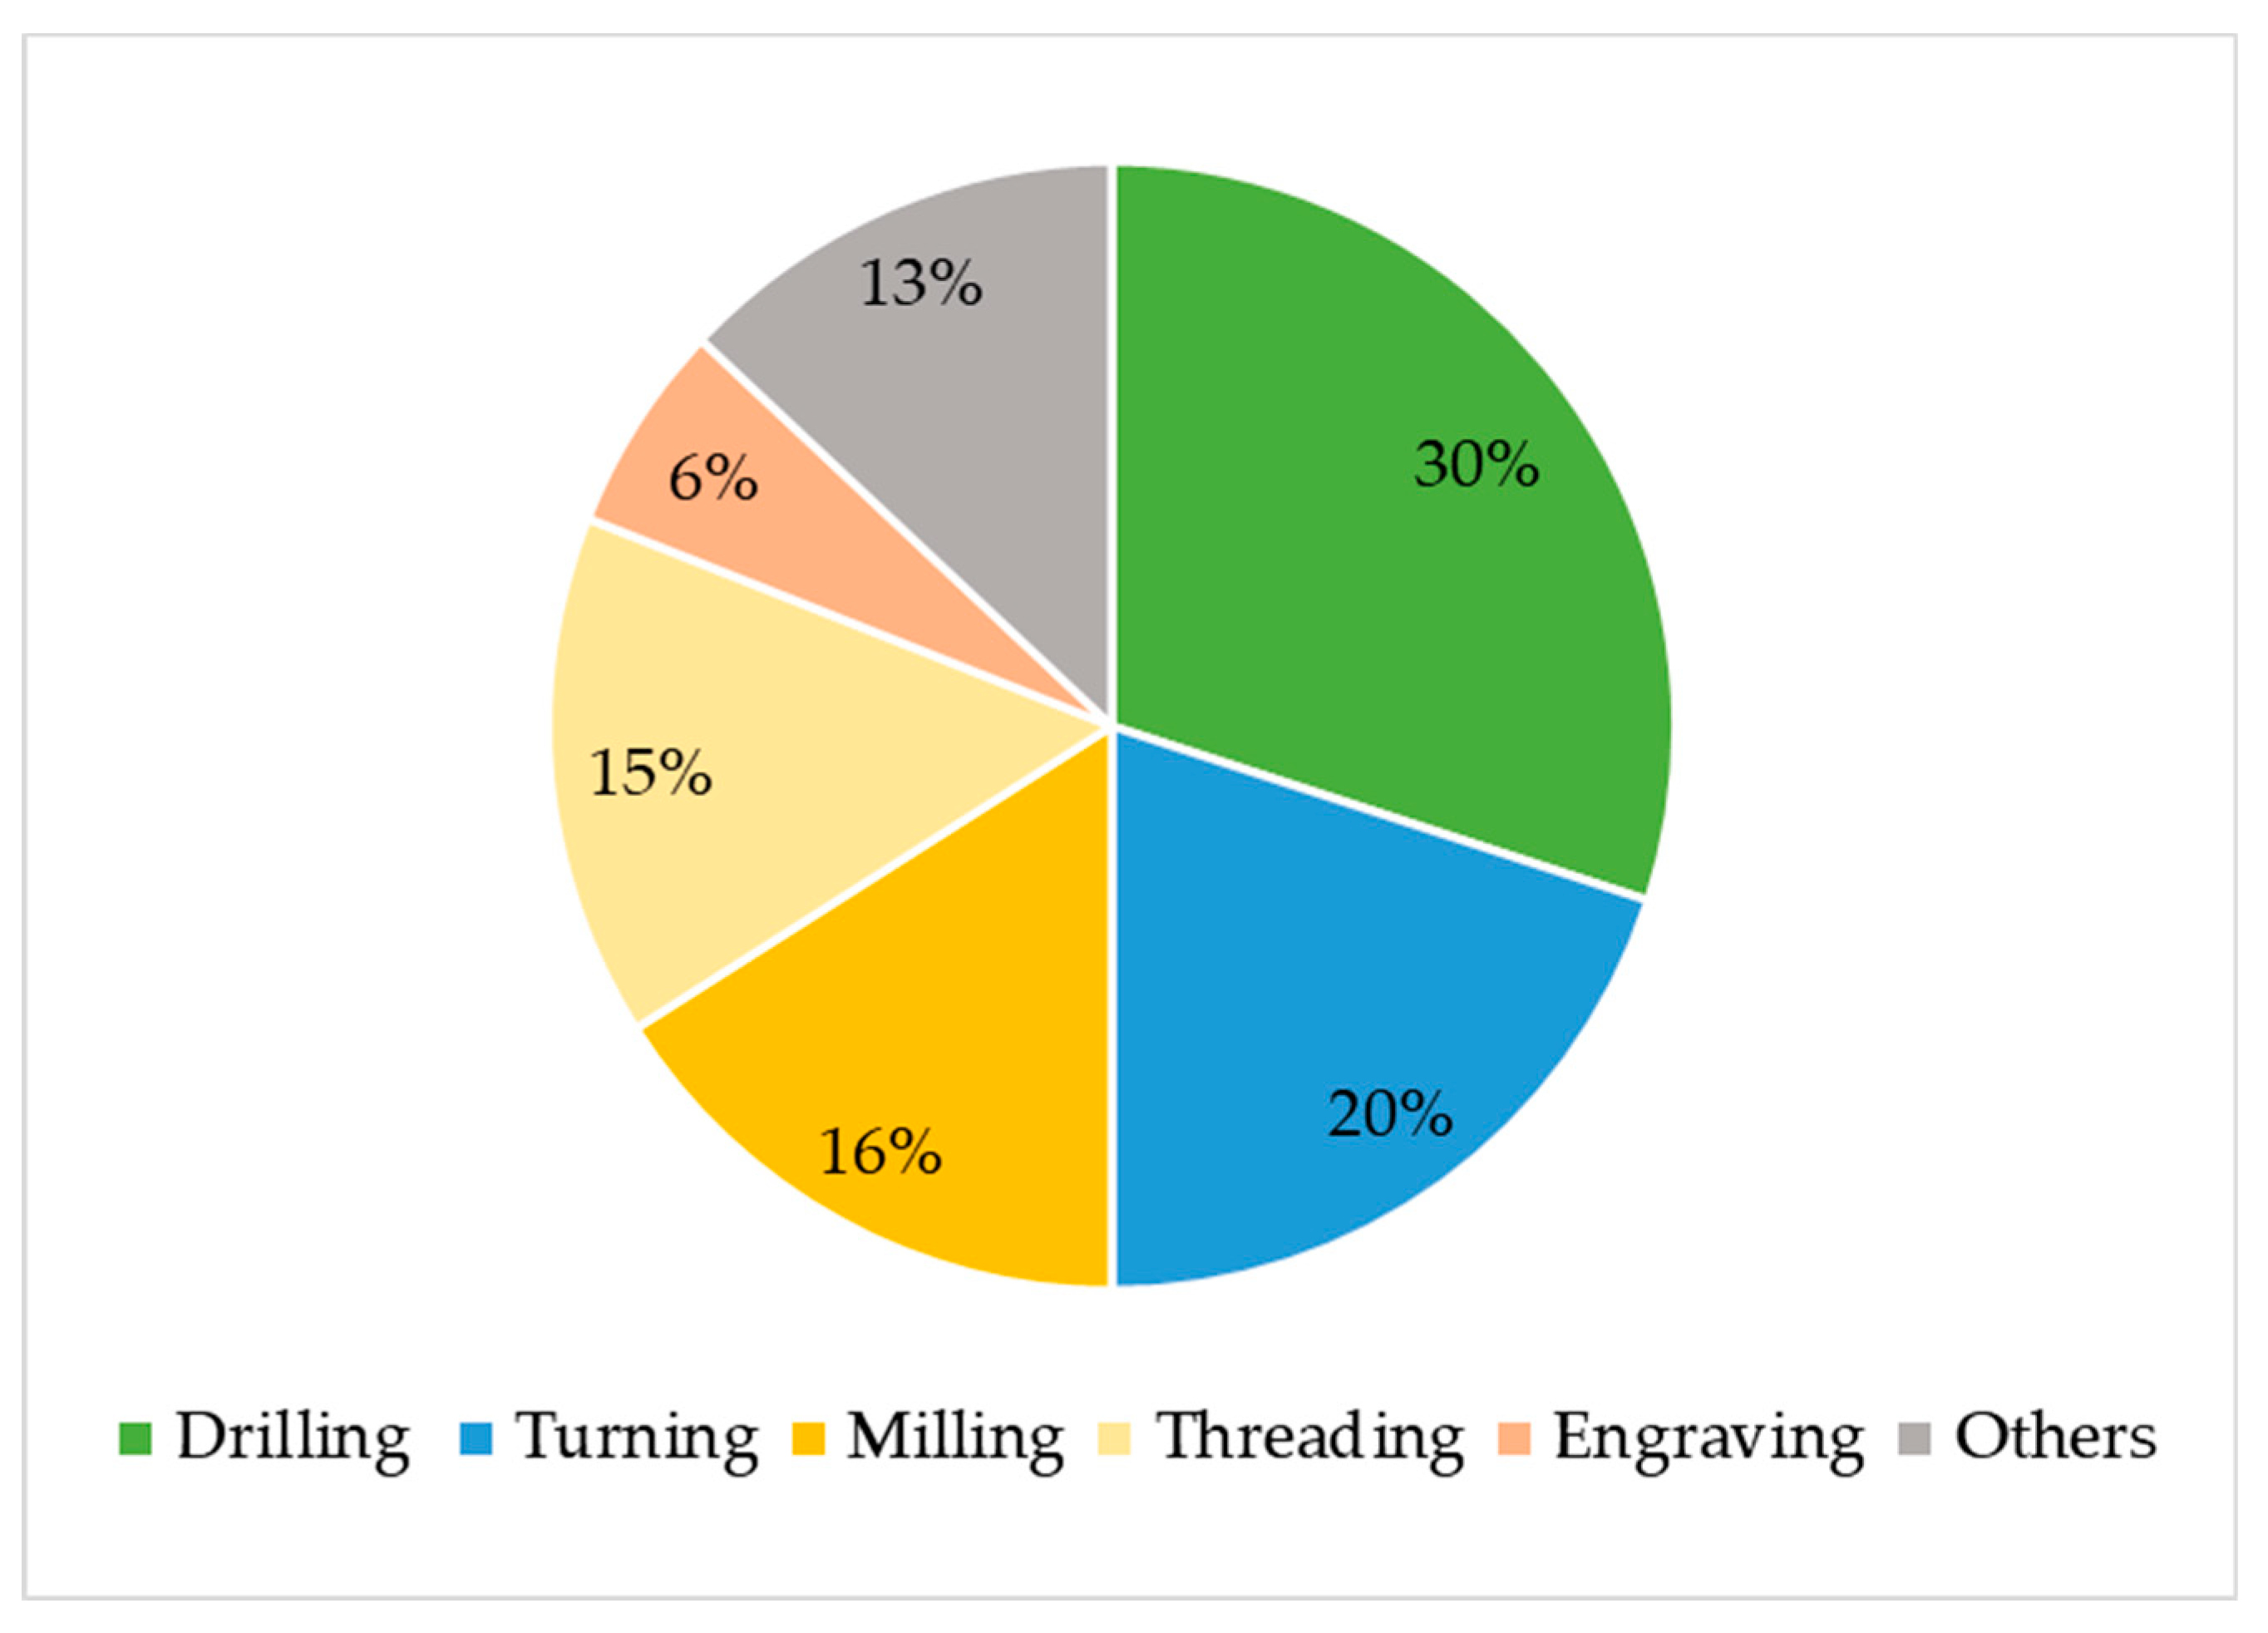
Figure 1. Machining processes.
Machines 11 00726 g001
Figure 2. Hole size.
Machines 11 00726 g002
Figure 3. Circularity.
Machines 11 00726 g003
Figure 4. Cylindricity.
Machines 11 00726 g004
Figure 5. Perpendicularity.
Machines 11 00726 g005
Figure 6. (a). Pareto chart for hole size. (b). Pareto chart for circularity. (c). Pareto chart for cylindricity. (d). Pareto chart for perpendicularity.
Machines 11 00726 g006
Figure 7. (a) Burr investigation using digital microscope. (b) Burr formation at 3500 rpm and 0.14 mm/rev.
Machines 11 00726 g007
Figure 8. SEM images of hole top and bottom edge after drilling at 3500 rpm and 0.14 mm/rev.
Machines 11 00726 g008
Figure 9. SEM hole analysis after drilling at 3500 rpm and 0.14 mm/rev.
Machines 11 00726 g009
Figure 10. Post-drilling tool conditions after drilling at 3500 rpm and 0.14 mm/rev.
Machines 11 00726 g010
Figure 11. SEM mid-hole analyses after drilling at 3500 rpm and 0.14 mm/rev.
Machines 11 00726 g011
Table 1. Previous studies on drilling Al2024.
MaterialSpindle Speed/
Cutting Speed
Feed RateDrill BitsAreas StudiedRef.
Al20241000, 2000, and 3000 (rpm)0.04, 0.08, and 0.14 (mm/rev)Uncoated carbide, 6 mm and 10 mmThrust force, surface roughness, burrs, hole surface damage analysis, chips formation, and tool condition[18]
AA202460, 120, and 180 (m/min)0.05, 0.15, and 0.25 (mm/rev)HSS twist drill with cobalt, 6 mmSurface roughness, thrust force, hole diameter, and exit burr height[19]
Al20241000, 3000, 6000, and 9000 (rpm)100, 300, 600, 900 (mm/min)TiAlN-coated carbide twist drillChip formation, surface roughness, hole size, burrs, and circularity error[20]
Al202428 and 94 (m/min)0.04 (mm/rev)HSS and HSS-CoThrust force, torque, and surface finish[21]
Al 202430, 45, and 60 (m/min)0.15, 0.20, and 0.25 (mm/rev)Uncoated HSS, TiN and TiAlN-coatedSurface finish and hole diameter[22]
Table 2. Experimental details.
Material Details
MaterialAl2024-T3
Dimension150 × 200 mm2
Thickness10 mm
Chemical compositionMgCrSiZCuMnFeTiAl
1.50.10.50.254.50.60.50.15Balance
Ultimate tensile strength445 MPa
Drilling parameters
Feed rate (mm/rev)0.04, 0.08, 0.14
Spindle speed (rpm)1500, 2500, 3500
Drilling conditionDry
Drill bit details
TypeTwist drill
MaterialHSS, carbide
CoatingNone
Drill diameter6 mm
Shank diameter6 mm
Helix angle30°
Number of flutes2 mm
Machines used
Machine toolCNC
Hole size, circularity, cylindricity, and perpendicularityCoordinate measuring machine (Taichung, Taiwan)
BurrsUSB digital microscope
Hole surface defectsScanning electron microscopy (Hitachi SU5000 Chiyoda, Japan)
Tool conditionOptical microscope (LEICA M80)
Table 3. ANOVA for hole size and circularity.
Hole Size
SourceDFSeq SSAdj SSAdj MSF-Valuep-ValueContribution
Model130.0121270.0121270.00093333.730.00299.10%
Linear50.011980.011980.00239686.63097.89%
Drill bit material10.0115160.0115160.011516416.38094.10%
Spindle speed20.0004590.0004590.0002298.290.0383.75%
Feed rate20.0000060.0000060.0000030.110.90.05%
Two-way interactions80.0001470.0001470.0000180.660.7121.20%
Drill bit material × spindle speed20.0000410.0000410.0000210.740.5320.34%
Drill bit material × feed rate20.0000050.0000050.0000020.080.9220.04%
Spindle speed × feed rate40.0001010.0001010.0000250.920.5330.83%
Error40.0001110.0001110.000028--0.90%
Total170.012238----100.00%
Circularity
Model130.0015790.0015790.0001213.240.13391.33%
Linear50.0012820.0012820.0002566.840.04374.19%
Drill bit material10.0007790.0007790.00077920.790.0145.07%
Spindle speed20.0001070.0001070.0000541.430.346.21%
Feed rate20.0003960.0003960.0001985.280.07522.91%
Two-way interactions80.0002960.0002960.0000370.990.54417.14%
Drill bit material × spindle speed20.000050.000050.0000250.670.5632.89%
Drill bit material × feed rate20.0001150.0001150.0000571.530.3216.63%
Spindle speed × feed rate40.0001320.0001320.0000330.880.5487.63%
Error40.000150.000150.000037--8.67%
Total170.001728----100.00%
Table 4. ANOVA for cylindricity and perpendicularity.
Cylindricity
SourceDFSeq SSAdj SSAdj MSF-Valuep-ValueContribution
Model130.0142330.0142330.00109532.180.00299.05%
Linear50.0119660.0119660.00239370.340.00183.28%
Drill bit material10.0092460.0092460.009246271.76064.35%
Spindle speed20.0023230.0023230.00116234.140.00316.17%
Feed rate20.0003960.0003960.0001985.820.0652.76%
Two-Way Interactions80.0022670.0022670.0002838.330.02915.78%
Drill bit material × spindle speed20.0007650.0007650.00038211.240.0235.32%
Drill bit material × feed rate20.0008310.0008310.00041512.210.025.78%
Spindle speed × feed rate40.0006710.0006710.0001684.930.0764.67%
Error40.0001360.0001360.000034--0.95%
Total170.014369----100.00%
Perpendicularity
Model130.000420.000420.00003212.890.01297.67%
Linear50.0003340.0003340.00006726.690.00477.74%
Drill bit material10.0002620.0002620.000262104.830.00161.08%
Spindle speed20.0000380.0000380.0000197.650.0438.92%
Feed rate20.0000330.0000330.0000176.650.0537.75%
Two-Way interactions80.0000860.0000860.0000114.270.08819.93%
Drill bit material × spindle speed20.0000560.0000560.00002811.210.02313.06%
Drill bit material × feed rate20.000020.000020.000013.970.1124.63%
Spindle speed × feed rate40.000010.000010.0000020.960.5162.23%
Error40.000010.000010.000003--2.33%
Total170.00043----100.00%
Disclaimer/Publisher’s Note: The statements, opinions and data contained in all publications are solely those of the individual author(s) and contributor(s) and not of MDPI and/or the editor(s). MDPI and/or the editor(s) disclaim responsibility for any injury to people or property resulting from any ideas, methods, instructions or products referred to in the content.