1. Introduction
Hysteresis, as a physical phenomenon, exists widely in nature and man-made systems [
1,
2]. Ewing first mentioned the hysteresis phenomenon in 1885 in his article on electromagnetism, which discussed the rate independence of the hysteresis phenomenon [
3]. The theory of rate independence believes that the hysteresis phenomenon is a result of the comprehensive action of internal factors of the system and that it has nothing to do with the external input rate. However, long-term follow-up research has found that rate independence is an ideal state for physical systems [
4]. When the external input rate is lower than a certain critical value, the system can approximately maintain the rate independence state. However, in most cases, it will be rate dependent [
5,
6].
The dependence of the rate considers that the rate of external input also affects the hysteresis phenomenon of the system.
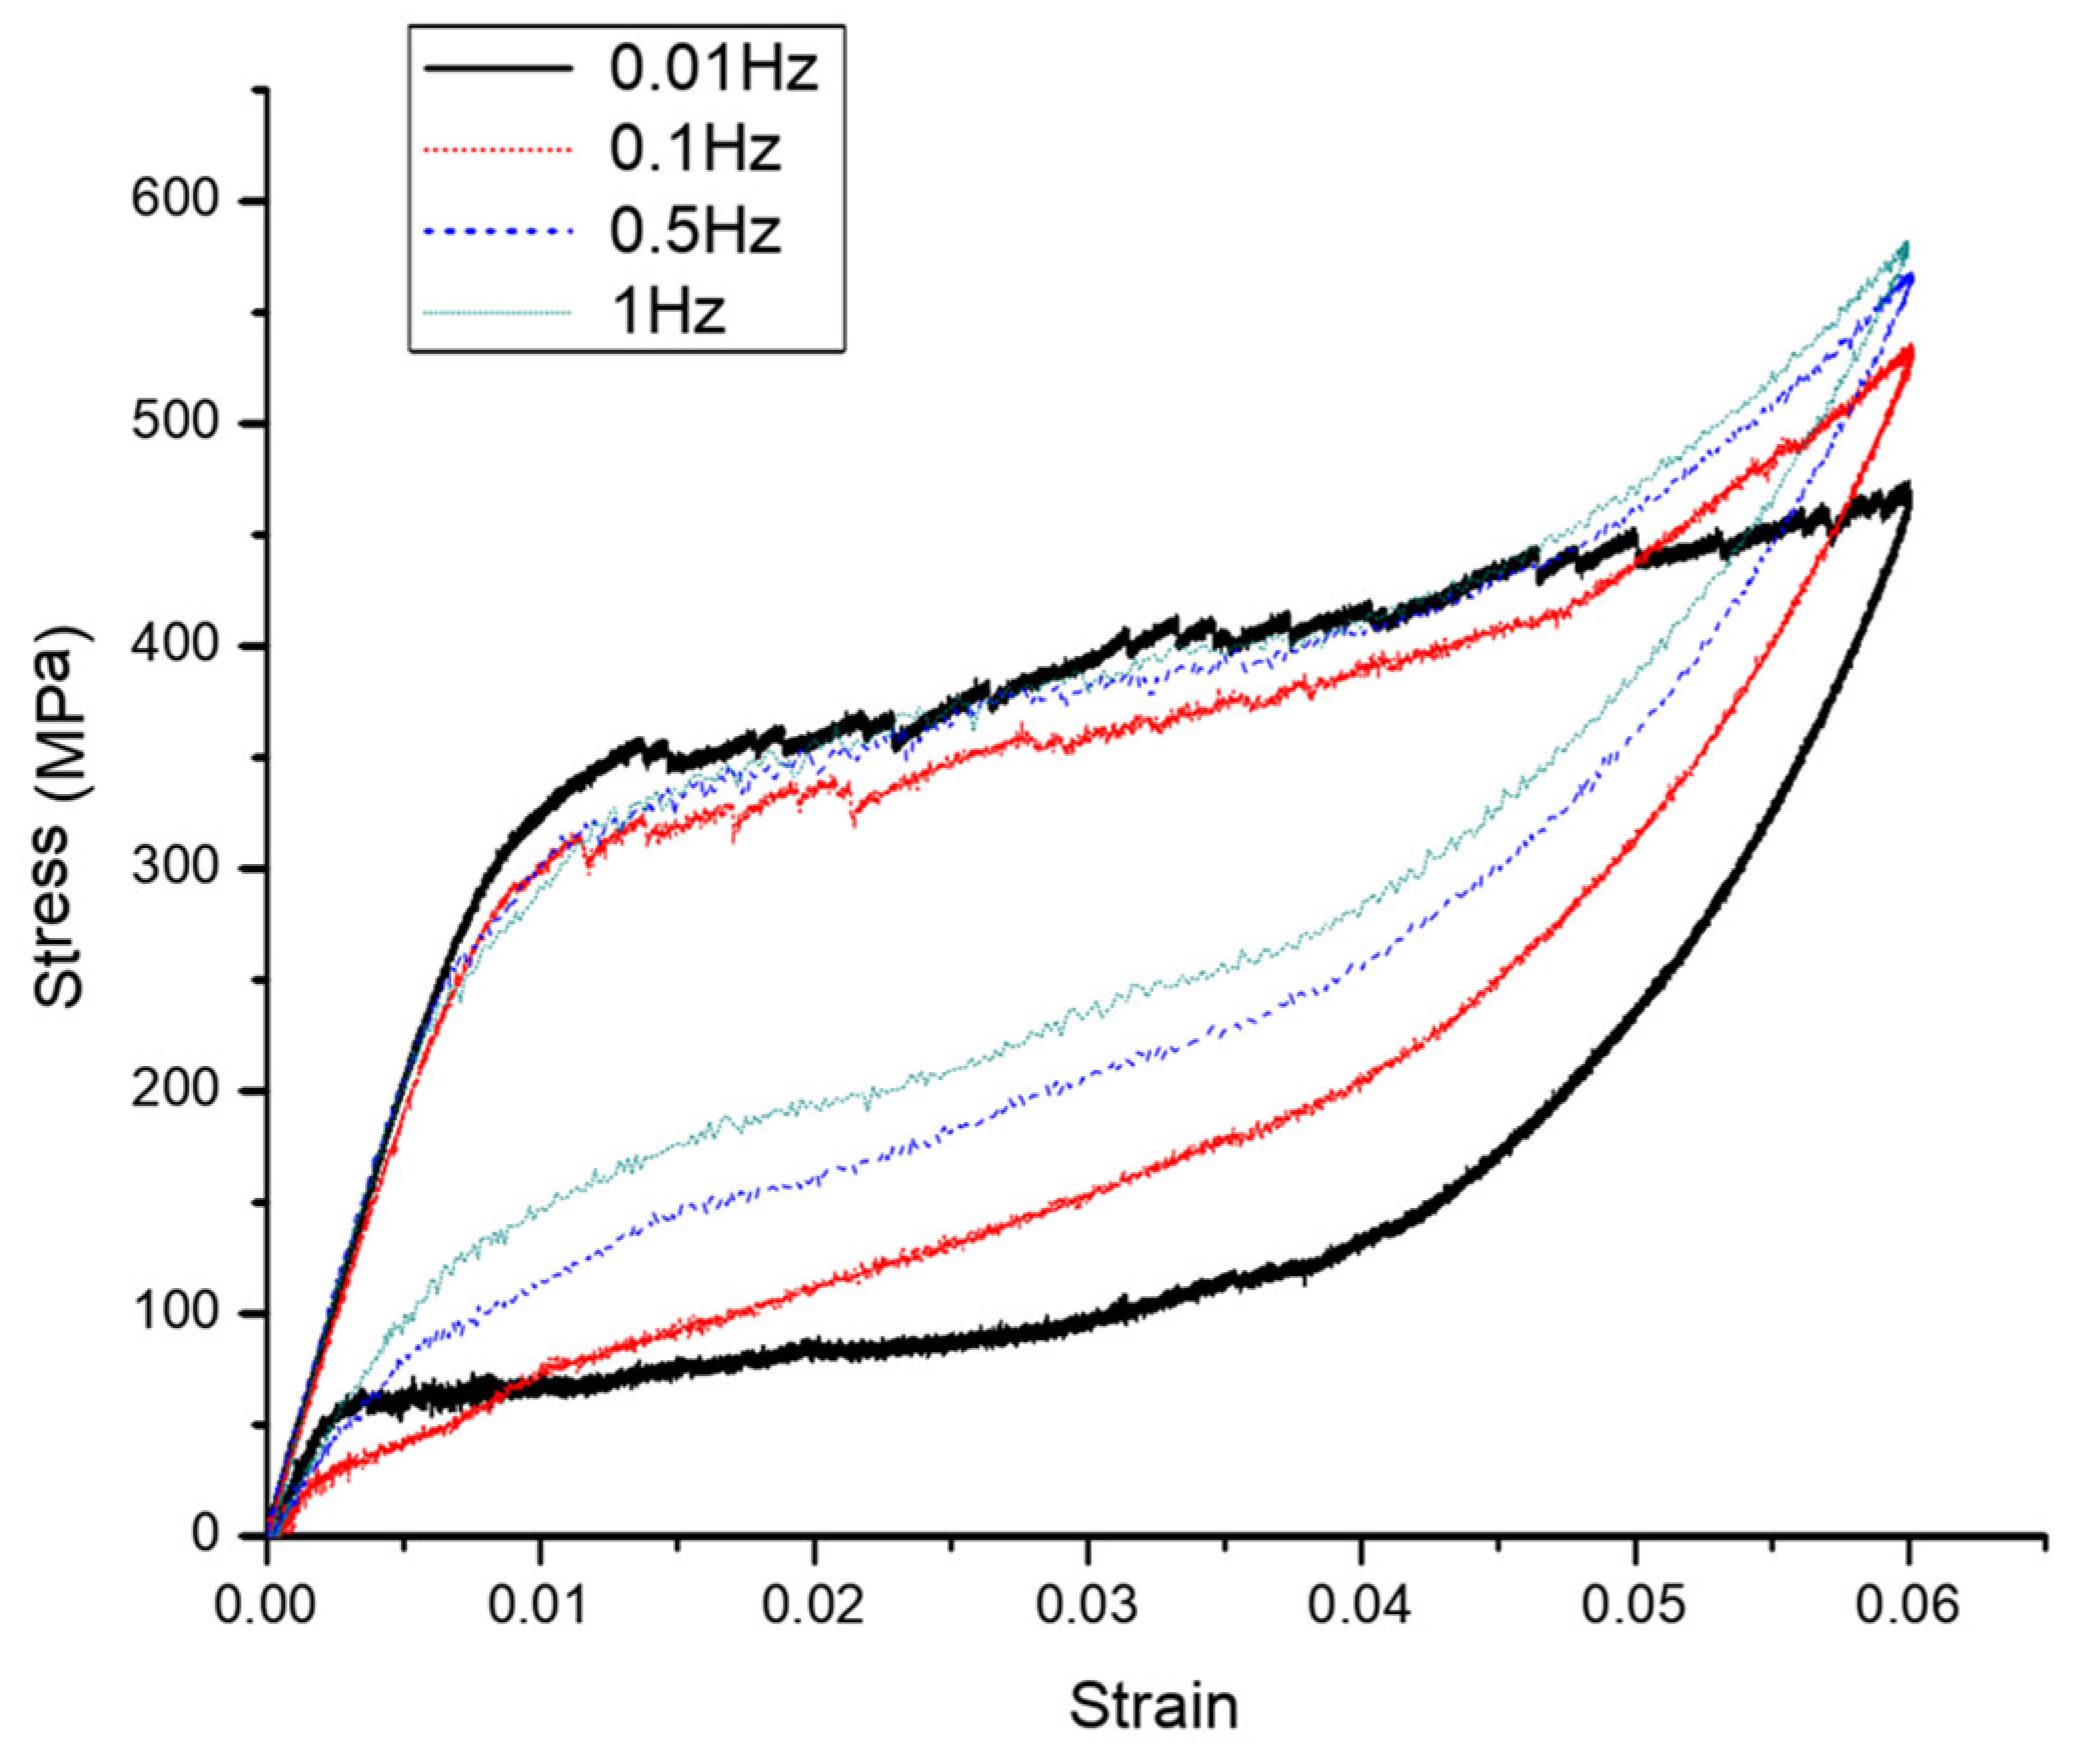
Figure 1 shows a hysteresis curve of a shape memory alloy [
7], which is a NiTi shape memory alloy wire with an alloy composition of Ti-50.8at% Ni. The material was tested at four different loading rates, and it was found that when the same strain amplitude value was loaded, the faster the loading rate, the greater the stress value required. For example, when the strain reached 0.06, the stress corresponding to 0.01 Hz was about 450 MPa, and the stress corresponding to 1 Hz was about 600 MPa. Consequently, the hysteresis curve decreases inward with the acceleration of the loading rate.
Figure 2 shows the hysteresis curve of BNT–BT piezoelectric ceramics prepared at three different cooling rates. It is found that with the acceleration of the cooling rate, the coercive field strength increases. For example, when the cooling rate is 1 °C/min, the strength of the coercive field can reach ±30 μ C/cm
2; when the cooling rate exceeds 10 °C/min, the strength of the coercive field can reach ±40 μ C/cm
2. The faster the cooling rate during the preparation of piezoelectric ceramics, the stronger the ferroelectric properties [
8]. Other materials are also affected by the external input rate. For example, the tensile strength of natural rubber materials is enhanced with an increase in the loading rate [
9]. With the increase in the loading rate, the bearing capacity of reinforced concrete beams also improves, etc. [
10]. The literature [
11] explored the performance of cyclic static dynamic loads of aluminum alloys.
The reducer is a common basic component of equipment. It is a typical system with hysteretic characteristics [
12,
13,
14]. Research on the hysteretics of the reducer has a long history. However, from a comprehensive review of these studies, it can be found that they have always defaulted on rate independence and ignored rate dependence. As a result, the effect of the loading rate dependence on the reducer was not considered in the design and test of the lost motion of the reducer, and the results obtained are questionable [
15,
16].
To solve the above problems, the loading rate dependence of the hysteretic of the reducer and its influence on the lost motion test is discussed in the paper. In view of the above problems, this paper discusses the loading rate dependence of the retarder hysteresis and its influence on the lost motion test. The paper is divided into six parts: (1) The first part is the introduction, which will analyze the research status of rate dependence. (2) In the second part, the loading rate dependence of the retarder hysteresis is analyzed theoretically, and the retarder hysteresis model considering geometric error is established to explore the influence of the loading rate dependence on the lost motion theoretically. (3) The third part is the experimental design, including the introduction of test objects, test methods, and test equipment. (4) The fourth part is the experimental research. The lost motion test experiment is carried out for three kinds of reducers to explore the effect of loading rate and compare with the theoretical analysis results. (5) In the fifth part, the theoretical analysis and experimental results are discussed, and some suggestions are put forward for the design and test of the lost motion of the reducer. (6) The last is the conclusion of this paper.
2. Loading Rate Dependence of Hysteretic of Reducer
2.1. Hysteresis Model
Different explanations for the mechanism of hysteresis can be obtained from researchers in different fields. The reducer hysteresis phenomenon is usually considered to be the result of the coupling effect of elastic deformation and hysteresis caused by friction [
17,
18]. Thus, in modeling and analysis, the hysteretic model of the reducer is expressed as the coupling structure of the stiffness module and the hysteretic module, which are, respectively, characterized by springs and massless Maxwell spring sliders subject to Coulomb friction [
19,
20,
21].
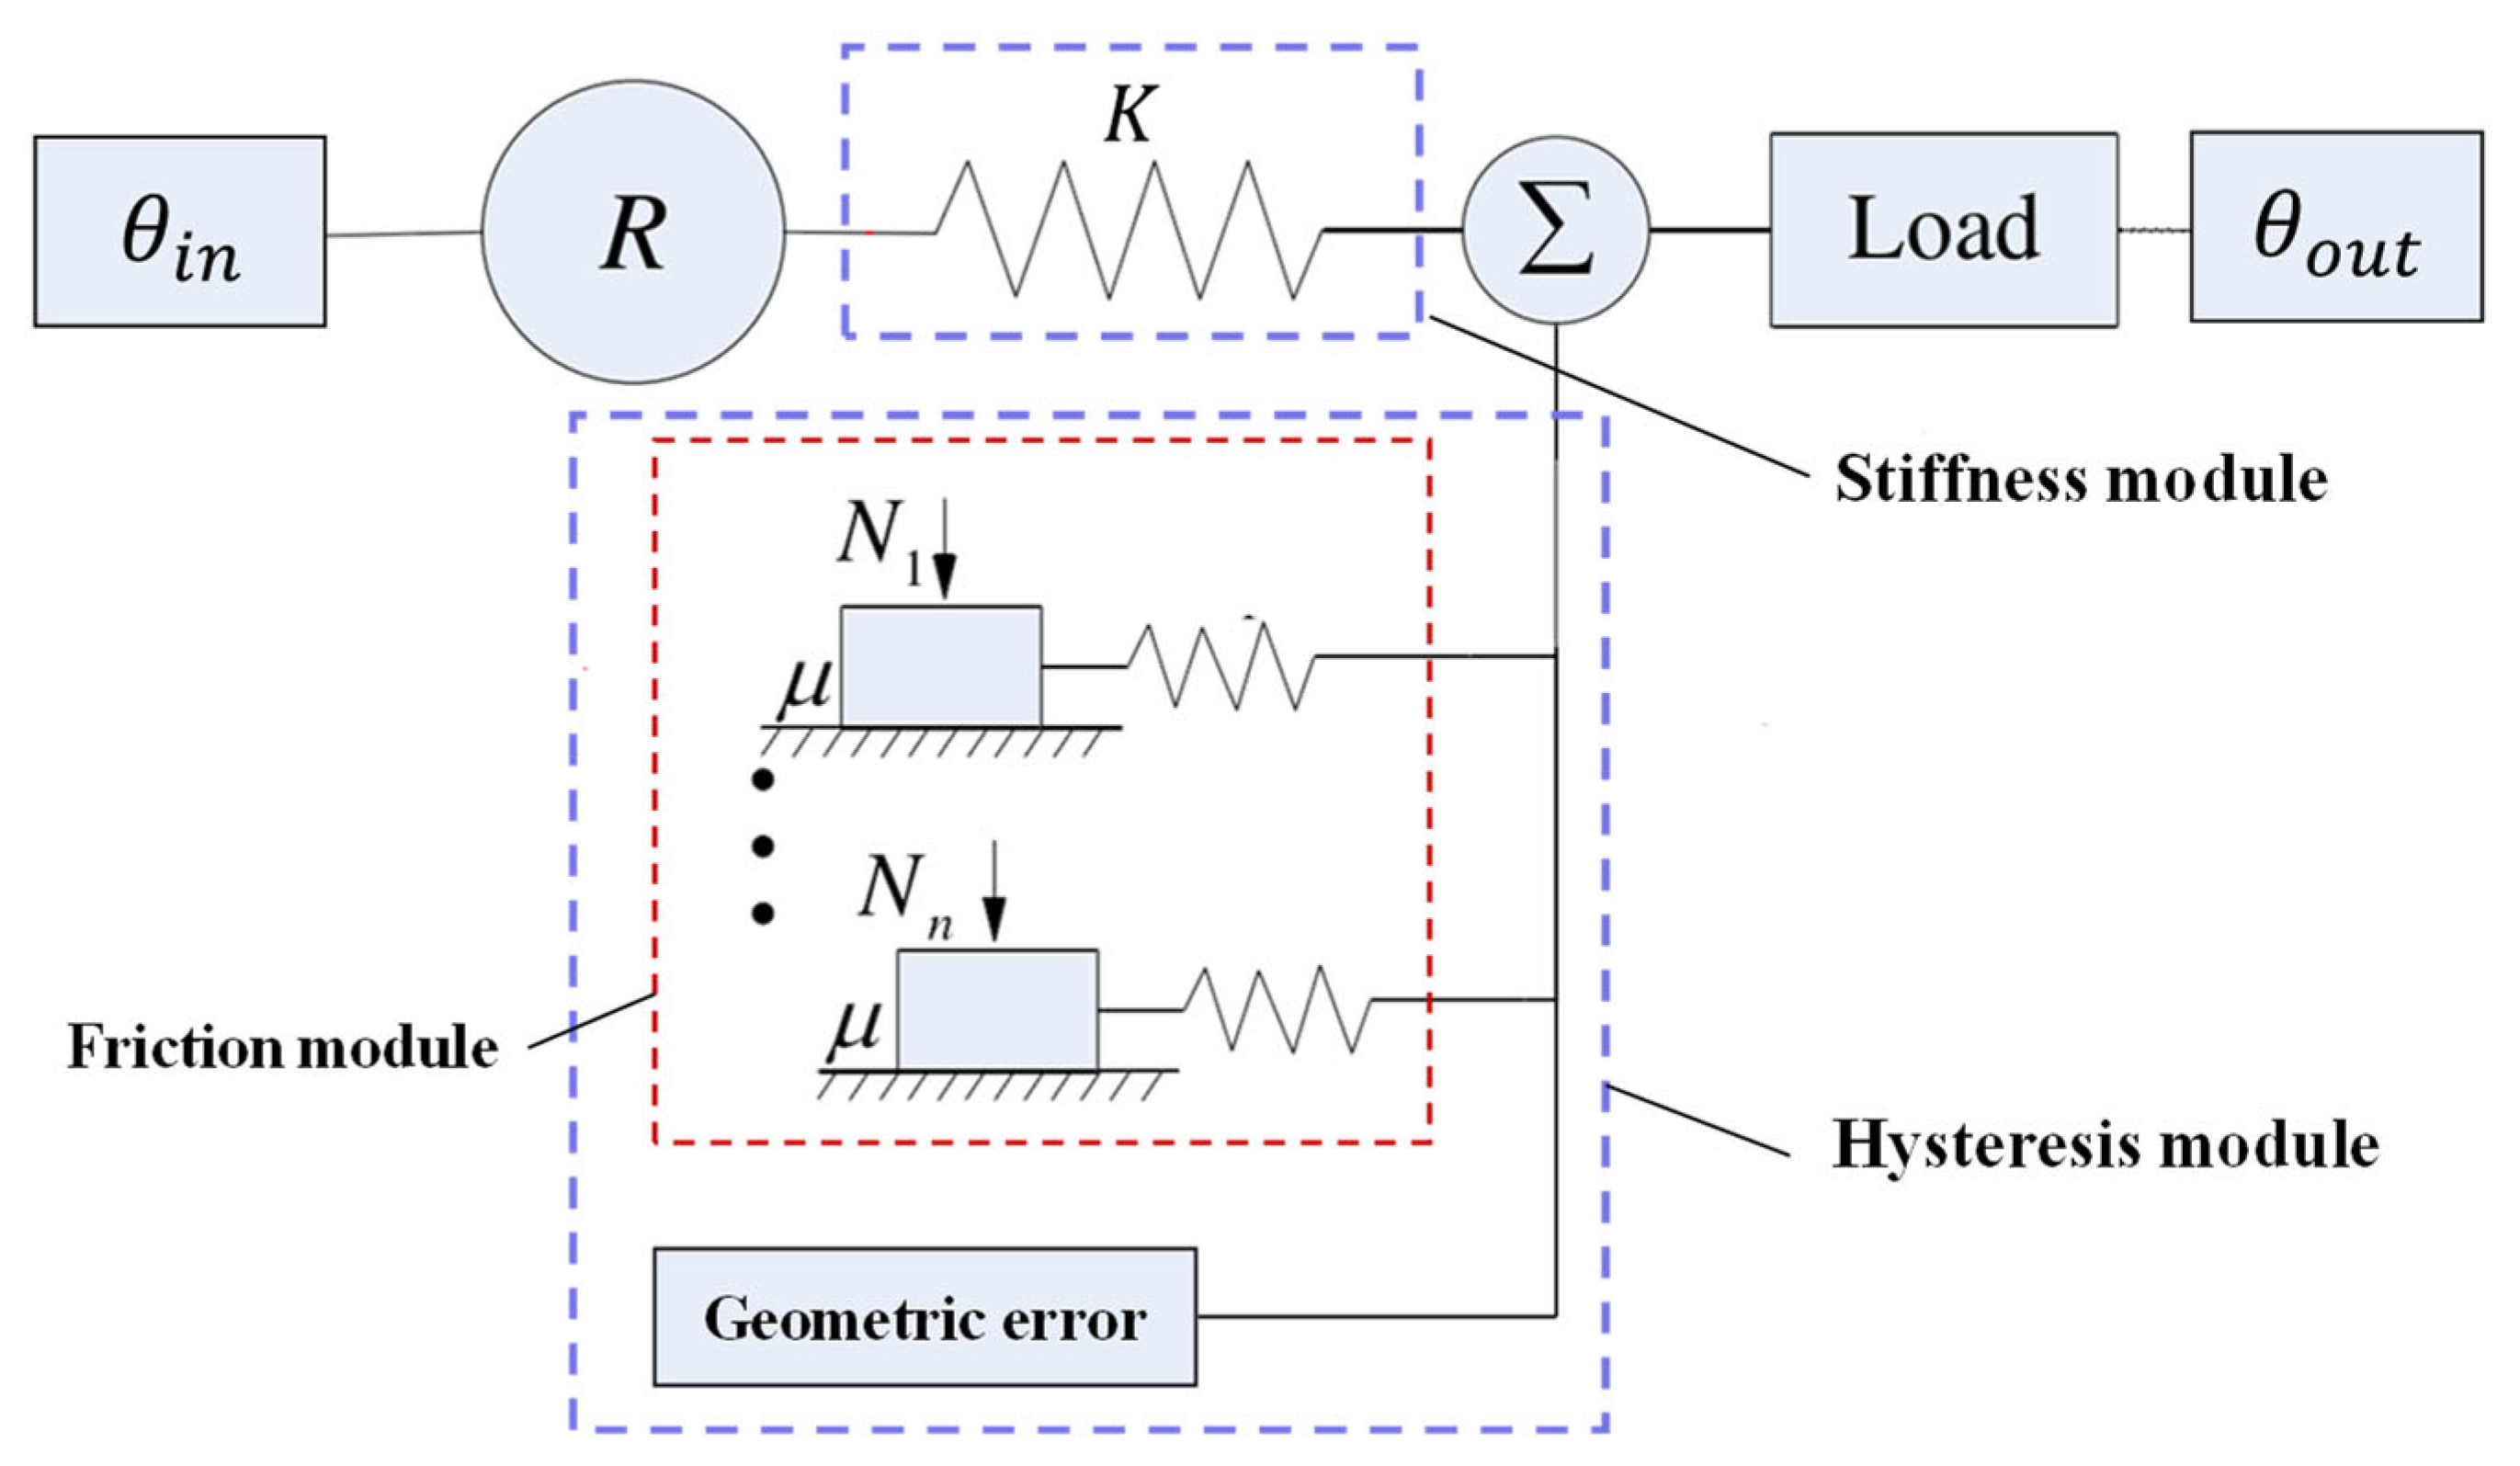
However, from long-term engineering practice, it is established that geometric errors caused by processing and installation, etc., also cause hysteresis. Thus, the hysteresis module actually includes friction and geometric errors [
22]. Therefore, the hysteresis model shown in
Figure 3 is established in the paper. Here, the hysteresis module is composed of a friction module and a geometric error module. In the figure,
stands for the input corner,
stands for the output angle,
stands for the transmission ratio of the reducer,
stands for the stiffness of the reducer,
stands for the positive pressure on the slider in each basic unit, and
stands for the Coulomb friction coefficient of the slider.
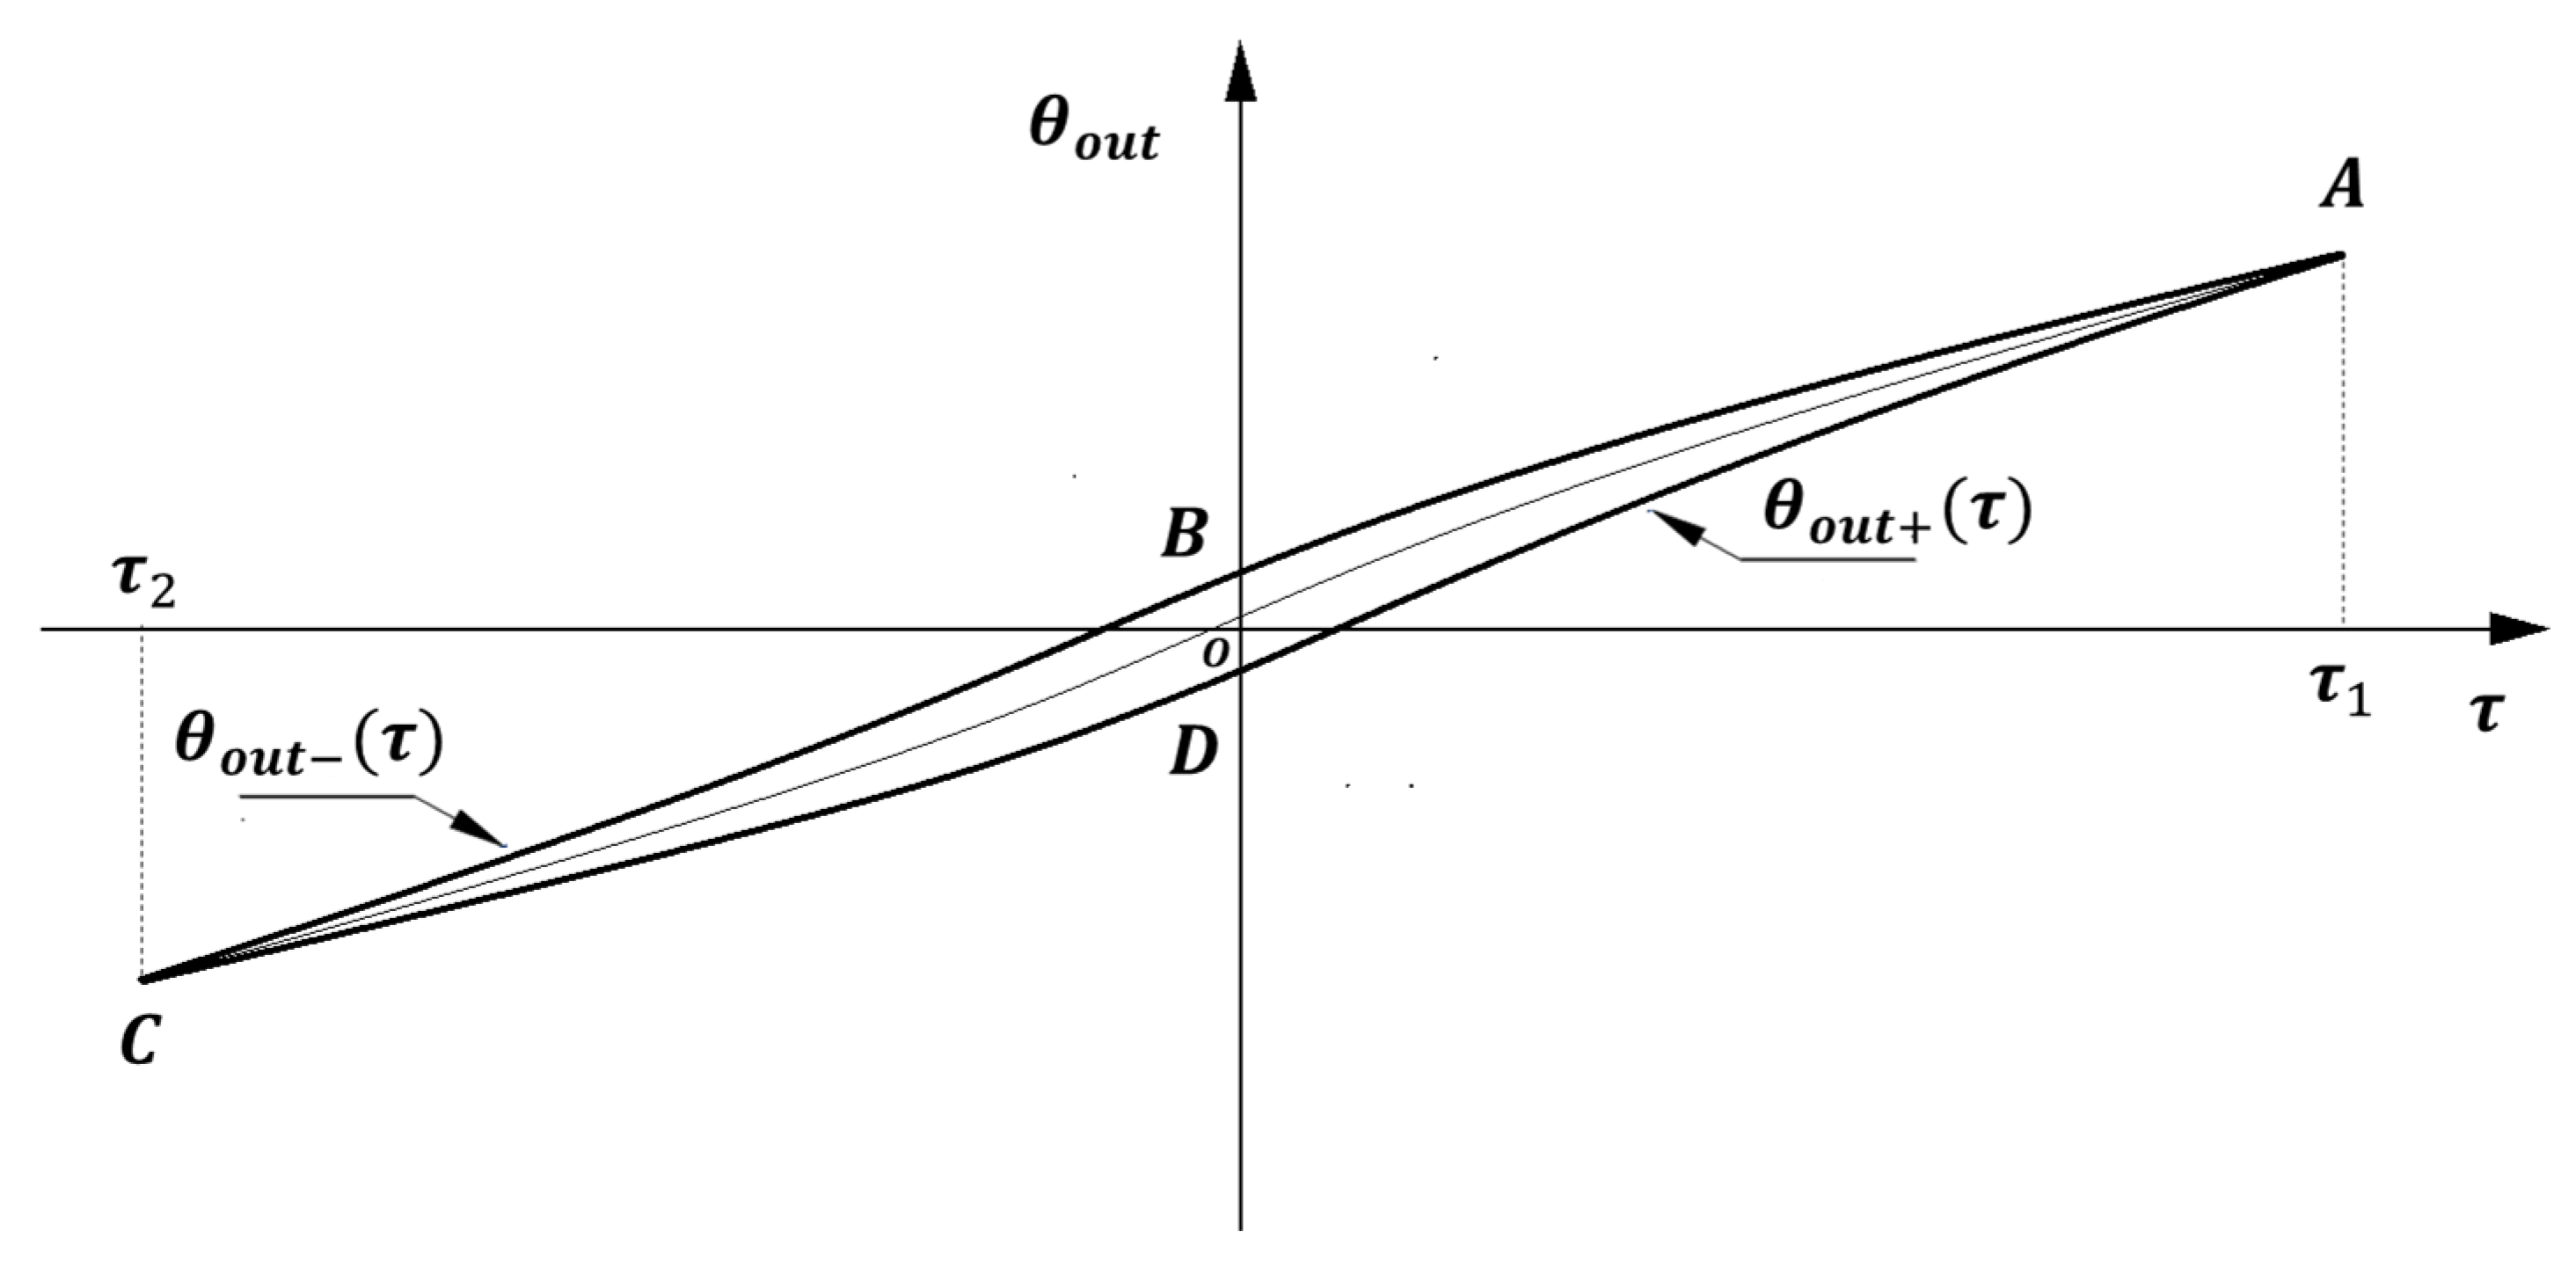
Figure 4 is a typical hysteresis curve of the reducer. The reducer undergoes the process of cyclic loading, unloading, reloading, and unloading;
is the rotation angle of the output end of the reducer; and
represents the torque at the output end of the reducer. The reducer from forward state
along the descending curve ABC to
and then returning to the initial position
along the rising curve CDA forms a closed hysteresis curve. Let the hysteresis curve in the figure be:
. The
curve can be expressed as a combination of rising curve
and falling curve
. The Equation is (1).
is the rate of change of torque.
Figure 4.
Hysteresis curves of reducer.
Figure 4.
Hysteresis curves of reducer.
Assume the rotation angle generated by the elastic deformation of the stiffness module is
, and the angle generated by the hysteresis module is
. Both of these can be expressed as a combination of a rising curve and a falling curve, as shown in Equations (2) and (3). Thus,
can be expressed as Equation (4).
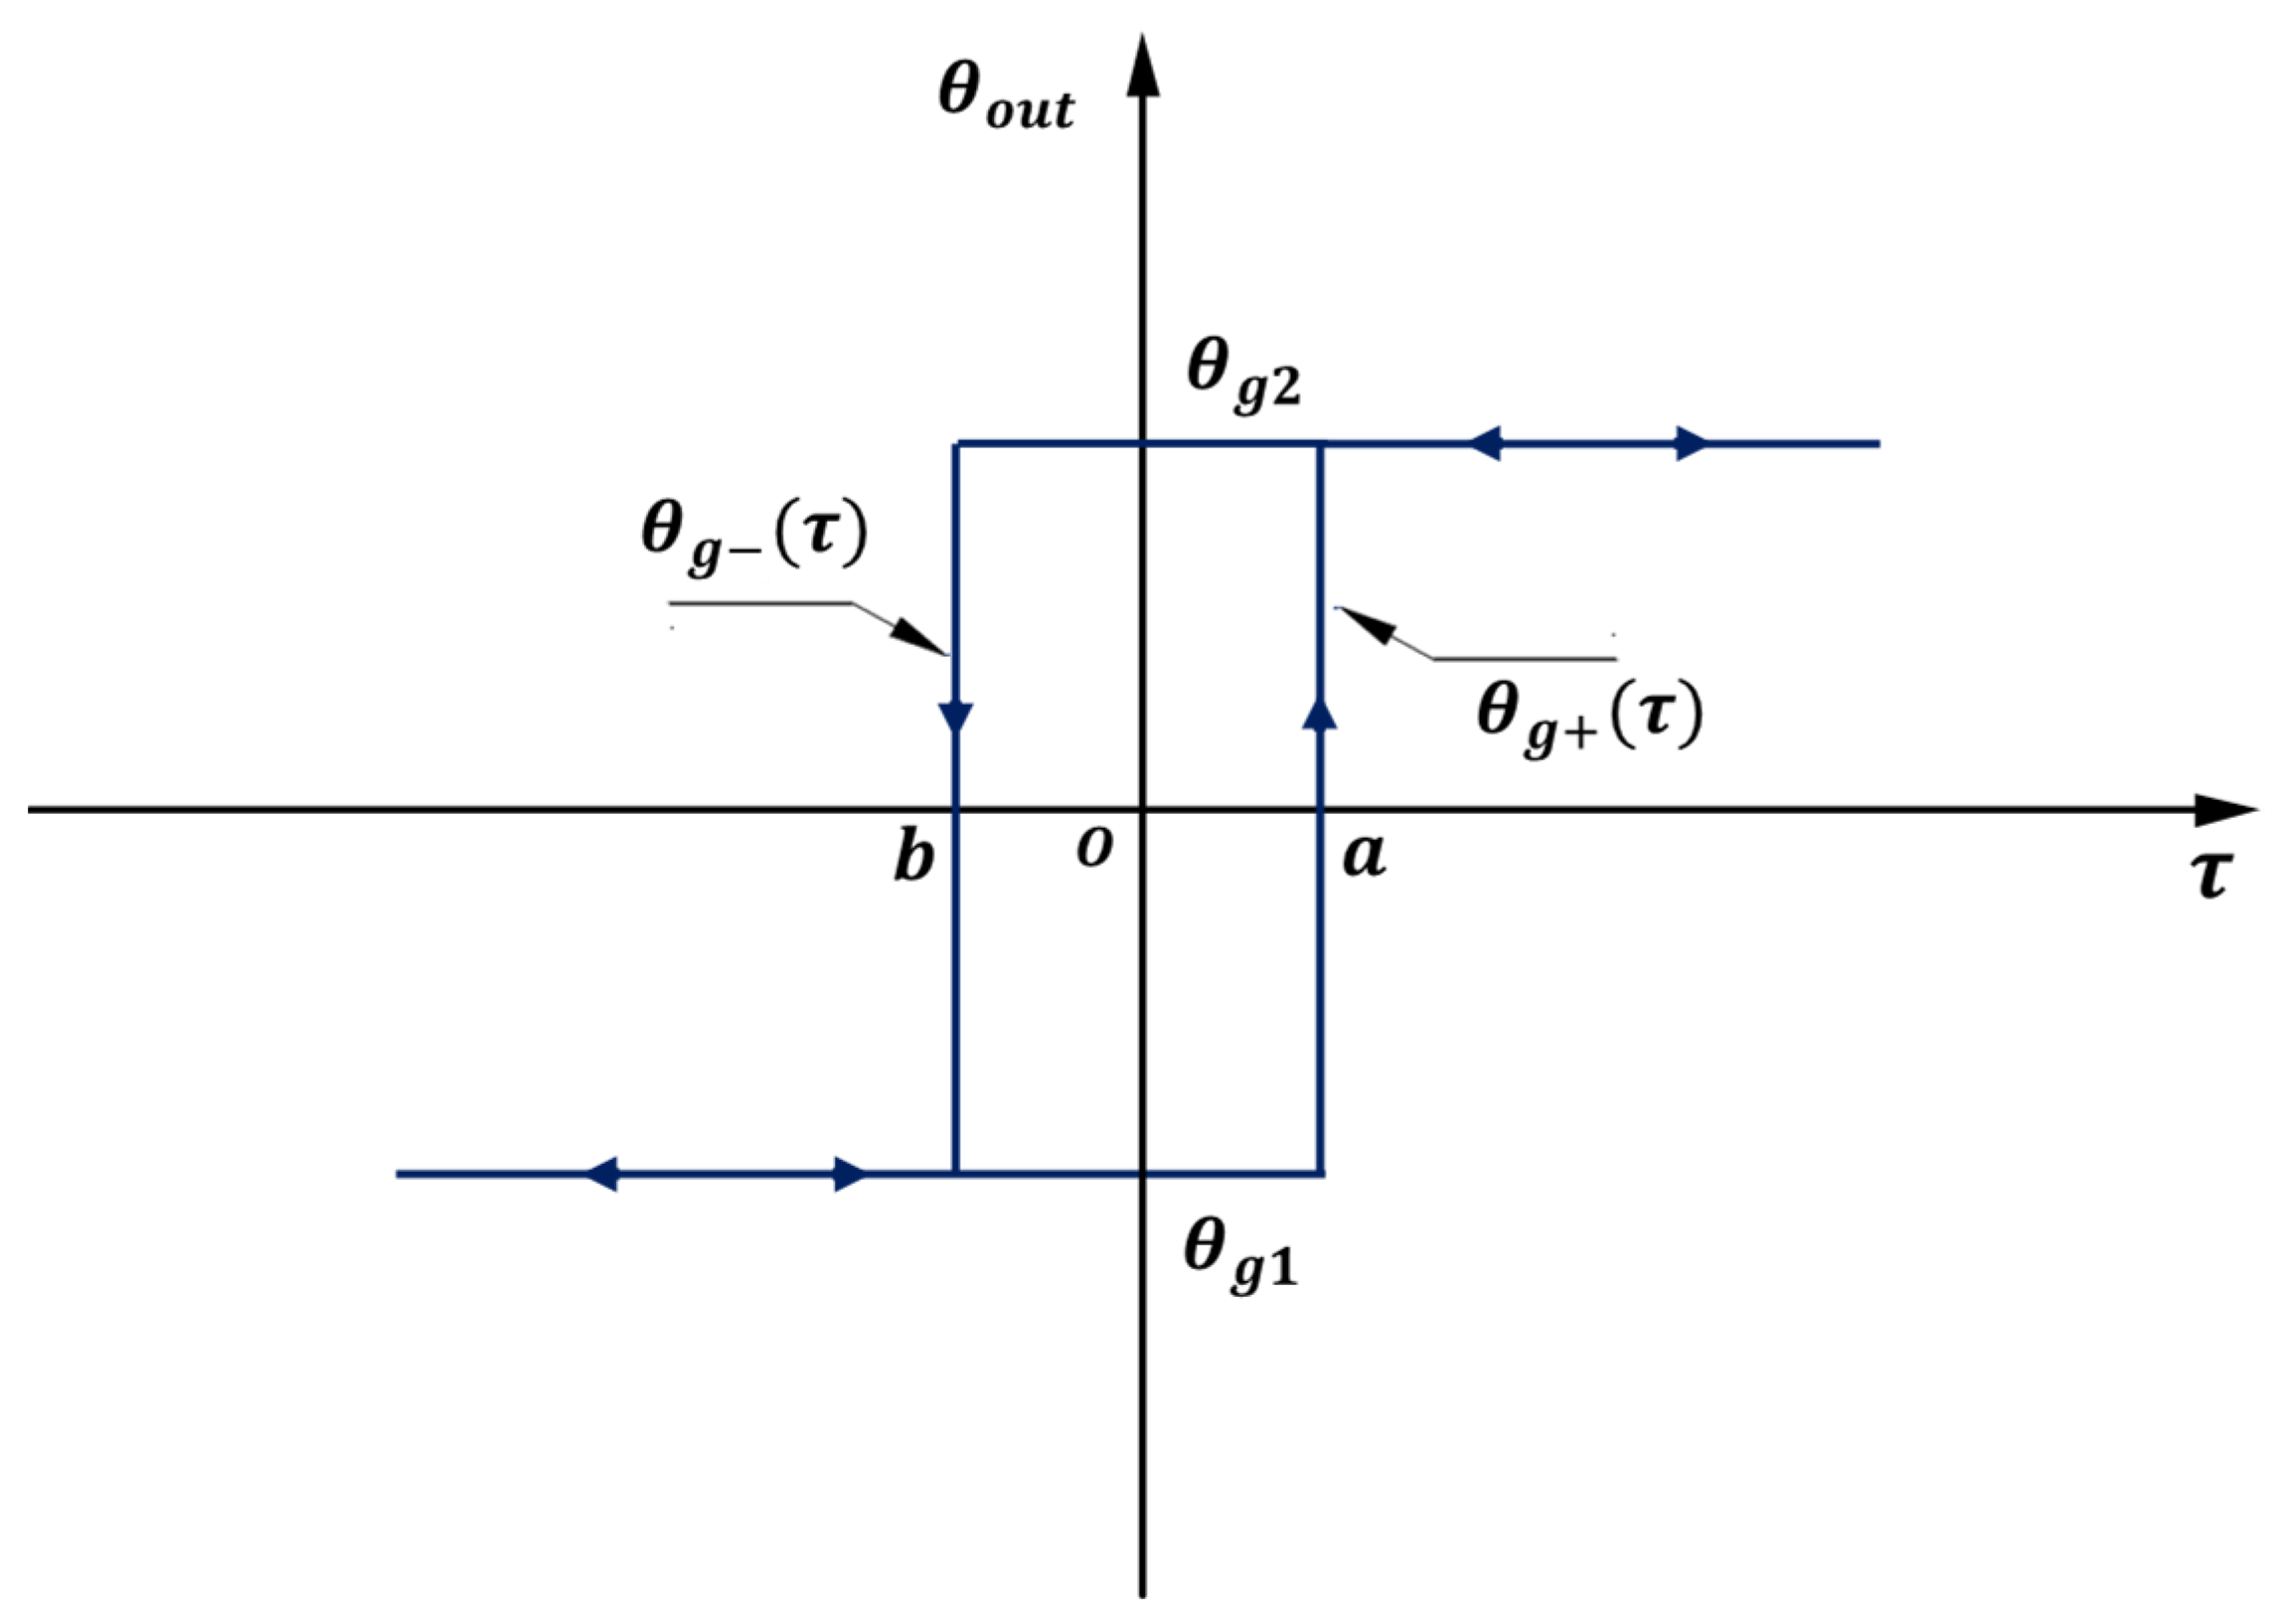
Assume the rotation angle caused by a geometric error in the hysteresis module is
, which is also the combination of a rising curve
and falling curve
, as presented in Equations (5)–(7). The curve is shown in
Figure 5, a,b is affected by the processing, installation, and other factors of the reducer.
Assume the rotation angle generated by friction in the hysteresis module is
, which is also the combination of a rising curve
and falling curve
, as shown in Equation (8). Then, Equation (3) can be expressed as Equation (9), and Equation (4) represents Equation (10).
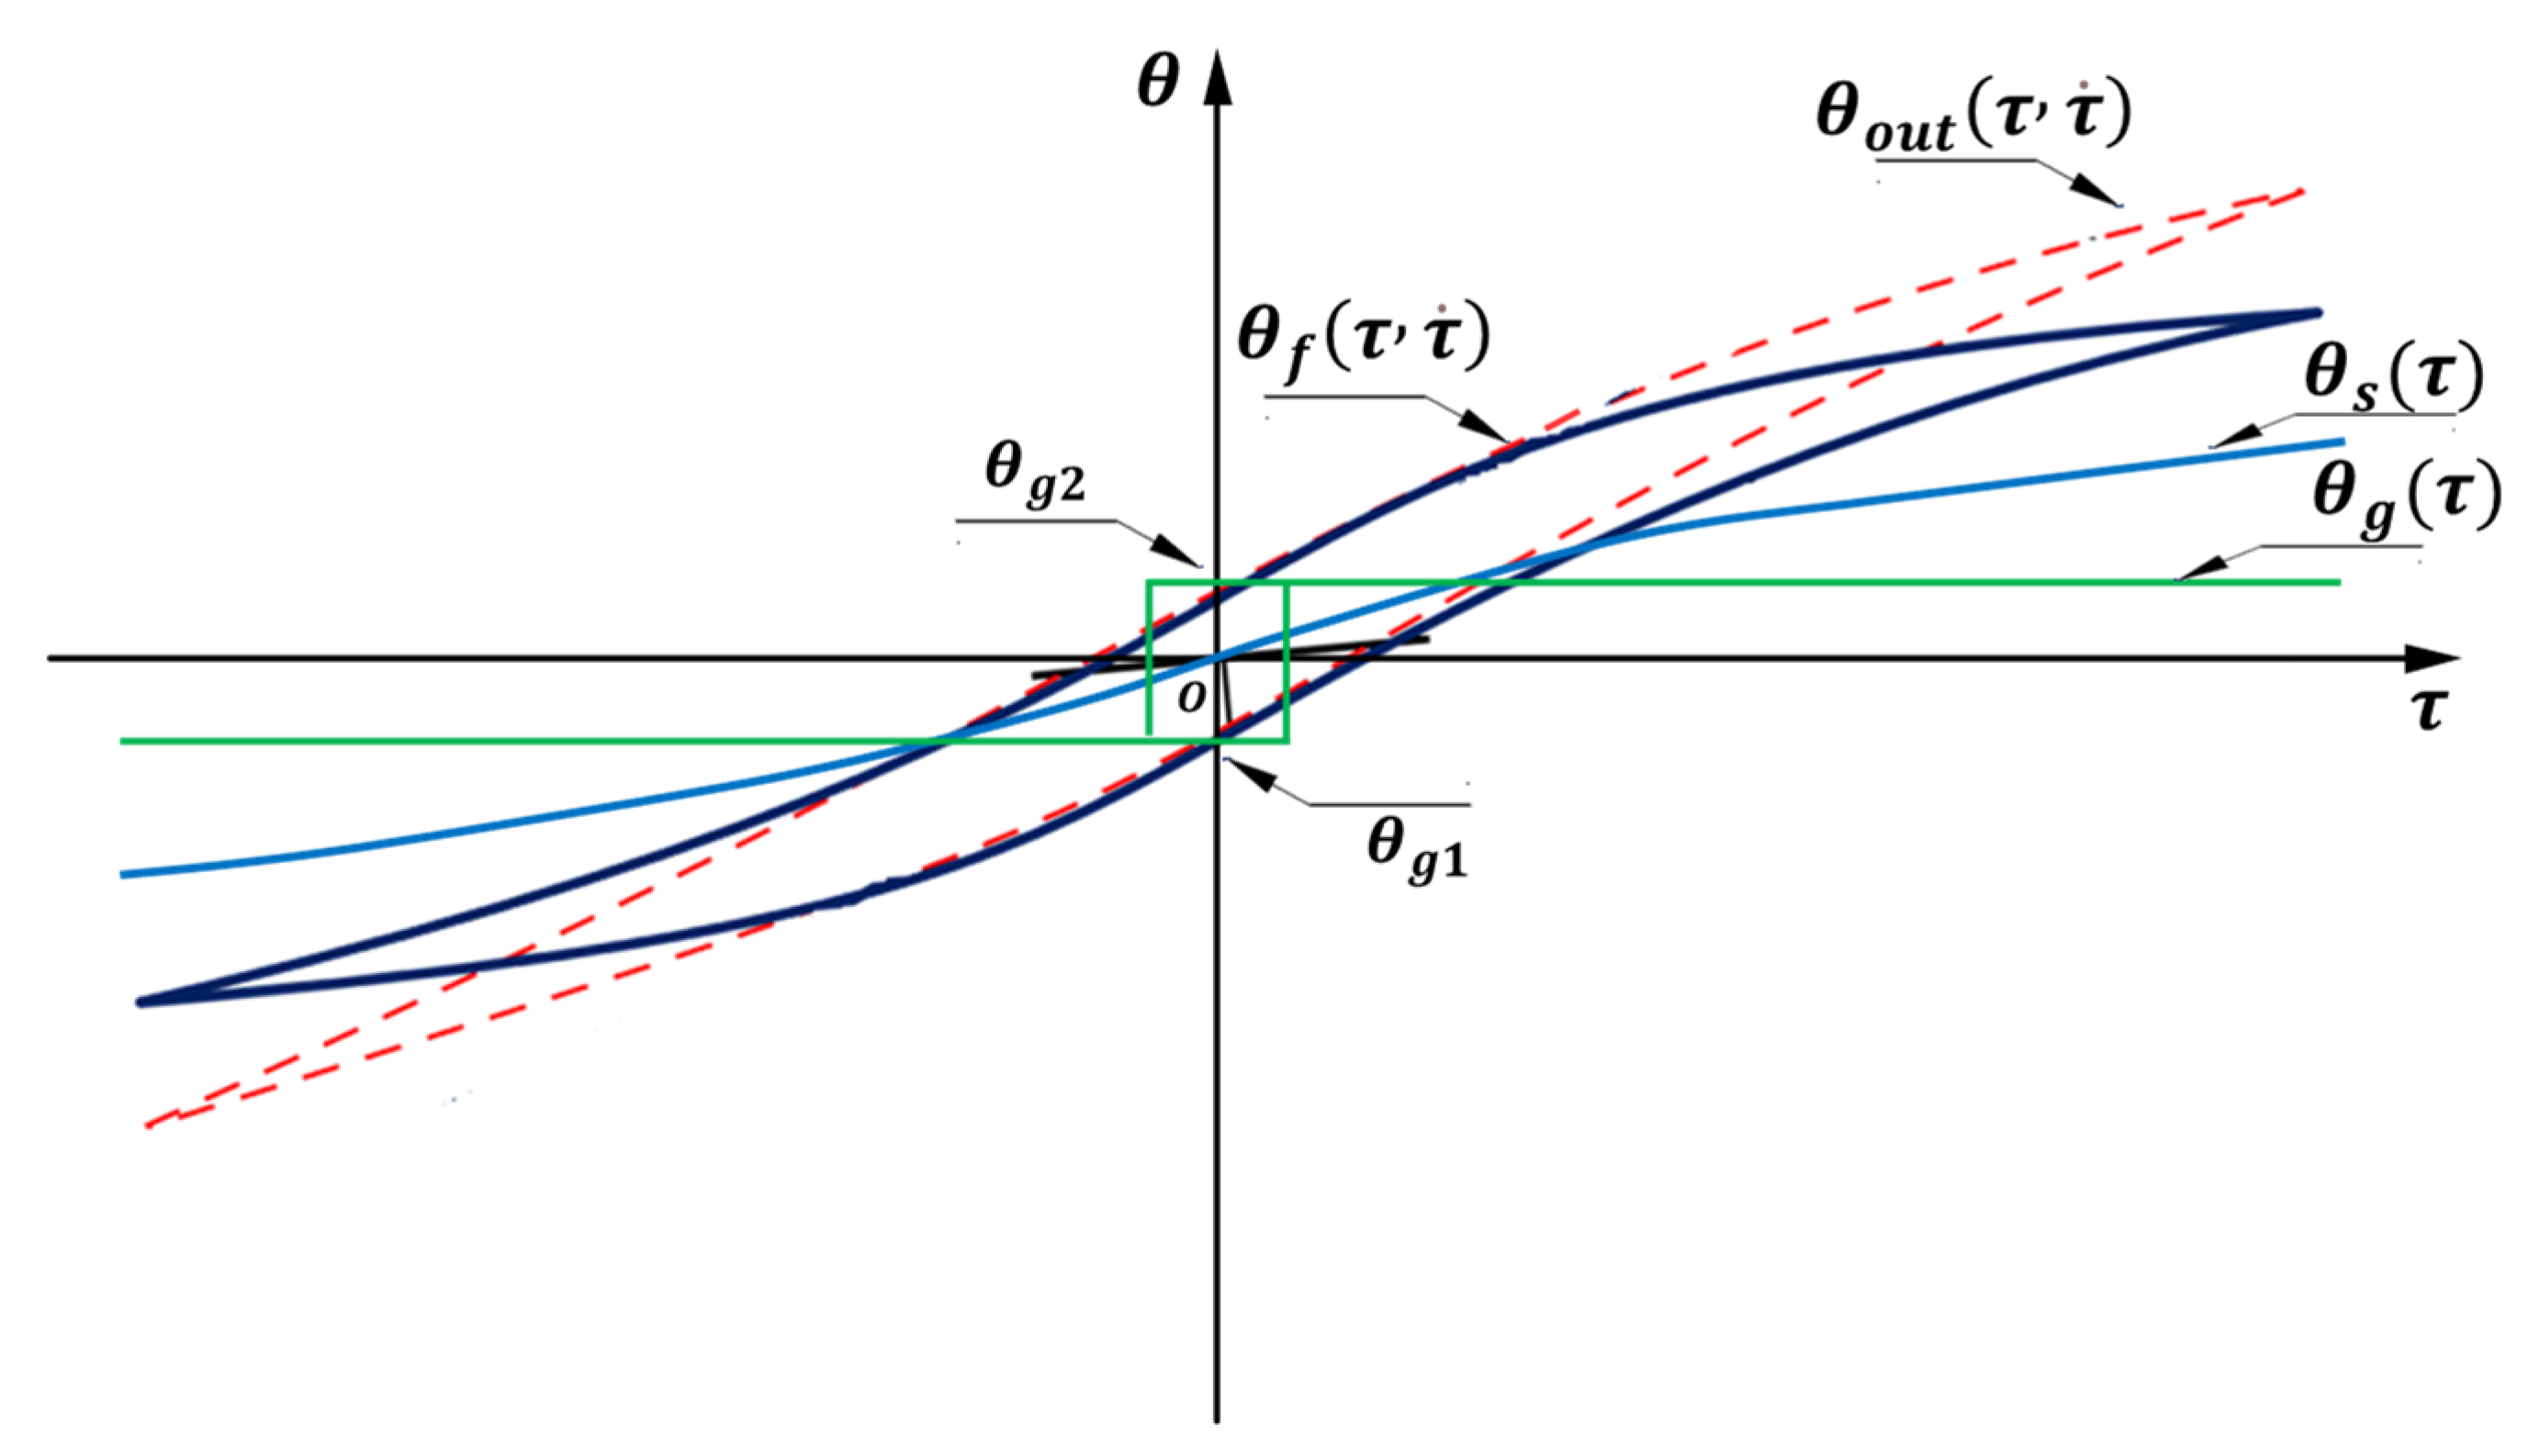
When considering the influence of the torque change rate on hysteresis,
can be expressed as the
curve as shown in
Figure 6, and Equation (10) can be expressed as Equation (11).
reflects that the hysteresis phenomenon of the reducer is related to the magnitude of the loaded torque. It is also related to its change rate. This means that the loading rate will also lead to a change in the hysteresis characteristics of the reducer.
2.2. Concept of Lost Motion
In engineering practice, the lost motion is used to characterize the hysteresis phenomenon of the reducer. Meanwhile, the hysteresis curve method is used to test the lost motion of the reducer. The “GB/T 40731–2021 Method of test and evaluation for the lost motion of precision reducer” is the existing standard [
23]. It defines the lost motion: the output end on the angle after the movement direction of the reducer input end changes, and the movement direction of the output end follows the change. Used in standards
,
, and
represents the lost motion, geometric lost motion and elastic lost motion. When the reduced motion is lost, the input end is usually fixed, and the output end is loaded. At this time, the angle
of the input end is 0. According to the standard provisions and the analysis of the hysteresis phenomenon of the reducer in this paper, the lost motion Equation (12) of the reducer can be obtained from Equation (11).
represents the lost motion of the reducer, is the elastic lost motion caused by elastic deformation, stands for the lost motion caused by internal and external friction of the reducer, and is the geometric lost motion caused by geometric errors.
2.3. Effect of Loading Rate Dependence on Lost Motion
The loading rate
is obtained using Equation (13), where
is the loading time. The
can be constant, linear, and nonlinear according to the requirements of the test.
The output torque
can be expressed as Equation (14):
can be expressed as Equation (15):
In
Figure 6, the area enveloped by the
curve represents the dissipated energy
of the reducer during loading and unloading. Here,
does not affect the area of the hysteresis curve. It only changes the inclination of the curve.
is actually composed of dissipated energy
, which is a result of internal and external friction and dissipated energy
caused by geometric errors, as shown in Equation (16).
At this time, Equation (12) can be expressed as Equation (17):
Further expressed as Equation (18):
can be expressed as Equation (19):
The area enveloped by the geometric error increases uniformly with the change of
. Therefore,
is actually a constant, that is
.
Therefore, Equation (18) can be expressed as Equation (21).
From Equation (21), it can be seen that the lost motion of the reducer is affected by the loading rate, whereas the geometric lost motion is not affected by the loading rate. The impact of the reducer of different materials, too, may be different, which is discussed below.
2.4. Discussion
The material of the reducer gear is usually metal or plastic. Here, the stiffness of different materials is different. In the lost motion test, the loading method is usually equal to gradient loading. This means that is a constant value. The influence of the loading rate dependence on the lost motion test of the same reducer and the reducers of different materials is discussed below.
2.4.1. Effect of Loading Rate on the Same Reducer
For example, take the plastic gear reducer and set the stiffness as
. The geometric lost motion is
. In the lost motion test, the reducer is usually loaded to the rated torque
in equal gradient. Assume the loading rates as
and
, and
, then
. Assuming that
is the same, the test results of lost motion
can be seen in Equations (22) and (23), respectively.
According to the analysis, . The faster the loading rate, the smaller the lost motion.
2.4.2. Effect of the Loading Rate on Reducers of Different Materials
Assume the stiffness of metal and plastic composite gear reducer as
. The rigidity of the metal gear reducer is
.
. The geometric lost motion
and
of the three reducers are the same. When the same
is loaded to rated torque
, the corresponding lost motion
is seen. The results are shown in Equations (24)–(26), respectively.
The analysis shows that the lost motion relationship is . In addition, the influence of the loading rate on the hysteretic characteristics of reducers with different materials is analyzed. The reason for the occurrence of load dependency is that the rate from one equilibrium point to another within the system is lower than the rate in the external input. Plastic gears have small stiffness and are easy to deform, which may cause the change of gear system dynamics to not catch up with the loading rate. The faster the loading rate, the smaller the deformation. The reaction to the change of the rotation angle of the output shaft: (1) the loading rate is slow, and the change of the rotation angle can catch up with the loading rate; (2) the loading rate is fast, and the load is advanced to the rated torque. At this time, the corner is not in place. Thus, the higher the loading rate, the smaller the δ of the plastic gear reducer may be. On the other hand, the metal gear reducer may be the opposite. This means that the hysteresis characteristic of the reducer with small stiffness is affected greatly by the loading rate dependence and the lost motion test. The high stiffness hysteresis characteristic of the reducer is less affected by the loading rate dependence. Additionally, it has little influence on the lost motion test.
To summarize, theoretically, it can be seen that the loading rate dependence will affect the hysteretic characteristics of the reducer, and the influence on the reducers of different materials is different. This results in the unreliable results of the lost motion test. Therefore, if the loading rate dependence and the design of the lost motion of the reducer are not considered in the test, the actual results may deviate from the expected results. The work involved experimental research on the lost motion test to explore the influence of loading rate dependence.
3. Experimental Design
3.1. Introduction to Reducer
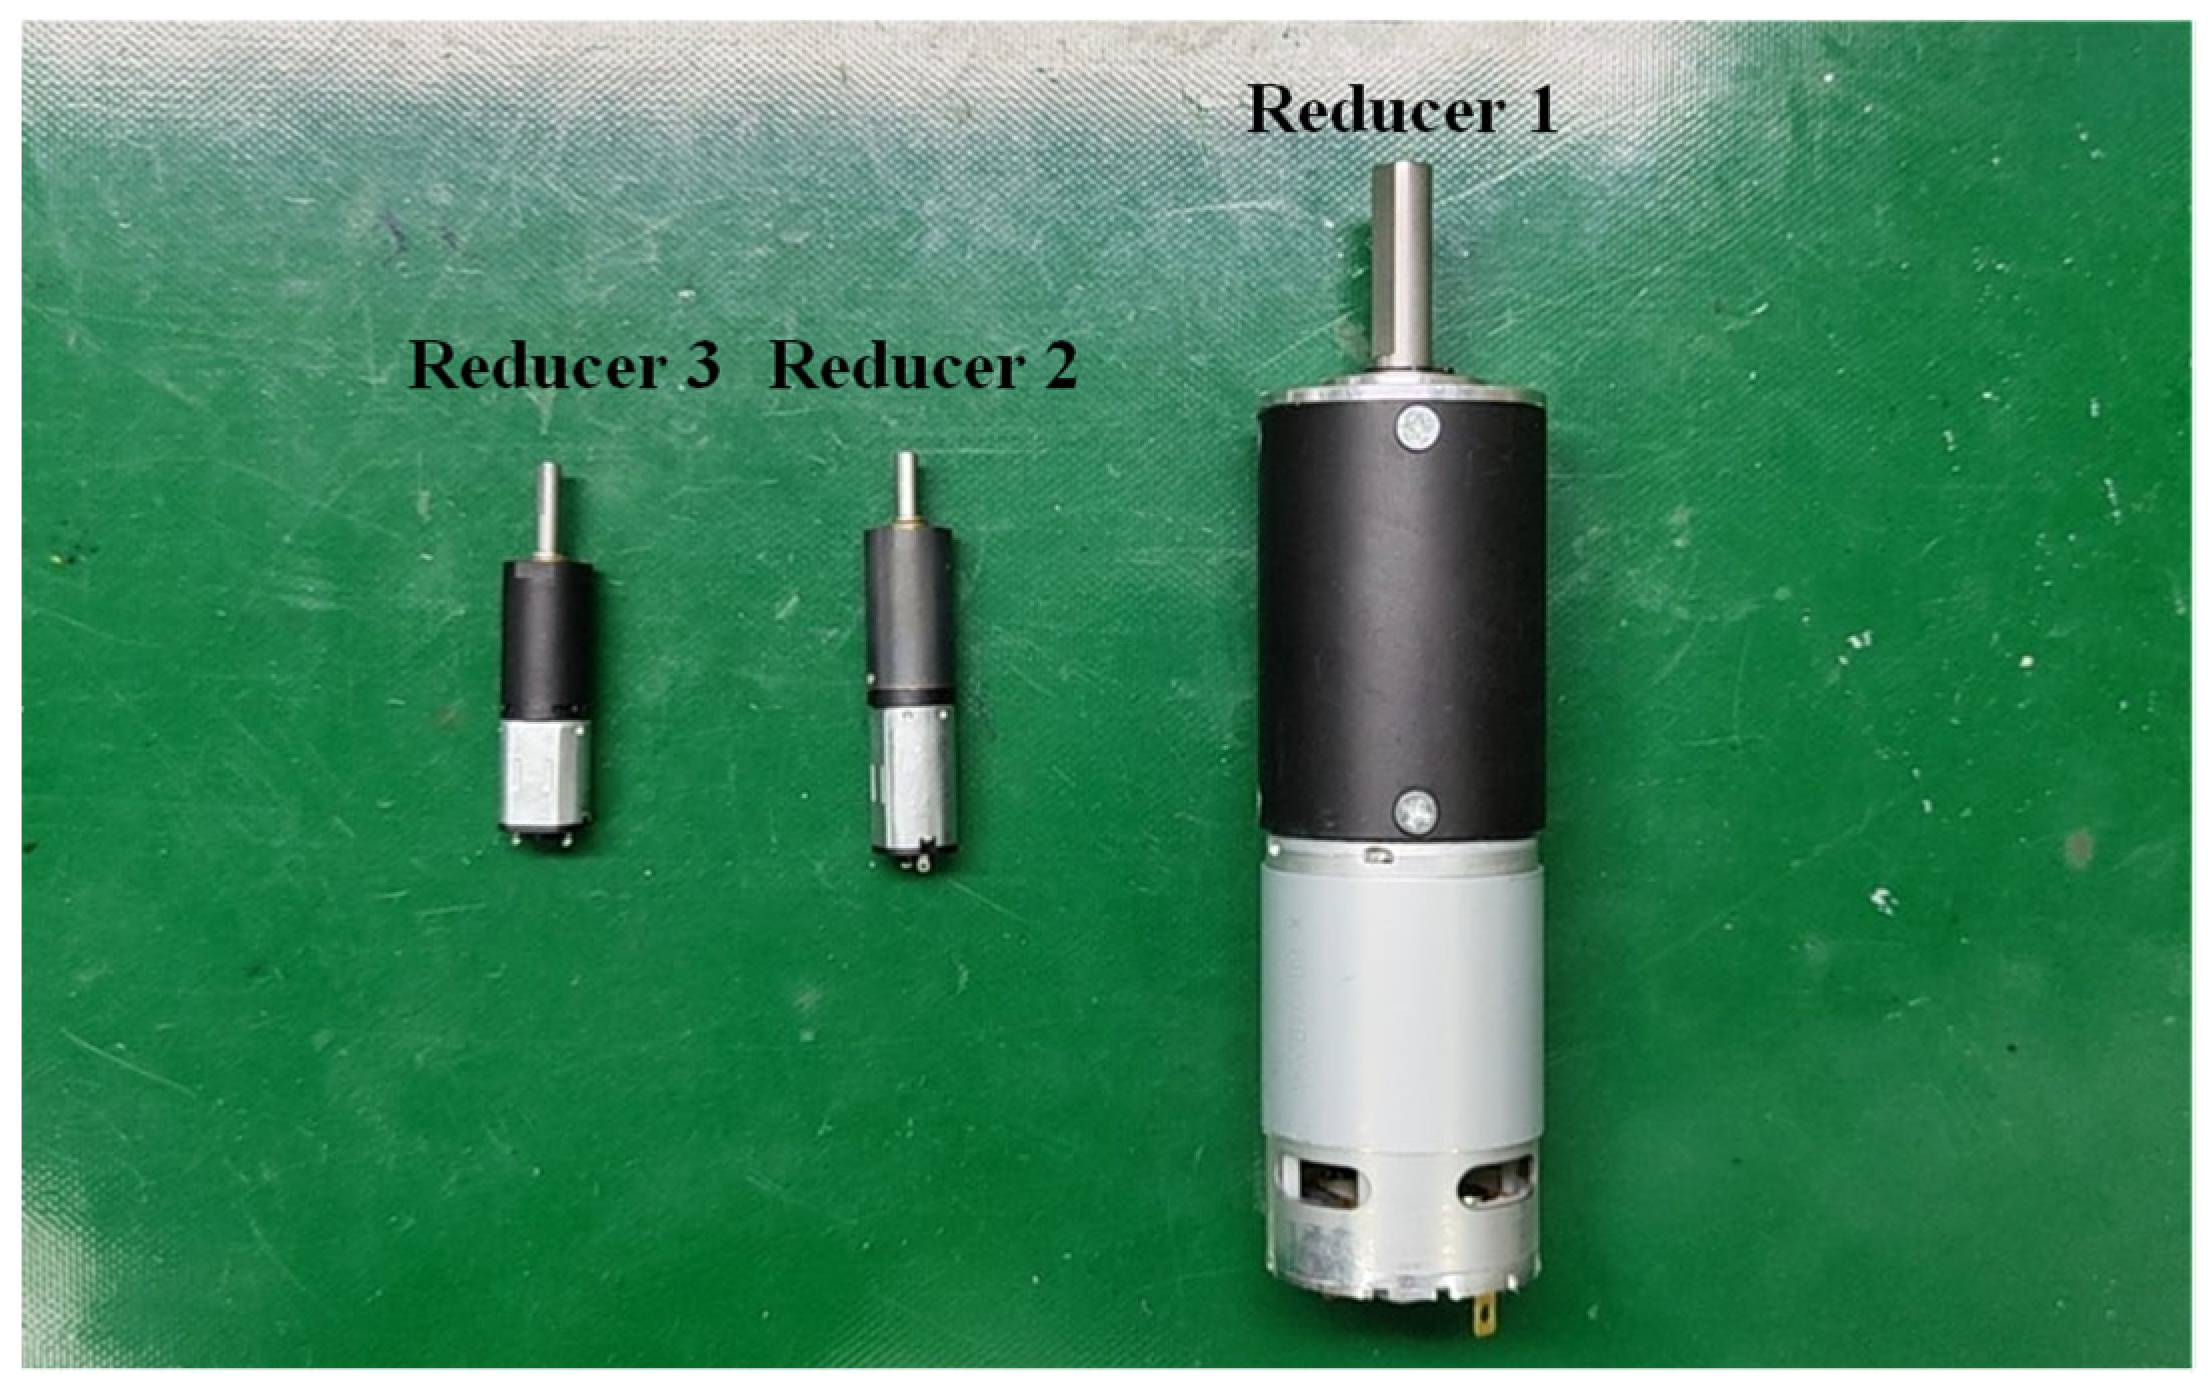
In this paper, three small reducers with different characteristics were tested and studied. The physical diagram of reducer is shown in
Figure 7. The relevant characteristics are as follows.
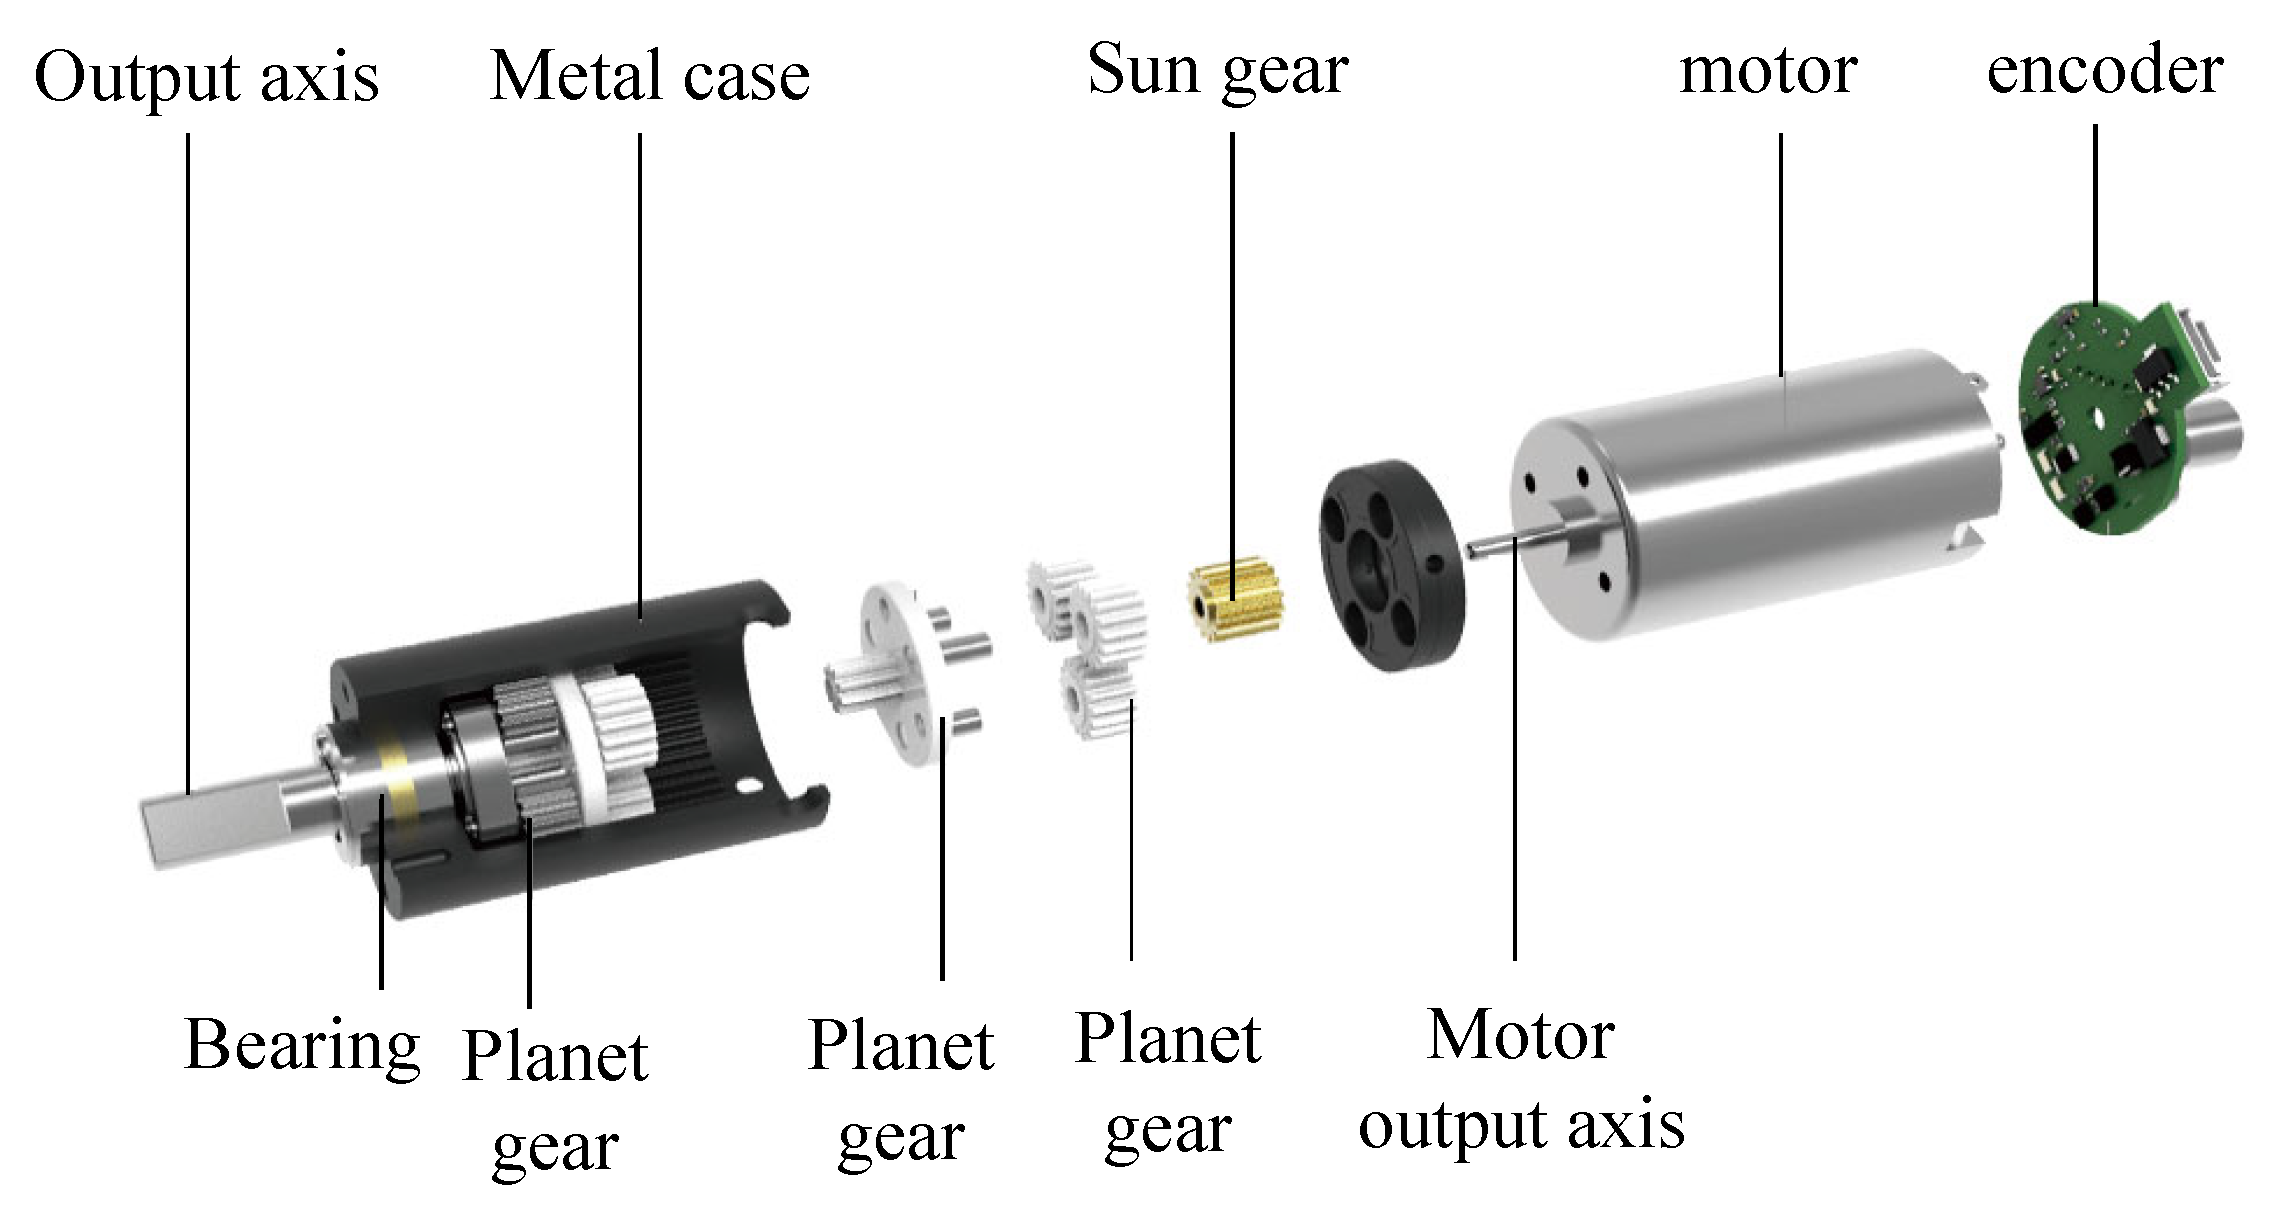
The structure of a small-size reducer 1 can be seen in
Figure 8. The reducer is a planetary reducer with a diameter of 38 mm. A small module cylindrical spur gear of 0.5 mm is used here. It adopts the three-stage reduction with a reduction ratio of 64. The sun gear is a powder metallurgy gear. Here, the first and second stage planetary gears are plastic gears, and the third stage planetary gears are powder metallurgy gears. The inner surface of the metal shell is an internal ring gear. The motor shaft gear is installed on the motor output shaft through an interference fit. The planetary gears at all levels are installed on the planet carrier through a clearance fit. It can be seen that the bearing is a rolling bearing. The relevant parameters are shown in
Table 1.
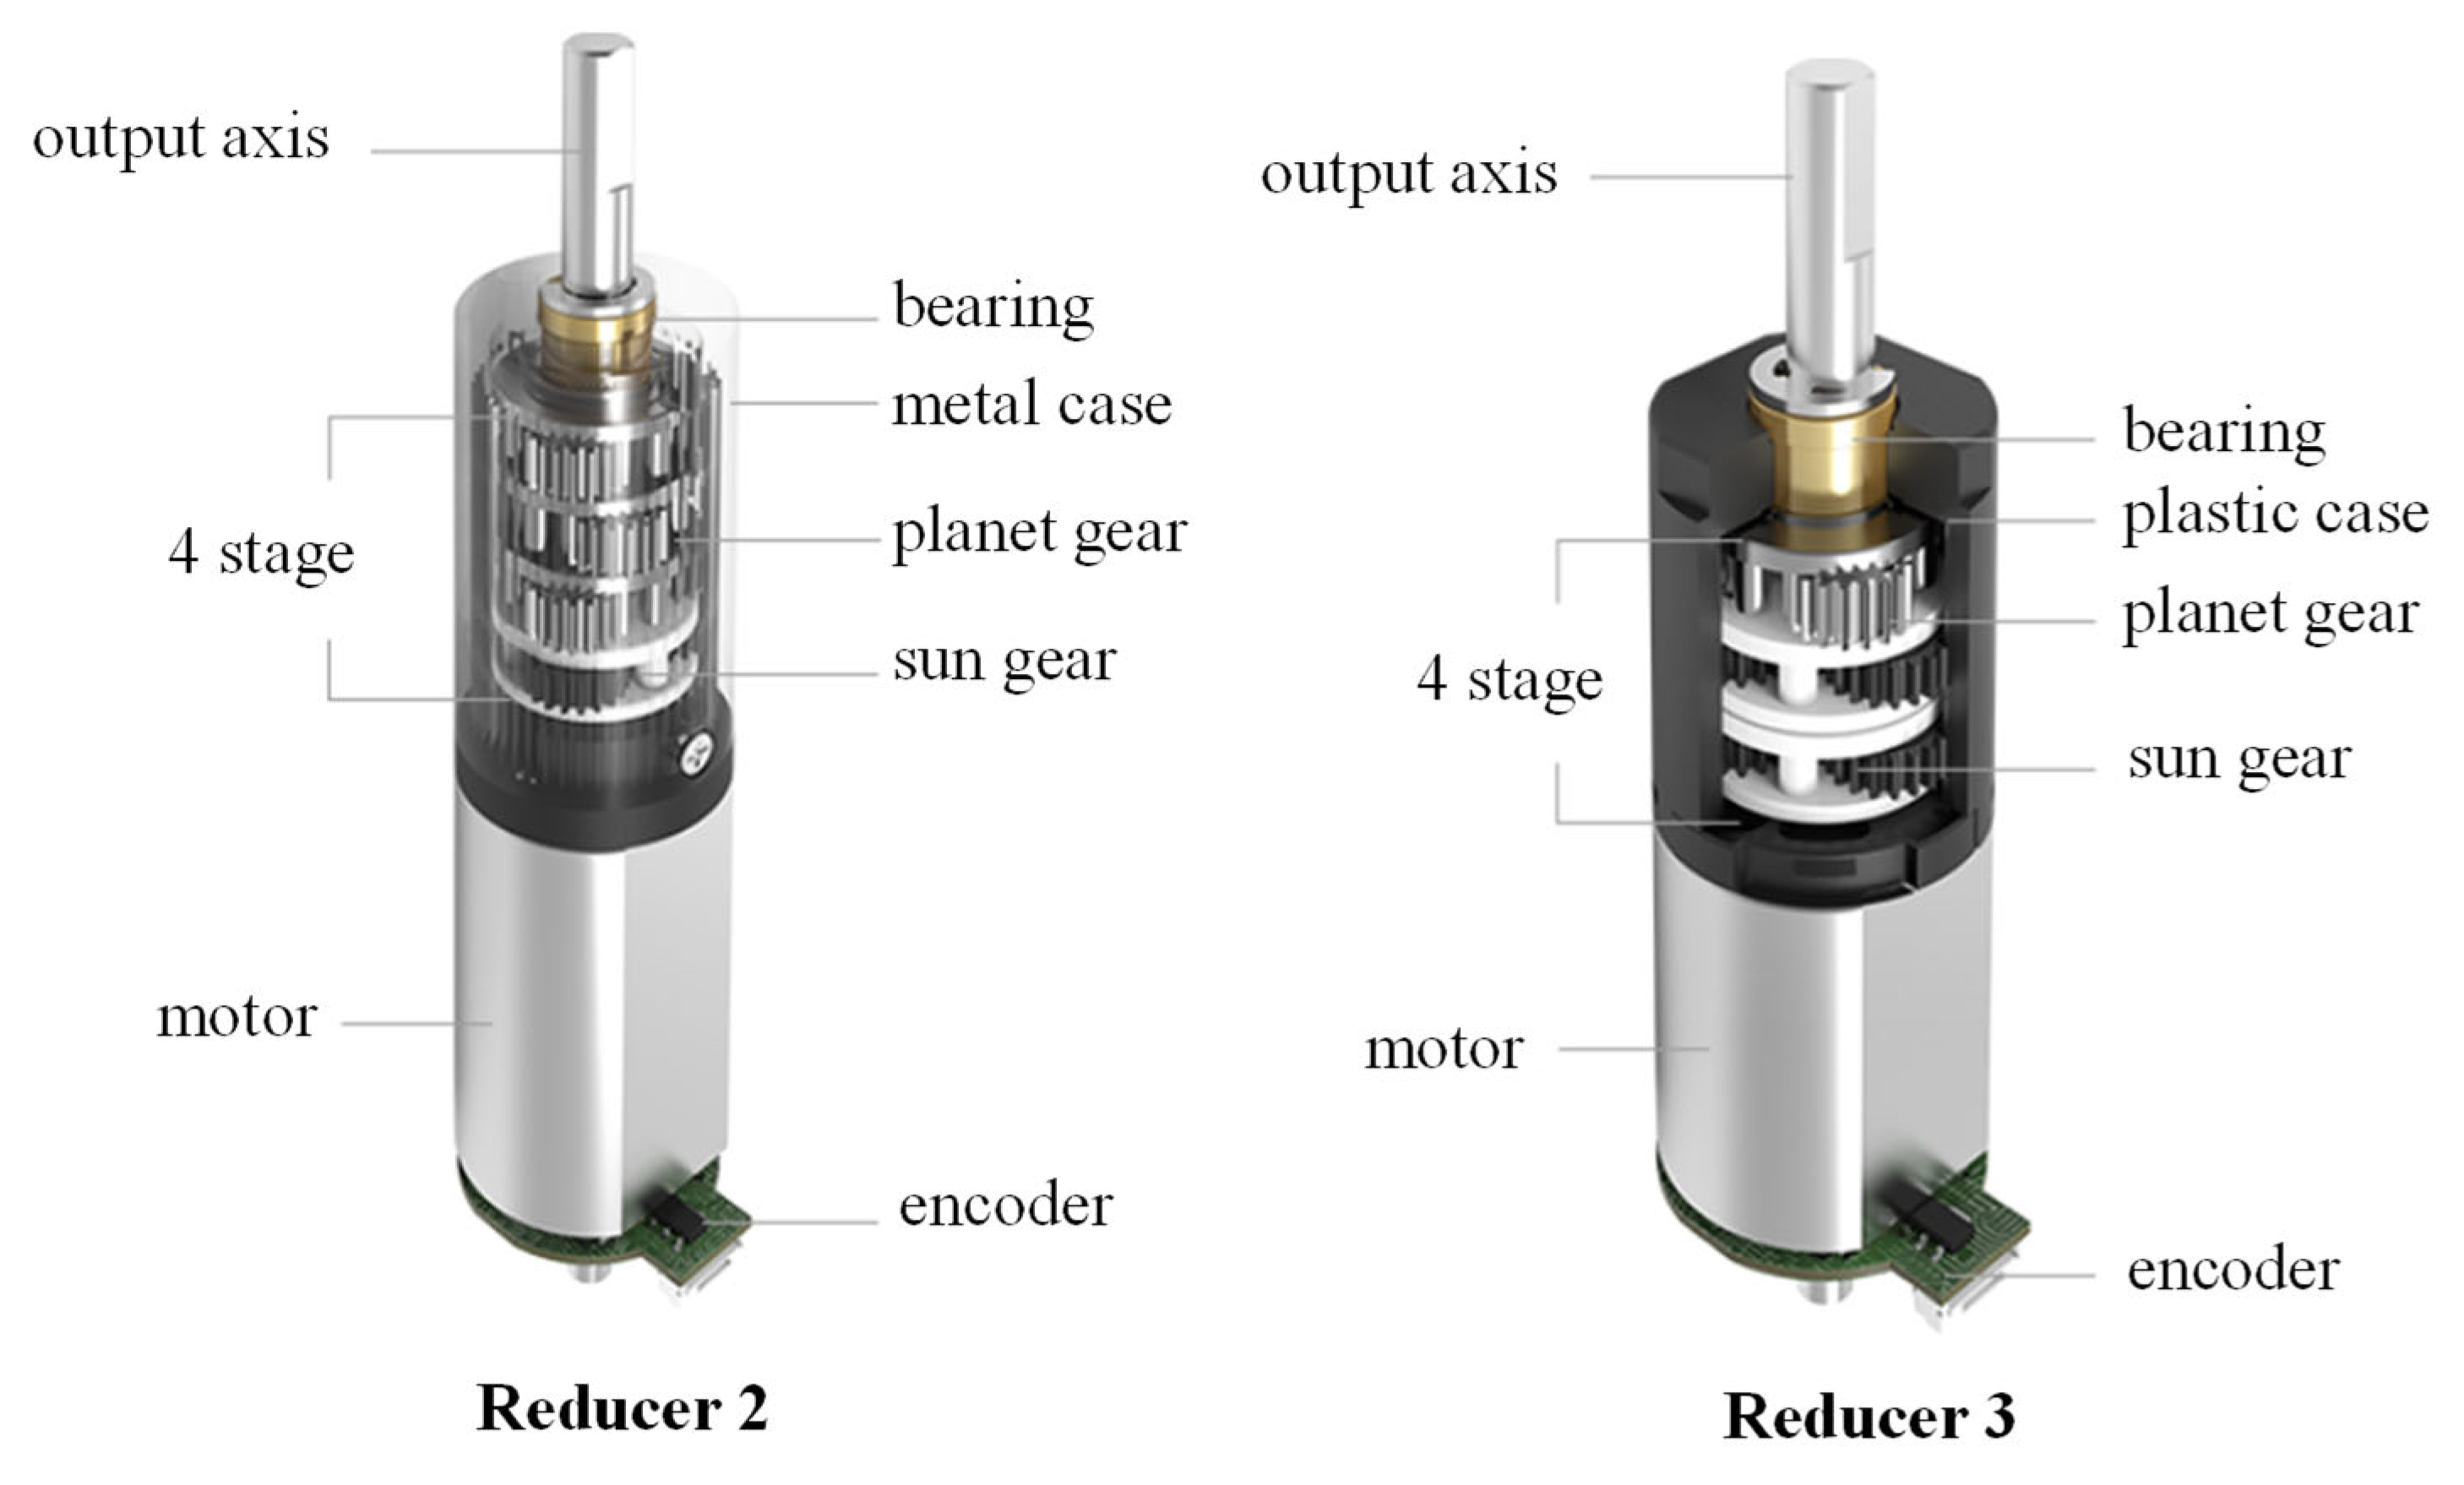
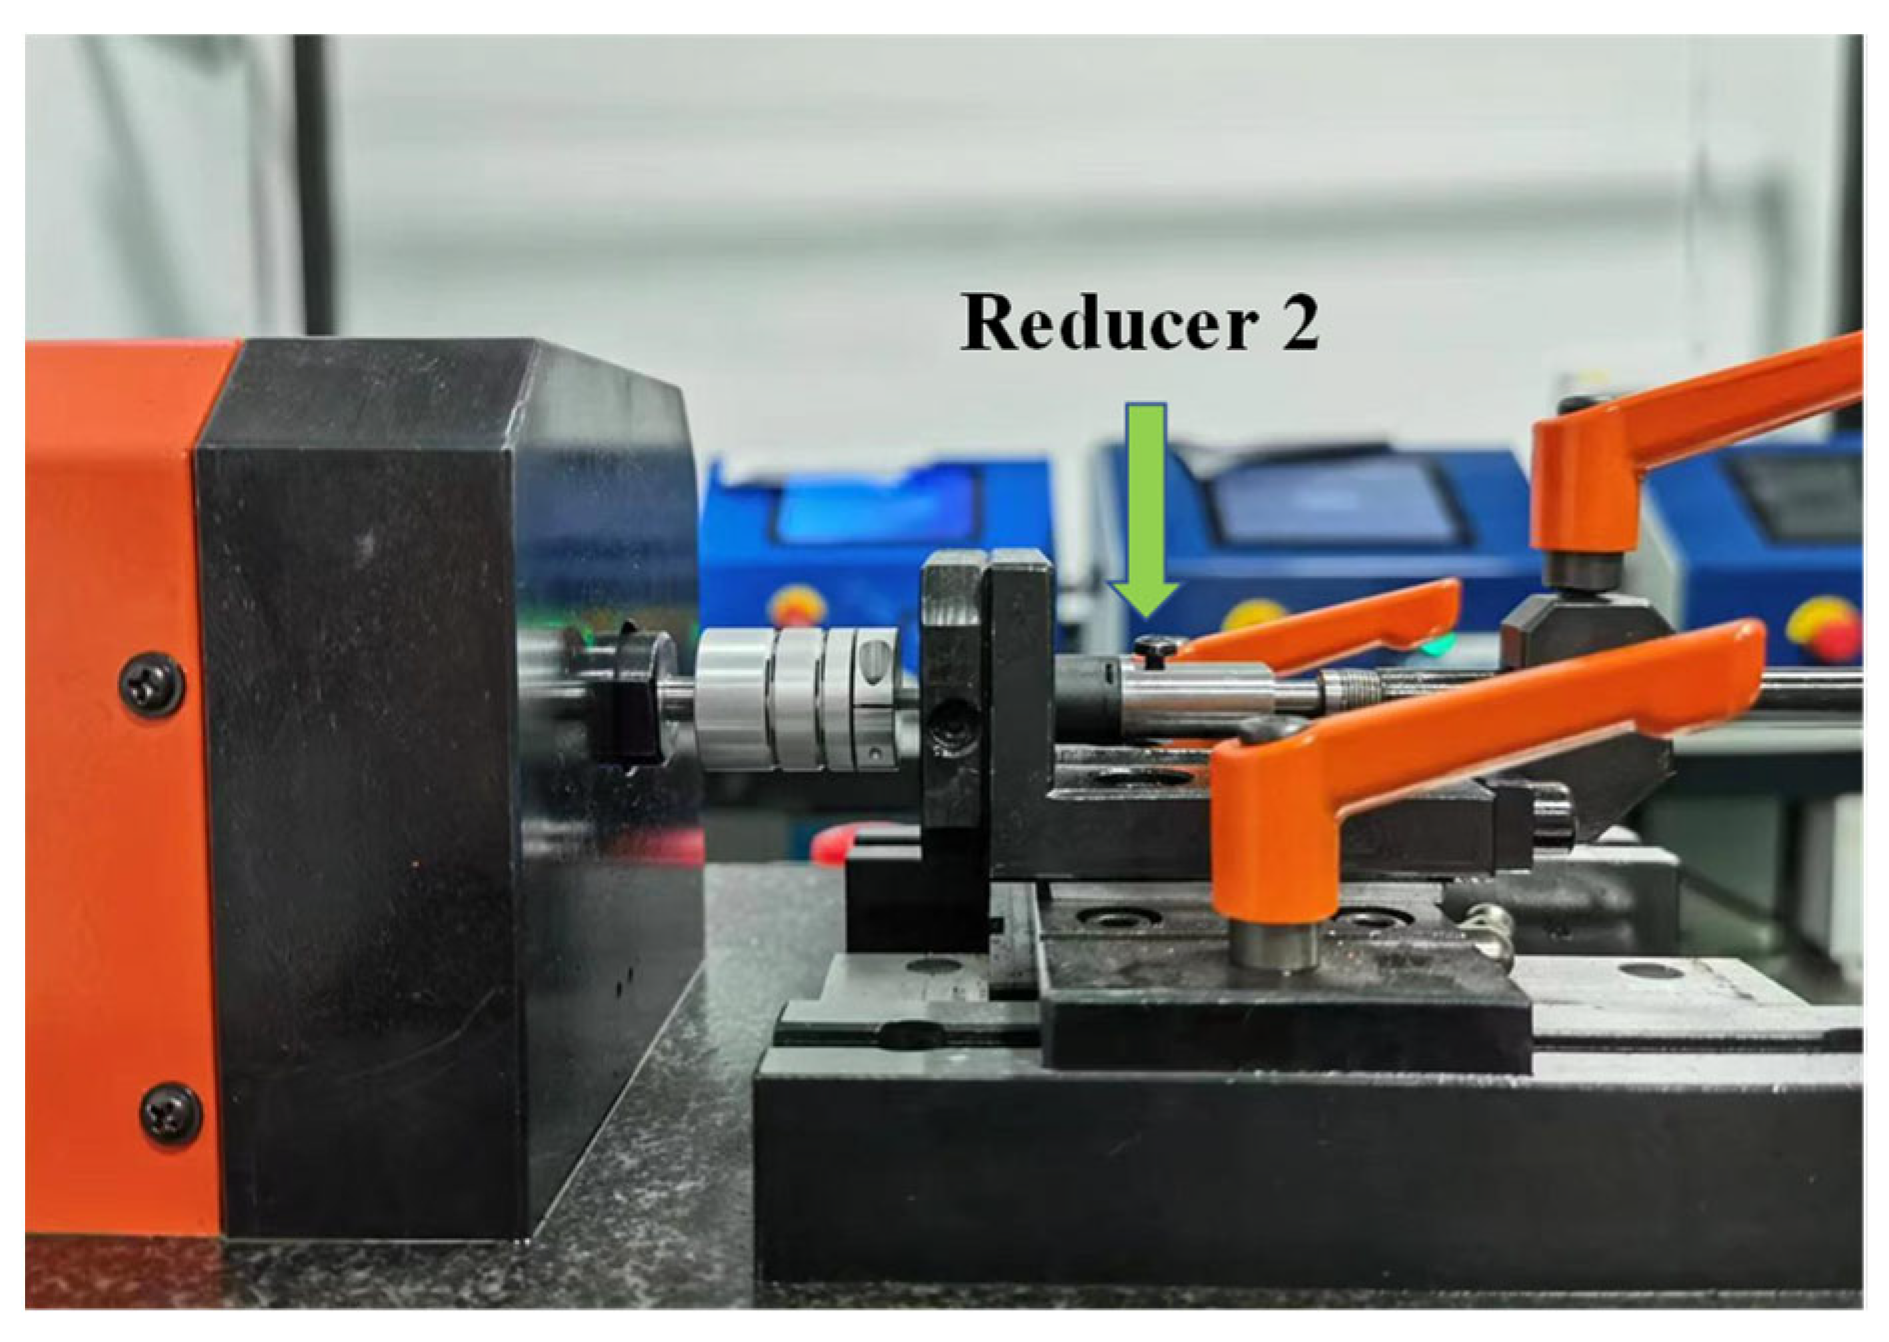
Reducers 2 and 3 can be seen in
Figure 9. The material of reducer 2 gear is powder metallurgy, and the material of reducer 3 gear is plastic. The other specifications remain the same, as can be seen in
Table 1. The reducer is a planetary reducer. A small module cylindrical spur gear of 0.22 mm is used here. It adopts a four-stage reduction with a pressure angle of 20°. The reduction ratio is 1296. The motor shaft gear is installed on the motor output shaft through an interference fit. The planetary gears at all levels are installed on the planet carrier through a clearance fit. The bearing is a rolling bearing.
3.2. Test Method
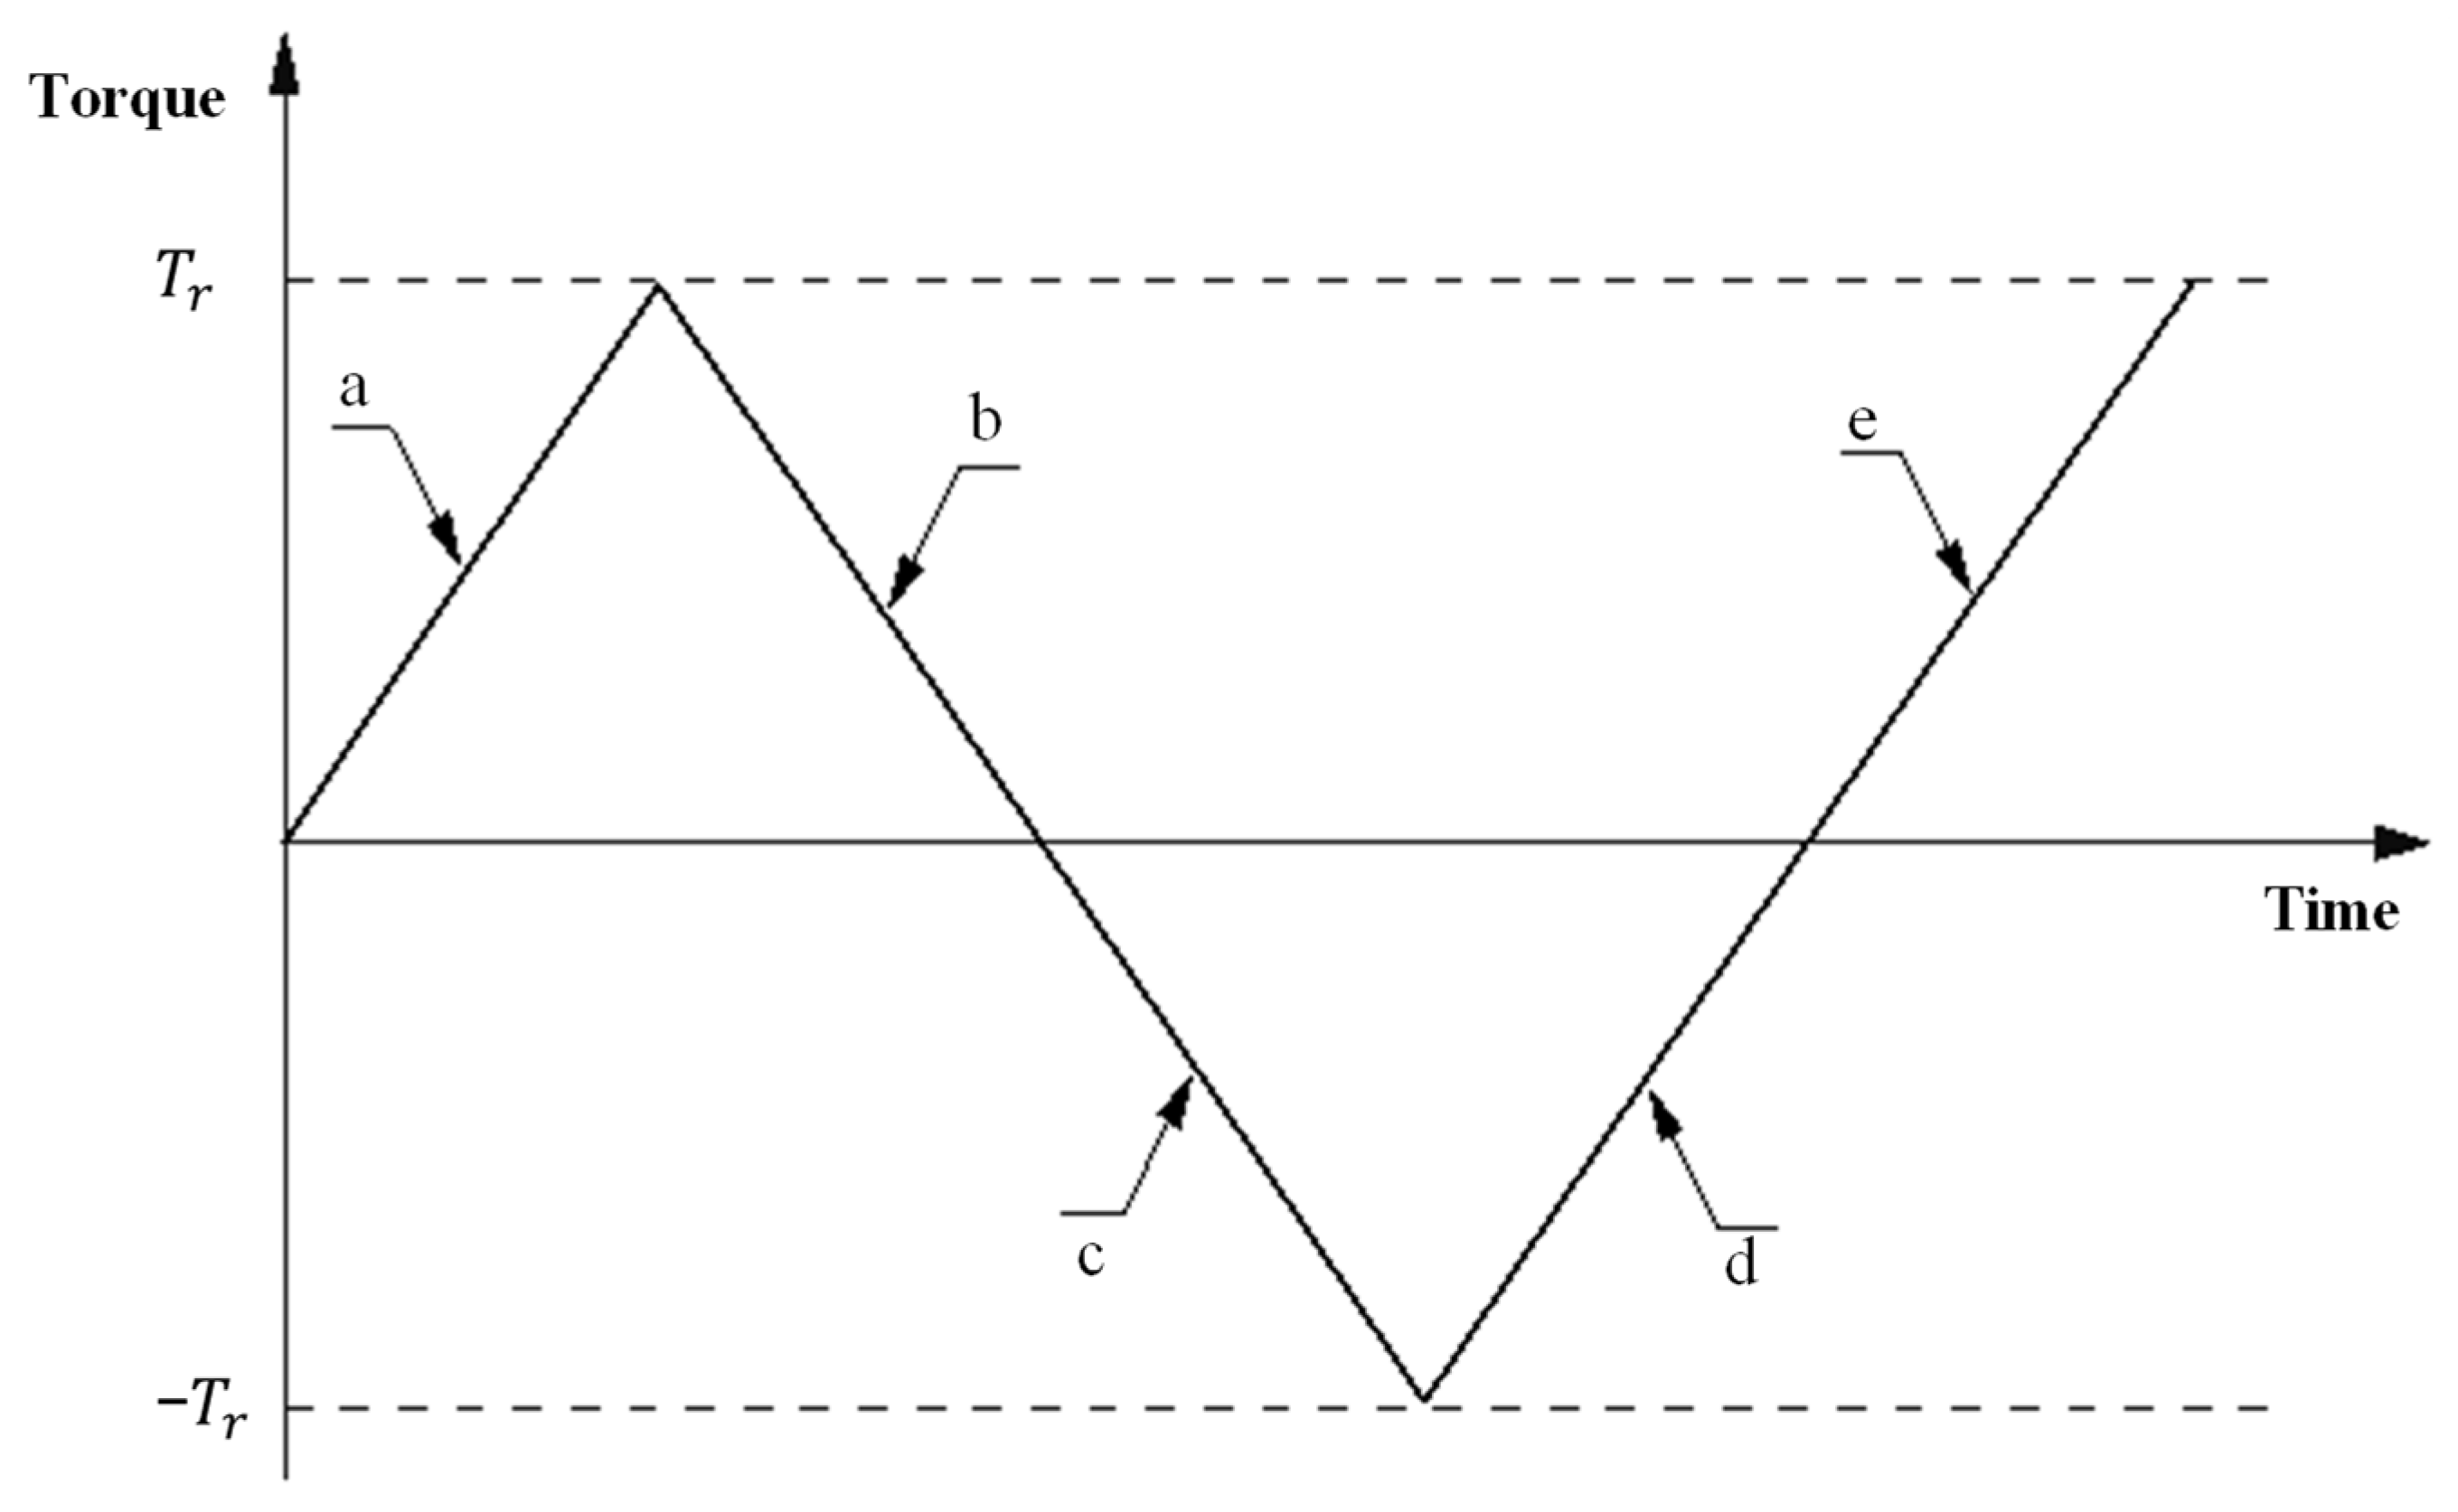
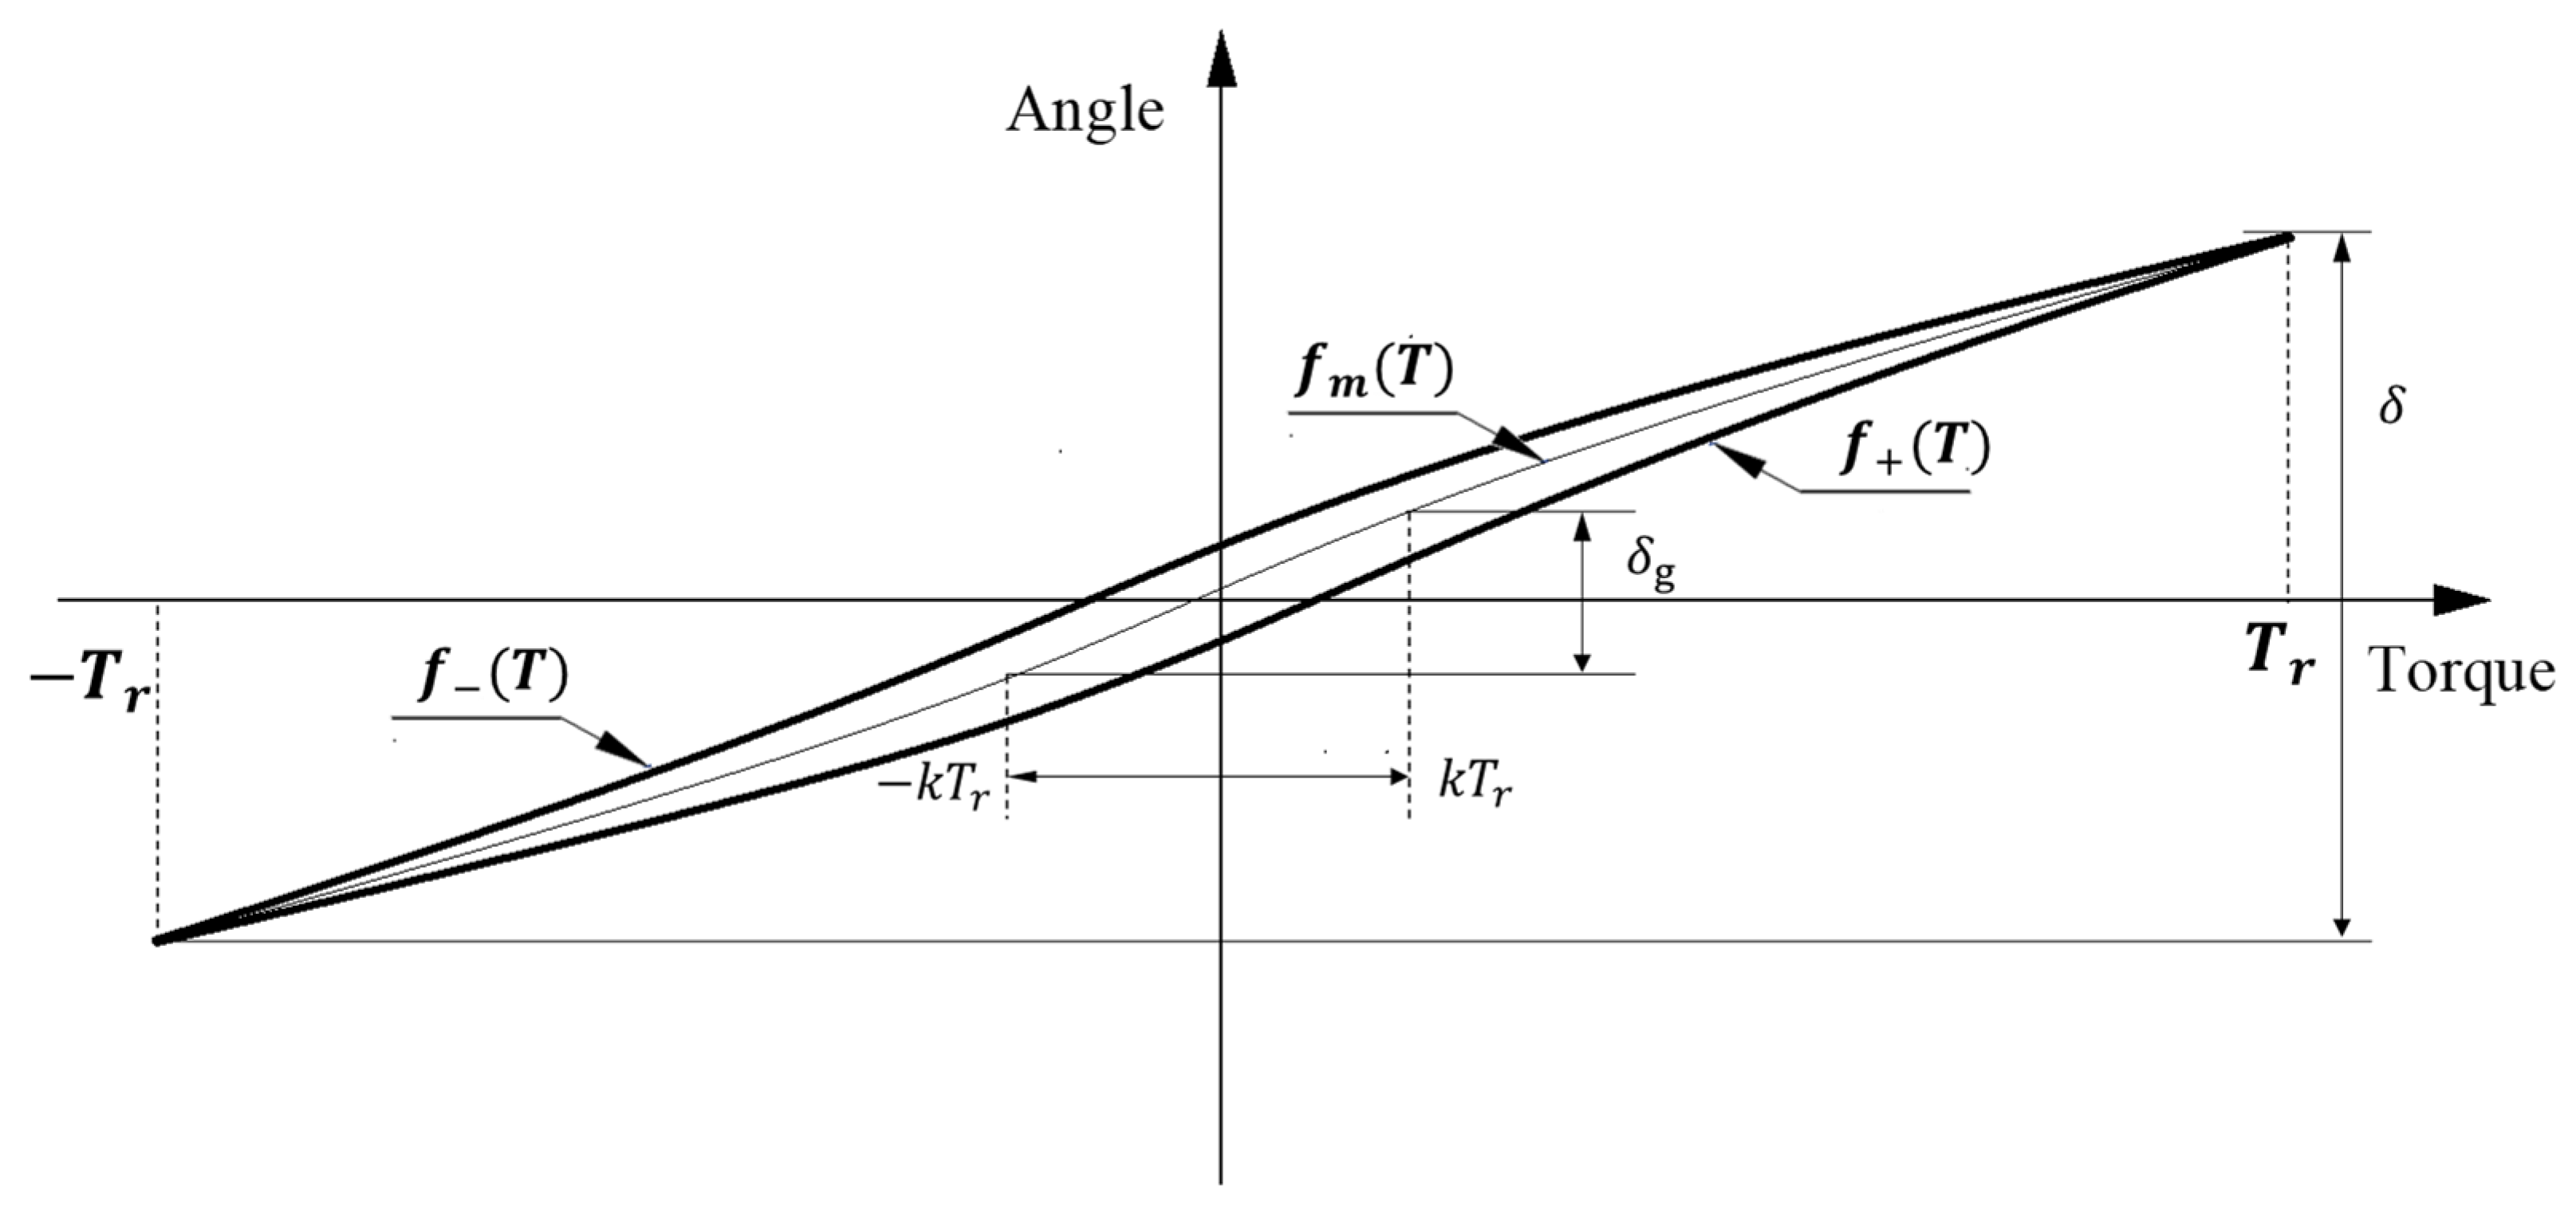
The steps to carry out the test are shown in
Figure 10 [
23]; (a) The output end is loaded forward to the rated torque
. (b) The output end is unloaded to 0. (c) The output end is loaded reversely to the rated torque
. (d) The output end is unloaded to 0. (e) The output end is loaded forward to the rated torque
.
3.3. Appraising Method
The “GB/T 40731–2021 Method of test and evaluation for the lost motion of precision reducer” is the existing standard. It has provided corresponding explanations for the reduced motion loss evaluation method [
23]. It specifies that the hysteresis curve is composed of a rising curve
, falling curve
and mean curve
, as it can be seen in
Figure 11. The
is the curve formed by the average value of the output angle corresponding to the same output torque in
and
. Equations (27)–(29) show the relationship between
,
and
in the hysteresis curve.
is the rated torque at the output end,
represents
the selected coefficient. This is affected by factors, such as reducer processing and installation, and is usually specified according to actual needs.
3.4. Test Equipment
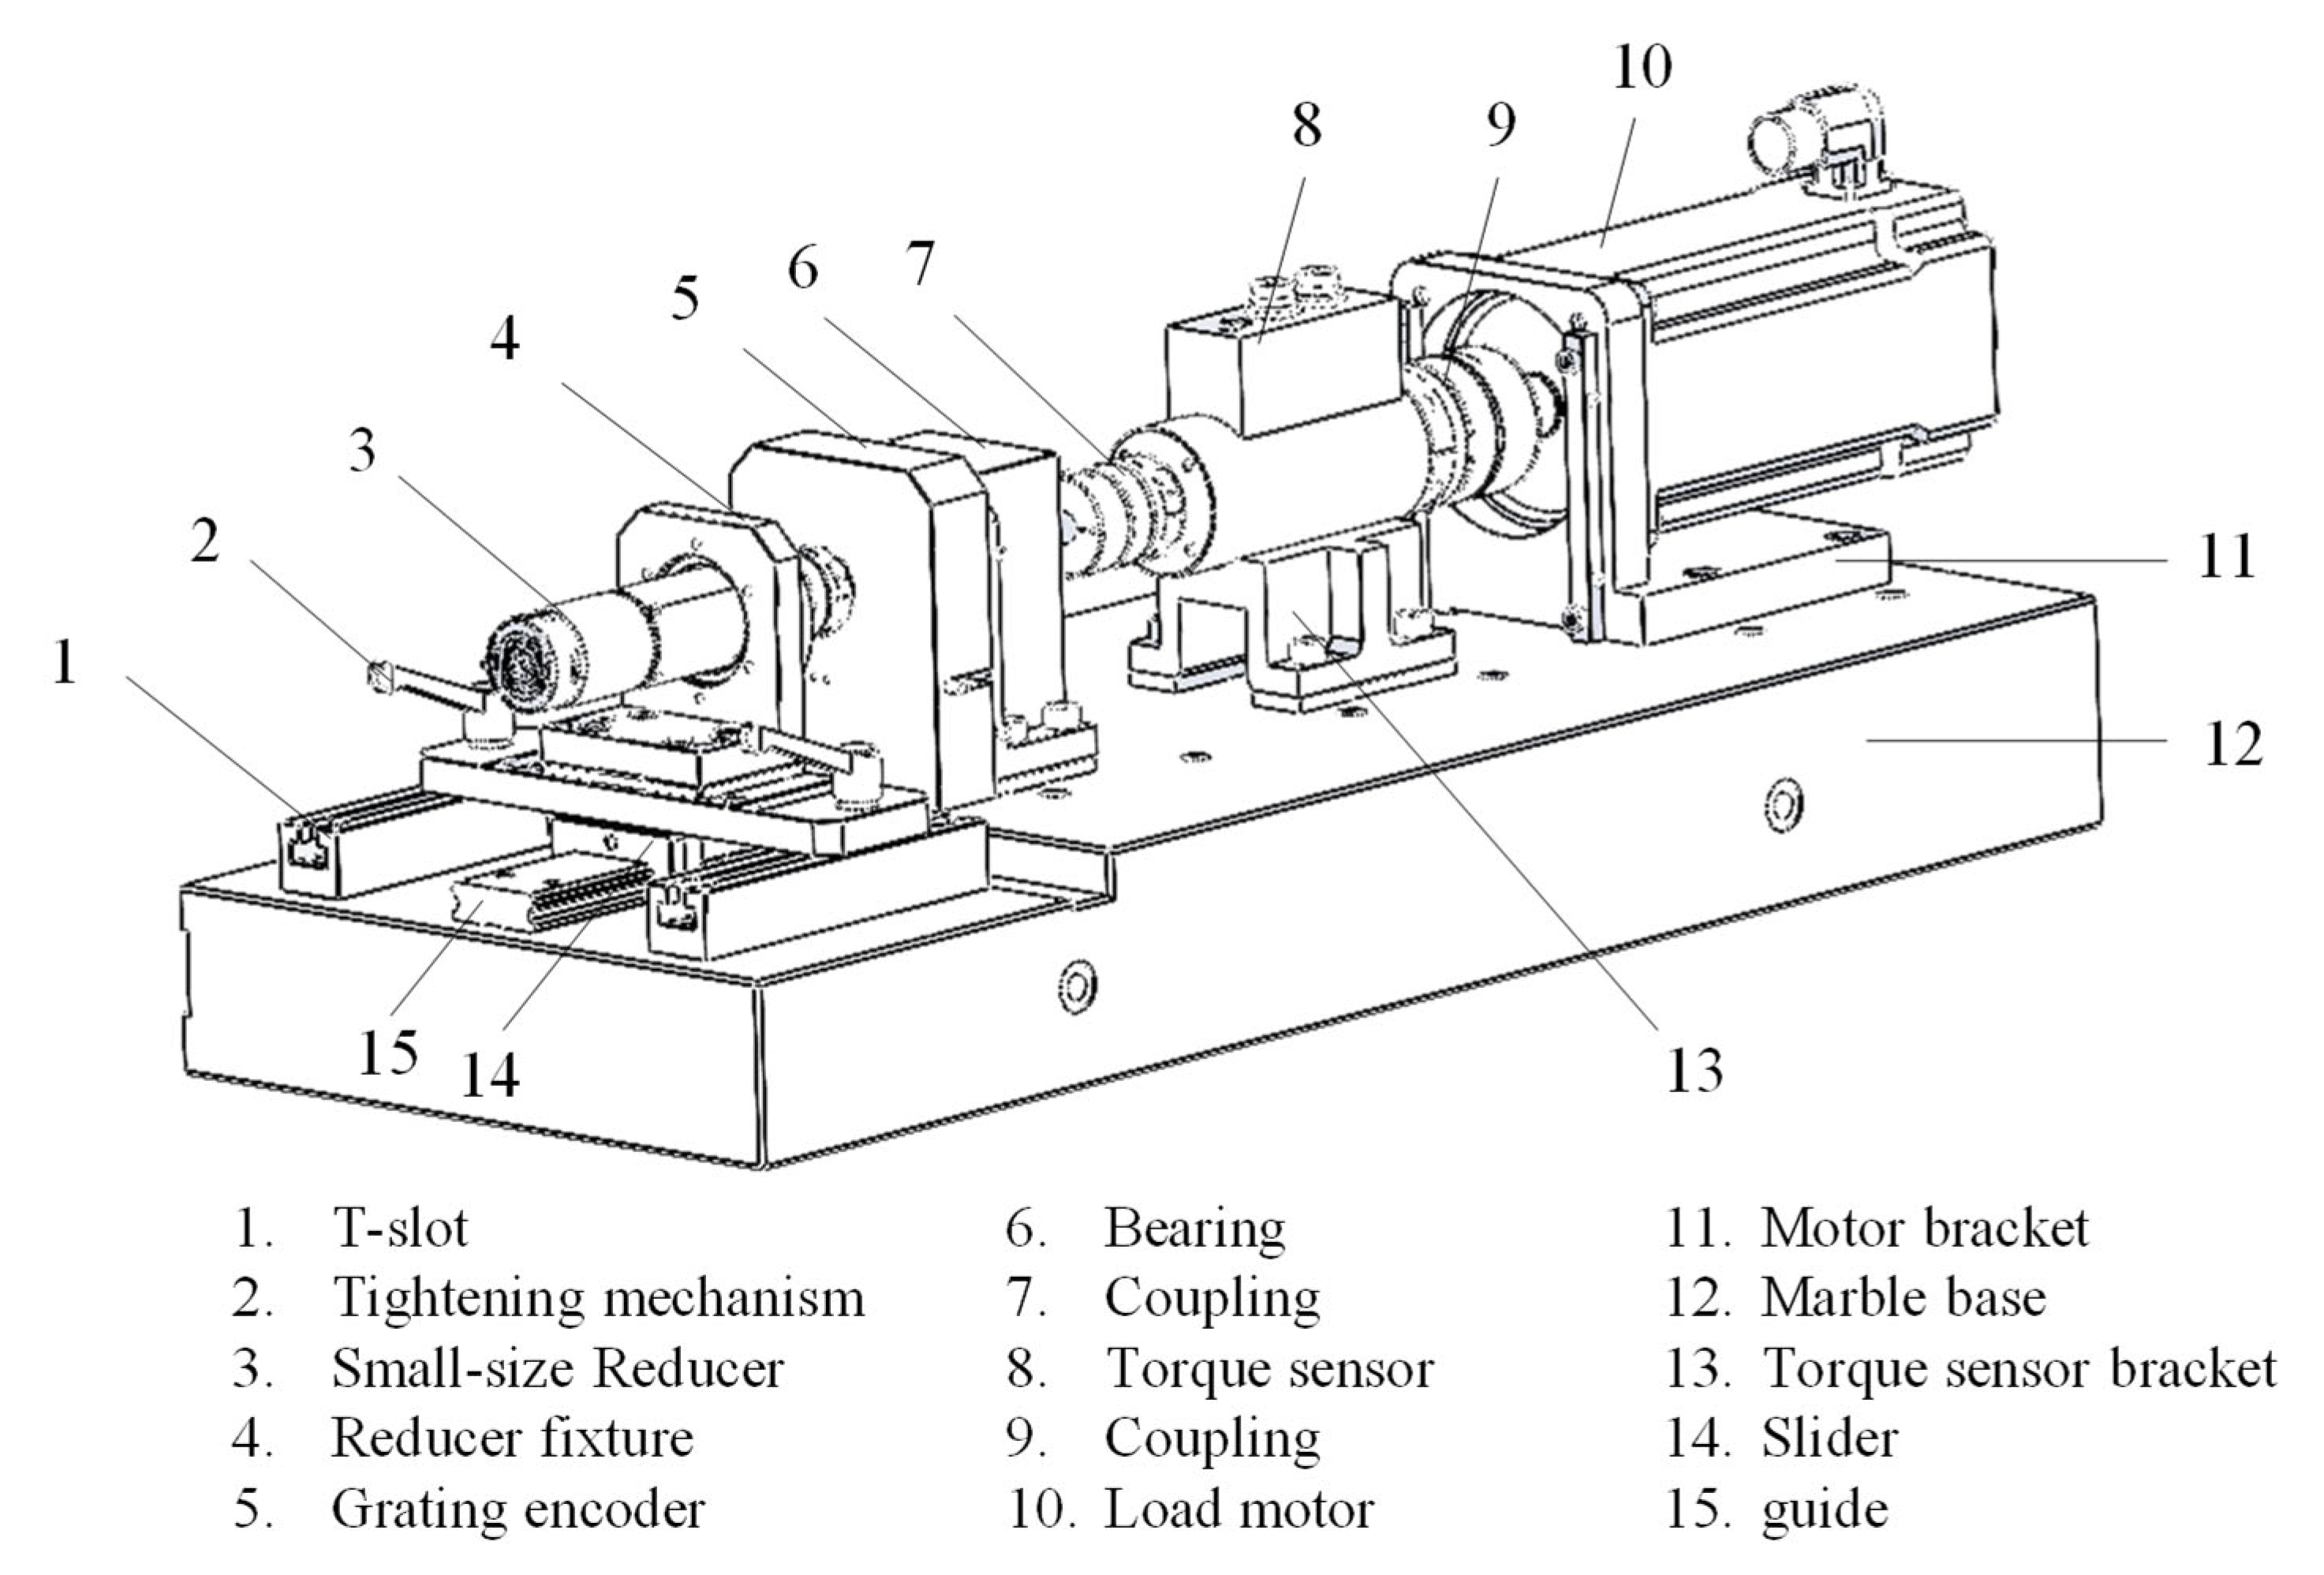
Figure 12 shows a design of testing machine for small-sized reducer created by the author, considering the current lack of small-size reducer lost motion tests in the field. The parameters of the tester are shown in
Table 2. The tester comprises a precision mechanical system, hardware system, and test software.
The main structure of the testing machine is shown in
Figure 13, and the reducer installation mode is shown in
Figure 14 and
Figure 15. During the test, the input end of the reducer is locked, and the load motor is driven by the industrial computer through the field bus control driver to achieve accurate torque control. The actual angle at the output end of the reducer is collected by the circular grating, and the angle data collected are transmitted to the industrial control computer through the field bus. The torque change of the tested reducer is tested with high accuracy by the torque sensor. The test software processes and analyzes the test data according to the test standard to obtain the
,
,
results and print them into reports.
4. Experimental Study
The lost motion test experiment is carried out on the three small-size reducers, respectively. Then, the lost motion when loaded to the rated torque at different loading rates is tested. The experimental conditions, results, and analysis are explained below.
4.1. Experimental Conditions
The three reducers are tested three times at different loading rates and different positions. The experimental conditions are shown in
Table 3.
In
Table 3, the loading rate 2 is the default loading rate in the lost motion test. In order to verify the effect of the loading rate and make the test results more obvious, the loading rate of the corresponding multiple is increased and decreased, respectively, for testing. The common motion mode of the reducer is rotary motion, and the lost motion at different positions may be different. Therefore, three positions 0°, 180° and 360° in one circle of the output shaft of the reducer are selected for testing, which respectively represent the start, middle and end positions of the reducer during rotary motion.
4.2. Experimental Results
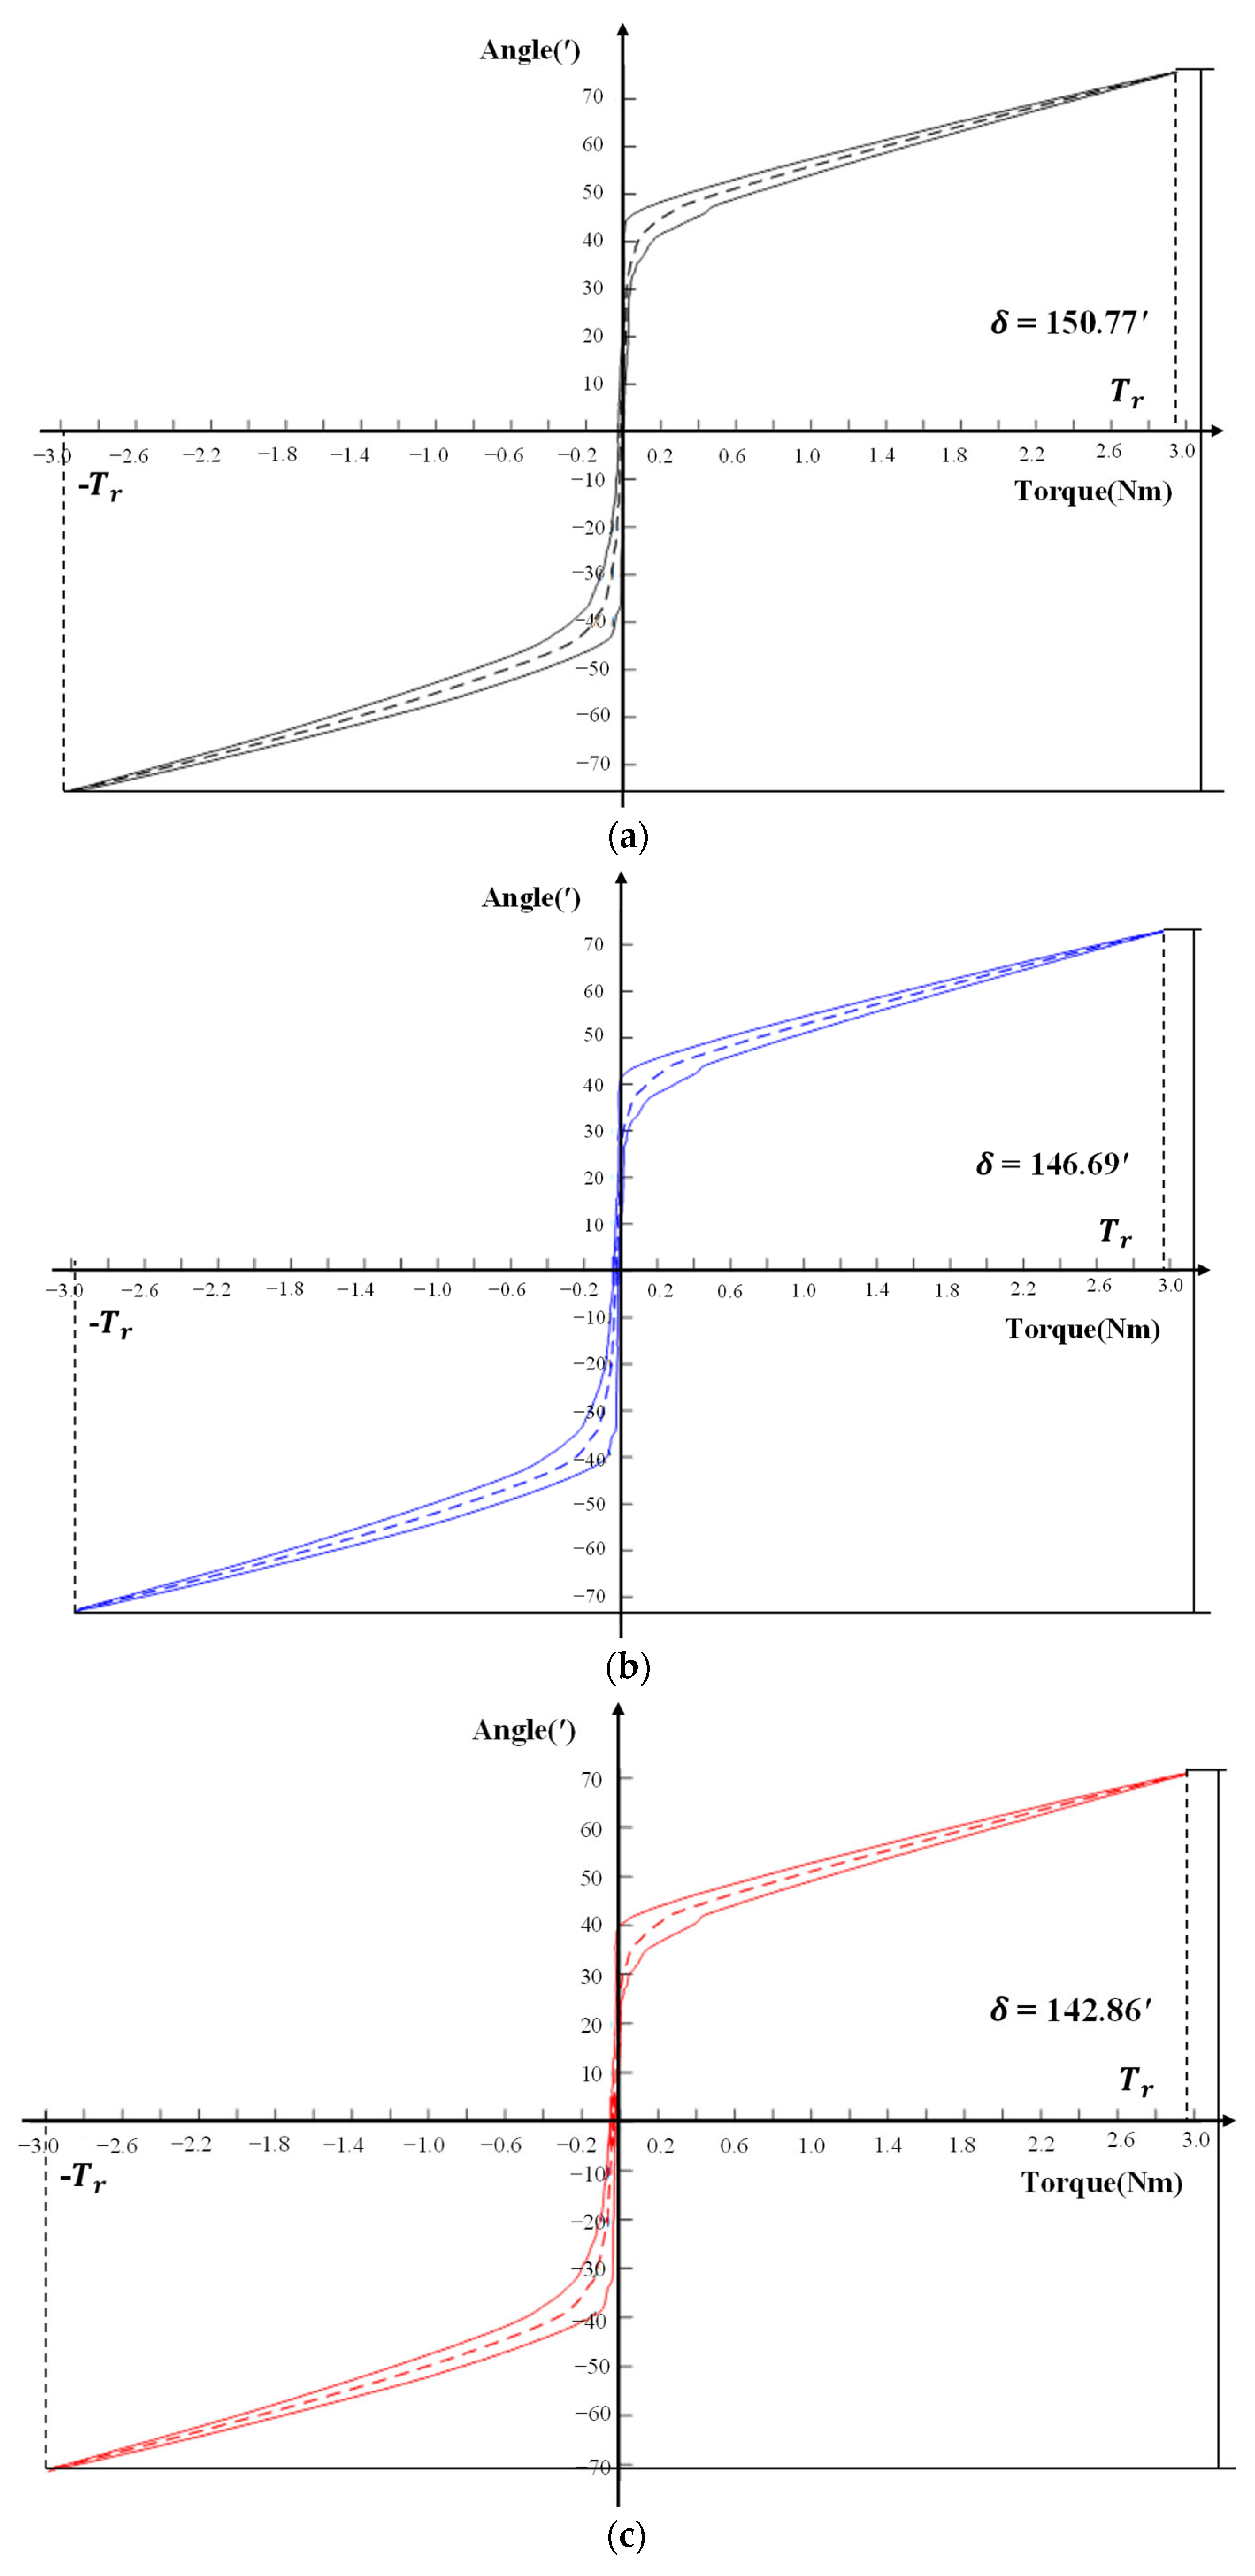
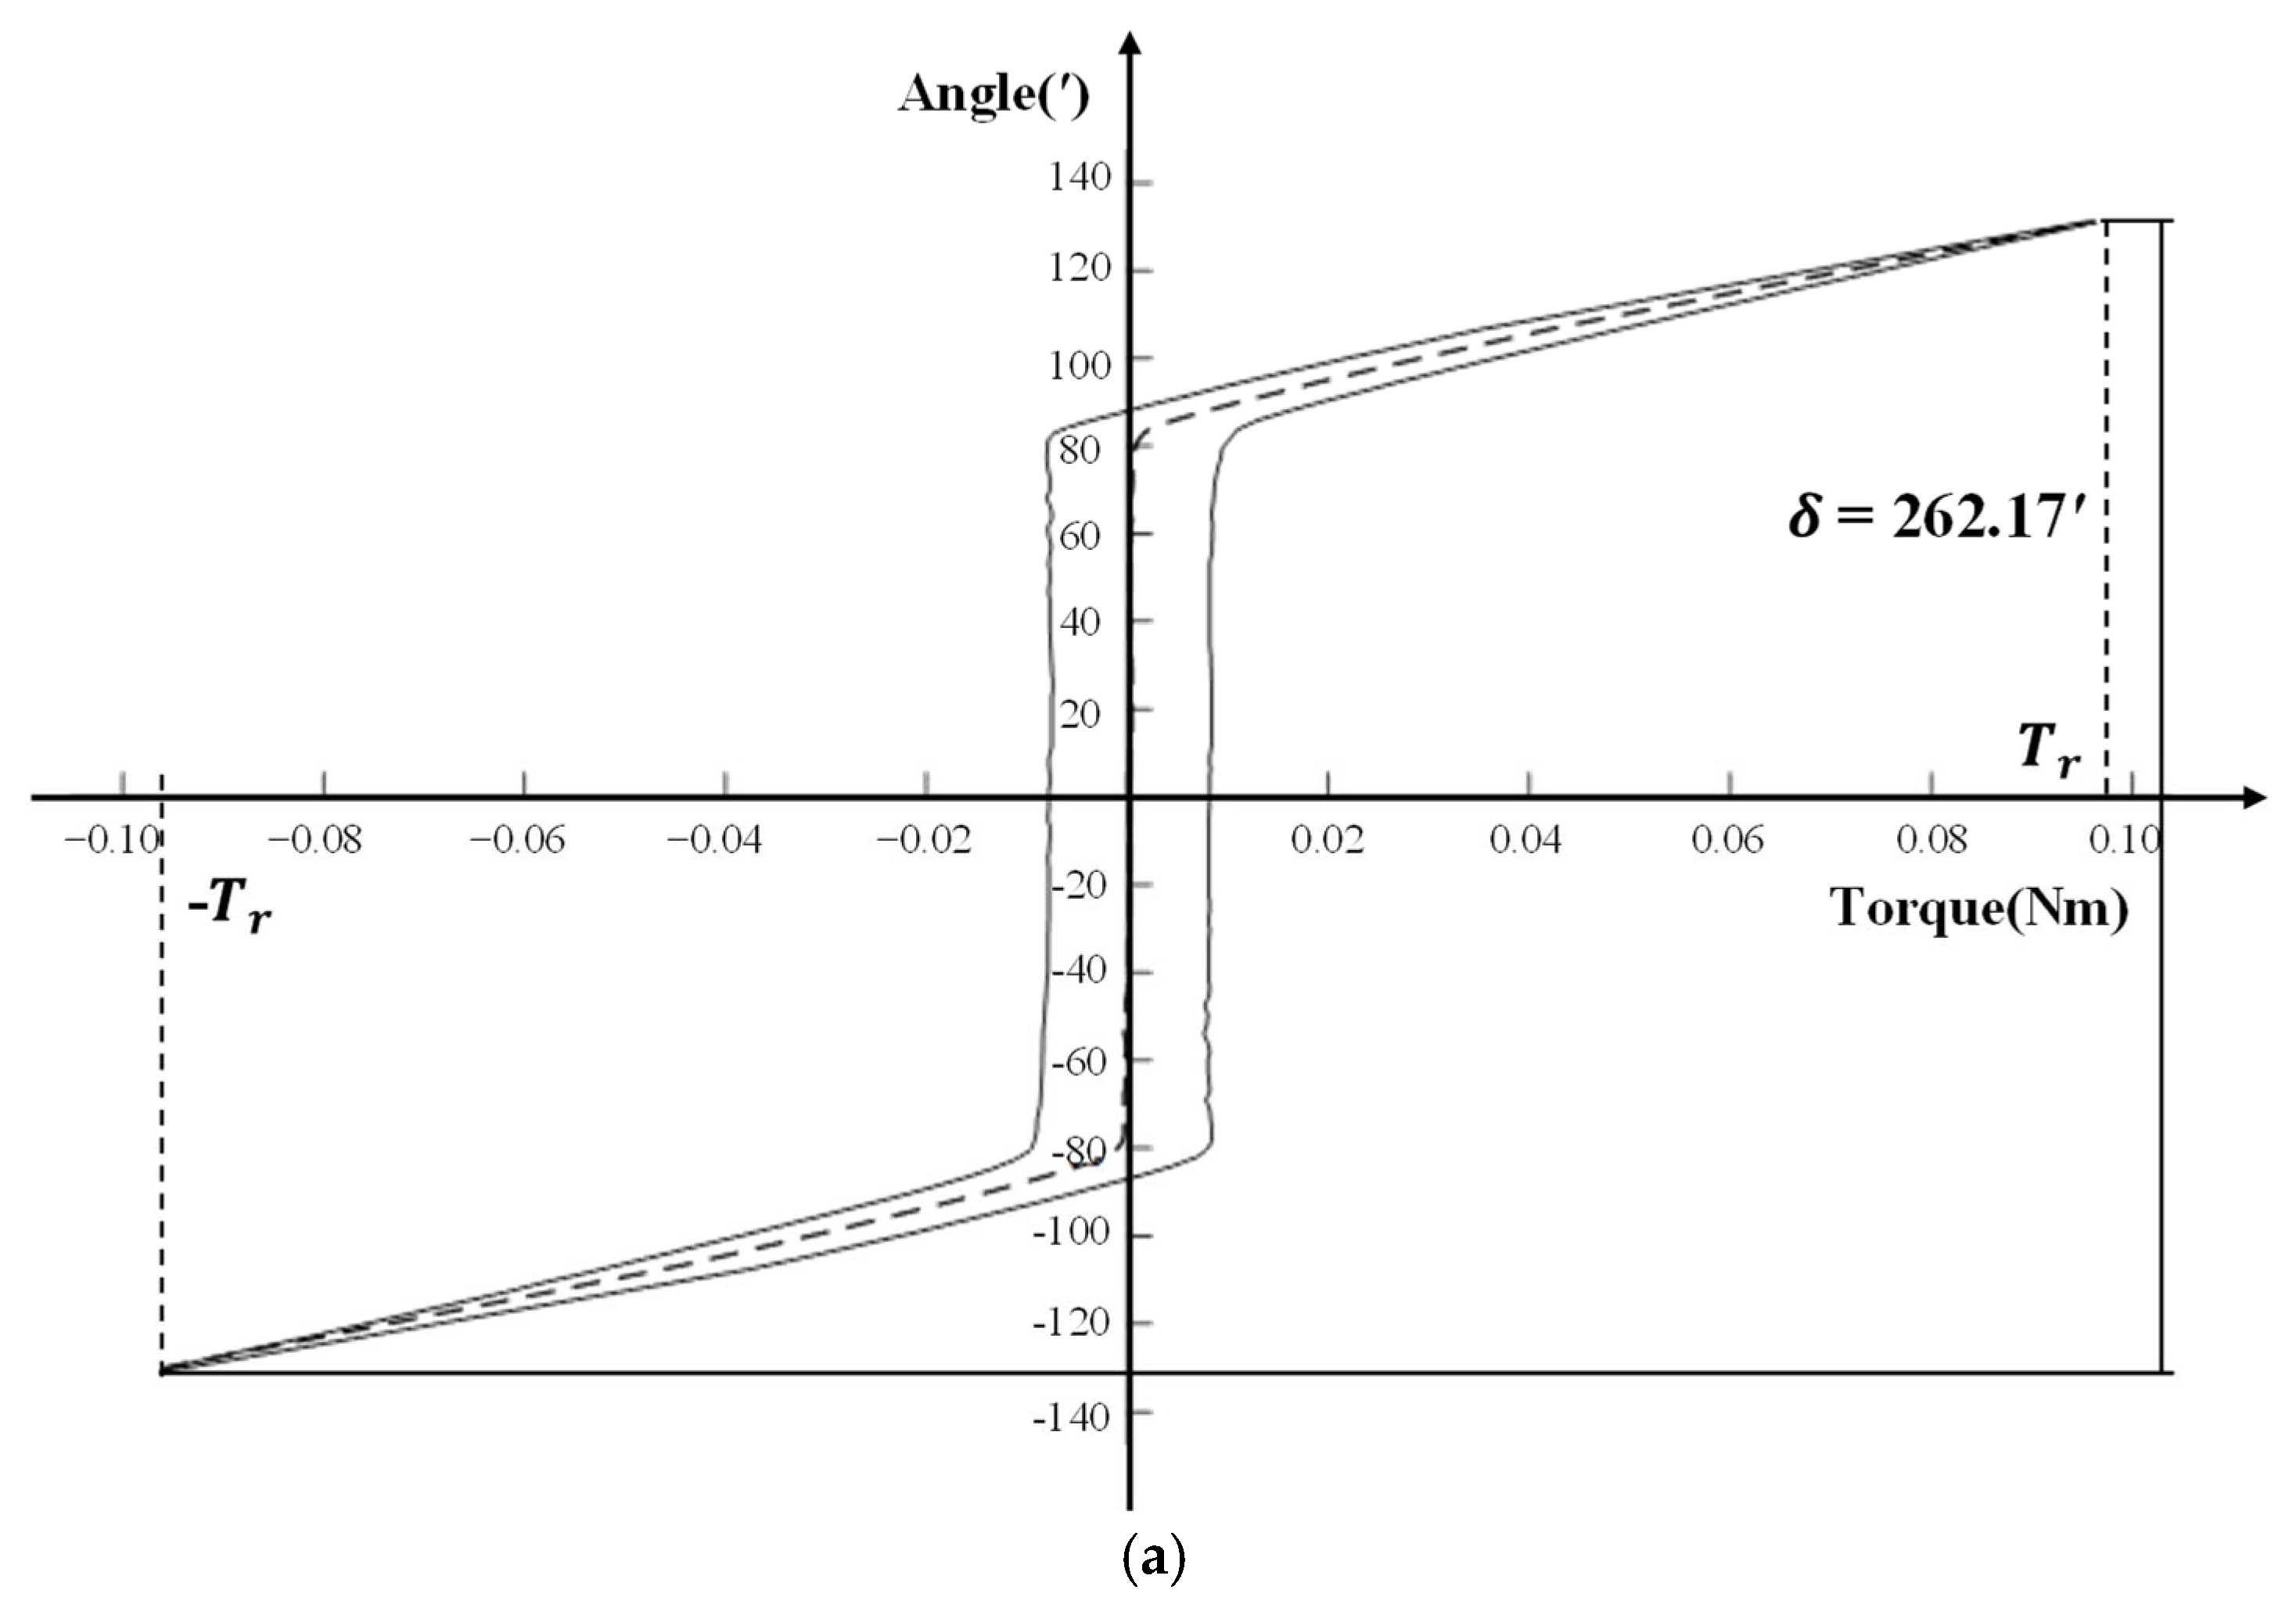
The hysteresis curve of the first test of reducer 1 is shown in
Figure 16a–c, and the lost motion
. The test results are shown in
Table 4. According to the experience of engineering practice [
12,
13,
23], the lost motion at 10% of the rated torque is taken as the geometric lost motion
. The results are shown in
Table 5. The elastic lost motion
as shown in
Table 6.
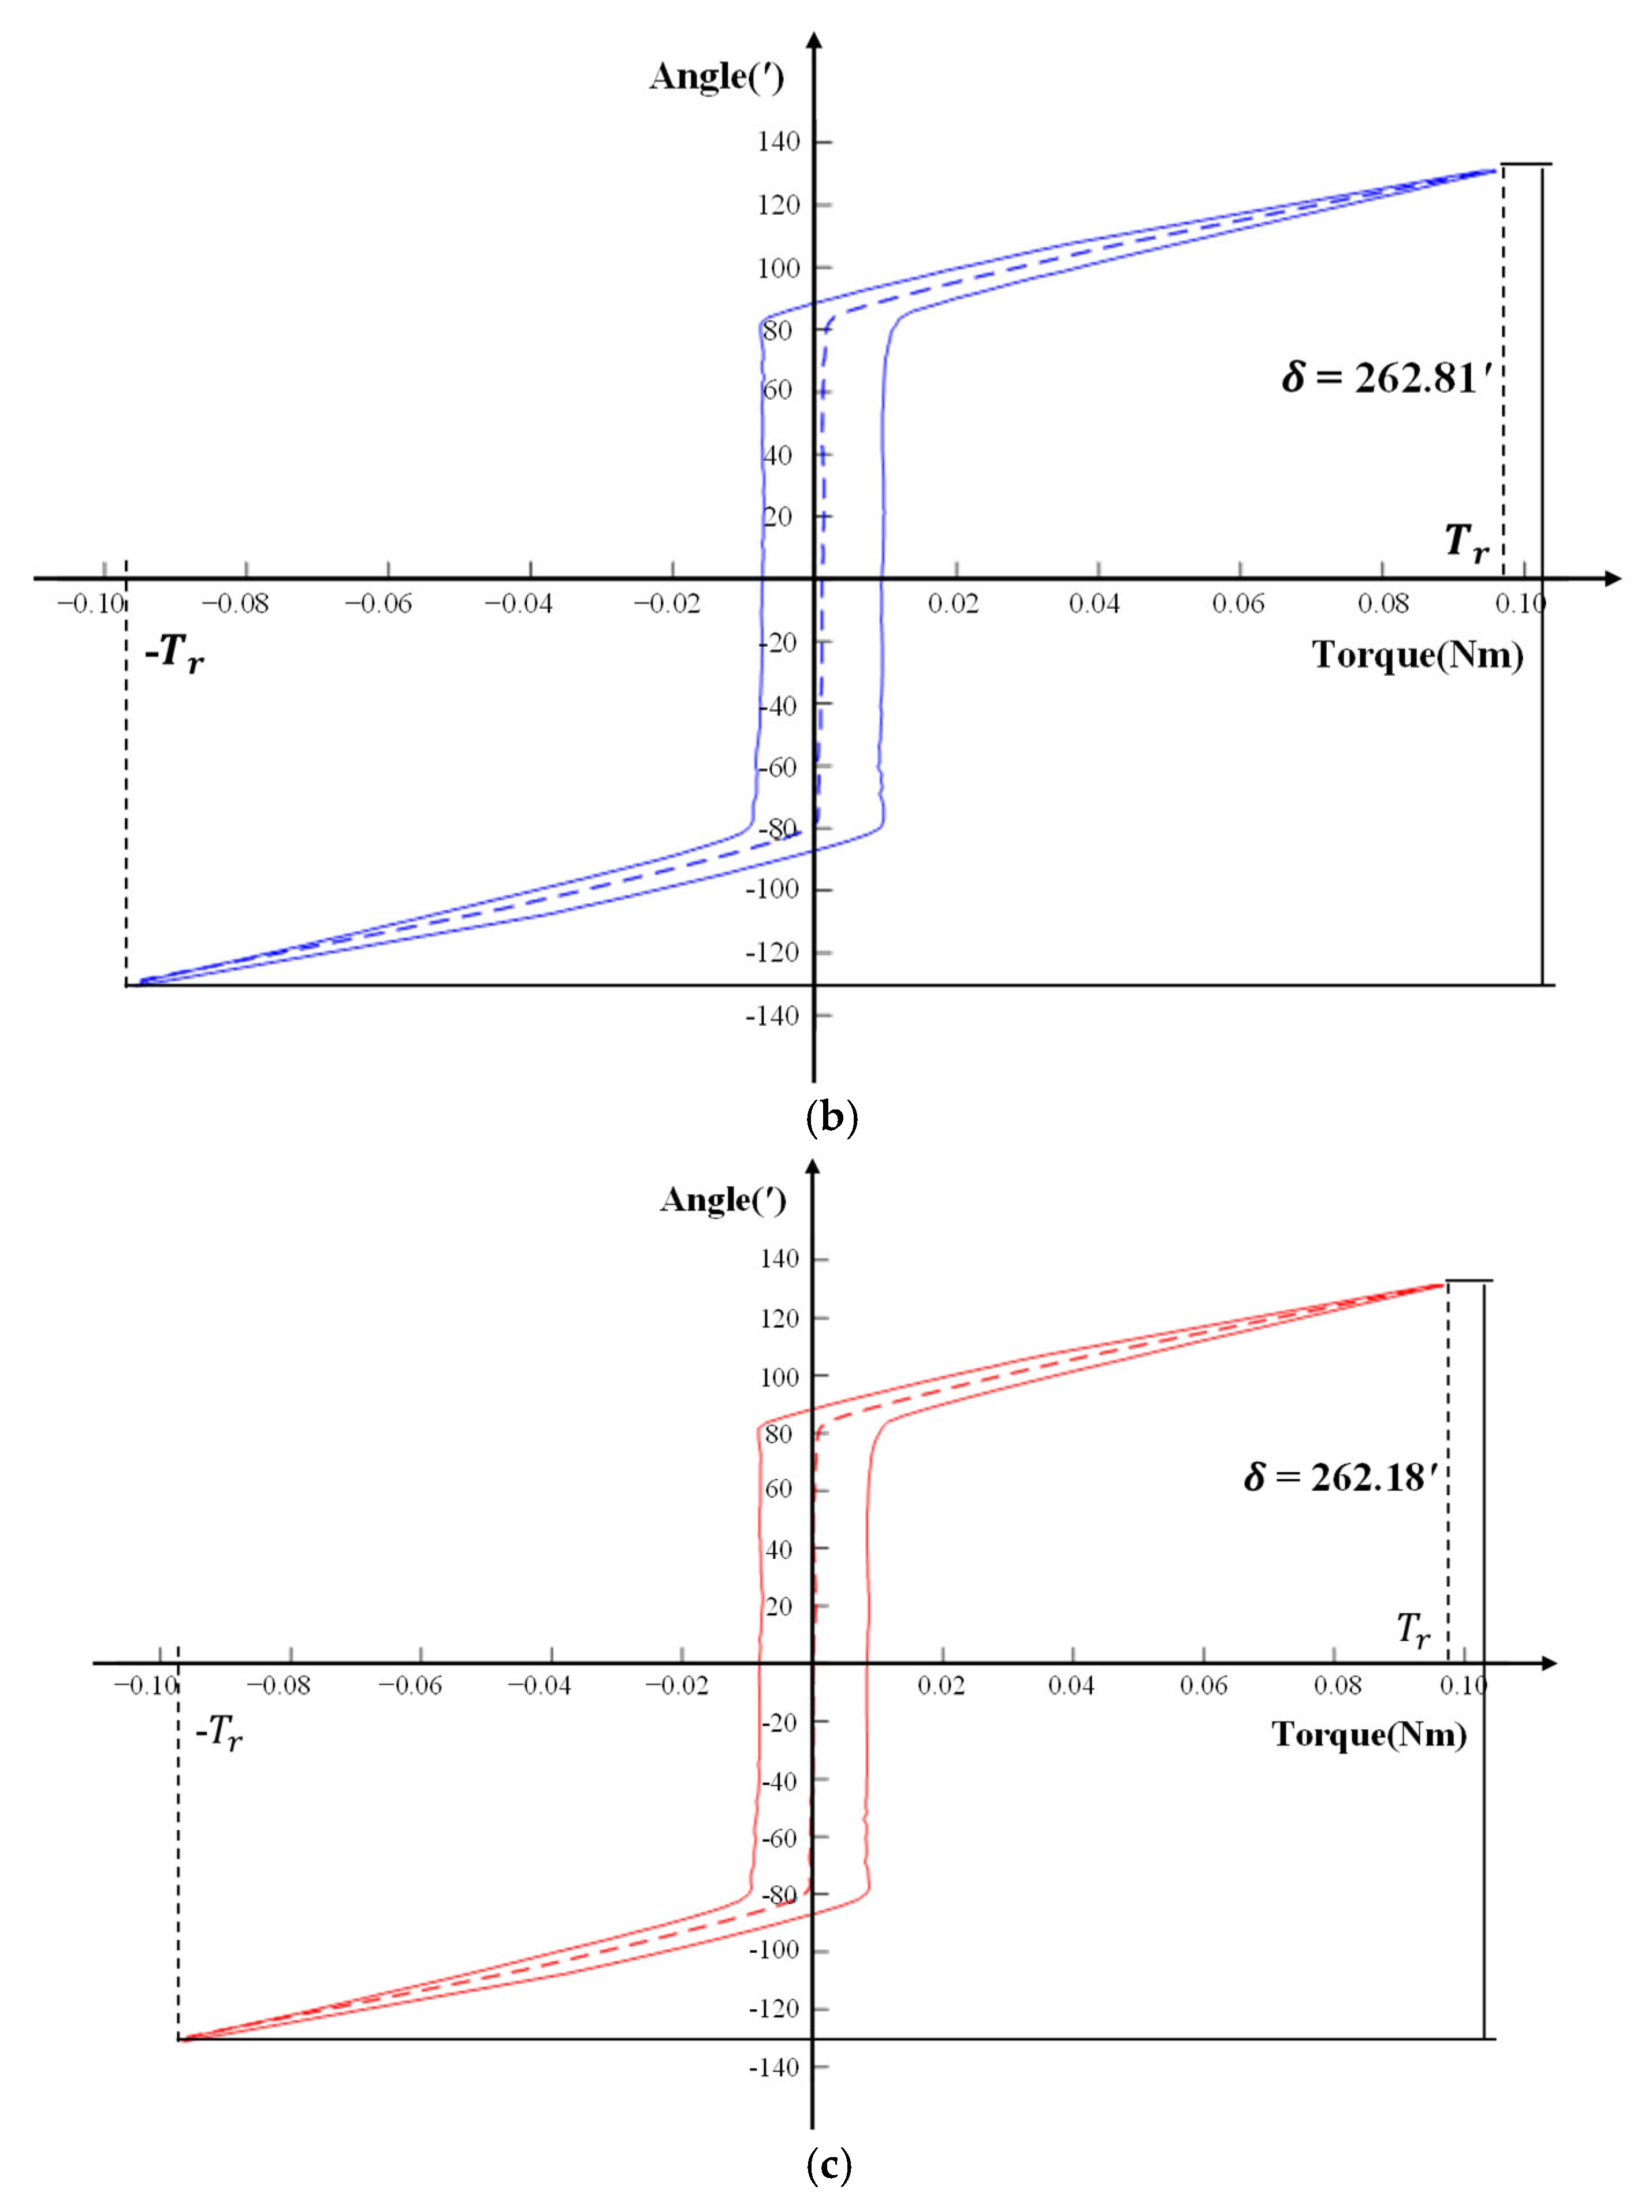
The hysteresis curve of the first test of reducer 2 is shown in
Figure 17a–c, and the lost motion
. The test results are shown in
Table 7, and the geometric lost motion
as shown in
Table 8, elastic lost motion
as shown in
Table 9.
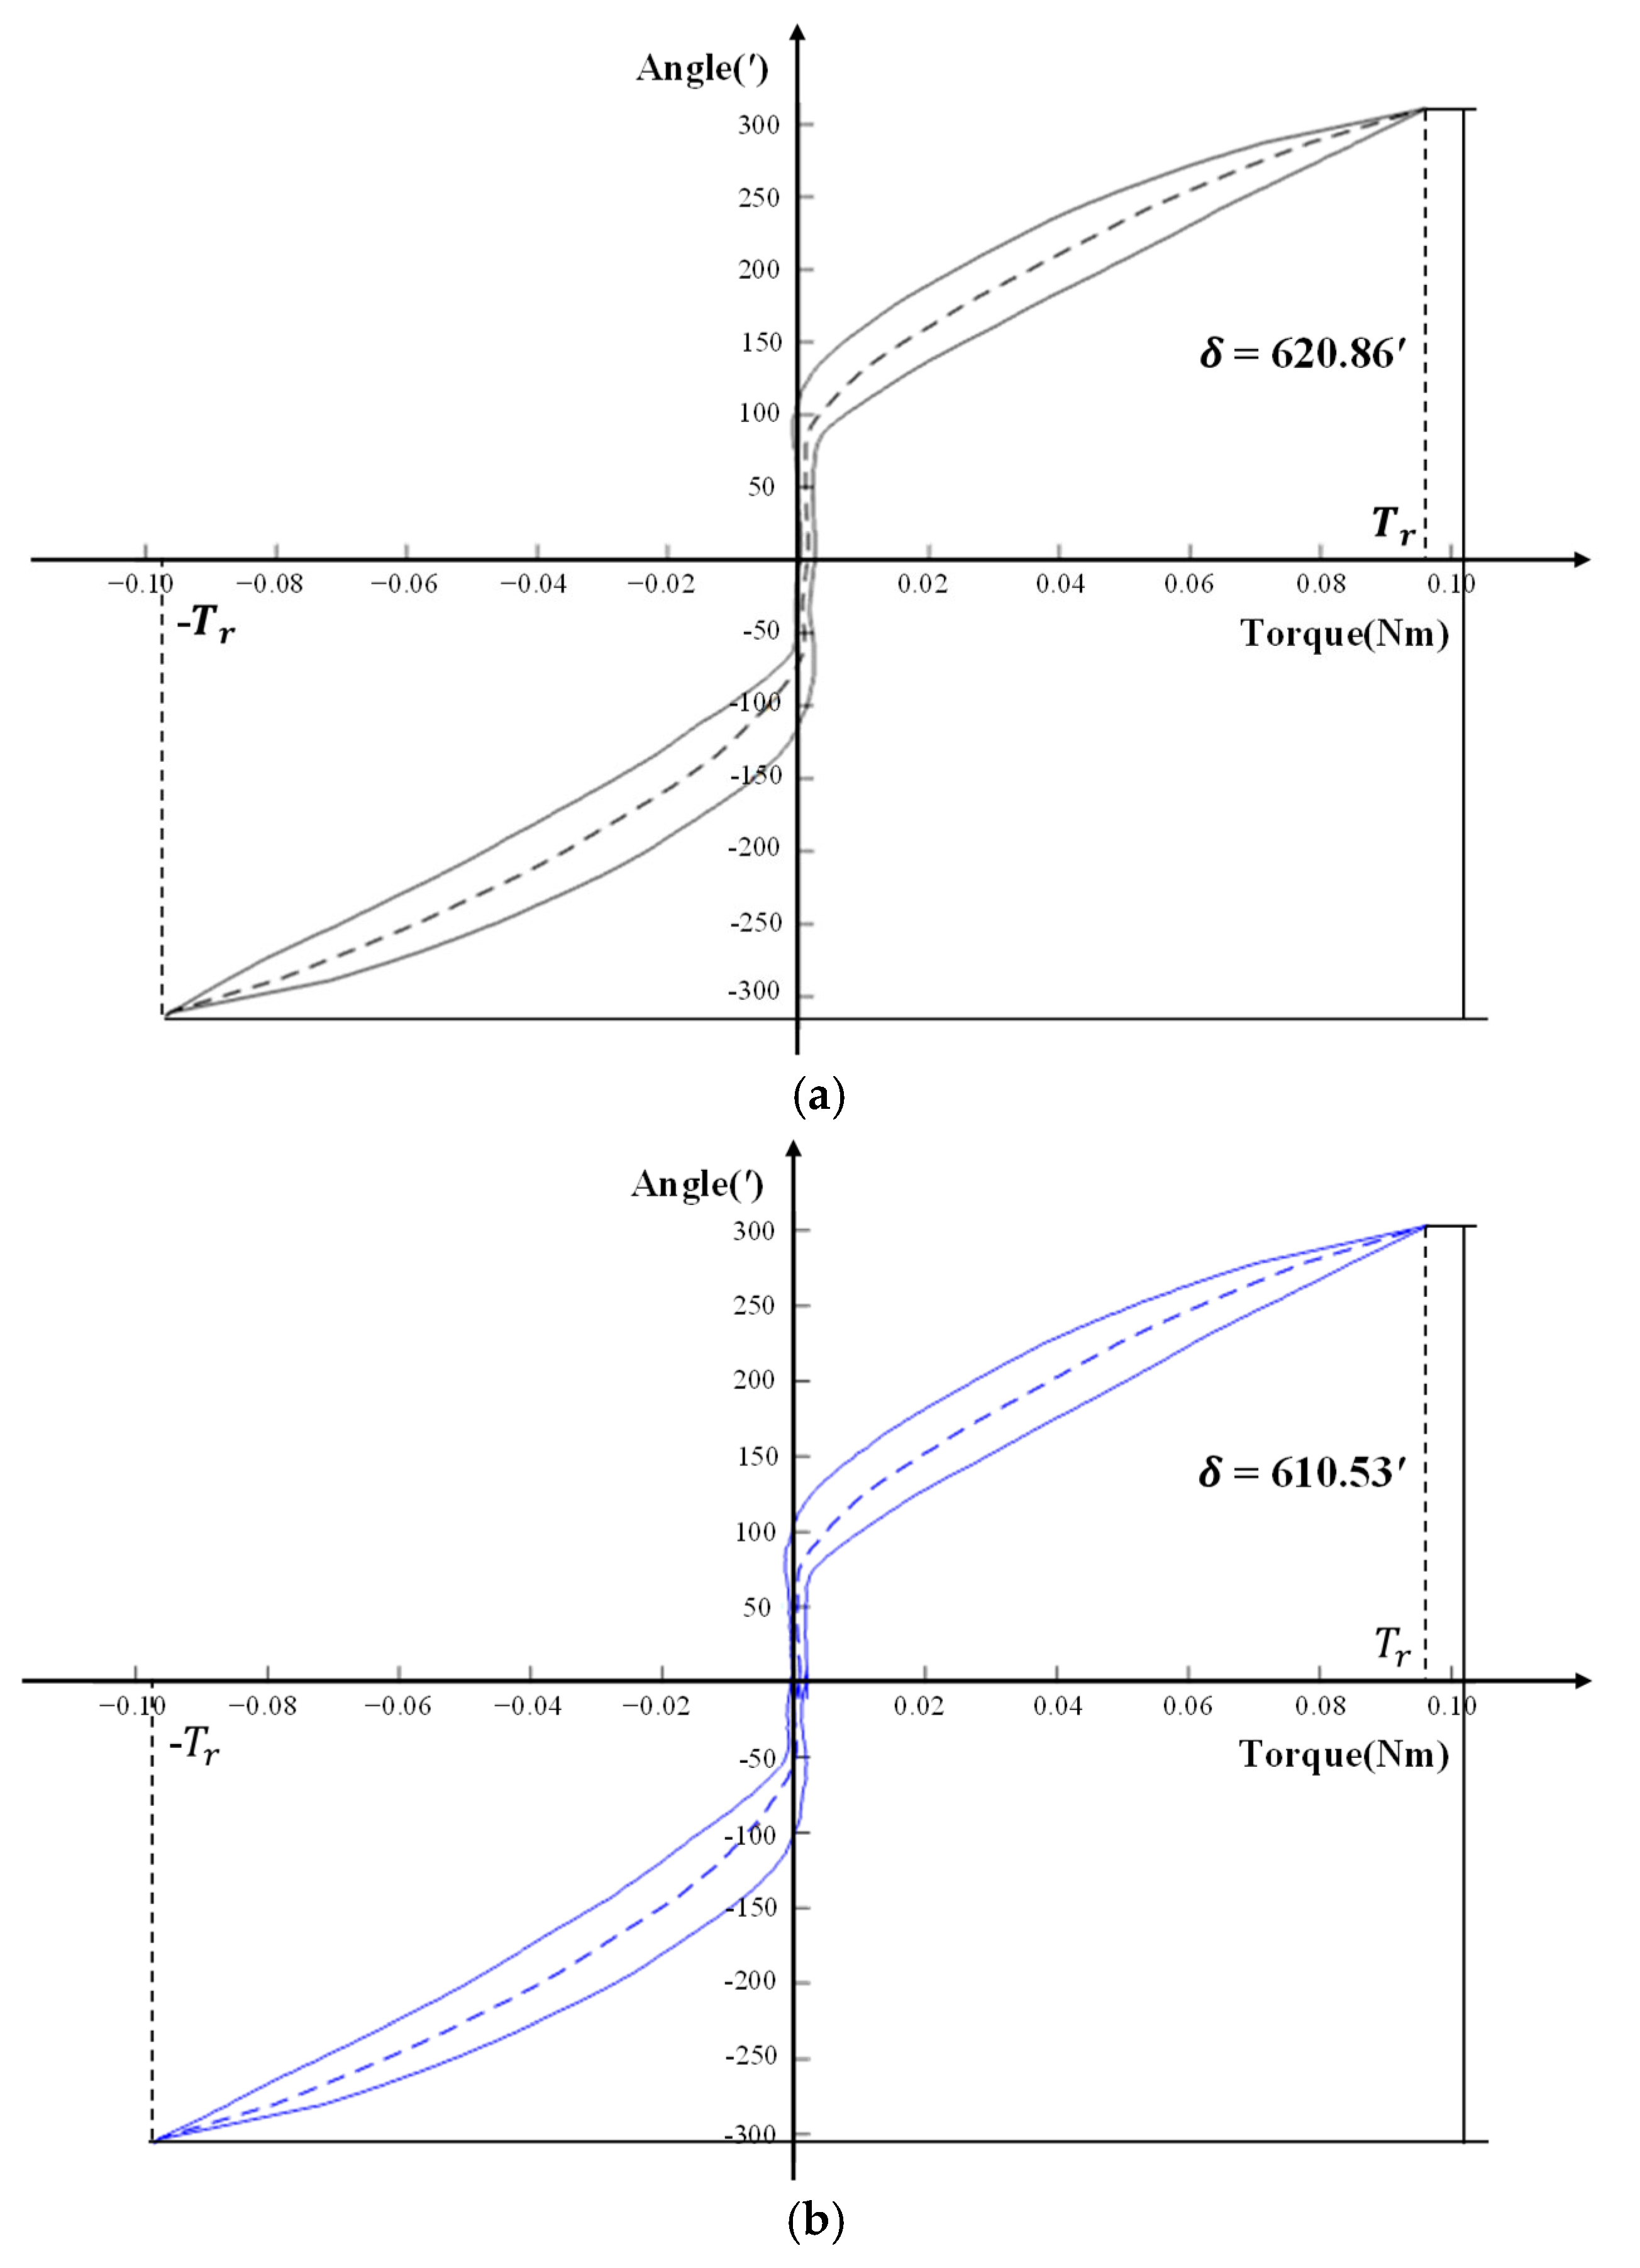
The hysteresis curve of the first test of reducer 3 is shown in
Figure 18a–c, and the lost motion
. The test results are shown in
Table 10, the geometric lost motion
is shown in
Table 11, and elastic lost motion
is shown in
Table 12.
4.3. Result Analysis
From the form of the hysteresis curve, (1) the hysteresis curve of reducer 1 forms an anti-Z shape. A greater slip and rotation angle occurs when it was close to 0 Nm. A slender feature can be seen in the envelope part of the hysteretic curve near 0 Nm. This reflects that the mechanism clearance of the reducer itself is large. (2) The hysteresis curve of reducer 2 also forms an anti-Z shape. The envelope area of the curve near the position of 0 Nm is large. On the other hand, the envelope area away from the position of 0 Nm is small. This shows that it is wide in the middle and narrow on both sides. (3) The hysteresis curve of reducer 3 is S-shaped. The envelope area of the curve near the position of 0 Nm is small. On the other hand, the envelope area away from the position of 0nm is large. This shows that it is narrow in the middle and wide on both sides, which reflects a small geometric gap and large elastic deformation.
From the numerical results, (1) the lost motion value of reducer 1 decreases with the increase in loading rate, decreasing by about 4 ‘each time, and the geometric lost motion is close. Elastic lost motion decreases with the increase in the loading rate and decreases by about 4′ each time, which indicates that it mainly affects the elastic lost motion and shows rate dependence. (2) Reducer 2, with the increase in loading rate, the lost motion of reducer , geometric lost motion error , and elastic lost motion is close to each other, and the effect of the loading rate dependence is small, which is approximately the rate independence. (3) As the loading rate of reducer 3 increases, the lost motion and elastic lost motion all show a downward trend, each decreasing by about 10’. Geometric lost motion changes little, reflecting the effect of the loading rate dependence.
The reason may be affected by the gear material. Reducer 1 is a combination of metal gear and plastic gear, while reducer 2 is metal gear. Compared to the metal gear, the plastic gear is more vulnerable to the impact of loading rate. Compared with the reducers 1 and 2, the gears of reducer 3 are all made of plastic. This is more vulnerable to the loading rate. When the loading rate is fast, the loading is advanced to the rated torque. Thus, the rotation angle is not in place at this time.
In the above test of the lost motion of the reducer, the influence of the loading rate on the test is explored. The findings are as follows: First, the loading rate influences the hysteresis of the reducer. Second, the hysteresis phenomenon of reducers made from different materials is affected differently by the loading rate. This has two manifestations: one is approximate to the rate independence, which has little influence on the test results. The other is that the rate dependence has a great impact on the test results, which can be seen in
Table 13. The test results are in harmony with the results of the theoretical analysis.
5. Discussion
In the present reducer lost motion test standards, there are corresponding requirements for test equipment, test steps, test positions, and sampling points. However, there are no requirements for the change in loading rate.
For the medium modulus precision reducers, such as planetary gear reducers, RV reducers, and harmonic reducers, the metal gear reducers are used mainly, which are manufactured by machining. Since the hysteresis curve method itself is a static test method, the loading rate will not be too high. Therefore, the test may conform to the rate independence. At this time, the loading rate has limited influence on the test results. However, if the influence of loading rate dependence is ignored in the lost motion test for small modulus plastic and powder metallurgy gear reducers, the results may not be accurate.
Therefore, if the accuracy and reliability of the test results of the reduced motion lost should be ensured, the influence of the loading rate dependence during the test process must be reduced, and the rate independence must be maintained. For this, two suggestions can be given: First, the loading rate should be slow to reduce the impact of input on the internal system. However, this will lead to problems, such as the reduction in measurement efficiency. Second, the test index needs to be increased. Before the lost motion test, first, measure the best loading rate. With this loading rate, the test result is more accurate.
Considering the dependence of the loading rate is also essential to the design of the reducer. Lost motion is the key index for evaluating the transmission accuracy of the reducer. The method of designing a lost motion is a problem that designers must consider. Through the research in the paper, it can be found that the loading rate dependence will affect the lost motion of the reducer, which will provide two new directions for the lost motion design of the reducer. (1) In general, changes in input quantities, such as gear material, load change speed and working temperature change, are considered so that the change rate of the internal equilibrium state of the system is faster than the input change rate, and the designed lost motion can be more suitable for the working condition at this time. (2) The “zero lost motion” design of the reducer only compensates for the geometric lost motion. It does not compensate for the unstable elastic lost motion. Compensation of the lost elastic motion is guided by the dependence on the loading rate.
6. Conclusions
Through theoretical analysis and experimental research, the paper discusses the loading rate dependence of the hysteretic characteristics of the reducer and its influence on the lost motion test. The following conclusions can be derived:
- (1)
The hysteretic characteristics of reducers are usually rate dependent, and some are rate independent. Complete rate independent is an ideal state.
- (2)
The dependence of the loading rate affects the lost motion test. The different reducer gear materials have different effects on the loading rate dependence: small stiffness has a large effect, and large stiffness, on the other hand, has a small effect.
- (3)
The premise of ensuring the accuracy of the lost motion test results is to minimize the influence of zero rate dependence.
- (4)
The influence of the loading rate dependence on lost motion design is analyzed. The loading rate dependence needs to be considered in the material selection and zero lost motion design.
