Article

Reduced-Friction Passive Magnetic Bearing: Innovative Design and Novel Characterization Technique

1
Département de génie mécanique, Université Laval, Québec, QC G1V 0A6, Canada
2
Département de génie électrique et informatique, Université de Sherbrooke, Sherbrooke, QC J1K 2R1, Canada
*
Author to whom correspondence should be addressed.
Machines 2013, 1(3), 98-115; https://doi.org/10.3390/machines1030098
Submission received: 1 August 2013 / Revised: 1 October 2013 / Accepted: 3 October 2013 / Published: 28 October 2013

Abstract

:
Friction is mostly unwanted in rotating machines. In order to reduce its impact on the system, the integration of magnetic bearings is frequently regarded as a valid solution. In rotating systems like flywheel energy storage systems (FESS), mechanical losses created by mechanical bearings greatly reduce the overall performance. Magnetic bearings are thus frequently integrated in FESS to eliminate mechanical losses. The simple design of passive magnetic bearings (PMBs), their inherent security, and their very low friction make them perfect candidates for FESS. The main objective, and most important contribution of this paper, is to document an innovative PMB that minimizes energy losses induced by the axial thrust bearing, and to document the methodology used to measure its stiffness and damping. Although PMBs are fairly well documented in literature, no other PMB is designed to reduce the friction generated by the thrust bearing. In order to promote their integration, it is critical to identify their mechanical properties such as stiffness and damping. Hence, another contribution of this paper is to propose a new way to easily characterize any magnetic bearing topology to replace available techniques that only provided the properties for a precise configuration of the bearing. The new technique provides an unprecedented mapping of the forces generated by complex combinations of permanent magnets. Experimental results show that the new PMB can be configured to effectively reduce the force applied to the thrust bearing, resulting in lower friction. This friction reduction is achieved while allowing the proper operation of the bearing. Results also show that the measured stiffness is different from those obtained analytically, suggesting that a magnetic bearing should always be characterized prior to its use.

1. Introduction

In almost every mechanical system, moving parts slide along stationary parts, generating friction and undesired energy losses. Traditionally, plain or ball bearings are used to reduce those losses. However, any system can benefit from a greater reduction of the friction between components. These benefits include a drop in the global energy demand of the system and in parts wear, which can result in a longer product life. For example, in the case of a long-term flywheel energy storage system (FESS), a device that stores energy in the form of kinetic energy, it is vital to minimize friction to achieve long-term storage. In order to do this, magnetic bearings are frequently used in this type of system, eliminating most, if not all, mechanical losses. Recent technological advances in magnetic materials allow the integration of magnetic bearings in a greater number of mechanical systems [1]. As part of a global project consisting in the development of a long-term FESS, a pair of radial PMBs was designed to minimize energy losses. The PMBs were primarily chosen, not only for their very low coefficient of friction [2] and their simplicity, but also for their inherent safety as they do not need control or power to be used. Unfortunately, PMBs are intrinsically unstable, as a result of Earnshaw’s theorem, when all six degrees of freedom are allowed to move freely. As will be shown in this paper, the stability problem can be overcome by blocking the PMB axially, thus, letting the other five degrees of freedom in a stabilized magnetic state. This blocking of the axial movement is accomplished in the paper by using a mechanical plain bearing, hereafter referred to as thrust bearing, chosen for its simplicity and ease of integration. Figure 1 shows the configuration of the bearing designed.
In order to reduce the mechanical friction introduced by this thrust bearing, it is proposed to favorably use the axial repulsion of the radial PMB to reduce the effective force on the ball of the thrust bearing. The main objective of this paper is, thus, to document an original design of a radial PMB that allows one to control the load on the thrust bearing required to stabilize the rotor. The load can be controlled by varying the position of the stator relatively to the rotor.
To facilitate the integration of the PMBs in the system, it is essential to know the mechanical properties of the magnetic bearings, namely the stiffness and the damping, as well as their operating limits. Equations have been proposed to predict the properties of different types of PMBs [3,4,5]. However, these equations will provide the stiffness, given that all parts are perfectly built and magnetized, which is not the case. Imperfections of experimental setups and magnetization patterns will in general cause the measured values to deviate from the theoretical values. Numerical models using finite element methods (FEM) are also proposed in the literature to improve the precision of the results [6,7,8]. Furthermore, experimental procedures are proposed in the literature to measure the stiffness and the damping of passive, active or superconductor magnetic bearings [7,8,9,10,11,12,13]. Almost all of these methodologies use a uniaxial load cell measuring the force generated in a single direction, which results in an incomplete characterization. It should also be noted that the measuring techniques proposed in the literature are usually only summarily described and hard to replicate. Although documented experimental measurements are accurate, they require a large number of manipulations often making the characterization harsh.
Figure 1. Configuration of the passive bearing using an axial PMB and a mechanical thrust bearing.
Machines 01 00098 g001
In response to the lack of a documented experimental methodology, this paper also presents a new technique that allows one to completely characterize any types of magnetic bearing in a limited number of trials. The method has been tested and validated while characterizing the newly designed PMB. The proposed technique could also be used with active and superconductor bearings (AMBs and SMBs, respectively) and more complex arrays of permanent magnets such as conical arrays or a combination of radial and axial magnets.
Section 2 of the article contains a description of the new bearing, the experimental setup and the methodology used for the characterization. Following this, theoretical calculations and results for the stiffness are presented in Section 3 of the paper. Those results are compared to the experimental results obtained with the new technique. Finally, ideas for future work are proposed.

2. Design of the Bearing and Characterization Method

2.1. Design of the Magnetic Bearings

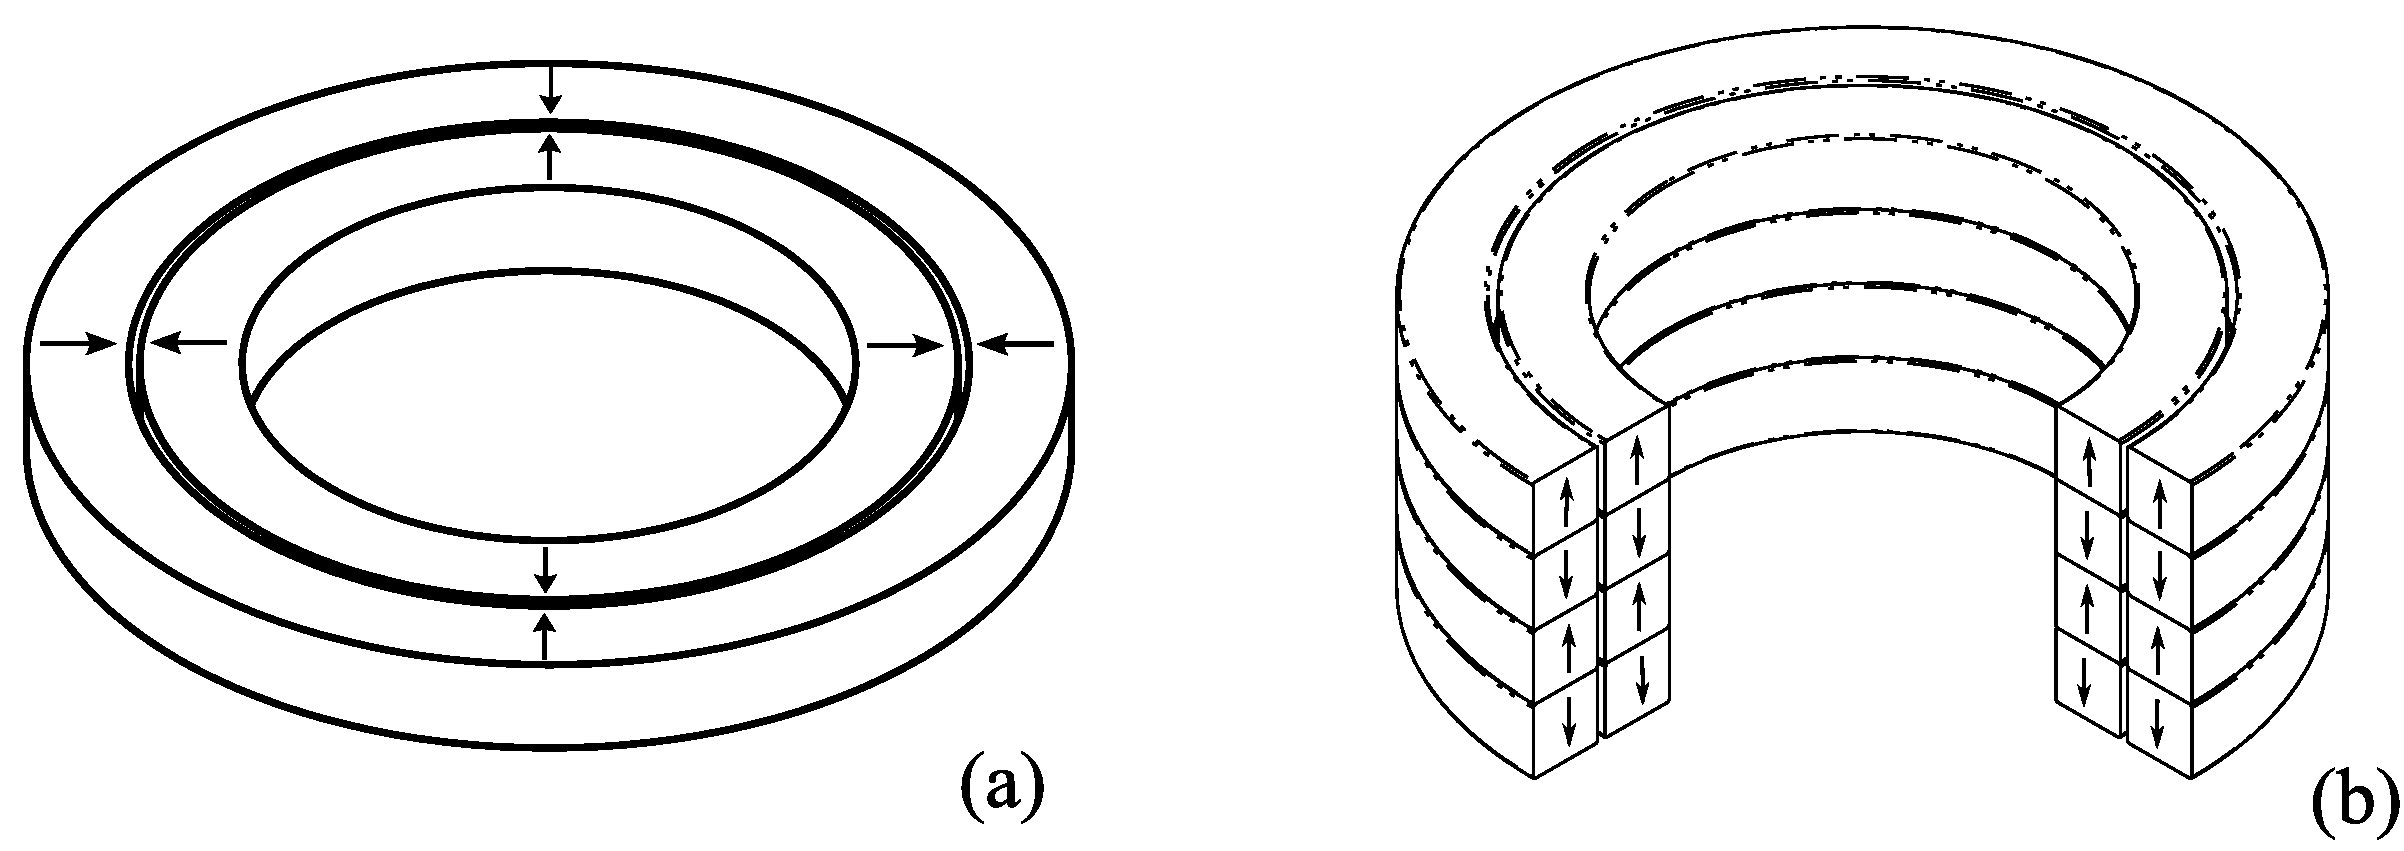
The radial bearings investigated in this paper were developed using ring-shaped neodymium magnets (NdFeB). Each bearing uses the configuration proposed by Yonnet et al. [3]. This arrangement is achieved by placing two concentric magnets so that the repulsive reaction forces will center the magnets relative to each other. Figure 2a shows the positioning of a rotor magnet (inside) and a stator magnet (outside). Moreover, it has been demonstrated that it is possible to modify global magnetic field and increase the generated forces by stacking many magnets with alternating poles. Figure 2b illustrates the stacking of four pairs of magnets. A 4-layer and a 5-layer magnet configuration were applied in the experimental setup.
Figure 2. (a) A pair of concentric ring-shaped magnets repulsing each other and (b) orientation of stacked magnets to increase the stiffness of a radial PMB. The arrows indicate the orientation of the magnetic field. Opposed arrows mean repulsion.
Machines 01 00098 g002
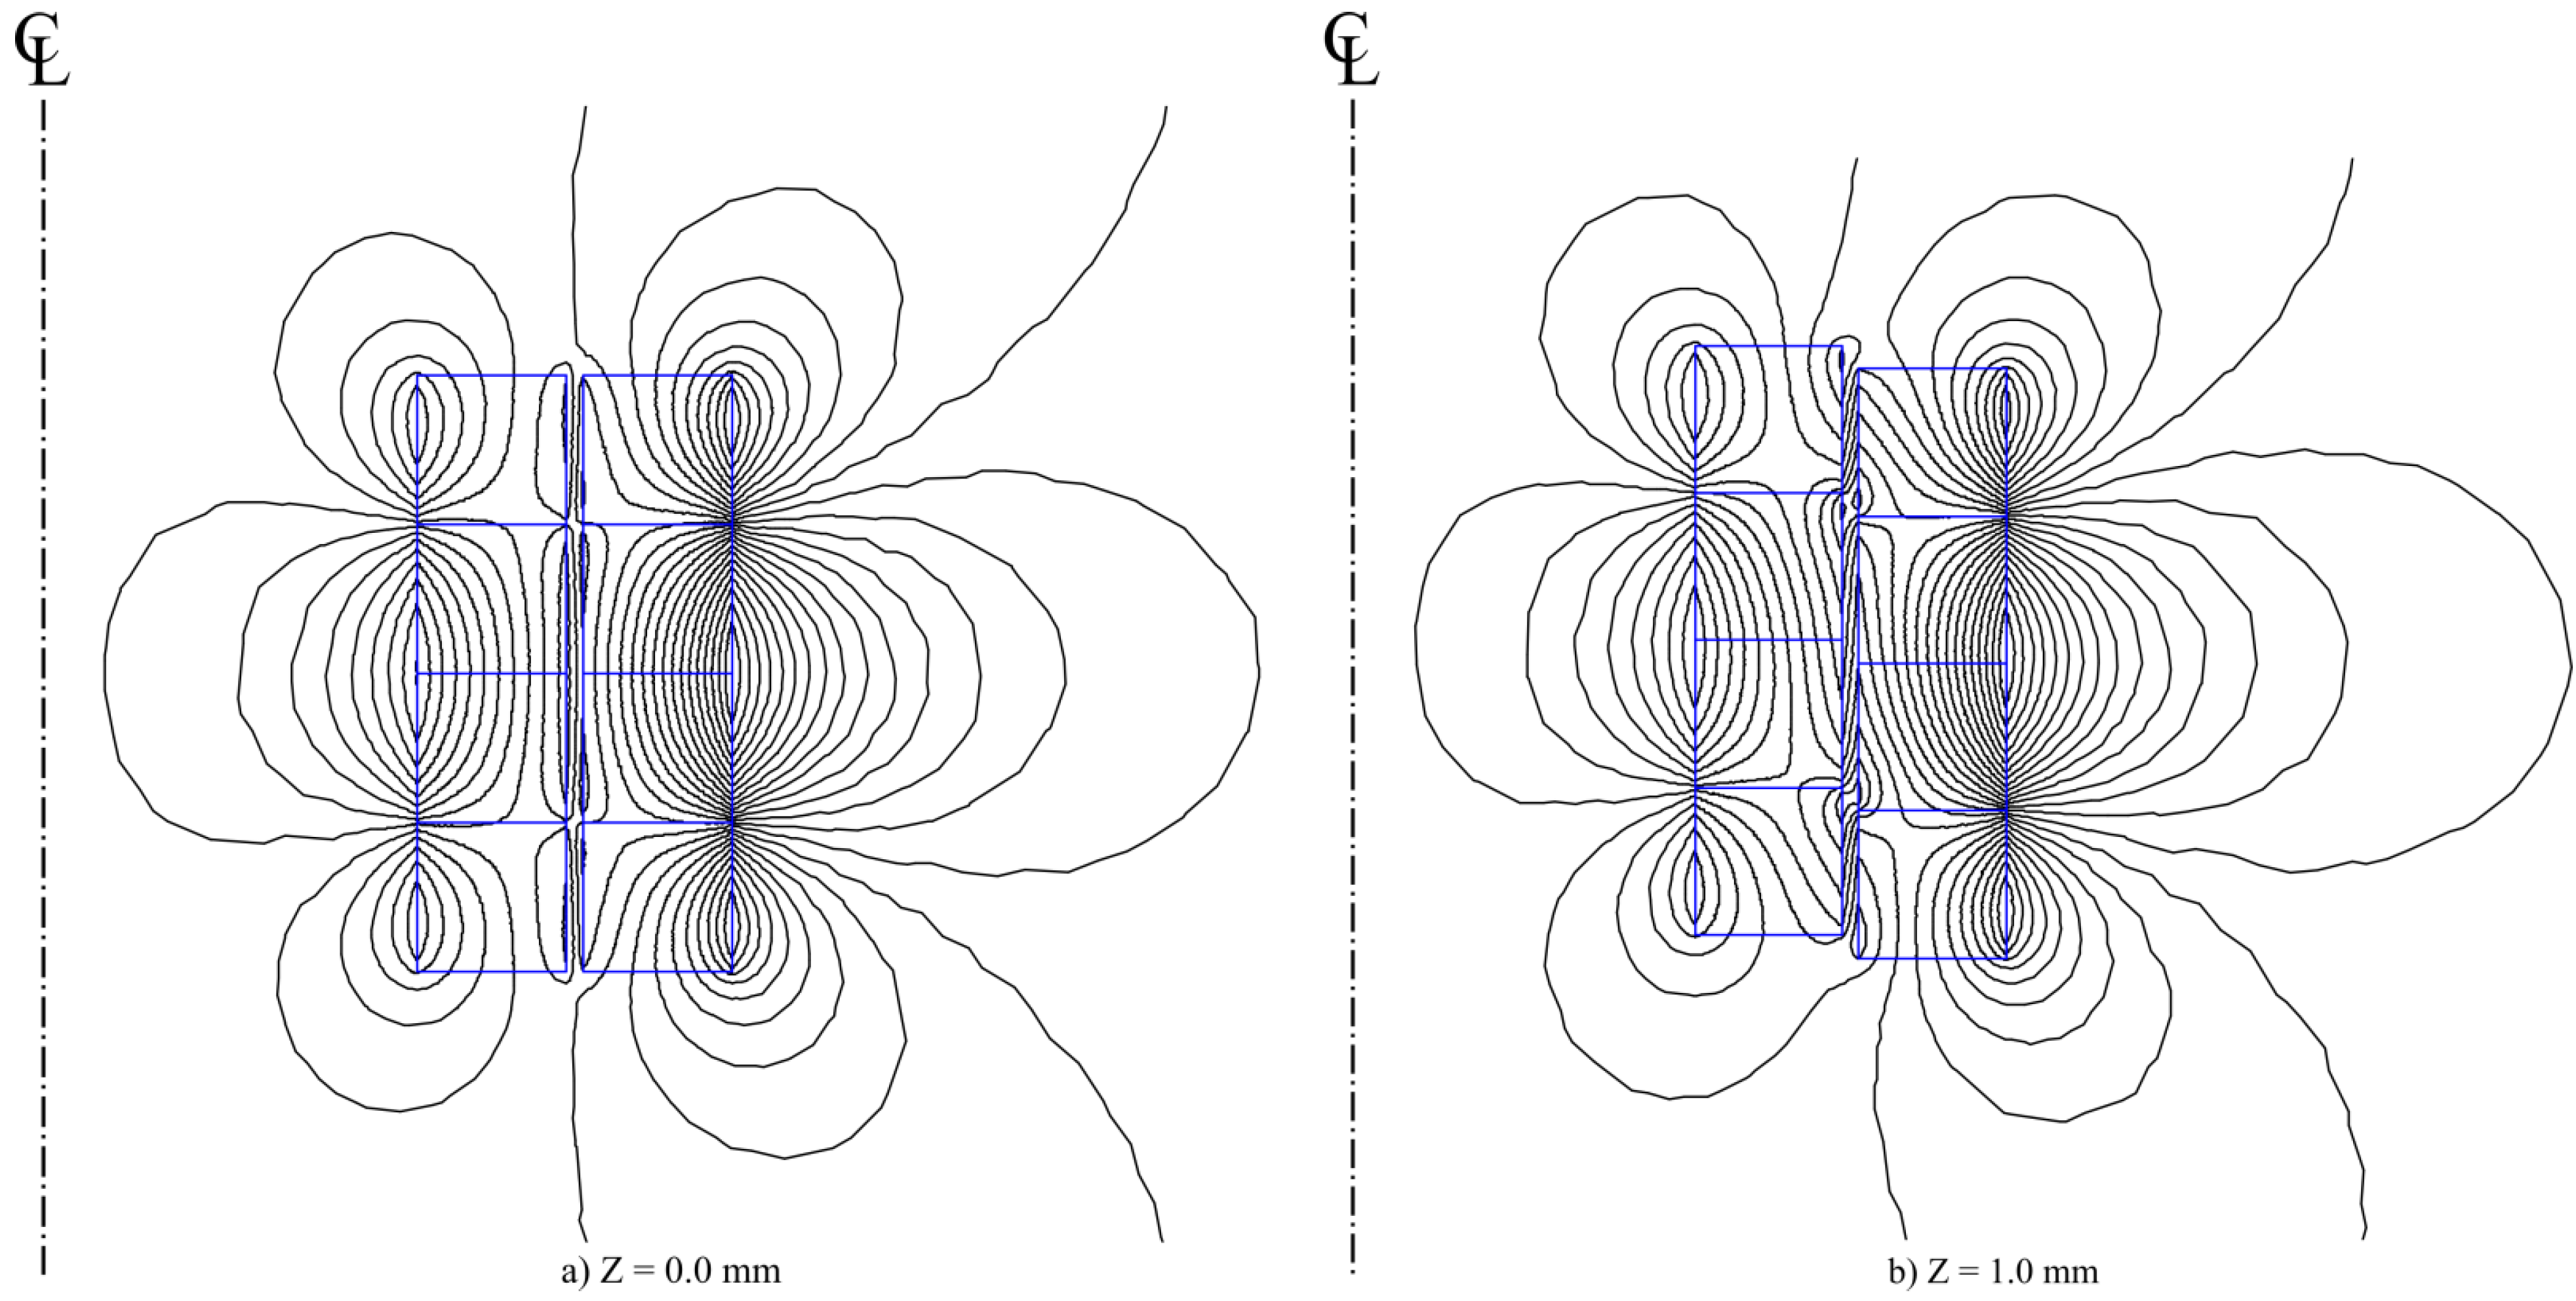
Figure 3 shows the magnetic field resulting from this type of assembly as calculated using a FEA model. For a perfect alignment of the magnets (a), it can be seen that the magnet packs repulse each other radially but do not interact vertically (all flux lines in the air gap are parallel to the PMB axial direction). As this position is unstable, Figure 3b shows what happens when the stator is moved axially downward. In these configurations, the rotor is still centered, but there is a vertical force generated that pushes the rotor away (Flux lines in the air gap are both axially and radially oriented). This phenomenon is particularly important in the new design proposed in this paper since the vertical force generated is used to reduce the load on the thrust bearing (see Tungsten carbide ball in Figure 5).
Figure 3. Magnetic flux lines generated by the PMB for different axial positions obtained with an axisymmetric FEA model. The centerlines are indicated left of each array. (a) Magnetic flux lines for a perfect axial alignment of the rotor and the stator, (b) Magnetic flux lines when an axial misalignment of the components is introduced.
Machines 01 00098 g003
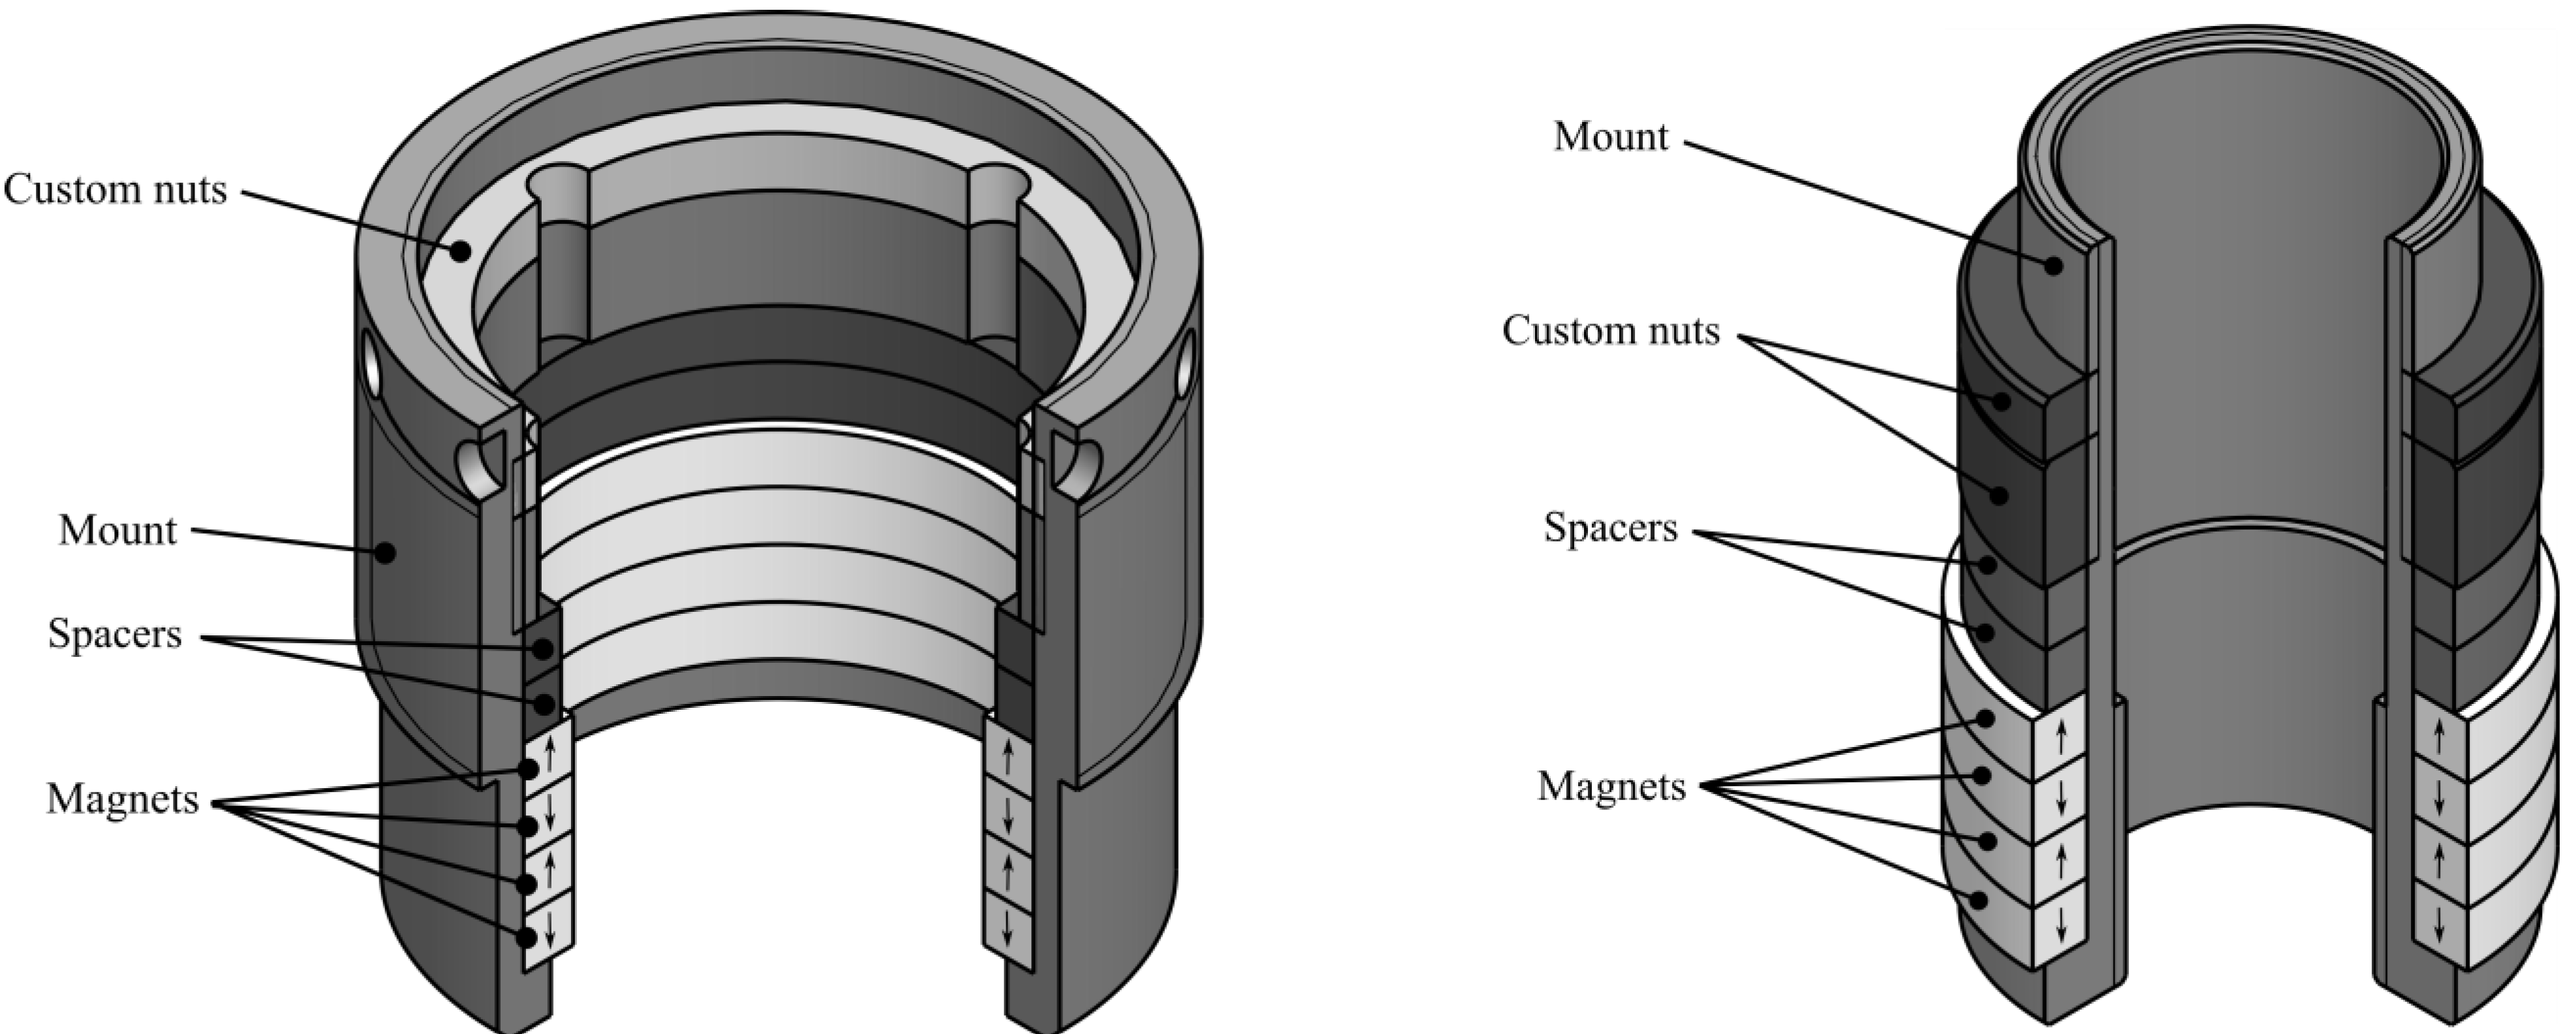
Numerous mechanical parts had to be designed to hold together the magnet assembly subject to high repulsive forces. The rotor and the stator of each bearing are composed of a magnet mount, ring-shaped magnets, spacers and custom nuts. Figure 4 shows a cut-away view of both components, detailing each assembly.
Figure 4. Cut-away view of the stator (left) and the rotor (right).
Machines 01 00098 g004
The mounts of the rotor and the stator were dimensioned so they could accept from two to six magnets to increase or decrease the forces. The rotor mount was designed to ensure that the magnets of both the rotor and the stator are aligned even when other magnets are added. All the components were fabricated using aluminum 6061-T6 for its good mechanical and non-magnetic properties. Most of the parts were also designed to be fabricated in a single operation, in order to reduce the geometric errors. Tight tolerances were achieved on all components with the only exception of the magnets, which were fabricated by a supplier with no information available on the quality control. They were custom-made with a square section of 6.35 mm. Baden et al. [14] proposed that a height/length ratio of 1 represents a good design to optimize the generated forces. The magnets of the rotor have an inside diameter of 38.1 mm and those for the stator have an inside diameter of 52.2 mm. Therefore, the radial air gap between the magnets is 0.7 mm. The magnets were dimensioned using theoretical equations detailed in the Calculation section of this paper.
For the rotor, magnets with opposing magnetization were inserted on the mount. The specially designed nuts were used to move the magnets until they touched each other. The same procedure was used to assemble the stator. The magnetization of each magnet was measured using a Gaussmeter and calculated using a finite-element software. Results showed that the magnets have a N33 grade according to the standard MMPA No. 0100-00.
The bearing assembly also includes a thrust bearing, which is composed of a carbide tungsten ball (Ø = 6.35 mm) and a M7 tool steel surface. The ball is located at the extremity of the rotor and the tool steel surface is integrated to the base of the bearing. When properly lubricated, the coefficient of friction of the thrust bearing is approximately 0.1.
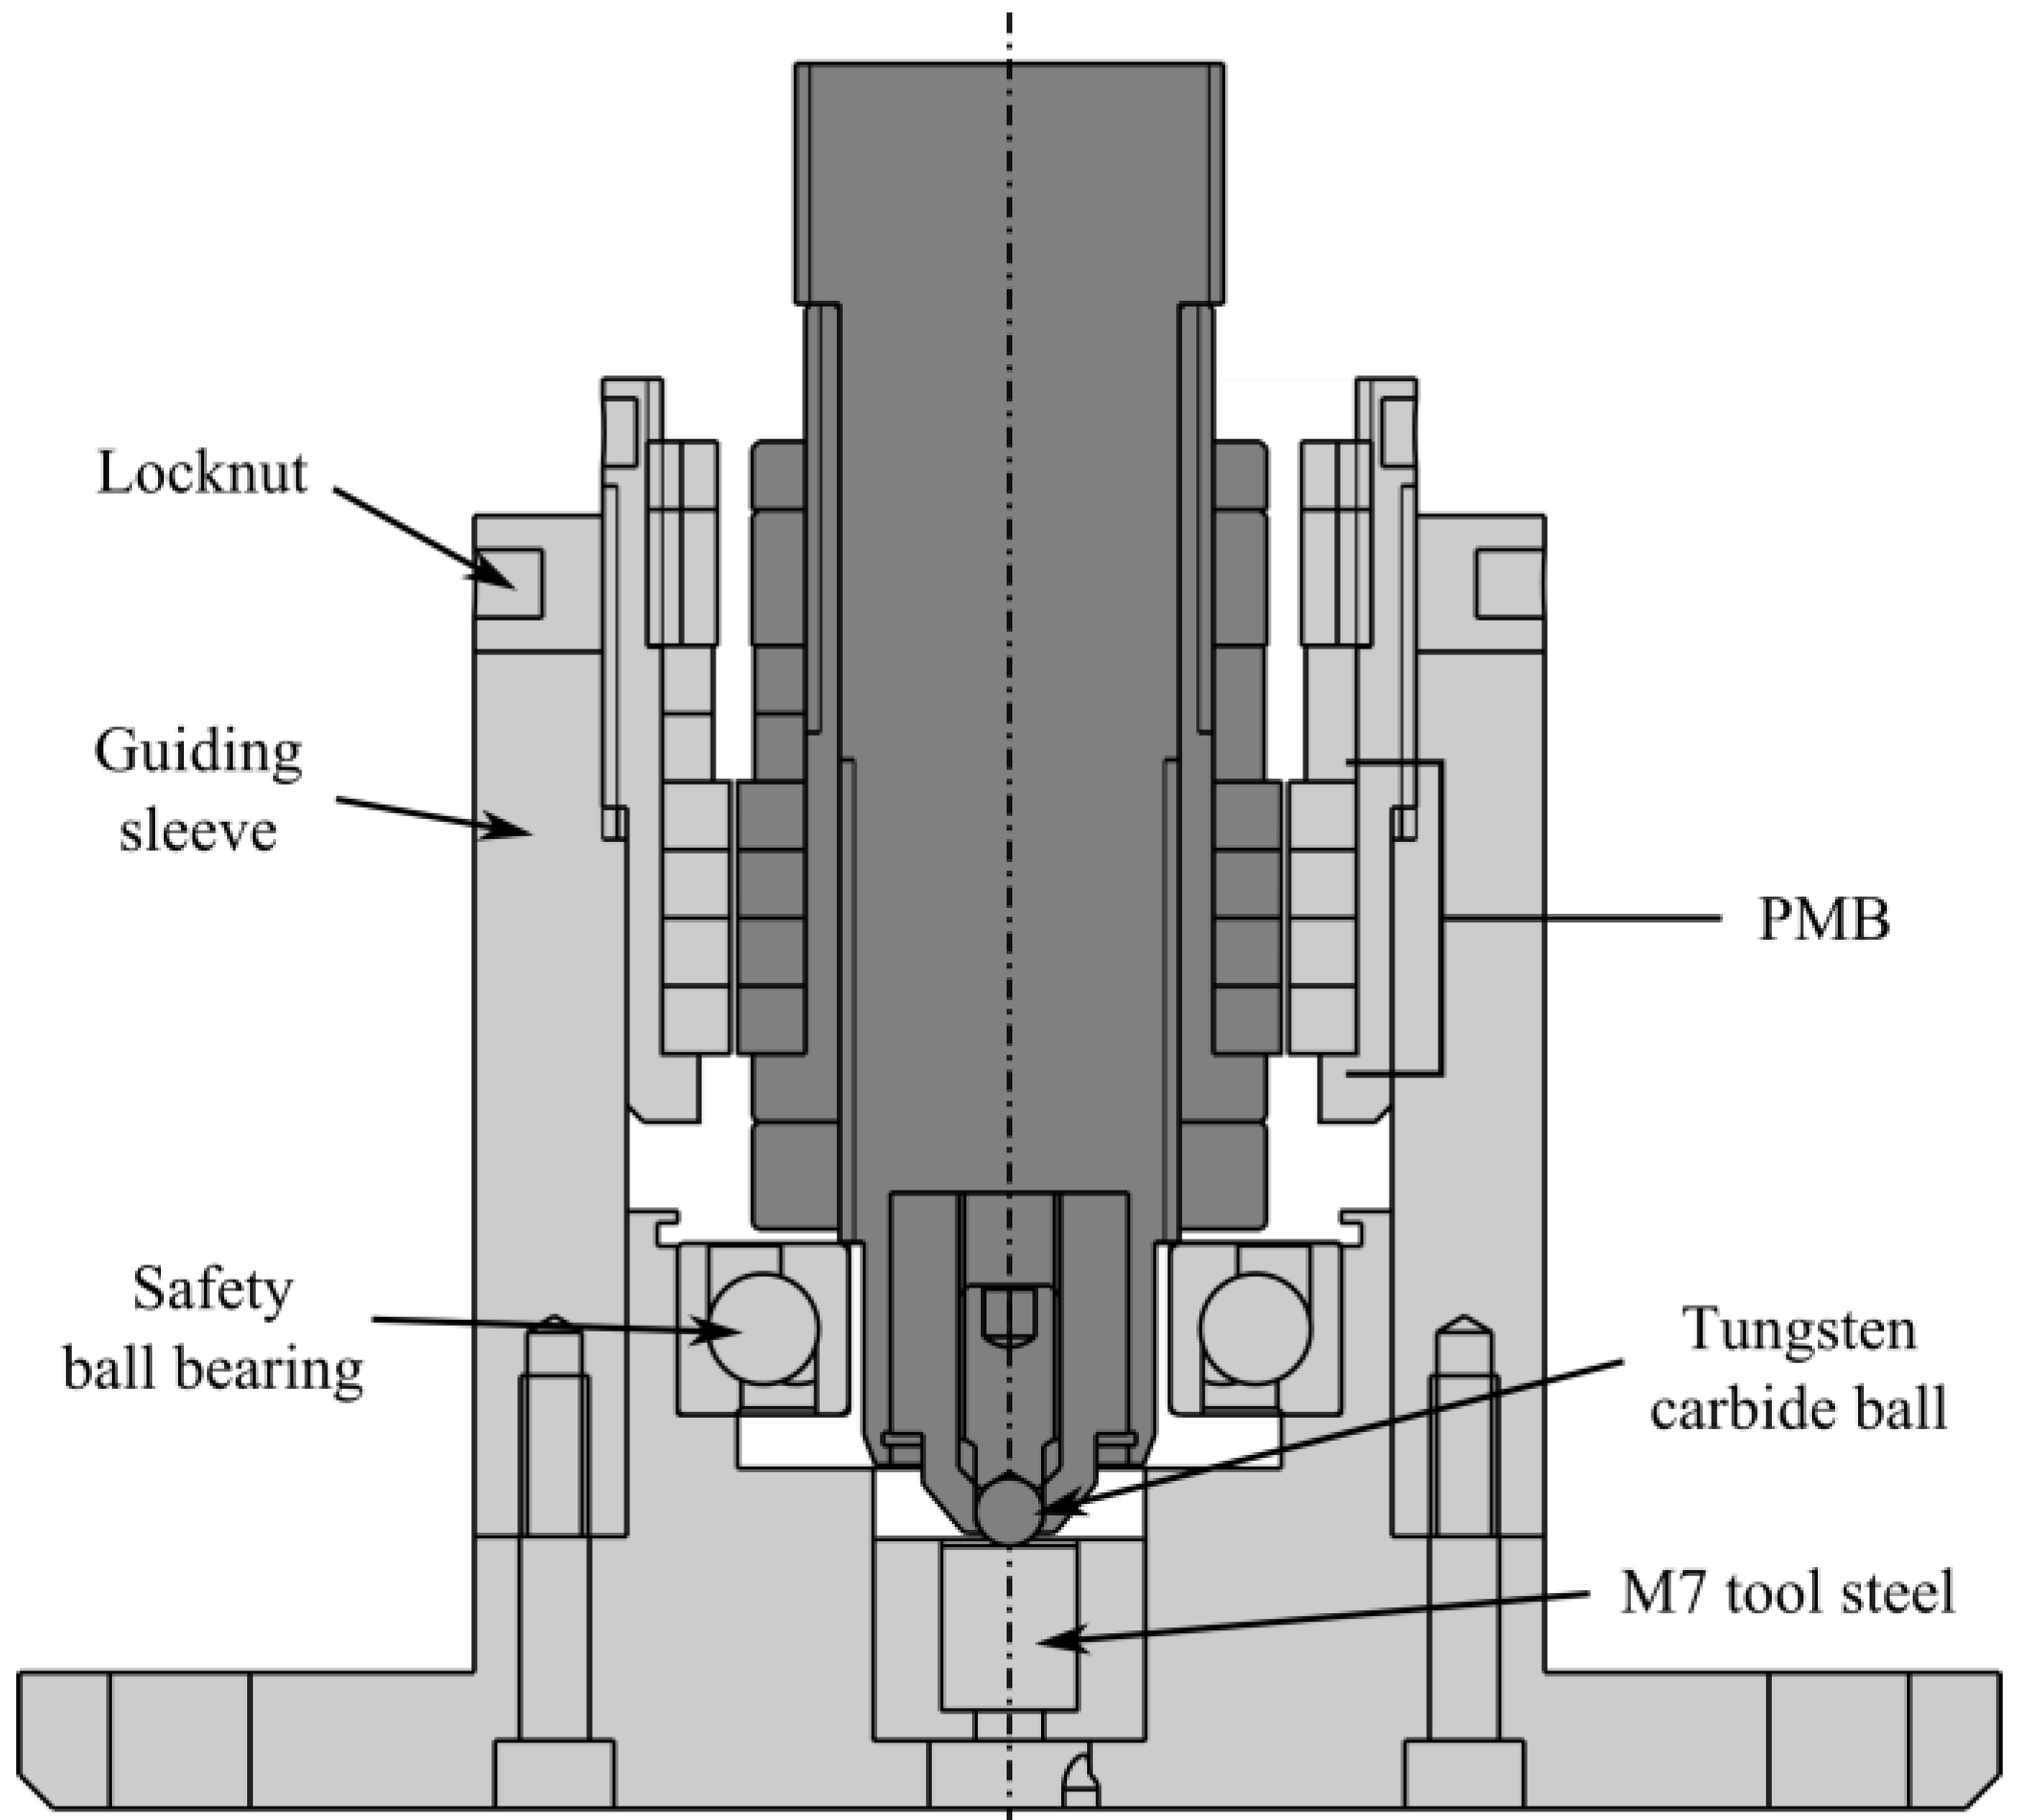
Another mechanical bearing was implemented for safety purposes. A radial ball bearing is used to prevent any contact between the rotor and the stator of the PMB. The gap between the shaft and the inner ring of the ball bearing was set at 0.45 mm. It should be noted that although it is mandatory to use the thrust bearing with the PMB, it was not included in the characterization to avoid its possible influence on the results. Figure 5 shows the primary components allowing the safe motion of the rotor: the PMB, the thrust bearing and the ball bearing used for safety.
Figure 5. Simplified cut-away view showing bearings used for a safe operation. The rotor and stator are shown in dark and light gray, respectively.
Machines 01 00098 g005
Figure 5 also shows the apparatus used to vary the axial position generated by the radial PMB. The stator is guided and locked in place by a partially threaded sleeve and a specially designed locknut. As the rotor is always placed at the same position, the force applied on the thrust bearing can be reduced by lowering the stator of the PMB. The sleeve has 16 threads per inch in order to have a relatively small vertical displacement (1.59 mm) for a full rotation of the stator. Finally, a load cell was placed beneath the steel surface of the thrust bearing to measure the force applied to it.

2.2. Characterization

2.2.1. Experimental Setup

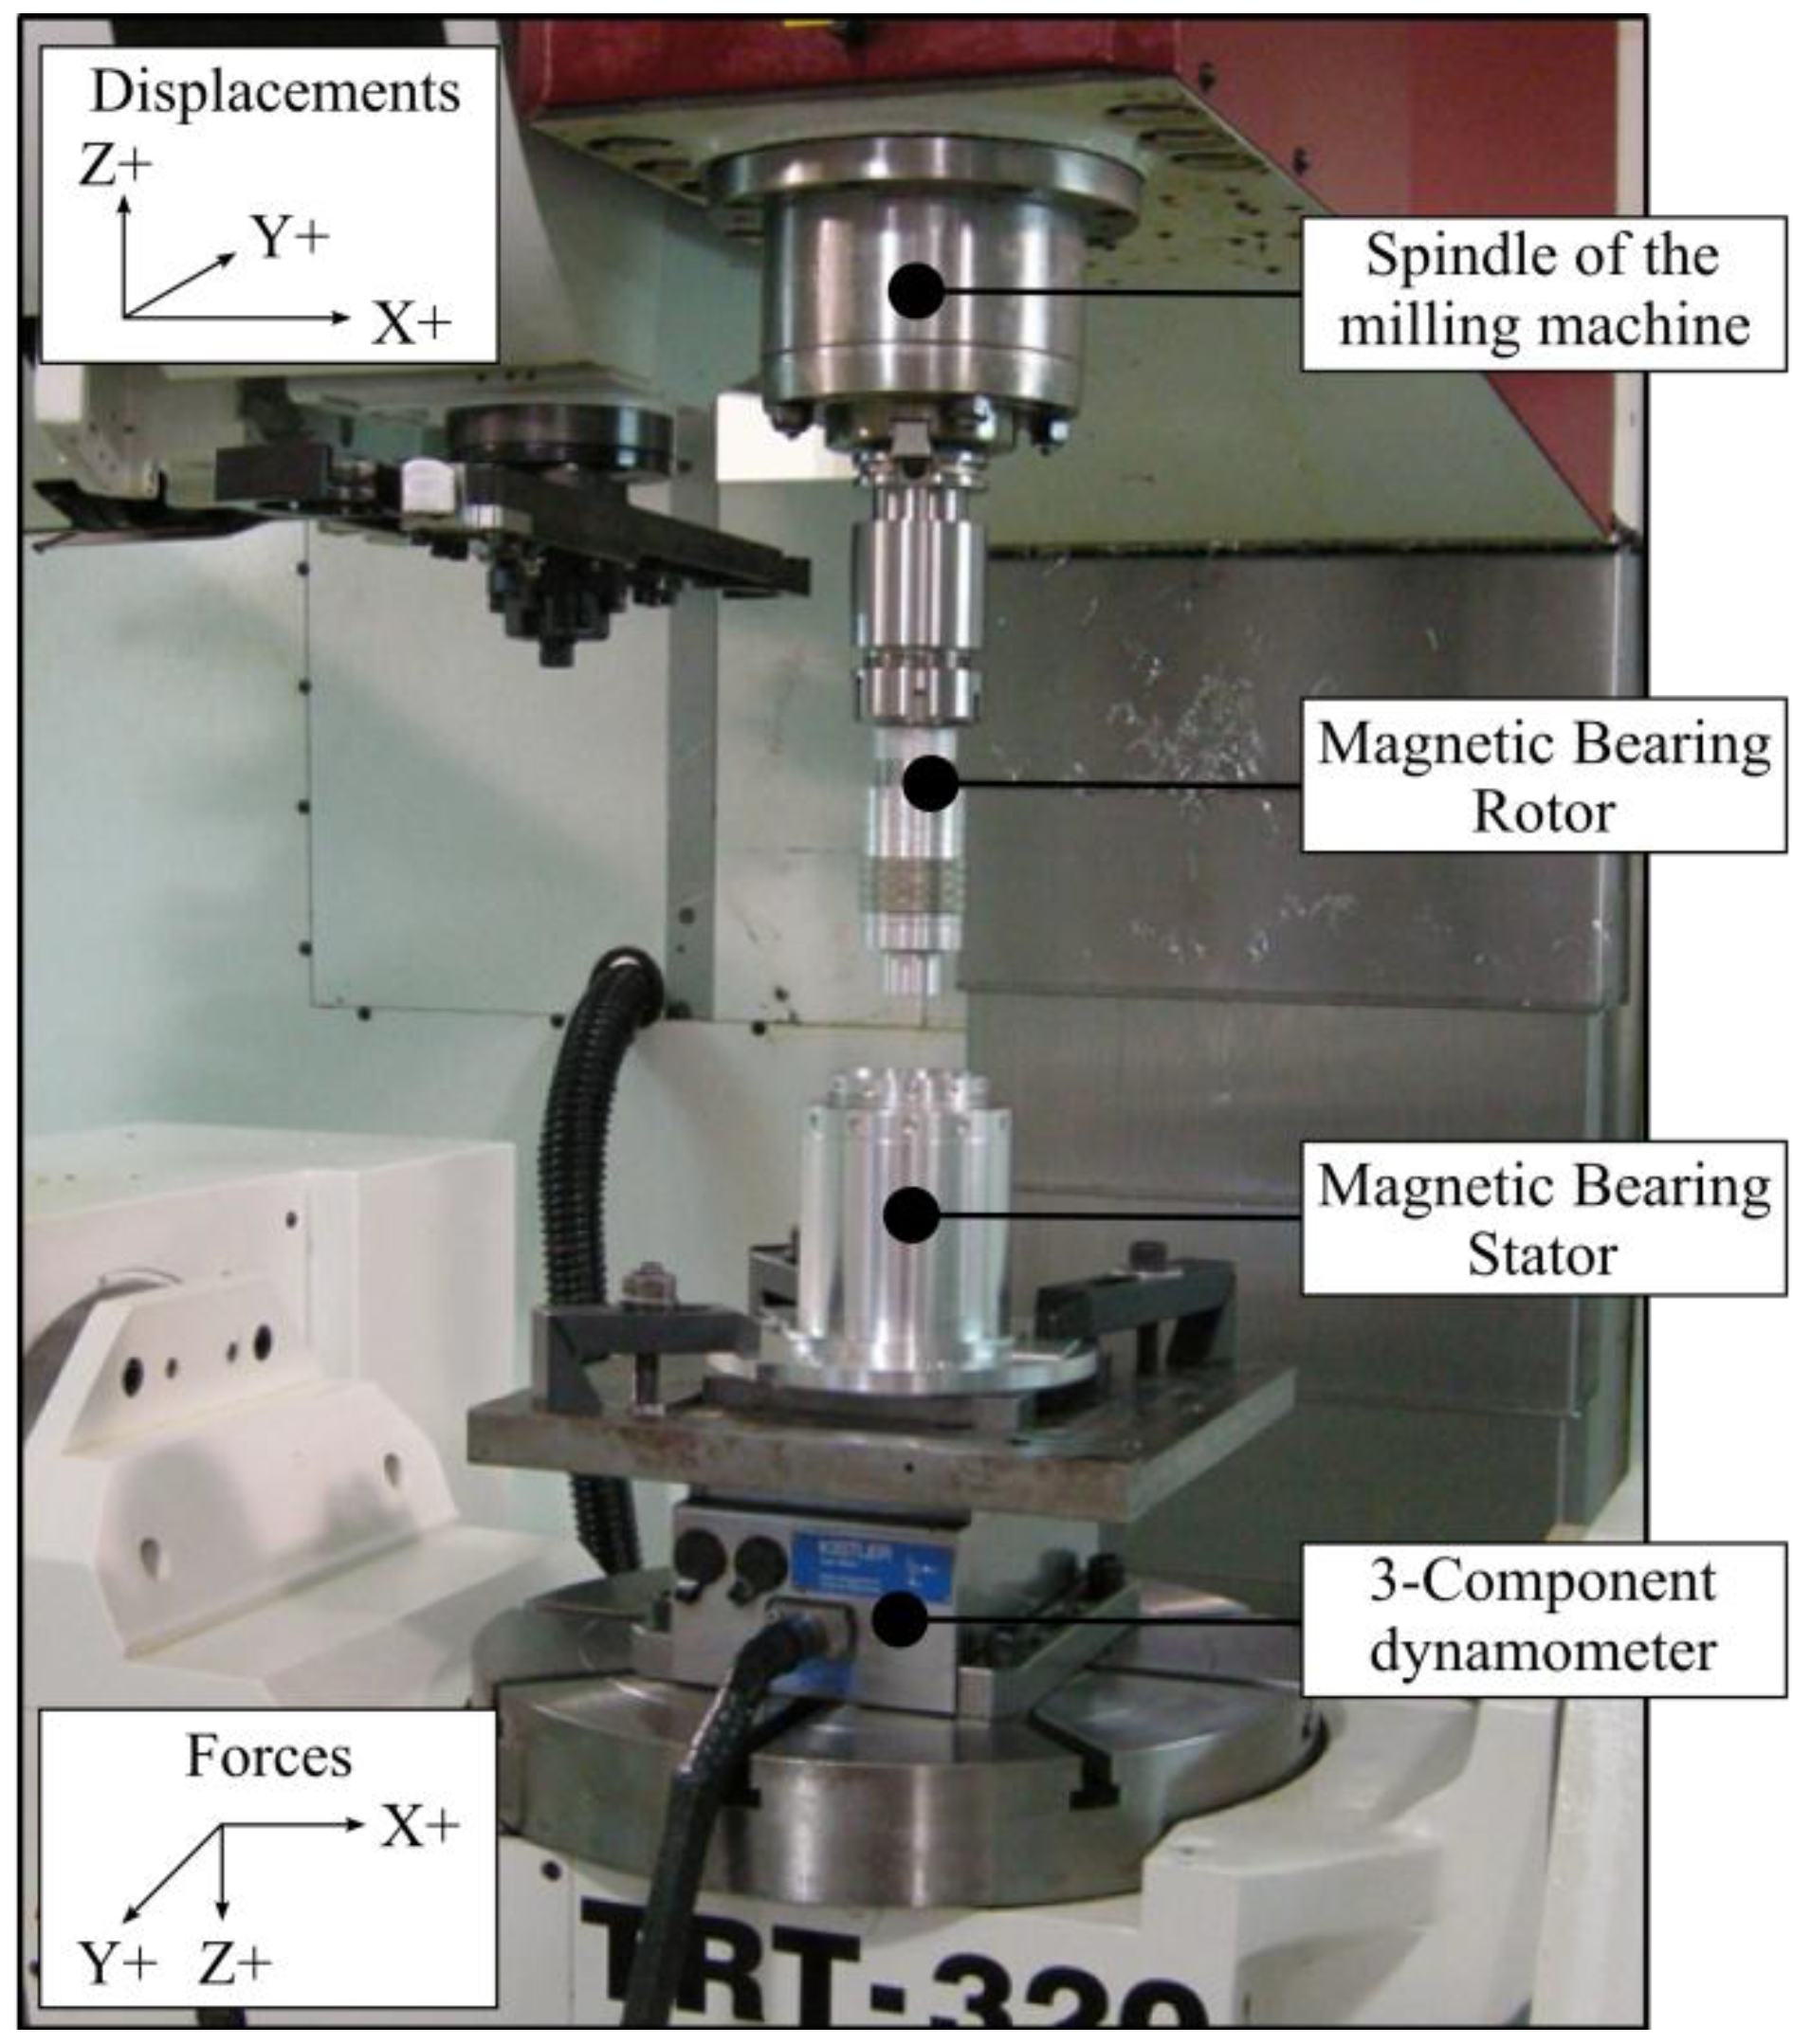
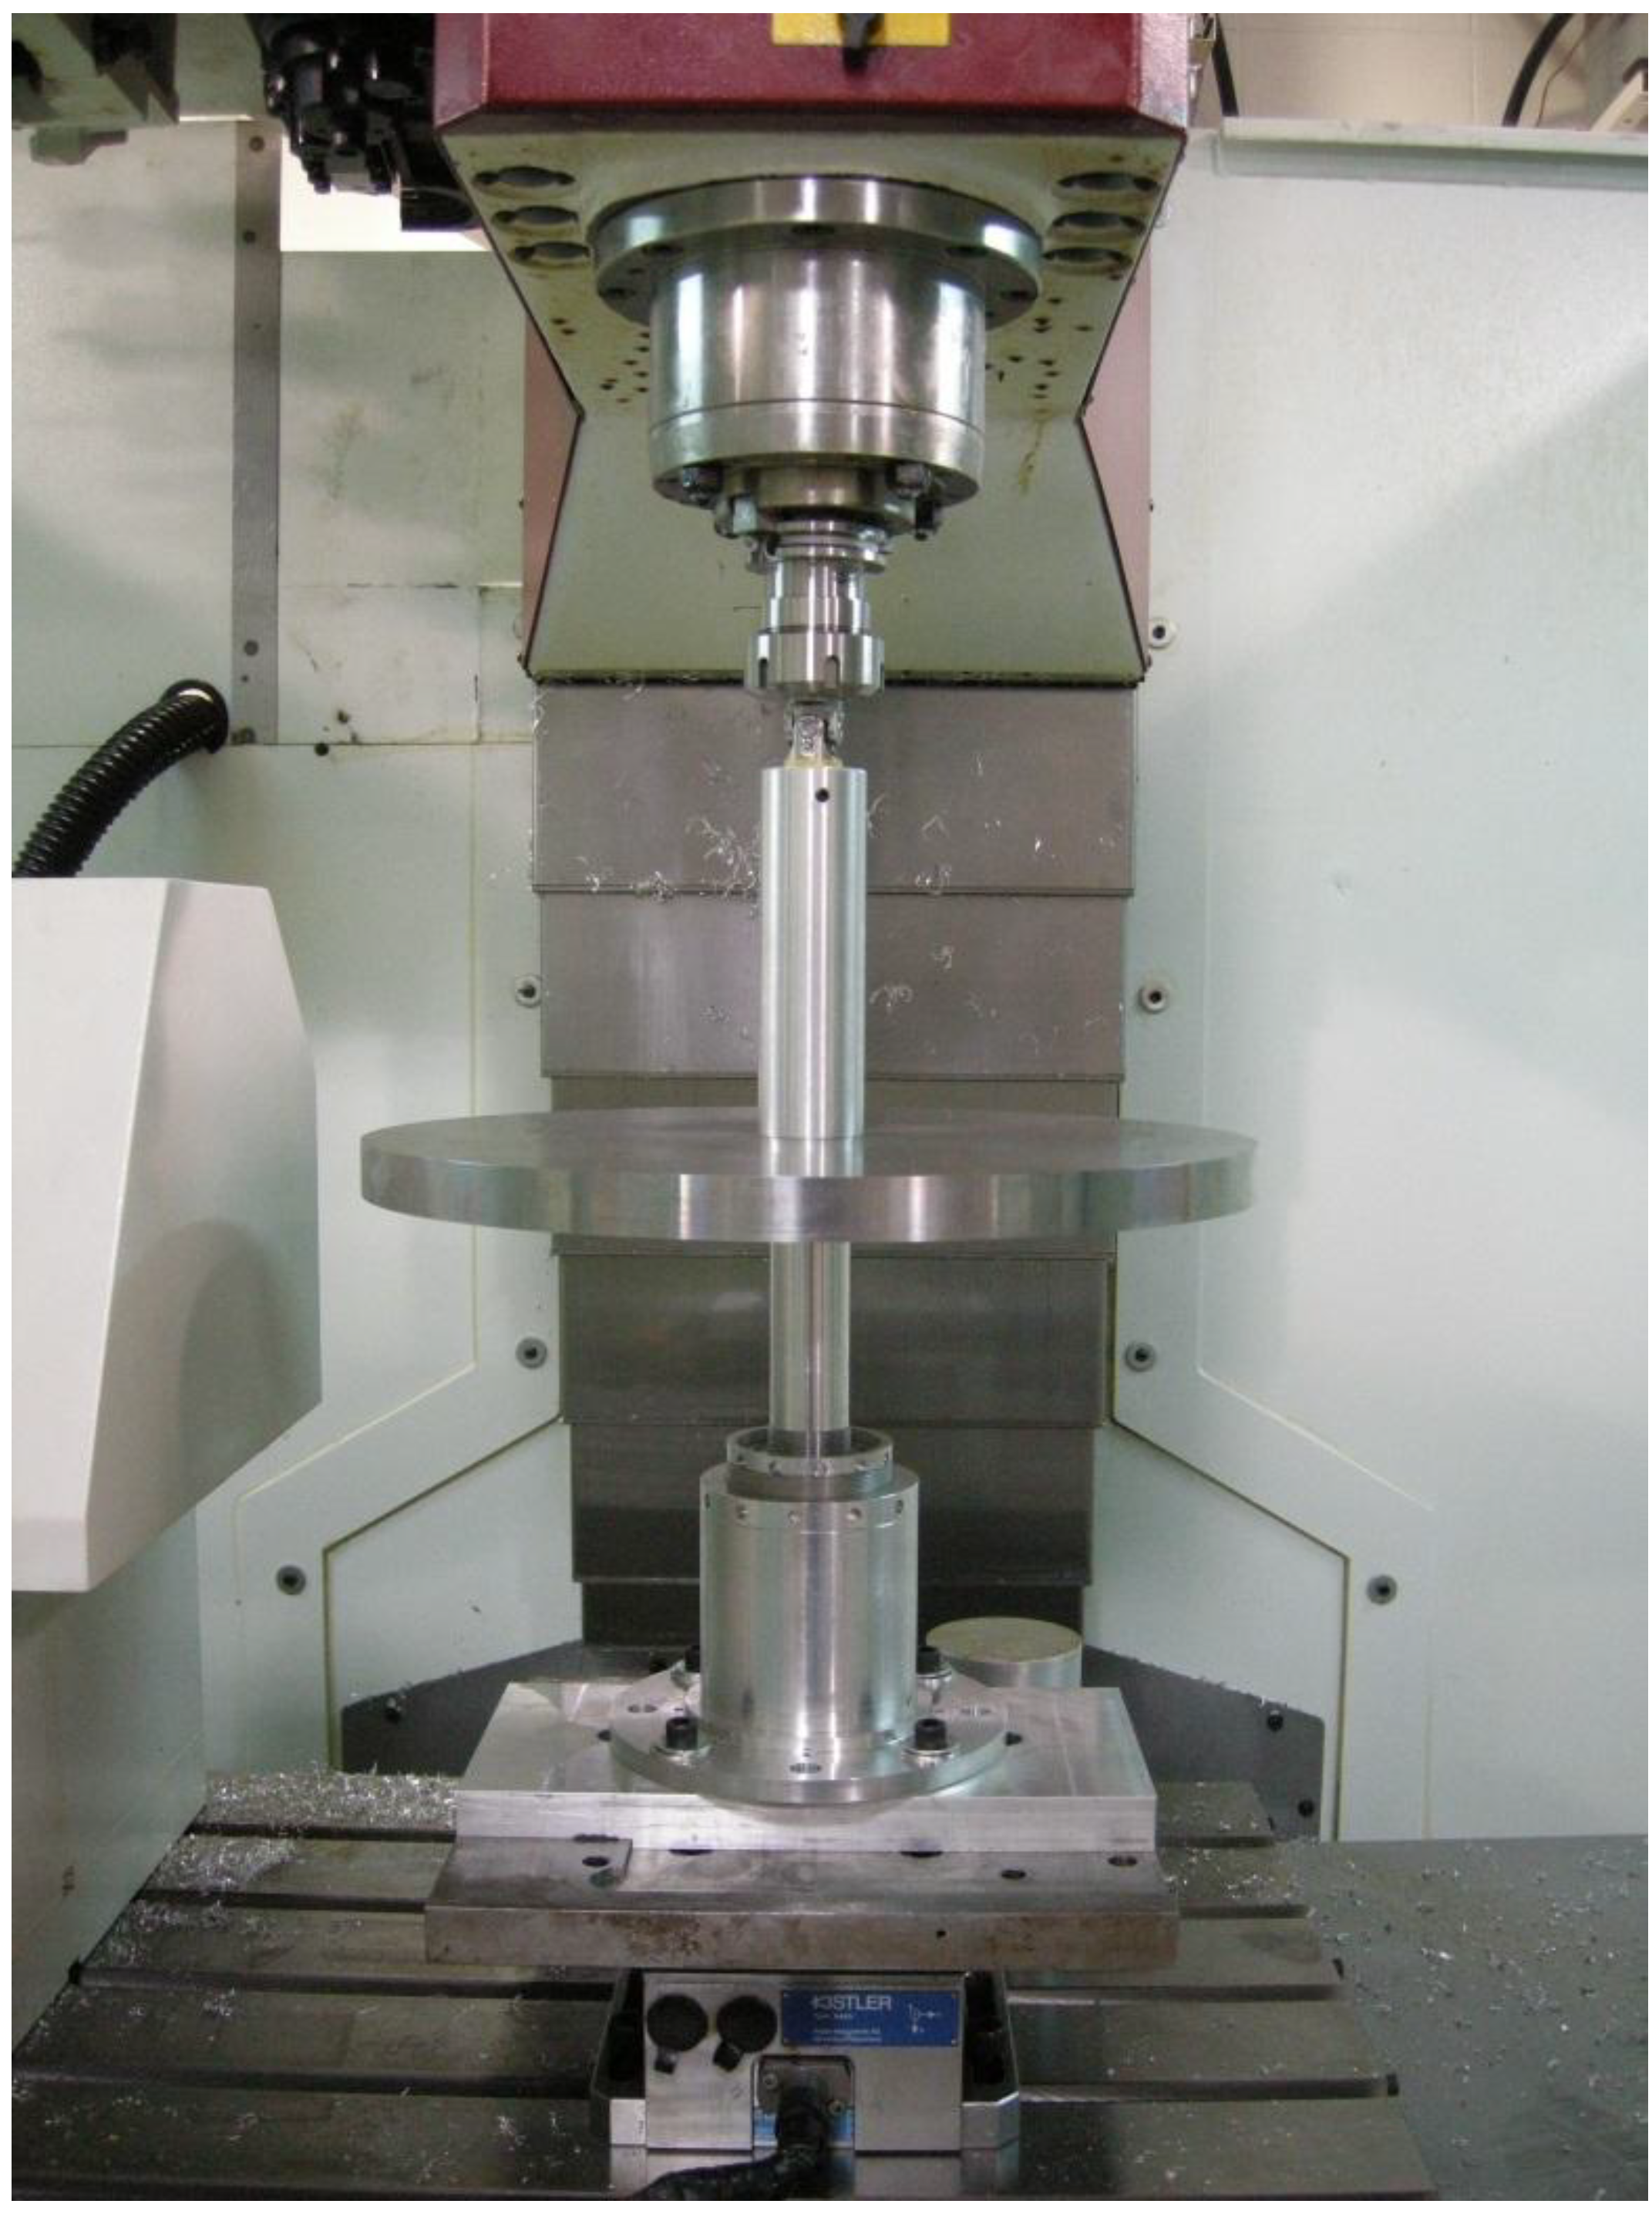
The stiffness of the bearing was obtained by measuring the forces generated by the relative positioning of the concentric magnets. To achieve this, the proposed methodology used a milling machine (Fryer TRT-320 5-axis) and a 3-component dynamometer (Kistler Type 9443B). The use of the milling machine is justified by the precision of its displacements and the stiffness of its construction. It should be noted that a 3-axis milling machine could be used for the characterization. The 3-component dynamometer is a device that measures forces in three perpendicular directions (X, Y, and Z) simultaneously and in real time. The high stiffness of both the milling machine and the dynamometer prevents any undesired deflections of the setup eliminating a source of error in the measurements. Figure 6 shows the magnetic bearing installed on the dynamometer and the milling machine. It also shows the coordinate system of the measured displacements and forces.
Figure 6. Experimental setup used to measure the forces generated by a displacement of the rotor relatively to the stator.
Machines 01 00098 g006
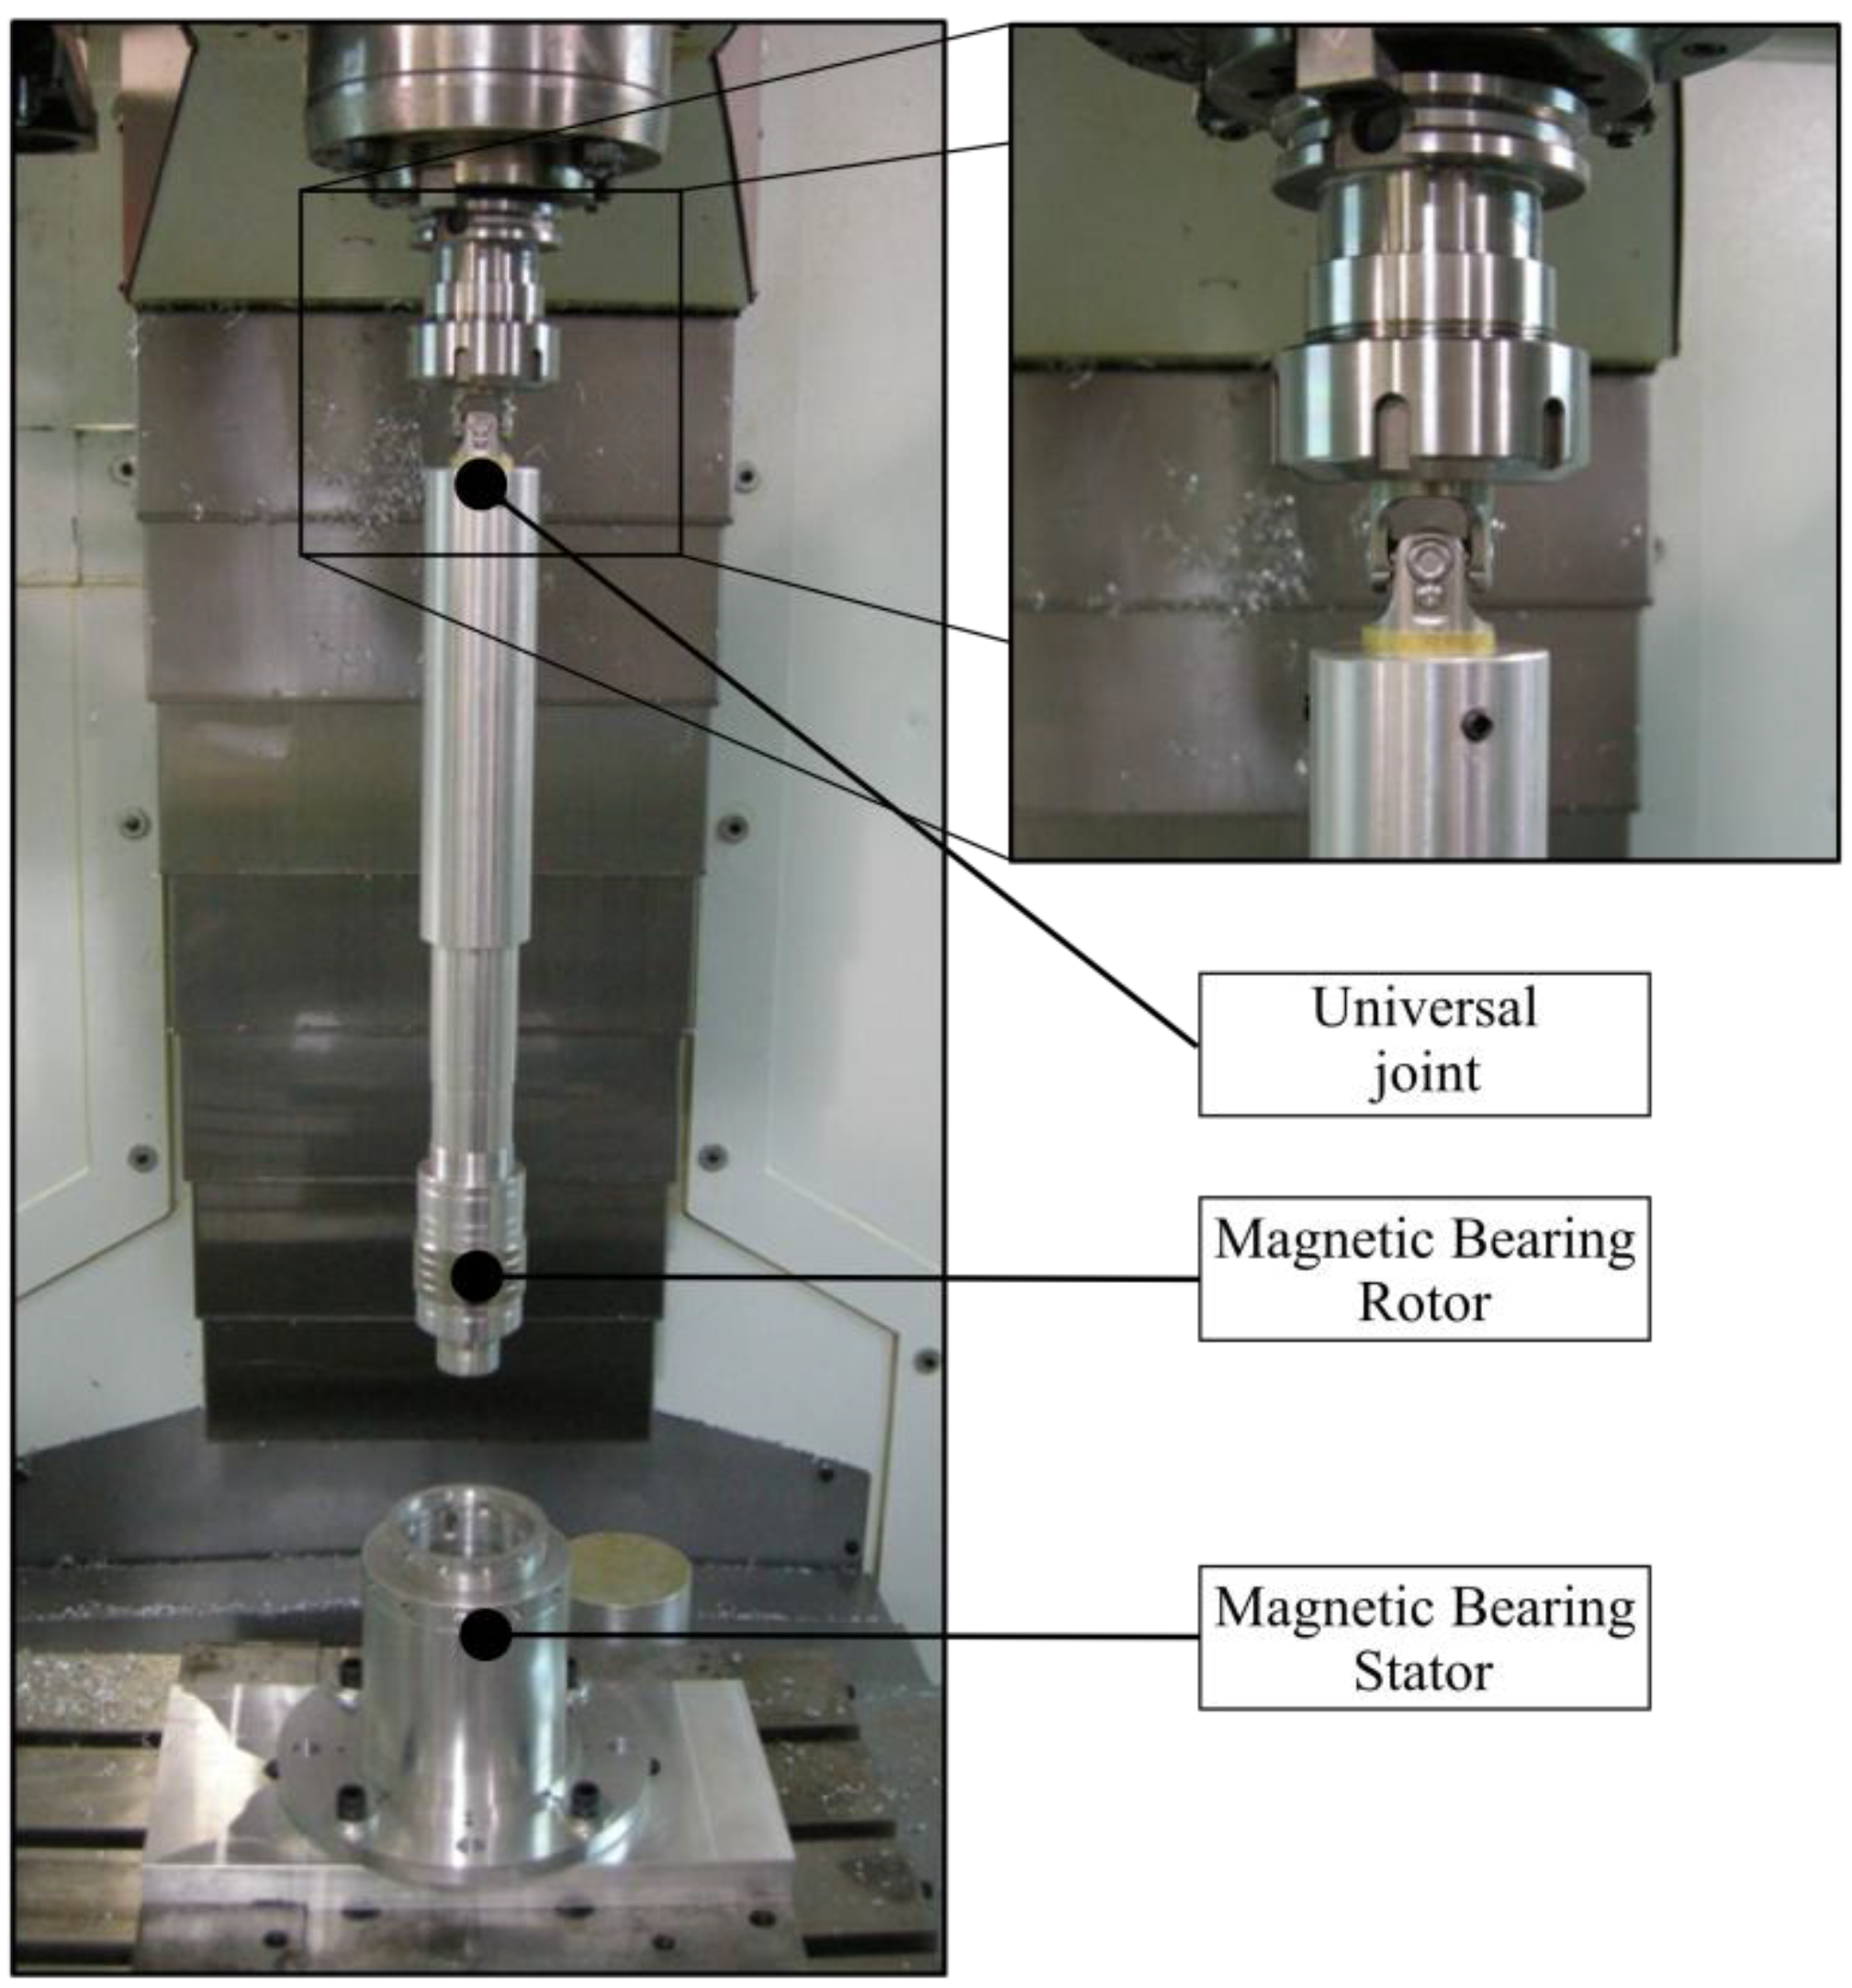
Two different setups were necessary to achieve all the measurements. The first setup was used to measure the axial and radial stiffness of the bearing while the second setup allowed the measurement of its damping. The main difference between the two setups was the presence, in the second one, of a universal joint with two degrees of freedom allowing the characterization of the damping. Figure 7 shows the second setup, which included the universal joint and a longer shaft. A longer shaft was used to give the possibility of varying test parameters by adding weight to the system.
Figure 7. Experimental setup used to characterize the damping of the magnetic bearing.
Machines 01 00098 g007
The characterization of the damping was achieved with an accelerometer placed on the shaft near the bearing. An impulse was applied to the shaft with an impact hammer. The impact was given on the side opposite to the accelerometer. The response was acquired at a rate of 500 Hz to ensure the quality of the results.

2.2.2. Experimental Procedures

Two experimental procedures were defined to measure the properties of the magnetic bearing. The first procedure was destined to obtain the axial and radial stiffness of the bearing while the second was used to measure the damping of the bearing. The first step for both procedures was to measure the position of the stator and the length of the shaft used to hold the rotor. These measurements were done using the milling machine’s integrated probes. The next steps of both techniques are described in the following sections.

2.2.2.1. Stiffness

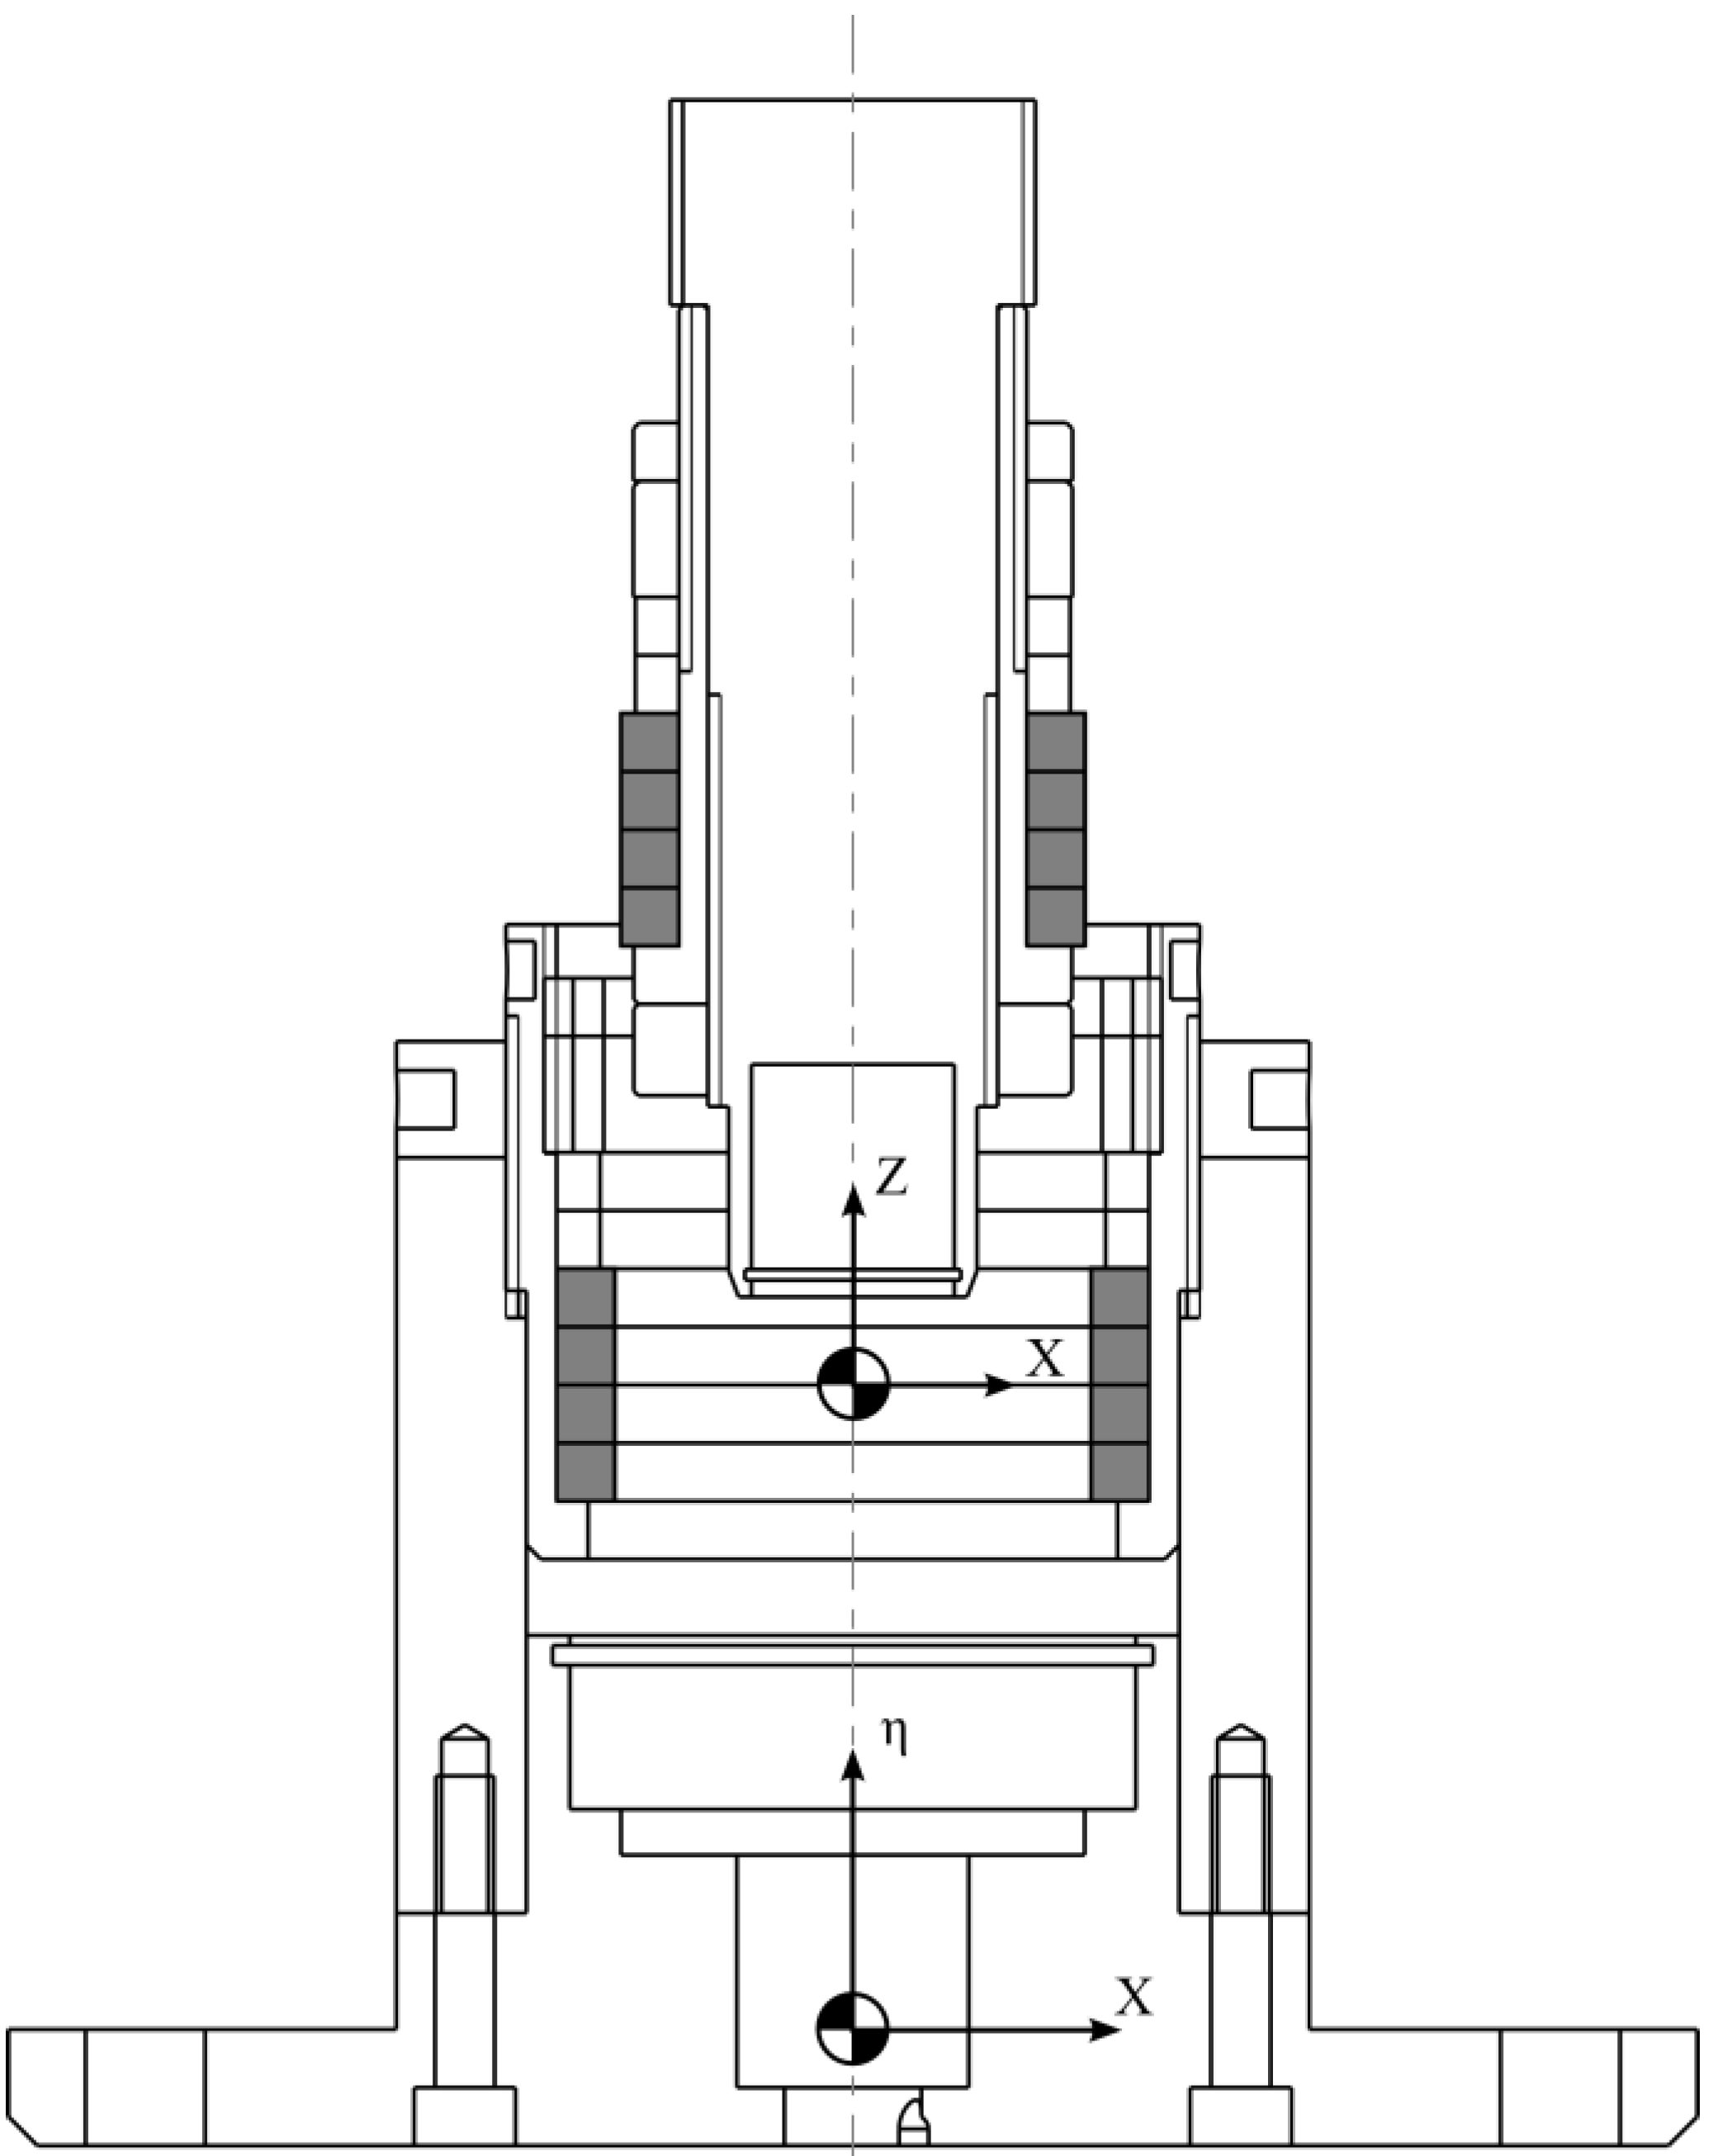
Two types of sweep were used to measure the stiffness. The first type was a vertical sweep and the second a lateral sweep. For the vertical sweep, the rotor was positioned centered (X = 0.0, Y = 0.0), at an initial height above the stator (η = 80.0 mm). The position η = 0.0 mm was defined as the base of the bearing as shown on Figure 8. It should be noted that the spindle of the machine tool was locked to prevent unwanted rotation during the trials.
Figure 8. Initial positioning of the rotor for the vertical sweep and positioning of the two coordinate systems. Permanent magnet rings are shown in gray.
Machines 01 00098 g008
The rotor was then lowered at a constant speed (20.0 mm/min) within the stator to a vertical position lower than the perfect alignment of the magnets. This way, the final deceleration of the milling machine did not influence the descent rate. Vertical and lateral forces were recorded continuously during the descent. Thereafter, the rotor was removed from the stator and was repositioned to the initial height η = 80.0 mm, but shifted 0.1 mm along the x-axis (X = 0.1 mm, Y = 0.0 mm). The measuring cycle was repeated for values of X ranging from −0.5 mm to 0.5 mm with increments of 0.1 mm. Due to the drift of the sensors of the 3-component dynamometer, a reset of the sensors was required before each run.
The data were subsequently processed using a Matlab code developed in-house to plot surfaces illustrating the forces X, Y, and Z at any position of the rotor. The program used the moving speed, the sampling frequency and the measured axial force in order to find the position where the magnets were perfectly aligned along z-axis, i.e., when the magnets stacks faced each other. Such position would occur when the axial force is zero and radial force is at its peak value.
For the lateral sweep, the rotor was aligned vertically with the stator (Z = 0.0 mm) and positioned to a lateral misalignment of 0.5 mm (X = −0.5 mm, Y = 0.0 mm). The rotor was then moved laterally at a rate on 0.5 mm/min. Vertical and lateral forces were measured and recorded during the displacement. Following the acquisition, the rotor was withdrawn for the stator and the sensor was reset. The acquisition sequence was then repeated for different vertical positions. The lateral sweep is a more direct method to measure the stiffness because it can be calculated from a single test run, whereas multiple vertical sweeps are required to achieve the same goal.

2.2.2.2. Damping

To measure the ability of the magnetic bearing to damp lateral vibrations, the rotor was placed on a longer shaft attached to the spindle through a universal joint. The universal joint was used to maintain the shaft position in the z-axis, while allowing X and Y movements. The universal joint used was a high-speed needle-bearing universal joint. Since it uses needle-bearings, the friction induced in the universal joint by the small angular displacements is very low and it should not introduce significant damping. The length of the shaft was measured with the integrated probe and was centered above the stator (X = 0.0 mm, Y = 0.0 mm). Thin polytetrafluoroethylene (PTFE) strips were placed inside the stator so that the magnets would not touch each other during the lowering of the rotor. The rotor was then lowered to the height where the magnets were axially aligned, i.e., at the greatest radial stiffness. Once in place, the PTFE strips were removed. After removing the PTFE strips, the rotor of the magnetic bearing was found to be centered according to the stator, as expected. The strips were reinserted before the rotor was pulled out. An accelerometer was glued to the shaft close to the bearing. A hammer was used to give an impulse to the shaft, in line with the accelerometer. At least 20 impulses were given to get a significant average response.

2.3. Calculation

2.3.1. Stiffness

Analytic equations were proposed in literature to calculate the radial stiffness of a passive magnetic bearing built from one or many concentric pairs of ring-shaped permanent magnets, as shown in Figure 2. Yonnet et al. [3] proposed Equation (1) to determine the radial stiffness of two concentric ring-shaped magnets repulsing each other.
Machines 01 00098 i001
The parameters of this Equation are the magnetization of the magnets, the vacuum permeability, the mean radius of the magnets, the gap between the magnets, and the width and height of the magnets. The radial stiffness of a bearing built with stacked magnets can be approximated with Equation (2).
Krn ≈ (2n − 1)Kr
These equations were used to design a low friction PMB providing sufficient stiffness, that is, high enough to radially constrain the rotor, but not too high to ensure that the first and second mechanical critical speeds would remain at a low value. With such a strategy, the critical speeds will be quickly passed during the acceleration phase toward the nominal operating speed of the FESS. The same dimensions discussed in Section 2 of this paper have been used (Rm = 25.75 mm, l = h = 6.35 mm, e = 0.7 mm) and the magnetization is 0.94 T (typical value for N33 grade NdFeB). It should be noted that the calculated stiffness is only valid for the case where the magnets of the rotor and the stator are perfectly aligned vertically, as shown in Figure 2b. Table 1 contains the radial stiffness calculated for the bearing composed of different numbers of magnet pairs.
Table 1. Theoretical stiffness of a passive magnetic bearing (PMB) in which magnets are in opposition.
Number of Pair of MagnetsStiffness (kN/m)
131.1
293.3
3155.6
4217.8
5280.0
6342.3
These theoretical values are given for comparison with the experimental results. Following Earnshaw’s theorem, it can be expected that the axial stiffness of a radial bearing to be negative and twice higher than its radial stiffness. This typical instability of passive magnetic bearings was also confirmed by Morales et al. [8].

3. Results and Discussion

3.1. Stiffness

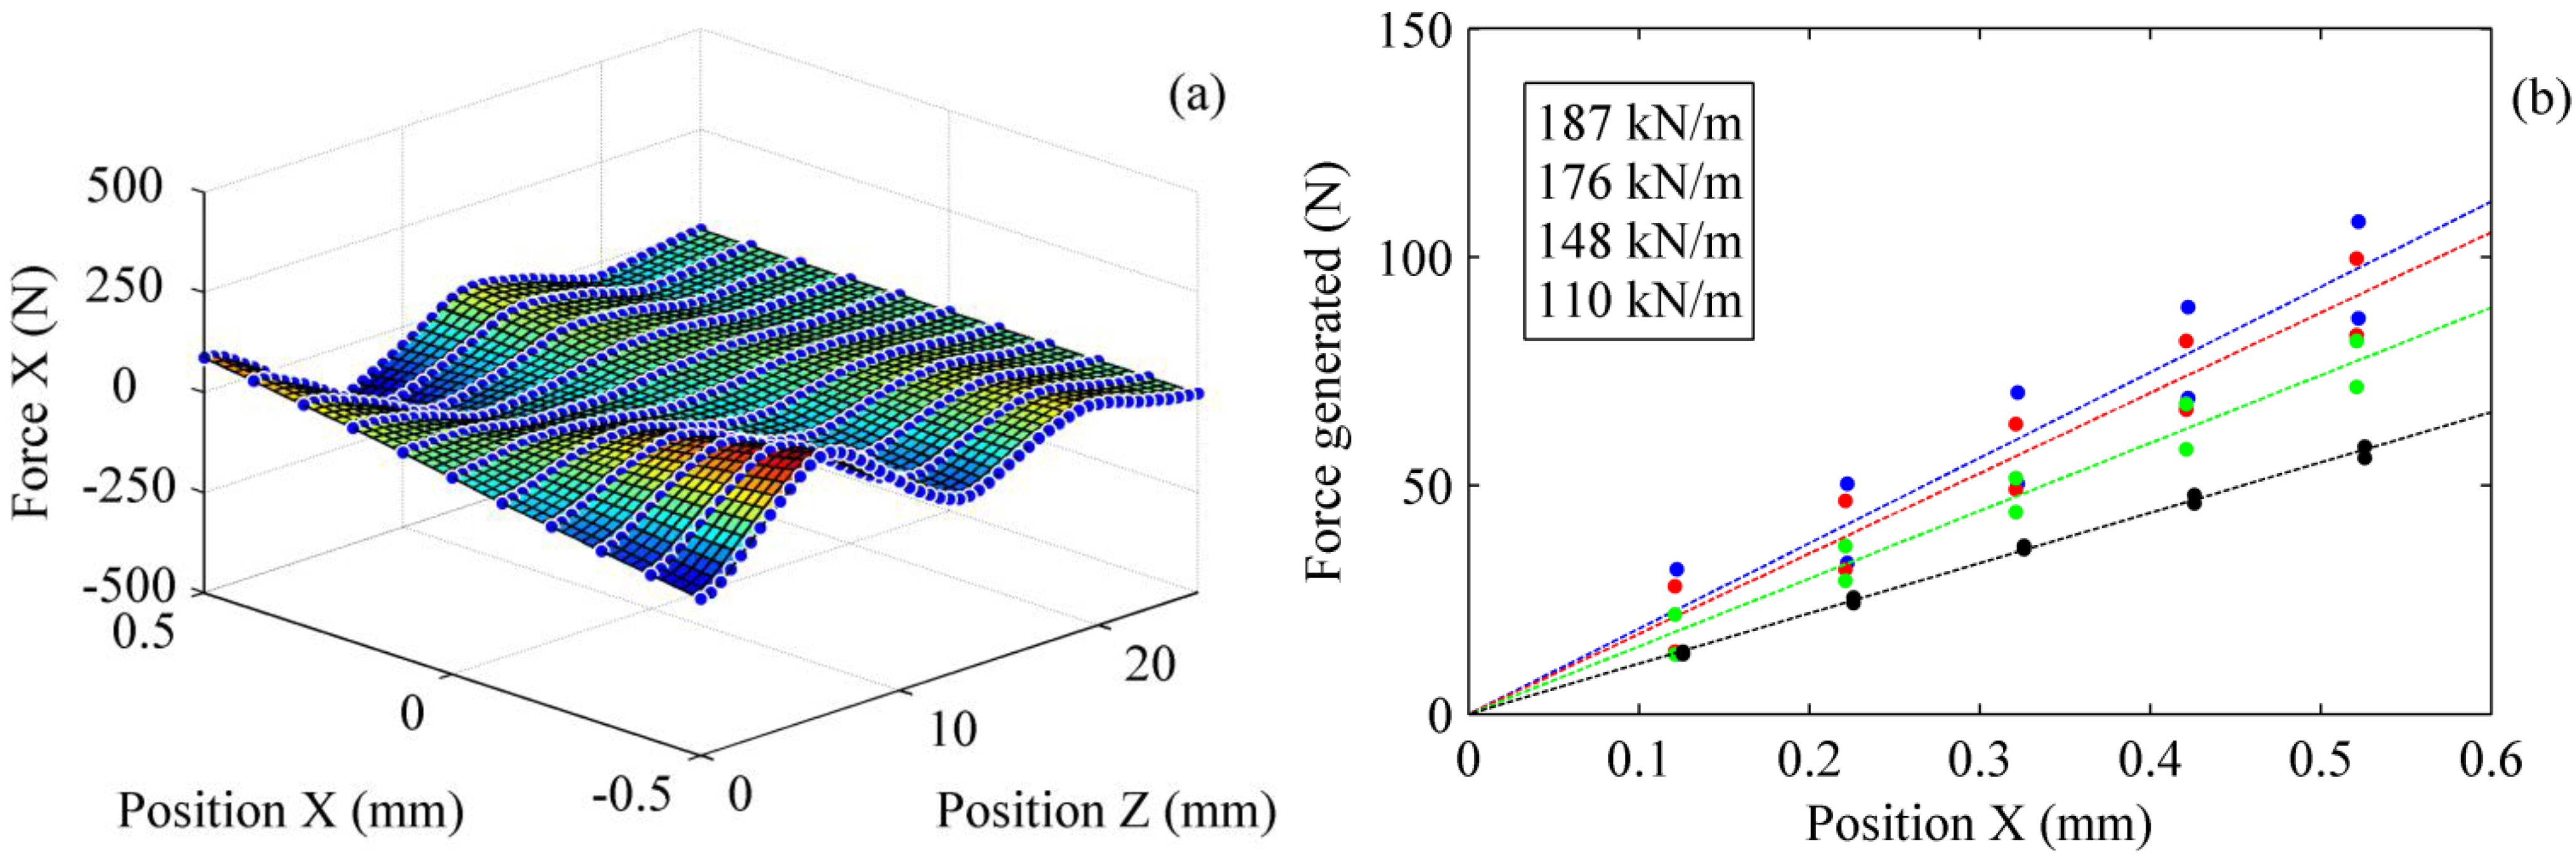
Experimental results were obtained using the apparatus detailed in Section 2. Figure 9a presents the two-dimensional mapping for the force measured in the x-direction with the dynamometer. These force values were obtained by moving the rotor vertically in the axial direction (z-axis), and repeating this process for different positions along the x-axis (radial direction). This measurement process is referred to as the vertical sweep.
Figure 9. (a) Radial forces obtained by vertical sweep at different radial stations. (b) Experimental data and curve fit at four different rotor positions along the z-axis (blue z = 0.0 mm, red z = 0.5 mm, yellow z = 1.0 mm, and black z = 1.5 mm, respectively).
Machines 01 00098 g009
In Figure 9a, the repulsive forces are positive for positive X positions and negative for negative X positions. It can be observed that the repulsive force varies quickly for slight vertical displacements. The slope of each curve in Figure 9b represents the radial stiffness, and it can be noticed that it varies notably for small vertical displacements (0 to 1.5 mm). In order to reduce the effects of rotor misalignment and geometric defects of the magnets, the repulsion force (in absolute value) on both sides of the rotation axis was used to evaluate the stiffness. The constant slope of the curves corresponds to the expected constant stiffness characterizing PMBs. The maximum stiffness of the bearing is 187 kN/m. The error between the experimental and the theoretical value (217 kN/m) is 14.1%. The difference may be caused by the assumptions made in the theoretical calculations, such as the perfect magnetization and geometry of the magnets. This shows that it is essential to characterize a PMB before using it in a mechanical system.
The characterization technique, with its combination of radial, vertical and rotational position variations, allows an interesting mapping of the forces and stiffness generated by the PMB. Inspecting the experimental mapping of Figure 9 readily provides the possibility of taking advantage of the vertical lift force generated when the matching magnet pairs of the rotor and the stator are offset, thus enabling to decrease the friction value of the thrust bearing. Of course the choice of such an offset position implies a reduction of the radial stiffness and a compromise has to be made between this lift increase and the radial stiffness reduction.
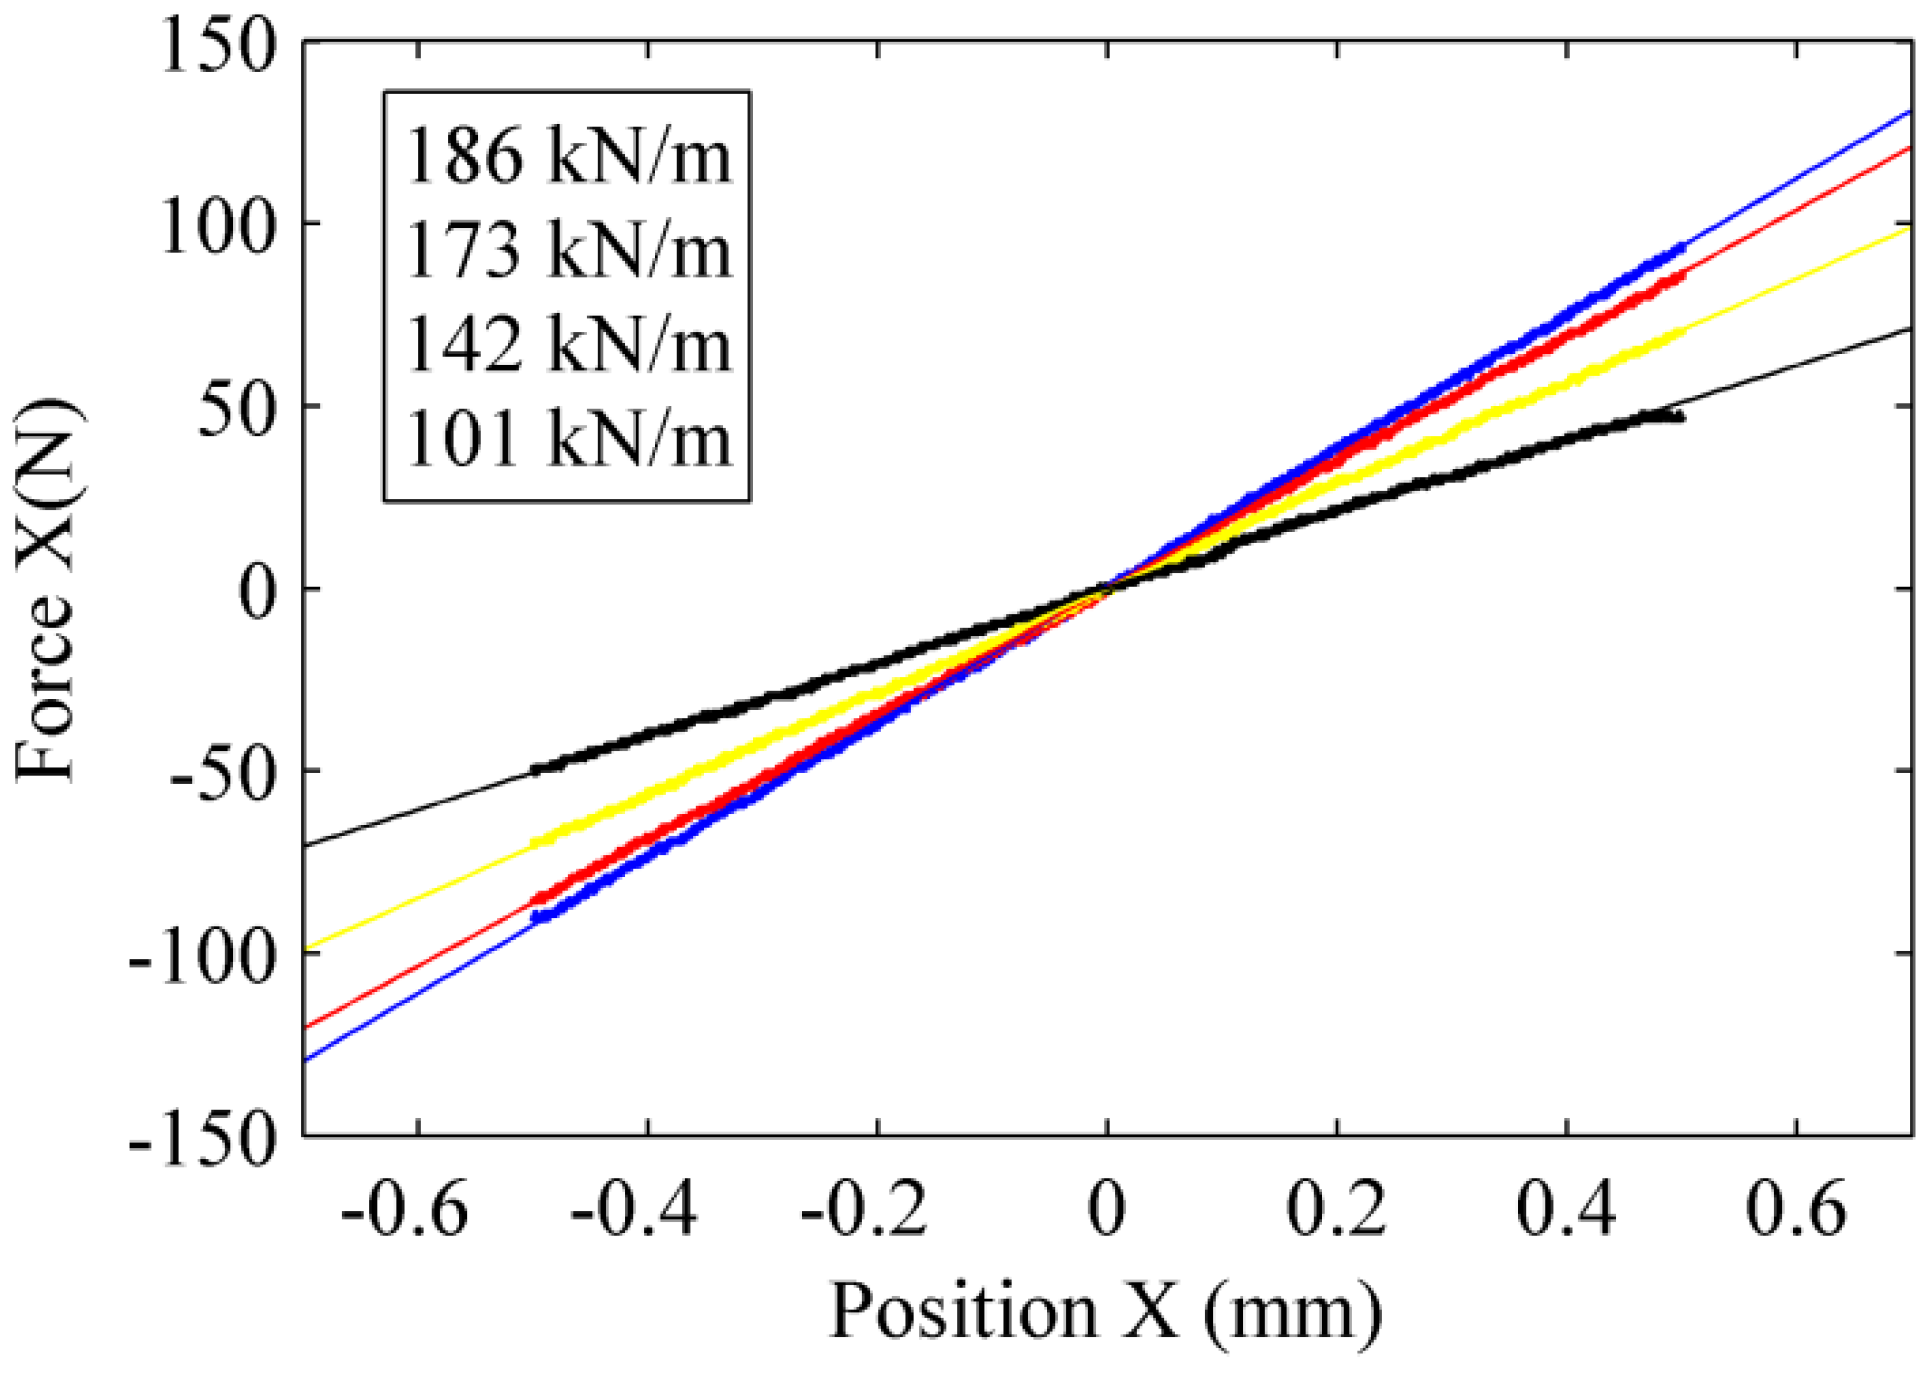
A lateral sweep was also performed to compare the results with those of the vertical sweep. Figure 10 shows the force in the x-direction obtained for the same four axial positions that were computed and presented in Figure 8b: 0 mm, 0.5 mm, 1.0 mm and 1.5 mm.
Figure 10. Force measured by a lateral sweep for different heights of rotor (blue 0.0mm, red 0.5mm, yellow 1.0mm, and black 1.5mm).
Machines 01 00098 g010
The stiffness is very similar to the values obtained with the vertical sweep. The slight differences may be attributed to an axial offset of the rotor between the two experiments, which is about 0.04 mm.
The vertical sweep was also used with other configurations of the PMB. Table 2 shows the experimental radial stiffness of a PMB containing different number of magnets.
Table 2. Stiffness of a radial PMB made from different combination of magnets. Results are presented for different axial positions of the rotor.
Stiffness (kN/m)
Z = 0.0 mmZ = 0.5 mmZ = 1.0 mmZ = 1.5 mm
3 rotor–4 stator134.0130.9112.286.6
4 rotor–3 stator142.1128.1107.279.5
4 rotor–4 stator187.0175.7148.3110.0
5 rotor–5 stator218.7204.1171.4121.5
As expected, the radial stiffness of the bearing increases with the number of magnet pairs. Once again, there is a difference between the theoretical and experimental values for the bearing using the 5-magnet configuration (21%).
Figure 11 shows the radial force in the y-direction obtained with the vertical sweep technique, and corresponding to the same conditions as those of the force in the x-direction (Figure 8). The surface is relatively flat and the forces measured are close to 0 N. This suggests that the magnets of the rotor are well centered.
Figure 11. Lateral forces in the y-direction measure by vertical sweeping (large scale and close-up).
Machines 01 00098 g011
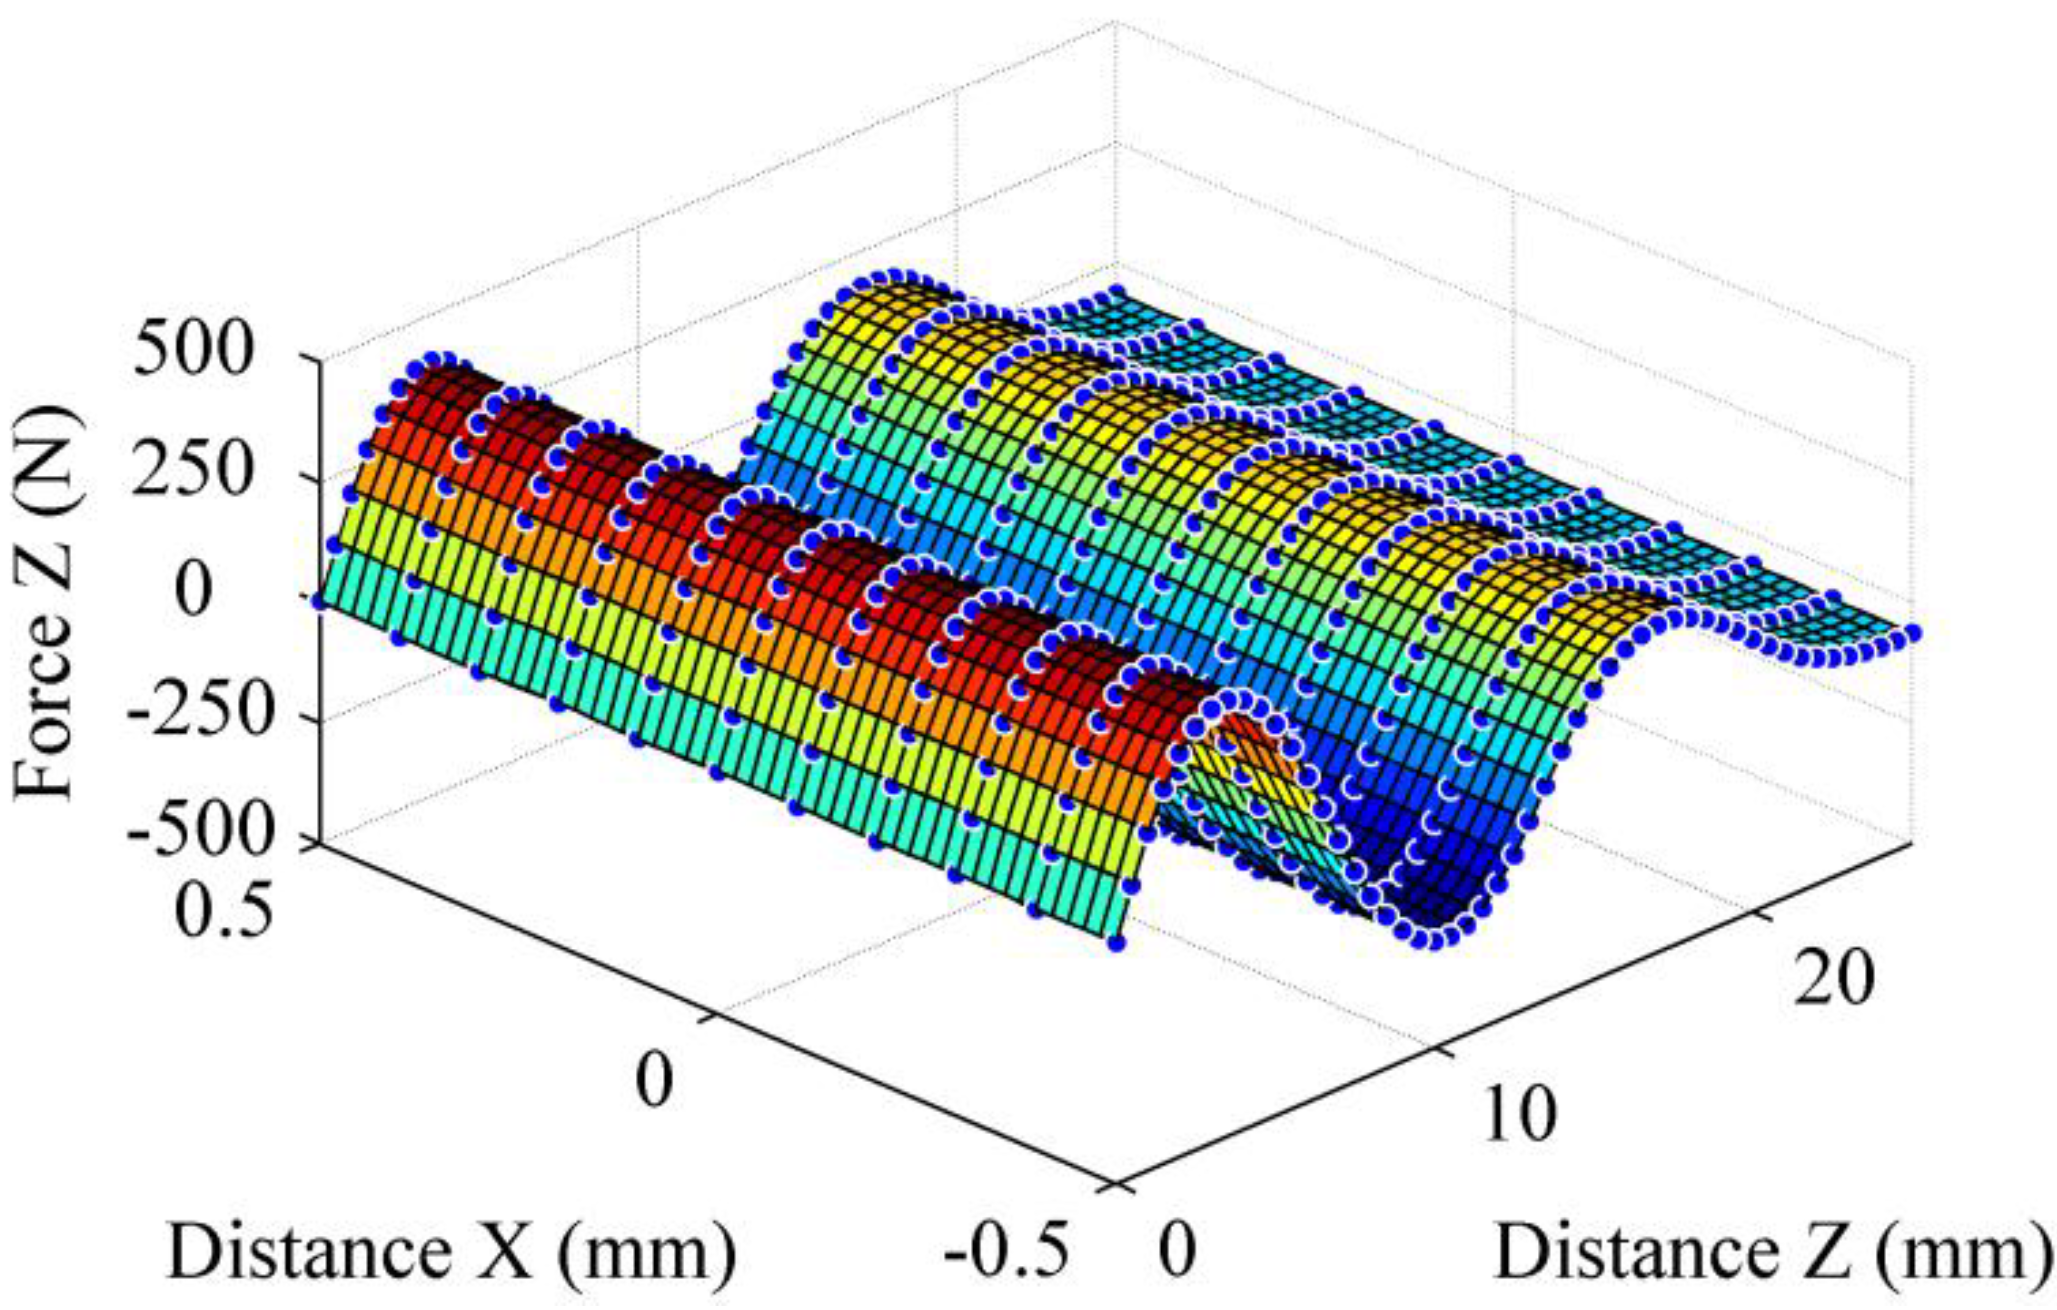
Finally, Figure 12 shows the surface obtained for the axial force (z-direction) with the vertical sweep technique. This graph illustrates the singular behaviour of a radial PMB. Indeed, the fact that a greater distance from the perfect alignment means a greater axial force is quite counterintuitive. This means that if the rotor is not well constrained, it will move up or down until it reaches a zone where the radial force attracts it.
Figure 12. Axial force in the z-direction measured by vertical sweep.
Machines 01 00098 g012
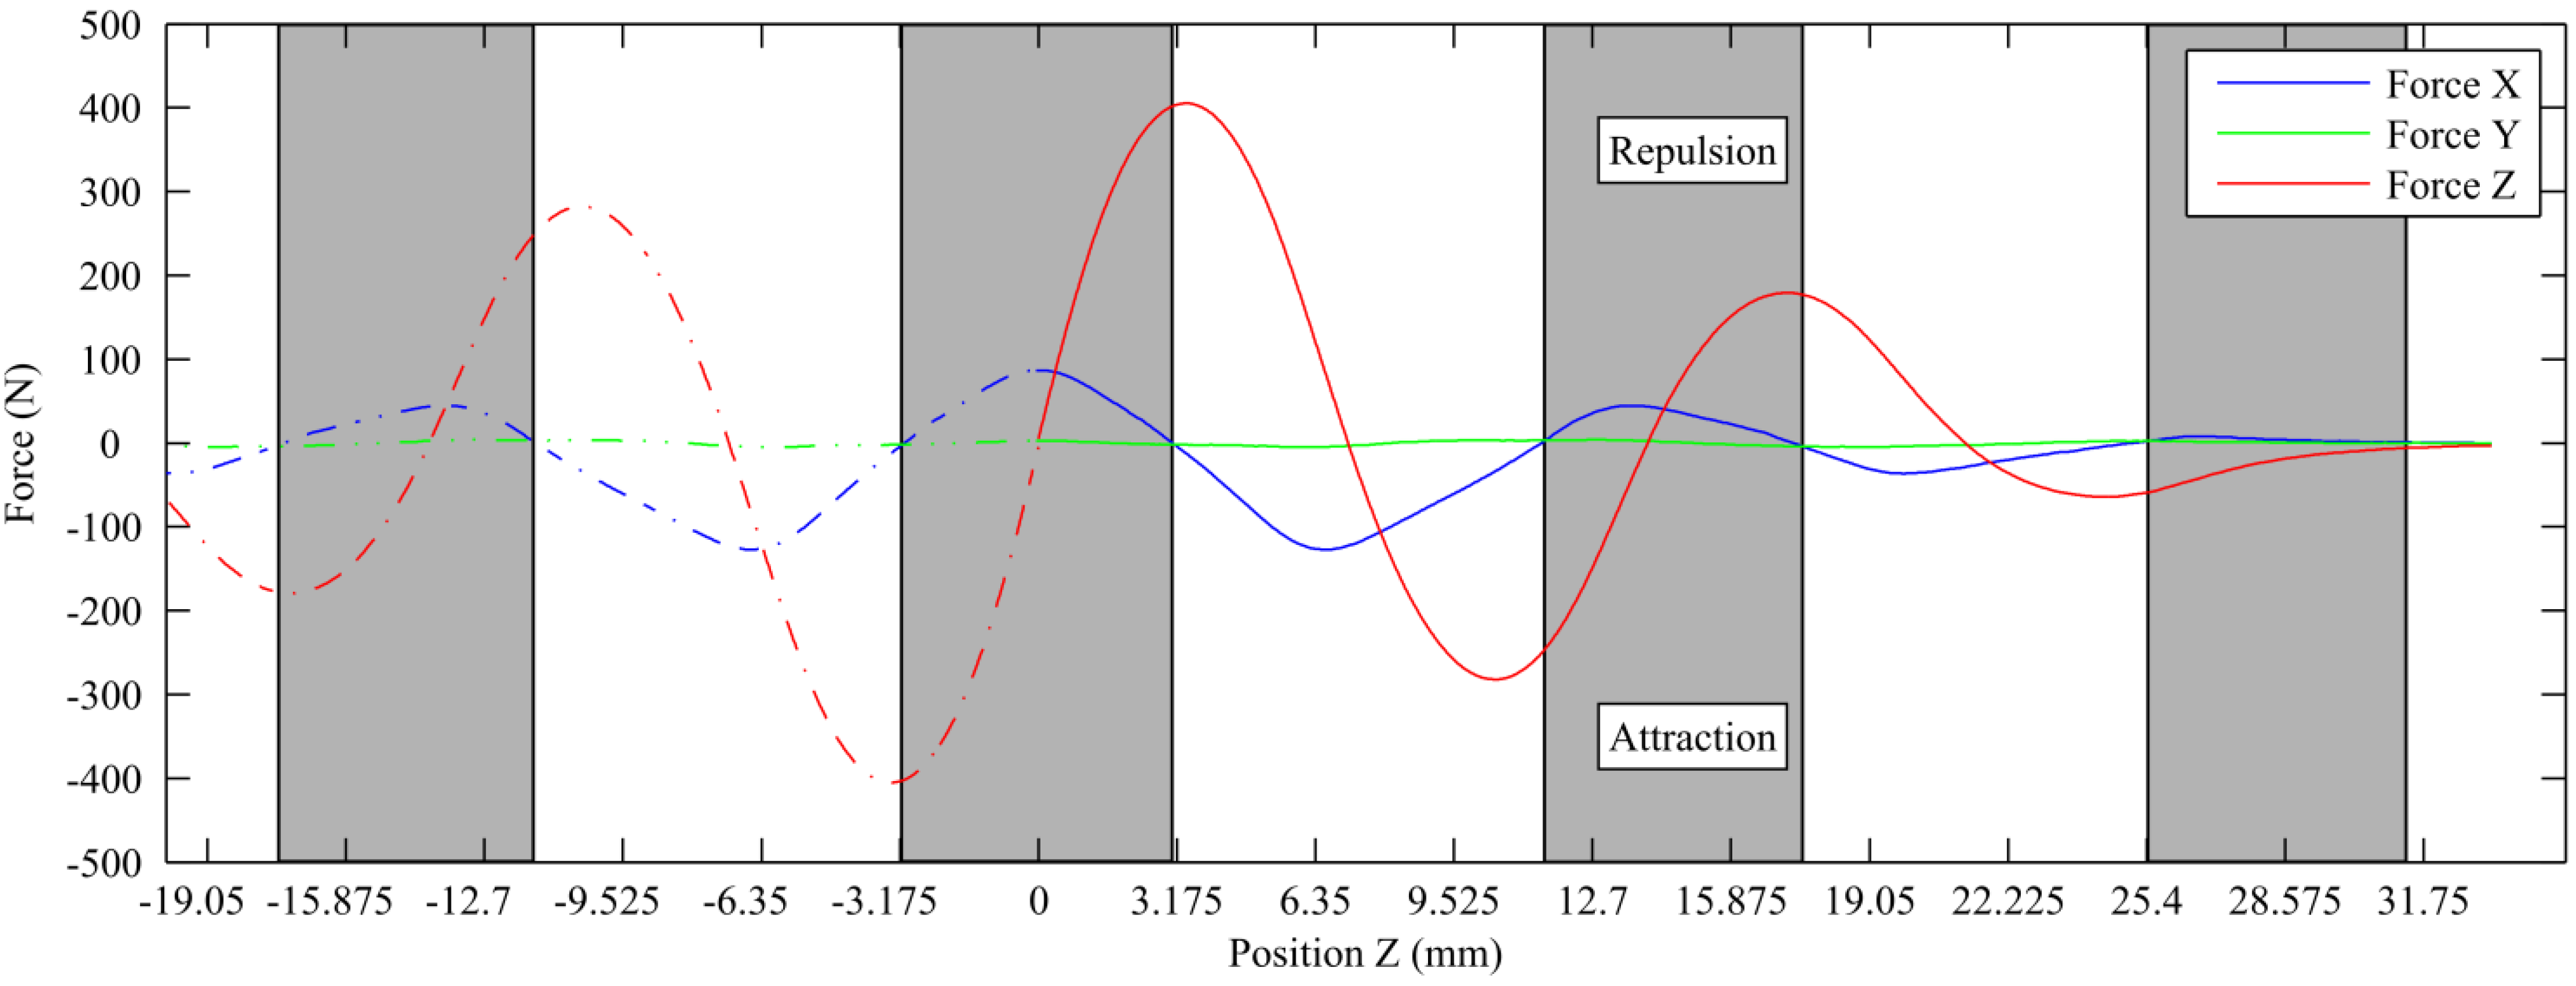
It is useful to group the three forces in one plot to get a better idea of the behaviour of the bearing. Figure 13 shows the variation of the forces for a displacement along the z-axis and for a slightly offset lateral position of X = 0.5 mm.
This graph allows the identification of the operating ranges of the bearing. Theses ranges (shaded areas) occur when the lateral force in the X direction is positive (repulsive). The slight force measured in the y-direction can be attributed to imperfections in the geometry and magnetization of the magnets rather than actual attractive or repulsive force. Knowledge of the operating range makes it possible to use the axial force Z to optimize the system without entering regions where the centering effect of the PMB does not operate. This force can be advantageously used to reduce the normal force applied on the plain bearing, thus reducing mechanical losses.
Figure 13. Forces measured by a vertical sweeping for a lateral position of X = 0.5 mm. Dashed lines are extrapolation of measured data.
Machines 01 00098 g013

3.2. Damping

Damping measurements were performed according to the methodology outlined in Section 2. The free vibration responses recorded during these trials were used to calculate the natural frequency of the system and the damping ratio of the bearing. Figure 14 shows a typical graph obtained from a single test, where a damped second order response is observed. From this waveform, it is possible to calculate the natural frequency and the damping ratio of the magnetic bearing. It should be noted that the natural frequency depends on the mass supported by the bearing.
Figure 14. Response of the system to an impact. The blue curve is the response, the black dots are the peak values and the red curve is a curve fit.
Machines 01 00098 g014
Numerous trials were performed to obtain admissible impacts and a mean value of the damping ratio. The equation of the curve that links the peaks is of the following form:
Amplitude = a ∙ exp(−ζωnt) + c,
Using Matlab’s least mean square curve fitting tool, it was possible to evaluate the parameters of Equation (3), i.e., the parameters and c and ζωn the product of . The damped frequency of the system was evaluated using the oscillation period. The theoretical value of the damped frequency was calculated using Equation (4).
Machines 01 00098 i002
Table 3 presents the damping ratios and the undamped natural frequencies of the PMB with and without a rotor disk, and for 3 axial positions ranging from 0 to 1 mm. The disk, shown in Figure 15, weighed 23 kg and was placed at a distance of 190.0 mm from the bearing and 190.0 mm from the universal joint, as shown in Figure 15.
Table 3. Damping ratios and undamped natural frequencies for different rotor positions without and with the disk.
4 on Rotor
4 on Stator
Z = 0.0 mmZ = 0.5 mmZ = 1.0 mm
ζωn (rad/s)ζωn (rad/s)ζωn (rad/s)
Without disk0.002894960.003504610.00594395
With disk0.002301430.004021370.00337120
Figure 15. Experimental apparatus including the steel disk used to measure the damping.
Machines 01 00098 g015
The measured damping ratios are relatively low compared to values documented in literature [8], which is good for the global energy efficiency of the system. Even though damping is good of the stability of the FESS [15], the eddy currents generated at high speed would significantly increase magnetic losses thus reducing the global efficiency. The damping is mainly induced by eddy currents generated by the variation of the magnetic flux within the magnets, but also by eddy currents in the surrounding aluminum parts. A small part of the global damping may also come from the compressibility of the air gap between the magnets. In both cases, the damping ratio increases with the axial displacement of the rotor. Although interesting, this phenomenon is complex and is not further investigated in this paper but should be explored in future works.
The undamped natural frequency also decreases with an axial displacement of the rotor. This is due to the lower stiffness of the bearing when the rotor is moved axially. The undamped natural frequency of the setup including the disk is much lower due to the higher mass of the system.
The damping was also studied for different bearing configurations. Table 4 compiles the damping ratios and undamped natural frequencies for other configurations of the radial PMB.
Table 4. Damping ratios, natural frequencies and amplitude of for different rotor positions and configurations.
Z = 0.0 mmZ = 0.5 mmZ = 1.0 mm
Without DiskζωnAmplitude (m)ζωnAmplitude (m)ζωnAmplitude (m)
4 rotor–4 stator0.00294953 × 10−50.00354613 × 10−50.00593953.5 × 10−5
5 rotor–5 stator0.00285593 × 10−50.00335183 × 10−50.00494393 × 10−5
The results indicate that the number of magnets used in the bearing has a limited influence the damping ratio, while it obviously increases the stiffness. According to the explanation given earlier, a greater number of magnets should not influence the damping. The conclusion that a greater number of magnets do not increase eddy currents is very counterintuitive. In order to make sure that the damping did not come from the universal joint, a study of that component was performed. Table 4 shows that the amplitude of the oscillation for all conditions is very similar. Simple geometric considerations indicate that for all these oscillations, the physics of the torsion deformation of the rubber part of the universal joint shall be similar. The parameter that is different for these different tests is the frequency, but the damping is generally independent of the frequency. So it is reasonable to state that the damping produced by the rubber seal of the universal joint shall not vary significantly for all these experiments. The conclusion is that the very significant increase in the damping has to be caused by the PMB. However, it is possible that a certain part of the damping may be produced by the universal joint, but it is thought that this component is small and constant.
In addition, the significant differences between the damping ratios observed for very small variations of the axial position of the rotor of the PMB further indicates that the damping measured is mainly due to the eddy currents induced by the PMB, and not solely or mainly by the universal joint. As it can be observed from Table 4, the damping ratio doubled for an axial displacement of 1 mm suggesting that the eddy currents have a major influence on the damping.
The experimental methodology proposed in this paper is an effective way to evaluate the damping of a magnetic bearing. As a result, it is possible to use the experimental parameters for the simulation and design of a safe and reliable mechanical system supported by PMBs.

4. Conclusions

The new PMB described in this paper, by using an intrinsic property of the magnetic field of permanent magnets, successfully reduces the force applied on the plain bearing, consequently reducing the friction induced by the contact. This friction reduction is achieved while maintaining the functionality of the bearing.
In addition, the proposed experimental characterization methodology represents an effective way to quickly measure the axial and radial stiffness of a magnetic bearing. It is also possible to measure its damping with minor modifications to the experimental setup. The measured stiffness is lower than the theoretical values obtained with the equations proposed in the literature for this type of bearing. This discrepancy is important to know because the stiffness of the bearing greatly influences the system’s dynamics. It is, thus, mandatory to characterize the bearing before using it in an actual system.
The results also show that the axial force does not vary when the rotor moves radially. This observation is essential since it provides necessary conditions for a stable operation. It was also demonstrated that the axial positioning of the rotor greatly influences the radial stiffness. These conclusions give the opportunity to know the possible configurations and the limitations of a PMB.
The main limitation of the proposed technique resides in the fact that the axial positioning of the rotor lacks precision since it is computed from other data. Nonetheless, the new methodology represents a significant advance to promote the integration of magnetic bearings in a greater number of systems by simplifying their characterization. The quality of the results obtained with the new technique suggests that it can be used for any other kind of magnetic bearings such as superconducting bearings or any complex configuration of PMB like conical bearings.
Forthcoming work will involve the integration of the bearing in a small-scale FESS, in order to validate numerical rotor dynamics models using stiffness and damping as input parameters. Energy losses will also be measured over a period of time to observe the wear of the plain bearing.

Acknowledgements

This work was supported by the Fonds de Recherche du Québec—Nature et technologies (FRQNT) under the partnership for the reduction and sequestration of greenhouse gas emissions. The authors would like to thank Pierre Carrier and Ian Fournier for their technical assistance. We would also like to thank Yves Jean for his expertise and the insightful discussions on the project.

Conflicts of Interest

The authors declare no conflict of interest.

References

  1. Bassani, R.; Ciulli, E.; Puccio, F.D.I.; Musolino, A. Study of conic permanent magnet bearings. Meccanica 2001, 36, 745–754. [Google Scholar] [CrossRef]
  2. Horner, R.E.; Proud, N.J. The Key Factors in the Design and Construction of Advanced Flywheel Energy Storage Systems and Their Application to Improve Telecommunication Power Back-Up. In Proceedings of Intelec’96—International Telecommunications Energy Conference 1996, Boston, MA, USA, 6–10 October 1996; pp. 668–675.
  3. Yonnet, J.-P.; Lemarquand, G.; Hemmerlin, S.; Olivier-Rulliere, E. Stacked structures of passive magnetic bearings. J. Appl. Phys. 1991, 70, 6633–6635. [Google Scholar] [CrossRef]
  4. Ravaud, R.; Lemarquand, G.; Lemarquand, V. Force and stiffness of passive magnetic bearings using permanent magnets. Part 1: Axial Magnetization. IEEE Trans. Magn. 2009, 45, 2996–3002. [Google Scholar] [CrossRef]
  5. Bassani, R. Levitation of passive magnetic bearings and systems. Tribol. Int. 2006, 39, 963–970. [Google Scholar] [CrossRef]
  6. Hamler, A.; Gorican, V.; Štumberger, B.; Jesenik, M.; Trlep, M. Passive magnetic bearing. J. Magn. Magn. Mater. 2004, 272, 2379–2380. [Google Scholar]
  7. Jinji, S.; Yuan, R.; Jiancheng, F. Passive axial magnetic bearing with Halbach magnetized array in magnetically suspended control moment gyro application. J. Magn. Magn. Mater. 2011, 323, 2103–2107. [Google Scholar] [CrossRef]
  8. Morales, W.; Fusaro, R.; Kascak, A. Permanent Magnetic Bearing for Spacecraft Applications. In 2003 Annual Meeting and Exhibition sponsored by the Society of Tribologists and Lubrication Engineer, New York, NY, USA, 2008; pp. 1–17.
  9. Mitsuda, H.; Inoue, A.; Nakaya, B.; Komori, M. Improvement of energy storage flywheel system with SMB and PMB and its performances. IEEE Trans. Appl. Supercond. 2009, 19, 2091–2094. [Google Scholar] [CrossRef]
  10. Floegel-Delor, U.; Rothfeld, R.; Wippich, D.; Goebel, B.; Riedel, T.; Werfel, F.N. Fabrication of HTS bearings with ton load performance. IEEE Trans. Appl. Supercond. 2007, 17, 2142–2145. [Google Scholar] [CrossRef]
  11. Nagashima, K.; Seino, H.; Miyazaki, Y.; Arai, Y.; Sakai, N.; Murakami, M. Force density of magnetic bearings using superconducting coils and bulk superconductors. Q. Rep. RTRI 2008, 49, 127–132. [Google Scholar] [CrossRef]
  12. Ichihara, T.; Matsunaga, K.; Kita, M.; Hirabayashi, I.; Isono, M.; Hirose, M.; Yoshii, K.; Kurihara, K.; Saito, O.; Saito, S.; et al. Application of superconducting magnetic bearings to a 10 KWH-class flywheel energy storage system. IEEE Trans. Appl. Supercond. 2005, 15, 2245–2248. [Google Scholar] [CrossRef]
  13. Hull, J.R.; Cansiz, A. Vertical and lateral forces between a permanent magnet and a high-temperature superconductor. J. Appl. Phys. 1999, 86, 6396–6404. [Google Scholar] [CrossRef]
  14. Paden, B.; Groom, N.; Antaki, J.F. Design formulas for permanent-magnet bearings. J. Mech. Des. 2003, 125, 734–738. [Google Scholar] [CrossRef]
  15. Chen, W.C.; Gunter, E.J. Introduction to Dynamics of Rotor-Bearing Systems; Trafford: Victoria, BC, Canada, 2007; pp. 1–469. [Google Scholar]