Application of Nano High-Entropy Alloys to Reduce Energy Consumption and Wear of Copper Oxide and High-Grade Iron Ores in Heavy Mining Industries—A Case Study
Abstract
1. Introduction
2. Materials and Methods
2.1. High-Entropy Nano-Alloy Coating Method
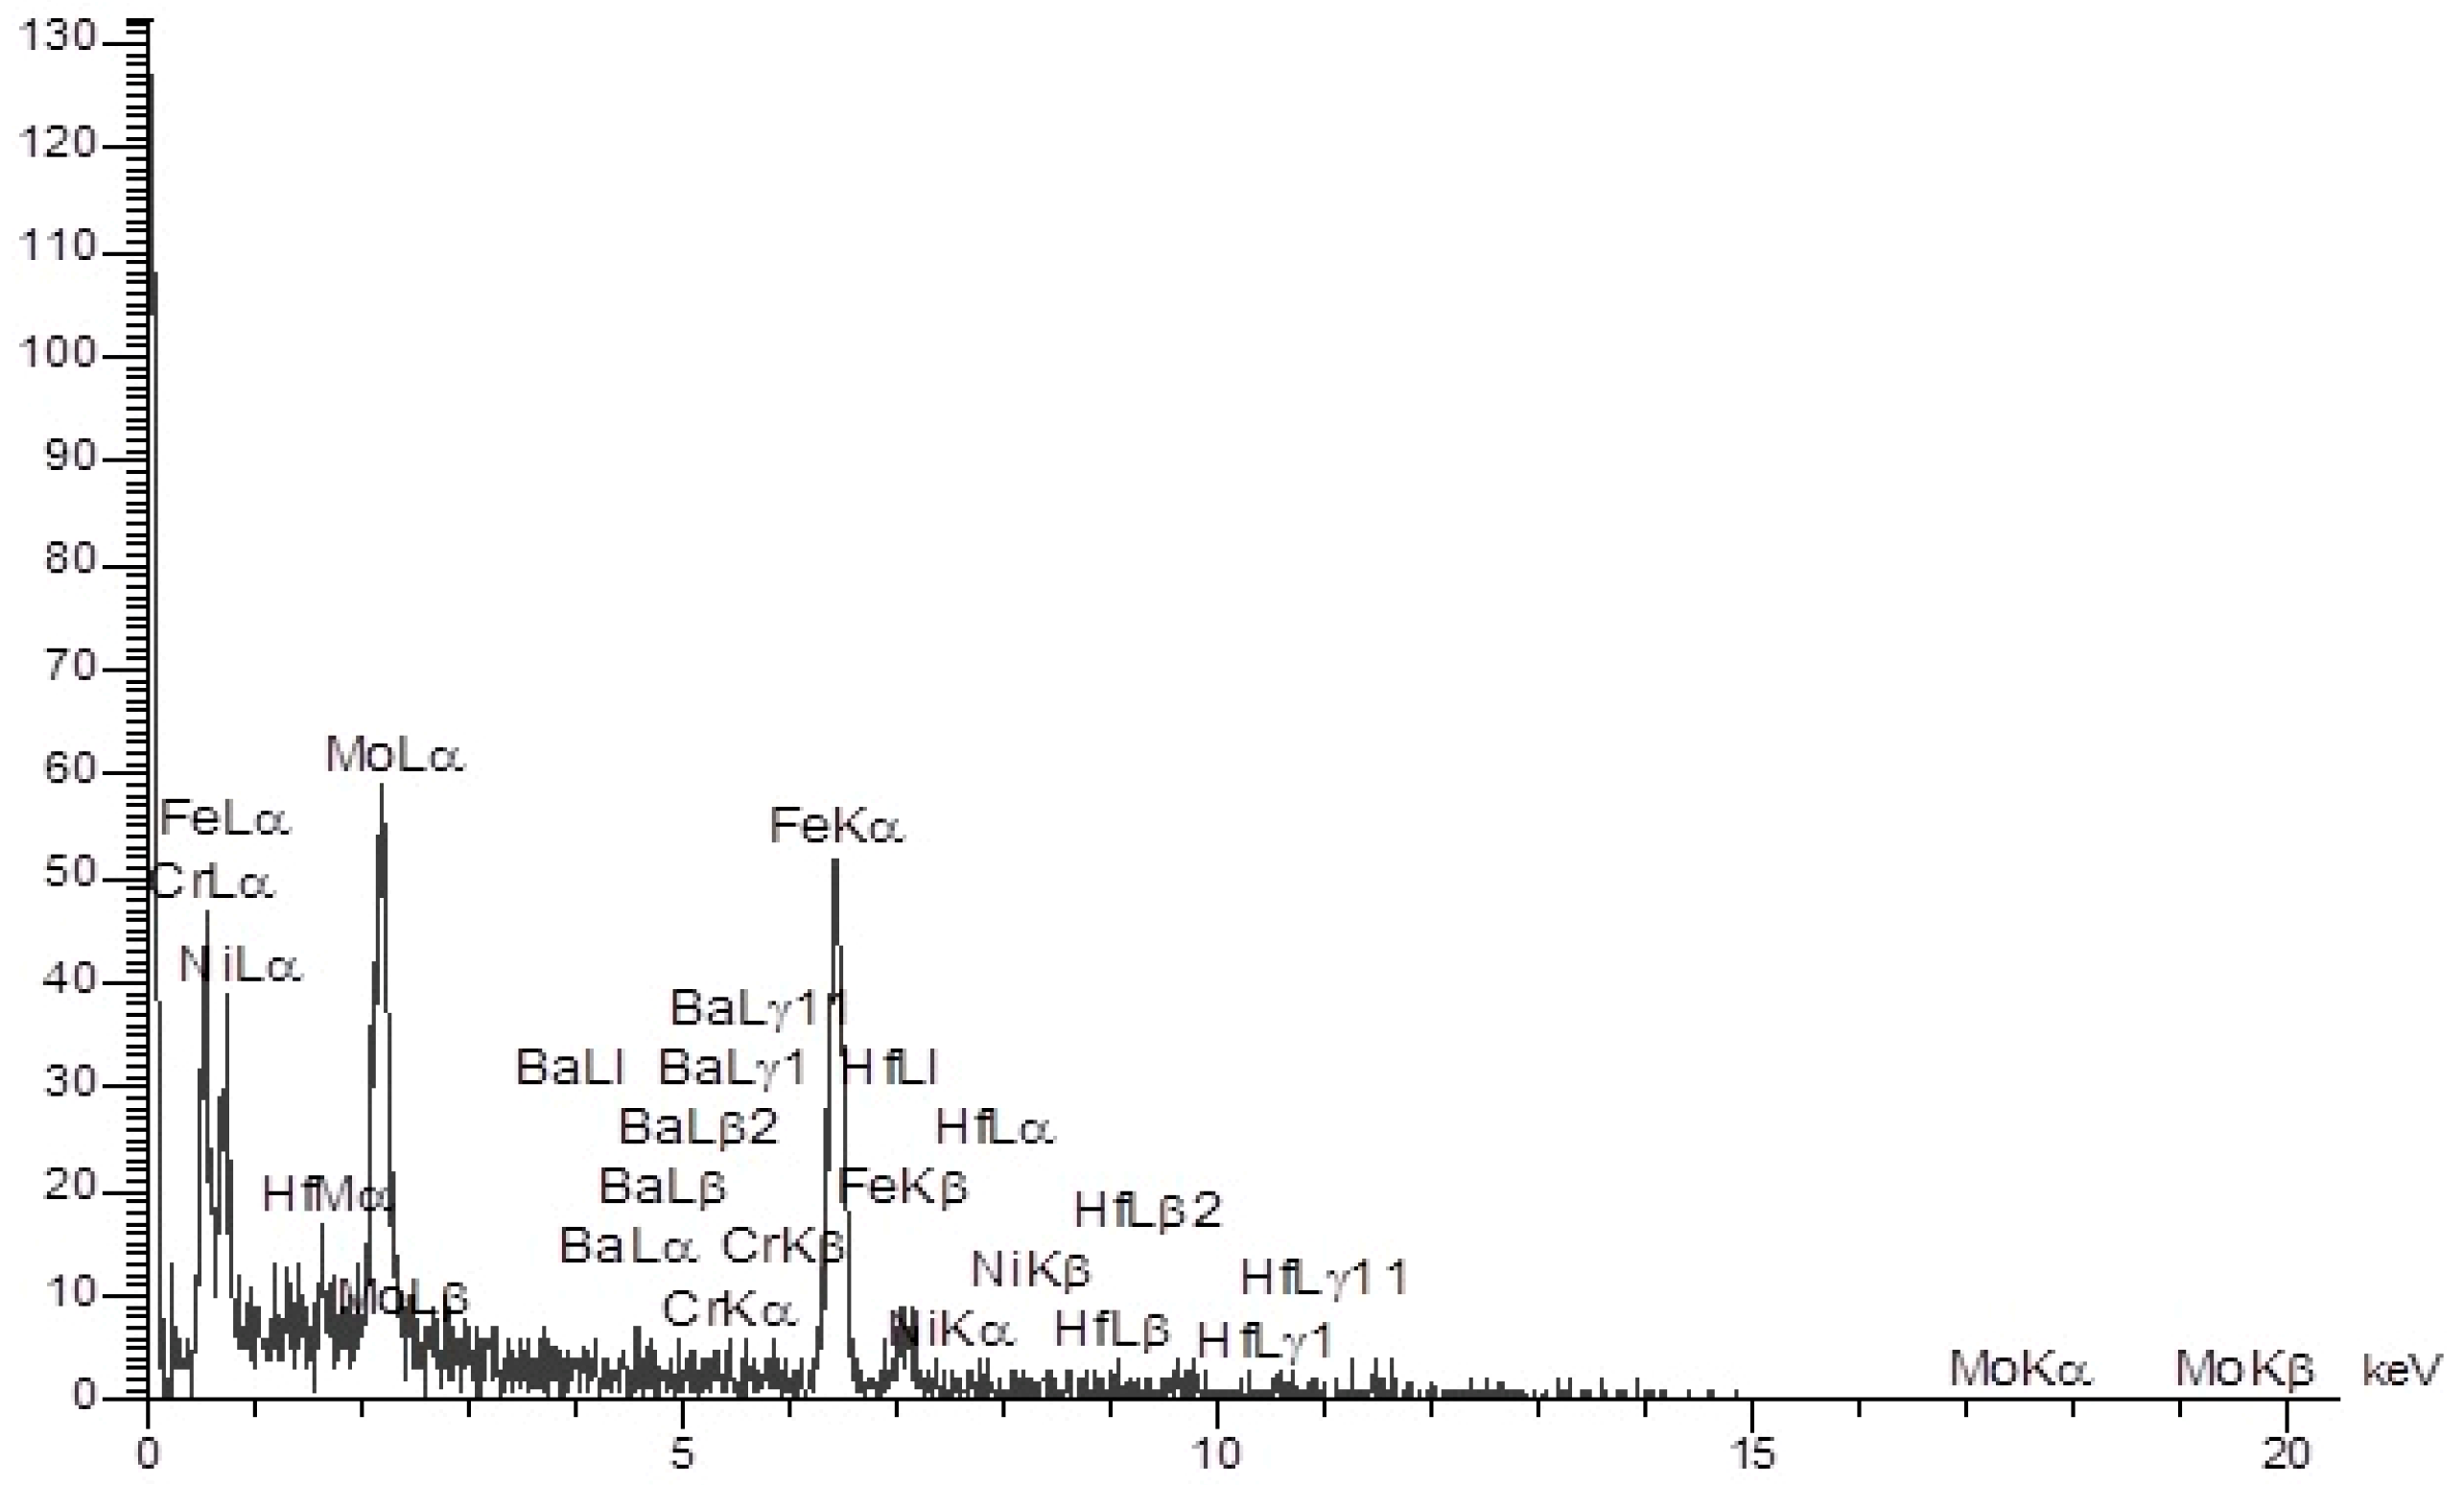
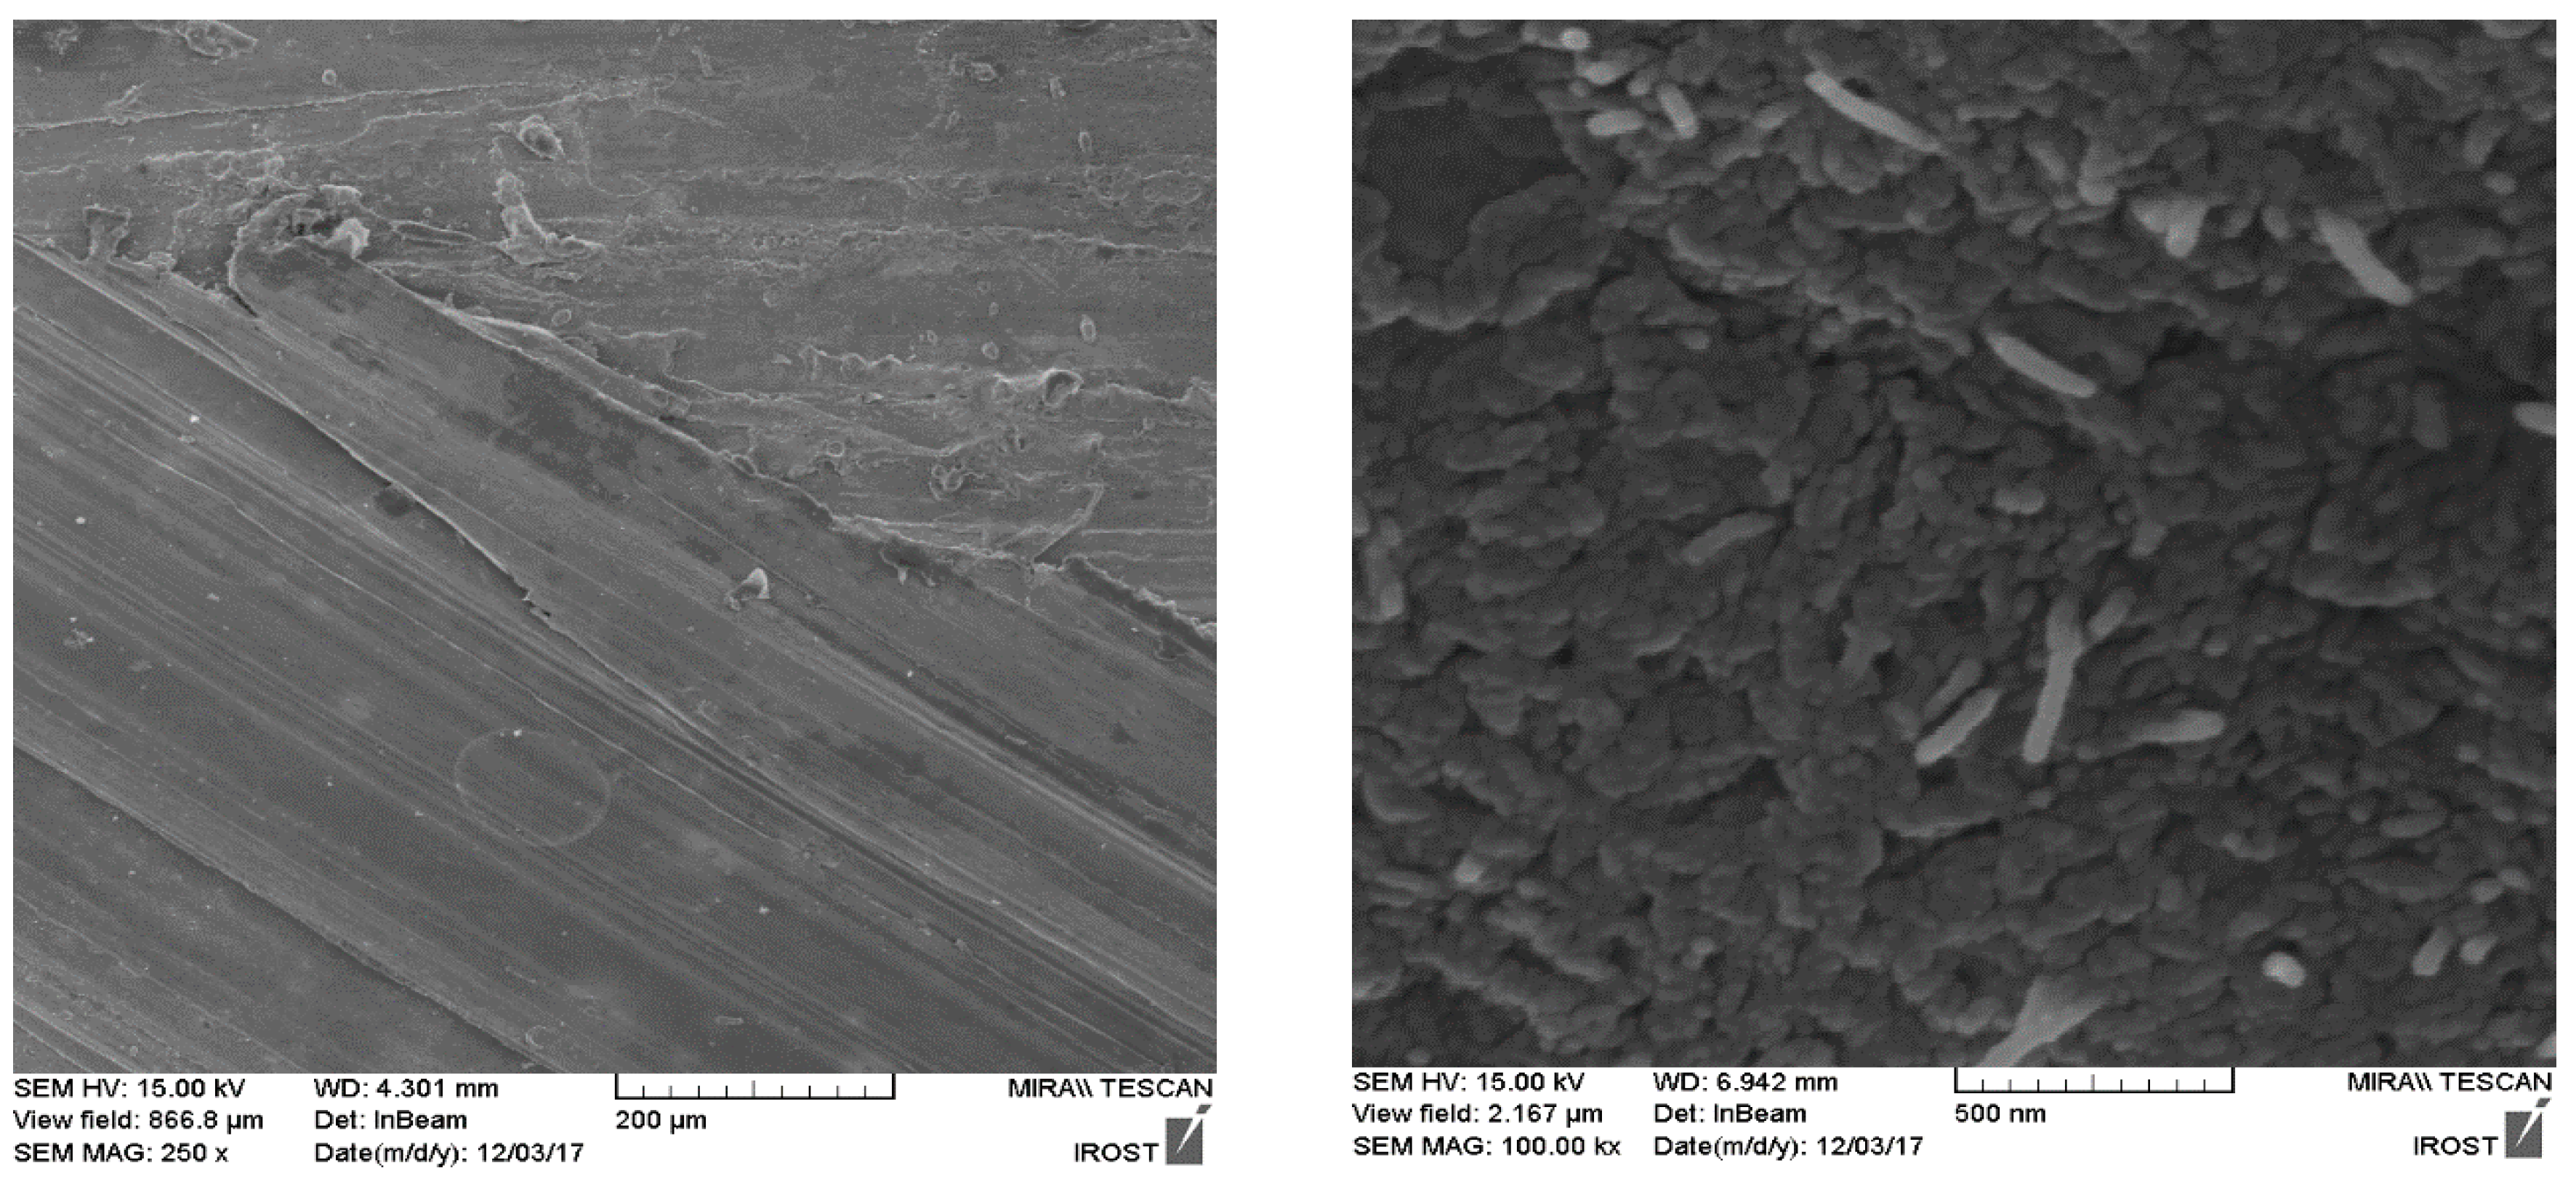
2.2. Characteristics of High-Entropy Nano-Alloy
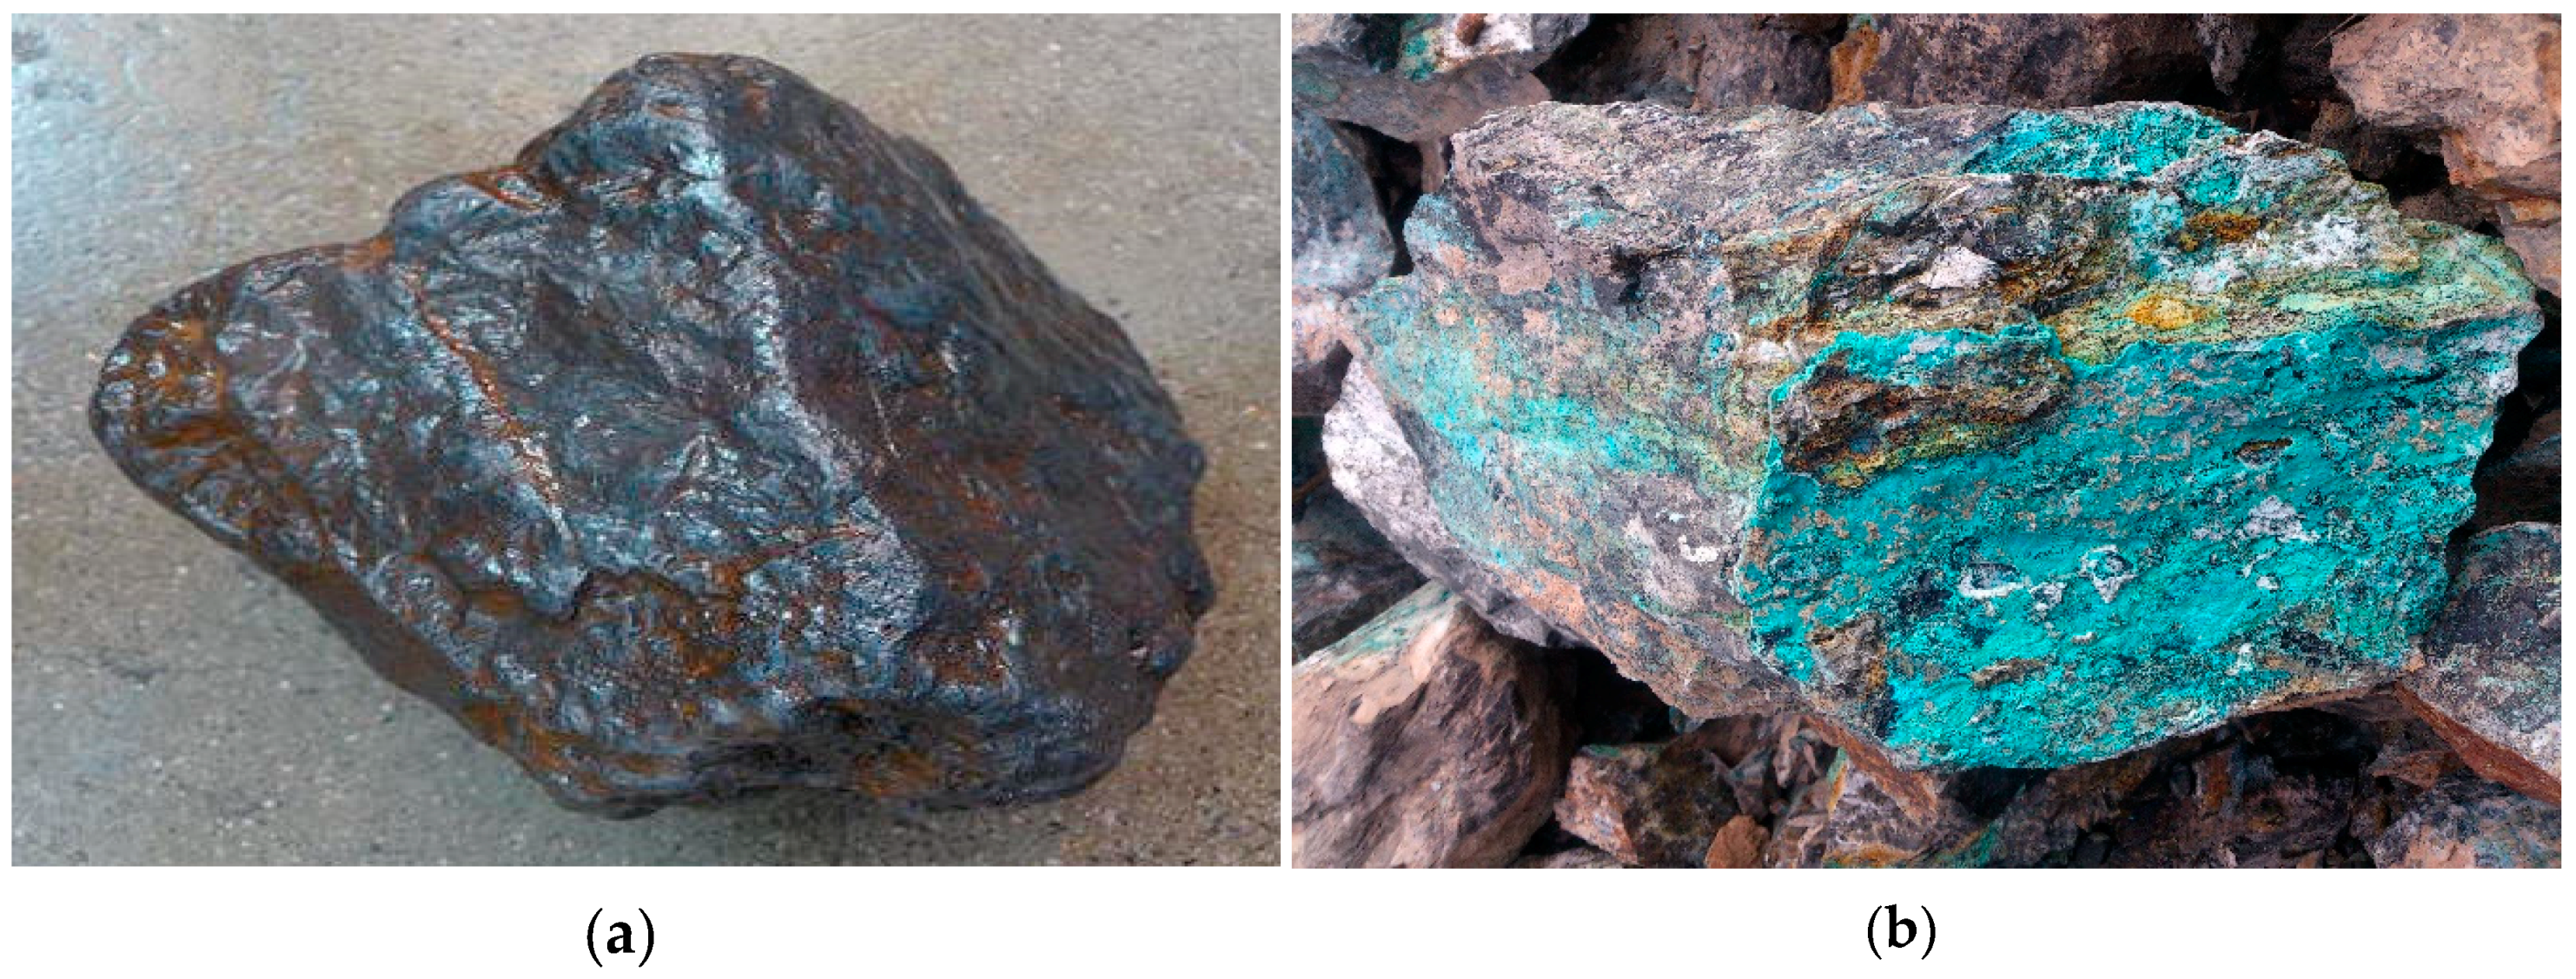
2.3. Preparation of Mineral Sample for the High-Entropy Alloy Wear Test
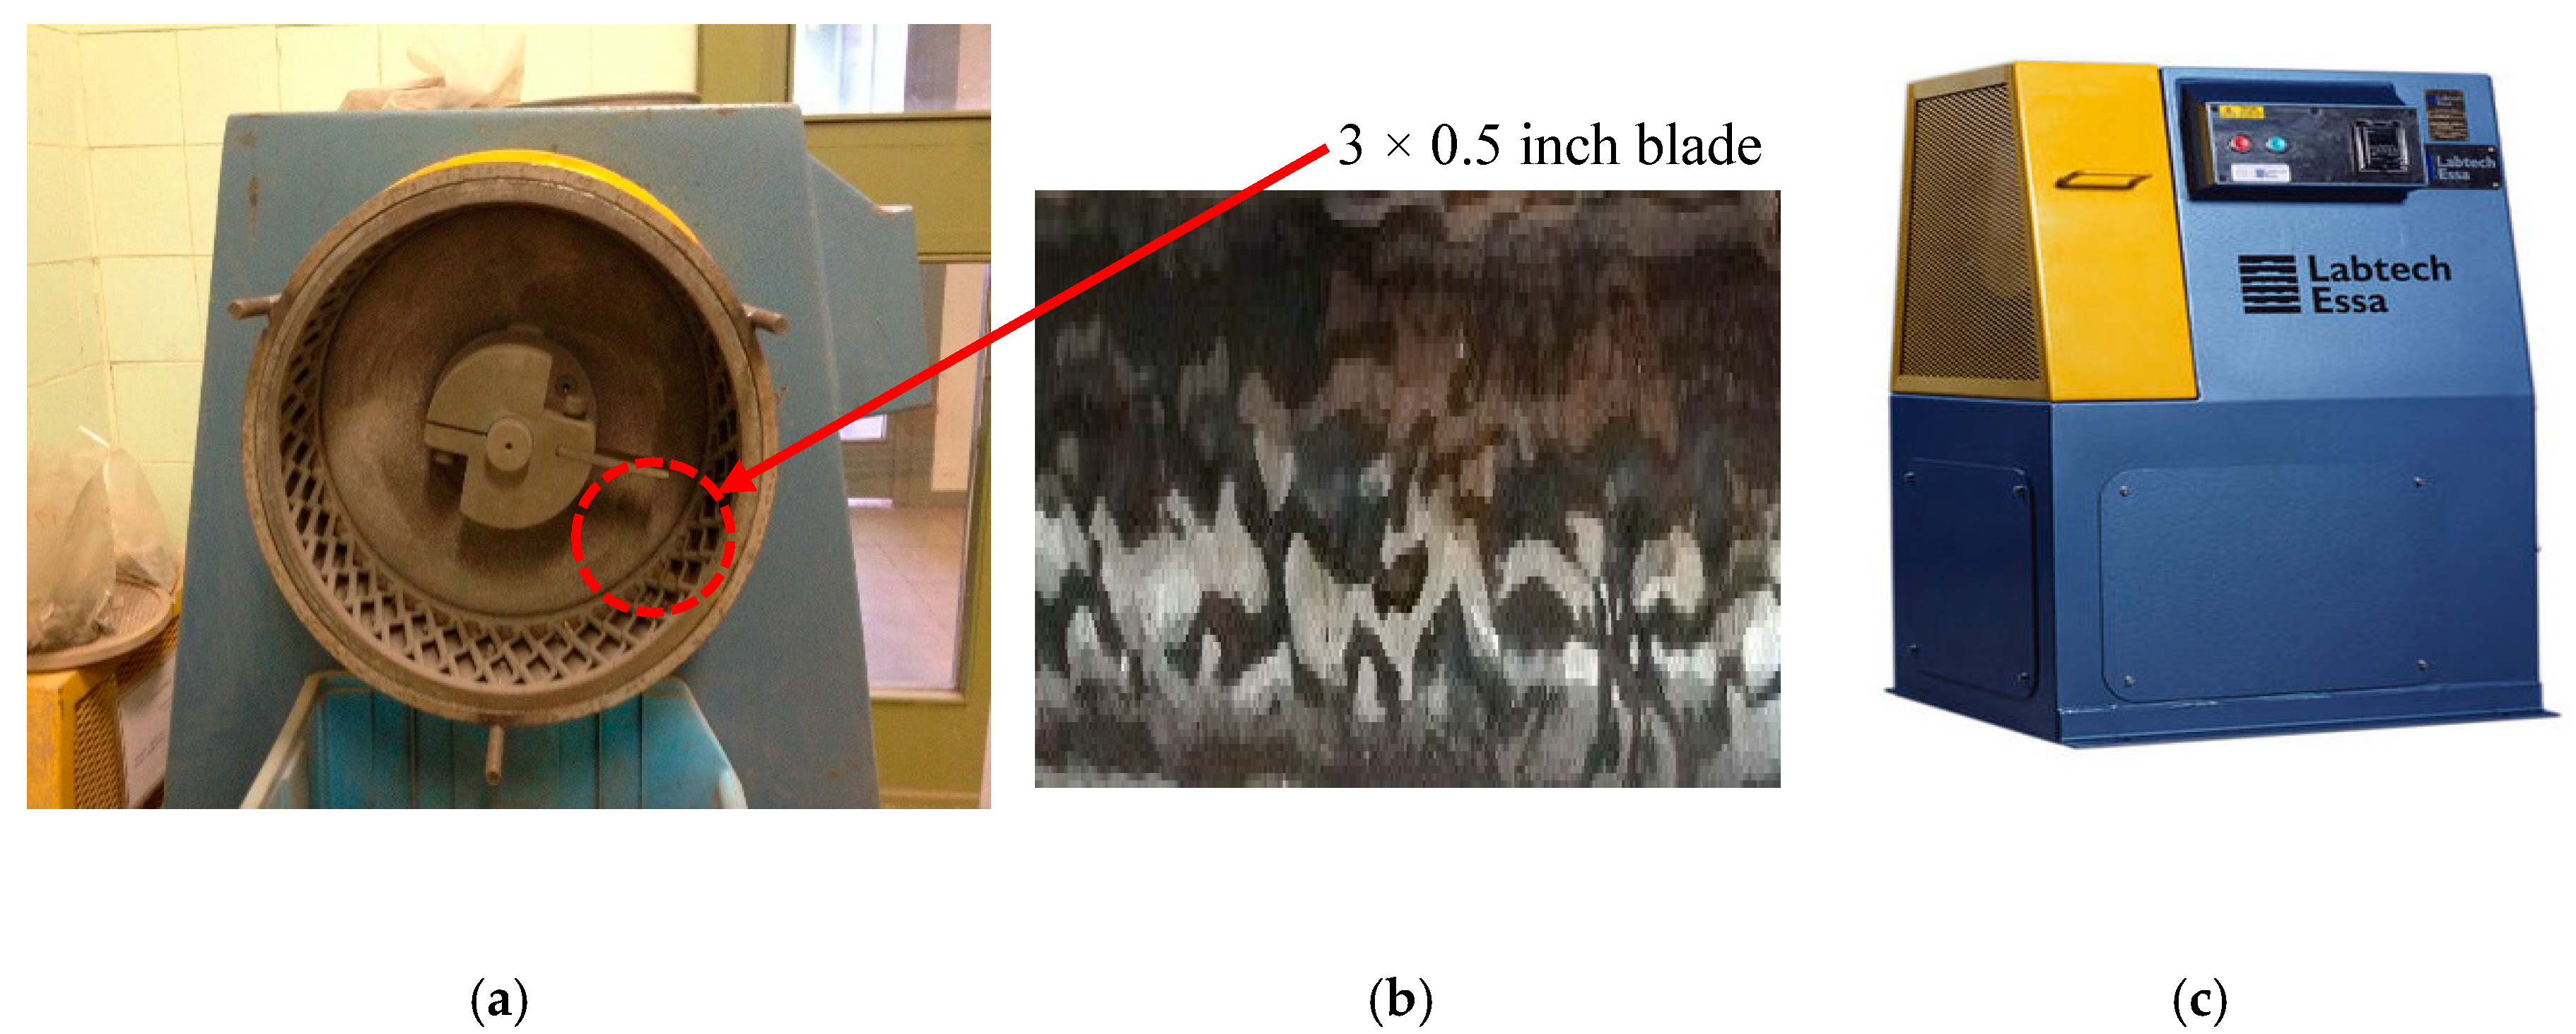
2.4. Preparation and Testing of Mineral Abrasion Measurement Using Blades Coated with High-Entropy FeMoCrNiBaHf Nano-Alloy
2.5. Measurement Procedure, Repeatability, and Reproducibility of Reduced Metal by Bond Abrasion Index
3. Results
4. Conclusions
Author Contributions
Funding
Acknowledgments
Conflicts of Interest
References
- Jeswiet, J.; Szekeres, A. Energy Consumption in Mining Comminution. Procedia CIRP 2016, 48, 140–145. [Google Scholar] [CrossRef]
- Fang, Z.Z.; Chandran, R.; Koopman, M. A New Method for Low Cost Production of Titanium Alloys for Reducing Energy Consumption of Mechanical Systems. Ph.D. Thesis, The University of Utah, Salt Lake City, UT, USA, 2016. [Google Scholar] [CrossRef]
- Murty, B.S.; Yeh, J.; Ranganathan, S. Ranganathan, High-entropy Alloys, 1st ed.; Butterworth-Heinemann: Oxford, UK, 2019; ISBN 9780128002513. [Google Scholar]
- Bhushan, R.K. Optimization of cutting parameters for minimizing power consumption and maximizing tool life during machining of Al alloy SiC particle composites. J. Clean. Prod. 2013, 39, 242–254. [Google Scholar] [CrossRef]
- Dube, N.B.; Hutchings, I.M. Influence of particle fracture in the high-stress and low-stress abrasive wear of steel. Wear 1999, 233, 246–256. [Google Scholar] [CrossRef]
- Misra, A.; Finnie, I. A classification of three-body abrasive wear and design of a new tester. Wear 1980, 60, 111–121. [Google Scholar] [CrossRef]
- Chacon-Nava, J.G.; Martinez-Villafañe, A.; Almeraya-Calderon, F.; Cabral-Miramontes, J.A.; Stack, M.M. Some remarks on particle size effects on the abrasion of a range of Fe based alloys. Tribol. Int. 2009, 43, 1307–1317. [Google Scholar] [CrossRef]
- Wirojanupatump, S.; Shipway, P.H. Abrasion of mild steel in wet and dry conditions with the rubber and steel wheel abrasion apparatus. Wear 2000, 239, 91–101. [Google Scholar] [CrossRef]
- Ala-Kleme, S.; Livimatainen, J.; Hellman, J.; Hannula, S.P. Abrasive wear properties of tool steel matrix composites in rubber wheel abrasion test and laboratory cone crusher experiments. Wear 2007, 263, 180–187. [Google Scholar] [CrossRef]
- Nahvi, S.M.; Shipway, P.H.; McCartney, D.G. Particle motion and modes of wear in the dry sand-rubber wheel abrasion test. Wear 2009, 267, 2083–2091. [Google Scholar] [CrossRef]
- Stevenson, A.N.J.; Hutchings, I.M. Development of the dry sand/rubber wheel abrasion test. Wear 1996, 195, 232–240. [Google Scholar] [CrossRef]
- G65-04 Standard Test Method for Measuring Abrasion Resistance Using the Dry Sand/Rubber Wheel Apparatus. In Book of Standards 03.02; ASTM International: Montgomery County, PA, USA, 2006; pp. 245–256.
- Davis, J.R. Davis and Associates, Hardfacing, Weld Cladding, and Dissimilar Metal Joining. In Metals Handbook, 10th ed.; American Society for Metals: Russell, OH, USA, 1997; Volume 6, pp. 789–829. [Google Scholar]
- Kokabi, A.H. Welding Technology, 5th ed.; Azadeh Publication: Tehran, Iran, 2003; ISBN 978-964-7982-43-6. [Google Scholar]
- Welding Handbook, Surfacing, 6th ed.; American Welding Society: Miami, FL, USA, 1970; Volume 3.
- Bialobrzeska, B.; Kostencki, P. Abrasive wear characteristics of selected low-alloy boron steels as measured in both field experiments and laboratory tests. Wear 2015, 328, 149–159. [Google Scholar] [CrossRef]
- Gregory, E.N.; Bartle, M. Weld Surfacing and Harfacing. In Materials for Harfacing; The Welding Institute: Cambridge, MA, USA, 1980; pp. 11–21. [Google Scholar]
- Zhang, K.B.; Fu, Z.Y.; Zhang, J.Y.; Wang, W.M.; Wang, H.; Wang, Y.C.; Zhanga, Q.J.; Shi, J. Microstructure and mechanical properties of CoCrFeNiTiAlx high-entropy alloys. Mater. Sci. Eng. A 2009, 508, 214–219. [Google Scholar] [CrossRef]
- Tsau, C.-H.; Wang, W.-L. Microstructures, Hardness and Corrosion Behaviors of FeCoNiNb0.5Mo0.5 and FeCoNiNb High-Entropy Alloys. Materials 2018, 11, 16. [Google Scholar] [CrossRef]
- Wang, Y.P.; Li, B.S.; Ren, M.X.; Yang, C.; Fu, H.Z. Microstructure and compressive properties of AlCrFeCoNi high-entropy alloy. Mater. Sci. Eng. A 2008, 491, 154–158. [Google Scholar] [CrossRef]
- Zhu, J.M.; Fu, H.M.; Zhang, H.F.; Wang, A.M.; Li, H.; Hua, Z.Q. Microstructures and compressive properties of multicomponent AlCoCrFeNiMox alloys. Mater. Sci. Eng. A 2010, 527, 6975–6979. [Google Scholar] [CrossRef]
- Chuang, M.-H.; Tsai, M.-H.; Wang, W.-R.; Lin, S.-J.; Yeh, J.-W. Microstructure and wear behavior of AlxCo1.5CrFeNi1.5Tiy high-entropy alloys. Acta Mater. 2011, 59, 6308–6317. [Google Scholar]
- Yeh, J.W.; Chen, S.K.; Lin, S.J.; Gan, J.Y.; Chin, T.S.; Shun, T.T.; Tsau, C.H.; Chang, S.Y. Nanostructured high-entropy alloys with multiple principal elements: Novel alloy design concepts and outcomes. Adv. Eng. Mater. 2004, 6, 299–303. [Google Scholar] [CrossRef]
- Youssef, K.M.; Zaddach, A.J.; Niu, C.; Irving, D.L.; Koch, C.C. A Novel Low-Density, High-Hardness, High-Entropy Alloy with Close-Packed Single-Phase Nanocrystalline Structures. Mater. Res. Lett. 2015, 3, 95–99. [Google Scholar] [CrossRef]
- Raabe, D.; Tasan, C.C.; Springer, H.; Bausch, M. From High-Entropy Alloys to High-Entropy Steels. Steel Res. Int. 2015, 86, 1127–1138. [Google Scholar] [CrossRef]
- SBIR/STTR. 2018; Exploration of High-Entropy Alloys for Turbine Applications|SBIR.Gov. Available online: https://www.sbir.gov/sbirsearch/detail/1212591 (accessed on 10 April 2018).
- Gludovatz, B.; Hohenwarter, A.; Catoor, D.; Chang, E.H.; George, E.P.; Ritchie, R.O. A Fracture-Resistant High-Entropy Alloy for Cryogenic Applications. Science 2014, 345, 1153–1158. [Google Scholar] [CrossRef]
- Ames Laboratory. n.d. Development of Radically Enhanced Alnico Magnets (DREAM) for Traction Drive Motors. Available online: https://www.ameslab.gov/dmse/fwp/development-radically-enhanced-alnico-magnets-dream-traction-drive-motors (accessed on 9 April 2015).
- Saal, J. Exploration of High-Entropy Alloys for Turbine Applications. 2016. Available online: https://www.netl.doe.gov/File Library/Events/2016/utsr/Wednesday/James-Saal.pdf (accessed on 2 November 2016).
- Dima, A.; Bhaskarla, S.; Becker, C.; Brady, M.; Campbell, C.; Dessauw, P.; Hanisch, R.; Kattner, U.; Kroenlein, K.; Newrock, M.; et al. Informatics Infrastructure for the Materials Genome Initiative. JOM 2016, 68, 2053–2064. [Google Scholar] [CrossRef]
- Li, D.; Zhang, Y. The Ultrahigh Charpy Impact Toughness of Forged AlxCoCrFeNi High-entropy Alloys at Room and Cryogenic Temperatures. Intermetallics 2016, 70, 24–28. [Google Scholar] [CrossRef]
- Löbel, M.; Lindner, T.; Mehner, T.; Lampke, T. Microstructure and Wear Resistance of AlCoCrFeNiTi High-Entropy Alloy Coatings Produced by HVOF. Coatings 2017, 7, 144. [Google Scholar] [CrossRef]
- Gao, M. Development of New High-entropy Alloys for Brazing of Ni-Base Superalloys. Colorado School of Mines. 2017. Available online: https://hdl.handle.net/11124/171240 890837 (accessed on 10 April 2018).
- Feng, R.; Gao, M.; Lee, C.; Mathes, M.; Zuo, T.; Chen, S.; Hawk, J.; Zhang, Y.; Liaw, P. Design of Light-Weight High-Entropy Alloys. Entropy 2016, 18, 333. [Google Scholar] [CrossRef]
- Kumar, A.; Gupta, M. An Insight into Evolution of Light Weight High-entropy Alloys: A Review. Metals 2016, 6, 199. [Google Scholar] [CrossRef]
- Feng, R.; Gao, M.C.; Zhang, C.; Guo, W.; Poplawsky, J.D.; Zhang, F.; Hawk, J.A.; Neuefeind, J.C.; Ren, Y.; Liaw, P.K. Phase Stability and Transformation in a Light-Weight High-Entropy Alloy. Acta Mater. 2018, 146, 280–293. [Google Scholar] [CrossRef]
- Yao, C.; Zhang, P.; Liu, M.; Li, G.; Ye, J.; Liu, P.; Tong, Y. Electrochemical Preparation and Magnetic Study of Bi–Fe–Co–Ni–Mn High-entropy Alloy. Electrochim. Acta 2008, 53, 8359–8365. [Google Scholar] [CrossRef]
- Zhu, J.M.; Fu, H.M.; Zhang, H.F.; Wang, A.M.; Li, H.; Hu, Z.Q. Microstructure and compressive properties of multiprincipal component AlCoCrFeNiCx alloys. J. Alloys Compd. 2011, 509, 3476–3480. [Google Scholar] [CrossRef]
- Wang, X.F.; Zhang, Y.; Qiao, Y.; Chen, G.L. Novel microstructure and properties of multicomponent CoCrCuFeNiTix alloys. Intermetallics 2007, 15, 357–362. [Google Scholar] [CrossRef]
- Ma, S.G.; Zhang, Y. Effect of Nb addition on the microstructure and properties of AlCoCrFeNi high-entropy alloy, Mater. Sci. Eng. A 2012, 532, 480–486. [Google Scholar] [CrossRef]
- Hsu, C.Y.; Sheu, T.S.; Yeh, J.W.; Chen, S.K. Effect of iron content on wear behavior of AlCoCrFexMo0.5Ni high-entropy alloys. Wear 2010, 268, 653–659. [Google Scholar] [CrossRef]
- Hsu, C.-Y.; Wang, W.-R.; Tang, W.-Y.; Chen, S.-K.; Yeh, J.-W. Microstructure and mechanical properties of new AlCoxCrFe-Mo0.5Ni high-entropy alloys. Adv. Eng. Mater. 2010, 12, 44–49. [Google Scholar] [CrossRef]
- Senkov, N.O.; Isheim, D.; Seidman, D.N.; Pilchak, A.L. Development of a Refractory High-entropy Superalloy. Entropy 2016, 18, 102. [Google Scholar] [CrossRef]
- Senkov, N.O.; Wilks, G.B.; Scott, J.M.; Miracle, D.B. Mechanical Properties of Nb25Mo25Ta25W25 and V20Nb20Mo20Ta20W20 Refractory High-entropy Alloys. Intermetallics 2011, 19, 698–706. [Google Scholar] [CrossRef]
- Chen, W.; Fu, Z.; Fang, S.; Xiao, H.; Zhu, D. Alloying behavior, microstructure and mechanical properties in a FeNiCrCo0.3Al0.7 high-entropy alloy. Mater. Des. 2013, 51, 854–860. [Google Scholar] [CrossRef]
- Li, C.; Li, J.C.; Zhao, M.; Jiang, Q. Effect of alloying elements on microstructure and properties of multiprincipal elements high-entropy alloys. J. Alloys Compd. 2009, 475, 752–757. [Google Scholar] [CrossRef]
- Senkov, N.O.; Scott, J.M.; Senkova, S.V.; Meisenkothen, F.; Miracle, D.B.; Woodward, C.F. Microstructure and Elevated Temperature Properties of a Refractory TaNbHfZrTi Alloy. J. Mater. Sci. 2012, 47, 4062–4074. [Google Scholar] [CrossRef]
- Miracle, B.D.; Senkov, O.N. A Critical Review of High-entropy Alloys and Related Concepts. Acta Mater. 2017, 122, 448–511. [Google Scholar] [CrossRef]
- Bridges, D.; Zhang, S.; Lang, S.; Gao, M.; Yu, Z.; Feng, Z.; Hu, A. Laser Brazing of a Nickel-Based Superalloy Using a Ni-Mn-Fe-Co-Cu High-entropy Alloy Filler Metal. Mater. Lett. 2018, 215, 11–14. [Google Scholar] [CrossRef]
- SBIR/STTR. 2018; Advanced Bond Coats for Thermal Barrier Coating Systems Based on High-entropy Alloys|SBIR.Gov. Available online: https://www.sbir.gov/sbirsearch/detail/890837 (accessed on 10 April 2018).
- Zhu, J.M.; Fu, H.M.; Zhang, H.F.; Wang, A.M.; Li, H.; Hu, Z.Q. Synthesis and properties of multiprincipal component AlCoCr-FeNiSix alloys. Mater. Sci. Eng. A 2010, 527, 7210–7214. [Google Scholar] [CrossRef]
- Nurthen, P.; Bergman, O. IHauer: Carbide Design in Wear Resistant Powder Materials; PM2008 World Congress: Washington, DC, USA, 2008. [Google Scholar]
- Li, Z.; Zhao, S.; Diao, H.; Liaw, P.K.; Meyers, M.A. High-Velocity Deformation of Al0.3CoCrFeNi High-Entropy Alloy: Remarkable Resistance to Shear Failure. Sci. Rep. 2017, 7, 42742. [Google Scholar] [CrossRef]
- Nair, B.R.; Arora, H.S.; Mukherjee, S.; Singh, S.; Singh, H.; Grewal, H.S. Exceptionally High Cavitation Erosion and Corrosion Resistance of a High-entropy Alloy. Ultrason. Sonochem. 2018, 41, 252–260. [Google Scholar] [CrossRef] [PubMed]
- Zhang, K.B.; Fu, Z.Y.; Zhang, J.Y.; Wang, W.M.; Lee, S.W.; Niihara, K. Characterization of nanocrystal line CoCrFeNiTiAl high-entropy solid solution processed by mechanical alloying. J. Alloys Compd. 2010, 495, 33–38. [Google Scholar] [CrossRef]
- Zhang, K.B.; Fu, Z.Y.; Zhang, J.Y.; Shi, J.; Wang, W.M.; Wang, H.; Wang, Y.C.; Zhang, Q.J. Nanocrystalline CoCrFeNiCuAl high-entropy solid solution synthesized by mechanical alloying. J. Alloys Compd. 2009, 485, L31–L34. [Google Scholar] [CrossRef]
- Tong, C.J.; Chen, Y.L.; Chen, S.K.; Yeh, J.W.; Shun, T.T.; Tsau, C.H.; Lin, S.J.; Chang, S.Y. Microstructure characterization of AlxCoCrCuFeNi high-entropy alloy system with multiprincipal elements. Metall. Mater. Trans. A 2005, 36, 881–893. [Google Scholar] [CrossRef]
- Guo, S.; Ng, C.; Lu, J.; Liu, C.T. Effect of valence electron concentration on stability of fcc or bcc phase in high-entropy alloys. J. Appl. Phys. 2011, 109, 103505. [Google Scholar] [CrossRef]
- Varalakshmi, S.; Kamaraj, M.; Murty, B.S. Synthesis and characterization of nanocrystalline AlFeTiCrZnCu high-entropy solid solution by mechanical alloying. J. Alloys Compd. 2008, 460, 253–257. [Google Scholar] [CrossRef]
- Varalakshmi, S.; Kamaraj, M.; Murty, B.S. Processing and properties of nanocrystalline CuNiCoZnAlTi high-entropy alloys by mechanical alloying. Mater. Sci. Eng. A 2010, 527, 1027–1030. [Google Scholar] [CrossRef]
- Davis, J.R.; Firm, K. Surface Engineering for Corrosion and Wear Resistance; Institute of Materials; ASM International: Materials Park, OH, USA, 2001; p. 279. [Google Scholar]
- Ratia, V. Behavior of Martensitic Wear Resistant Steels in Abrasion and Impact Wear Testing Conditions; Tampere University of Technology: Tampere, Finland, 2015. [Google Scholar]
- Ripoll, M.R.; Ojala, N.; Katsich, C.; Totolin, V.; Tomastik, C.; Hradil, K. The role of niobium in improving toughness and corrosion resistance of high speed steel laser hardfacings. Mater. Des. 2016, 99, 509–520. [Google Scholar] [CrossRef]
- Lindroos, M.; Valtonen, K.; Kemppainen, A.; Laukkanen, A.; Holmberg, K.; Kuokkala, V.-T. Wear behavior and work hardening of high strength steels in high stress abrasion. Wear 2015, 323, 32–40. [Google Scholar] [CrossRef]
- Sambyal, P.; Ruhi, G.; Mishra, M.; Gupta, G.; Dhawan, S.K. Conducting polymer/bio-material composite coatings for corrosion protection. Mater. Corros. 2017, 13, 1–16. [Google Scholar] [CrossRef]
- Waara, P. Interview on 20.5.2016; SSAB: Stockholm, Sweden, 2016. [Google Scholar]
- Bhaduri, D.; Penchev, P.; Dimov, S.; Soo, S.L. An investigation of accuracy, repeatability and reproducibility of laser micromachining systems. Measurement 2016, 88, 248–261. [Google Scholar] [CrossRef]
- De Smith, M.J. Statistical Analysis Handbook; Drumlin Security Ltd.: London, UK, 2018; p. 638. ISBN 978-1912556076. [Google Scholar]
| Hardfacing Process | Consumable |
|---|---|
| Oxyfuel/Oxyacetylene (OFW/OAW) | Bare cast or tubular rod |
| Shielded metal arc (SMAW) | Coated solid or tubular rod (stick electrode) |
| Oxyfuel powder spray (OFP) | Powder, tubular wire (flux-cored) |
| Gas-tungsten arc (GTAW) | Bare cast or tubular rod |
| Gas-metal arc (GMAW) | Tubular or solid wire |
| Flux-cored open arc | Tubular wire (flux-cored) |
| Submerged arc (SAW) | Tubular or solid wire |
| Plasma transferred arc (PTA) | Powder |
| Laser beam | Powder |
| Ore | Element (%) | |||||||||
|---|---|---|---|---|---|---|---|---|---|---|
| Copper Ore | Cu | TiO2 | SO3 | MnO | MgO | FeT | CaO | Al2O3 | SiO2 | LOI |
| 4.88 | 1.32 | 0.25 | 0.82 | 2.4 | 22.88 | 27.93 | 7.72 | 29.44 | 2.36 | |
| Iron Ore | Fe2O3 | TiO2 | SO3 | MnO | MgO | K2O | CaO | Al2O3 | SiO2 | LOI |
| 93.96 | - | 0.33 | - | - | 0.12 | 0.62 | 0.83 | 1.77 | 2.37 | |
| First Day (A) | Second Day (B) | ||||||||||
|---|---|---|---|---|---|---|---|---|---|---|---|
| Abrasion Rate (AR) of Alloy Steel Blade Covered by N-HEA for Copper Ore | Abrasion Rate (AR) of Alloy Steel Blade Covered by N-HEA for Iron Ore | ||||||||||
| x | n = 30 | , n = 10 | d | x | n = 30 | , n = 10 | d | ||||
| 1 | 0.0793 × 10⁻³ | 0.0799 × 10⁻³ | −0.4 × 10⁻³ | 0.52915 × 10⁻³ | 0.0803 × 10⁻³ | 1 | 0.0903 × 10⁻³ | 0.0905 × 10⁻³ | −0.2 × 10⁻³ | 0.2 × 10⁻³ | 0.0908 × 10⁻³ |
| 2 | 0.0803 × 10⁻³ | 2 | 0.0905 × 10⁻³ | ||||||||
| 3 | 0.0801 × 10⁻³ | 3 | 0.0907 × 10⁻³ | ||||||||
| 4 | 0.0801 × 10⁻³ | 0.0800 × 10⁻³ | −0.3 × 10⁻³ | 0. 20817 × 10−3 | 4 | 0.0905 × 10⁻³ | 0.0906 × 10⁻³ | −0.2 × 10⁻³ | 0.11547 × 10⁻³ | ||
| 5 | 0.0802 × 10⁻³ | 5 | 0.0905 × 10⁻³ | ||||||||
| 6 | 0.0798 × 10⁻³ | 6 | 0.0907 × 10⁻³ | ||||||||
| 7 | 0.0805 × 10⁻³ | 0.0801 × 10⁻³ | −0.2 × 10⁻³ | 0. 36055 × 10−3 | 7 | 0.0905 × 10⁻³ | 0.0908 × 10⁻³ | 0.1 × 10⁻³ | 0.35119 × 10⁻³ | ||
| 8 | 0.0800 × 10⁻³ | 8 | 0.0908 × 10⁻³ | ||||||||
| 9 | 0.0798 × 10⁻³ | 9 | 0.0912 × 10⁻³ | ||||||||
| 10 | 0.0799 × 10⁻³ | 0.0804 × 10⁻³ | 0.0 × 10⁻³ | 0. 45092 × 10−3 | 10 | 0.0907 × 10⁻³ | 0.0909 × 10⁻³ | 0.1 × 10⁻³ | 0.20817 × 10⁻³ | ||
| 11 | 0.0804 × 10⁻³ | 11 | 0.0908 × 10⁻³ | ||||||||
| 12 | 0.0808 × 10⁻³ | 12 | 0.0911 × 10⁻³ | ||||||||
| 13 | 0.0798 × 10⁻³ | 0.0806 × 10⁻³ | 0.2 × 10⁻³ | 0. 70946 × 10−3 | 13 | 0.0909 × 10⁻³ | 0.0910 × 10⁻³ | 0.3 × 10⁻³ | 0.1 × 10⁻³ | ||
| 14 | 0.0812 × 10⁻³ | 14 | 0.0910 × 10⁻³ | ||||||||
| 15 | 0.0807 × 10⁻³ | 15 | 0.0911 × 10⁻³ | ||||||||
| 16 | 0.0797 × 10⁻³ | 0.0802 × 10⁻³ | −0.1 × 10⁻³ | 0.55677 × 10⁻³ | 16 | 0.0904 × 10⁻³ | 0.0906 × 10⁻³ | −0.2 × 10⁻³ | 0.15275 × 10⁻³ | ||
| 17 | 0.0808 × 10⁻³ | 17 | 0.0906 × 10⁻³ | ||||||||
| 18 | 0.0801 × 10⁻³ | 18 | 0.0907 × 10⁻³ | ||||||||
| 19 | 0.0803 × 10⁻³ | 0.0803 × 10⁻³ | −0.1 × 10⁻³ | 0.35119 × 10⁻³ | 19 | 0.0907 × 10⁻³ | 0.0907 × 10⁻³ | 0.0 × 10⁻³ | 5.7735 × 10⁻⁵ | ||
| 20 | 0.0806 × 10⁻³ | 20 | 0.0907 × 10⁻³ | ||||||||
| 21 | 0.0799 × 10⁻³ | 21 | 0.0908 × 10⁻³ | ||||||||
| 22 | 0.0805 × 10⁻³ | 0.0804 × 10⁻³ | 0.1 × 10⁻³ | 0.36056 × 10⁻³ | 22 | 0.0906 × 10⁻³ | 0.0907 × 10⁻³ | 0.0 × 10⁻³ | 0.15275 × 10⁻³ | ||
| 23 | 0.0807 × 10⁻³ | 23 | 0.0907 × 10⁻³ | ||||||||
| 24 | 0.0800 × 10⁻³ | 24 | 0.0909 × 10⁻³ | ||||||||
| 25 | 0.0804 × 10⁻³ | 0.0807 × 10⁻³ | 0.4 × 10⁻³ | 0.3 × 10⁻³ | 25 | 0.0907 × 10⁻³ | 0.0908 × 10⁻³ | 0.1 × 10⁻³ | 0.15275 × 10⁻³ | ||
| 26 | 0.0807 × 10⁻³ | 26 | 0.0908 × 10⁻³ | ||||||||
| 27 | 0.0810 × 10⁻³ | 27 | 0.091 × 10⁻³ | ||||||||
| 28 | 0.0805 × 10⁻³ | 0.0808 × 10⁻³ | 0.5 × 10⁻³ | 0.3 × 10⁻³ | 28 | 0.0908 × 10⁻³ | 0.0909 × 10⁻³ | 0.1 × 10⁻³ | 1 × 10⁻⁴ | ||
| 29 | 0.0811 × 10⁻³ | 29 | 0.0909 × 10⁻³ | ||||||||
| 30 | 0.0808 × 10⁻³ | 30 | 0.0910 × 10⁻³ | ||||||||
| The Bond Abrasion Index (Ai) and Abrasion Rate (AR) | Ore Type | ||||
|---|---|---|---|---|---|
| Iron Ore | Copper Ore | ||||
| Standard alloy steel blade, Ai (kg) (hardness 500 Brinell ~52 Rockwell–HRC) | 0.1647 × 10⁻³ | 0.1472 × 10⁻³ | |||
| Alloy steel blade covered by FeMoCrNiBaHf, Ai (kg) (hardness 746 Brinell ~67 Rockwell–HRC) | 0.0908 × 10⁻³ | 0.0803 × 10⁻³ | |||
| Standard alloy steel blade Abrasion rate (AR) | Dry ball mill (lb/kWh) | Balls | 0.05Ai0.5 | 0.0203 × 10⁻³ | 0.0192 × 10⁻³ |
| Liners | 0.005Ai0.5 | 0.0020 × 10⁻³ | 0.0019 × 10⁻³ | ||
| Crushers (gyratory, jaw, cone) (lb/kWh) | Liners | (Ai + 0.22)/11 | 0.0350 × 10⁻³ | 0.0334 × 10⁻³ | |
| Alloy steel blade covered by Nano high-entropy alloy Abrasion rate (AR) | Dry ball mill (lb/kWh) | Balls | 0.05Ai0.5 | 0.0151 × 10⁻³ | 0.0142 × 10⁻³ |
| Liners | 0.005Ai0.5 | 0.00151 × 10⁻³ | 0.0014 × 10⁻³ | ||
| Crushers (gyratory, jaw, cone) (lb/kWh) | Liners | (Ai + 0.22)/11 | 0.0283 × 10⁻³ | 0.0273 × 10⁻³ | |
© 2019 by the authors. Licensee MDPI, Basel, Switzerland. This article is an open access article distributed under the terms and conditions of the Creative Commons Attribution (CC BY) license (http://creativecommons.org/licenses/by/4.0/).
Share and Cite
Heydartaemeh, M.; Karamoozian, M.; Potgieter, H. Application of Nano High-Entropy Alloys to Reduce Energy Consumption and Wear of Copper Oxide and High-Grade Iron Ores in Heavy Mining Industries—A Case Study. Minerals 2020, 10, 16. https://doi.org/10.3390/min10010016
Heydartaemeh M, Karamoozian M, Potgieter H. Application of Nano High-Entropy Alloys to Reduce Energy Consumption and Wear of Copper Oxide and High-Grade Iron Ores in Heavy Mining Industries—A Case Study. Minerals. 2020; 10(1):16. https://doi.org/10.3390/min10010016
Chicago/Turabian StyleHeydartaemeh, Mohammadreza, Mohammad Karamoozian, and Herman Potgieter. 2020. "Application of Nano High-Entropy Alloys to Reduce Energy Consumption and Wear of Copper Oxide and High-Grade Iron Ores in Heavy Mining Industries—A Case Study" Minerals 10, no. 1: 16. https://doi.org/10.3390/min10010016
APA StyleHeydartaemeh, M., Karamoozian, M., & Potgieter, H. (2020). Application of Nano High-Entropy Alloys to Reduce Energy Consumption and Wear of Copper Oxide and High-Grade Iron Ores in Heavy Mining Industries—A Case Study. Minerals, 10(1), 16. https://doi.org/10.3390/min10010016


