Article

The Role of Rotational Tool Speed in the Joint Performance of AA2024-T4 Friction Stir Spot Welds at a Short 3-Second Dwell Time

by
Yousef G. Y. Elshaghoul
1,
Mahmoud F. Y. Shalaby
2,
Mohamed M. El-Sayed Seleman
3,*,
Ahmed Elkelity
1,
Hagar A. Reyad
4 and
Sabbah Ataya
5,*
1
Mechanical Engineering Department, Faculty of Engineering, Suez University, Suez 43221, Egypt
2
Department of Industrial Engineering, College of Engineering, Imam Mohammad Ibn Saud Islamic University (IMSIU), Riyadh 11432, Saudi Arabia
3
Department of Metallurgical and Materials Engineering, Faculty of Petroleum and Mining Engineering, Suez University, Suez 43221, Egypt
4
Arabian Steel Industries, Suez 43552, Egypt
5
Department of Mechanical Engineering, College of Engineering, Imam Mohammad Ibn Saud Islamic University (IMSIU), Riyadh 11432, Saudi Arabia
*
Authors to whom correspondence should be addressed.
Crystals 2025, 15(12), 1054; https://doi.org/10.3390/cryst15121054
Submission received: 17 November 2025 / Revised: 9 December 2025 / Accepted: 11 December 2025 / Published: 12 December 2025
(This article belongs to the Special Issue Development of Light Alloys and Their Applications)

Abstract

This study explores Friction Stir Spot Welding (FSSW), a well-established solid-state joining technique, for high-strength aluminum alloys like AA2024-T4, which present significant challenges for conventional welding techniques. This research focuses on the impact of relatively low rotational speeds, specifically within a range of 700 to 1300 rpm, on the mechanical and microstructural properties of the welded joints. By employing a short dwell time of 3 s, this study aims to enhance productivity in the automotive and aerospace industries. The experimental work evaluated the joints’ thermal cycles, macrostructure, microstructure, hardness and load-carrying capacity. Results indicated a linear relationship between rotational speed and heat input. Although all welds exhibited a significant grain size reduction in the stir zone (SZ) compared to the base material (29.7 ± 6.1 μm), the SZ grain size increased with rotational speed, ranging from 4.7 ± 1.4 to 8.3 ± 1.3 μm. This study identified 900 rpm as the optimal parameter, achieving the highest load-carrying capacity (7.35 ± 0.4 kN) and a high SZ hardness (99 ± 1.5 HV). These findings confirm that joint strength is a balance between grain refinement and thermal softening. The presence of precipitates and the fractography of the tensile–shear tested specimens were also investigated and discussed.

1. Introduction

The rising global demand to lower greenhouse gas emissions, especially CO2, and enhance fuel economy in the transportation and aerospace sectors has profoundly influenced material selection in modern industries [1,2]. In this context, lightweight alloys such as magnesium (Mg) and aluminum (Al) have become highly favored for constructing vehicles, shipbuilding and aerospace structural parts. These materials offer compelling advantages, including superior corrosion resistance and an exceptional strength-to-weight ratio [3,4]. Within the Al alloys, the 2xxx series, particularly AA2024, stands out as a material of choice for demanding structural applications [5]. Its excellent strength, lightweight nature, and fatigue resistance make it widely used in critical industries like aerospace, automotive, and defense. However, the inherent characteristics of AA2024, being a heat-treatable alloy, pose significant challenges for conventional fusion welding techniques [1,6]. Welding processes involving melting and solidification often introduce detrimental defects such as hot cracking, porosity, and the formation of brittle secondary phases within the weld zone [7]. The presence of these flaws consistently impairs the mechanical integrity and structural reliability of the fabricated joints. This degradation in performance consequently hinders the wider application of AA2024 in critical and high-performance structures where reliability is paramount [8,9].
Consequently, the scientific and industrial communities have increasingly turned their attention towards solid-state joining alternatives that circumvent these fusion-related issues. Among the various solid-state joining techniques, Friction Stir Welding (FSW) [10,11,12] and its derivative, Friction Stir Spot Welding (FSSW) [2,13], have emerged as highly effective solutions. FSW operates on the principle of generating localized heat through friction and intense plastic deformation induced by a non-consumable rotating tool. This process facilitates material flow and consolidation below the melting point of the parent material, inherently preventing solidification defects. FSW is renowned for producing joints with refined microstructures and enhanced mechanical properties in both similar [9,14] and dissimilar [15,16,17,18,19] material combinations, thereby improving overall joint quality [20,21]. FSSW, as a specialized variant of FSW, is tailored for localized spot joining of sheet materials. It offers a robust and environmentally friendly alternative to traditional spot joining methods like riveting and resistance spot welding [22,23,24] providing higher joint efficiency.
The quality and mechanical performance of the FSSW joints is highly dependent on the precise control and optimization of various process parameters, including tool selection (geometry and material) [25,26,27], plunge depth [28], plunge rate [29], rotational speed [30,31], and dwell time [32]. Building on this, some works have been conducted on the FSSW of Al alloys, including AA2024, to understand the influence of these parameters. For instance, Tiwan et al. [1] studied the effect of using different tool geometries on the dissimilar FSSW joints of AA2024-O and AA6061-T6 Al alloys. The spot-welding process parameters were set at a 5 s fixed dwell time and various rotational speeds of 900, 1400 and 1800 rpm were applied. Their findings highlighted the cylindrical pin as an optimal choice for promoting effective material mixing and upward flow, with 1400 rpm yielding a favorable combination of fine grain size, precipitation hardening, and minimal hook width. Dourandish et al. [2] studied the applicability to use protrusion FSSW to join similar sheet thickness of AA2024-T3 Al alloy. The welding parameters were rotational speeds of 1000, 1600 and 2000 rpm at a constant dwell time of 10 s. They identified 1600 rpm as the optimal speed, achieving the highest maximum load value of 6700 N. Rashkovets et al. [22] investigated the probeless-FSSW of dissimilar 2024-T3 (1.5 mm thick) and 6082-T6 (0.8 mm thick) Al alloy sheets. Their study, conducted at a dwell time of 90 s and rotational speeds ranging from 500 to 2500 rpm, indicated that optimal rotational speeds between 1500 and 2000 rpm maximized the joint’s load-bearing capacity. In a limited study, Lewise et al. [33] focused on the FSSW of dissimilar AA2024-T3 and AA7075-T6 sheets (2 mm thick), specifically examining the influence of an 1800 rpm rotational speed, 45 s dwell time, and 3.3 mm plunge depth. They attributed improvements in both hardness and tensile strength to the superior mechanical properties of the starting AA7075-T6 alloy. Zhang et al. [34] also studied the FSSW of dissimilar aluminum alloy sheets (1.6 mm thick), with AA2024-T3 as the upper sheet and AA7075-T6 as the lower sheet. Their work, using a plunge rate of 2 mm/min, a 5 s dwell time, and rotational speeds from 630 to 1000 rpm, demonstrated that increasing rotational speed led to an increase in grain sizes (from 3.3 to 7.8 µm) and an enhancement in the load-bearing capacity of the FSSW joints.
Despite these valuable contributions, a notable gap persists in the published literature concerning the FSSW of similar sheet thicknesses of AA2024 Al alloy, particularly a systematic investigation across a focused relatively low range of rotational speeds at a short dwell time [2]. Previous studies often involve dissimilar alloys, different material thicknesses, or broader parameter ranges that may not fully elucidate the specific behavior of similar AA2024 joints. The precise effect of different rotational speeds on the microstructural development and subsequent mechanical performance of such joints, particularly with a short dwell period, requires more work.
The novelty of the present work lies in its systematic investigation of FSSW on similar 2 mm thick AA2024 Al alloy sheets. This study specifically focuses on the influence of various relatively low rotational speeds of 700, 900, 1100, and 1300 rpm, while maintaining a constant short dwell time of 3 s, which is a key parameter for enhancing productivity. This strategic rotational speed range (700–1300 rpm) is selected for the FSSW of AA2024-T4 to establish a controlled thermal cycle. This control is crucial for balancing two primary objectives: generating sufficient heat for robust metallurgical bonding and dynamic recrystallization in the stir zone (SZ), while simultaneously limiting excessive heat input to minimize detrimental thermal softening from precipitate over-aging. Furthermore, operating within this range enhances process stability by reducing tool wear and mitigating volumetric defects such as excessive flash.
This research aims to comprehensively study the thermal cycle (temperature and heat input energy) during the joining process. Furthermore, it seeks to characterize the microstructural features and to provide a comprehensive evaluation of the resulting mechanical properties, specifically focusing on hardness and tensile–shear strength, of the fabricated joints. A detailed fractographic analysis of the fracture surfaces will also be conducted to elucidate the underlying failure mechanisms. By establishing optimal FSSW parameters for similar AA2024 joints, this study seeks to provide critical data and insights that will contribute to the enhanced reliability and broader industrial application of AA2024 in high-performance structural components.

2. Materials and Methods

The AA2024-T4 sheet materials were supplied by (Dongguan Fujin Metal Materials Co., Ltd., Dongguan, China), with dimensions of 2 (thickness) × 250 (length) × 250 (width) mm. These sheets were then cut into strips of 2 × 40 × 120 mm using a wire cutting machine for the FSSW experiments. The chemical composition and mechanical properties of the as-received material, including tensile and hardness tests, are detailed in Table 1 and Table 2, respectively.
FSSW was used to create lap shear joints with a 40 mm overlap. This process used a specially designed fixation system, as shown in Figure 1, to increase process efficiency and welding quality. The fixture was designed to firmly hold multiple lap joint specimens in place, allowing them to be spot-welded sequentially without realignment or repositioning. The multi-sample fixture reduced setup time between welds, enhanced productivity, and reduced human clamping and repositioning errors that affected weld quality.
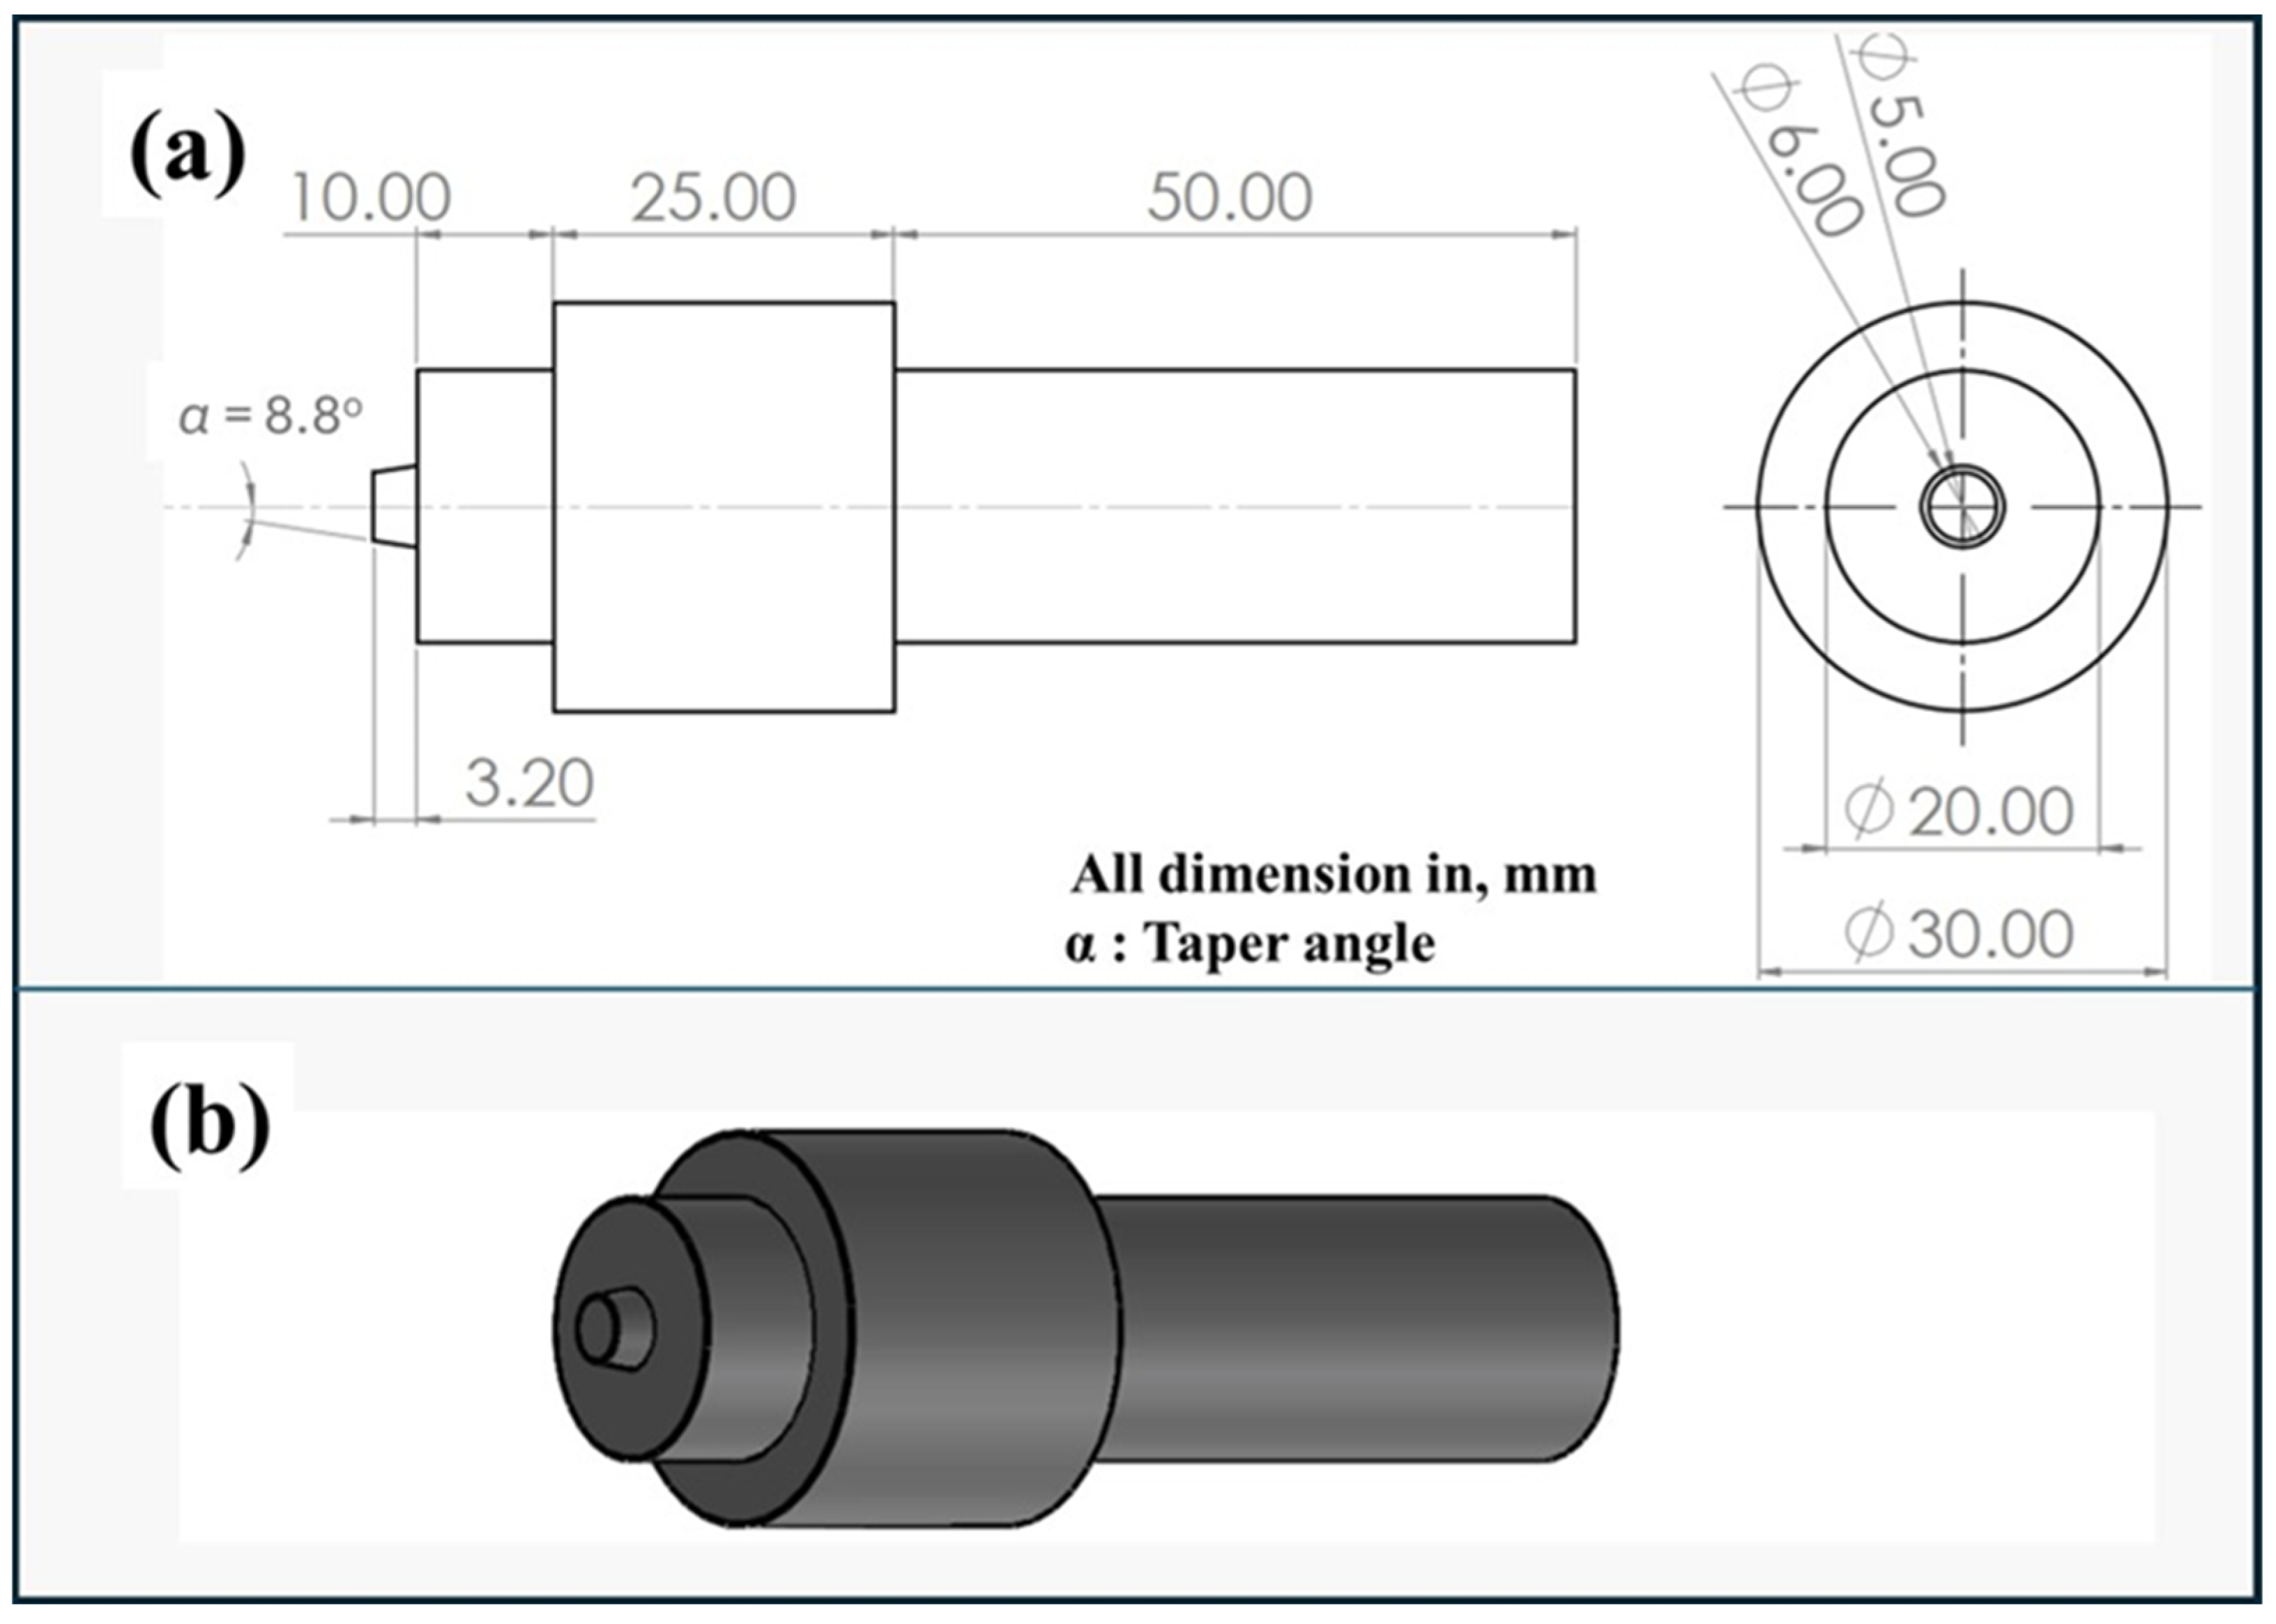
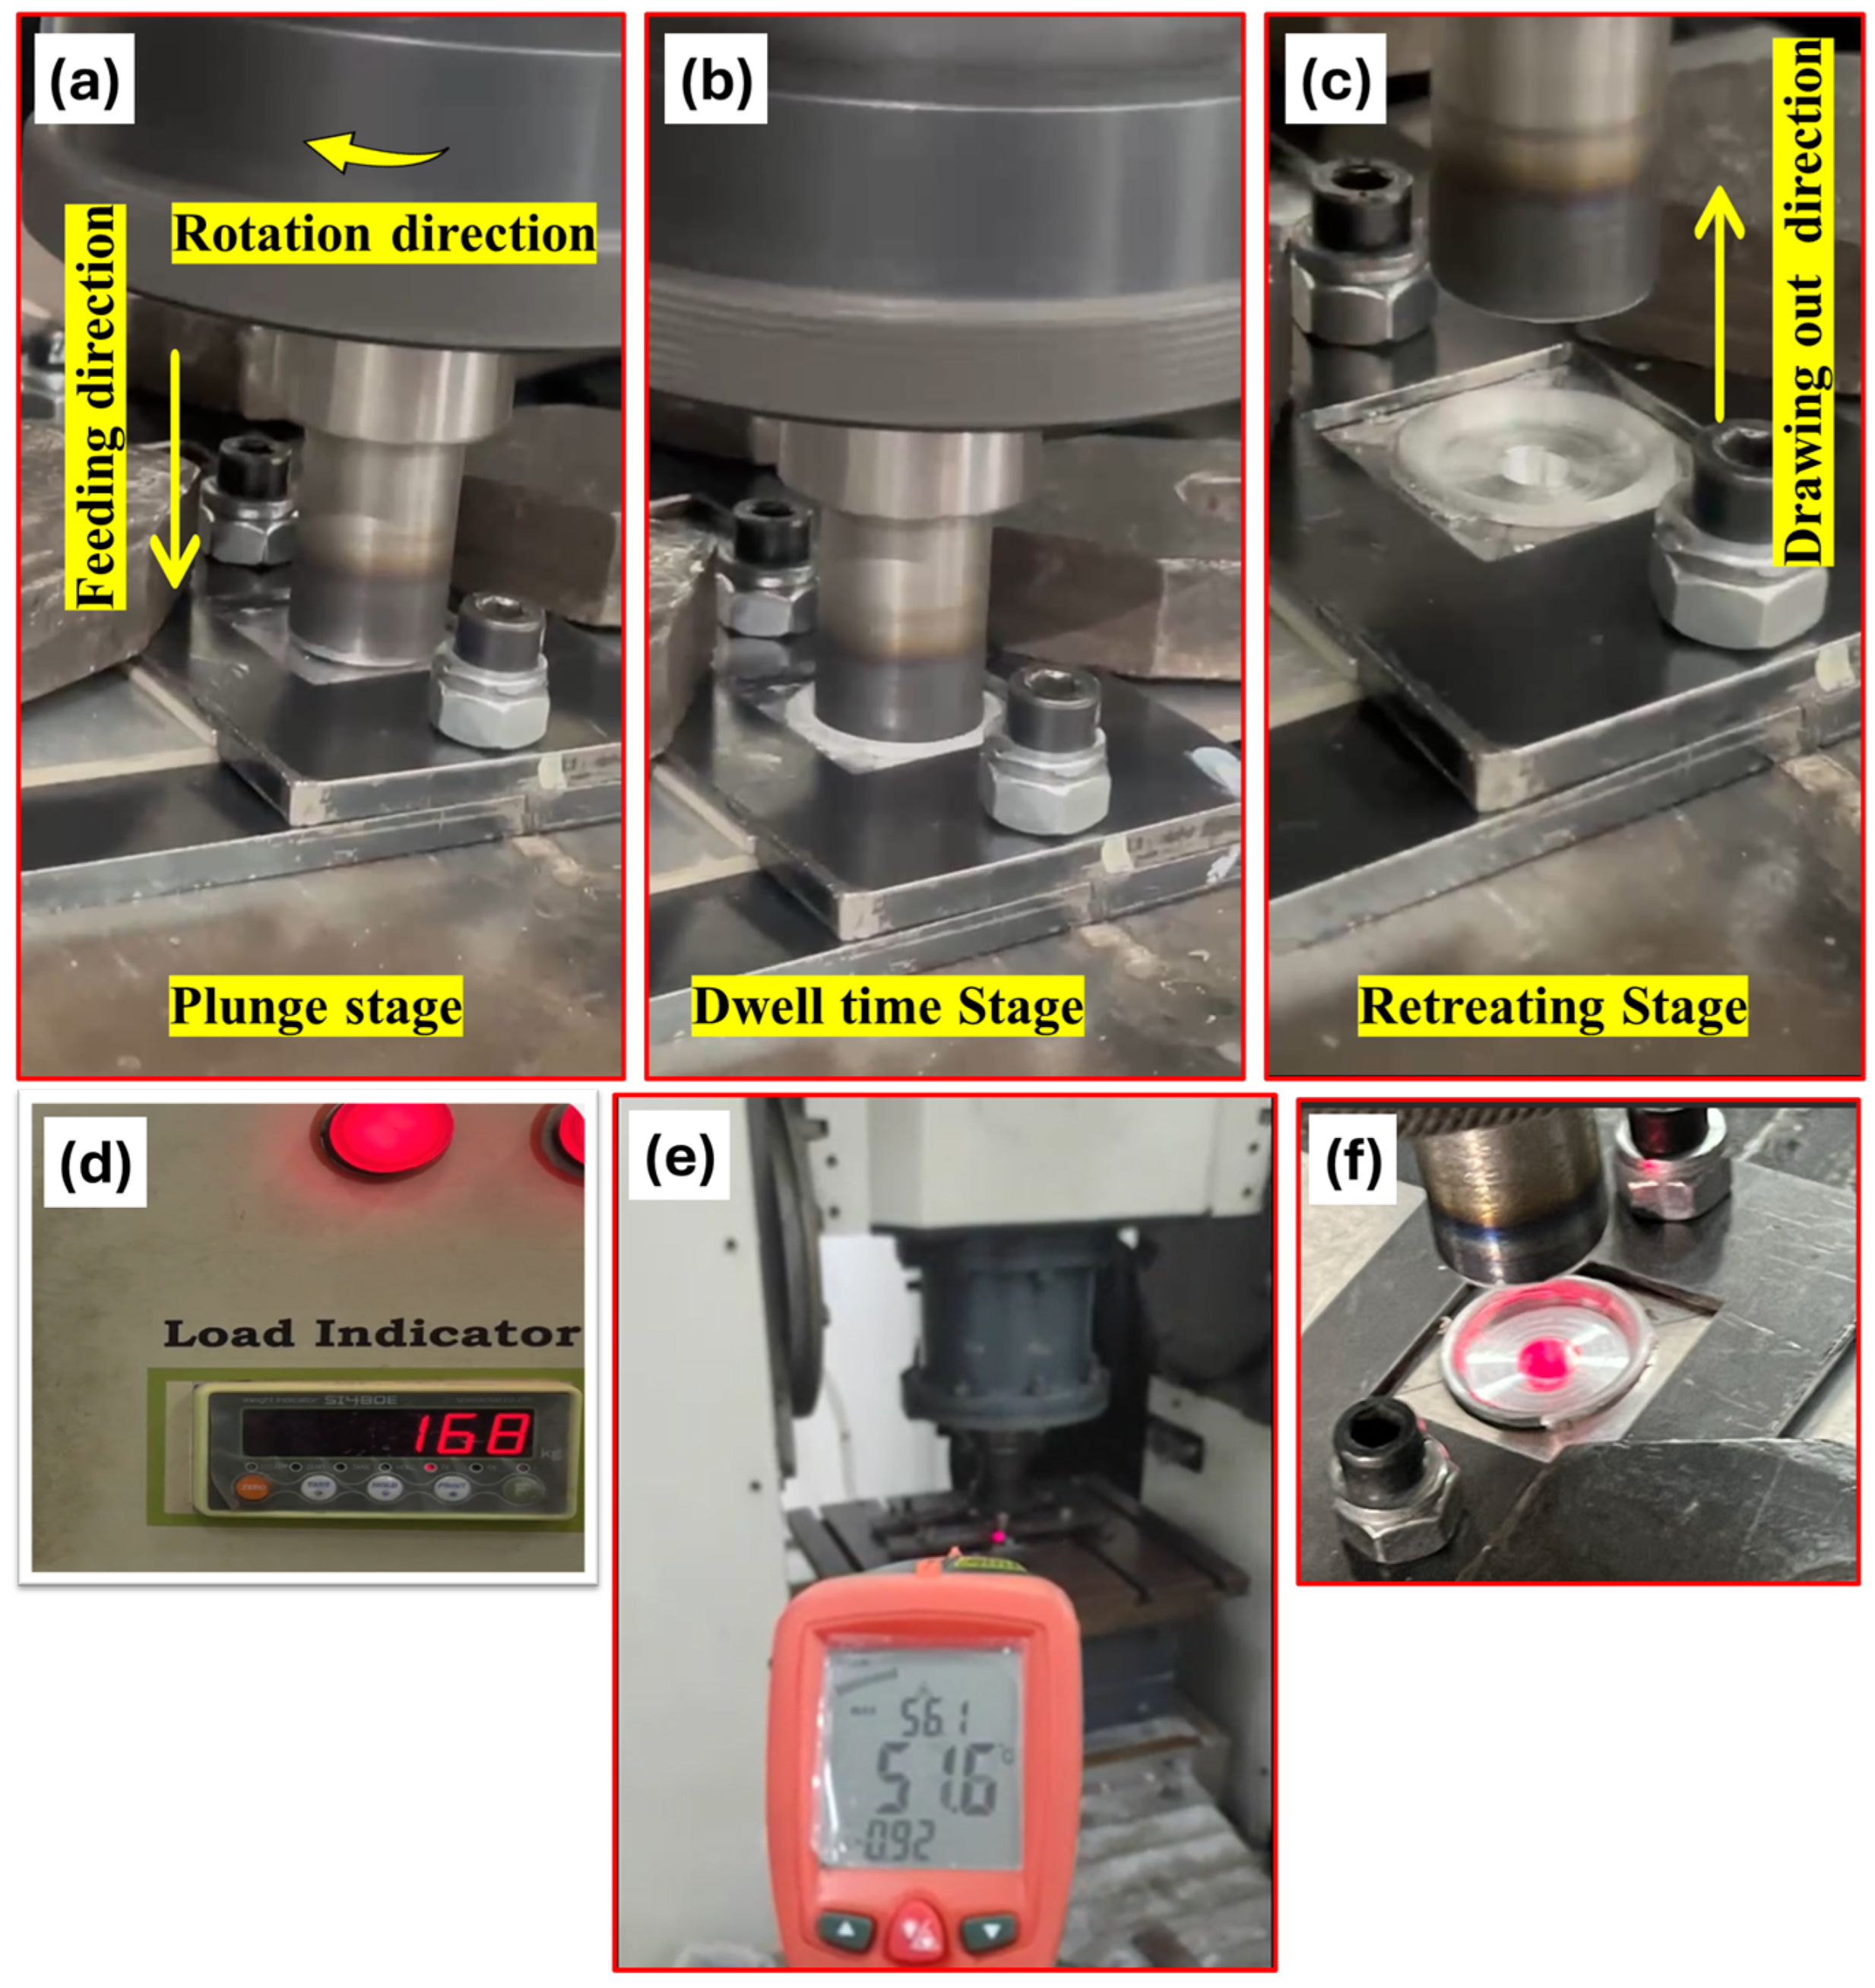
The tool design plays a critical role in heat generation, material flow, and weld quality [35,36]. A welding tool was fabricated from AISI H13 steel, featuring a flat shoulder of 20 mm in diameter. Its tapered pin had a major diameter of 6 mm which decreased to 5 mm over its 3.2 mm length. The specific dimensions of both the pin and the shoulder are illustrated in Figure 2. The FSSW joints were fabricated on an EG-FSW-M1 friction stir welding/processing machine [37,38]. The spot-welding process was achieved in three steps: (1) the plunge and stirring stage with the rotating tool (Figure 3a); (2) the dwell time stage (Figure 3b); and (3) the retreating stage (Figure 3c).
The specimens were joined via Friction Stir Spot Welding (FSSW) in lap joints with a 40 mm overlap. The welding process was conducted with various rotational speeds of 700, 900, 1100, and 1300 rpm and a constant dwell time of 3 s. To ensure consistency, other critical welding parameters, including a plunge depth of 3.4 mm, a plunge rate of 0.1 mm/s, and a tilt angle of 0°, were maintained at fixed values. The axial force exerted by the welding tool throughout the FSSW process was monitored using the integrated load indicator of the EG-FSW-M1 FSW machine, as depicted in Figure 3d. This load indicator offered a visual representation of the instantaneous force exerted during the insertion and holding periods the procedure. The temperature during the FSSW process was also recorded using a dual-laser infrared thermometer (Model 42570, Extech Instruments, FLIR company, Shenzhen, China). The measurement was conducted with a constant emissivity coefficient setting of 0.35, a standard reference value of aluminum alloys. This non-contact instrument, positioned, as seen in Figure 3e,f, functions by sensing the thermal radiation emitted from the weld zone surface. To ensure the statistical reliability and enable direct correlation with the final weld properties, thermal profiles were captured for the same three replicate welds at each rotational speed (700, 900, 1100, and 1300 rpm) that were subsequently used for mechanical and microstructural characterization.
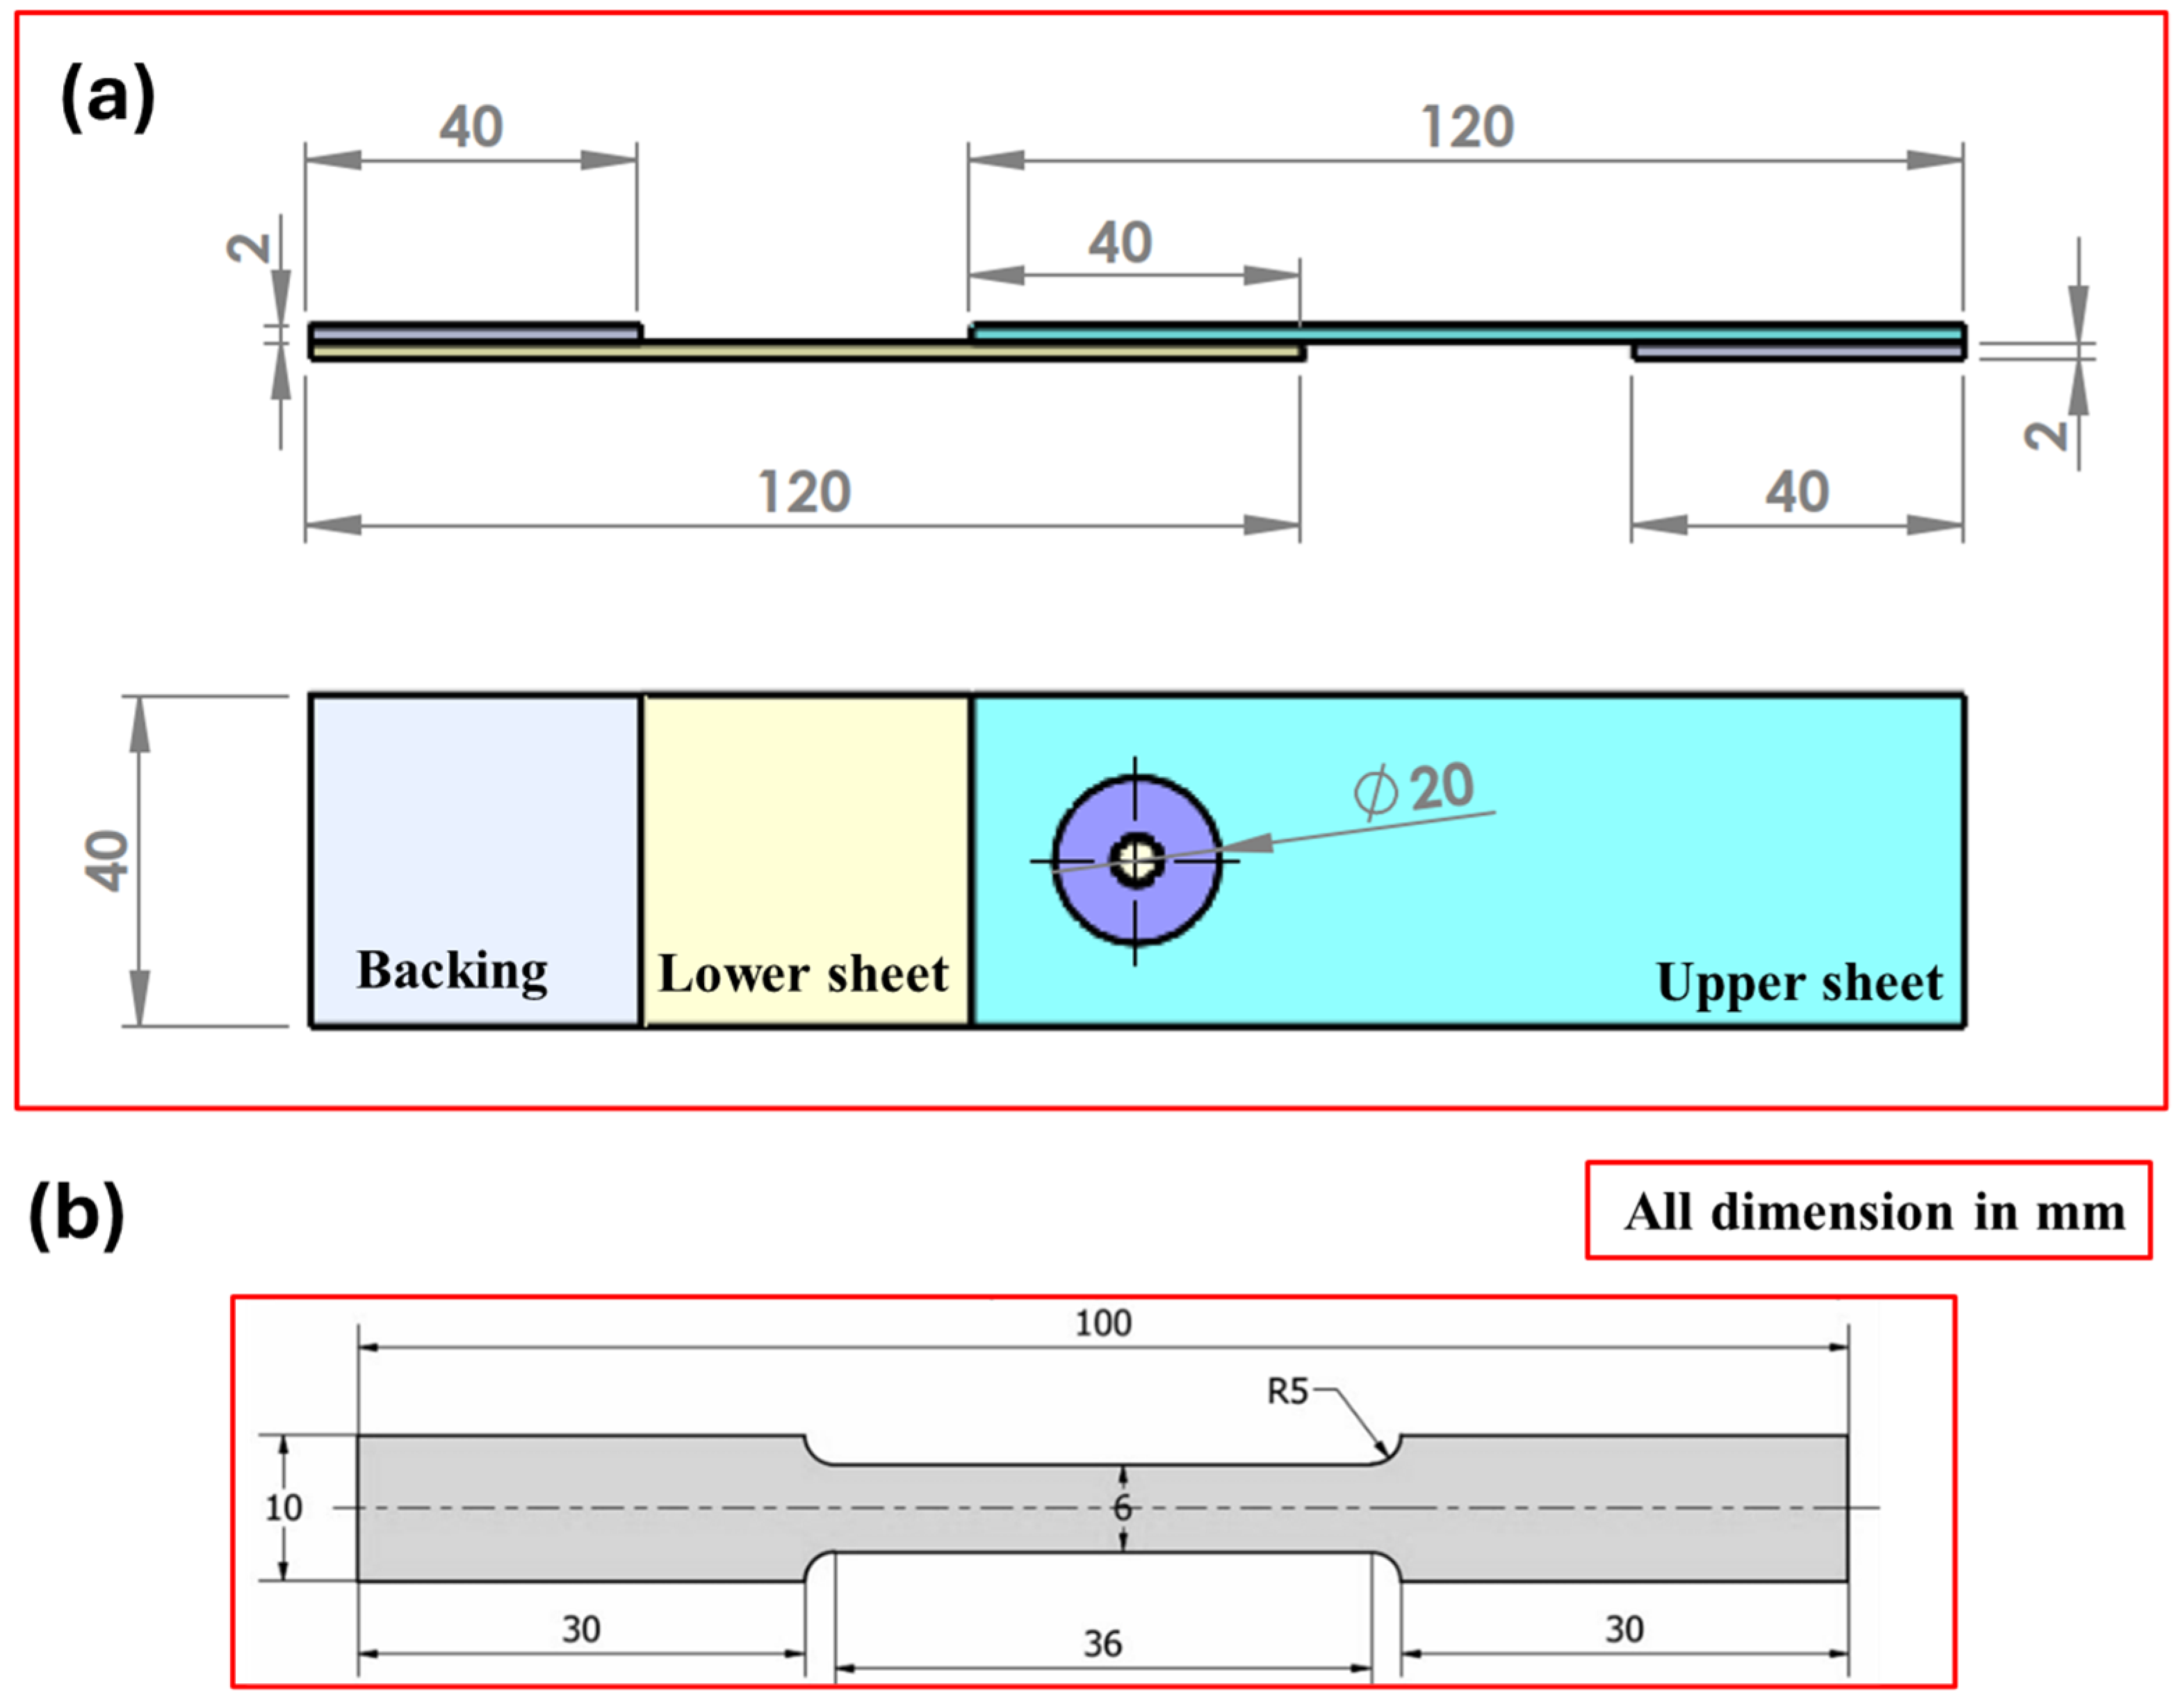
The fabricated FSSW joints were cut for macrostructural assessment, microstructural analysis, and hardness testing. The cross-sectional specimens were ground with SiC sheets up to a final grit of 2400. They were then polished with a cloth and an alumina slurry until a surface smoothness of 0.05 μm was obtained. For microstructural analysis, the polished samples underwent chemical etching using Keller’s etchant, a solution consisting of 2.5 mL of HNO3, 1.5 mL of HCl, 1 mL of HF, and 95 mL of distilled water. All standard laboratory chemicals used in this study, were supplied by El Nasr for Intermediate Chemicals Co., Giza, Egypt. The microstructural analysis was performed using an optical microscope (OM) (Model BX41M-LED, Olympus, Tokyo, Japan). The microscope was used for both general microstructural examination and quantitative grain size analysis. For the latter, multiple OM micrographs were taken from distinct areas within the SZ of each weld condition. The reported average grain size and standard deviation for each parameter were derived from measurements of a minimum of 50 grains per condition. Hardness measurements were taken on the transverse cross-sections of the spot-welded joints. A Vickers hardness tester (Model HWDV-75, TTS Unlimited, Osaka, Japan) was employed for the measurements, with a 500 g force applied for a dwell period of 15 s. Indentations were spaced at 1 mm intervals across the weld cross-section to ensure comprehensive data collection. To ensure consistency, the hardness profile for each welding parameter was determined using two separate cross-sectional samples. The average values across the weld zones are plotted for comparison. The tensile–shear test, which assesses load-carrying capacity of the AA2024-T4 FSSW joints, was conducted with a 30-ton universal tensile testing machine (Type-WDW-300D, Dongguan, China) at ambient temperature. The FSSW joints were subjected to tensile–shear testing with a constant loading rate of 0.1 mm/s. Specimen preparation for the tests was conducted in accordance with the ASTM E 8M-04 standard. To ensure statistical reliability, three replicate samples were tested for both each welding parameter condition (700, 900, 1100, and 1300 rpm) and the AA2024-T4 base material (BM), and the average values are reported. Figure 4 provides schematic diagrams of the test specimens, showing the tensile–shear test specimen for the FSSWed AA2024-T4 joint in Figure 4a and the tensile test specimen for the BM in Figure 4b. Following the tensile–shear tests, the fracture surfaces of the separated FSSW specimens were examined using a Quanta FEG 250 scanning electron microscope (SEM) from FEI (Hillsboro, OR, USA). The microscope was equipped with an integrated energy-dispersive spectroscopy (EDS) system, which was utilized for elemental analysis to determine the presence of precipitates.

3. Results

3.1. Macrostructural Appearance of FSSW Joints

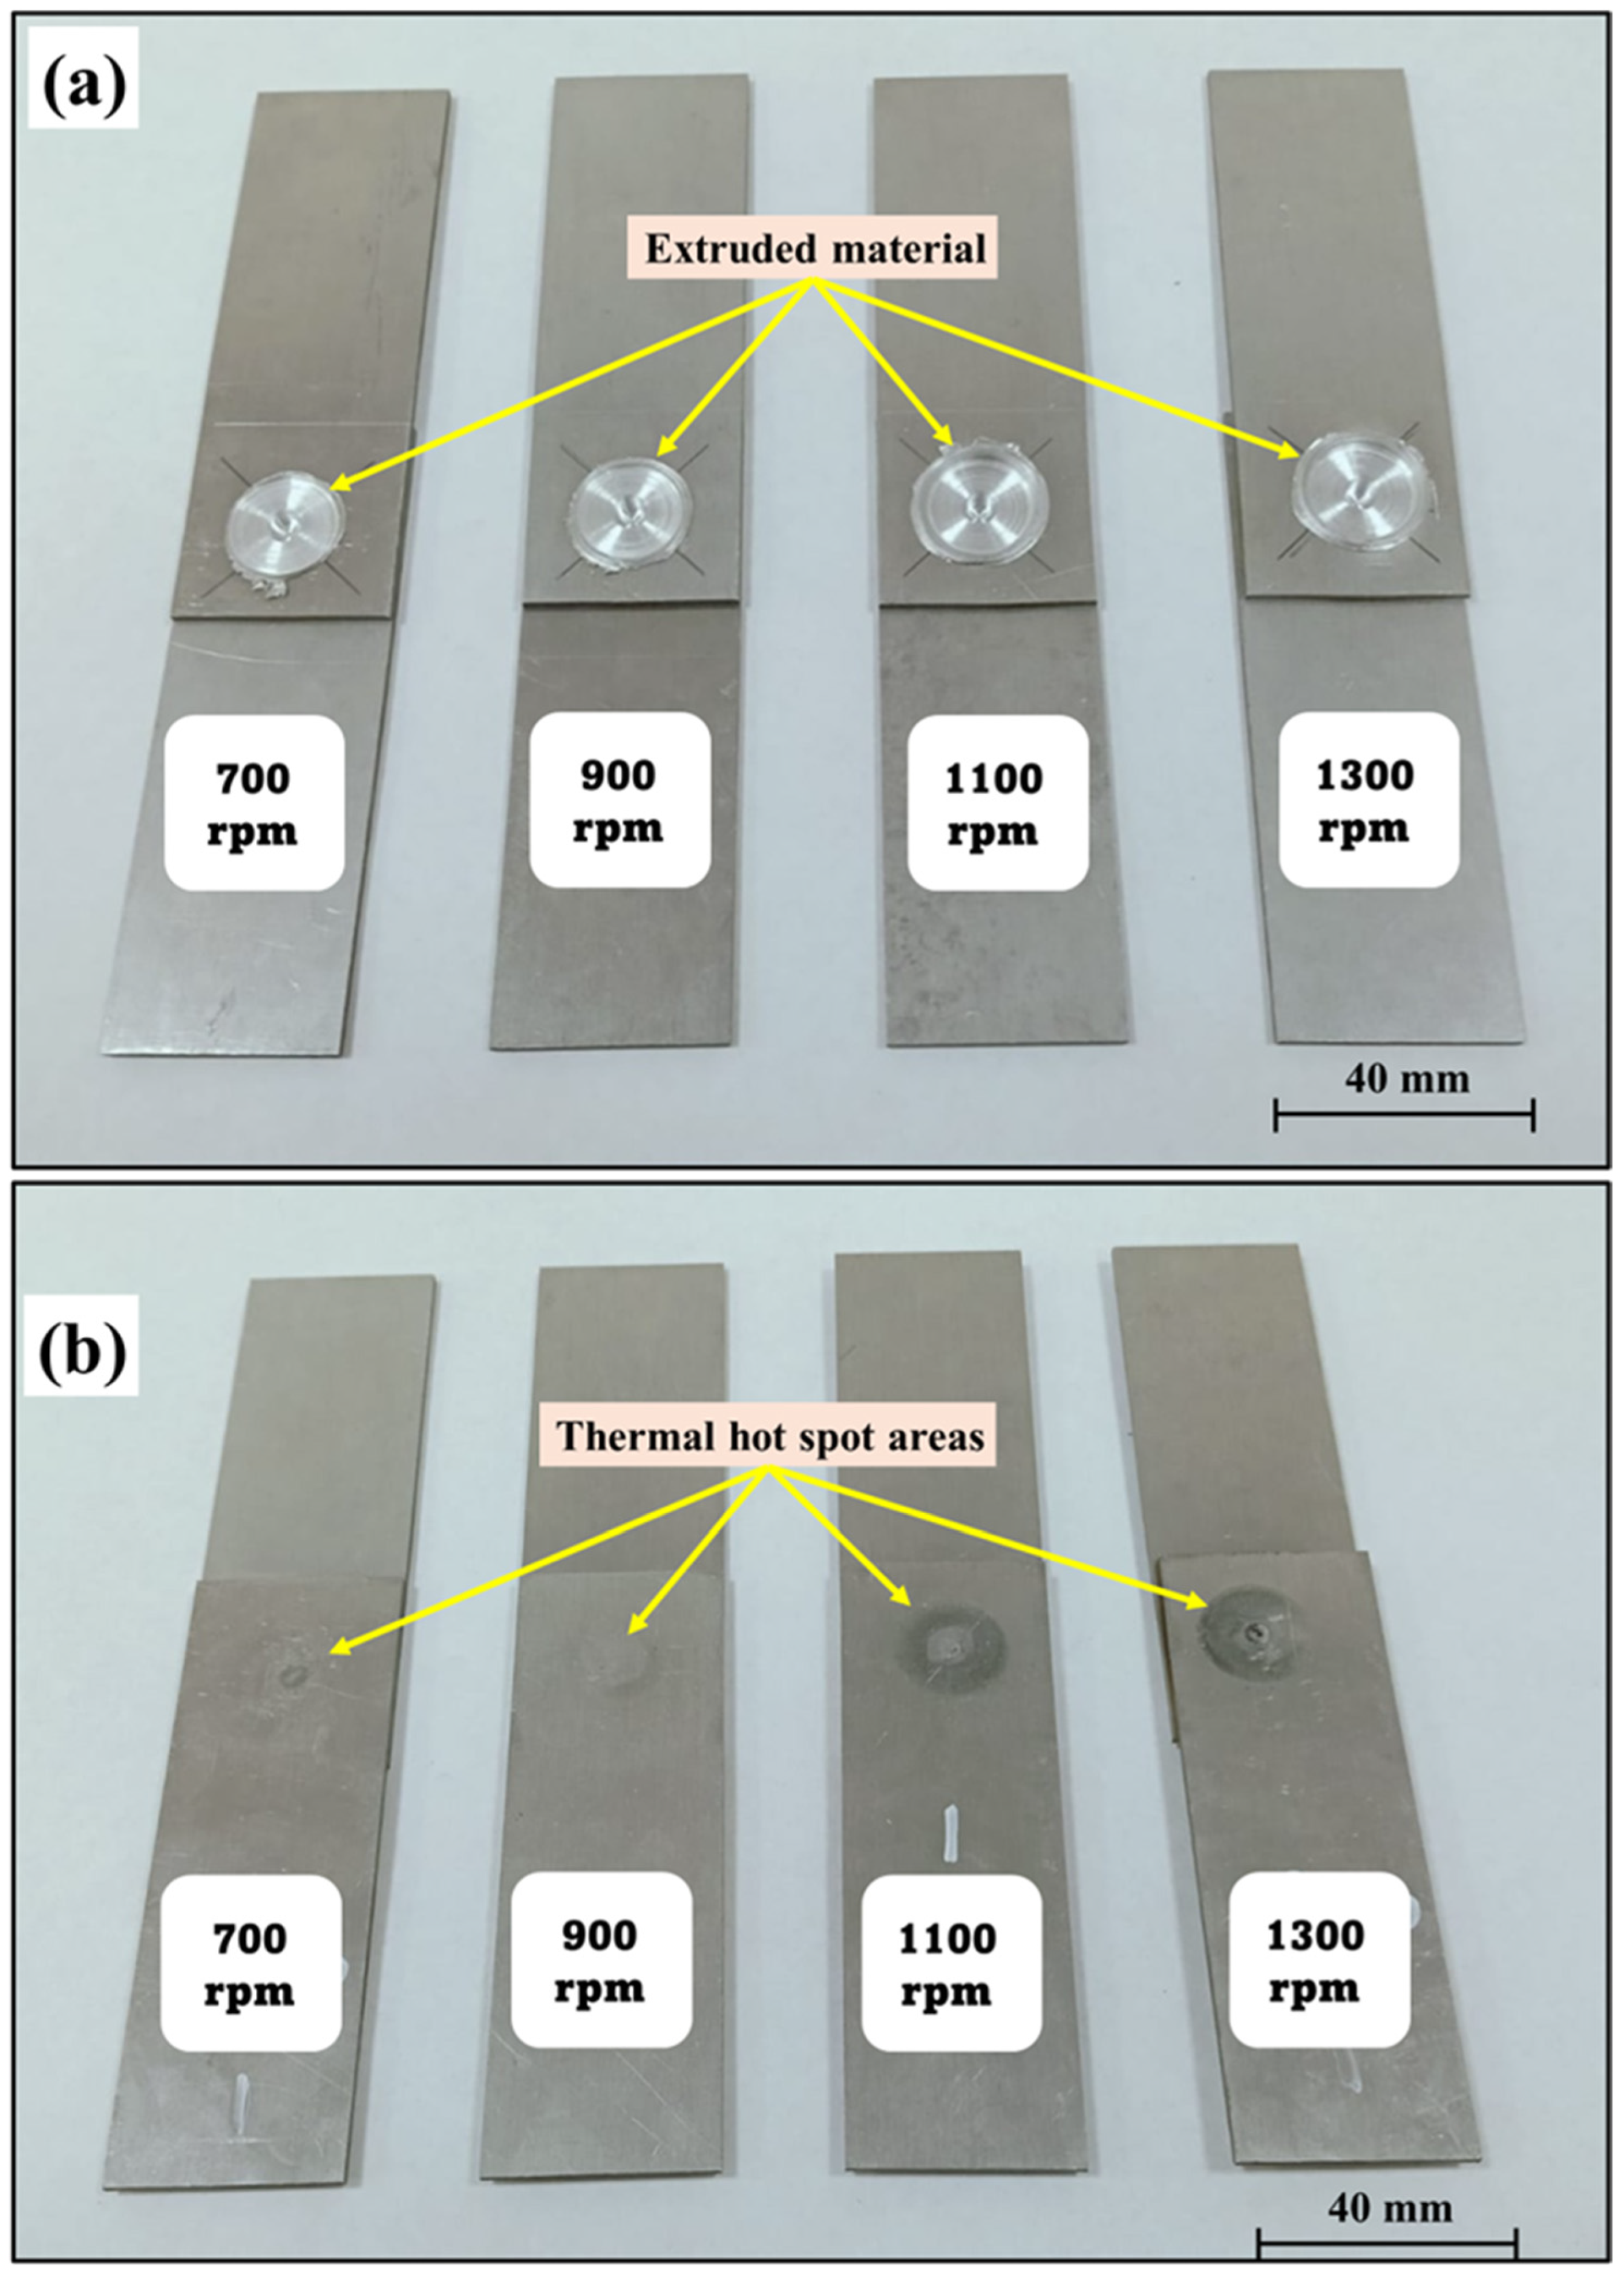
Figure 5 displays the representative top and bottom surface features of the FSSW joints. A visual assessment of the welds, which were fabricated using different tool rotational speeds ranging from 700 to 1300 rpm and a constant dwell time of 3 s, confirmed that the chosen parameters were effective for producing defect-free joints in the AA2024-T4 sheets.
As seen from the top view in Figure 5a, circular indentations from the shoulder are present at all applied parameters, with extruded material flashing to the sides of the shoulder projection. This extruded material increases with the increase in tool rotational speed [39]. An examination of the FSSW joints’ bottom surface revealed visible thermal zones, which correspond to the regions affected by the friction stirring process. These heated areas showed a progressively darker discoloration with increasing rotational speed, which is a direct result of the greater heat input generated during the dwell period, as depicted in Figure 5b.

3.2. Temperature Variation with Rotational Speed in FSSW

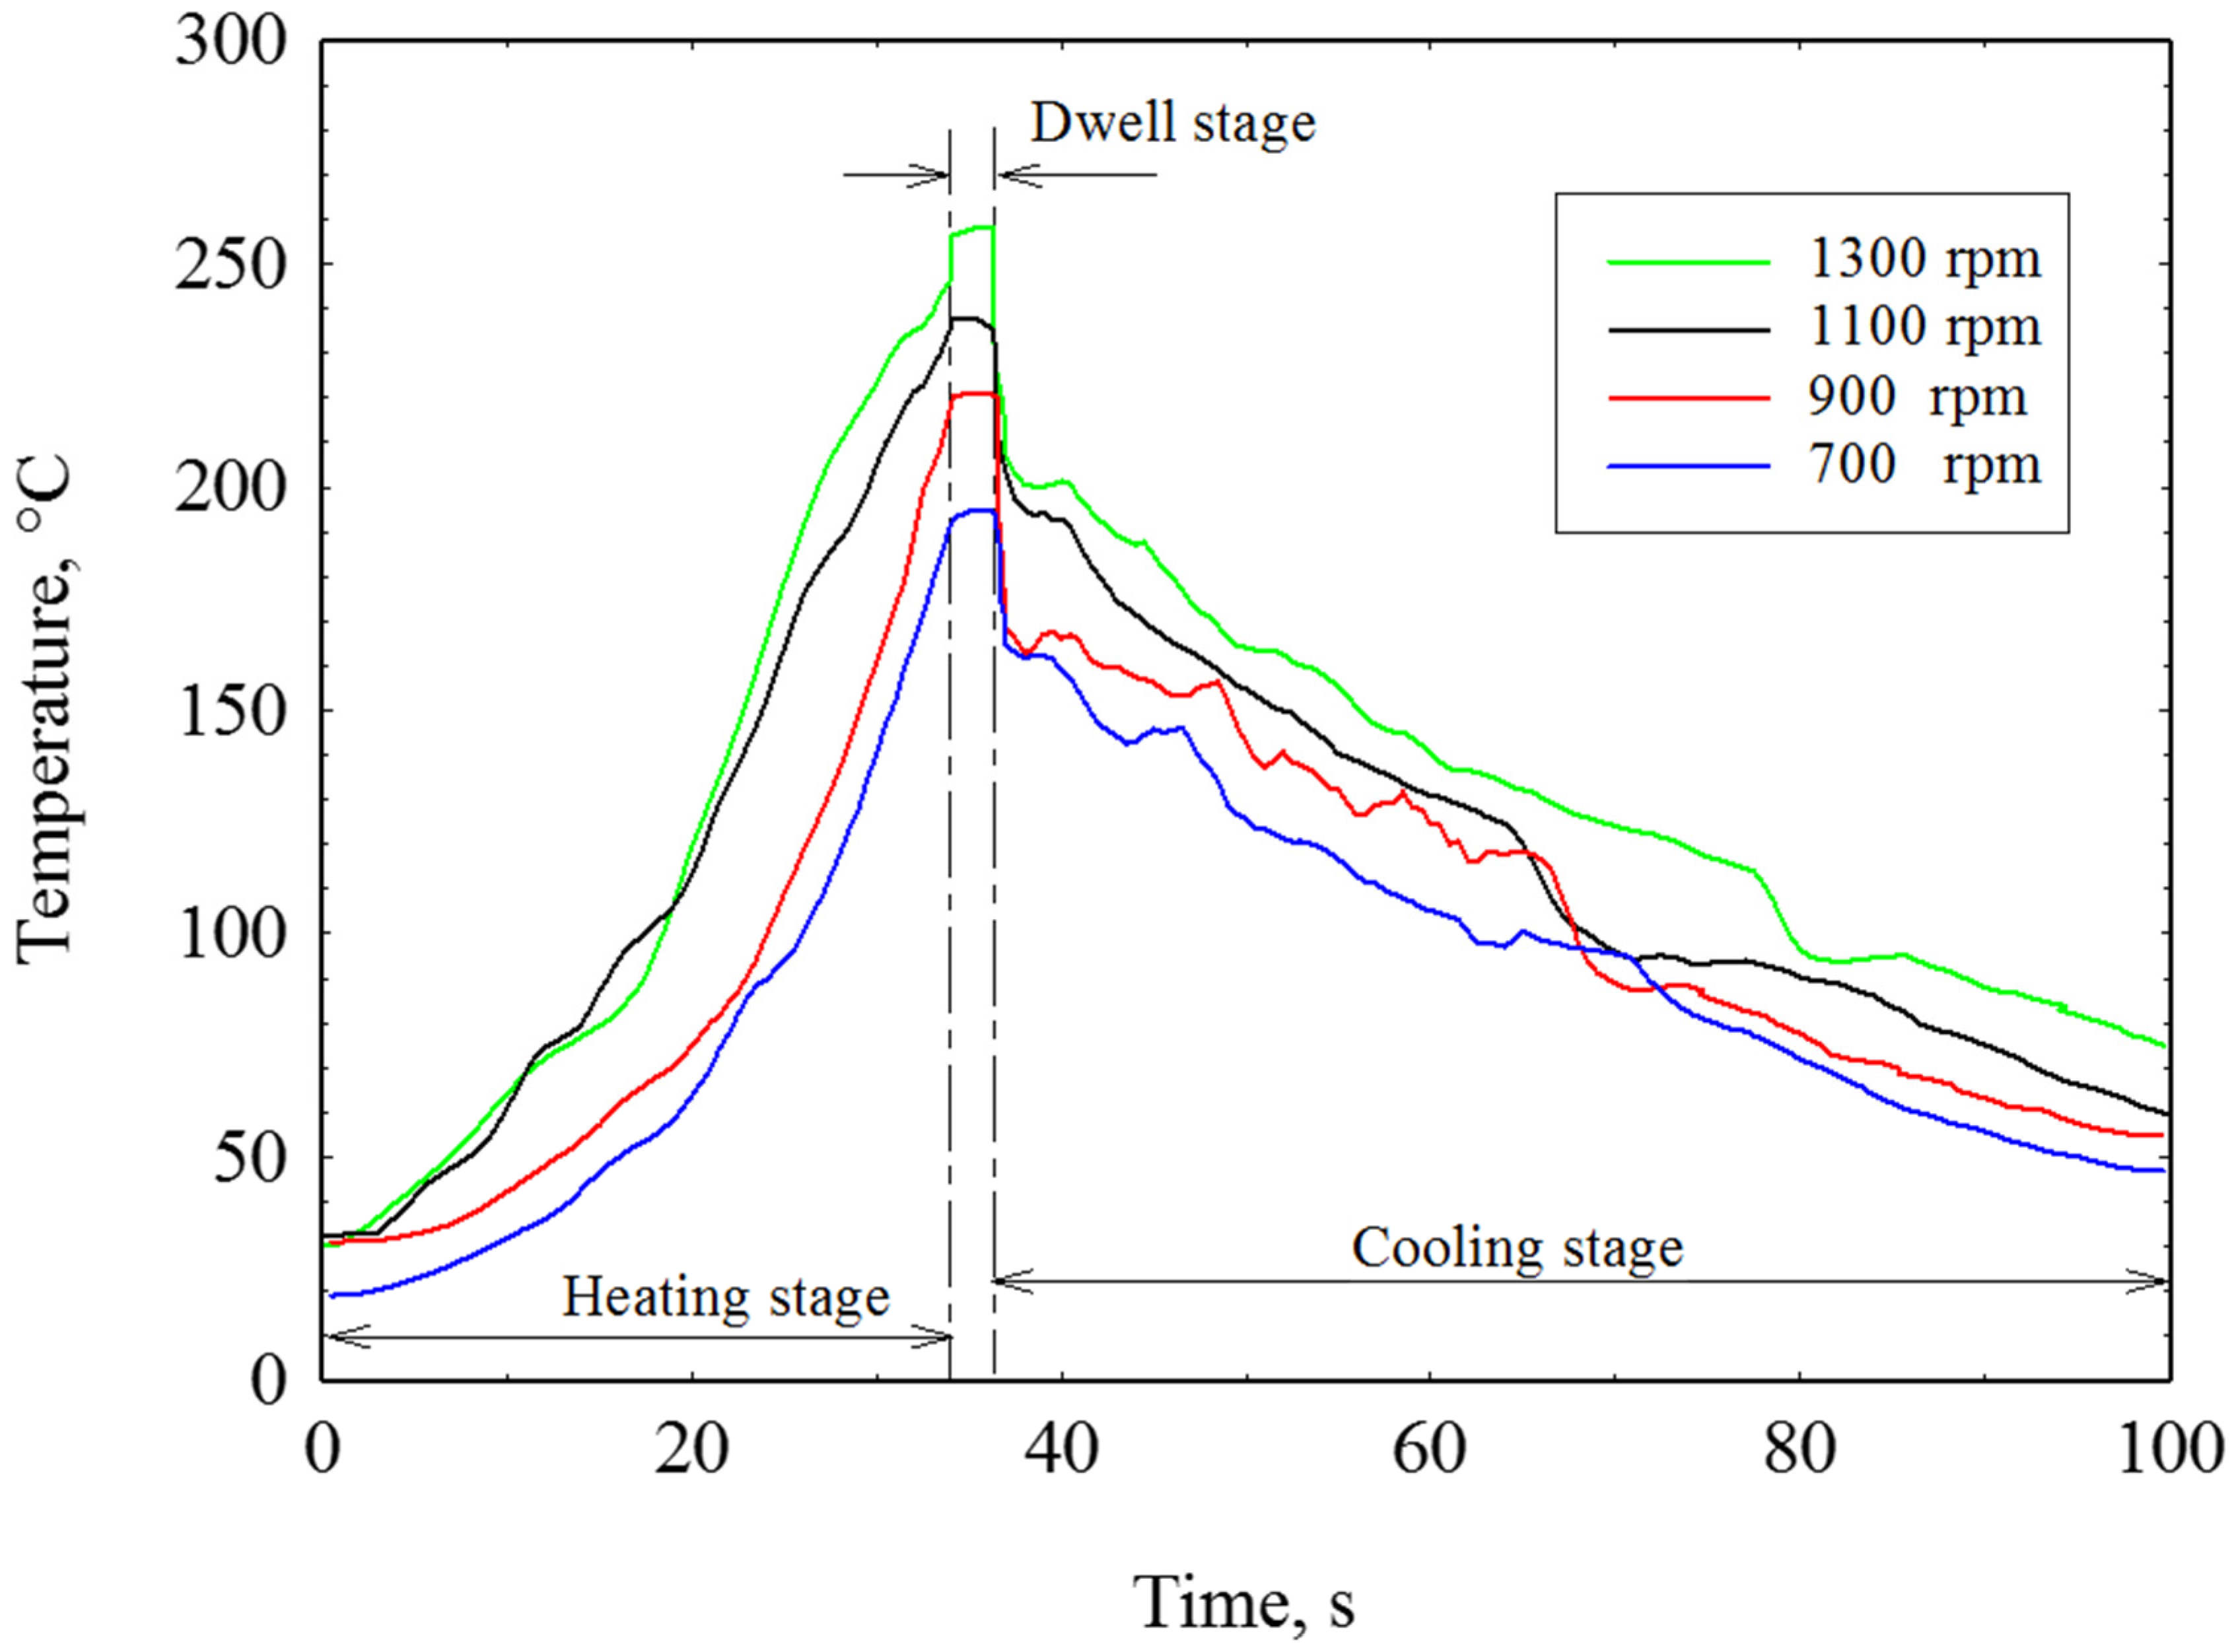
This section examines the thermal behavior of the FSSW process on AA2024-T4 sheets. Specifically, it focuses on the influence of tool rotation speed (700–1300 rpm) at a constant dwell time of 3 s on the comparative thermal cycles and relative heat input. A detailed analysis of the measured temperatures provides insight into the crucial thermal-mechanical conditions that govern spot weld formation. As shown in Figure 6, the temperature profiles exhibit a typical three-stage pattern, involving an initial heating stage, the achievement of a peak temperature during the 3 s dwell time, and a final cooling stage. The heating stage is characterized by a slow temperature rise as the tool’s shoulder contacts the upper surface of the AA2024-T4 lap joint. As the tool’s plunge depth increases, the temperature of the material under processing also rises. Higher rotational speeds accelerate this temperature rise, leading to a quicker achievement of peak temperatures once the tool reaches the target penetration depth of 3.4 mm. These peak temperatures are directly related to the applied rotational speed.
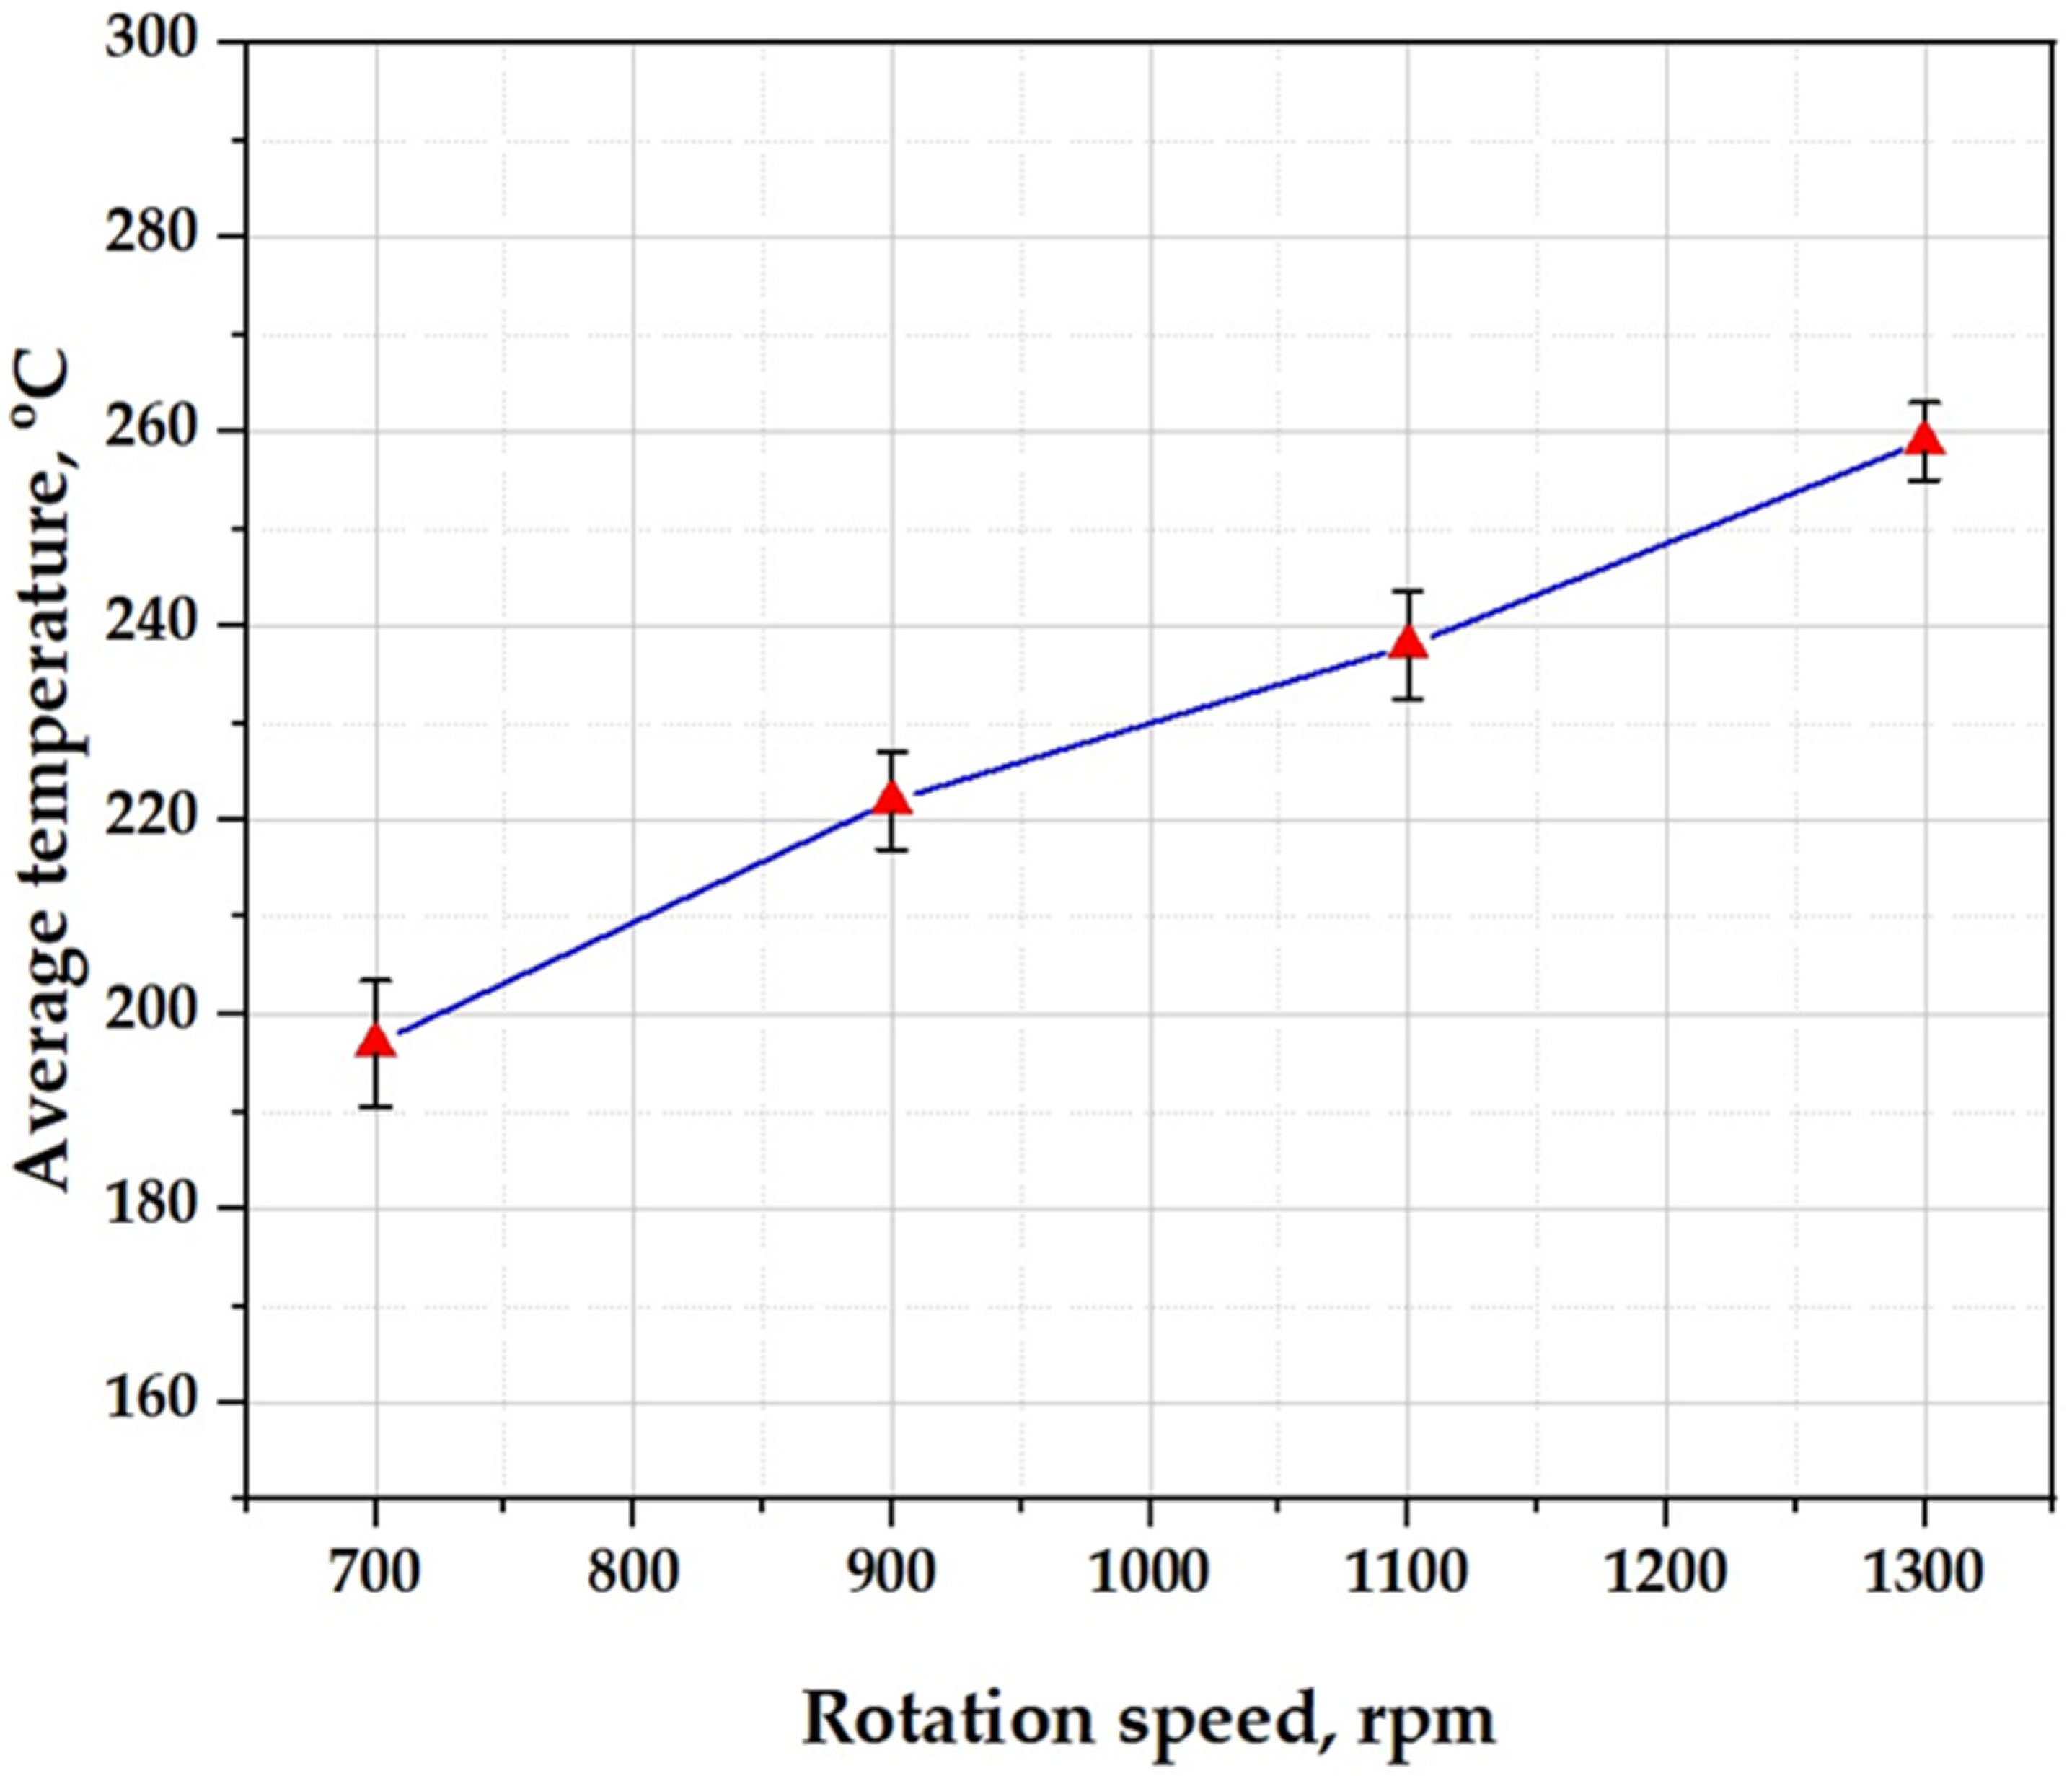
The measured peak temperatures were 197 ± 13 °C, 222 ± 10 °C, 238 ± 11 °C, and 259 ± 8 °C for tool rotational speeds of 700 rpm, 900 rpm, 1100 rpm, and 1300 rpm, respectively, as given in Figure 7. The data clearly show that increasing the rotational speed in FSSW results in higher process temperatures due to increased frictional heat generation at higher speeds. While elevated temperatures generally improve material flow and weld quality, it is essential to balance the speed to avoid overheating and associated defects. Following the peak temperature stage, the tool was retracted, and the joint was allowed to cool in the air. The cooling stage is marked by a gradual temperature drop as heat dissipates from the joint. The rate of cooling depends on the amount of heat generated, the surrounding cooling medium, and the welded material’s thermal properties [40,41].

3.3. Thermal Energy Generation in FSSW

Based on FSW/FSSW process parameters, the generated heat input energy depends on rotating tool profile and geometry, rotational speed, axial force, dwell time, and friction coefficient. The generated heat input energy  ( Q T : watt) was calculated using Equation (1) [42,43]:
Q T = 2 3 ×   μ × ω × P R s 2   [ R s 3 R P T 3 + 3 4 × H P cos α × ( 2 × R P T H P × tan α ) 2 + ( R P T H P × tan α ) 3 ]
The   consumed   heat   input   energy = Q T × t   ( J )
where P (in N) is the axial force,  ω  (in rad/min) is the angular velocity, calculated as  ω  = (2π × n/60), where n is the applied rotational speed in rpm, and  R P T  (in m) is the pin tip radius,  R S  (in m) is the shoulder radius,  H P  (in m) is the pin height,  μ  is the friction coefficient, which describes the interaction between the tool and the aluminum alloy, taken as 0.4 [44,45], α is the design tapered tool angle (in degrees)and t is the dwell time (in s).
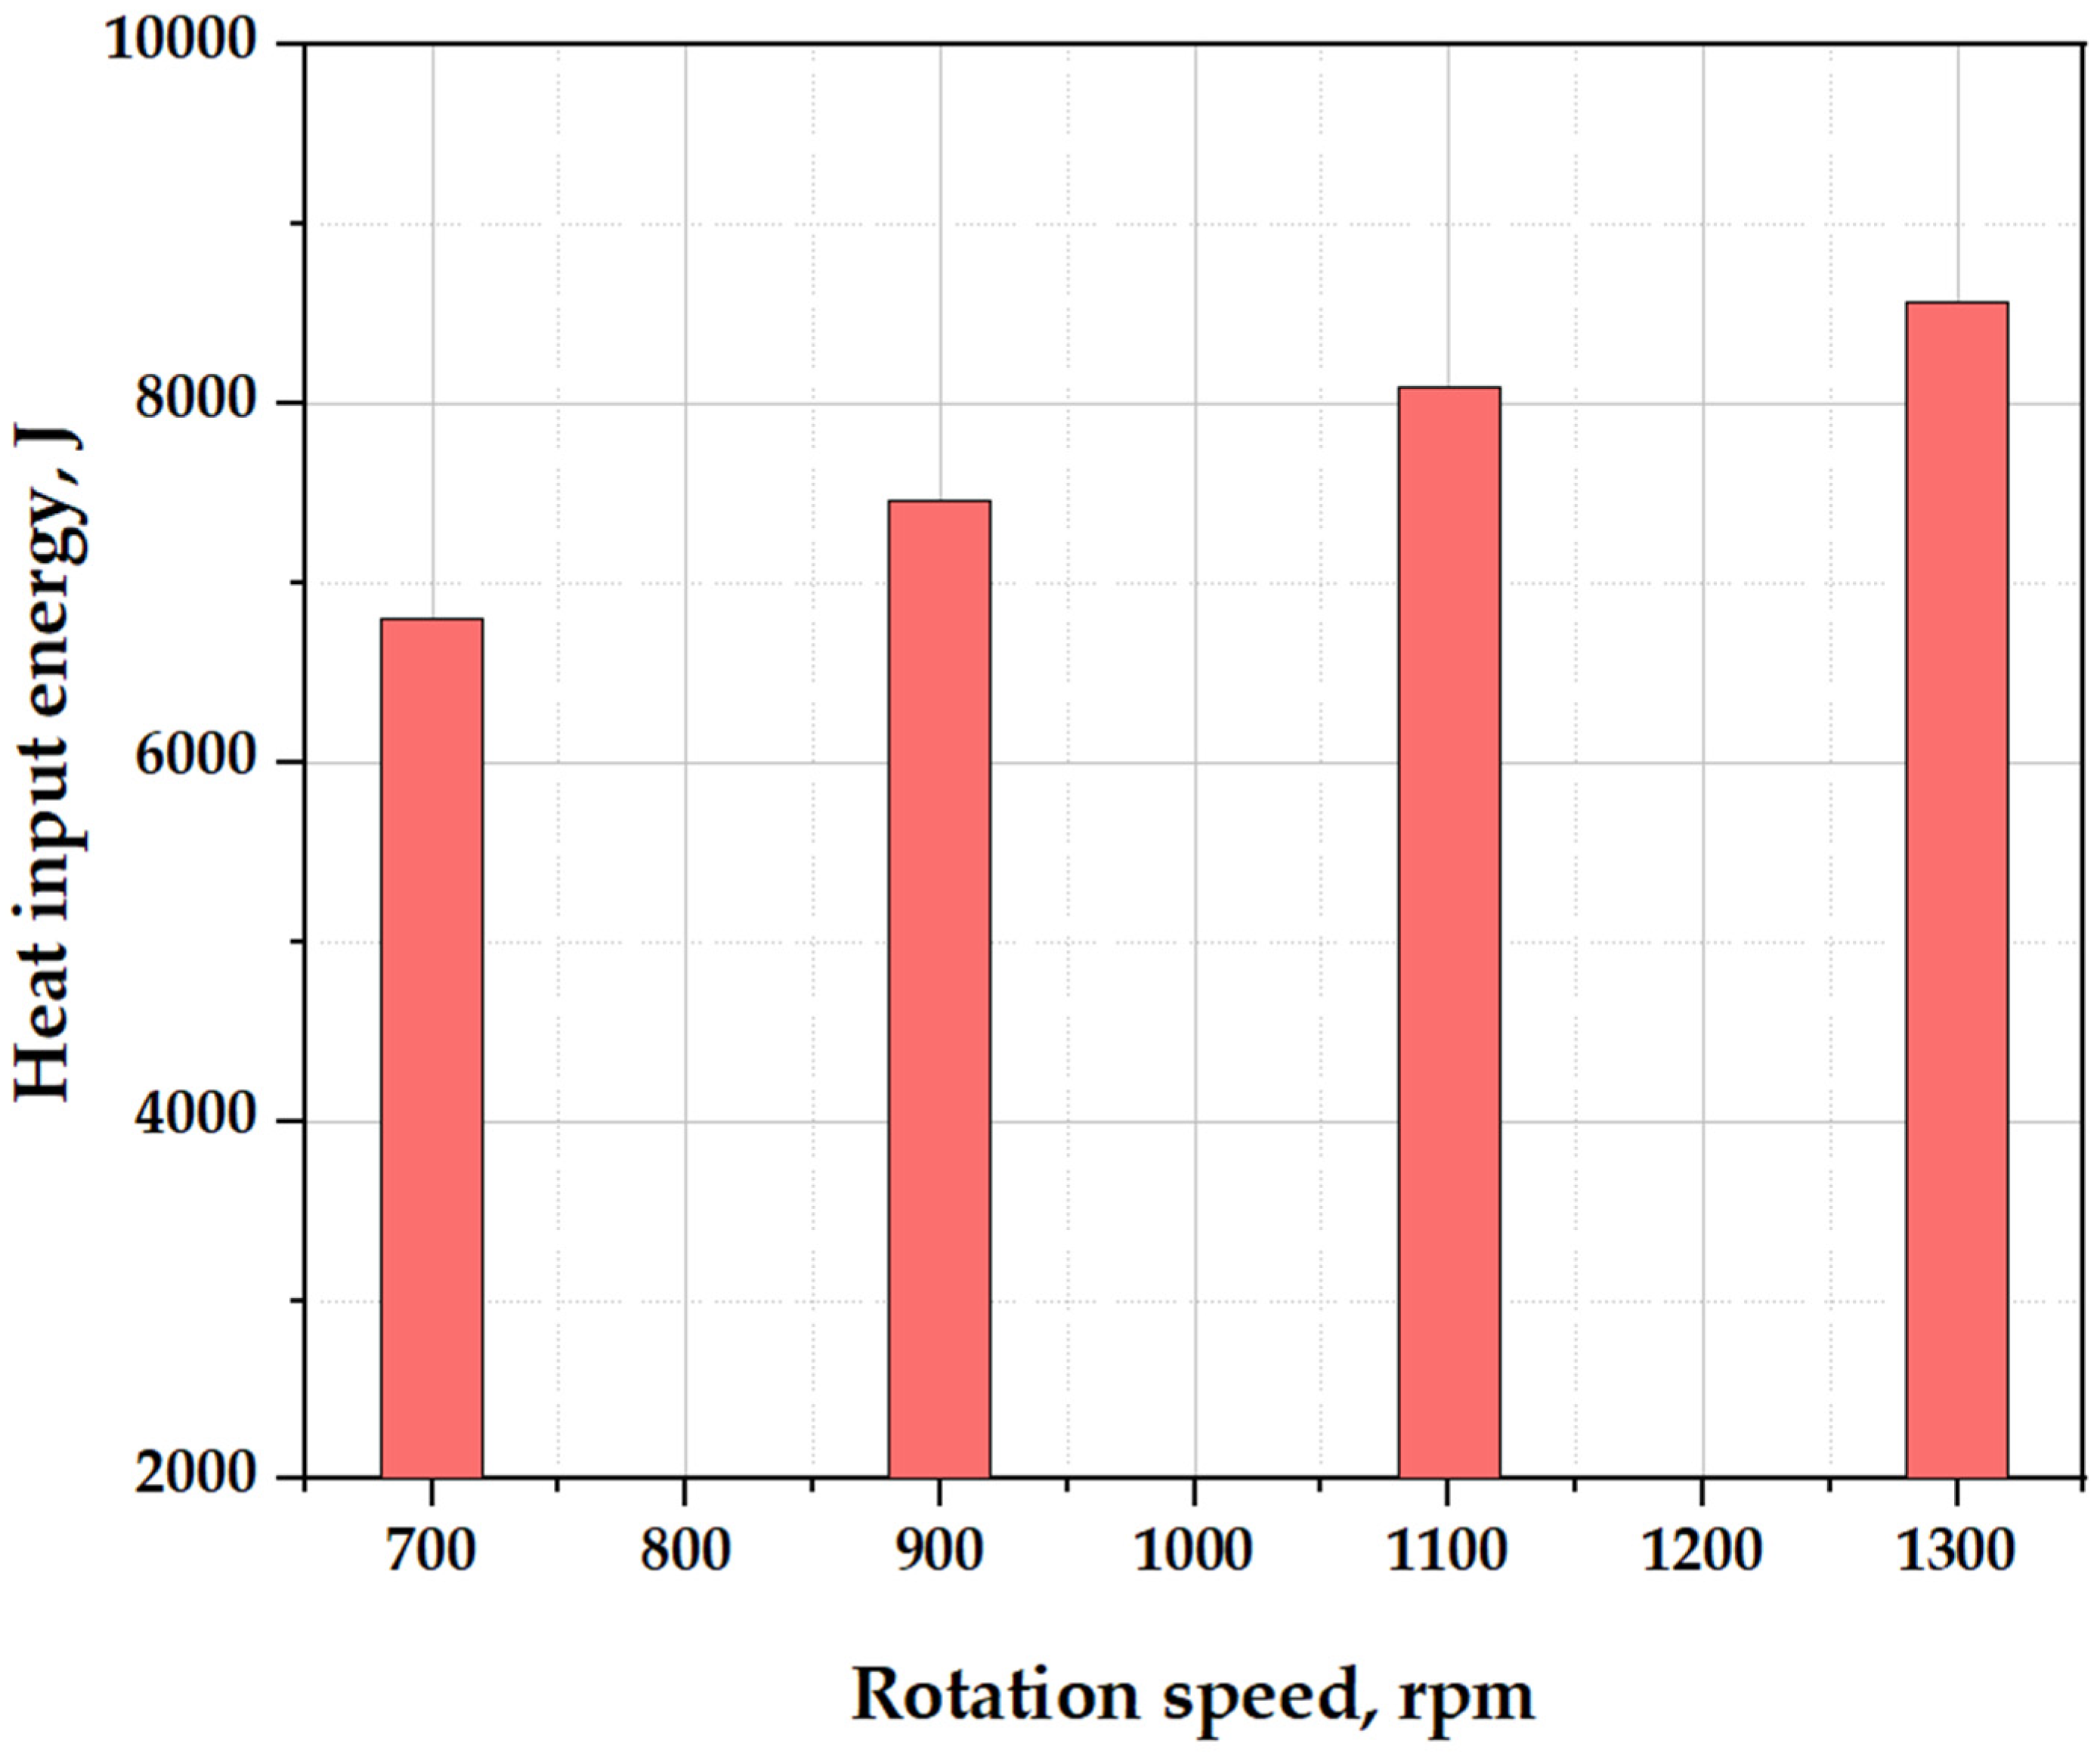
By calculating the heat input using the provided equation, the current study quantifies the thermal energy generated at different rotational speeds to provide a crucial understanding of the thermal-mechanical conditions during the AA2024-T4 spot welding process. Figure 8 displays the heat input generated at different rotational speeds for the AA2024-T4 FSSW process. The data reveals a direct correlation, with the thermal energy generated showing a continuous increase as the rotational speed was raised from 700 to 1300 rpm. Specifically, the rotational speed of 1300 rpm exhibited the highest heat input energy of 8580.877 J, while the rotational speed of 700 rpm exhibited the lowest heat input energy of 6796.566 J.

3.4. Features and Properties of the Produced Spot Joints

3.4.1. Macrographs of the FSSWed Joints

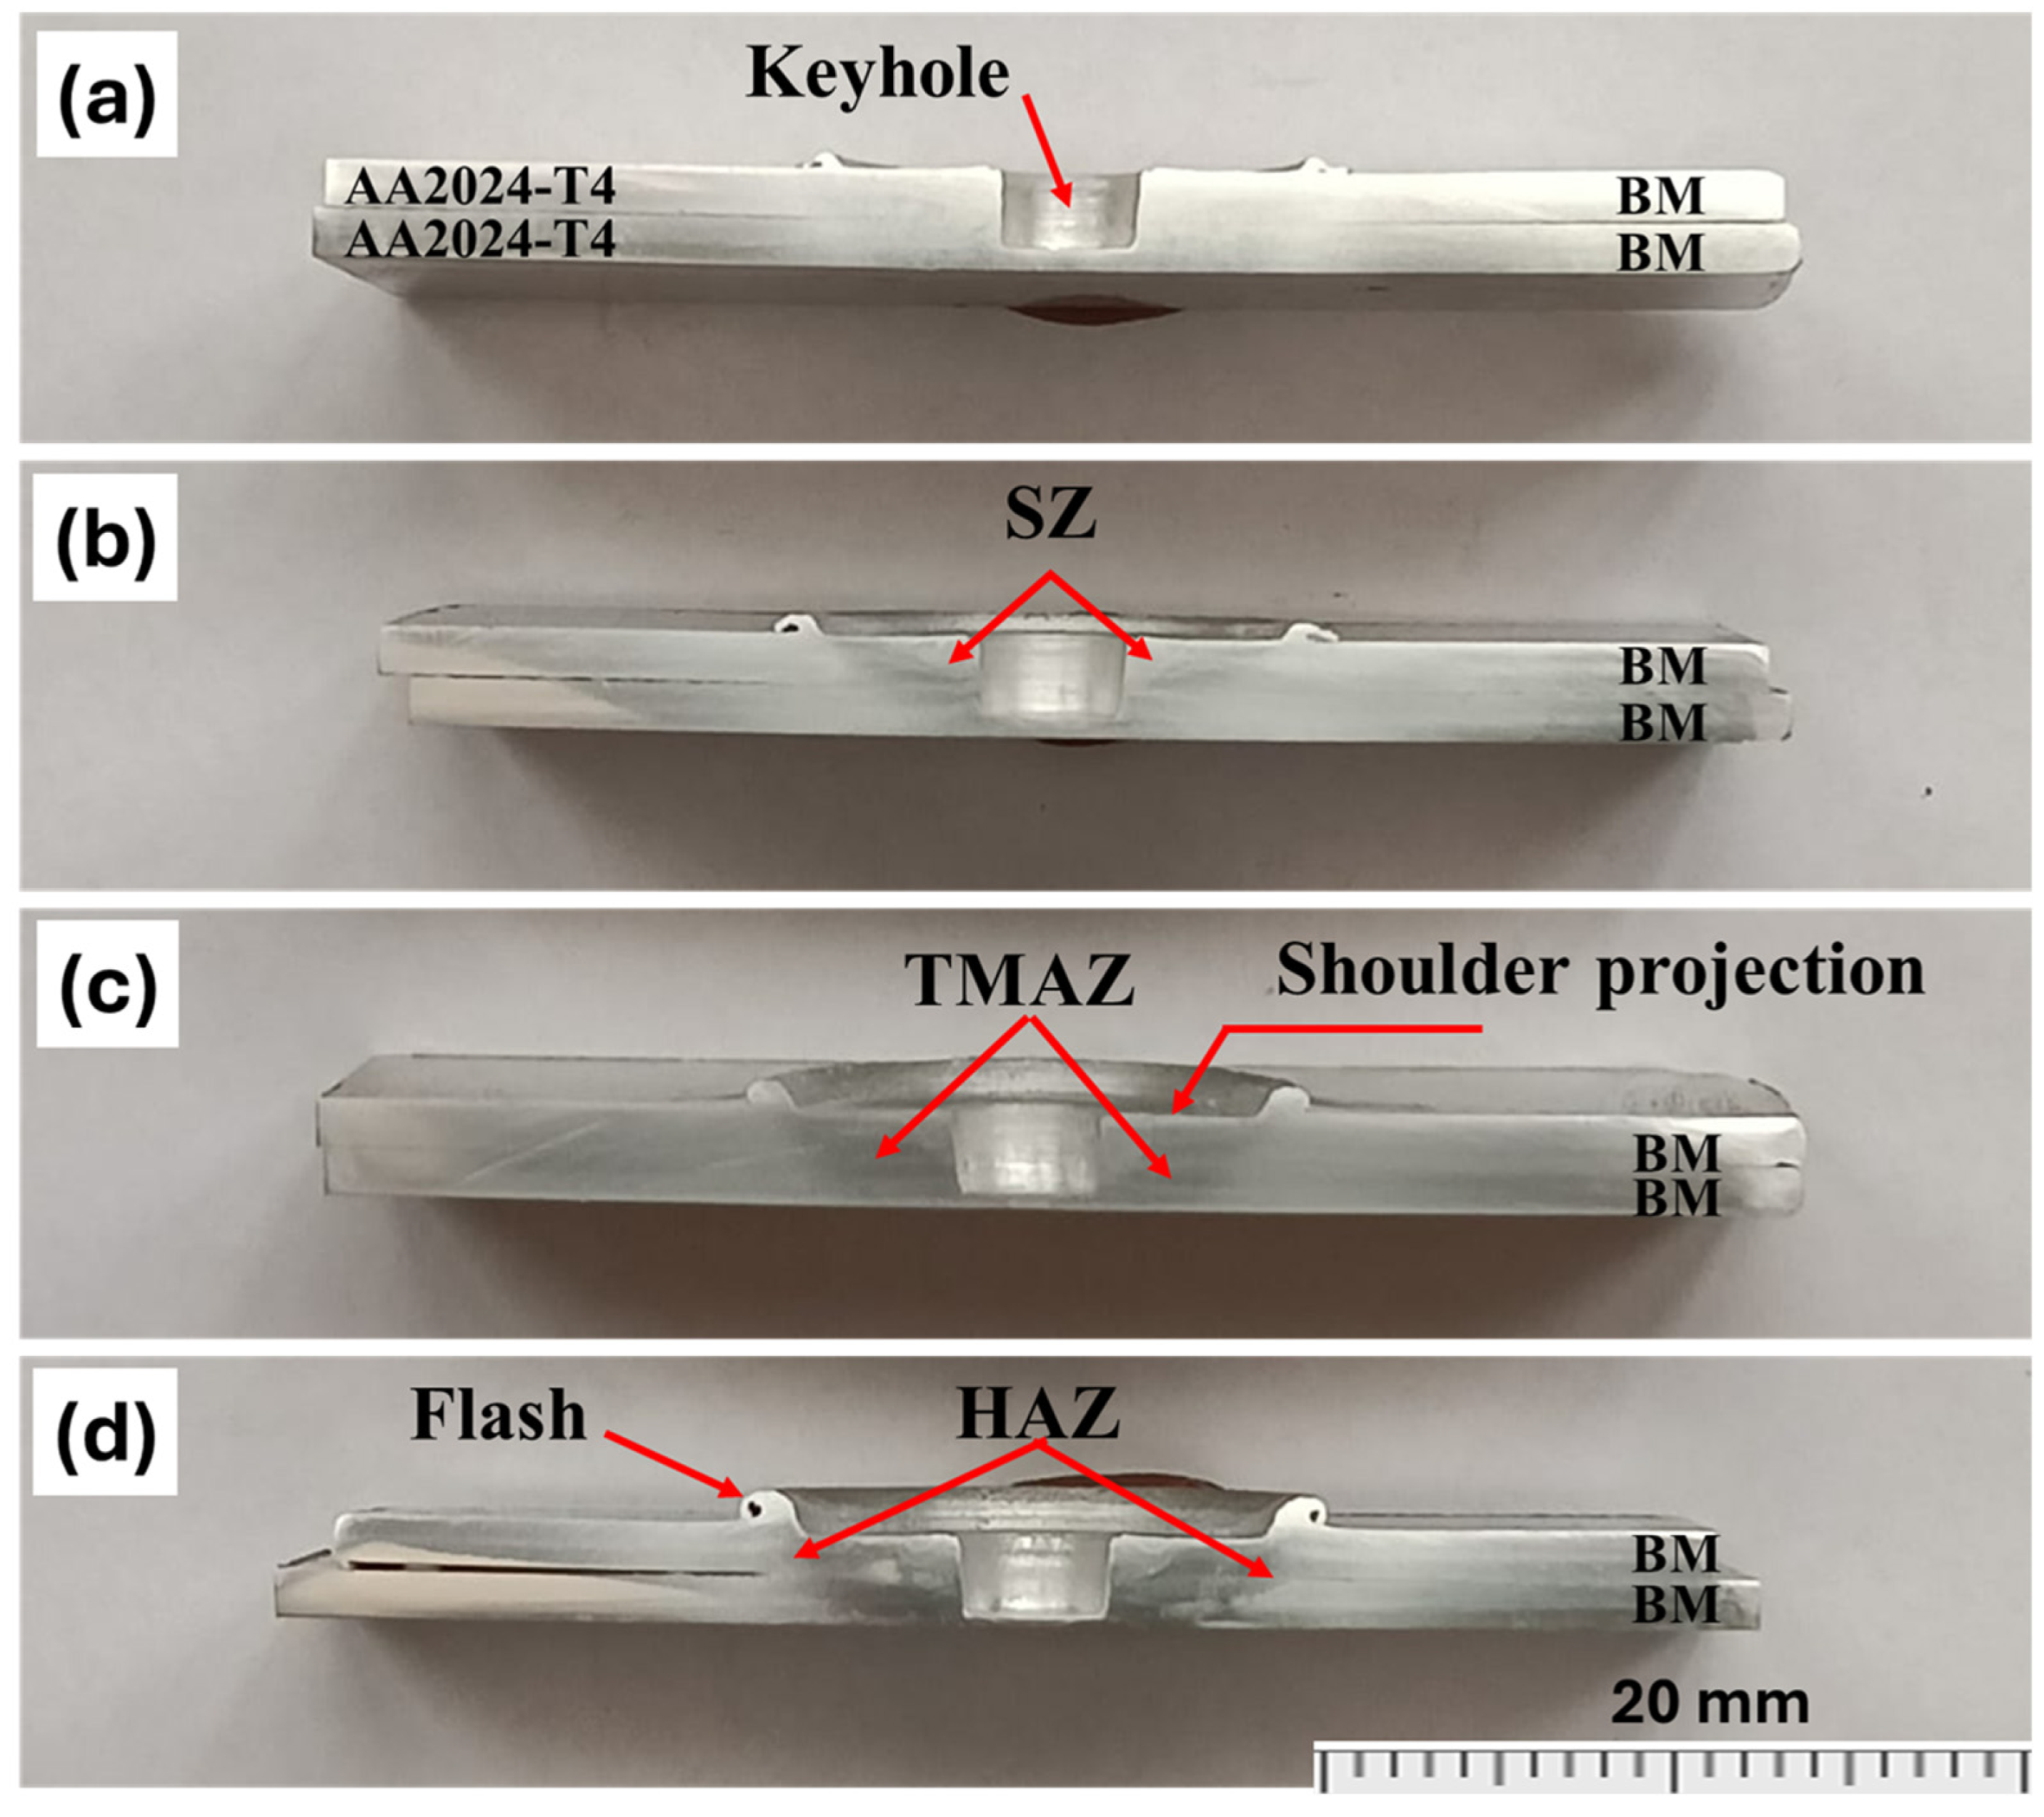
The macrographs of the AA2024-T4 FSSW cross-sections, shown in Figure 9, reveal the disappearance of the interface between the overlapped 4 mm thick AA2024 sheets in the weld zone, which indicates that the spot joining process was successful at the applied FSSW parameters of 700–1300 rpm and 3 s dwell time. The distinct zones characteristic of the FSSW process were found. As a result of the localized heat and severe plastic deformation, four main regions can be identified: the SZ, the thermo-mechanically affected zone (TMAZ), the heat-affected zone (HAZ), and the BM.
The increase in tool rotational speed from 700 to 1300 rpm results in greater heat input, which directly enlarges the size of the SZ, as shown in Figure 9a–d. For instance, the SZ in the joint produced at 900 rpm (Figure 9b) is larger than that at 700 rpm, and this trend continues through 1100 rpm (Figure 9c) up to 1300 rpm. This is a direct result of the greater frictional heat at higher speeds, which softens the material and increases the volume of the stirred zone. A prominent feature in the center of the weld is the keyhole, which formed upon the withdrawal of the tool’s pin. This keyhole accurately represents the tool pin’s geometry and dimensions. Its size increases with higher rotational speeds (from 700 to 1300 rpm), which is a direct consequence of the greater heat input and resulting material softening around the rotating pin, potentially affecting the joint strength [27,46,47]. The overall macroscopic appearance of the joints indicates that flash formation is directly related to rotational speed. A minimal flash is present at lower rotational speeds (700 and 900 rpm). However, at higher speeds (1100 and 1300 rpm), a more significant flash is observed (Figure 9c,d), which is consistent with an increase in the shoulder projection.

3.4.2. Microstructures of the FSSWed Joints

The microstructural evolution during FSSW differs fundamentally from linear FSW, primarily due to the localized, stationary nature of the process. While both utilize a rotating tool to induce plastic deformation and heating, FSSW involves a rapid cycle of plunging, dwelling, and retreating, resulting in a confined, cylindrical weld geometry rather than a continuous seam [48]. This distinction leads to unique material flow patterns (predominantly vertical and rotational mixing around the pin), and a more rapid thermal cycle with less steady-state heat generation compared to FSW. Consequently, the precipitate dissolution, fragmentation, and subsequent dynamic recrystallization (DRX) processes within the weld zone are significantly influenced by this transient heat input profile [39]. Understanding the localized microstructural zones in FSSW is therefore essential for correlating process parameters to final joint properties.
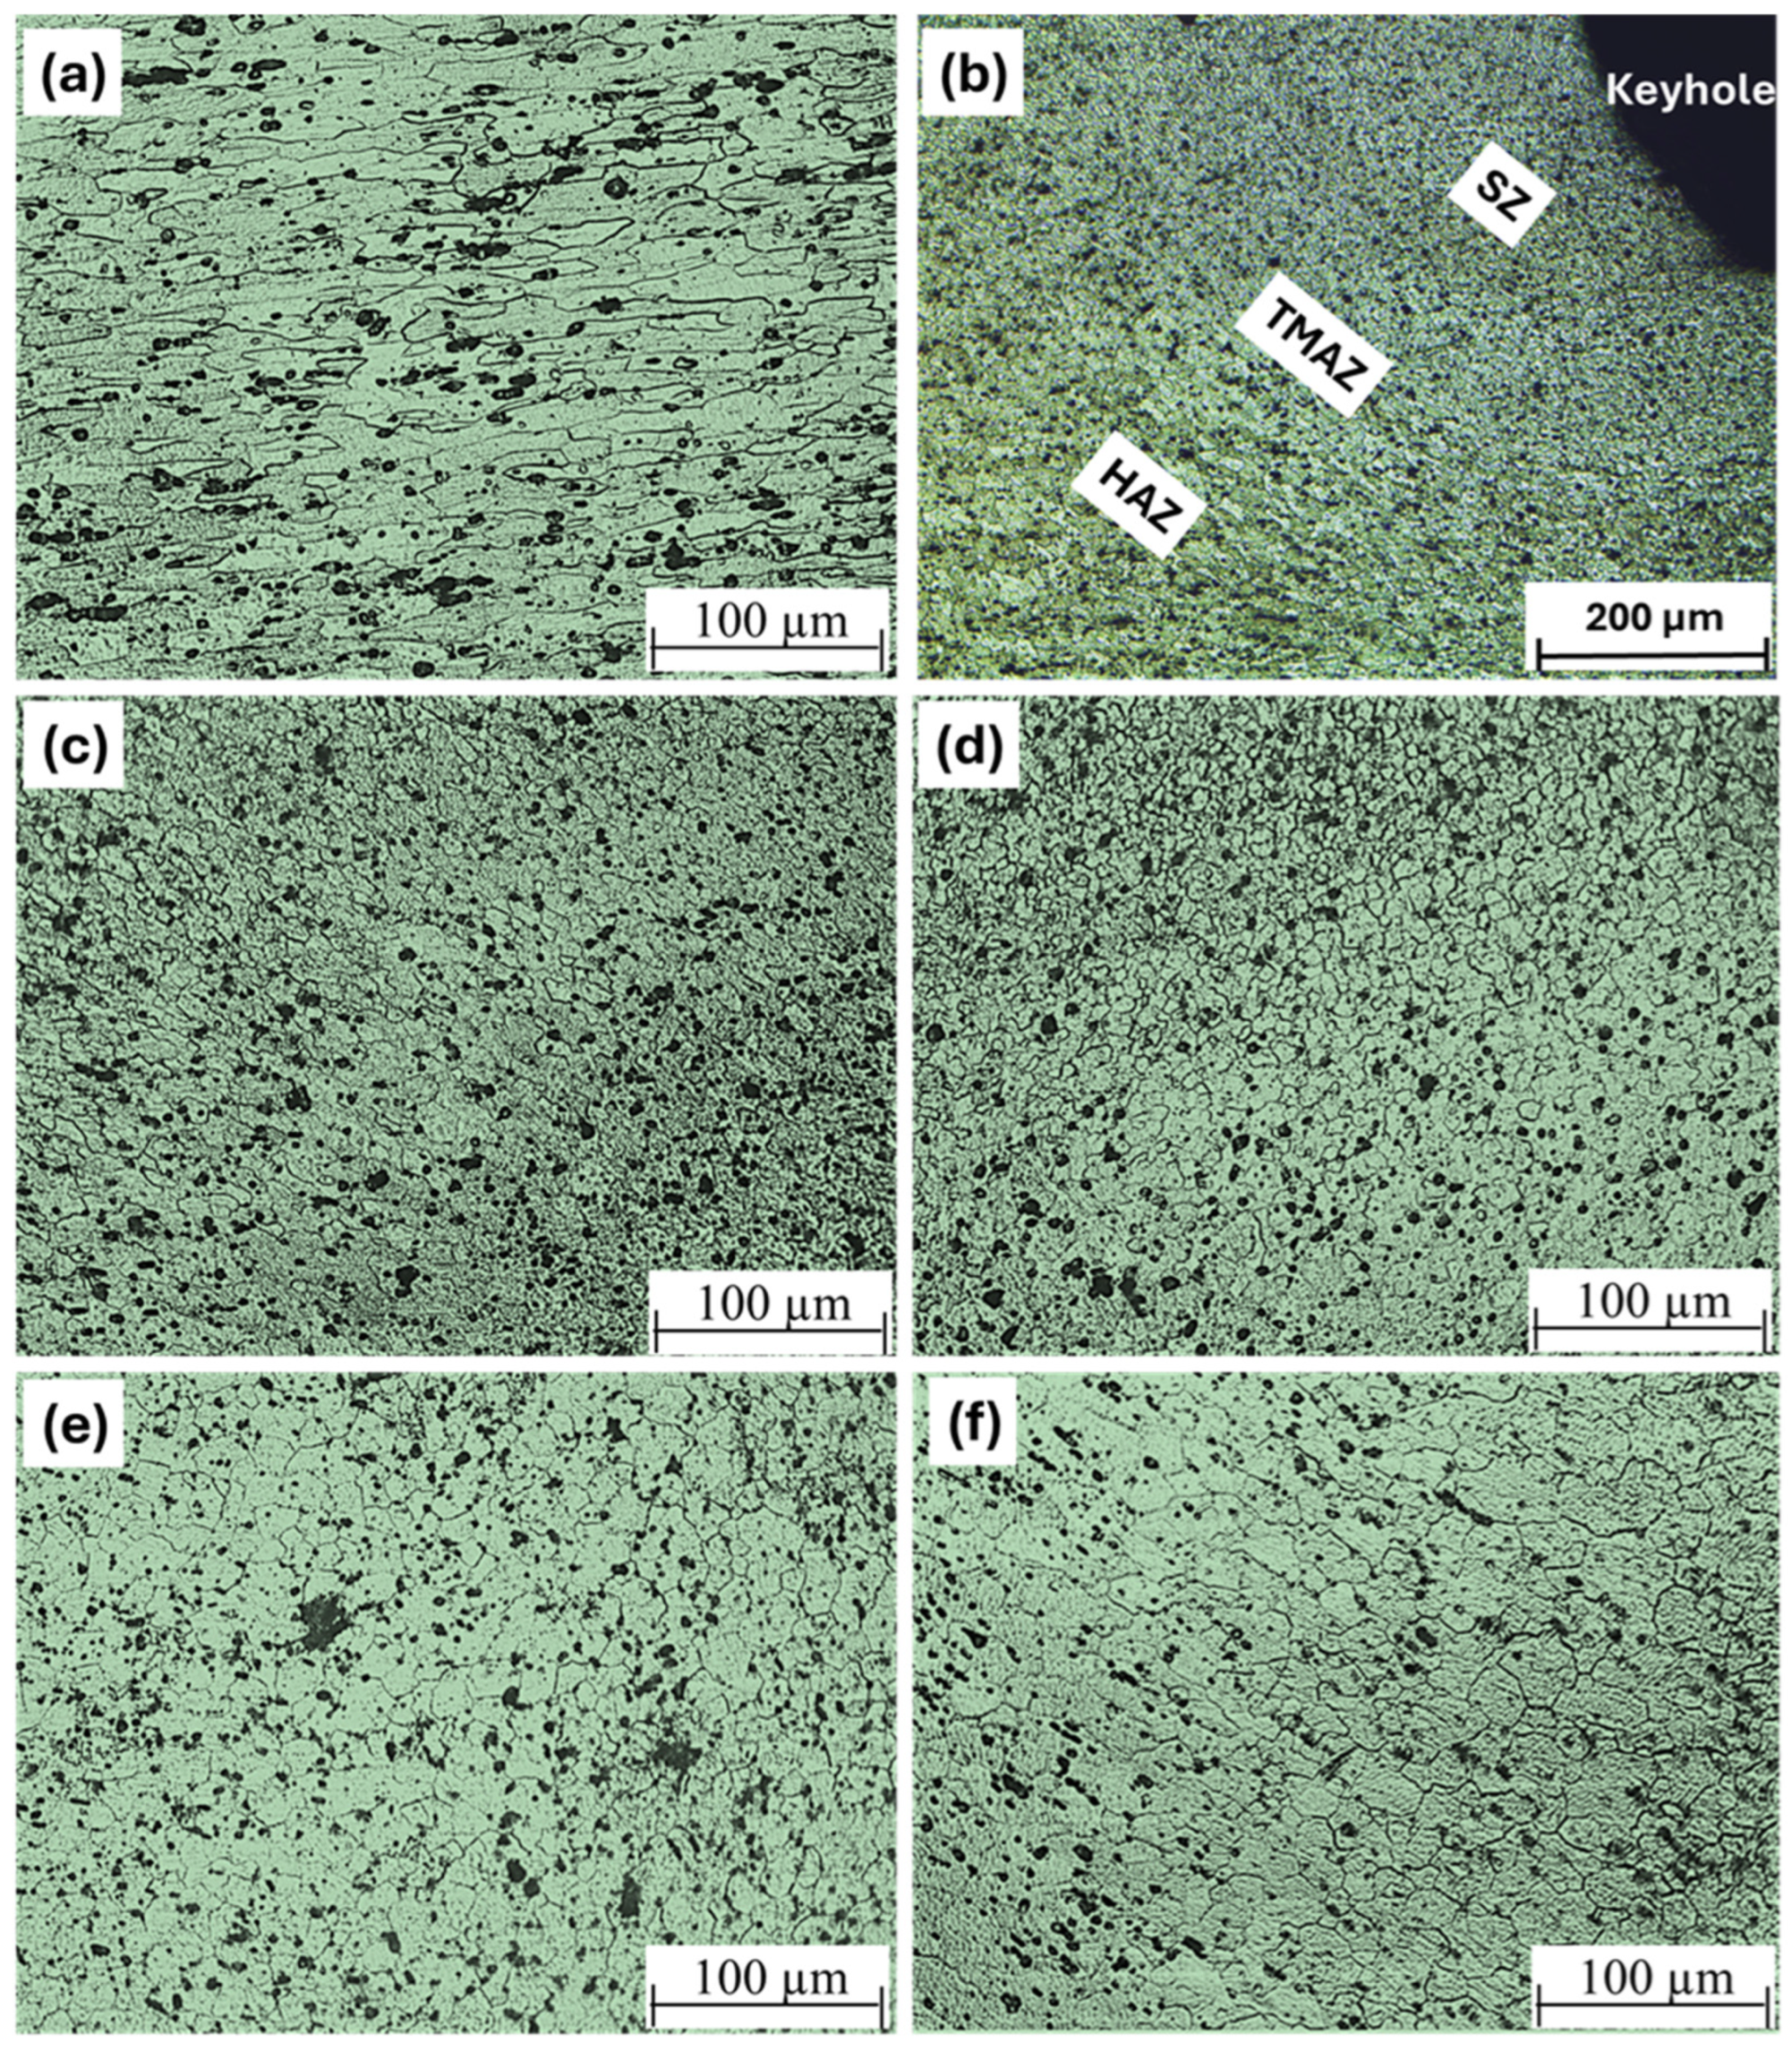
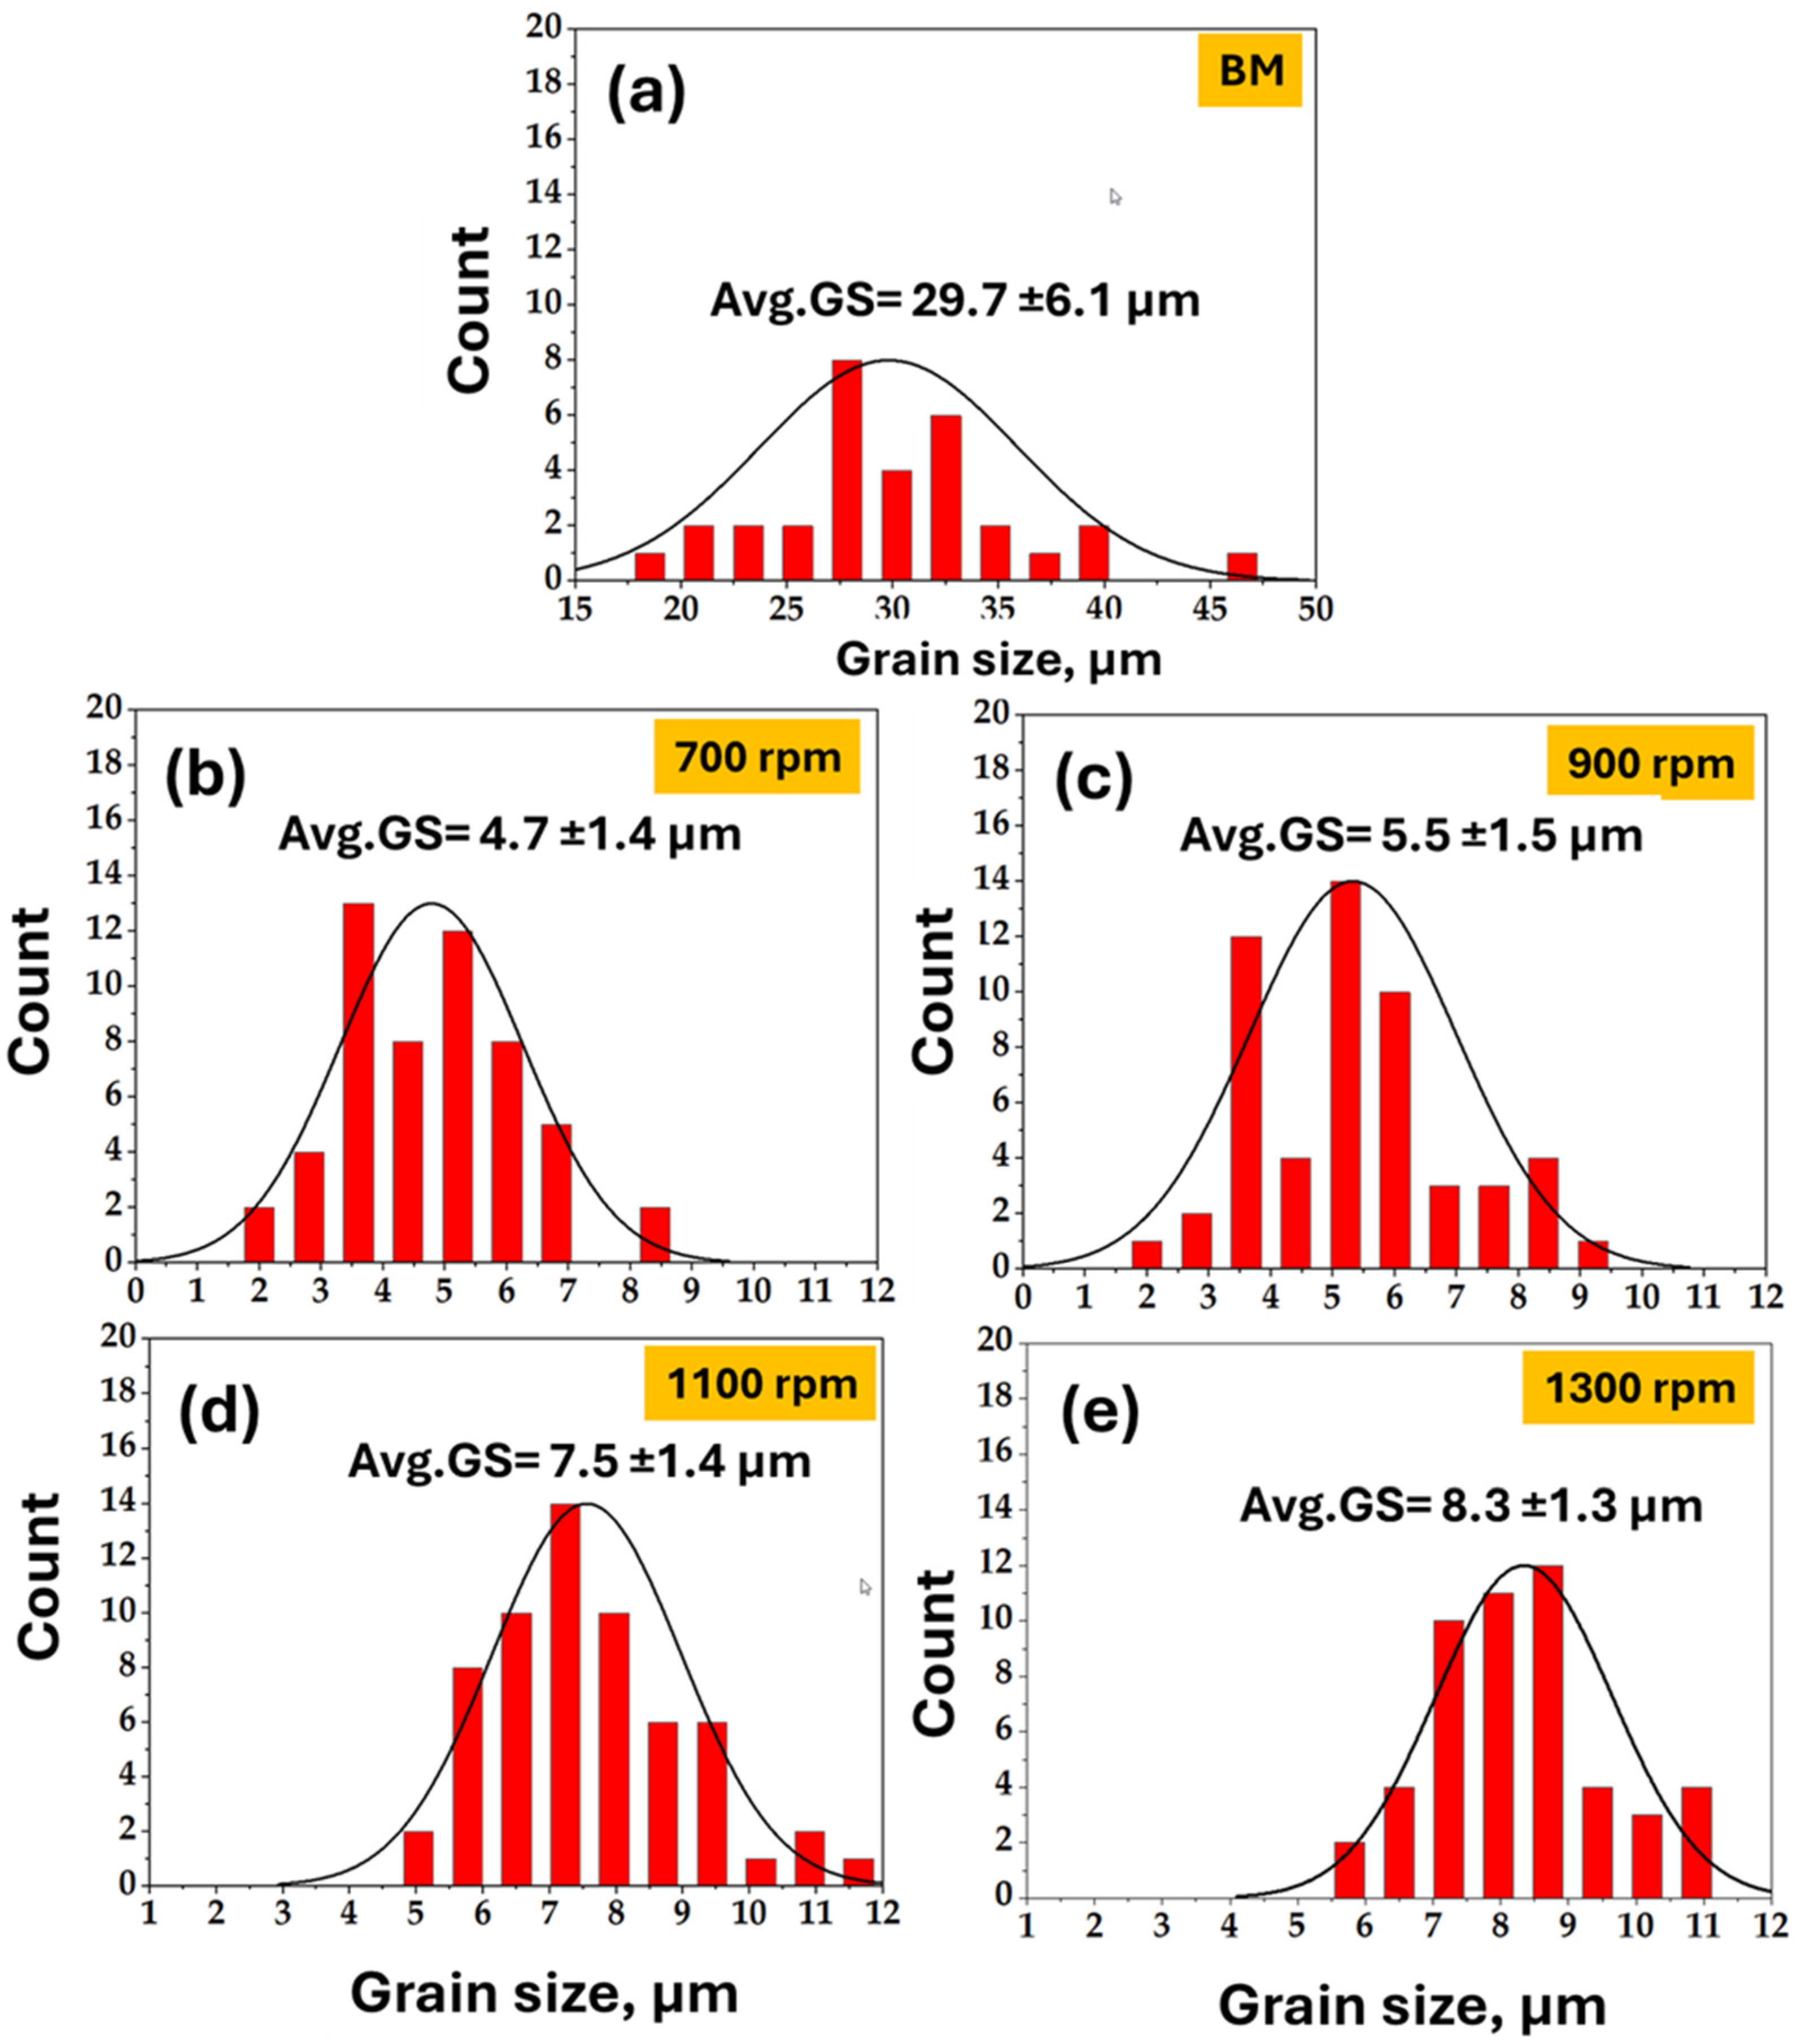
Accordingly, the microstructure of the AA2024-T4 FSSW joints shows significant changes compared to the BM. While the BM is characterized by its elongated grains and the presence of black phase precipitates (Figure 10a), the FSSW process creates distinct zones within the welded joint, as shown in Figure 10b. The microstructural evolution observed in the present FSSW joints, particularly the formation of a fine, dynamically recrystallized equiaxed grain structure in the SZ (Figure 10c–f), aligns with the fundamental mechanisms reported for linear FSW of AA2024 [6,9,16]. This zone is surrounded by the TMAZ, which contains highly deformed and elongated grains. The outermost region, the HAZ, is distinguished by coarsened grains resulting from the thermal cycle of the welding process. This grain refinement in the SZ is a key feature of the FSSW process, as it directly results from the dynamic recrystallization that occurs due to intense plastic deformation and thermal exposure [49]. From Figure 10c–f, the SZ reveals that the grain size is not uniform across all welding conditions; instead, the grain size within the SZ increases as the rotation speed (and thus the heat input) increases. Furthermore, studies on AA2024 FSW often report on the stability and fragmentation precipitates [50,51]. Similarly, a closer examination of the SZ in our work reveals that large, stable precipitates undergo fragmentation and dispersion due to the intense stirring action of the FSSW tool at lower rotational speeds (700 and 900 rpm). Conversely, in alignment with observations in high-heat-input FSW of similar alloys [6], the higher heat inputs in FSSW (1100 and 1300 rpm) appear to promote precipitate coarsening or dissolution within the SZ. This comparative analysis demonstrates that, while the basic metallurgical principles are similar, the specific thermal and strain gradients in FSSW result in distinct microstructural features, which the current study documents in detail for AA2024-T4. Figure 11 presents grain size histograms for the AA2024-T4 BM (Figure 11a) and the stir zones of FSSW joints (Figure 11b–e). The joints were welded at a constant dwell time of 3 s with rotational speeds of 700 rpm, 900 rpm, 1100 rpm, and 1300 rpm. The mean grain size of the BM was 29.7 ± 6.1 μm (Figure 11a), which was significantly reduced in the stir zones to 4.7 ± 1.4 μm (Figure 11b), 5.5 ± 1.5 μm (Figure 11c), 7.5 ± 1.4 μm (Figure 11d), and 8.3 ± 1.3 μm (Figure 11e) for the 700, 900, 1100, and 1300 rpm conditions, respectively.
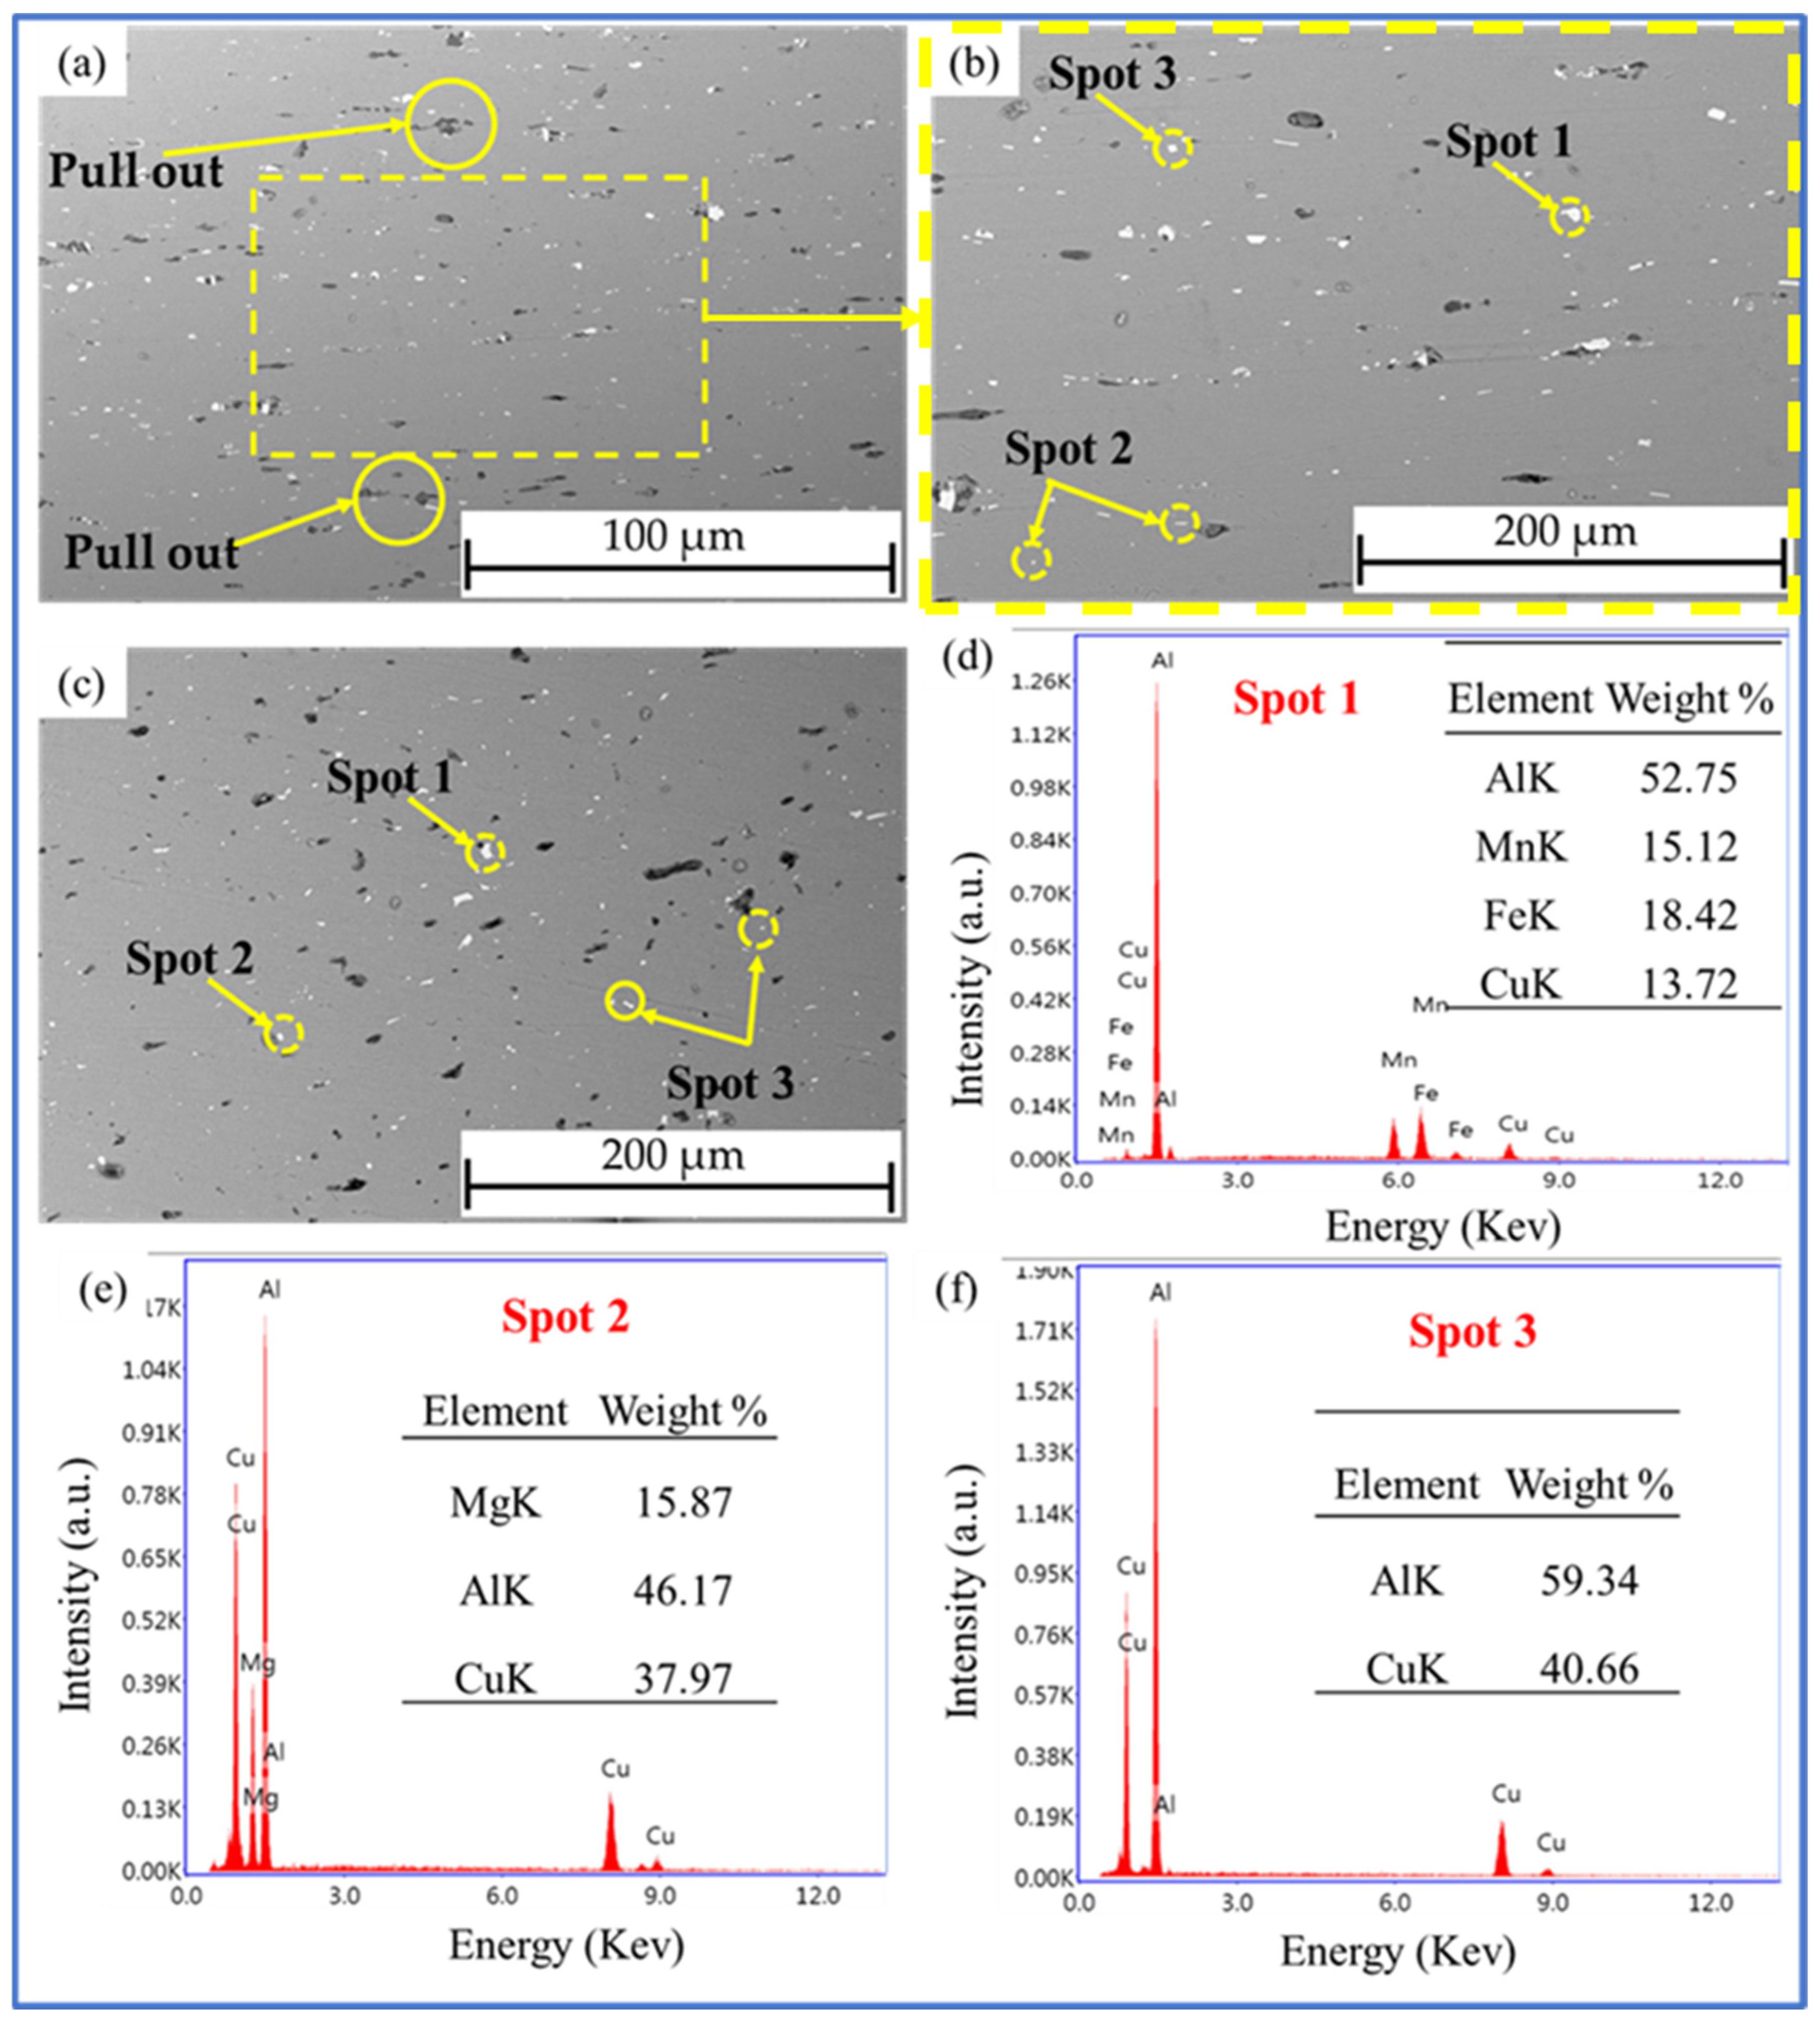
SEM-EDS advanced system was used to identify the microstructural features, specifically the precipitates, in both the AA2024-T4 BM and the FSSW joints. The precipitates appear as bright white phases within the gray aluminum matrix and are irregular in shape. During sample preparation (grinding and polishing processes), some precipitates were observed to be pulled out of the matrix, while others remained attached.
As shown in the micrographs (Figure 12a,b), these hard phases are coarse in the BM. In contrast, the intense stirring action in the SZ of the FSSW joint (Figure 12c) fragments these precipitates into smaller particles and redistributes them in the aluminum matrix. EDS analysis further confirmed the presence of the precipitates, identifying the irregular Al(CuMnFe) phases (Figure 12d), as well as rod- and spherical-shaped Al2CuMg (Figure 12e) and Al2Cu (Figure 12f) particles. These findings are consistent with results reported by other researchers for the FSW of AA2024 alloy [50,52,53].

3.5. Mechanical Properties

3.5.1. Hardness Test Results

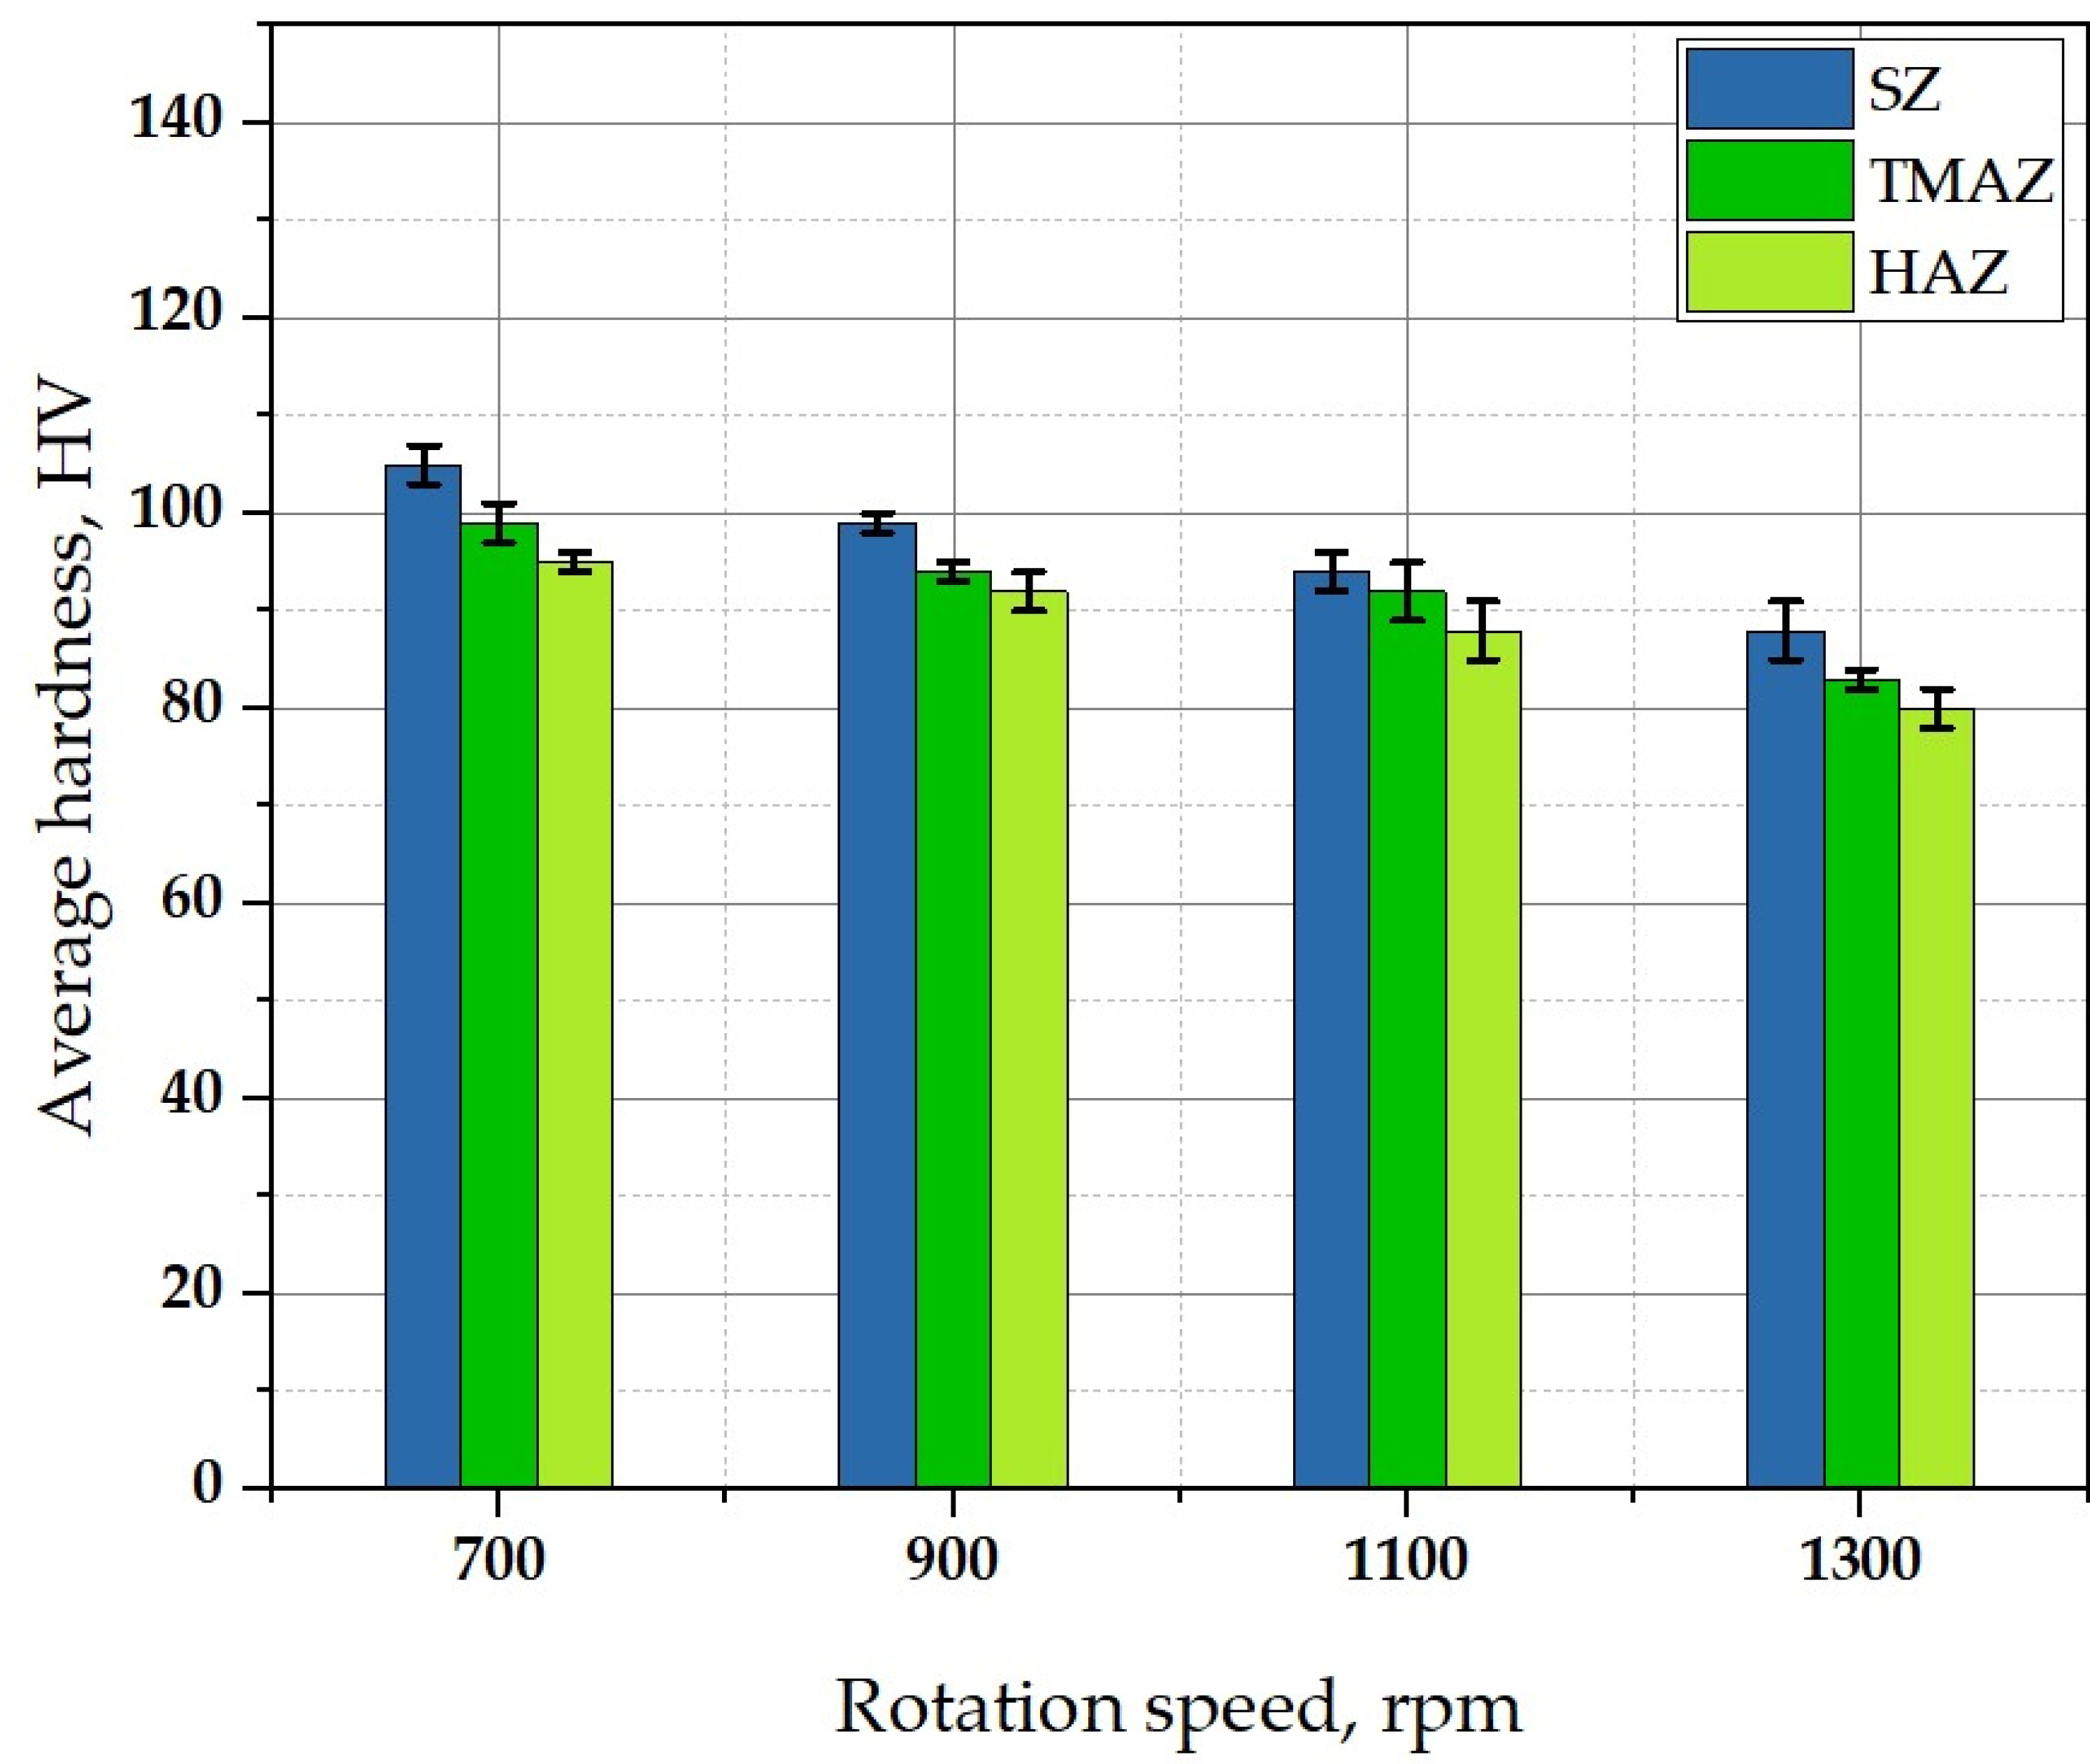
Hardness measurements were conducted on the highly polished cross-sections of the AA2024-T4 spot-welded joints. These specimens were fabricated at a fixed dwell time of 3 s and different rotational speeds of 700, 900, 1100, and 1300 rpm. Figure 13 represents the collected data for all the specimens tested. The distribution of hardness across the weld zones is widely recognized to be a direct consequence of the thermal cycle induced by the FSSW process. The heat generated during welding alters the material’s microstructure in specific regions, which is the primary factor controlling the final hardness. The resultant hardness behavior is also significantly affected by the initial state of the starting material. In the current investigation, the BM was in the T4 temper condition, which indicates that it was entirely hardened through age hardening. High thermal exposure during the FSSW process is expected to cause a loss in hardness within the weld zones, primarily as a result of coarsening or re-dissolution of the strengthening precipitates [18,51,54,55,56]. The AA2024-T4 BM showed a mean hardness value of 111 ± 6 HV (Table 2). Compared to the BM, the hardness values of the spot weld zones significantly decreased at all the applied rotational speeds (700–1300 rpm). This reduction is attributed to the thermal softening of the AA2024-T4 BM caused by the frictional heat generated during the FSSW processes (Figure 13). Within every spot-welded joint, the lowest hardness values were invariably found in the HAZ. This is a direct consequence of over-aging, where the precipitates that contribute to hardening coarsen and dissolve, leading to maximum softening in this specific region. In contrast to the HAZ, an increased hardness was seen in the SZ for all the welds. This is mainly attributable to a dynamically recrystallized, equiaxed fine-grain structure and the possibility of reprecipitation of hardening phases throughout the cooling cycle [57]. The hardness values of the stir zones were measured as 105 ± 2.4 HV, 99 ± 1.5 HV, 94 ± 2.5 HV, and 88 ± 3.4 HV for the specimens welded at 700, 900, 1100, and 1300 rpm, respectively. This clear decrease in hardness with increasing rotational speed (and thus increasing heat input) is consistent with the microstructural observations shown in Figure 11. The 700-rpm specimen achieved the highest SZ hardness because it possesses the smallest grain size. This relationship between grain size and hardness directly correlates with the Hall-Petch relation [58,59]. As shown in Figure 13, the TMAZ displayed a hardness value that was intermediate to the SZ and HAZ. The notable increase in hardness within the TMAZ relative to the adjacent HAZ can be directly linked to the considerable plastic deformation that occurs in this region, which greatly increases the material’s dislocation density [49].

3.5.2. Load-Carrying Capacity and Fracture Behavior

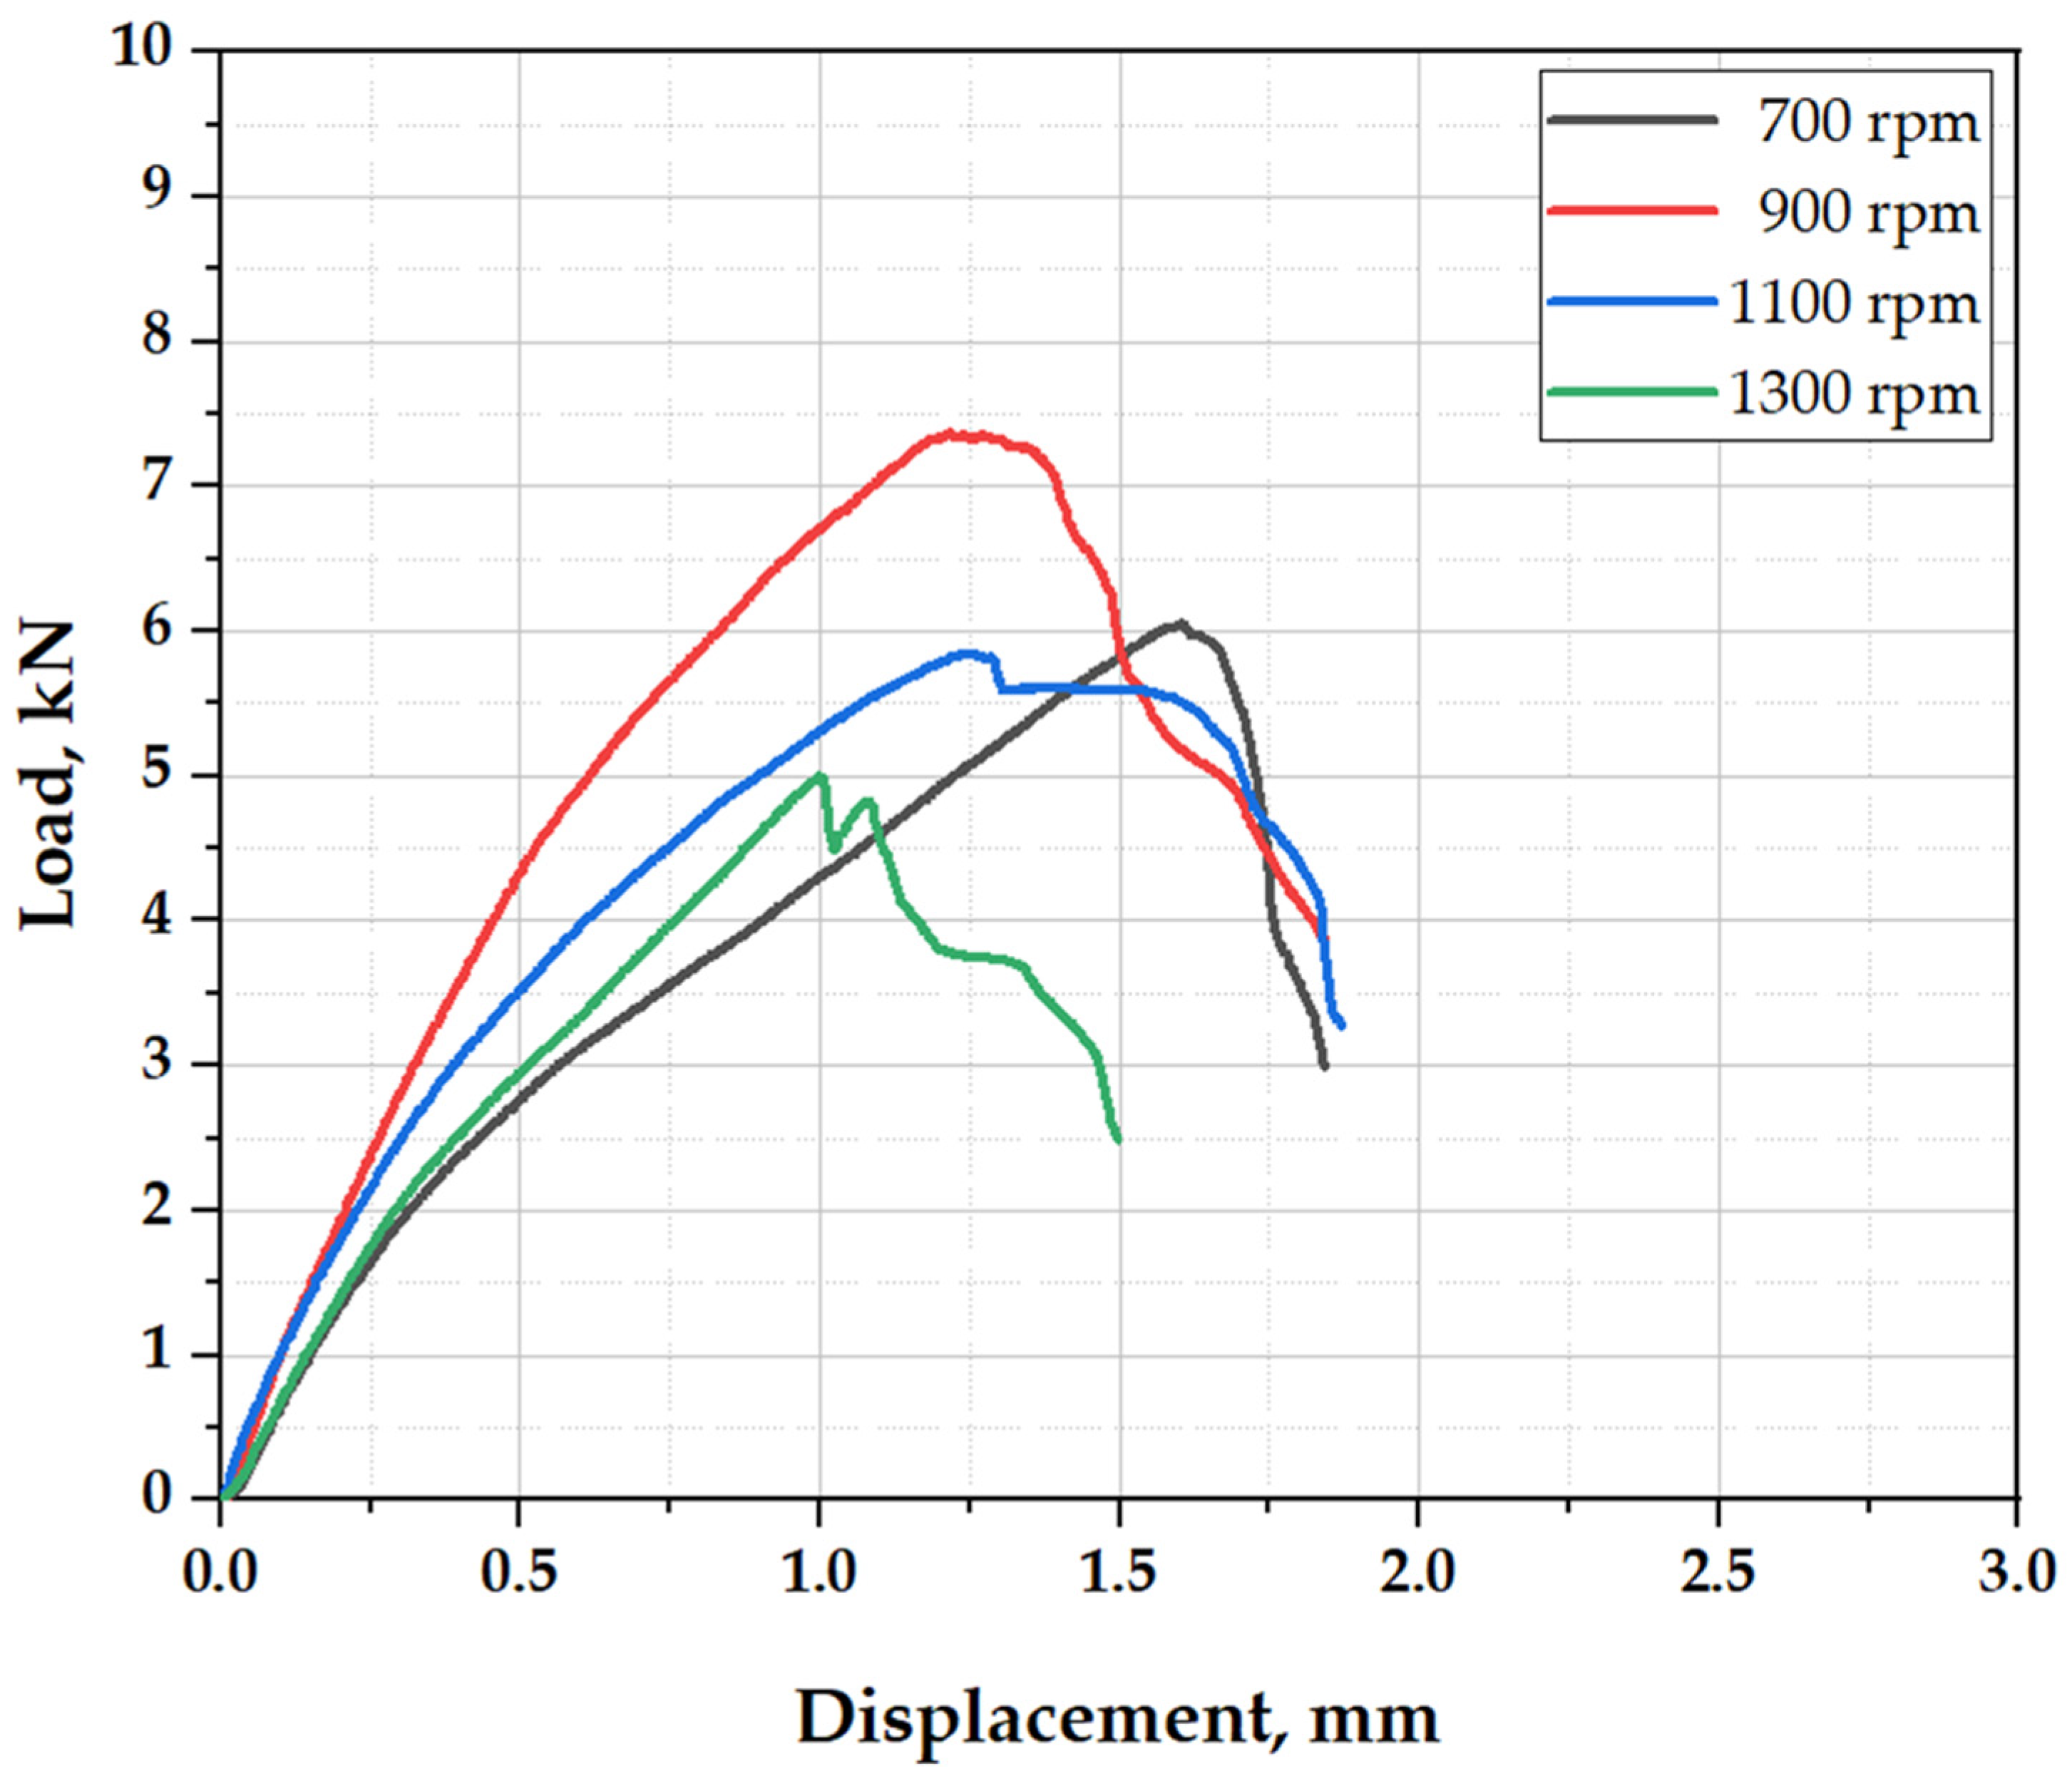
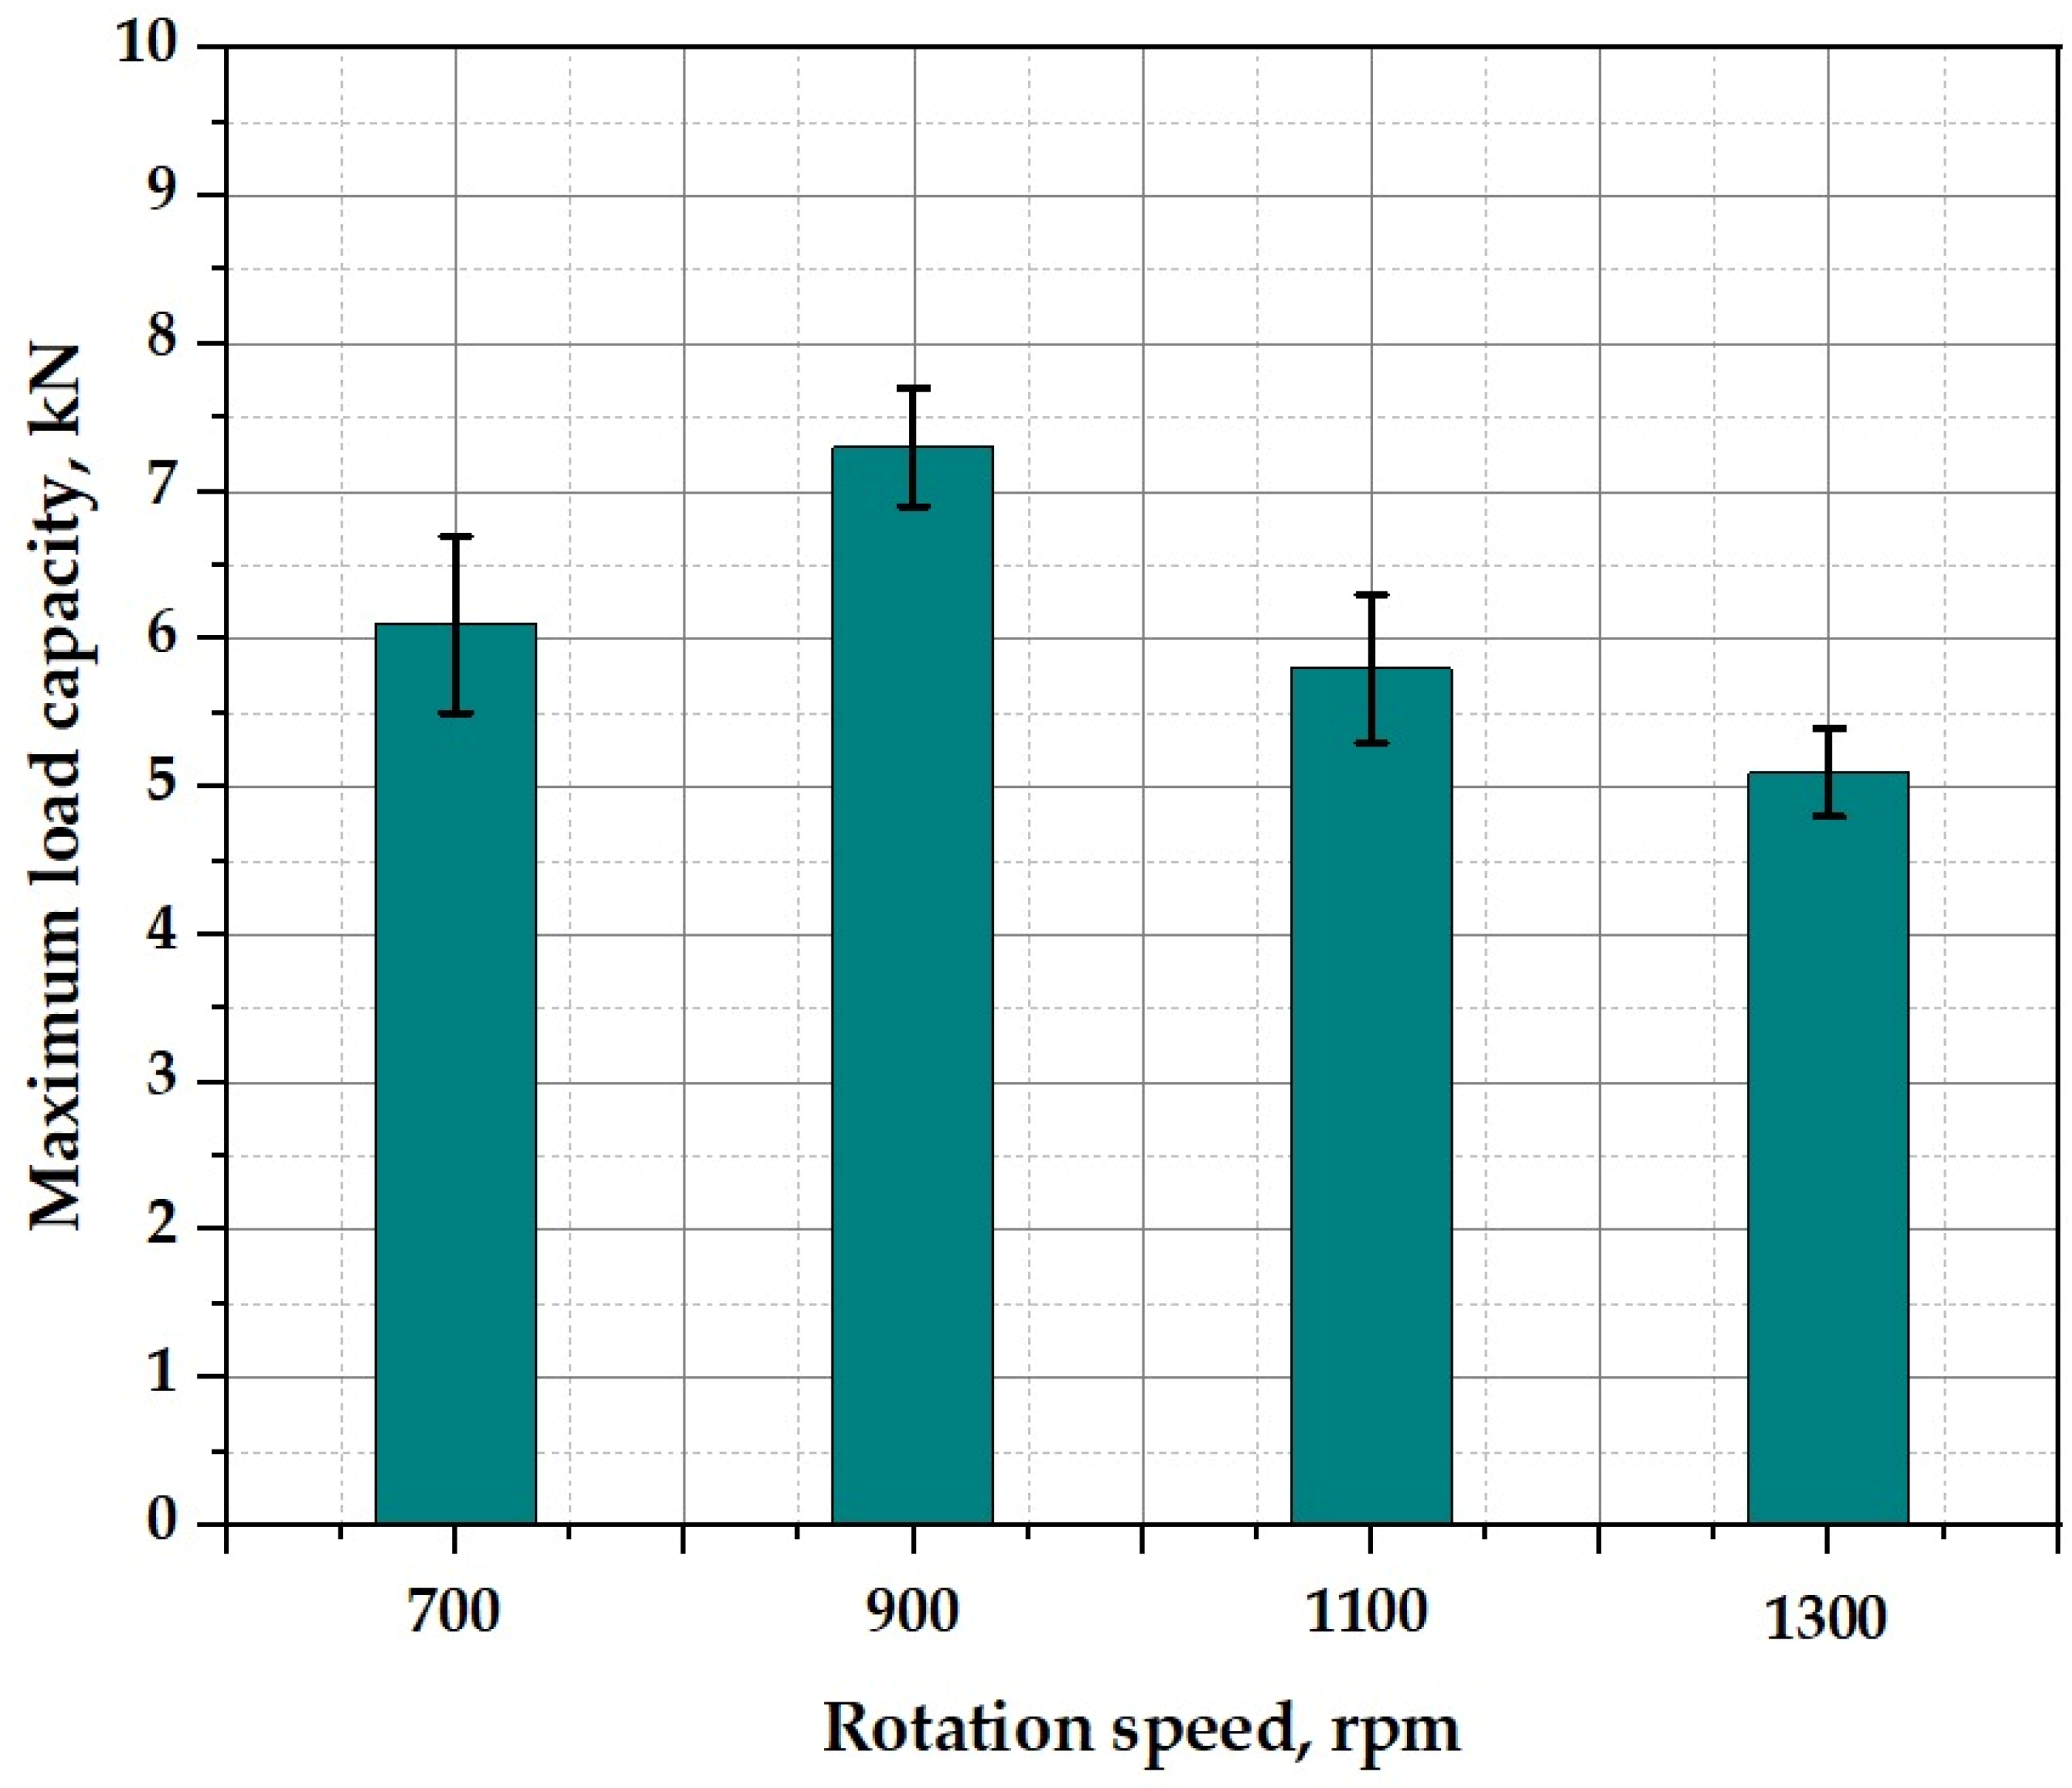
The tensile–shear test results, as depicted in Figure 14, show the distinct load versus displacement curves for FSSW AA2024-T4 lap joints produced at various rotational speeds (700 to 1300 rpm) and a constant dwell time of 3 s. These curves provide a comprehensive view of the joint’s mechanical response of each joint under tensile shear loading, from initial deformation to ultimate failure. The data summarized in Figure 15, which represents the maximum load-carrying capacity of AA2024-T4 FSSW joints as a function of tool rotational speed. Based on these Figure 13 and Figure 14, the optimal strength was achieved at a rotational speed of 900 rpm, which resulted in the highest load-carrying capacity of 7.3 ± 0.4 kN. In comparison, the joints produced at 700 rpm showed a slightly lower capacity of 6.1 ± 0.6 kN, while those at 1100 rpm and 1300 rpm showed significantly reduced strengths of 5.8 ± 0.5 kN and 5.1 ± 0.3 kN, respectively. This parabolic relationship suggests that there is an ideal range of heat input and material flow for achieving the maximum joint strength. The tensile test results can be directly correlated with the previously observed hardness (Figure 13) and microstructural changes (Figure 10 and Figure 11). The significant drop in joint strength at higher rotational speeds (1100 and 1300 rpm) is a direct consequence of the excessive heat input. As discussed in the hardness analysis, this higher temperature leads to more pronounced over-aging and coarsening of the strengthening precipitates in the HAZ. This over-softened HAZ acts as the weakest link in the joint, dictating its overall load-carrying capacity. Conversely, the joint produced at the lowest speed of 700 rpm, while possessing the highest hardness in the SZ due to its very fine grain structure, did not achieve the maximum tensile strength. This suggests that the heat input at 700 rpm was likely insufficient to produce a fully bonded, defect-free interface, leading to premature failure despite a strong SZ. The peak strength at 900 rpm represents an ideal balance: the heat input was high enough to promote adequate material flow and grain refinement, while not being so high as to excessively soften the critical HAZ. This balance resulted in a joint with an optimized balance of strength and ductility, leading to the highest load-carrying capacity.
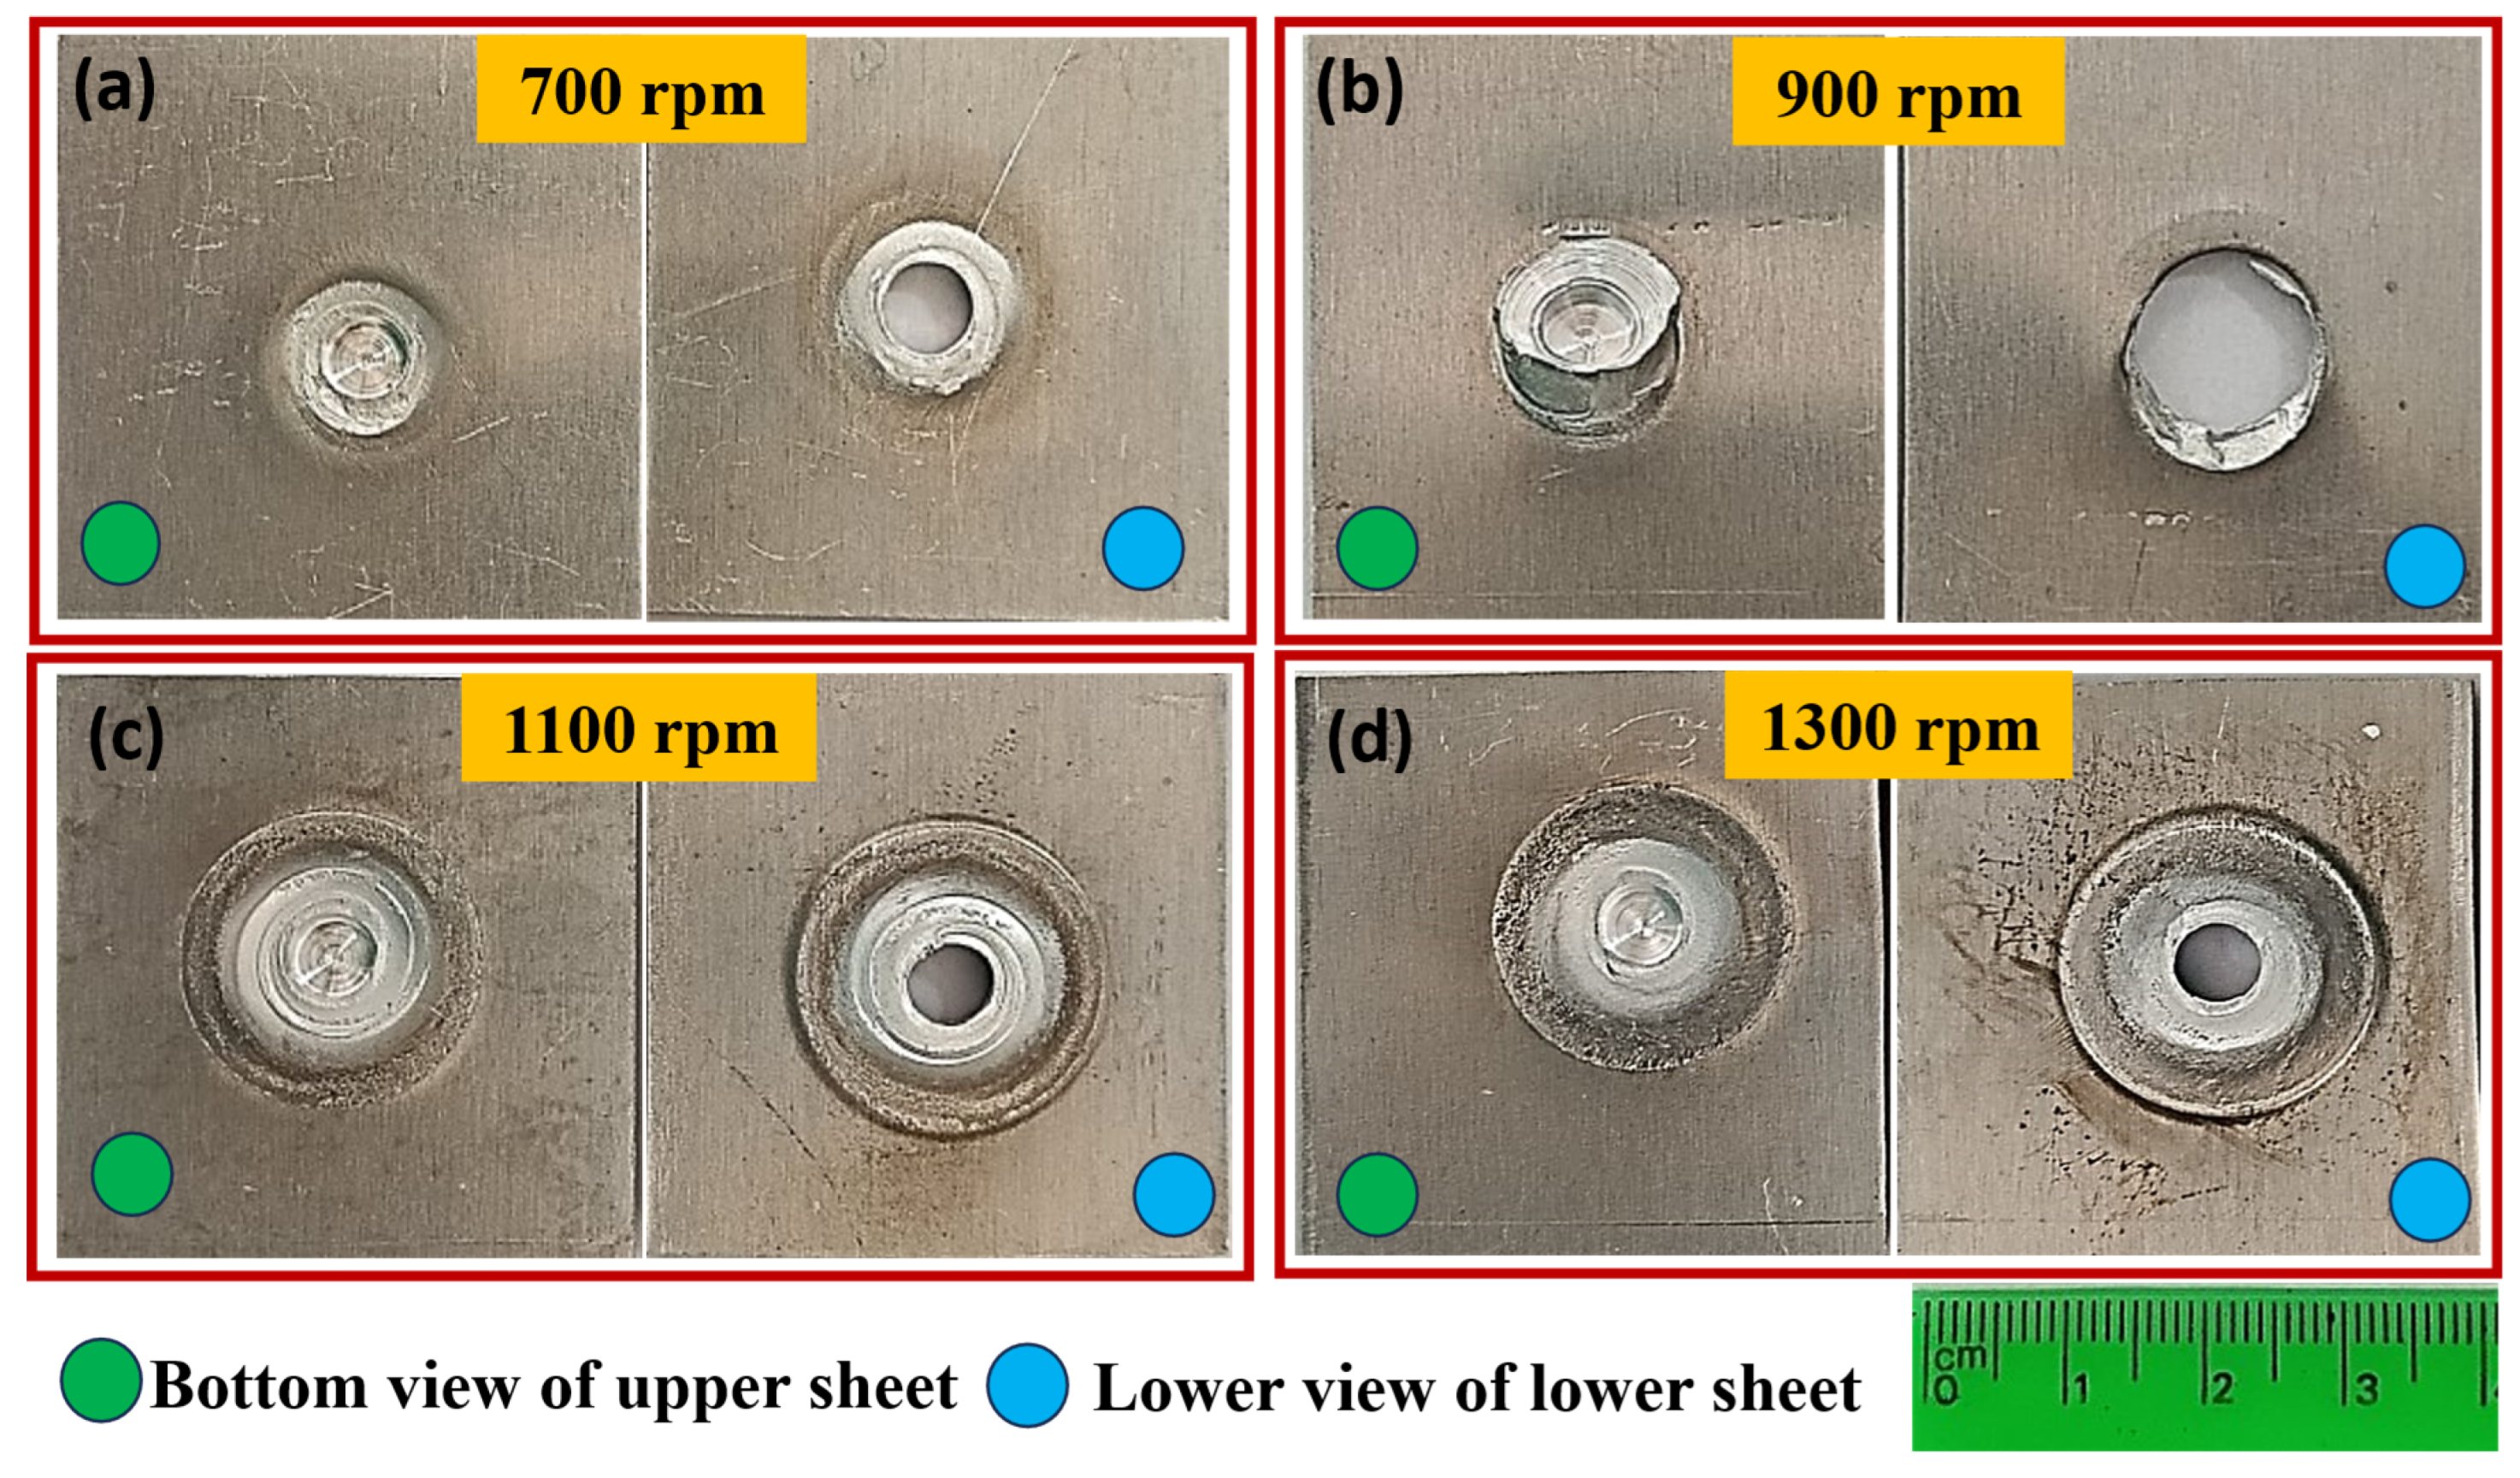
The fracture location of a FSSW joint is a critical indicator of its mechanical performance and is highly dependent on the welding parameters [48,60,61]. Analysis of the fracture surfaces, as shown in Figure 16, provides a clear visual correlation between rotational speed, joint strength, and failure mechanism. The joint produced at 700 rpm (Figure 16a) exhibits a fracture path indicative of insufficient bonding, likely due to inadequate heat input and material flow, which explains its lower strength of 6.1 ± 0.6 kN. In contrast, the optimal joint strength of 7.3 ± 0.4 kN was achieved at 900 rpm (Figure 16b), where the fracture surface reveals a plug-type failure through the SZ or TMAZ, signifying a strong metallurgical bond that forced failure into the parent material. As rotational speed increased further, excessive heat input led to a severe decline in strength. The fracture for the joint at 1100 rpm (Figure 16c) shows a failure mode transitioning into the excessively softened HAZ, corresponding to its reduced load capacity of 5.8 ± 0.5 kN. This trend culminated in the joint at 1300 rpm (Figure 16d), which displayed the lowest strength (5.1 ± 0.3 kN) and a fracture path completely confined within the over-aged and weakest region of the HAZ.
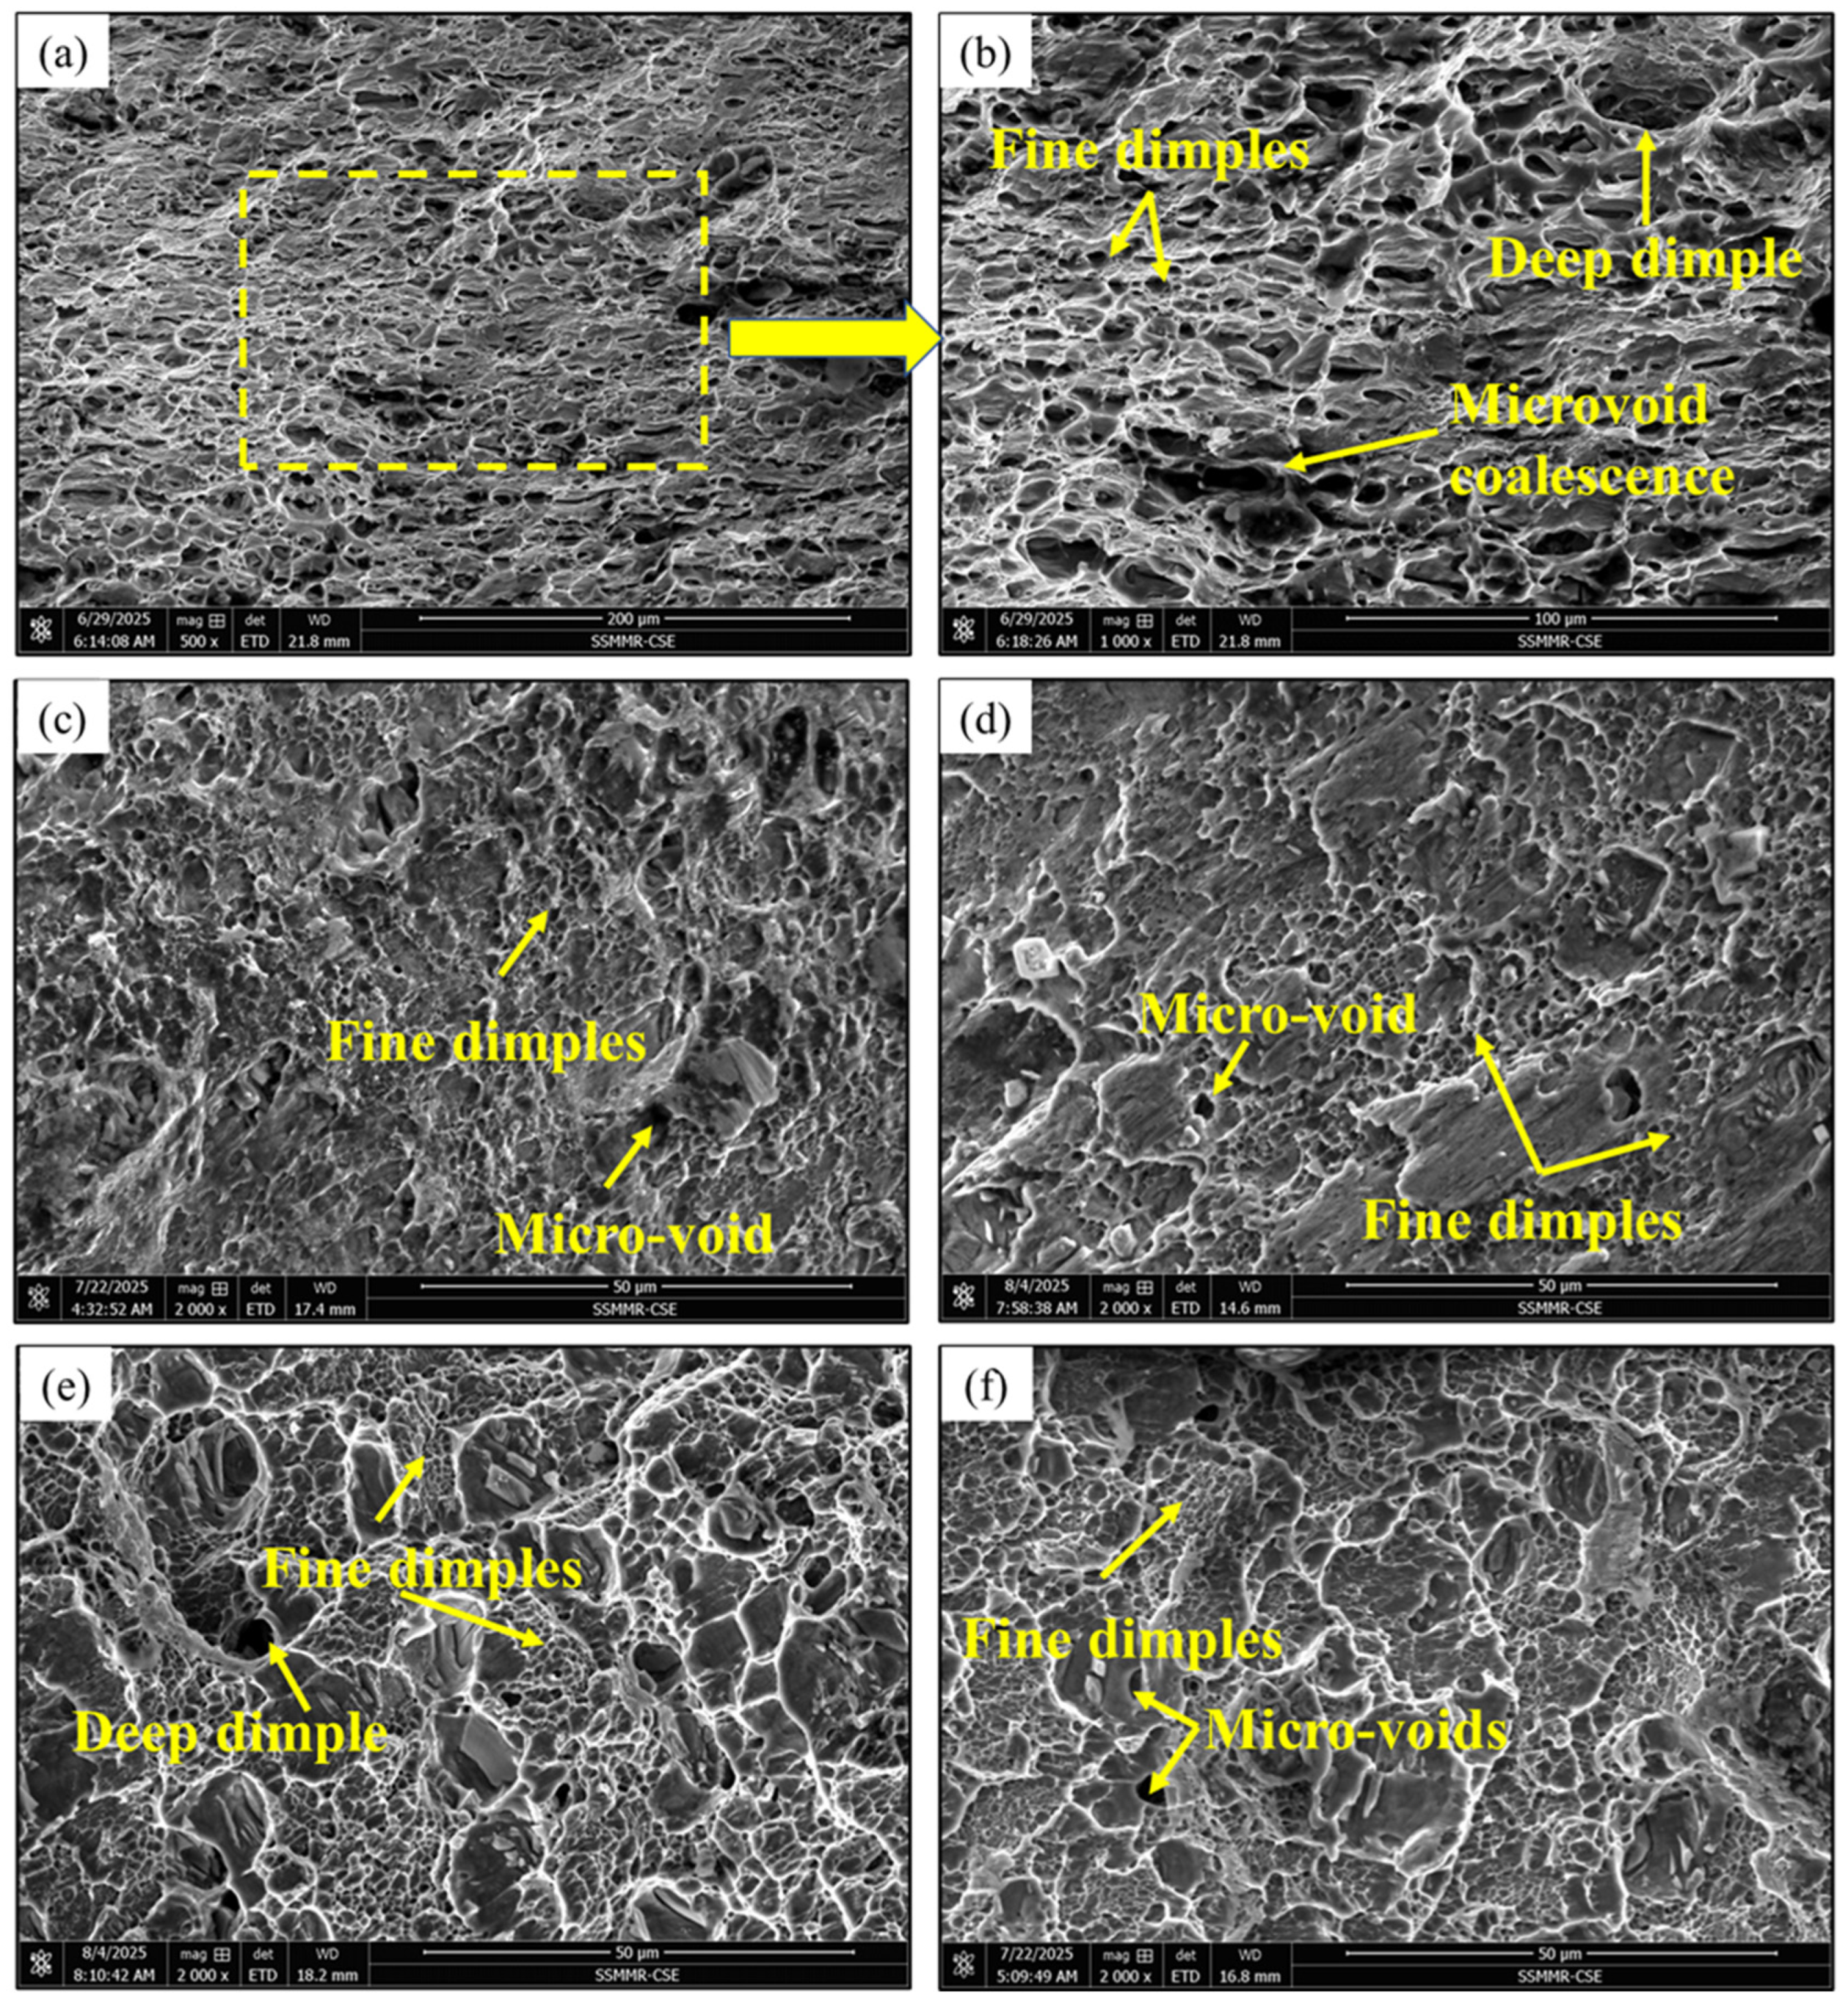
Figure 17 presents the fracture surfaces of both the base metal (BM) and the FSSW joints. The base metal (Figure 17a,b) exhibits a classic ductile fracture mode, characterized by an aluminum matrix with dimples of varying sizes. The presence of micro-voids, formed by the pull-out of strengthening precipitates, is also evident. These fracture surface features are directly correlated with the known microstructural characteristics of the AA2024-T4 base metal [62]. Conversely, the fracture surfaces of the tensile–shear tested FSSW joints (Figure 17c–f) reveal a more complex failure mechanism. Failure initiated at the stress concentration site of the hook’s tip, with microcracks propagating horizontally along the joint interface. The subsequent shearing action ultimately resulted in final failure through the stir zone (SZ). Examination of the lower sheet’s fracture surface across all joints showed consistent features, including numerous micro-voids and a high density of small, deep dimples. This morphology is a direct consequence of grain refinement within the SZ during the FSSW process and confirms that the failure, while influenced by the joint geometry, remained fundamentally ductile in nature.
Finally, the optimal parameter set identified in this study (900 rpm, 3 s) underscores the process efficiency of FSSW for AA2024-T4. The 3 s dwell time is a key driver of productivity, enabling rapid joining cycles. Crucially, achieving the peak load-carrying capacity at this intermediate rotational speed (rather than at the maximum energy input of 1300 rpm) defines an energy-efficient process window. This indicates an efficient conversion of process energy into joint integrity while avoiding the strength degradation associated with excessive thermal softening. Compared to a previous study on a similar alloy that employed longer dwell times and higher rotational speeds [2], the parameters identified here offer an advantageous synergy of reduced process time and enhanced mechanical performance.

4. Conclusions

This study comprehensively investigated the influence of relatively low rotational speeds (700–1300 rpm) and a constant short dwell time of 3 s on the mechanical performance and microstructural evolution of 2 mm thick AA2024-T4 spot-lap welds. The main findings from the analysis of heat input, grain structure, hardness, tensile shear strength, and fracture morphologies are summarized below.
  • By using a short, fixed dwell time of 3 s and a range of tool rotational speeds (700–1300 rpm), this study shows that FSSW is an effective method for joining 2 mm thick AA2024 sheets in similar lap spot welds. The rapid cycle time achieved with these parameters is a key finding, as it indicates a significant advantage for productivity in industrial settings.
  • An optimal tool rotational speed of 900 rpm was identified, producing joints with the highest tensile–shear strength of 7.3 ± 0.4 kN, as it achieved an ideal balance between sufficient material flow and controlled heat input.
  • This study concluded that increasing the rotational speed from 700 to 1300 rpm resulted in a corresponding increase in the SZ grain size. The base material’s (BM) mean grain size of 29.7 ± 6.1 μm was significantly refined in all joints, but the refinement was most pronounced at 700 rpm, yielding the smallest grain size of 4.7 ± 1.4 μm. Conversely, the largest SZ grain size of 8.3 ± 1.3 μm was observed at 1300 rpm, directly correlating with the higher heat input at this speed.
  • The fracture location and mode are directly governed by the rotational speed: joints at 700 rpm failed via interfacial fracture due to insufficient bonding, while joints at the optimal 900 rpm failed by a plug-type fracture through the nugget, indicating superior bond strength.
  • Microstructural analysis confirms that failure in all cases remained ductile, characterized by dimpled fracture surfaces; however, the significantly finer and deeper dimples in the stir zone fracture surfaces are a direct consequence of grain refinement during the FSSW process.
  • The findings of this research offer valuable insights for the practical implementation of FSSW, particularly for manufacturing applications in the aerospace and automotive industries where high-strength, lightweight structures are essential.

Author Contributions

Conceptualization, Y.G.Y.E., M.M.E.-S.S. and S.A.; methodology, Y.G.Y.E., H.A.R. and M.M.E.-S.S.; software, H.A.R. and A.E.; validation, Y.G.Y.E., M.M.E.-S.S. and H.A.R.; formal analysis, A.E. and S.A.; investigation, Y.G.Y.E., H.A.R. and M.M.E.-S.S.; resources, A.E.; data curation, H.A.R. and S.A.; writing—original draft preparation, Y.G.Y.E., S.A. and M.M.E.-S.S.; writing—review and editing, Y.G.Y.E., M.M.E.-S.S., M.F.Y.S. and S.A.; visualization, M.F.Y.S. and A.E.; supervision, M.M.E.-S.S.; project administration, M.F.Y.S. and S.A.; funding acquisition, M.F.Y.S. and S.A. All authors have read and agreed to the published version of the manuscript.

Funding

This work was supported and funded by the Deanship of Scientific Research at Imam Mohammad Ibn Saud Islamic University (IMSIU) (grant number: IMSIU-DDRSP2503).

Data Availability Statement

The original contributions presented in this study are included in the article. Further inquiries can be directed to the corresponding author.

Conflicts of Interest

The author Hagar A. Reyad was employed by the company Arabian Steel Industries. The remaining authors declare that the research was conducted in the absence of any commercial or financial relationships that could be construed as potential conflict of interest.

References

  1. Tiwan; Ilman, M.N.; Kusmono; Sehono. Microstructure and Mechanical Performance of Dissimilar Friction Stir Spot Welded AA2024-O/AA6061-T6 Sheets: Effects of Tool Rotation Speed and Pin Geometry. Int. J. Lightweight Mater. Manuf. 2023, 6, 1–14. [Google Scholar] [CrossRef]
  2. Dourandish, S.; Mousavizade, S.M.; Ezatpour, H.R.; Ebrahimi, G.R. Microstructure, Mechanical Properties and Failure Behaviour of Protrusion Friction Stir Spot Welded 2024 Aluminium Alloy Sheets. Sci. Technol. Weld. Join. 2018, 23, 295–307. [Google Scholar] [CrossRef]
  3. Anton Savio Lewise, K.; Edwin Raja Dhas, J. FSSW Process Parameter Optimization for AA2024 and AA7075 Alloy. Mater. Manuf. Process. 2022, 37, 34–42. [Google Scholar] [CrossRef]
  4. Siddiquee, A.N.; Pandey, S.P.; Khan, N.Z. Friction Stir Welding of Austenitic Stainless Steel: A Study on Microstructure and Effect of Parameters on Tensile Strength. Mater. Today Proc. 2015, 2, 1388–1397. [Google Scholar] [CrossRef]
  5. Sabry, I. Exploring the Effect of Friction Stir Welding Parameters on the Strength of AA2024 and A356-T6 Aluminum Alloys. J. Alloys Metall. Syst. 2024, 8, 100124. [Google Scholar] [CrossRef]
  6. Zhang, C.; Huang, G.; Zhang, D.; Sun, Z.; Liu, Q. Microstructure and Mechanical Properties in Dissimilar Friction Stir Welded AA2024/7075 Joints at High Heat Input: Effect of Post-Weld Heat Treatment. J. Mater. Res. Technol. 2020, 9, 14771–14782. [Google Scholar] [CrossRef]
  7. Ahmed, M.M.Z.; Abdelazem, K.A.; El-Sayed Seleman, M.M.; Alzahrani, B.; Touileb, K.; Jouini, N.; El-Batanony, I.G.; Abd El-Aziz, H.M. Friction Stir Welding of 2205 Duplex Stainless Steel: Feasibility of Butt Joint Groove Filling in Comparison to Gas Tungsten Arc Welding. Materials 2021, 14, 4597. [Google Scholar] [CrossRef]
  8. Zhang, C.; Huang, G.; Cao, Y.; Zhu, Y.; Li, W.; Wang, X.; Liu, Q. Microstructure and Mechanical Properties of Dissimilar Friction Stir Welded AA2024-7075 Joints: Influence of Joining Material Direction. Mater. Sci. Eng. A 2019, 766, 138368. [Google Scholar] [CrossRef]
  9. Pang, Q.; Zhang, J.H.; Huq, M.J.; Hu, Z.L. Characterization of Microstructure, Mechanical Properties and Formability for Thermomechanical Treatment of Friction Stir Welded 2024-O Alloys. Mater. Sci. Eng. A 2019, 765, 138303. [Google Scholar] [CrossRef]
  10. Kashaev, N.; Ventzke, V.; Çam, G. Prospects of Laser Beam Welding and Friction Stir Welding Processes for Aluminum Airframe Structural Applications. J. Manuf. Process. 2018, 36, 571–600. [Google Scholar] [CrossRef]
  11. Albaijan, I.; Ahmed, M.M.Z.; El-Sayed Seleman, M.M.; Touileb, K.; Habba, M.I.A.; Fouad, R.A. Optimization of Bobbin Tool Friction Stir Processing Parameters of AA1050 Using Response Surface Methodology. Materials 2022, 15, 6886. [Google Scholar] [CrossRef] [PubMed]
  12. Gain, S.; Acharyya, S.K.; Sanyal, D.; Das, S.K. Influence of Welding Parameters on Austenitic Stainless Steel Pipe Weldments Produced by Friction Stir Welding. Trans. Indian Inst. Met. 2024, 77, 3927–3939. [Google Scholar] [CrossRef]
  13. Deng, L.; Li, S.; Ke, L.; Liu, J.; Kang, J. Microstructure and Fracture Behavior of Refill Friction Stir Spot Welded Joints of AA2024 Using a Novel Refill Technique. Metals 2019, 9, 286. [Google Scholar] [CrossRef]
  14. Yadav, S.K.; Yusufzai, M.Z.K.; Mishra, S.; Singh, D.K. Influence of Multiple Friction Stir Welding Passes on the Microstructure and Mechanical Properties of AA2024 Age-Hardened Aluminum Alloy. Proc. Inst. Mech. Eng. Part L J. Mater. Des. Appl. 2024, 239, 1292–1305. [Google Scholar] [CrossRef]
  15. Moradi, M.M.; Jamshidi Aval, H.; Jamaati, R.; Amirkhanlou, S.; Ji, S. Microstructure and Texture Evolution of Friction Stir Welded Dissimilar Aluminum Alloys: AA2024 and AA6061. J. Manuf. Process. 2018, 32, 1–10. [Google Scholar] [CrossRef]
  16. Tang, J.; Shen, Y. Numerical Simulation and Experimental Investigation of Friction Stir Lap Welding between Aluminum Alloys AA2024 and AA7075. J. Alloys Compd. 2016, 666, 493–500. [Google Scholar] [CrossRef]
  17. Sadeesh, P.; Venkatesh, K.M.; Rajkumar, V.; Avinash, P.; Arivazhagan, N.; Devendranath, R.K.; Narayanan, S. Studies on Friction Stir Welding of Aa 2024 and Aa 6061 Dissimilar Metals. Procedia Eng. 2014, 75, 145–149. [Google Scholar] [CrossRef]
  18. Ahmed, M.M.Z.; Jouini, N.; Alzahrani, B.; Seleman, M.M.E.S.; Jhaheen, M. Dissimilar Friction Stir Welding of AA2024 and AISI 1018: Microstructure and Mechanical Properties. Metals 2021, 11, 330. [Google Scholar] [CrossRef]
  19. Ghazaei Najafabadi, M.A.; Abdollah-Zadeh, A.; Mofid, M.A. Post-Weld Heat Treatment Effects on Microstructure and Mechanical Properties of Underwater Friction Stir-Welded AA 2024/6061 Lap Joints. Mater. Chem. Phys. 2025, 339, 130789. [Google Scholar] [CrossRef]
  20. Jabraeili, R.; Jafarian, H.R.; Khajeh, R.; Park, N.; Kim, Y.; Heidarzadeh, A.; Eivani, A.R. Effect of FSW Process Parameters on Microstructure and Mechanical Properties of the Dissimilar AA2024 Al Alloy and 304 Stainless Steel Joints. Mater. Sci. Eng. A 2021, 814, 140981. [Google Scholar] [CrossRef]
  21. Rathinasuriyan, C.; Puviyarasan, M.; Sankar, R.; Selvakumar, V. Effect of Process Parameters on Weld Geometry and Mechanical Properties in Friction Stir Welding of AA2024 and AA7075 Alloys. J. Alloys Metall. Syst. 2024, 7, 100091. [Google Scholar] [CrossRef]
  22. Rashkovets, M.; Dell’Avvocato, G.; Contuzzi, N.; Palumbo, D.; Galietti, U.; Casalino, G. On the Role of Rotational Speed in P-FSSW Dissimilar Aluminum Alloys Lap Weld. Weld. World 2025, 69, 2095–2107. [Google Scholar] [CrossRef]
  23. Yuan, W.; Mishra, R.S.; Webb, S.; Chen, Y.L.; Carlson, B.; Herling, D.R.; Grant, G.J. Effect of Tool Design and Process Parameters on Properties of Al Alloy 6016 Friction Stir Spot Welds. J. Mater. Process Technol. 2011, 211, 972–977. [Google Scholar] [CrossRef]
  24. Gerlich, A.; Avramovic-Cingara, G.; North, T.H. Stir Zone Microstructure and Strain Rate during Al 7075-T6 Friction Stir Spot Welding. Metall. Mater. Trans. A 2006, 37, 2773–2786. [Google Scholar] [CrossRef]
  25. Tozaki, Y.; Uematsu, Y.; Tokaji, K. Effect of Tool Geometry on Microstructure and Static Strength in Friction Stir Spot Welded Aluminium Alloys. Int. J. Mach. Tools Manuf. 2007, 47, 2230–2236. [Google Scholar] [CrossRef]
  26. Palanivel, R.; Koshy Mathews, P.; Murugan, N.; Dinaharan, I. Effect of Tool Rotational Speed and Pin Profile on Microstructure and Tensile Strength of Dissimilar Friction Stir Welded AA5083-H111 and AA6351-T6 Aluminum Alloys. Mater. Des. 2012, 40, 7–16. [Google Scholar] [CrossRef]
  27. Ataya, S.; Ahmed, M.M.Z.; El-Sayed Seleman, M.M.; Hajlaoui, K.; Latief, F.H.; Soliman, A.M.; Elshaghoul, Y.G.Y.; Habba, M.I.A. Effective Range of FSSW Parameters for High Load-Carrying Capacity of Dissimilar Steel A283M-C/Brass CuZn40 Joints. Materials 2022, 15, 1394. [Google Scholar] [CrossRef]
  28. Piccini, J.M.; Svoboda, H.G. Effect of Pin Length on Friction Stir Spot Welding (FSSW) of Dissimilar Aluminum-Steel Joints. Procedia Mater. Sci. 2015, 9, 504–513. [Google Scholar] [CrossRef]
  29. Awang, M.; Mucino, V.H. Energy Generation during Friction Stir Spot Welding (FSSW) of Al 6061-T6 Plates. Mater. Manuf. Process. 2010, 25, 167–174. [Google Scholar] [CrossRef]
  30. Jo, D.S.; Kahhal, P.; Kim, J.H. Optimization of Friction Stir Spot Welding Process Using Bonding Criterion and Artificial Neural Network. Materials 2023, 16, 3757. [Google Scholar] [CrossRef] [PubMed]
  31. Sehono, S.; Putra, I.R. Microstructure and Mechanical Performance of Friction Stir Spot Welding to Riveting Process Aluminum AA2024-T3 Plate: Effect of Tool Rotation Speed. AIP Conf. Proc. 2025, 3250, 070003. [Google Scholar] [CrossRef]
  32. Fujimoto, M.; Koga, S.; Abe, N.; Sato, S.Y.; Kokawa, H. Analysis of Plastic Flow of the Al Alloy Joint Produced by Friction Stir Spot Welding. Weld. Int. 2009, 23, 589–596. [Google Scholar] [CrossRef]
  33. Anton Savio Lewise, K.; Edwin Raja Dhas, J.; Pandiyarajan, R.; Sabarish, S. Metallurgical and Mechanical Investigation on FSSWed Dissimilar Aluminum Alloy. J. Alloys Metall. Syst. 2023, 2, 100010. [Google Scholar] [CrossRef]
  34. Zhang, G.; Xiao, C.; Ojo, O.O. Dissimilar Friction Stir Spot Welding of AA2024-T3/AA7075-T6 Aluminum Alloys under Different Welding Parameters and Media. Def. Technol. 2021, 17, 531–544. [Google Scholar] [CrossRef]
  35. Sadoun, A.M.; Wagih, A.; Fathy, A.; Essa, A.R.S. Effect of Tool Pin Side Area Ratio on Temperature Distribution in Friction Stir Welding. Results Phys. 2019, 15, 102814. [Google Scholar] [CrossRef]
  36. Ratković, N.; Jovanović Pešić, Ž.; Arsić, D.; Pešić, M.; Džunić, D. Tool Geometry Effect on Material Flow and Mixture in FSW. Adv. Technol. Mater. 2022, 47, 33–36. [Google Scholar] [CrossRef]
  37. Seleman, M.M.E.S.; Ahmed, M.M.Z.; Ramadan, R.M.; Zaki, B.A. Effect of FSW Parameters on the Microstructure and Mechanical Properties of T-Joints between Dissimilar Al-Alloys. Int. J. Integr. Eng. 2022, 14, 1–12. [Google Scholar] [CrossRef]
  38. Elfishawy, E.; Ahmed, M.M.Z.; El-Sayed Seleman, M.M. Additive Manufacturing of Aluminum Using Friction Stir Deposition. In TMS 2020 149th Annual Meeting & Exhibition Supplemental Proceedings; Springer International Publishing: Cham, Switzerland, 2020; pp. 227–238. [Google Scholar]
  39. Mubiayi, M.P.; Akinlabi, E.T. An Overview on Friction Stir Spot Welding of Dissimilar Materials. In Transactions on Engineering Technologies: World Congress on Engineering and Computer Science 2014; Springer: Dordrecht, The Netherlands, 2015; pp. 537–549. ISBN 9789401772365. [Google Scholar]
  40. Lu, X.; Luan, Y.; Meng, X.; Zhou, Y.; Zhao, N.; Liang, S.Y. Temperature Distribution and Mechanical Properties of FSW Medium Thickness Aluminum Alloy 2219. Int. J. Adv. Manuf. Technol. 2022, 119, 7229–7241. [Google Scholar] [CrossRef]
  41. Chao, Y.J.; Qi, X.; Tang, W. Heat Transfer in Friction Stir Welding–Experimental and Numerical Studies. J. Manuf. Sci. Eng. 2003, 125, 138–145. [Google Scholar] [CrossRef]
  42. Schmidt, H.; Hattel, J.; Wert, J. An Analytical Model for the Heat Generation in Friction Stir Welding. Model Simul. Mat. Sci. Eng 2004, 12, 143–157. [Google Scholar] [CrossRef]
  43. Ranjan Kumar, R.; Kumar, S.; Kumar, A. Study on Effect of Tool Geometry on Energy and Temperature of Friction Stir Welding. Int. J. Civ. Eng. Technol. 2017, 8, 742–754. [Google Scholar]
  44. Hamilton, C.; Dymek, S.; Sommers, A. A Thermal Model of Friction Stir Welding in Aluminum Alloys. Int. J. Mach. Tools Manuf. 2008, 48, 1120–1130. [Google Scholar] [CrossRef]
  45. Javadi, M.; Tajdari, M. Experimental Investigation of the Friction Coefficient between Aluminium and Steel. Mater. Sci.-Pol. 2006, 24, 305–310. [Google Scholar]
  46. Correia, A.N.; Santos, P.A.M.; Braga, D.F.O.; Baptista, R.; Infante, V. Effects of Friction Stir Welding Process Control and Tool Penetration on Mechanical Strength and Morphology of Dissimilar Aluminum-to-Polymer Joints. J. Manuf. Mater. Process. 2023, 7, 106. [Google Scholar] [CrossRef]
  47. Di Bella, G.; Borsellino, C.; Chairi, M.; Campanella, D.; Buffa, G. Effect of Rotational Speed on Mechanical Properties of AA5083/AA6082 Friction Stir Welded T-Joints for Naval Applications. Metals 2024, 14, 1410. [Google Scholar] [CrossRef]
  48. Bagheri, B.; Mahdian Rizi, A.A.; Abbasi, M.; Givi, M. Friction Stir Spot Vibration Welding: Improving the Microstructure and Mechanical Properties of Al5083 Joint. Metallogr. Microstruct. Anal. 2019, 8, 713–725. [Google Scholar] [CrossRef]
  49. Pang, Q.; Zhao, M.; Zhang, Z. The Effect of High-Temperature Deformation on the Mechanical Properties and Corrosion Resistance of the 2024 Aluminum Alloy Joint after Friction Stir Welding. Materials 2024, 17, 2969. [Google Scholar] [CrossRef]
  50. Staszczyk, A.; Sawicki, J. Comparison of Mechanical Behaviour of Microstructures of 2024 Aluminium Alloy Containing Precipitates of Different Morphologies. IOP Conf. Ser. Mater. Sci. Eng. 2020, 743, 012052. [Google Scholar] [CrossRef]
  51. Ehrich, J.; Staron, P.; Karkar, A.; Roos, A.; Hanke, S. Precipitation Evolution in the Heat-Affected Zone and Coating Material of AA2024 Processed by Friction Surfacing. Adv. Eng. Mater. 2022, 24, 2201019. [Google Scholar] [CrossRef]
  52. Irmer, D.; Yildirim, C.; Sennour, M.; Esin, V.A.; Moussa, C. Effect of Second-Phase Precipitates on Deformation Microstructure in AA2024 (Al–Cu–Mg): Dislocation Substructures and Stored Energy. J. Mater. Sci. 2024, 59, 18978–19002. [Google Scholar] [CrossRef]
  53. Morozova, I.; Królicka, A.; Obrosov, A.; Yang, Y.; Doynov, N.; Weiß, S.; Michailov, V. Precipitation Phenomena in Impulse Friction Stir Welded 2024 Aluminium Alloy. Mater. Sci. Eng. A 2022, 852, 143617. [Google Scholar] [CrossRef]
  54. Mohammadtaheri, M.; Haddad-Sabzevar, M.; Mazinani, M. The Effects of Heat Treatment and Cold Working on the Microstructure of Aluminum Alloys Welded by Friction Stir Welding (FSW) Technique. Adv. Mater. Res. 2012, 409, 287–292. [Google Scholar] [CrossRef]
  55. Staszczyk, A.; Sawicki, J.; Adamczyk-Cieslak, B. A Study of Second-Phase Precipitates and Dispersoid Particles in 2024 Aluminum Alloy after Different Aging Treatments. Materials 2019, 12, 4168. [Google Scholar] [CrossRef]
  56. Habba, M.I.A.; Alsaleh, N.A.; Badran, T.E.; El-Sayed Seleman, M.M.; Ataya, S.; El-Nikhaily, A.E.; Abdul-Latif, A.; Ahmed, M.M.Z. Comparative Study of FSW, MIG, and TIG Welding of AA5083-H111 Based on the Evaluation of Welded Joints and Economic Aspect. Materials 2023, 16, 5124. [Google Scholar] [CrossRef]
  57. El Rayes, M.M.; Soliman, M.S.; Abbas, A.T.; Pimenov, D.Y.; Erdakov, I.N.; Abdel-Mawla, M.M. Effect of Feed Rate in FSW on the Mechanical and Microstructural Properties of AA5754 Joints. Adv. Mater. Sci. Eng. 2019, 2019, 156176. [Google Scholar] [CrossRef]
  58. Baudin, T.; Bozzi, S.; Brisset, F.; Azzeddine, H. Local Microstructure and Texture Development during Friction Stir Spot of 5182 Aluminum Alloy. Crystals 2023, 13, 540. [Google Scholar] [CrossRef]
  59. Khalafe, W.H.; Sheng, E.L.; Bin Isa, M.R.; Omran, A.B.; Shamsudin, S.B. The Effect of Friction Stir Welding Parameters on the Weldability of Aluminum Alloys with Similar and Dissimilar Metals: Review. Metals 2022, 12, 2099. [Google Scholar] [CrossRef]
  60. Padhy, G.K.; Wu, C.S.; Gao, S. Friction Stir Based Welding and Processing Technologies–Processes, Parameters, Microstructures and Applications: A Review. J. Mater. Sci. Technol. 2018, 34, 1–38. [Google Scholar] [CrossRef]
  61. Kosturek, R.; Torzewski, J.; Wachowski, M.; Śnieżek, L. Effect of Welding Parameters on Mechanical Properties and Microstructure of Friction Stir Welded AA7075-T651 Aluminum Alloy Butt Joints. Materials 2022, 15, 5950. [Google Scholar] [CrossRef] [PubMed]
  62. Urrego, L.F.; García-Beltrán, O.; Arzola, N.; Araque, O. Mechanical Fracture of Aluminium Alloy (AA 2024-T4), Used in the Manufacture of a Bioproducts Plant. Metals 2023, 13, 1134. [Google Scholar] [CrossRef]
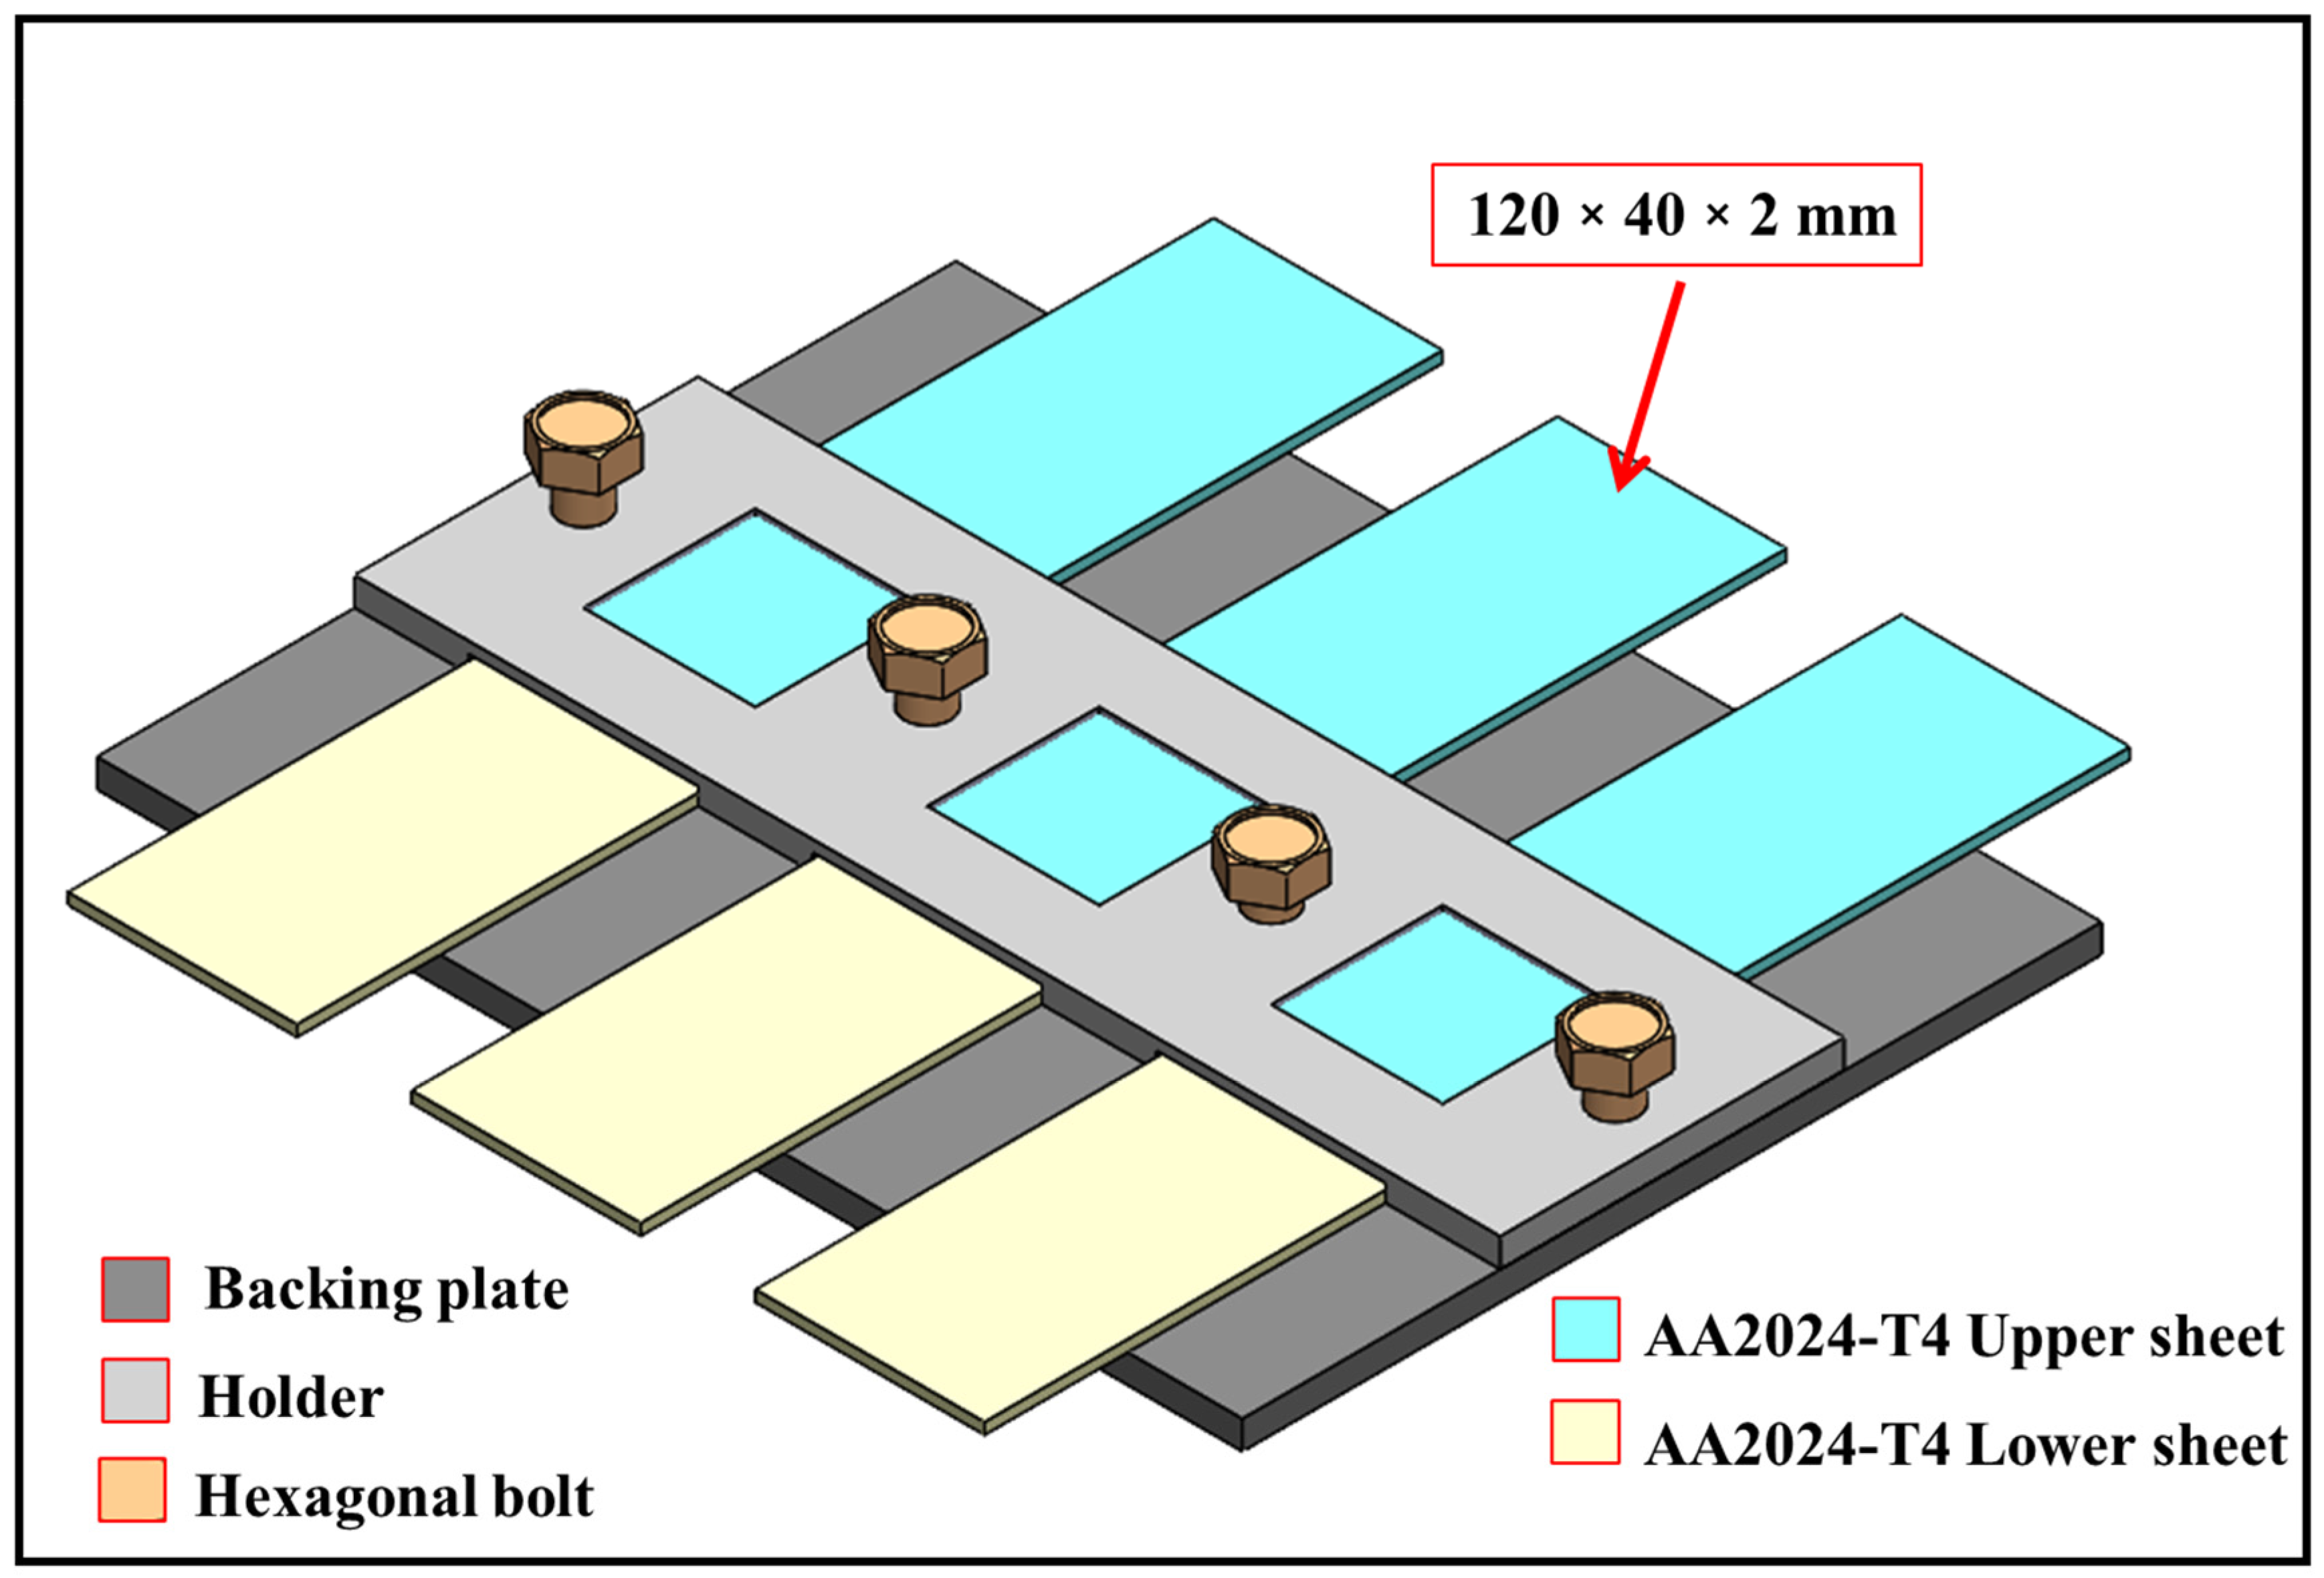
Figure 1. Illustration of the fixation system setup for joining AA2024-T4 in similar FSSW lap joints.
Crystals 15 01054 g001
Figure 2. Depicts the design of the welding tool used for FSSW, showing its schematic in (a) and its isometric view in (b).
Crystals 15 01054 g002
Figure 3. The FSSW process, showing (a) the stage of tool’s insertion and material stirring, (b) the dwell time stage, (c) the retreating stage, (d) the load indicator, and (e,f) the temperature measurement setup.
Crystals 15 01054 g003
Figure 4. Schematic illustrations of the test specimens. These include: (a) the tensile–shear sample for the AA2024-T4 FSSW lap joint and (b) the tensile sample for the BM.
Crystals 15 01054 g004
Figure 5. FSSW joints processed at various rotational speeds (700, 900, 1100, and 1300 rpm) and a constant dwell time of 3 s. (a) Top view and (b) Bottom view.
Crystals 15 01054 g005
Figure 6. Typical temperature-time profiles during the FSSW process on AA2024-T4 sheets, showing the three distinct stages: heating, peak temperature, and cooling.
Crystals 15 01054 g006
Figure 7. Peak temperatures as a function of tool rotational speed during FSSW of AA2024-T4 joints at various rotational speeds (700–1300 rpm) and a dwell time of 3 s.
Crystals 15 01054 g007
Figure 8. The effect of rotational speed (700–1300 rpm) and a constant dwell time of 3 s on heat input during the FSSW of AA2024-T4 joints.
Crystals 15 01054 g008
Figure 9. Transverse macrographs of FSSW joints in AA2024-T4 at different rotational speeds, (a) 700 rpm, (b) 900 rpm, (c) 1100 rpm and (d) 1300 rpm, all welded at a constant dwell time of 3 s.
Crystals 15 01054 g009
Figure 10. (a) Optical micrograph of the AA2024-T4 BM and (b) a representative image showing the three distinct zones of the FSSW joint (SZ, TMAZ, and HAZ) for the FSSW joint at 900 rpm and 3 s. (cf) Optical micrographs of the stir zones of the FSSW joints welded at (c) 700 rpm, (d) 900 rpm, (e) 1100 rpm, and (f) 1300 rpm, at a constant dwell time of 3 s.
Crystals 15 01054 g010
Figure 11. Grain size histograms of (a) the AA2024-T4 BM and the stir zones of the FSSW joints welded at a 3 s dwell time and various rotational speeds: (b) 700 rpm, (c) 900 rpm, (d) 1100 rpm, and (e) 1300 rpm.
Crystals 15 01054 g011
Figure 12. (ac) SEM micrographs and (df) EDS analysis of the AA2024-T4 BM and the FSSW joint processed at 900 rpm and 3 s.
Crystals 15 01054 g012
Figure 13. Shows the effect of rotational speed on the average hardness of the SZ, TMAZ, and HAZ for the AA2024-T4 FSSW joints welded at various rotational speeds (700–1300 rpm) and a 3 s dwell time.
Crystals 15 01054 g013
Figure 14. Load–displacement curves for the AA2024-T4 FSSW lap joints produced at various rotational speeds (700–1300 rpm) and a constant dwell time of 3 s.
Crystals 15 01054 g014
Figure 15. Maximum load-carrying capacity of the AA2024-T4 FSSW joints as a function of tool rotational speed at a fixed dwell time of 3 s.
Crystals 15 01054 g015
Figure 16. Images of the inner fracture surfaces of the AA2024-T4 FSSW joints after tensile–shear testing for welds fabricated at (a) 700 rpm, (b) 900 rpm, (c) 1100 rpm, and (d) 1300 rpm and 3 s welding time.
Crystals 15 01054 g016
Figure 17. SEM images of the AA2024 BM and FSSW joints: (a,b) the BM fracture surfaces at low and high magnifications, (cf) the fracture surfaces of the FSSW joints welded at 700, 900, 1100 and 1300 rpm, respectively (all joints were processed with a 3 s dwell time).
Crystals 15 01054 g017
Table 1. Chemical Composition of AA2024-T4 (wt.%).
Elements (%)CuMgMnFeSiZnCrTiAl
Wt.%3.81.20.300.50.500.250.100.15Bal.
Table 2. Mechanical properties of AA2024-T4 base material.
Yield Stress (MPa)Ultimate Tensile Strength (MPa)Hardness (HV)
279 ± 4.5420 ± 6.4111 ± 6.0279
Disclaimer/Publisher’s Note: The statements, opinions and data contained in all publications are solely those of the individual author(s) and contributor(s) and not of MDPI and/or the editor(s). MDPI and/or the editor(s) disclaim responsibility for any injury to people or property resulting from any ideas, methods, instructions or products referred to in the content.