Abstract
TIG arc additive manufacturing experiments were performed utilizing TiB2 nanoparticle-reinforced toward to 7075 aluminum alloy welding wire, and the microstructure and mechanical properties corresponding to different locations of welding plate were investigated. At the top location of the deposited layer, the microstructure was characterized by fine dendrite induced by solidification, and equiaxed grain was predominant at the middle location. The grain size at the bottom location was obviously larger compared to the top and middle locations, and secondary-phase particles were homogeneously distributed at the grain boundary or inner grains. The mechanical properties at the top location of the deposited layer were most excellent compared to the middle and bottom locations, and the tensile properties and micro-hardness were decreased with the detected area varying from middle location to the bottom location. The excellent combination of fracture elongation and maximum of tensile strength corresponding to different locations on the deposited layer were determined to be 361.8 MPa with respect to the 7075 aluminum alloy welding wire, respectively, which was higher compared to the samples processed by general arc additive manufacturing process with tensile strength of (279.4 ± 5.3) MPa, indicating the TiB2 nano-sized particles possessed certain enhancing effects on the investigated 7075 aluminum alloy.
1. Introduction
The 7xxx series high-strength aluminum alloy is a lightweight material with high specific strength and high damage tolerance [1,2]. With the continuous development of high-strength and high-toughness aluminum alloy, the manufacturing requirements of complex and precise structural parts of products in special fields such as transportation, shipbuilding industry and aerospace could be met [3,4]. As a low-cost and high-efficiency additive manufacturing method, wire arc additive manufacturing can rapidly realize the integrated forming of aluminum alloy components, greatly save the cost of raw materials as well as shorten the processing cycle, which has been successfully applied into industrial production [5,6,7,8,9].
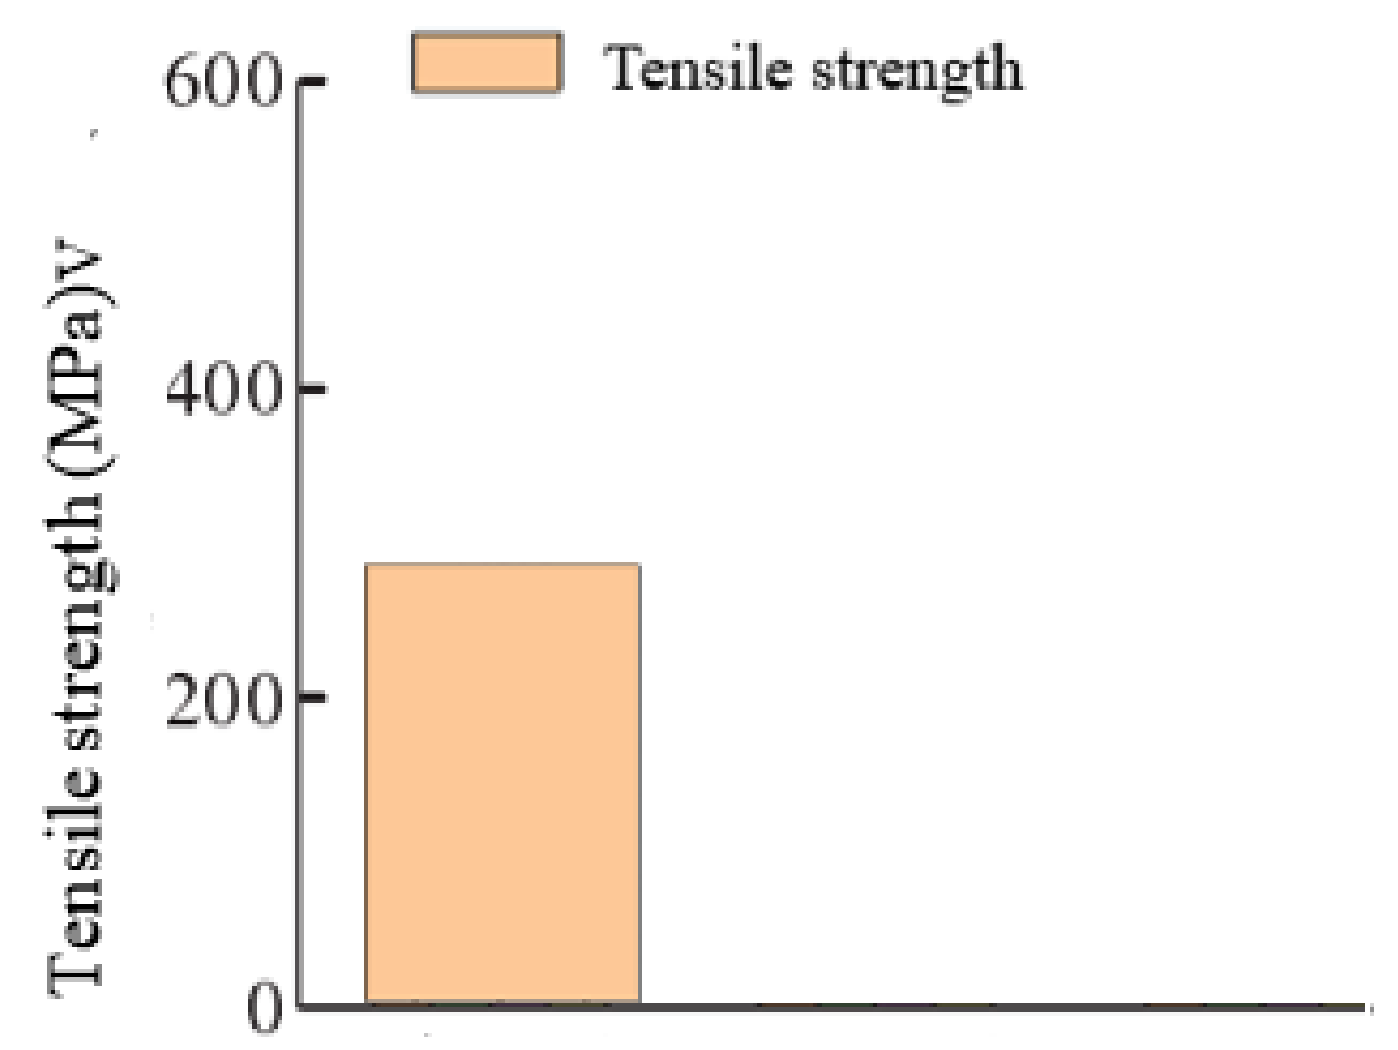
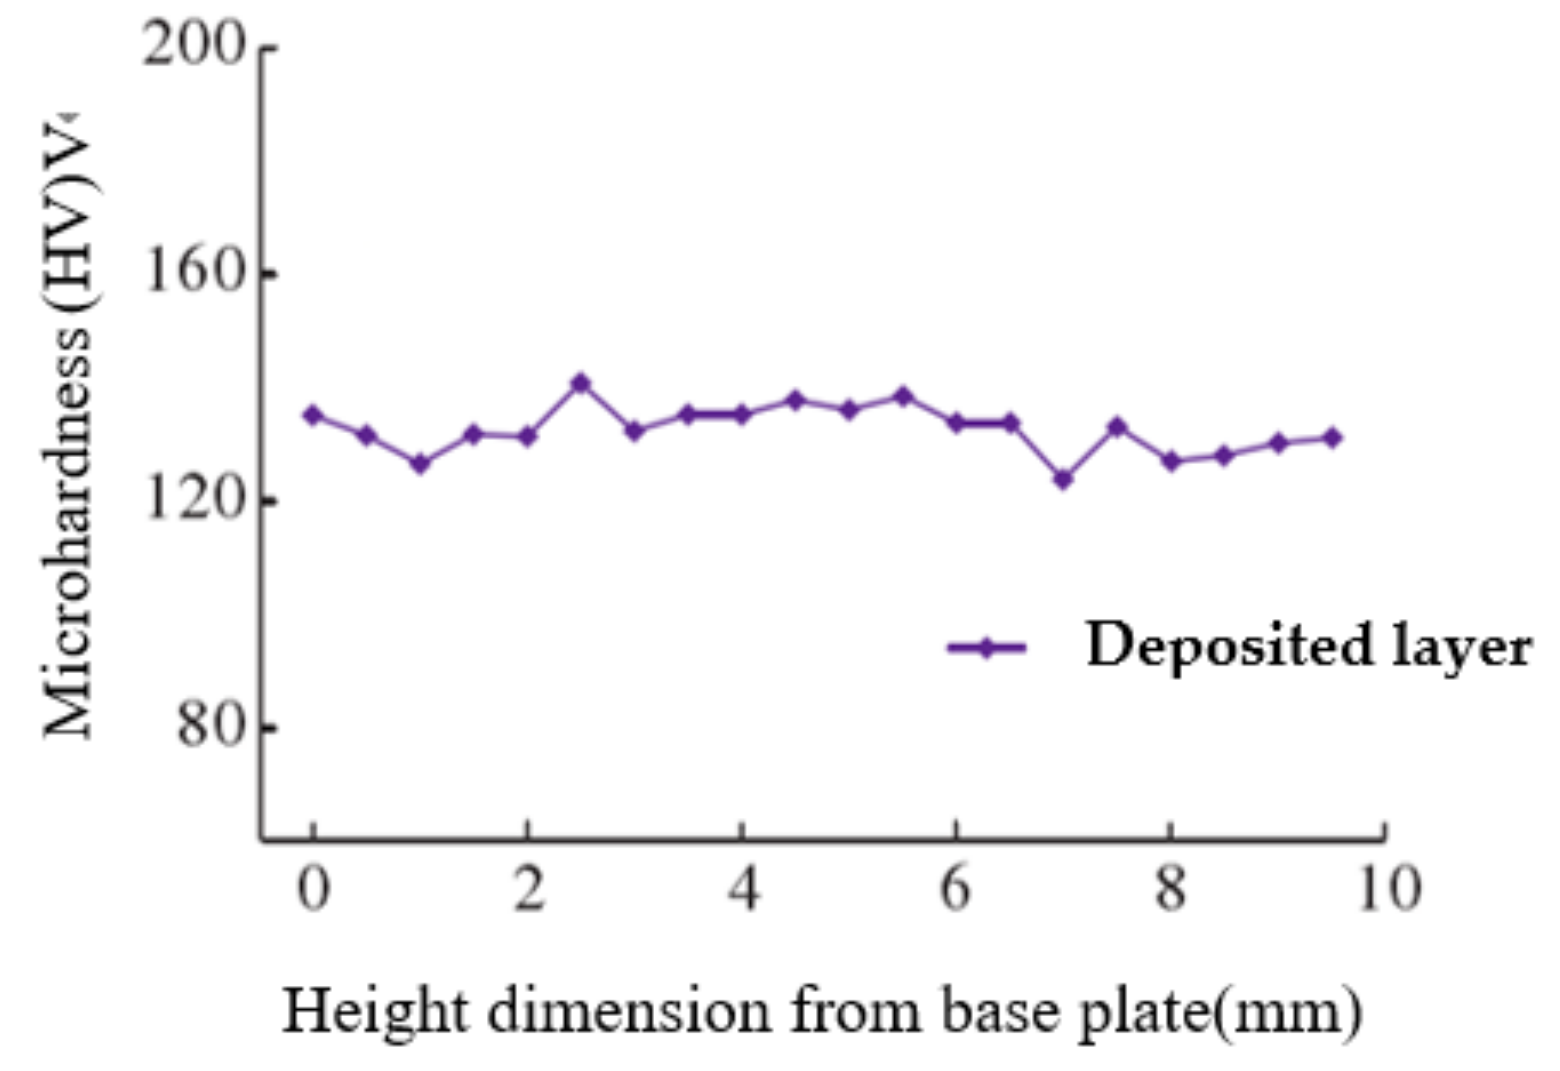
In recent years, the research and development on the arc additive manufacturing of high-performance aluminum alloys has become more prominent [10,11,12,13]. Chang Tianxing et al.’s research on the manufacturing technology of aluminum alloy fuse additive showed that the tensile strength and yield strength of 7055 aluminum alloy manufactured with GTAW additive were determined to be 230.7 MPa and 148.3 MPa [14]. The tensile strength and yield strength of 7075 aluminum alloy processed by arc additive manufacturing obtained by Hu Wenwen et al. were confirmed to be 269.29 MPa and 140.65 MPa [15]. It can be seen that there usually exists obvious softening problems and defects such as uneven structure and element segregation associated to the as-deposited specimens of 7-series high-strength aluminum alloy obtained by arc additive manufacturing, which inevitably resulted in low mechanical properties of the formed specimens [15]. Ma Guangyi et al.’s research on microstructure and mechanical properties of 7075 aluminum alloy fabricated by wire and arc additive manufacturing showed that the tensile strength of 7075 aluminum alloy were confirmed to be (279.4 ± 5.3) MPa as shown in Figure 1, and the other research results were shown in Figure 2 and Figure 3 [16].

Figure 1.
Tensile strength of deposited samples [16].

Figure 2.
Microhardness distribution of deposited samples [16].

Figure 3.
Metallographic and SEM images of 7075 aluminum alloy [16]. (a) Deposition characteristics of deposited layer in the stable section of arc additive manufacturing. (b) Metallographic structure diagram of deposited layer. (c) Microstructure of the deposited layer.
In view of the problem of low strength for high-strength aluminum alloy added by electric arc [17], this paper proposes to improve the strength of 7075 aluminum alloy made by electric arc addition through particle reinforcement, and 7075 aluminum alloy welding wire with TiB2 nanoparticle reinforcement phase is used as raw material. The effect of welding current on the macro forming, microstructure feature and mechanical properties of the deposited samples was studied through the verification of different process parameters, and the response of the macro forming, microstructure and mechanical properties of the deposited samples at different positions was further studied [18,19]. The research results are expected to have important significance for promoting the application of 7075 aluminum alloy arc additive manufacturing technology.
2. Materials and Methods
2.1. Test Materials
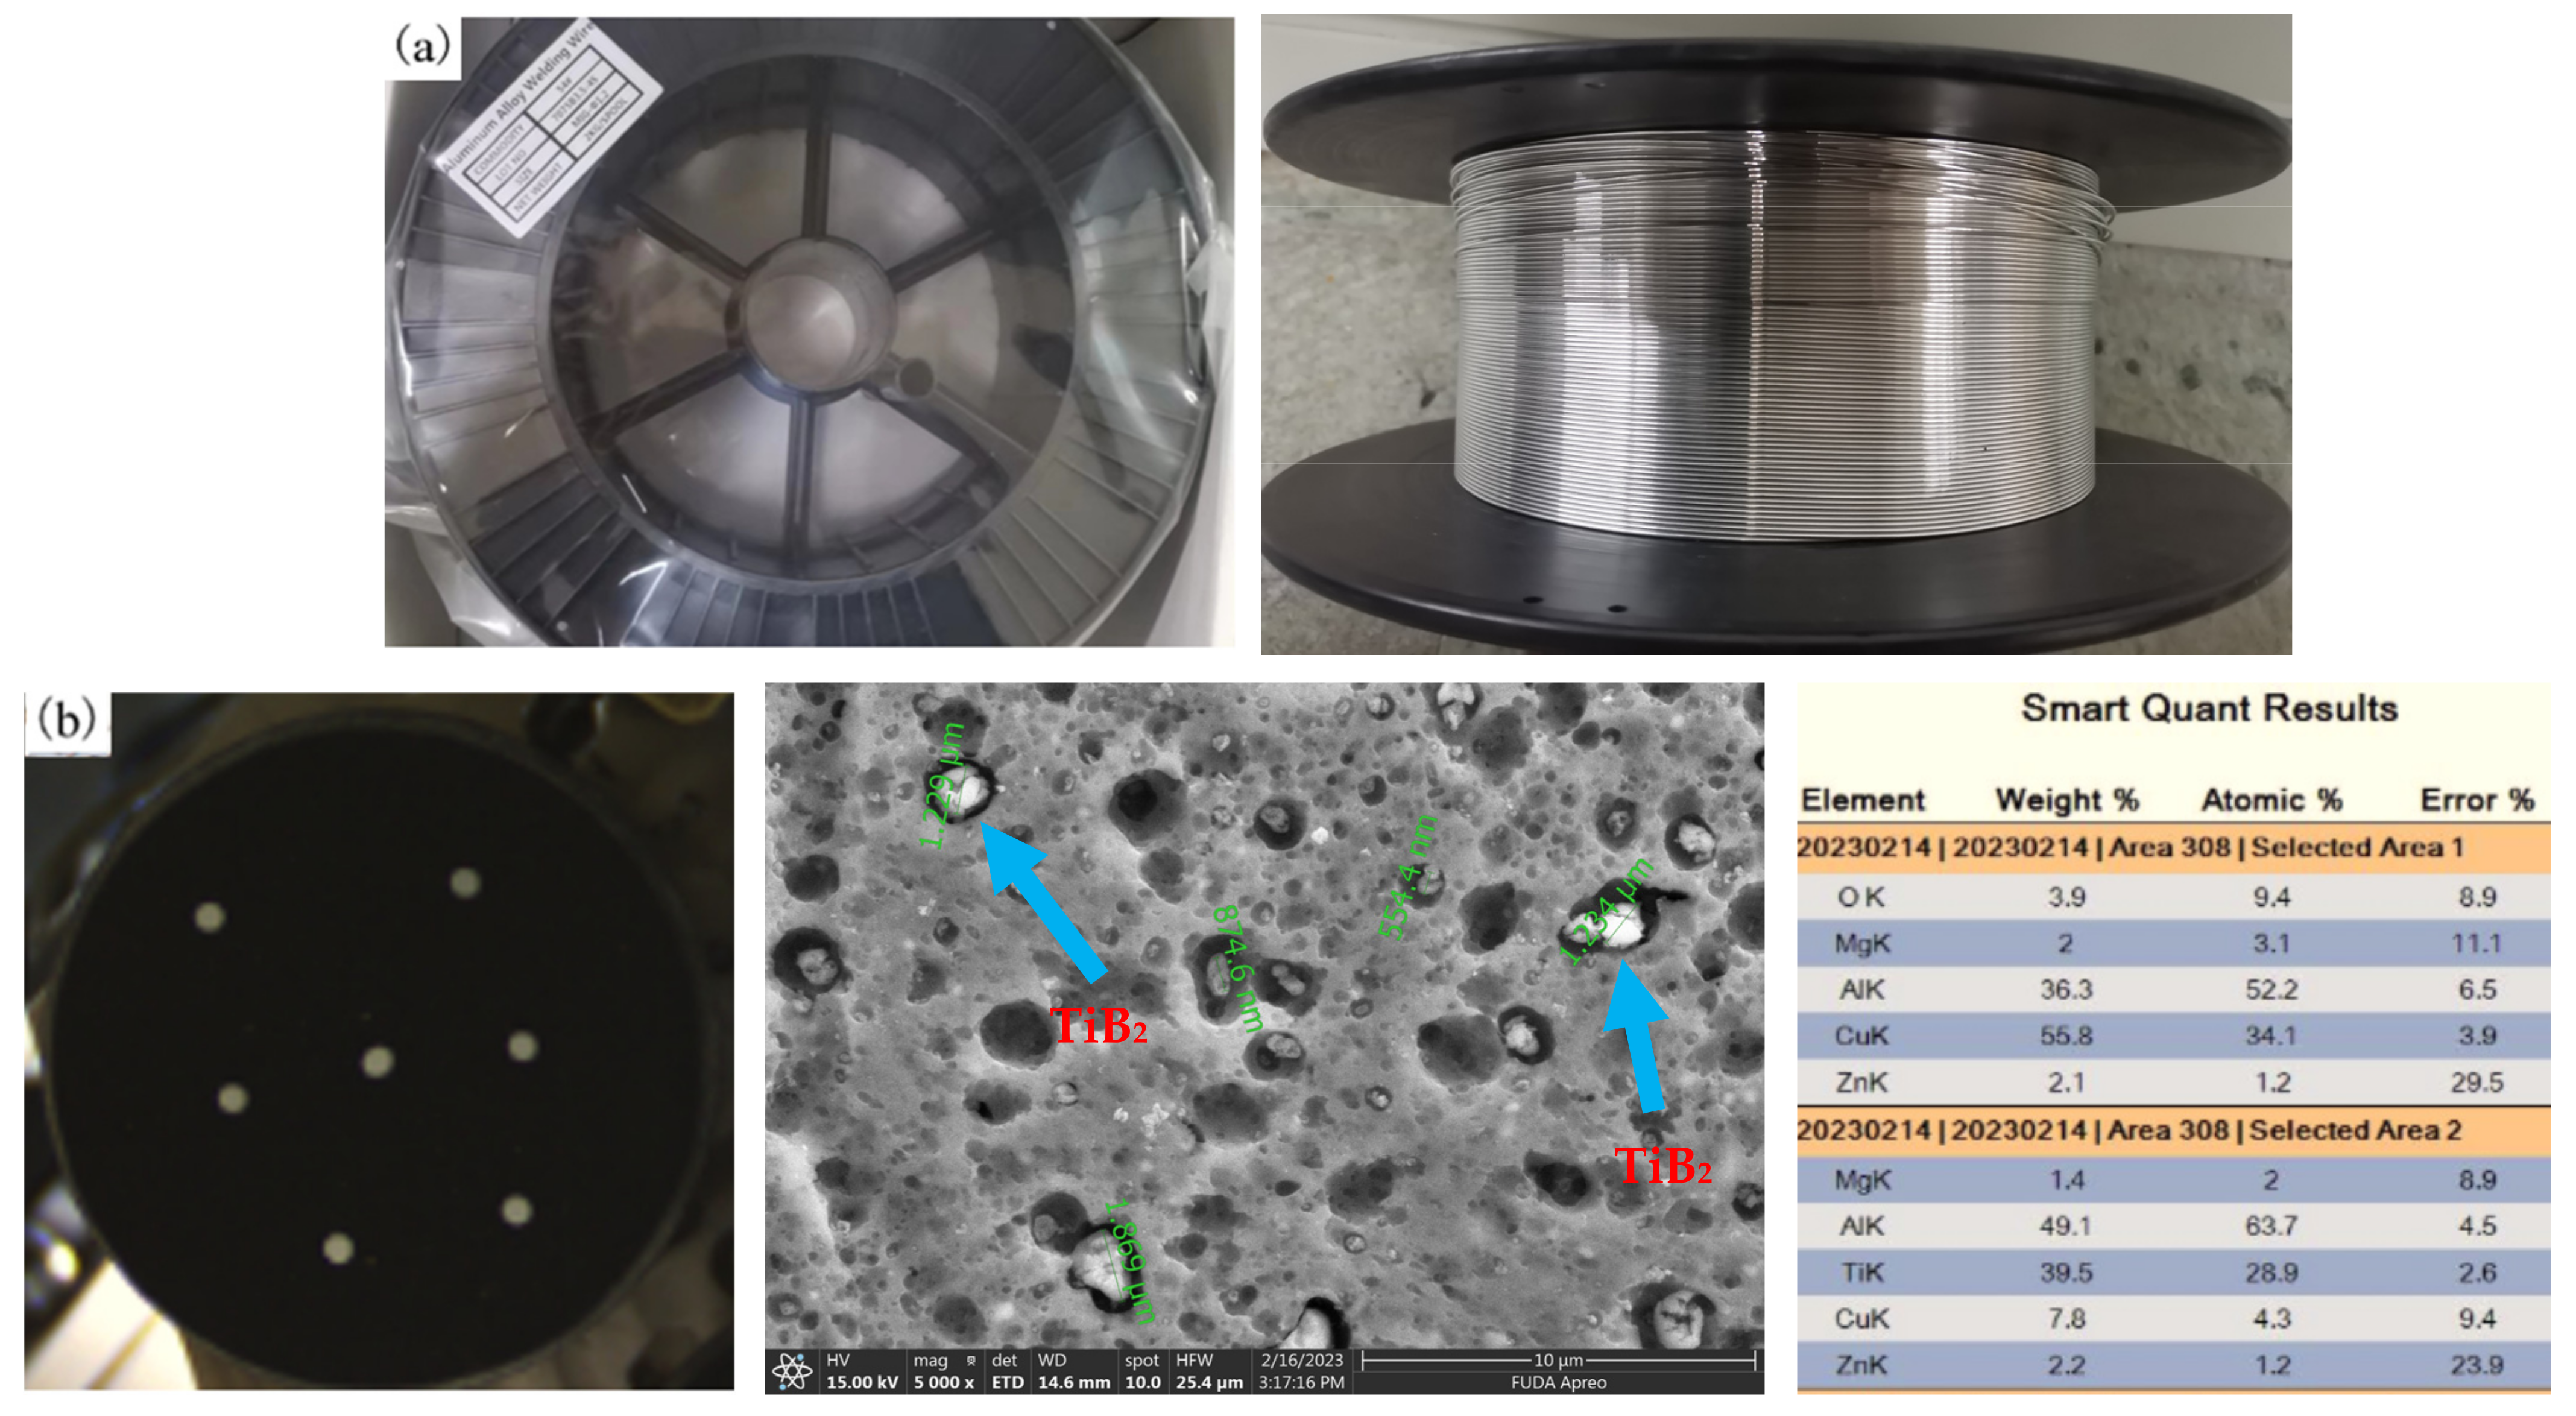
7075 aluminum alloy plate with dimension of 200 mm × 85 mm × 6 mm is selectedas the base plate for arc additive manufacturing test, and the welding wire brand is 7075 B3.5-4S. The welding wire diameter is φ 1.2 mm, and the reinforcing phase is TiB2 nanoparticles. The chemical composition of the welding wire is shown in Table 1. The macro images and SEM scanning images of the welding wire are shown in Figure 4 below. Through measurement, we found that the size of the TiB2 nanoparticle reinforced 7075 aluminum alloy is from 550 nm to 1800 nm.

Table 1.
Chemical composition of 7075 aluminum alloy welding wire (%, mass fraction).


Figure 4.
Macro images and SEM scanning images of welding wire. (a) Macro images of welding wire. (b,c) SEM scanning images of welding wire.
As a new type of ceramic reinforcing particle, TiB2 crystal has excellent mechanical properties and good elastic modulus, such as good thermal stability, high strength, high melting point and other advantages due to the strong combination of B-Ti ionic bond and B-B covalent bond, which can refine the internal structure of the deposition layer and improve the strength of its matrix.
2.2. Test Method
The tests were performed on the welding platform equipped with the variable-polarity TIG welding equipment produced by Japan’s Mitsubishi Corporation and the CNC machine tool, as shown in Figure 5. Before the additive manufacturing test, the surface of 7075 aluminum alloy substrate is polished to remove the oxide film on its surface, and the surface is wiped with non-woven cloth dipped with acetone reagent to remove other impurities. The processing parameters of arc additive manufacturing test are depicted in Table 2.

Figure 5.
Cross section and morphology of deposited layer. (a) Deposition characteristics of deposited layer in the stable section of arc additive manufacturing. (b) Appearance morphology of forming characteristics of arc deposited layer.

Table 2.
Arc additive manufacturing process parameters.
2.3. Analysis and Test Methods
2.3.1. Morphology and Microstructure
The specimens used for metallographic observation are cut at different positions of the deposited layer of the plate processed by arc additive manufacturing, and then polished and etched with abrasive paper and Keller reagent for 20 s. OLYMPUS DSX-510 metallographic microscope and HitachiS-4700 scanning electron microscope were used to observe the weld microstructure and phase distribution of the samples processed by arc additive manufacturing.
2.3.2. Mechanical Tests
The Vickers microhardness tester is used to measure the surface hardness of the sample at different positions. The loading force and time are 50 g and 10 s, respectively, and the interval between the measuring points is 1 mm. The tensile test is carried out on the universal testing machine (Model: INSTRON MODEL 1186). The tensile rate is 2 mm/min. After the tensile test, the fracture of the sample is observed and analyzed by the scanning electric microscope.
3. Results and Discussion
3.1. Macroforming Characteristics
The TIG arc additive manufacturing test was carried out with TiB2 nanoparticle reinforced 7075 aluminum alloy welding wire. The test parameters are shown in Table 2. Taking the welding current of 180 A as an example, the macro shape of the deposited sample is shown in Figure 1. It can be seen that the forming characteristics of the deposited layer produced by arc additive manufacturing have no obvious change after adding TiB2 nano-particles into the welding wire.
According to the forming characteristics, it can be divided into three areas along the scanning direction, they are the start section, the stable section and the end section, respectively. The start section is characterized by little heat accumulation, low temperature and poor fluidity of liquid aluminum alloy. Under the effect of liquid surface tension, the metal liquid solidifies in a spherical shape, so a raised unstable section will be formed in the start section. In the stable section, the molten pool can exist stably, and the surface of the deposited layer is relatively flat. The arc stability is high, and the formation can be stable. Figure 5a shows the characteristics of the deposited layer from the bottom to the top of the stable section of the TiB2 reinforced 7075 aluminum alloy welding wire TIG arc additive manufacturing test piece. It can be found that there are no obvious crack defects in the formed part, and no obvious porosity defects can be observed in the top area. Furthermore, no obvious porosity defects can be observed in the middle and bottom areas. In particular, there are a large proportion of porosity defects in the bottom area. The heat input of the arc is gradually reduced during the arc closing process, and the end of the formed part is melted due to the continuous heat effect. Then, the molten pool collapses under the action of the protective gas, and a slope end section is formed, as shown in Figure 5b.
3.2. Microstructure of Sedimentary Layer
The microstructure of the deposited specimen fabricated using a welding current of 180 A was studied. As shown in Figure 6a, the grain size at the top of the deposited specimen was the smallest compared with the other parts, and the grain structure was equiaxed crystal. The grain morphology was good, and the size was uniform. There were no pores distributed in the weld. At the same time, the grains were surrounded by inhomogeneous second phase, and some of the second phase had dissolved into the grain matrix under repeated thermal action. The second phase at the top grain boundaries was not uniformly distributed and mostly existed in the form of granules. At the same time, it could be observed that there were black granular precipitates in the grains. As shown in Figure 6b, the grain size increased, and the grain morphology was equiaxed. Larger pores appeared around the grains, affecting the as-deposited properties. The grain size of the bottom structure was significantly increased, as shown in Figure 6. Under the repeated heat action of the arc, the grain size of the bottom structure of the weld increased, resulting in malignant growth. The second phase was uniformly distributed at the grain boundaries, and there was black, granular second phase among the grains.

Figure 6.
Grain microstructure at different locations of the deposited layer fabricated using welding current of 180 A. (a) Grain microstructure at the top of the layer. (b) Grain microstructure in the middle of the layer. (c) Grain microstructure at the bottom of the layer.
In Figure 7a–c, grain structure morphologies obtained using different currents are compared, and it can be seen that the grain size increased with the increase in current. When the welding current was 180 A, the grain structure was equiaxed crystal, and there were many second-phase particles among the grains. When the welding current was 190 A, the size of equiaxed grains was increased to a certain extent, and there were a small number of second-phase particles among the grains. When the welding current was increased to 200 A, part of the grain size was elongated in the Z-direction, which affected the mechanical properties.

Figure 7.
Grain microstructure at the top of the layer fabricated using different currents. (a) Grain microstructure at the top (180 A). (b) Grain microstructure at the top (190 A). (c) Grain microstructure at the top (200 A).
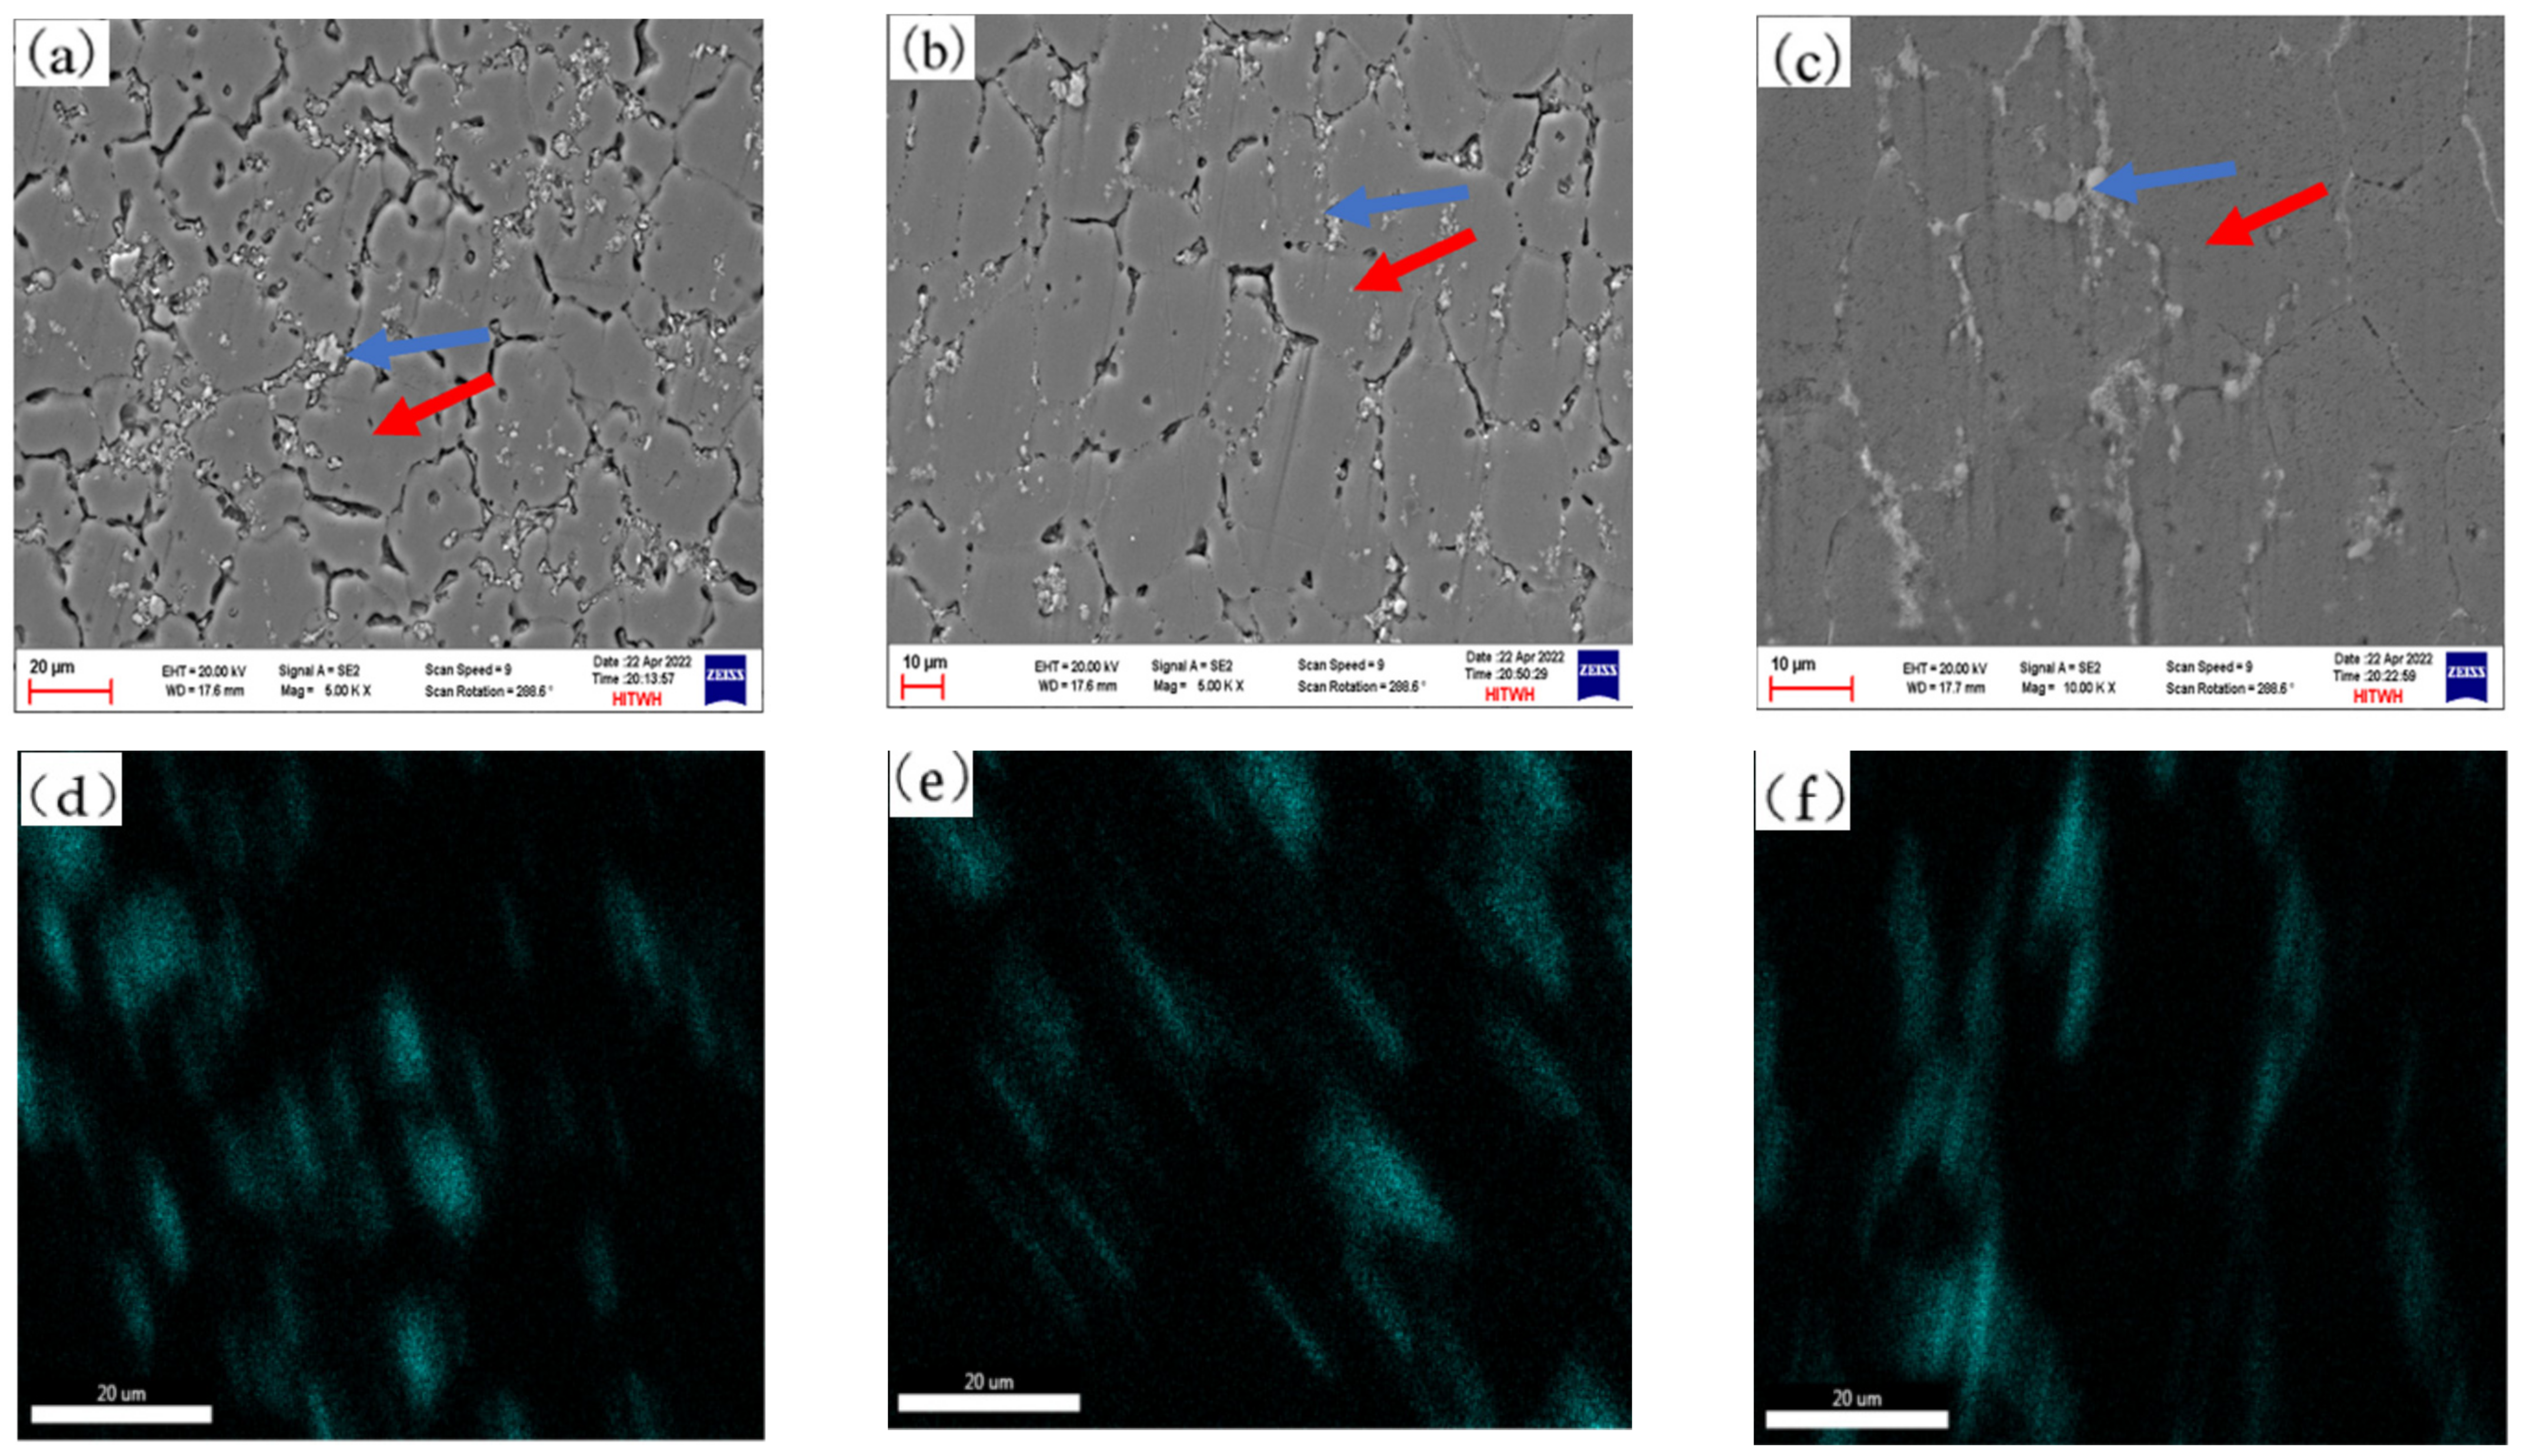
As shown in Figure 8a, the grain size at the top of the deposited layer is the smallest compared to the other parts, and it is a fine equiaxed crystal. There are second-phase particles in the grain and at the grain boundary, and most of them are in the form of grains. In the middle deposited layer, as shown in Figure 8b, the grain size is significantly increased, and the grain morphology is mainly columnar. In this region, the second phase particles are mainly distributed at the grain boundary, and a small amount of second phase particles exist in the grain. Under the repeated heat action of the arc, the grain size in the bottom area grows more obviously, and the second phase is evenly distributed at the grain boundary, as shown in Figure 8c.


Figure 8.
Microstructure in different regions of TiB2 nanoparticle-reinforced 7075 aluminum alloy welding wire TIG arc additive manufacturing specimen. (a) Microstructure at the top, (b) microstructure in the middle and (c) microstructure at the bottom of the manufactured sample. (d) Ti element distribution at the top, (e) Ti element distribution in the middle and (f) Ti element distribution at the bottom. (g) EDS spectrum of the area indicated by the blue arrow and (h) EDS spectrum of the area indicated by the red arrow.
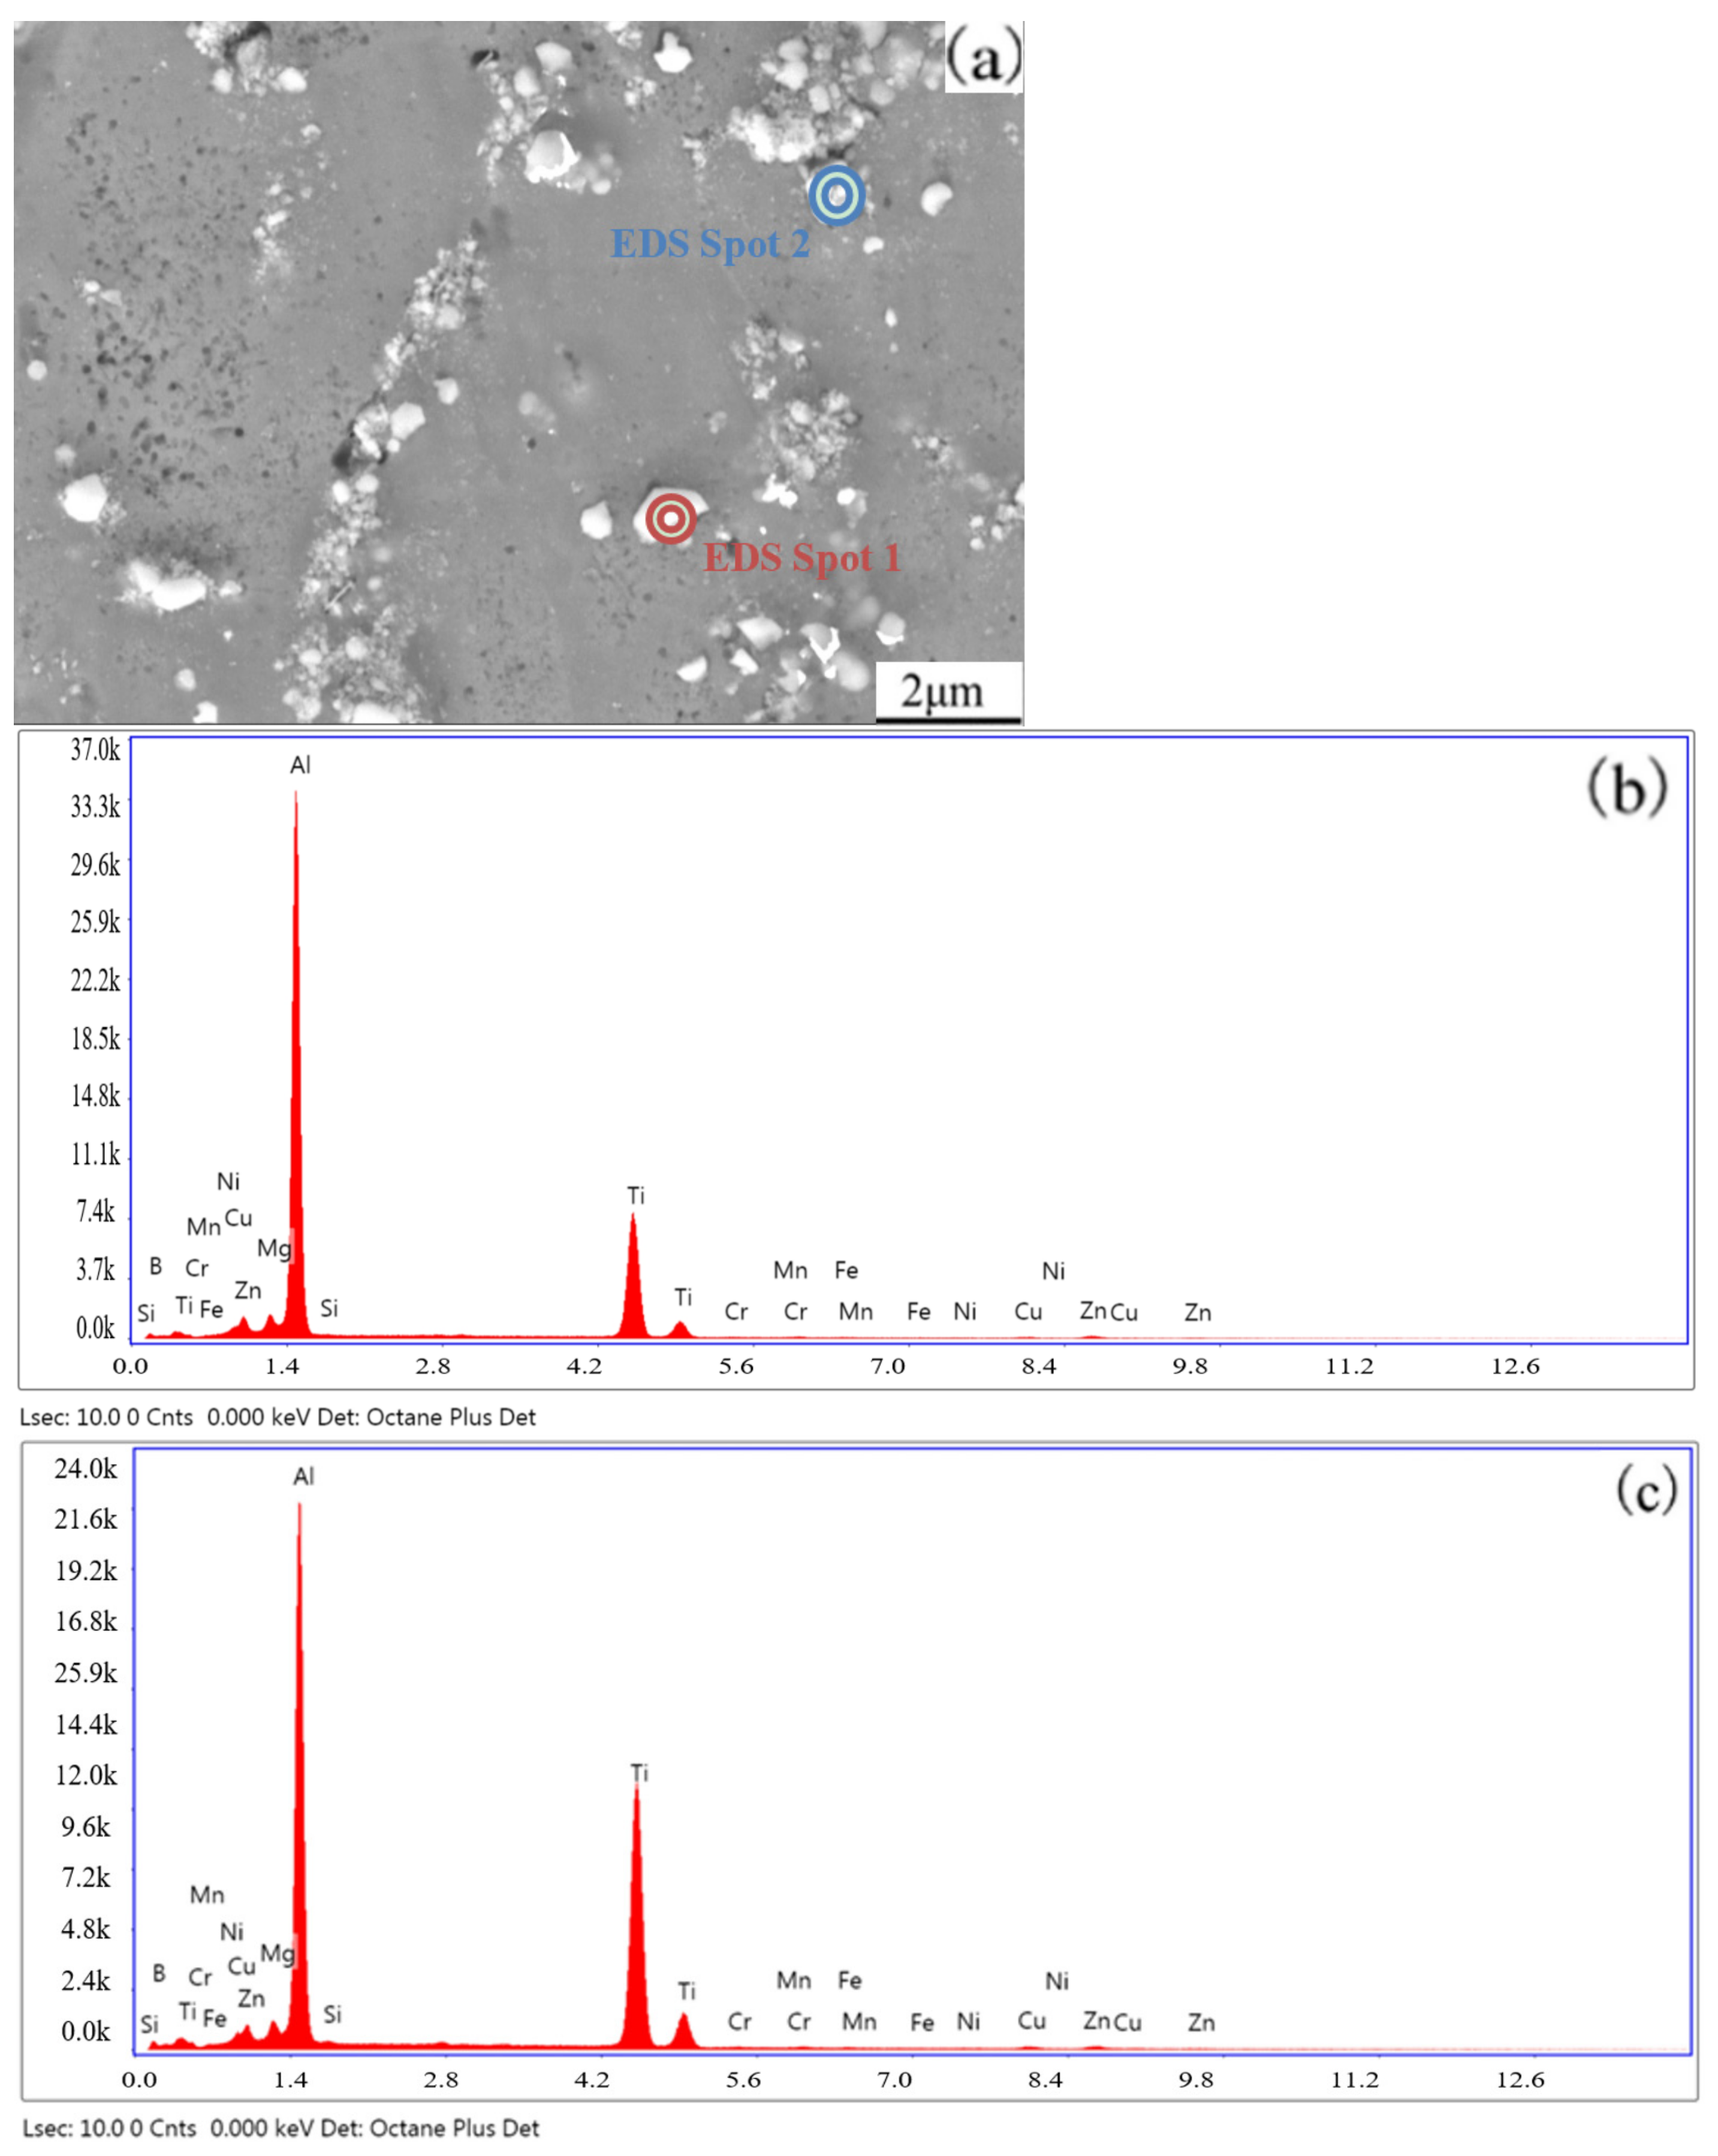
Figure 9 shows the microstructure of grain boundary and its vicinity in the top area. The energy spectrum analysis of the second phase particles at the grain boundary and inner the grain is carried out, and the results are shown in Table 3. From the scanning results of elements, it can be seen that Mg, Ti, Cu and Al elements are enriched. According to the chemical composition of the composite, it can be inferred that the accumulated Ti element is derived from the accumulated TiB2 reinforced particles. It happens that TiB2 nanoparticles are also added to the welding wire as the reinforcing phase in present study, shown in Figure 1. During the solidification process of weld, the TiB2 particles suspended in the molten aluminum alloy material become refractory compounds due to the refractory nature of Ti element, and act as impurity nuclei to promote the non-equilibrium crystallization and limit the grain growth, which lead to the refinement of the grain size. From the SEM image of the deposited state, it can be found that the second-phase particles with TiB2 as the main component are mostly distributed at the grain boundary, and a small amount of particles are embedded in the grain structure.

Figure 9.
SEM images of second-phase particles and corresponding EDS scanning results. (a) SEM image of second-phase particles. (b) EDS scanning result of spot 1. (c) EDS scanning result of spot 1.

Table 3.
Second-phase particle composition (wt.%).
The TiB2 particles in the deposited specimen for additive manufacturing are ceramic phase. Because of the high melting point and high thermal stability for TiB2 particles, they will not be affected during the arc additive process. TiB2 particles have high hardness and are not easily deformed, and their size is generally smaller than 2 μm. When dislocation moves, the dislocation can be hindered at the particle, and the dislocation ring around the particle will be generated under the action of the particle, which can increase the resistance of material deformation and strengthen the material.
The TiB2 particles with high melting point in the welding material are entered into the molten pool with the melting of the welding wire. These fine TiB2 particles can act as the particles of non-uniform nucleation of the aluminum alloy melt during the solidification process, which improves the nucleation rate of the crystal nucleus, and then makes the microstructure of deposition layer with relatively fine grain size.
3.3. Mechanical Tests
3.3.1. Tensile Properties
To study the variability of tensile strength in different parts of the formed parts subjected to different numbers of thermal cycles, one sheet tensile part was fabricated from the top, middle and bottom at each of the three different positions by wire-cutting in the deposited direction of the deposited specimen as shown in Figure 10a, and the specific shape and dimensions were shown in Figure 10b.

Figure 10.
Sampling position and size of tensile samples. (a) Sampling position of tensile samples. (b) Sampling size of tensile samples.
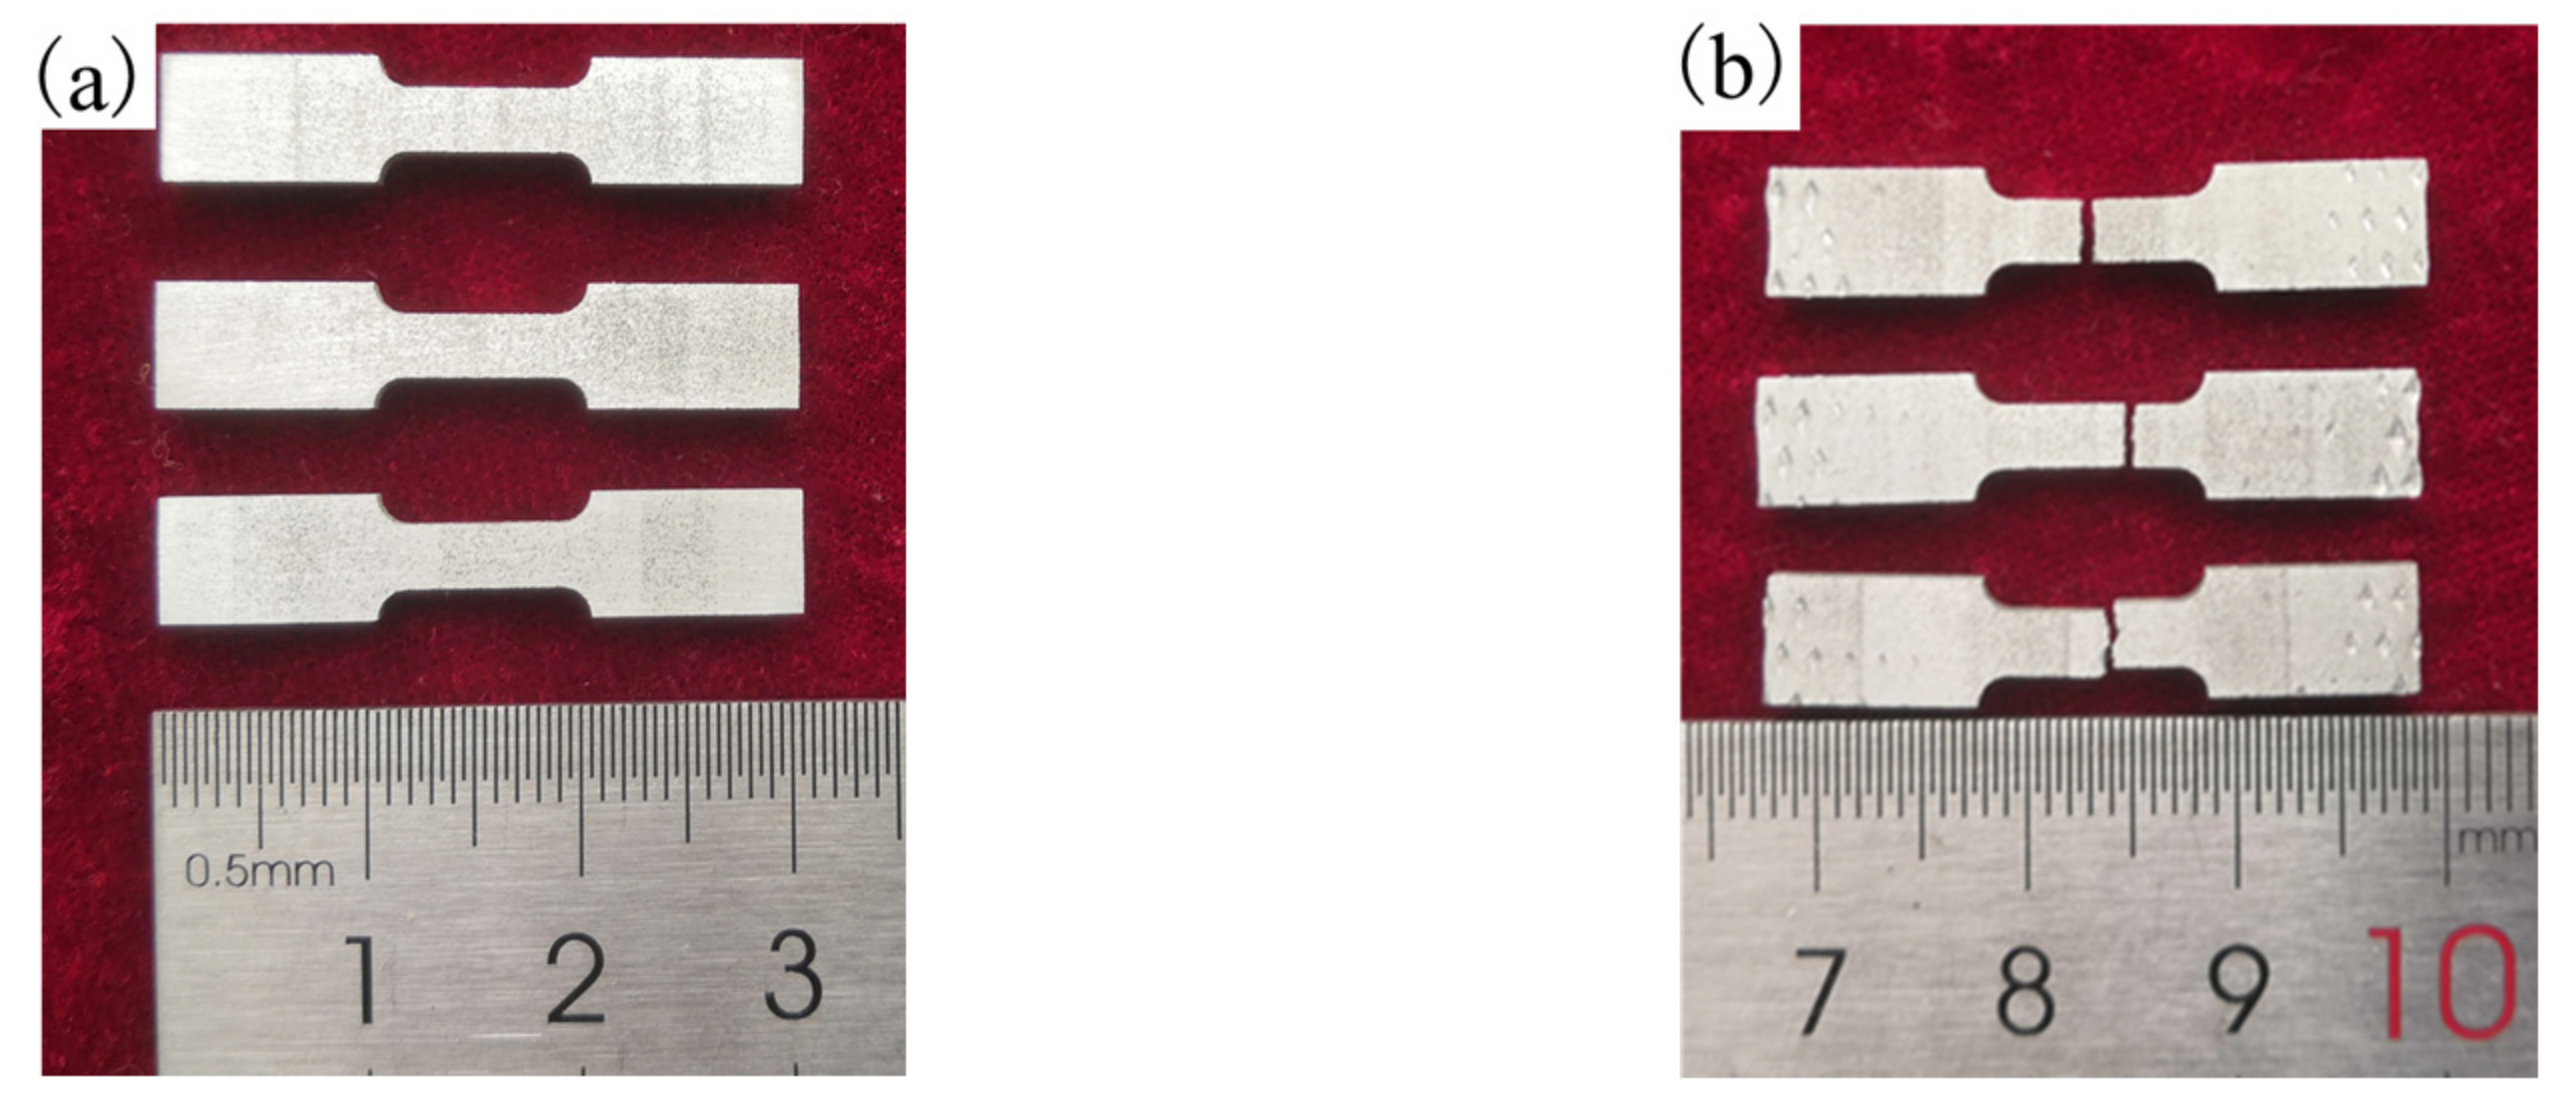
As shown in Figure 11, the dimensions of the stretched parts did not change significantly before and after fracture, and the macroscopic morphology also did not change significantly. It could be obtained that the fracture elongation were determined to be (9.5 ± 0.5)%.

Figure 11.
Comparison of macroscopic morphology before and after tensile tests. (a) Macromorphology before tensile tests. (b) Macromorphology after tensile tests.
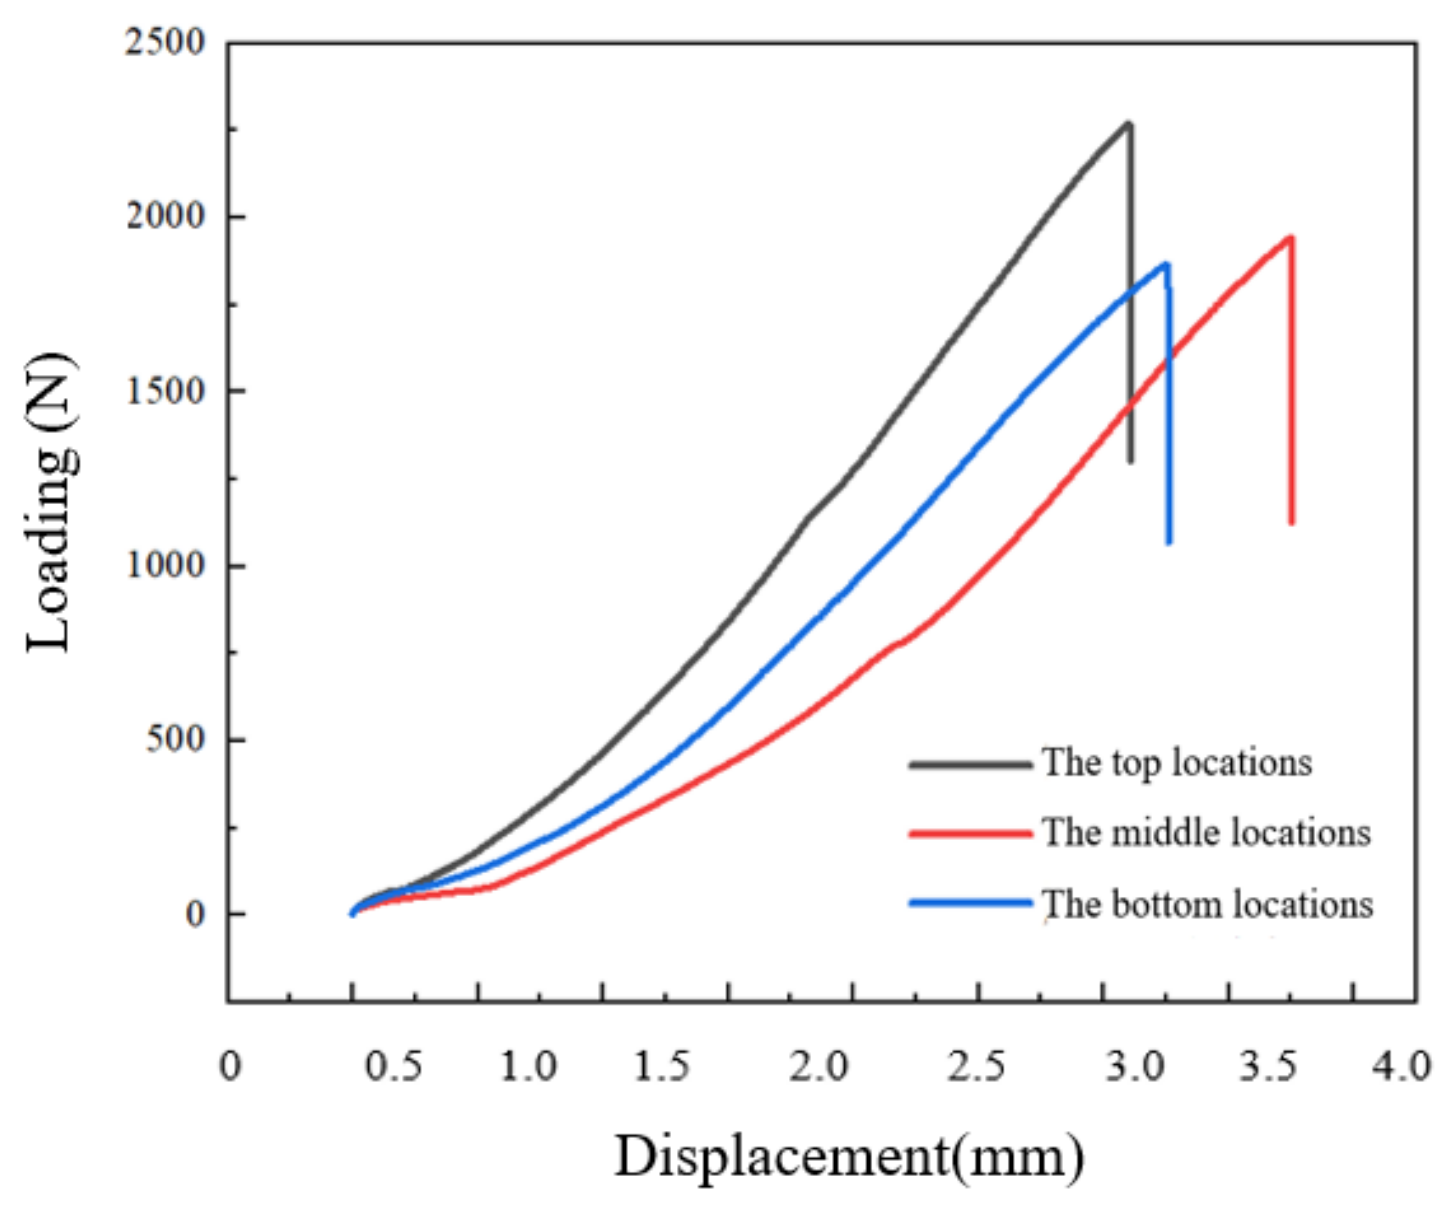
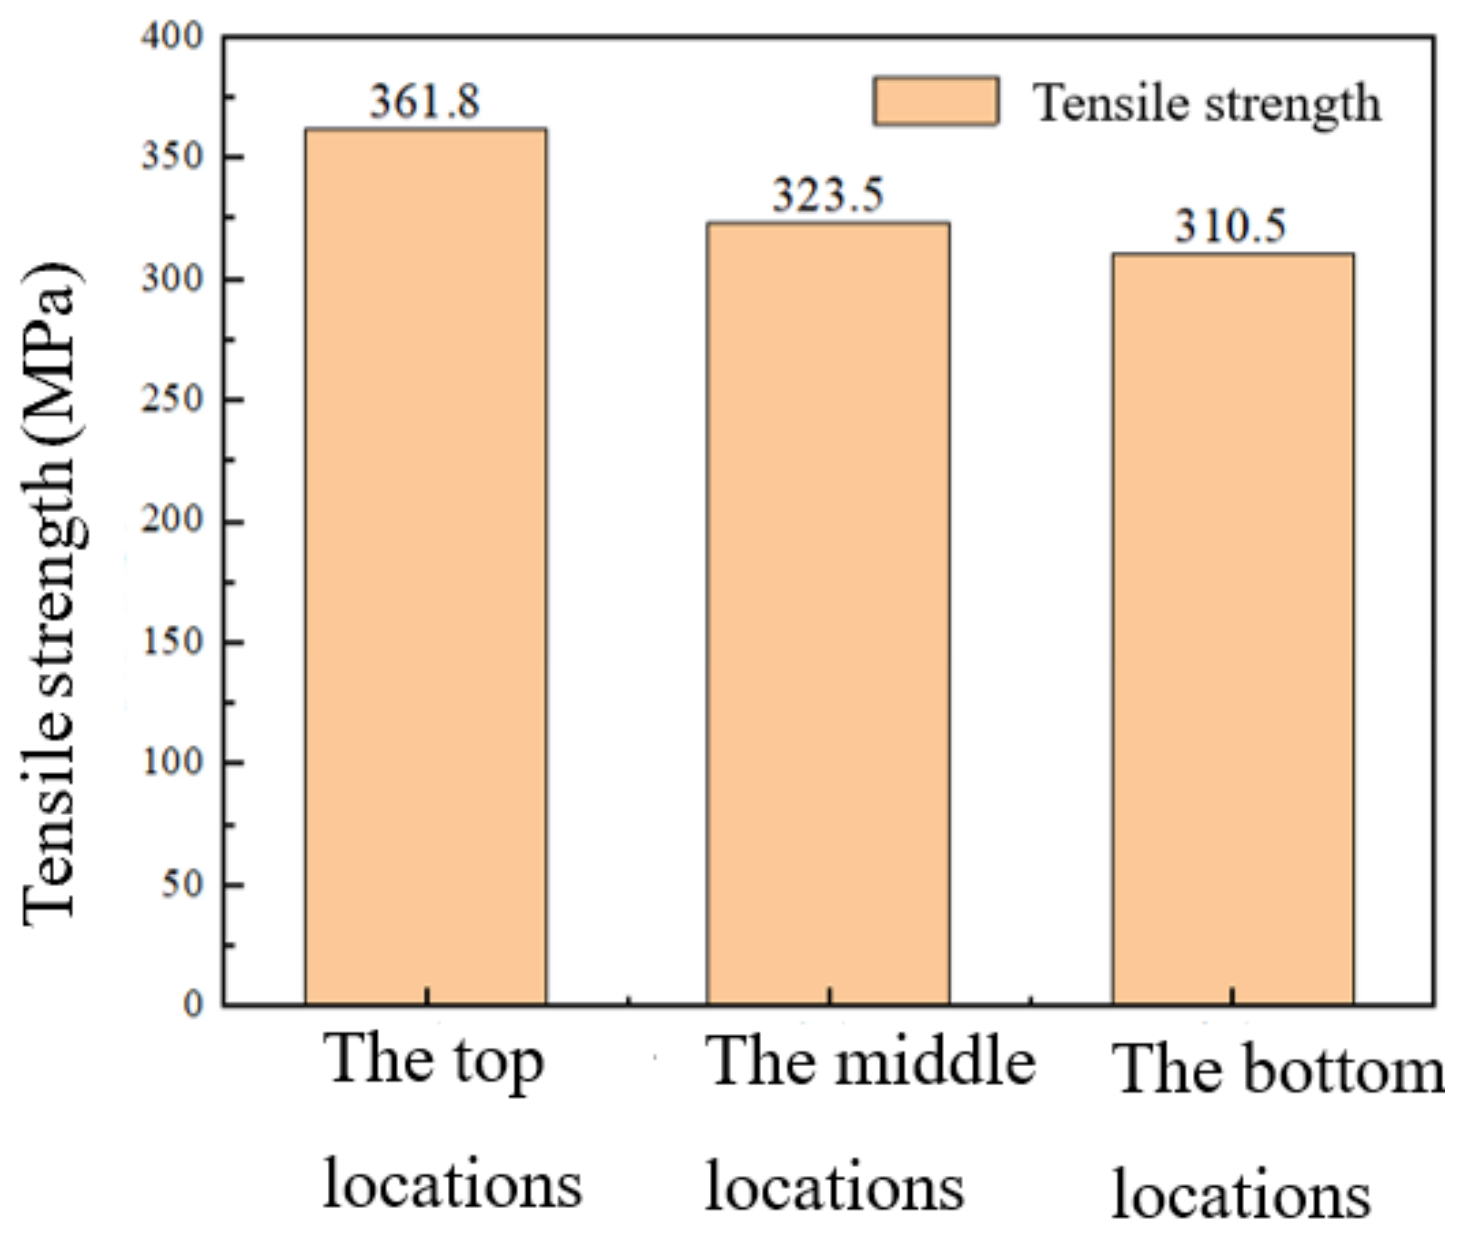
The deposited specimens with a welding current of 180 A were studied. From the displacement-load curve of three tensile specimens taken out of the deposited state specimens, as shown in Figure 12, and the tensile properties of different parts are significantly different. The top region has the most excellent tensile properties, the ordinary 7075 aluminum alloy wire of arc-enhanced manufacturing specimens. The tensile strength of the deposited layer utilizing 7075 aluminum alloy wire reinforced with TiB2 is shown in Figure 13, where the tensile strength of the top tissue reaches 361.8 MPa, while the tensile properties of the middle and bottom tissues are reduced. The tensile properties of the obtained tissues are all better than those of the deposited state of the ordinary 7075 aluminum alloy wire due to addition of the reinforced phase into the wire. The top crystal size was reduced by the different number of thermal cycles, and the slip spacing was smaller, indicating the dislocation hindrance was stronger and the organization was more uniform phenomenon. The top organization does not show obvious porosity defects, and the organization is dense and fine grained, and the mechanical properties are excellent. The reason for the different tensile properties of different parts is that arc additive manufacturing is a dynamic non-equilibrium melting and solidification process characterized by layer-by-layer deposition of the wire, and each location inside the deposited layer is subjected to multiple alternating heat effects with different degrees of superposition. The closer the area to the bottom, the more heat is applied, and the various elements in the wire are subjected to different degrees of thermal action and precipitation at different locations.

Figure 12.
Tensile curves for different locations of deposited samples.

Figure 13.
Tensile strengths for different locations of deposited samples.
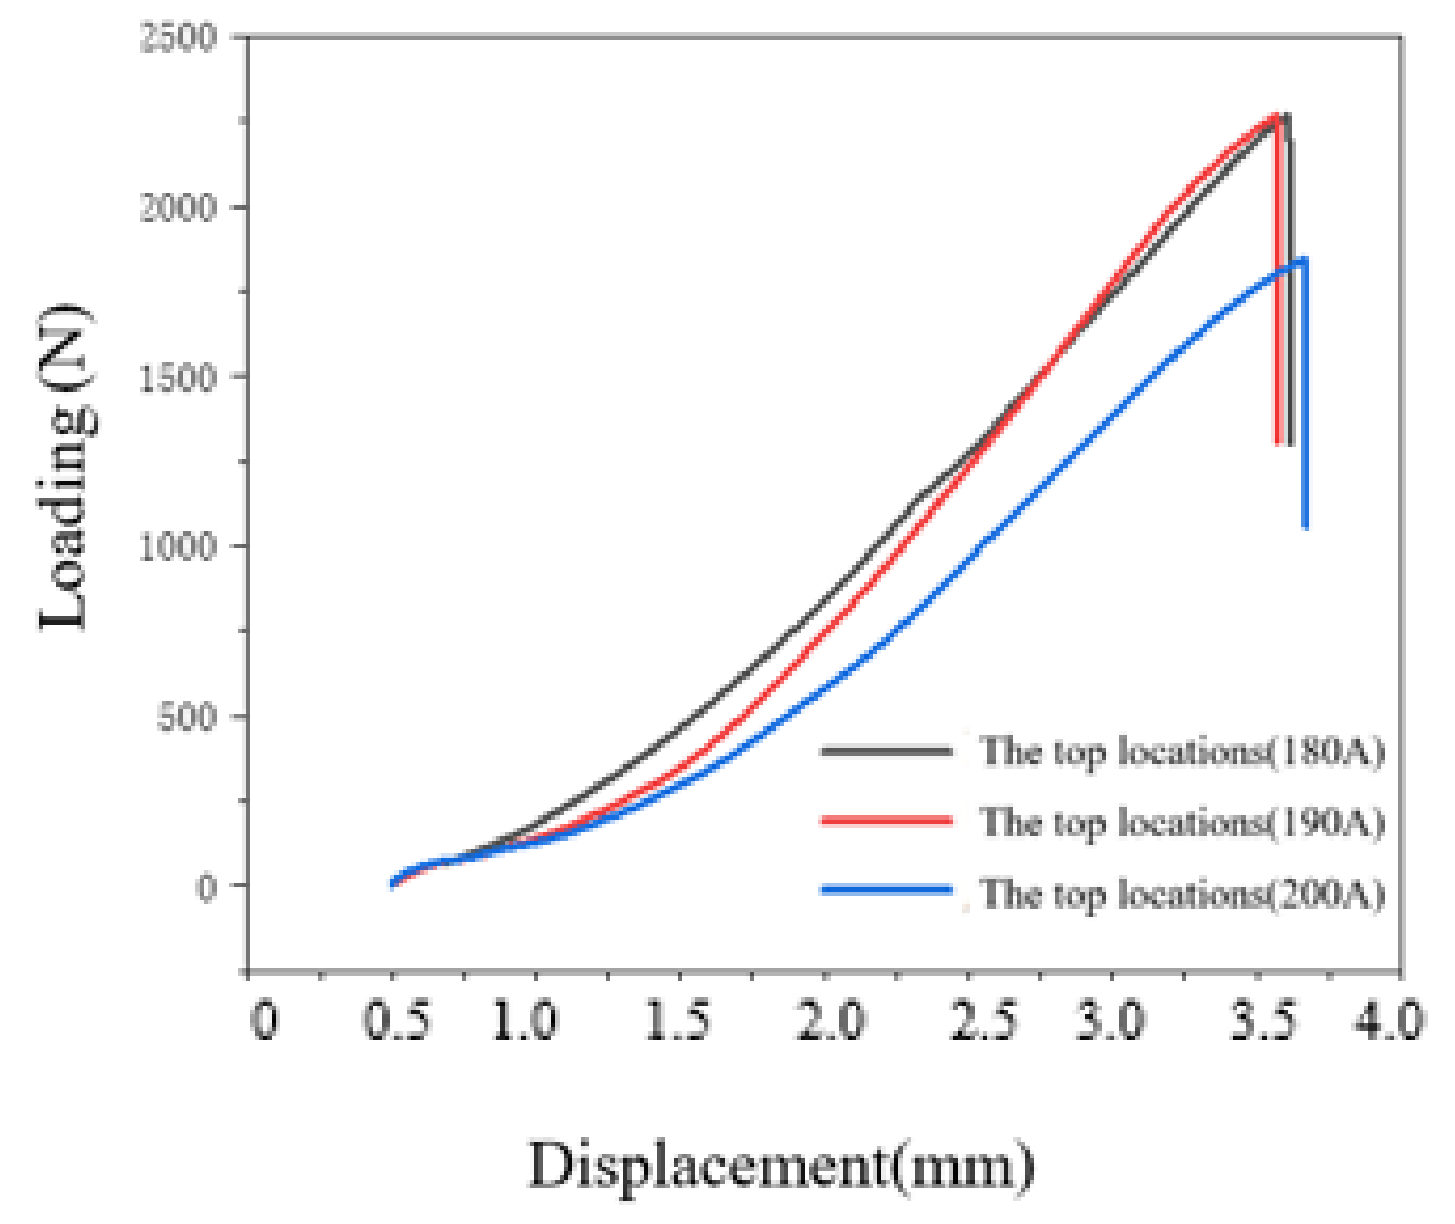
At the same time, the tensile properties of the specimens were also studied for different welding currents, and the tensile curves are shown in Figure 14. Though the grain size is relatively small, tensile experiments were performed on the upper layer organization with less porous. The results show that the tensile properties of the specimen are decreased with the increase in welding current. Tensile properties obtained at 180 A and 190 A welding current are closer. Whereases, the performance for 180 A specimen is still better than the 190 A specimen. When the welding current is further increased to 200 A, the tensile performance decline is increased, which is the worst of the three specimens. Preliminary analysis, the increases in heat input and in grain size in the welding process with the increase in welding current are responsible for a decline in mechanical properties. With the increase in heat input, the welding process is more prone to porosity due to the aluminum alloy solidification process is fast, and the existence of temperature gradient leads to most of the pores can not precipitate in time, thus remaining in the specimen, finally affecting the mechanical properties of the specimen.

Figure 14.
Tensile curves for top locations of deposited samples fabricated using different currents.
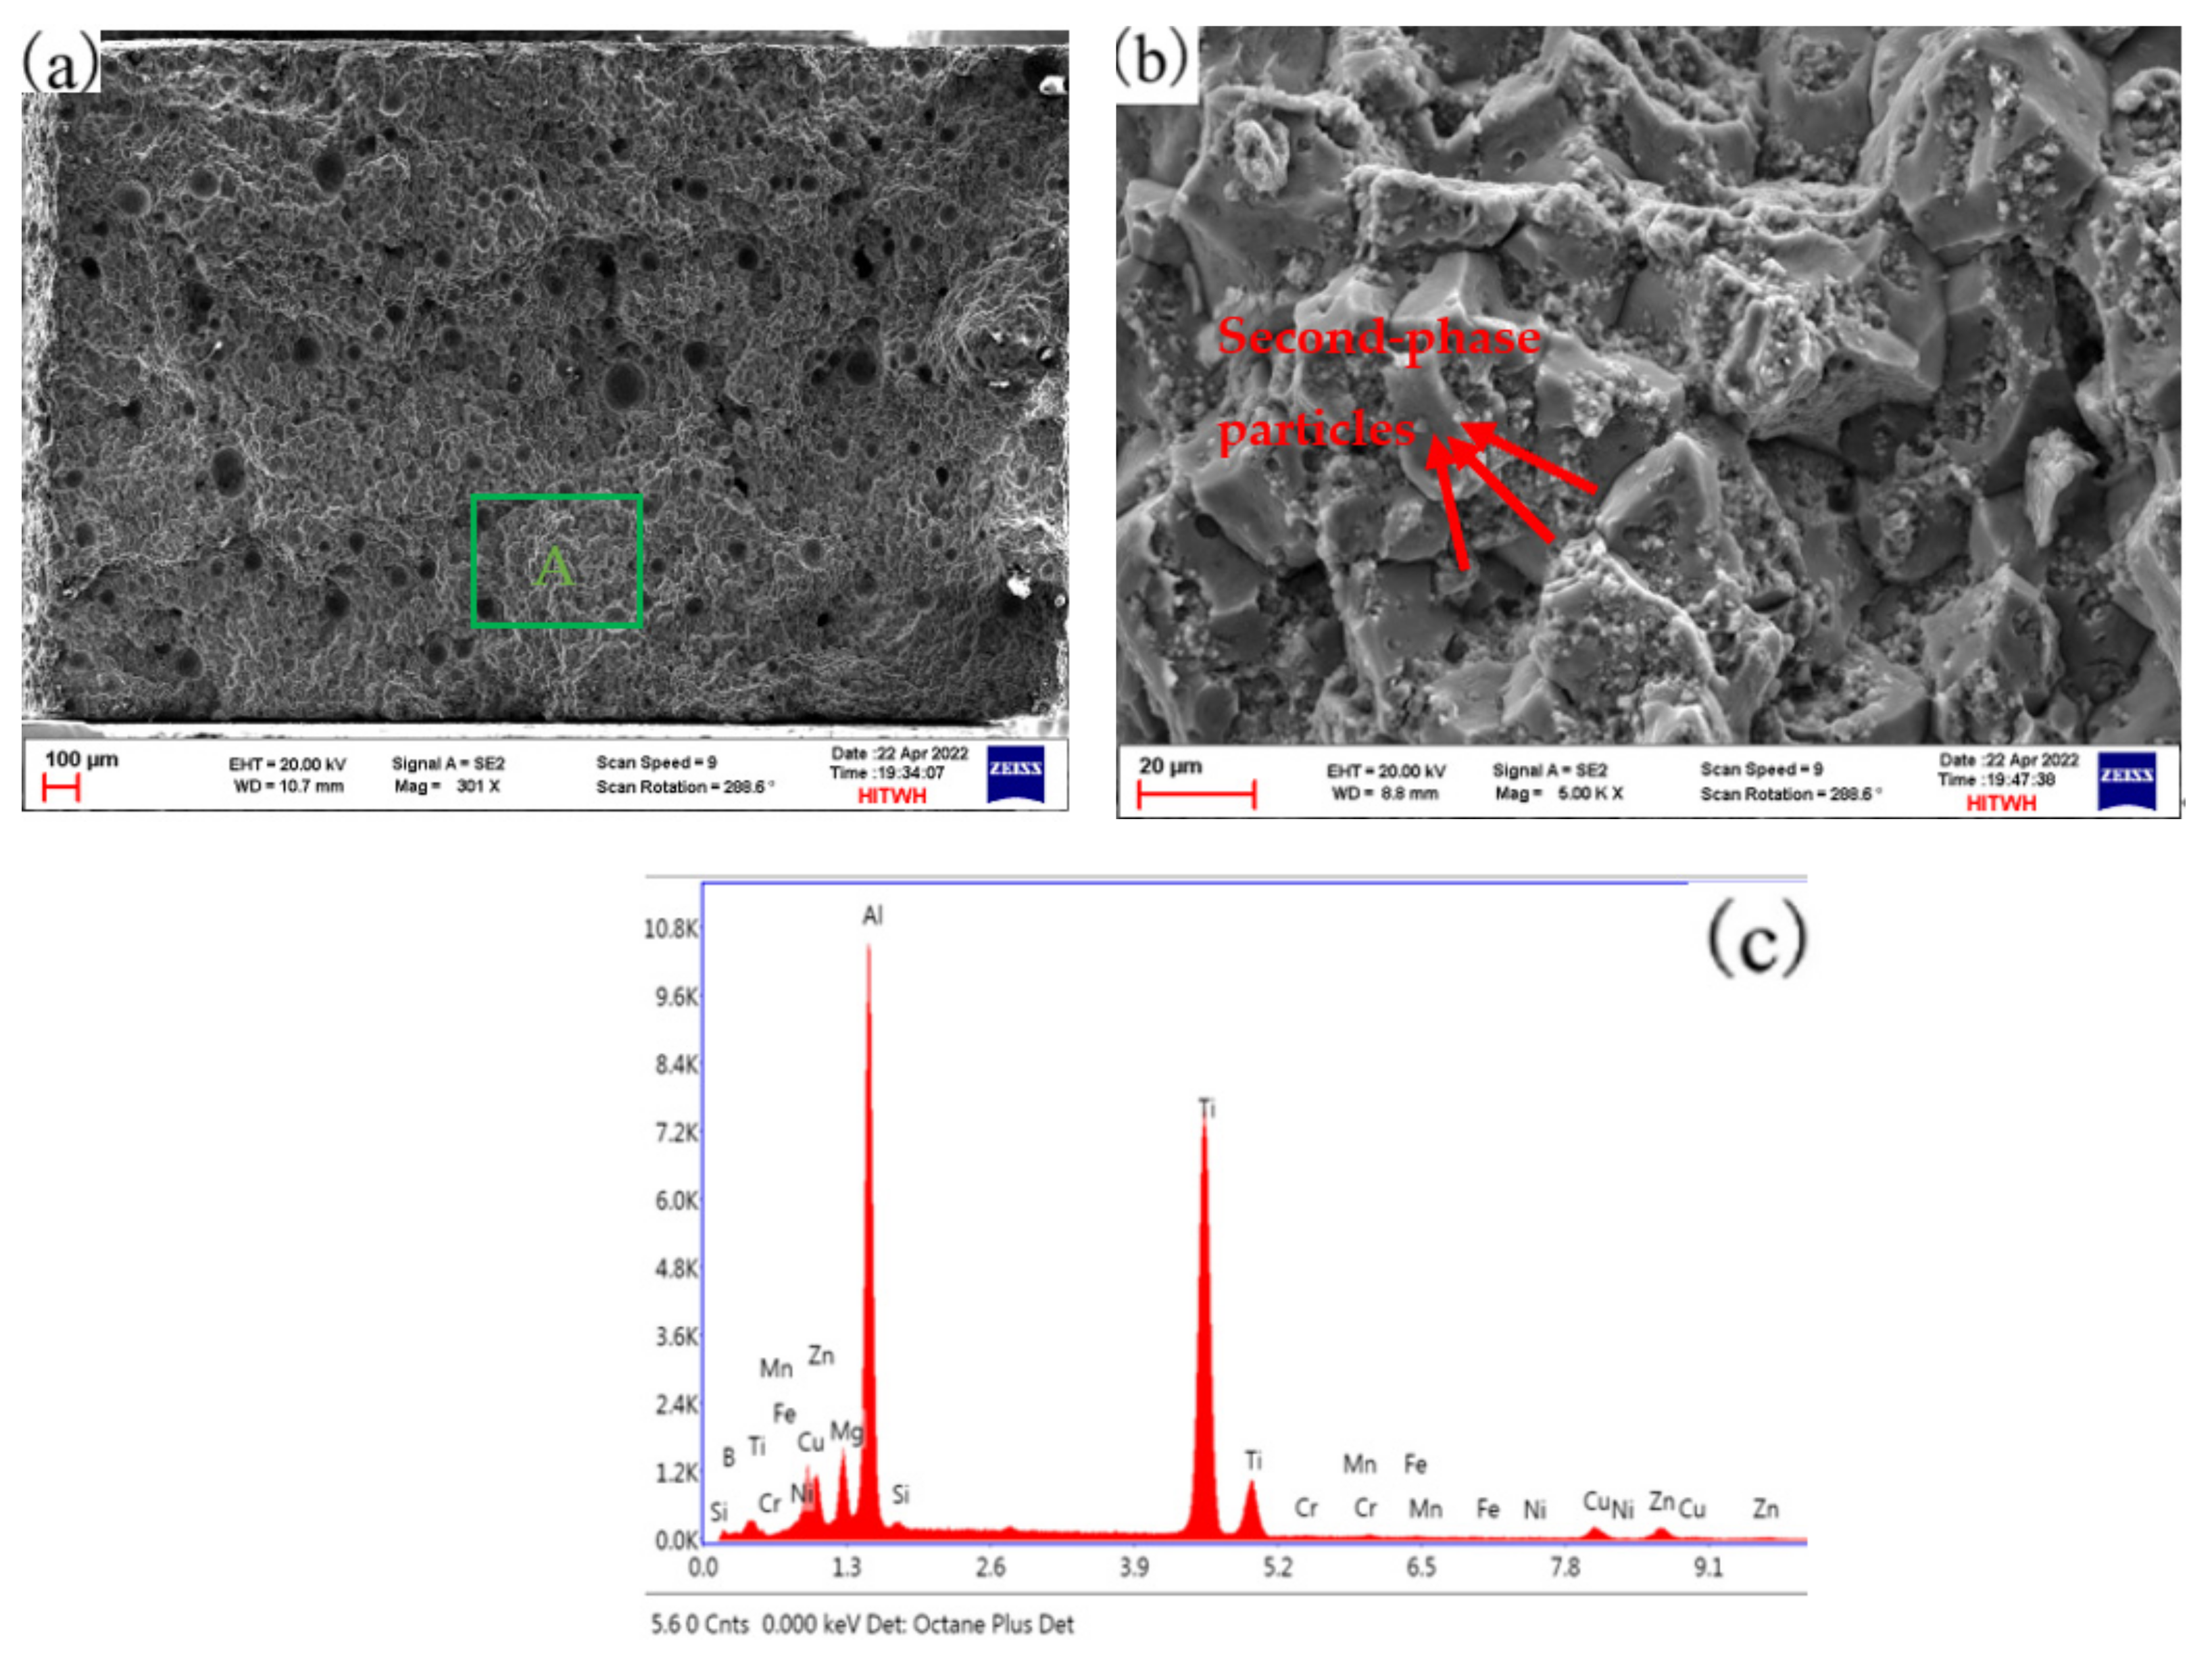
The fracture morphology of the tensile part of the bottom tissue of the deposited specimen fabricated with TiB2-reinforced 7075 aluminum alloy wire is shown in Figure 15. It can be observed that there is an aggregation of second-phase particles on the tensile fracture surface of the deposited specimen, and the fracture mode of the deposited specimen is brittle fracture along the grain boundary, with a small amount of granular TiB2 second phase at the grain boundary. However, a large number of pores can also be found on the fracture, which is consistent with the organization of the bottom of the deposited layer shown in Figure 15a, and the pore defects also reduce the plasticity of the joint. It can be seen that the addition of TiB2 nanoparticle-reinforced phase can improve the tensile properties of the deposited layer and reduce the plasticity. The presence of a small amount of granular second phase at the grain boundaries is shown in Figure 15b, the main element of the second phase is determined to be Ti from the EDS analysis results. The aggregation of second-phase particles is indicated by the red arrows in the Figure 15b below.

Figure 15.
EDS scanning result of fracture morphology of tensile sample. (a) Fracture morphology. (b) Fracture morphology of zone A. (c) EDS scanning result.
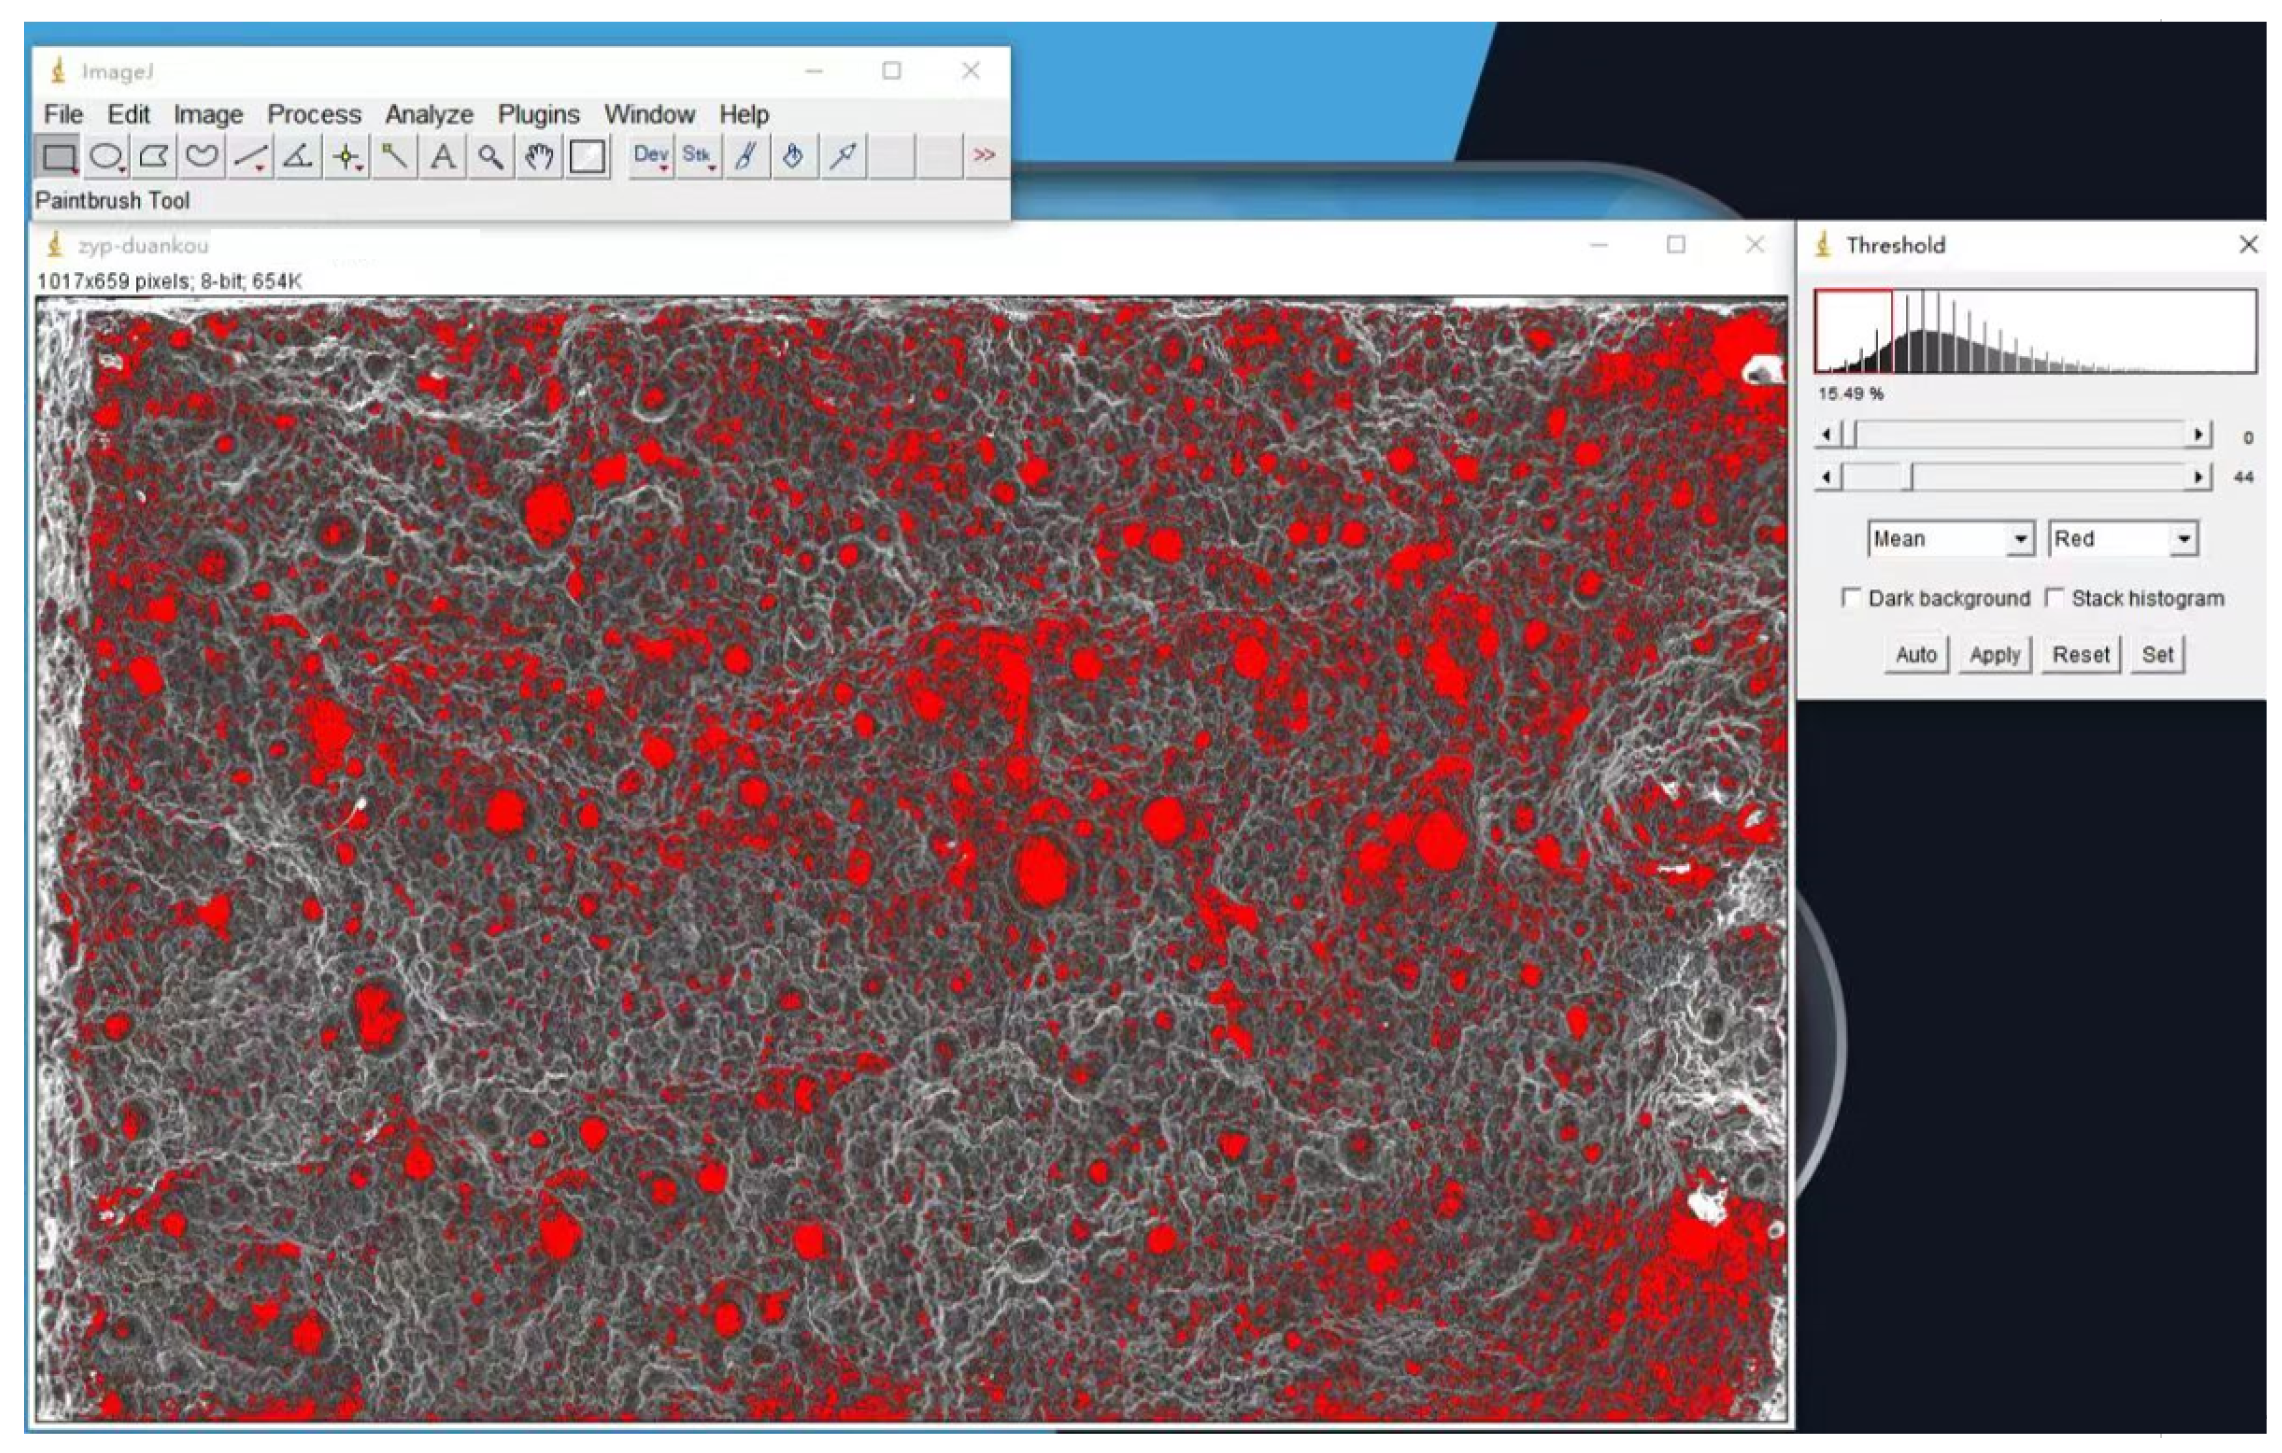
From the fracture morphology of tensile sample of the deposited part, it can be known that there are relatively obvious pores, which are mainly concentrated in the middle area of the deposited layer. As shown in Figure 16, the ImageJ software was utilized to calculate the porosity data in order to obtaining the porosity results with quantitative analysis, and the data was determined to be 15.64%. Generally, porosity is related to the process parameters such as welding current, welding speed and gas flow of shielding gas in the process of arc additive manufacturing. Therefore, the porosity of the internal structure of the deposited part will be reduced, and the mechanical properties of the deposited layer will be further improved in our subsequent study by optimizing the process parameters.

Figure 16.
Porosity results of quantitative analysis.
3.3.2. Microhardness
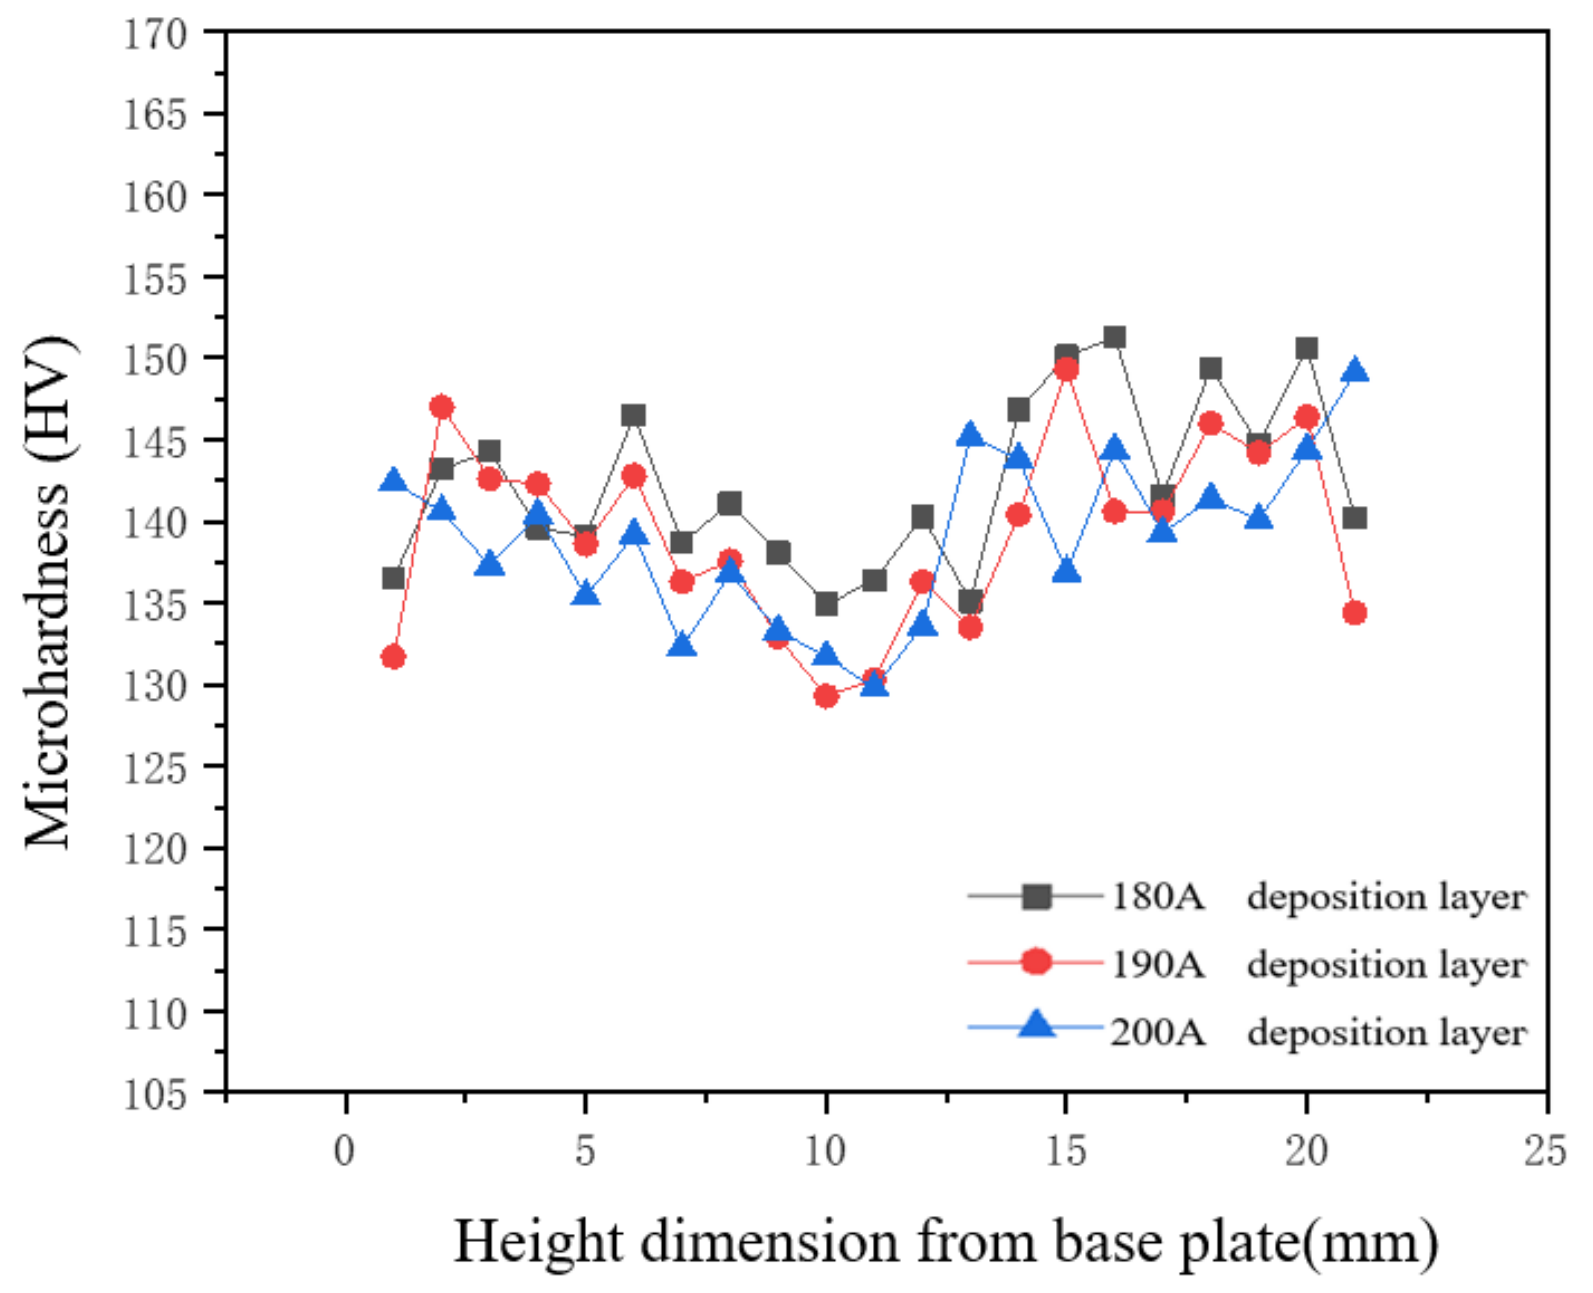
Hardness tests were performed on the deposited samples with intervals of 1 mm from high position to low position in the vertical deposition direction. The results of the hardness test are shown in Figure 17. The hardness at the upper part of the deposited state is meastured to be (145 ± 5) HV, which is higher compared to the middle and bottom regions with hardenss value of (135 ± 5) HV.Combined with the microhardness distribution in different regions, it can be seen that the top grain is fine and has the highest hardness value. While, the grains in the middle and bottom regions are significantly larger, the presence of TiB2 particles does not decrease the hardness significantly, indicating the obvious enhancement effect of TiB2 nanoparticles.

Figure 17.
Microhardness curves of deposited samples fabricated using different currents.
The results show that the hardness of the weld channel decreases as the current increases in the specimen. The increase of the welding current can result in the increase of heat input during the welding process. The grain is then accompanily coarsen and the mechanical properties are decreased. For a single specimen there is a significant decrease in hardness near the middle of the specimen. After analysis, it is believed that the number of pores in the middle of the weld channel is higher, which affects the mechanical properties of the welded parts. So that the organization of the hardness is decreased. After analyzing the metallographic organization, it is found that the grain organization at the top of the weld channel was relatively small. Since it moved toward the middle of the channel, the grain size started to become larger and the mechanical properties are decreased compared to the top.
4. Conclusions
- The TiB2-reinforced 7075 aluminum alloy wire was used for TIG arc additive manufacturing tests, and a well-formed 7075 aluminum alloy deposited specimens could be obtained utilizing the following welding parameters: welding current of 180 A, welding speed of 220 mm/min, wire feed speed of 100 mm/min., The top region of the tissue tensile strength and elongation can reach 361.8 MPa, and (9.5 ± 0.5)%,respectively, which is significantly higher than the tensile strength (279.4 ± 5.3) MPa of the 7075 aluminum alloy fabricated by arc-enhanced welding wire of the same material.
- The grains in the top region of the deposited parts are fine, and the second-phase particles are distributed at grain boundaries and within the grains. In the middle and bottom regions, the grains are significantly coarsened, and the second phase is mainly distributed at the grain boundaries. Tensile strength and hardness values in the top region are slightly higher compared to the middle and bottom regions.
- With the welding current increases, the heat input increases, and the number of pores inside the deposited parts is also increased, which lead to the increase of grain size, and decrease of the mechanical properties.
- The addition of TiB2 nanoparticles in the wire possesses a strengthening effect on the deposited layer. While, the plasticity is reduced accompanily.
Author Contributions
Methodology, T.J. and C.L.; validation, writing—original draft preparation, Z.S.; writing—review and editing, T.W.; supervision, Z.W. All authors have read and agreed to the published version of the manuscript.
Funding
This research was funded by Shandong Provincial Key Research and Development Program.
Data Availability Statement
Not applicable.
Conflicts of Interest
The authors declare no conflict of interest.
References
- Shin, J.; Kim, T.; Kim, D.E.; Kim, D.; Kim, K. Castability and mechanical properties of new 7xxx aluminum alloys for automotive chassis/body applications. J. Alloy. Compd. 2016, 698, 577–590. [Google Scholar] [CrossRef]
- Furong, C.; Guowei, L. Research Status of 7075 Aluminum. Alloys 2019, 1, 1–7. [Google Scholar]
- Taşdemir, A.; Nohut, S. An overview of wire arc additive manufacturing (WAAM) in shipbuilding industry. Ships Offshore Struct. 2020, 16, 797–814. [Google Scholar] [CrossRef]
- Zhang, X.S.; Chen, Y.J.; Hu, J.L. Recent advances in the development of aerospace materials. Prog. Aerosp. Sci. 2018, 97, 22–34. [Google Scholar] [CrossRef]
- Tabernero, I.; Paskual, A.; Álvarez, P.; Suárez, A. Study on arc welding processes for high deposition rate additive manufacturing. Procedia Cirp. 2018, 68, 358–362. [Google Scholar] [CrossRef]
- Sokoluk, M.; Cao, C.; Pan, S.; Li, X. Nanoparticle-enabled phase control for arc welding of unweldable aluminum alloy 7075. Nat. Commun. 2019, 10, 98. [Google Scholar] [CrossRef] [PubMed]
- Köhler, M.; Fiebig, S.; Hensel, J.; Dilger, K. Wire and Arc Additive manufacturing of aluminum. Metals 2019, 9, 608. [Google Scholar] [CrossRef]
- Attaran, M. The rise of 3-D printing: The advantages of additive manufacturing over traditional manufacturing. Bus. Horiz. 2017, 60, 677–688. [Google Scholar] [CrossRef]
- Williams, S.; Martina, F.; Addison, A.; Ding, J.; Pardal, G.; Colegrove, P. Wire + arc additive manufacturing. Mater. Sci. Technol. 2016, 32, 641–647. [Google Scholar] [CrossRef]
- Oropeza, D.; Hofmann, D.C.; Williams, K.; Firdosy, S.; Bordeenithikasem, P.; Sokoluk, M.; Liese, M.; Liu, J.; Li, X. Welding and additive manufacturing with nanoparticle-enhanced aluminum 7075 wire. J. Alloy. Compd. 2020, 834, 154987. [Google Scholar] [CrossRef] [PubMed]
- Morais, P.; Gomes, B.; Santos, P.; Gomes, M.; Gradinger, R.; Schnall, M.; Bozorgi, S.; Klein, T.; Fleischhacker, D.; Warzcok, P.; et al. Characterisation of a high-performance Al-Zn-Mg-Cu alloy designed for wire arc additive manufacturing. Materials 2020, 13, 1610. [Google Scholar] [CrossRef] [PubMed]
- Klein, T.; Schnall, M.; Gomes, B.; Warczok, P.; Fleischhacker, D.; Morais, P. Wire-arc additive manufacturing of a novel high-performance Al-Zn-Mg-Cu alloy: Processing, characterization and feasibility demonstration. Addit. Manuf. 2021, 37, 101663. [Google Scholar] [CrossRef]
- Klein, T.; Schnall, M. Control of macro-/microstructure and mechanical properties of a wire-arc additive manufactured aluminium alloy. Int. J. Adv. Manuf. Technol. 2020, 108, 235–244. [Google Scholar] [CrossRef]
- Chang, T.; Liu, B.; Fang, X.; Huang, K.; Lu, B. Development status and prospect of aluminum alloy additive manufacturing. Aerosp. Mater. Technol. 2022, 52, 76–84. [Google Scholar] [CrossRef]
- Zhao, P.; Tang, C.; Pu, Z.; Li, Y.; Li, S. Microstructure and tensile properties of 5356 aluminum alloy made by TIG arc additive. J. Weld. 2020, 41, 65–70. [Google Scholar] [CrossRef]
- Ma, G.; Liu, D.; Shi, J.; Wang, R.; Niu, F.; Wu, D. Microstructure and mechanical properties of 7075 aluminum alloy prepared by wire and arc additive manufacturing. Aeronaut. Manuf. Technol. 2022, 65, 14–19. [Google Scholar] [CrossRef]
- Bermingham, M.; StJohn, D.; Easton, M.; Yuan, L.; Dargusch, M. Revealing the mechanisms of grain nucleation and formation during additive manufacturing. JOM J. Occup. Med. 2020, 72, 1065–1073. [Google Scholar] [CrossRef]
- Kannan, A.R.; Kumar, S.M.; Pramod, R.; Kumar, N.P.; Shanmugam, N.S.; Palguna, Y. Microstructure and mechanical properties of wire arc additive manufactured bi-metallic structure. Sci. Technol. Weld. Join. 2020, 26, 47–57. [Google Scholar] [CrossRef]
- Winterkorn, R.; Pittner, A.; Lahnsteiner, R.; Rethmeier, M. Wire Arc Additive Manufacturing of High Strength Al-Mg-Si Aluminum Alloys Using Similar Filler Wires with Addititional Grain Refiner. IIW-Annu. Assem. 2019, 4, 46–60. [Google Scholar]
Disclaimer/Publisher’s Note: The statements, opinions and data contained in all publications are solely those of the individual author(s) and contributor(s) and not of MDPI and/or the editor(s). MDPI and/or the editor(s) disclaim responsibility for any injury to people or property resulting from any ideas, methods, instructions or products referred to in the content. |
© 2023 by the authors. Licensee MDPI, Basel, Switzerland. This article is an open access article distributed under the terms and conditions of the Creative Commons Attribution (CC BY) license (https://creativecommons.org/licenses/by/4.0/).

