Article

Carbon Nanotubes (CNTs) Reinforced CoCrMoNbTi0.4 Refractory High Entropy Alloy Fabricated via Laser Additive Manufacturing: Processing Optimization, Microstructure Transformation and Mechanical Properties

1
School of Mechanical Engineering and Mechanics, Ningbo University, Ningbo 315211, China
2
Ningbo Institute of Materials Technology and Engineering, Chinese Academy of Sciences, Key Laboratory of Aero Engine Extreme Manufacturing Technology of Zhejiang Province, Ningbo 315201, China
3
Institute of Welding and Remanufacturing, Ningbo Branch of Chinese Academy of Ordnance Science, Ningbo 315103, China
*
Authors to whom correspondence should be addressed.
Crystals 2022, 12(11), 1678; https://doi.org/10.3390/cryst12111678
Submission received: 29 October 2022 / Revised: 15 November 2022 / Accepted: 16 November 2022 / Published: 21 November 2022
(This article belongs to the Special Issue Advances of High Entropy Alloys)

Abstract

:
Refractory high-entropy alloys (RHEAs) exhibit outstanding softening resistance and thermal stability at elevated temperatures. Unfortunately, poor ductility at room temperature has remained the critical issue for their processability and practical application. In this study, an original-type fabrication method of RHEA was proposed, using multi-walled carbon nanotubes (MWCNTs) to enhance the alloy prepared via laser melting deposition (LMD) technology. The processing optimization, microstructure evolution and mechanical properties were systematically investigated for LMD processing of CNTs/CoCrMoNbTi0.4 RHEA. The results have shown that CNTs/CoCrMoNbTi0.4 RHEA have a polycrystalline structure (BCC, HCP, and TiC). As the optimal LMD-processing parameters of laser linear energy density of 3.6 J/mm were applied, owing to the formation of high densification and an ultrafine microstructure, the fully dense LMD-processed alloy exhibited high microhardness of 1015 HV0.5, fracture strength of 2110.5 MPa, and fracture strain of 2.39%. The solid solution strengthening and load transfer are considered as the main strengthening mechanisms occurring simultaneously during compressive tests at room temperature, leading to excellent mechanical properties of LMD-processed CNTs/CoCrMoNbTi0.4 RHEA, which explores the potential application of RHEAs.

1. Introduction

High entropy alloys (HEAs), an emerging generation of metallic alloys, were originally proposed by Yeh et al. [1] The design concept violates the design of traditional metallic alloys, which is composed of at least five principles in equal or nearly equal atomic ratios (wt.%). Refractory high-entropy alloys (RHEAs) [2,3], as a subclass of HEAs, consisting of high-melting-point elements (W, Mo, Nb, Hf and Ta) and additions of Cr, Co, Ti or Si elements, etc., have a superior microstructure and mechanical properties [4,5,6]. RHEAs could have broadened application prospects in aerospace, nuclear industry, weapons and other important industrial fields, which have been attracting much attention among researchers. For example, Senkov et al. [7] investigated that the WTaMoNb alloy prepared by vacuum arc melting (VAM) technology does not merely maintain the phase structure and microstructure stability at 1400 °C, but has 405 MPa compressive yield strength, 600 MPa compressive strength and more than 25% compressive deformation at 1600 °C. The elevated temperature mechanical properties of the WTaMoNb alloy are much better than that of nickel-based superalloys [8]. Wang et al. [9] confirmed that the methods of mechanical alloying (MA) and spark plasma sintering (SPS) were used to synthesize the MoNbTaTiV alloy, with fine grains, homogeneous microstructure and excellent mechanical properties.
However, the fabrication of RHEAs, currently, mainly relies on VAM or SPS, failing to process RHEAs with a simple procedure and complicated structure in size and shape. Luckily, laser-melting deposition (LMD) technology is one of the advanced additive manufacturing technologies developed based on laser melting and rapid prototyping and has obvious advantages in addressing it [10,11]. Dobbelstein et al. [12] initially and successfully adopted LMD to produce the TiZrNbHfTa alloy, with a specimen of equiaxed grain shape and a bcc single phase exhibiting an elevated hardness of 509 HV0.2. However, there are still microcracks, pores and other defects in the RHEAs prepared by LMD technology, which seriously affect the properties of alloy. Therefore, effective defect control in the laser-additive manufacturing process of RHEAs is key to obtaining high performance and large size alloy. At present, the improvement of the quality of the formed parts mainly focuses on optimization of component design [13,14,15,16], combination with the heat treatment process [17] and introduction of second phase materials [18,19,20,21]. Carbon nanotubes (CNTs) have large specific strength, low density and a nano effect [22], and have emerged as one of the most promising candidates since Iijima first discovered them in 1991 [23]. Studies have shown that CNT can effectively inhibit the diffusion of microcracks and maintain plasticity while improving the strength of the alloy when rapid laser-forming CNTs reinforced ceramic, amorphous, superalloy and other composites [24]. Therefore, there is great potential to introduce CNTs as reinforcement into the preparation of RHEAs.
In this work, the manufacturing process of LMD-formed CNT-reinforced RHEA composites were proposed. This process can effectively improve the poor plasticity at room temperature and the difficulty in forming large-size and complex structural parts in the manufacture of RHEAs. There is still not much known on the effect of CNT additions for the properties of RHEAs at room and elevated temperature. The processing optimization, microstructure evolution and mechanical properties were systematically investigated for LMD-processing of CNTs/CoCrMoNbTi0.4 refractory high entropy to establish a relationship among processing parameters, surface roughness, microstructures and properties.

2. Materials and Methods

Co, Cr, Mo, Nb and Ti basic elements powder with a purity of 99.9% were used in this study, with a spherical shape particle and ranging from 45 μm to 150 μm. Table 1 shows the fundamental property of the elements powder. Multi-walled carbon nanotubes (XFNANO, Nanjing) with a purity of 95%, outer diameter of 10~30 nm and length of 10~30 μm, were one of the raw materials of the component of CNTs/CoCrMoNbTi0.4 nanocomposite powder. MWCNTs were uniformly dispersed into a mixed powder by ultrasonic vibration and mechanical ball milling to obtain CNTs/CoCrMoNbTi0.4 (0.8 wt.% CNTs and 99.2 wt.% CoCrMoNbTi0.4), representing in Figure 1. The optimal ball-processing parameters were determined as follows: ball-to-powder of 1:2; rotation speed of 400 rpm; milling time of 10 h. Among these, after each 2 h, the interval of 30 min was set for the purpose of avoiding damaging the structural integrity of CNTs due to overheating of the powder.
A set of the LMD system was used, too, in this study, which consists of a semiconductor Ro fin FL 040 continuous fiber laser, with focal laser spot diameter of 3 mm, a maximum power output of 4000 W and a wavelength of 1070 ± 10 nm, and a coaxial powder-feeding nozzle. Additionally, the working chamber filled with high-purity argon prevents the molten pool metal from oxidation, during the laser melting deposition process. A series of preliminary exploratory experiments were conducted to optimize the range of processing parameters. Based on the outputs of preliminary experiments, the optimized LMD-based processing parameters were selected as follows: the scanning speed was set at 5 mm/s, the powder feed rate was fixed at 1.0 g/min and the laser power range was accepted from 1400 W to 2200 W. In order to accurately calculate the laser energy input, the linear energy density was used in this work, with a unit of J/mm, which can be expressed as follows:
E l = P V
where P   is the laser power with a unit of W, V   is the laser scanning velocity with a unit of mm/s. Accordingly, five different laser power of 1400 W, 1600 W, 1800 W, 2000 W and 2200 W were chosen, corresponding to the linear energy densities of 2.8 J/mm, 3.2 J/mm, 3.6 J/mm, 4.0 J/mm and 4.4 J/mm.
Before the experiment, the TC4 substrate removed the oxide layer with sandpaper and cleaned it with anhydrous ethanol. After the LMD process, all specimens were cut from the TC4 substrate via wire electro discharge machining (EDM) for the following microstructure and performance tests; then, those were ground to 5000 and polished according to standard procedures. The structural integrity of MWCNTs was conducted by a Renishaw in Via Reflex Raman spectroscopy, with a laser wavelength of 532 nm. The microstructure and phase composition of the alloy samples were characterized via a D8 ADVANCE DAVINCI X-ray diffractometer (XRD) with Cu Kα radiation at 40 kV and 40 mA. The scan mode was continuous and the scan speed was set at 0.1°/s with 2θ range from 20° to 100°. The structure and morphology of the molten pool of specimens were detected through a LEICA 1750 M optical microscope (OM) and FEI Quanta FEG 250 scanning electron microscopes (SEM) equipped with Energy Dispersive X-ray Spectroscopy (EDS) for examining the chemical elements distribution of specimens.
The microhardness test was carried out on a RDHVS-100Z Vickers hardness tester using an applied load of 500 g and a dwell time of 15 s, along the building direction of specimens. Nine measurements were obtained from each specimen, and its average value was regarded as the experimental hardness value. The compression test according to the standard procedures was performed on the Zwick/Roell Z100 equipped with an extensometer. The cylindrical specimens were 3 mm in diameter and 6 mm in height at room temperature (25 °C), with an initial strain rate of 10−3 s−1. The fracture surface of the compressive samples was examined using an SEM operated in the secondary electron mode.

3. Results and Discussion

3.1. Densification Behavior and Phase Analysis

Using the density of pure elements (Table 1) and alloy composition, one can use the mixture rule to estimate the density of alloy of the same composition. According to the theoretical density of the alloys, it can be calculated by the formula [25]:
ρ o t h e r =   c i A i   c i A i ρ i
Here, c i , A i and ρ i are the atomic fraction, atomic weight and density of elements of i, respectively. After calculating, the ρ o t h e r value is 8.62 g/cm3. Besides, the actual density of the formed parts prepared though LMD based on the Archimedes drainage method, and the relative density of alloys, can be obtained by the ratio of actual density to relative density; the calculation results are shown in the Table 2. It can be seen from Table 2 that the energy density of the laser has a great influence on the relative density of the alloys. Because of the relatively low of the laser energy density and the not sufficiently melted powder, the alloys remain in a solid–liquid two-phase coexistence state, and the surface tension and viscosity of the liquid phase increase, resulting in the liquid not being able to flow smoothly. Thus, it is agglomerated into spherical particles and form pores, reducing the relative density of the alloy samples. However, when the laser energy density is too large, the surface temperature of the material is too high due to the excessive energy of the laser irradiation to the powder surface, and the burning loss and gasification of some low melting point elements occur, which reduces the compactness of the formed parts.
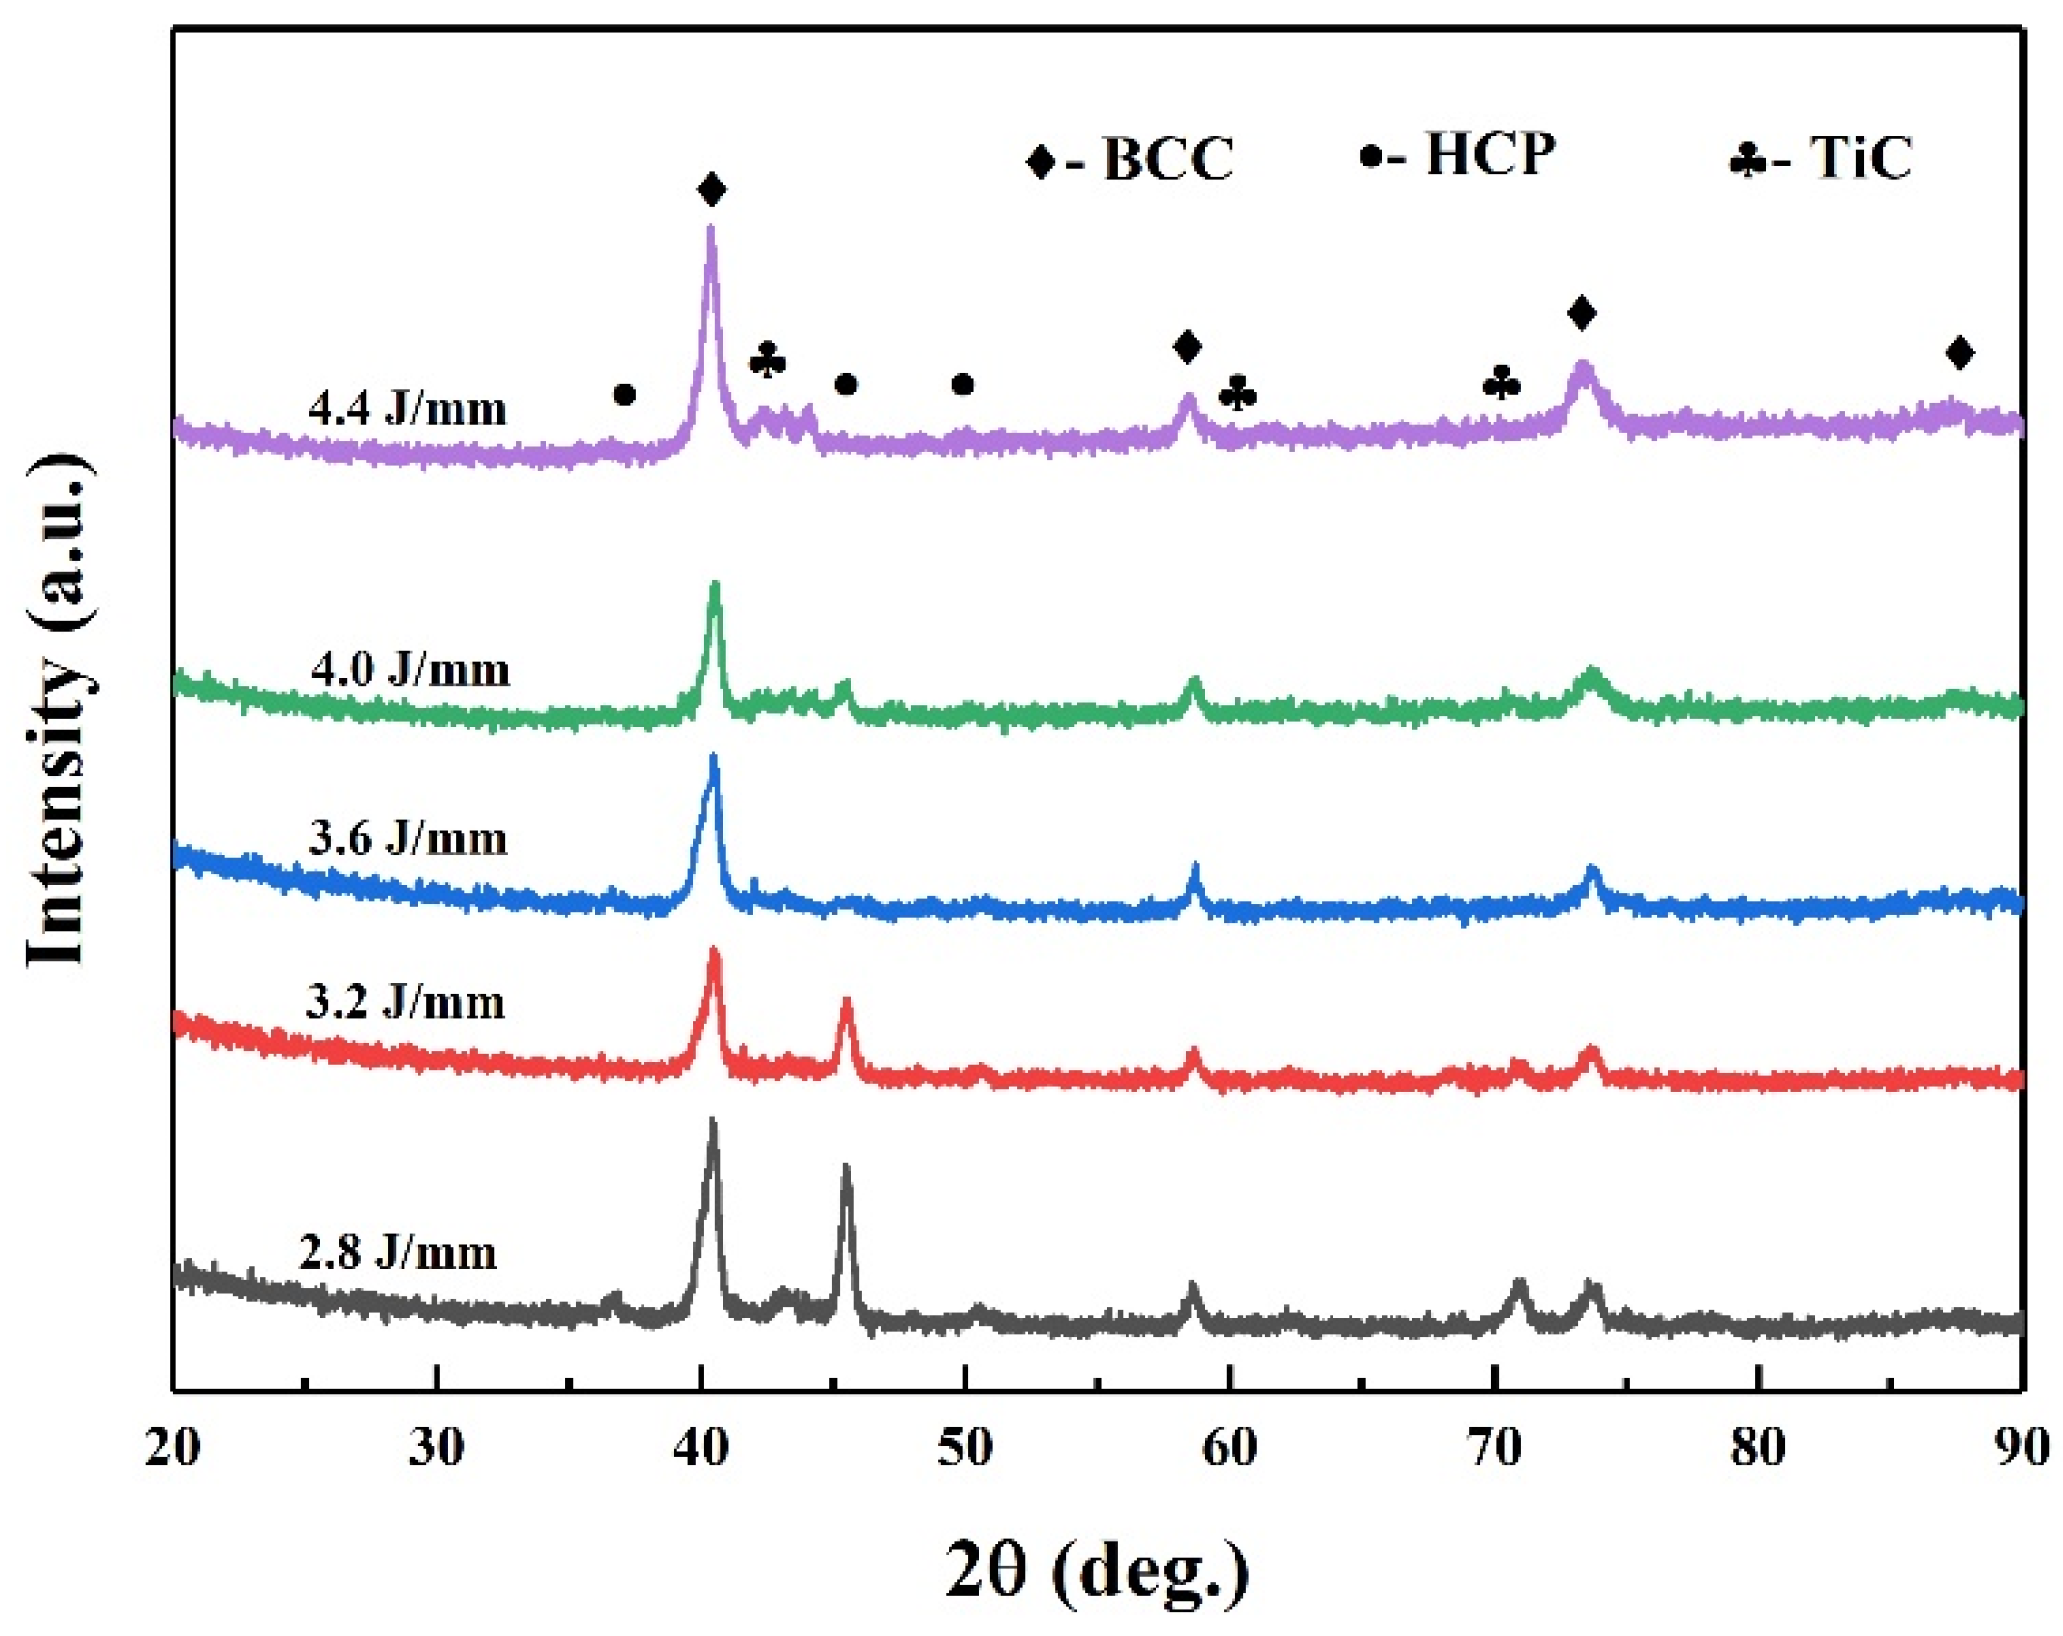
Typical XRD patterns of LMD-fabricated specimens at various processing parameters are depicted in Figure 2. The diffraction peaks from three phases, body-centered cubic (BCC), hexagonal close-packed structure (HCP) and third phase, are presented in all specimens. Although laser energy density cannot change the main phase composition, it causes local phase transformation, and the change of phase structure have an influence on the forming performance. As shown in Figure 2, the intensity of the diffraction peak at near 2θ = 46.1° dramatically decreased when the applied laser energy density increased to 3.6 J/mm. According to Bragg’s law, the lattice parameters of the BCC phase and HCP phase are 314.7 pm and 250.3 pm, respectively. However, there is a slight deviation between the diffraction peaks of carbide and standard diffraction peaks of TiC and NbC in the XRD pattern. Based on the PDF card (No. 32-1383 and No. 38-1364), TiC and NbC carbides have BCC structures and belong to the Fm-3m space group, so solid solutions of TiC and NbC could be obtained. The calculation of the lattice constant of carbide in the alloy by linear extrapolation is based on the XRD pattern (a = 430.7 pm). Therefore, it could be preliminarily inferred that the third phase may be a carbide with chemical formula (Ti, Nb) C. The mixing enthalpy of Nb atoms, Ti atoms and C atoms calculated via Miedema model was −109 KJ/mol [26], which indicates that Ti atoms and C atoms have the strongest binding ability and are easy to form compounds. Thus, combined with the results of SEM, it is assumed that TiC was the third phase.
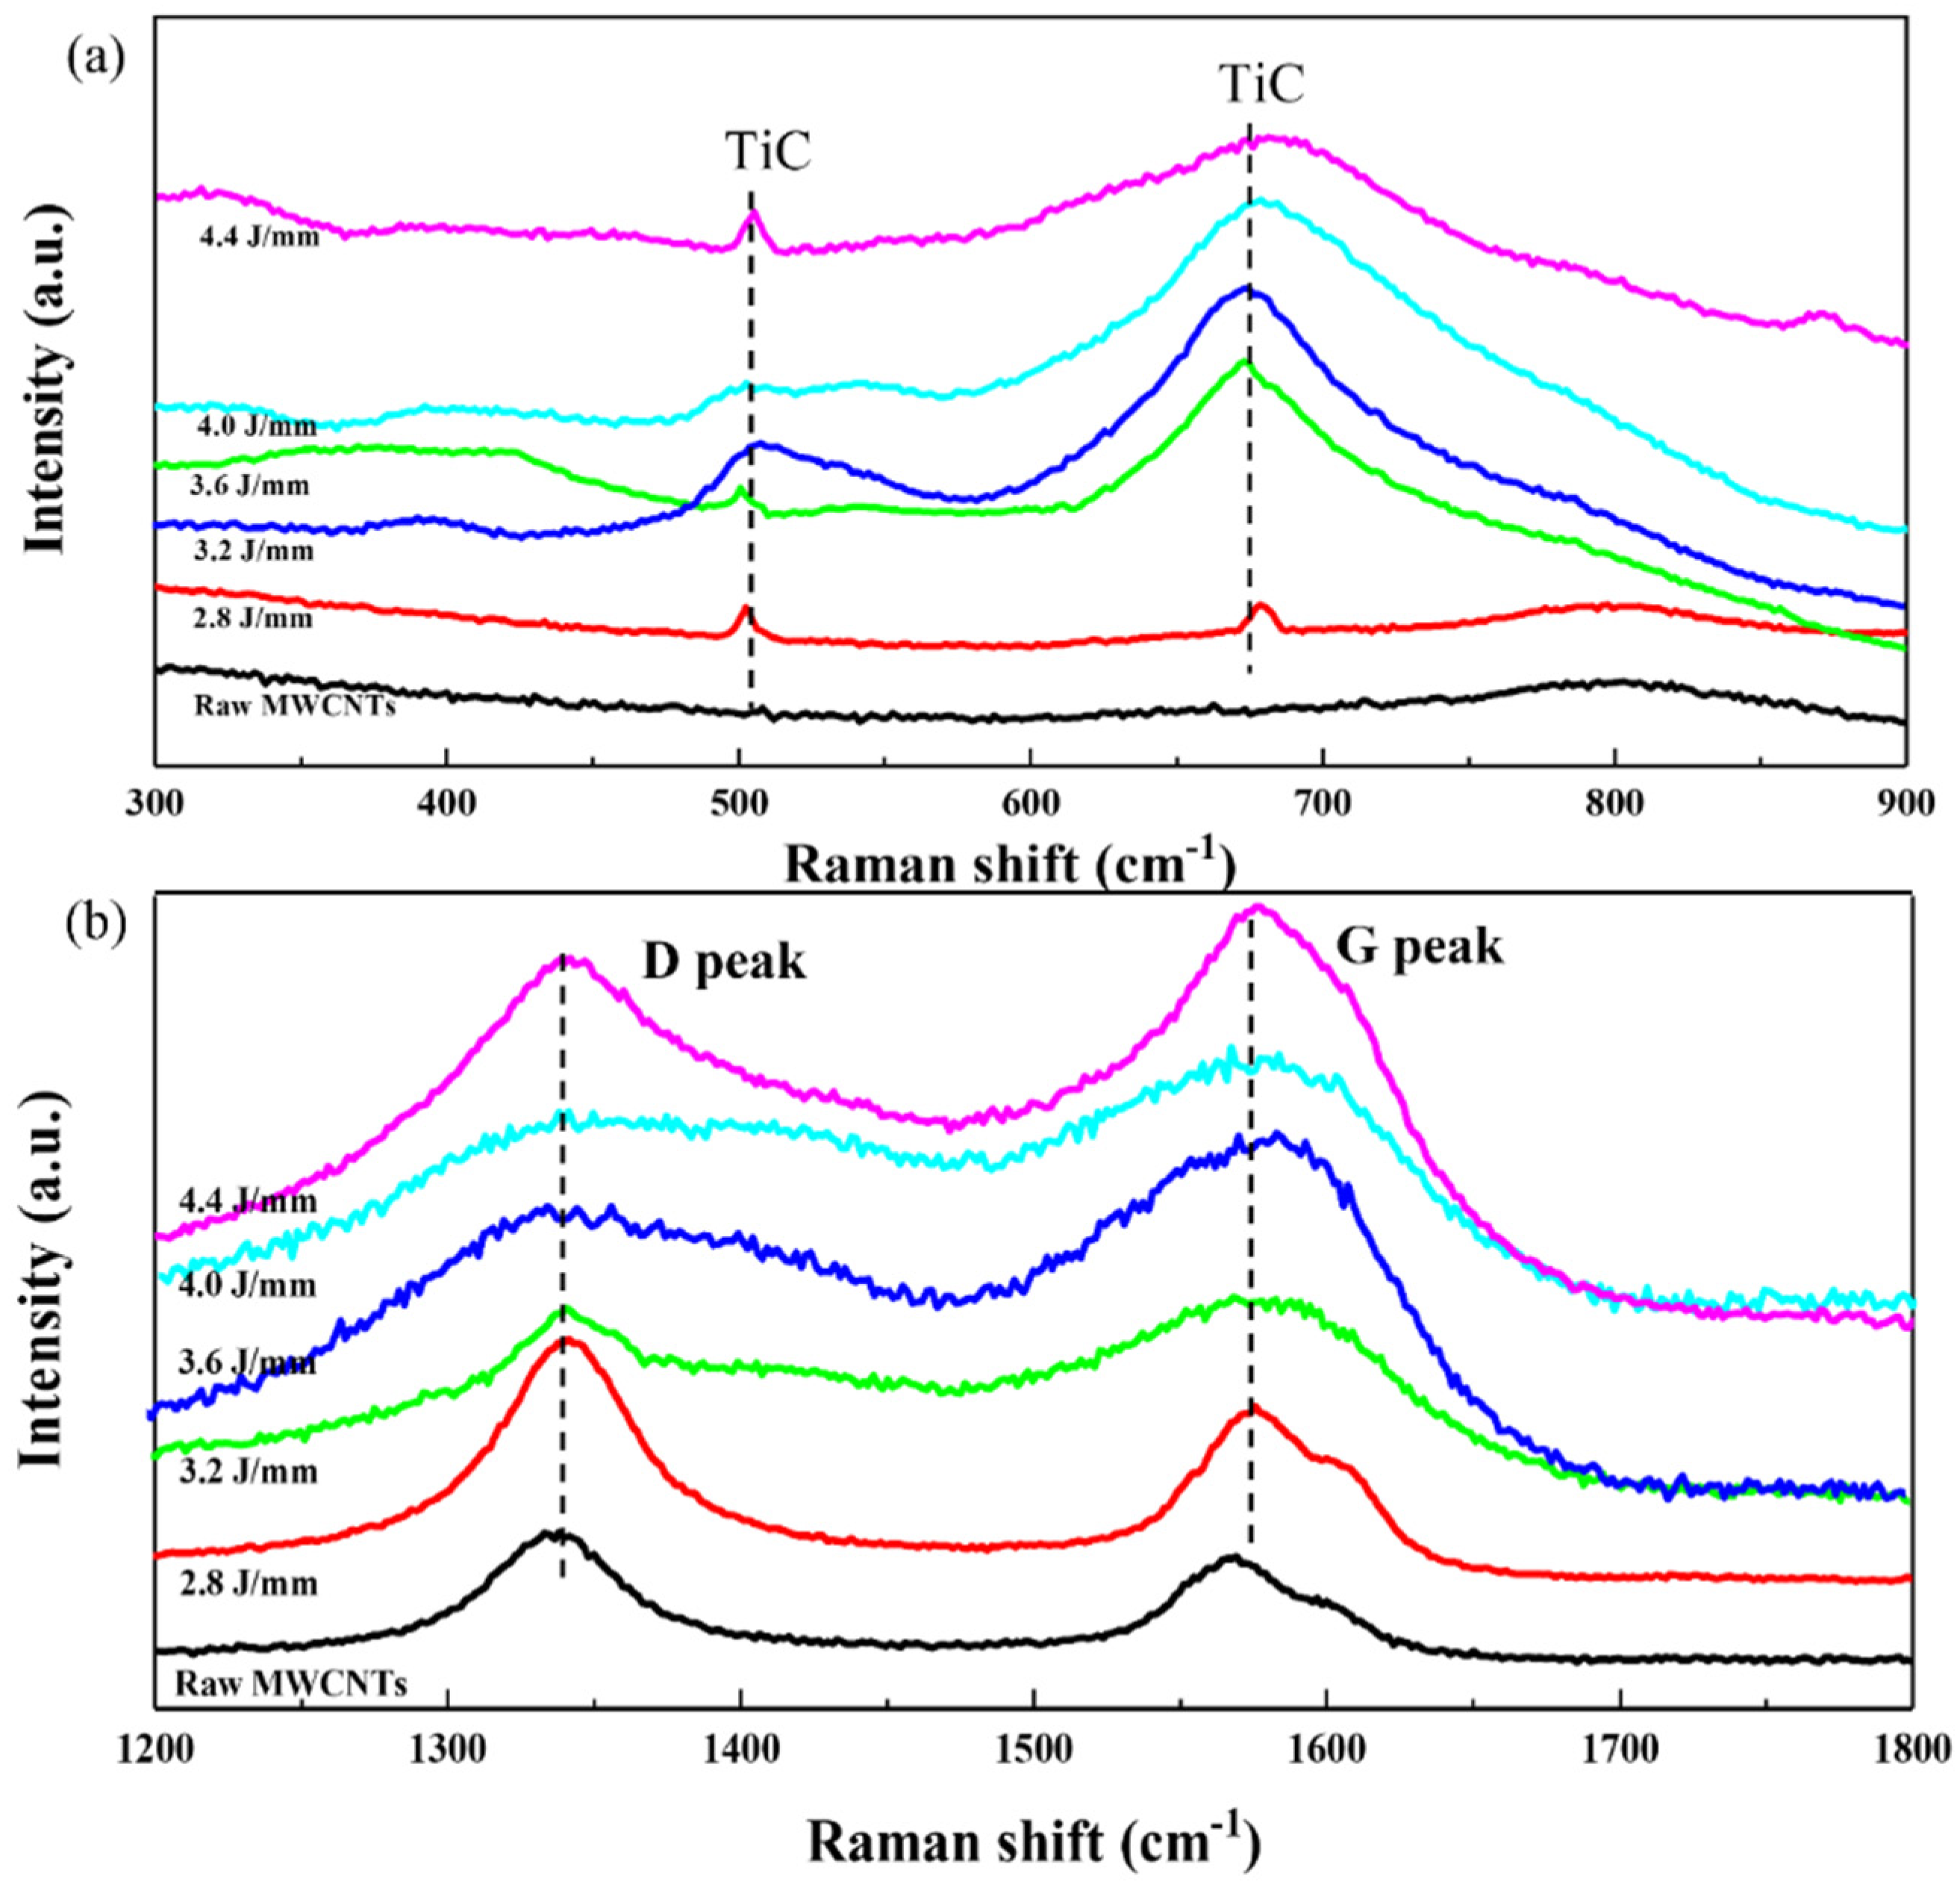
Figure 3 is the Raman spectra of the original MWCNTs and the thin-walled parts at different processing parameters. The D peak at the Raman shift of 1350 cm−1 is a disordered structure peak, which is excited by the structural defects in the C-C single bond. The G peak at the Raman shift of 1580 cm−1 represents the ordered structure of CNTs. The ratio of D peak to G peak intensity Id/Ig is usually used as a criterion to characterize the structural order of CNTs [27]. Compared with the Id/Ig of the original MWCNTs of 0.88, the Id/Ig of the thin-walled parts is increased to 1.26 at the linear energy density of 3.6 J/mm, which indicates that the structural defects of MWCNTs in thin-walled parts had an increasing trend to be induced at the high energy laser beam. Besides, there are peaks of TiC presented at 510 cm−1 and 672 cm−1 in LMD-fabricated specimens. This phenomenon implies that the high temperature molten pool environment formed in the LMD process intensifies the diffusion movement of atoms and promotes the in-situ reaction between the outer wall of MWCNTs and the matrix of CoCrMoNbTi0.4 RHEA.

3.2. Surface Morphology

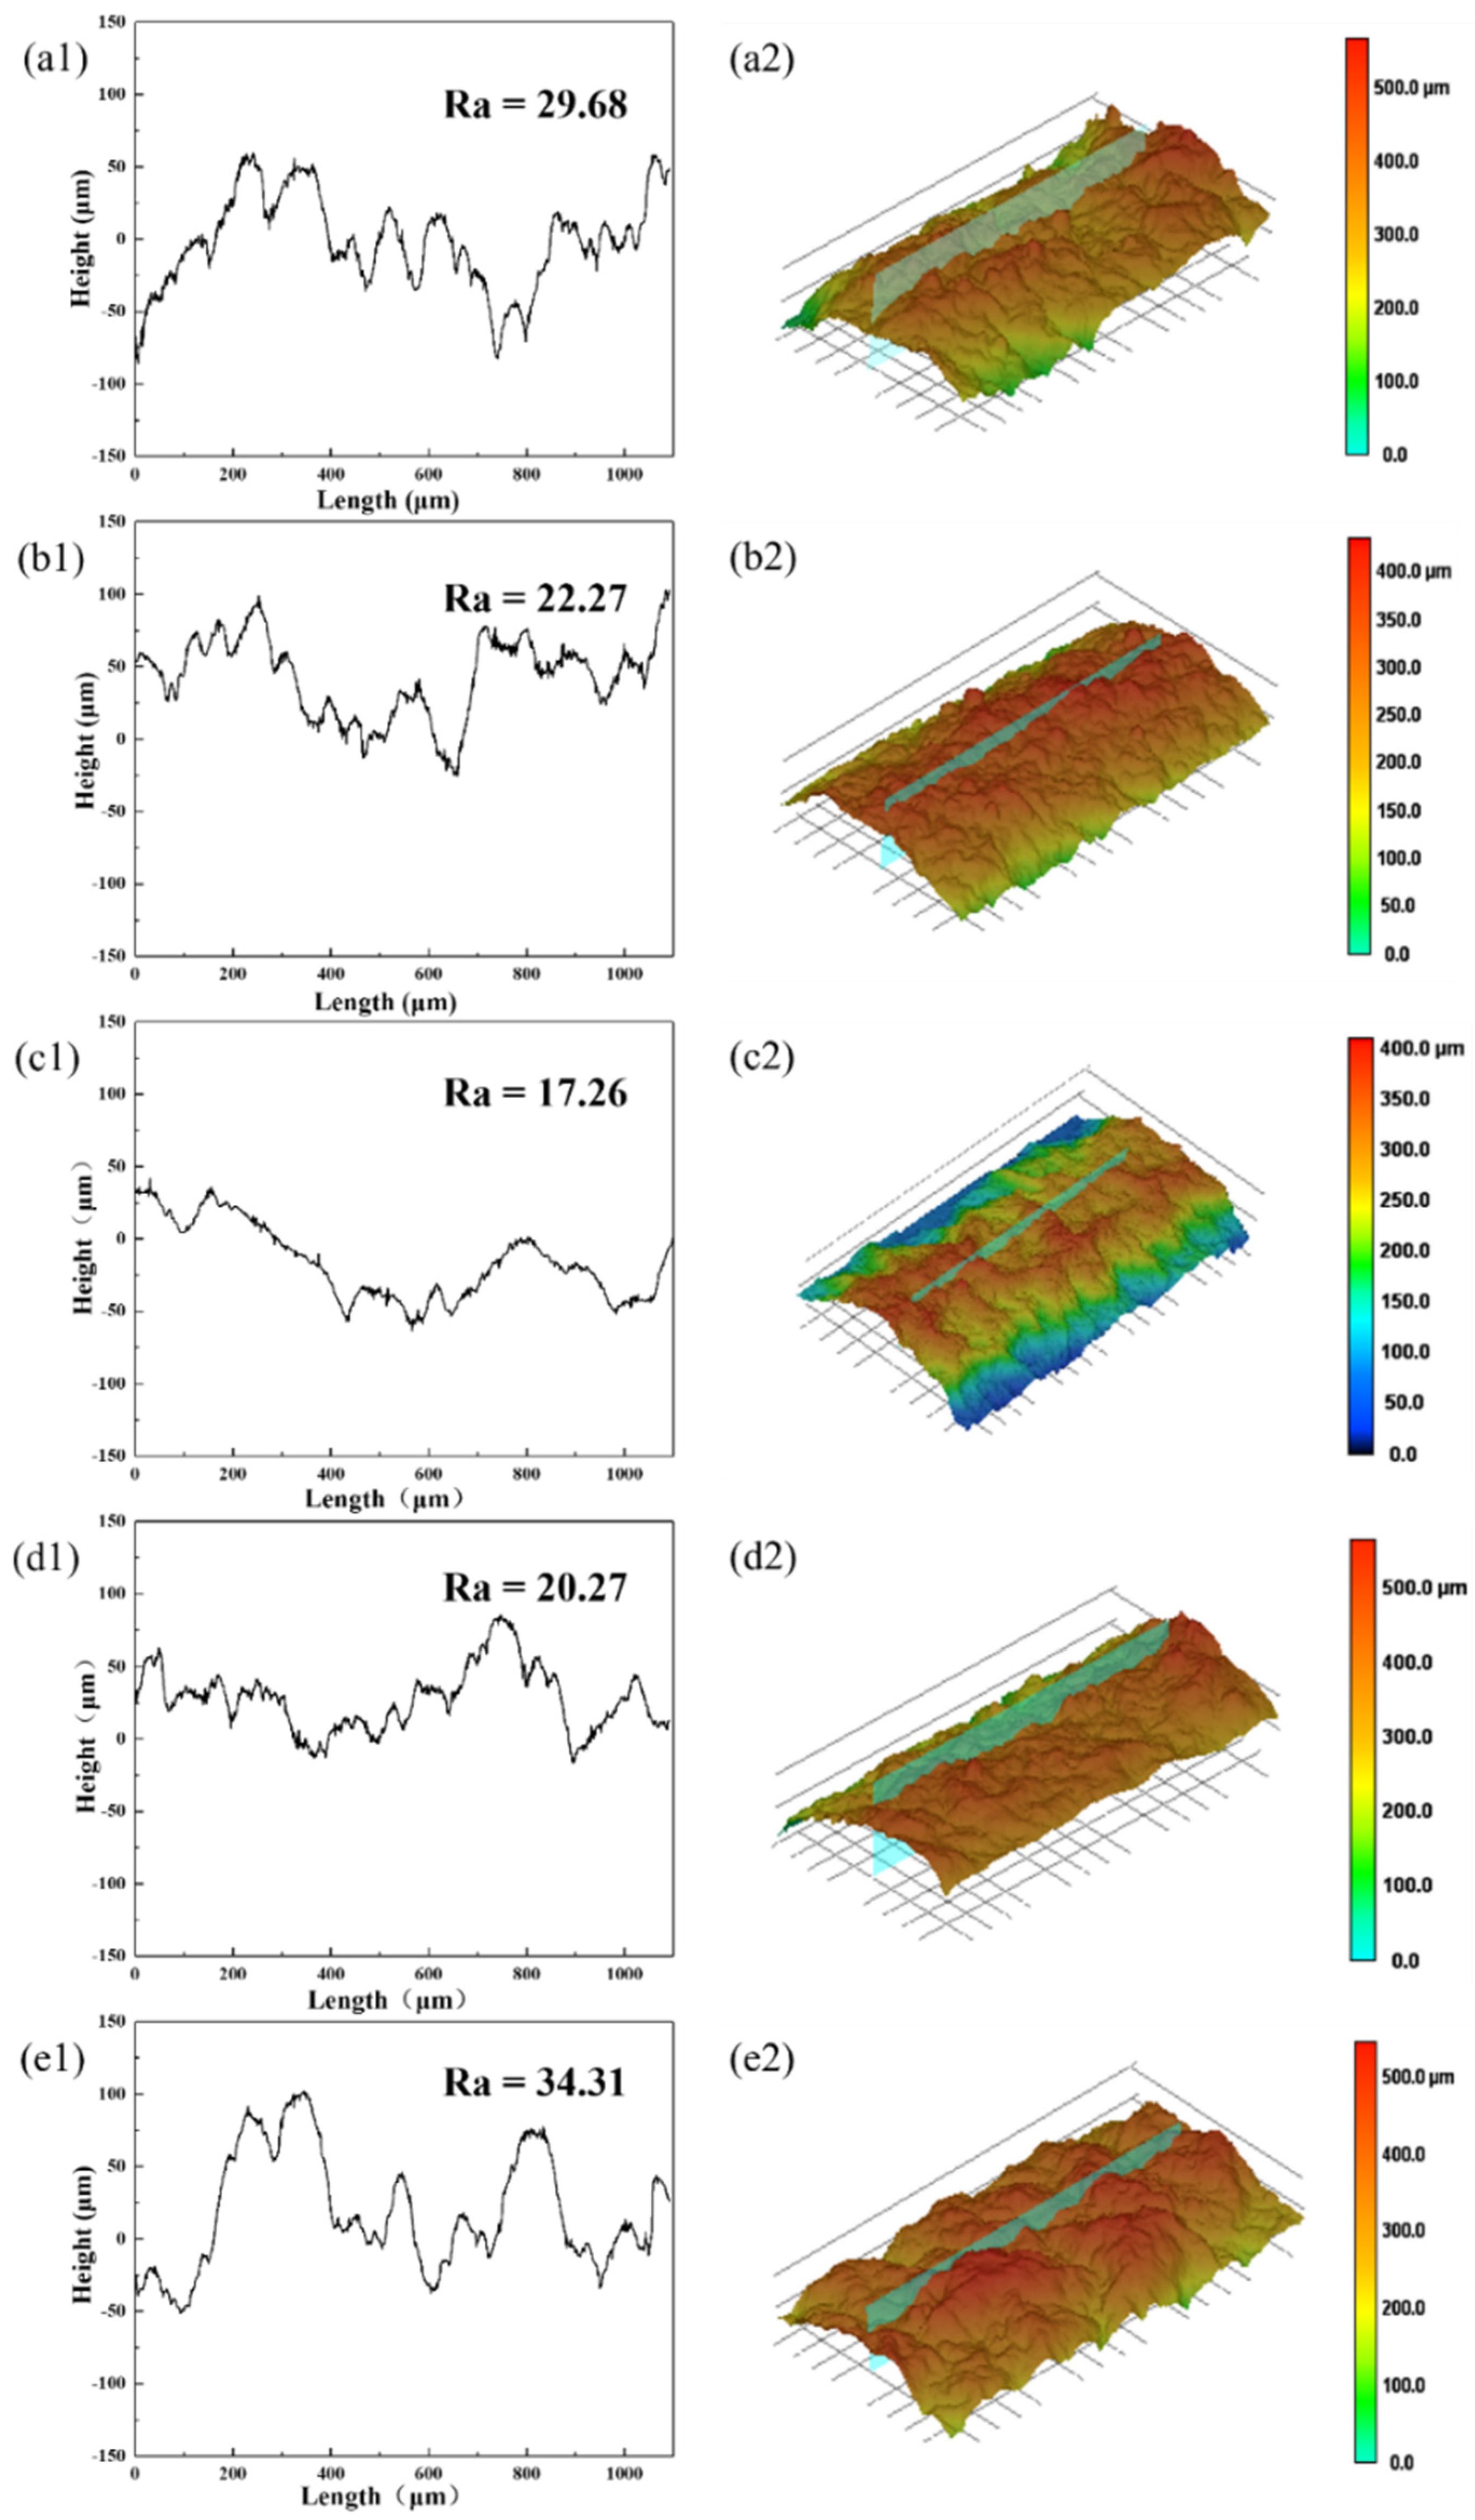
The preparation of alloy by laser melting deposition technology is a process of layer−by−layer accumulation and rapid solidification of metal powder under the action of a high-energy laser beam, and the surface roughness reflects the forming quality of the alloy sample surface. The surface roughness of the alloy sample will affect the overlapping effect between the layers of the formed part, affecting the density of the alloy. Therefore, it is particularly necessary to consider the surface roughness of the alloy when studying the forming quality of the alloy sample. Figure 4 presents the surface morphology of all samples. Among them, Figure 4(a1–e1) uncover the two-dimensional surface profiles obtained from the green lines, and Figure 4(a2–e2) disclose the three-dimensional surface profile of all specimens. The line roughness value was obtained along the scanning direction. After further processing of the experimental data, it was found that the surface quality of the thin-walled forming parts prepared with different linear energy density is different. By enforcing a lower laser energy density (2.8 J/mm and 3.2 J/mm), many unmelted powders appear on the surface of the alloys, with a rough surface. The two-dimensional surface profile fluctuates between −100 μm and 100 μm, while the surface roughness value is 29.68 μm and 22.27 μm (Figure 4(a1,a2)). The main reason is that the melting point of each component of the RHEA is high, resulting in a large number of unmelted powders in the alloy specimens due to the low laser energy density, which greatly reduces the forming quality of thin-walled forming parts. As the laser energy density is increased to 3.6 J/mm, only a few unmelted powder particles are observed on the surface of the alloy, and the surface is smoothly combined with clear melt tracks (Figure 4(c2)). The surface roughness value is reduced even more to 17.26 μm, which meets the surface quality requirements of the LMD-formed specimens (Figure 4(c1)). Unfortunately, as the laser energy density is increased to 4.0 J/mm and 4.4 J/mm, the surface quality of the alloy begins to deteriorate again, with an irregular molten pool surge and splashed powder adhered to the surface of the alloy. Consequently, the surface roughness value amounts to 20.27 μm and 34.31 μm (Figure 4(d1,e1)).
Figure 5 is the macroscopic morphology of thin−walled parts after LMD-forming with 0.8 wt.% CNTs at different processing parameters. There are a large number of cracks, unmelted powders and holes in the specimens (Figure 5a,b) and the samples gradually show cracks again (Figure 5d,e). Luckily, the specimen at 3.6 J/mm has an excellent appearance, smooth surface and no obvious cracks and holes on the cross section (Figure 5c). When the laser power is too high, the micro-cracks appear mainly because the CNTs structure is seriously damaged with the action of the high−energy laser beam, which becomes the crack source inside the thin-walled forming parts. In the rapid cooling process, the cracks are finally formed.

3.3. Microstructure

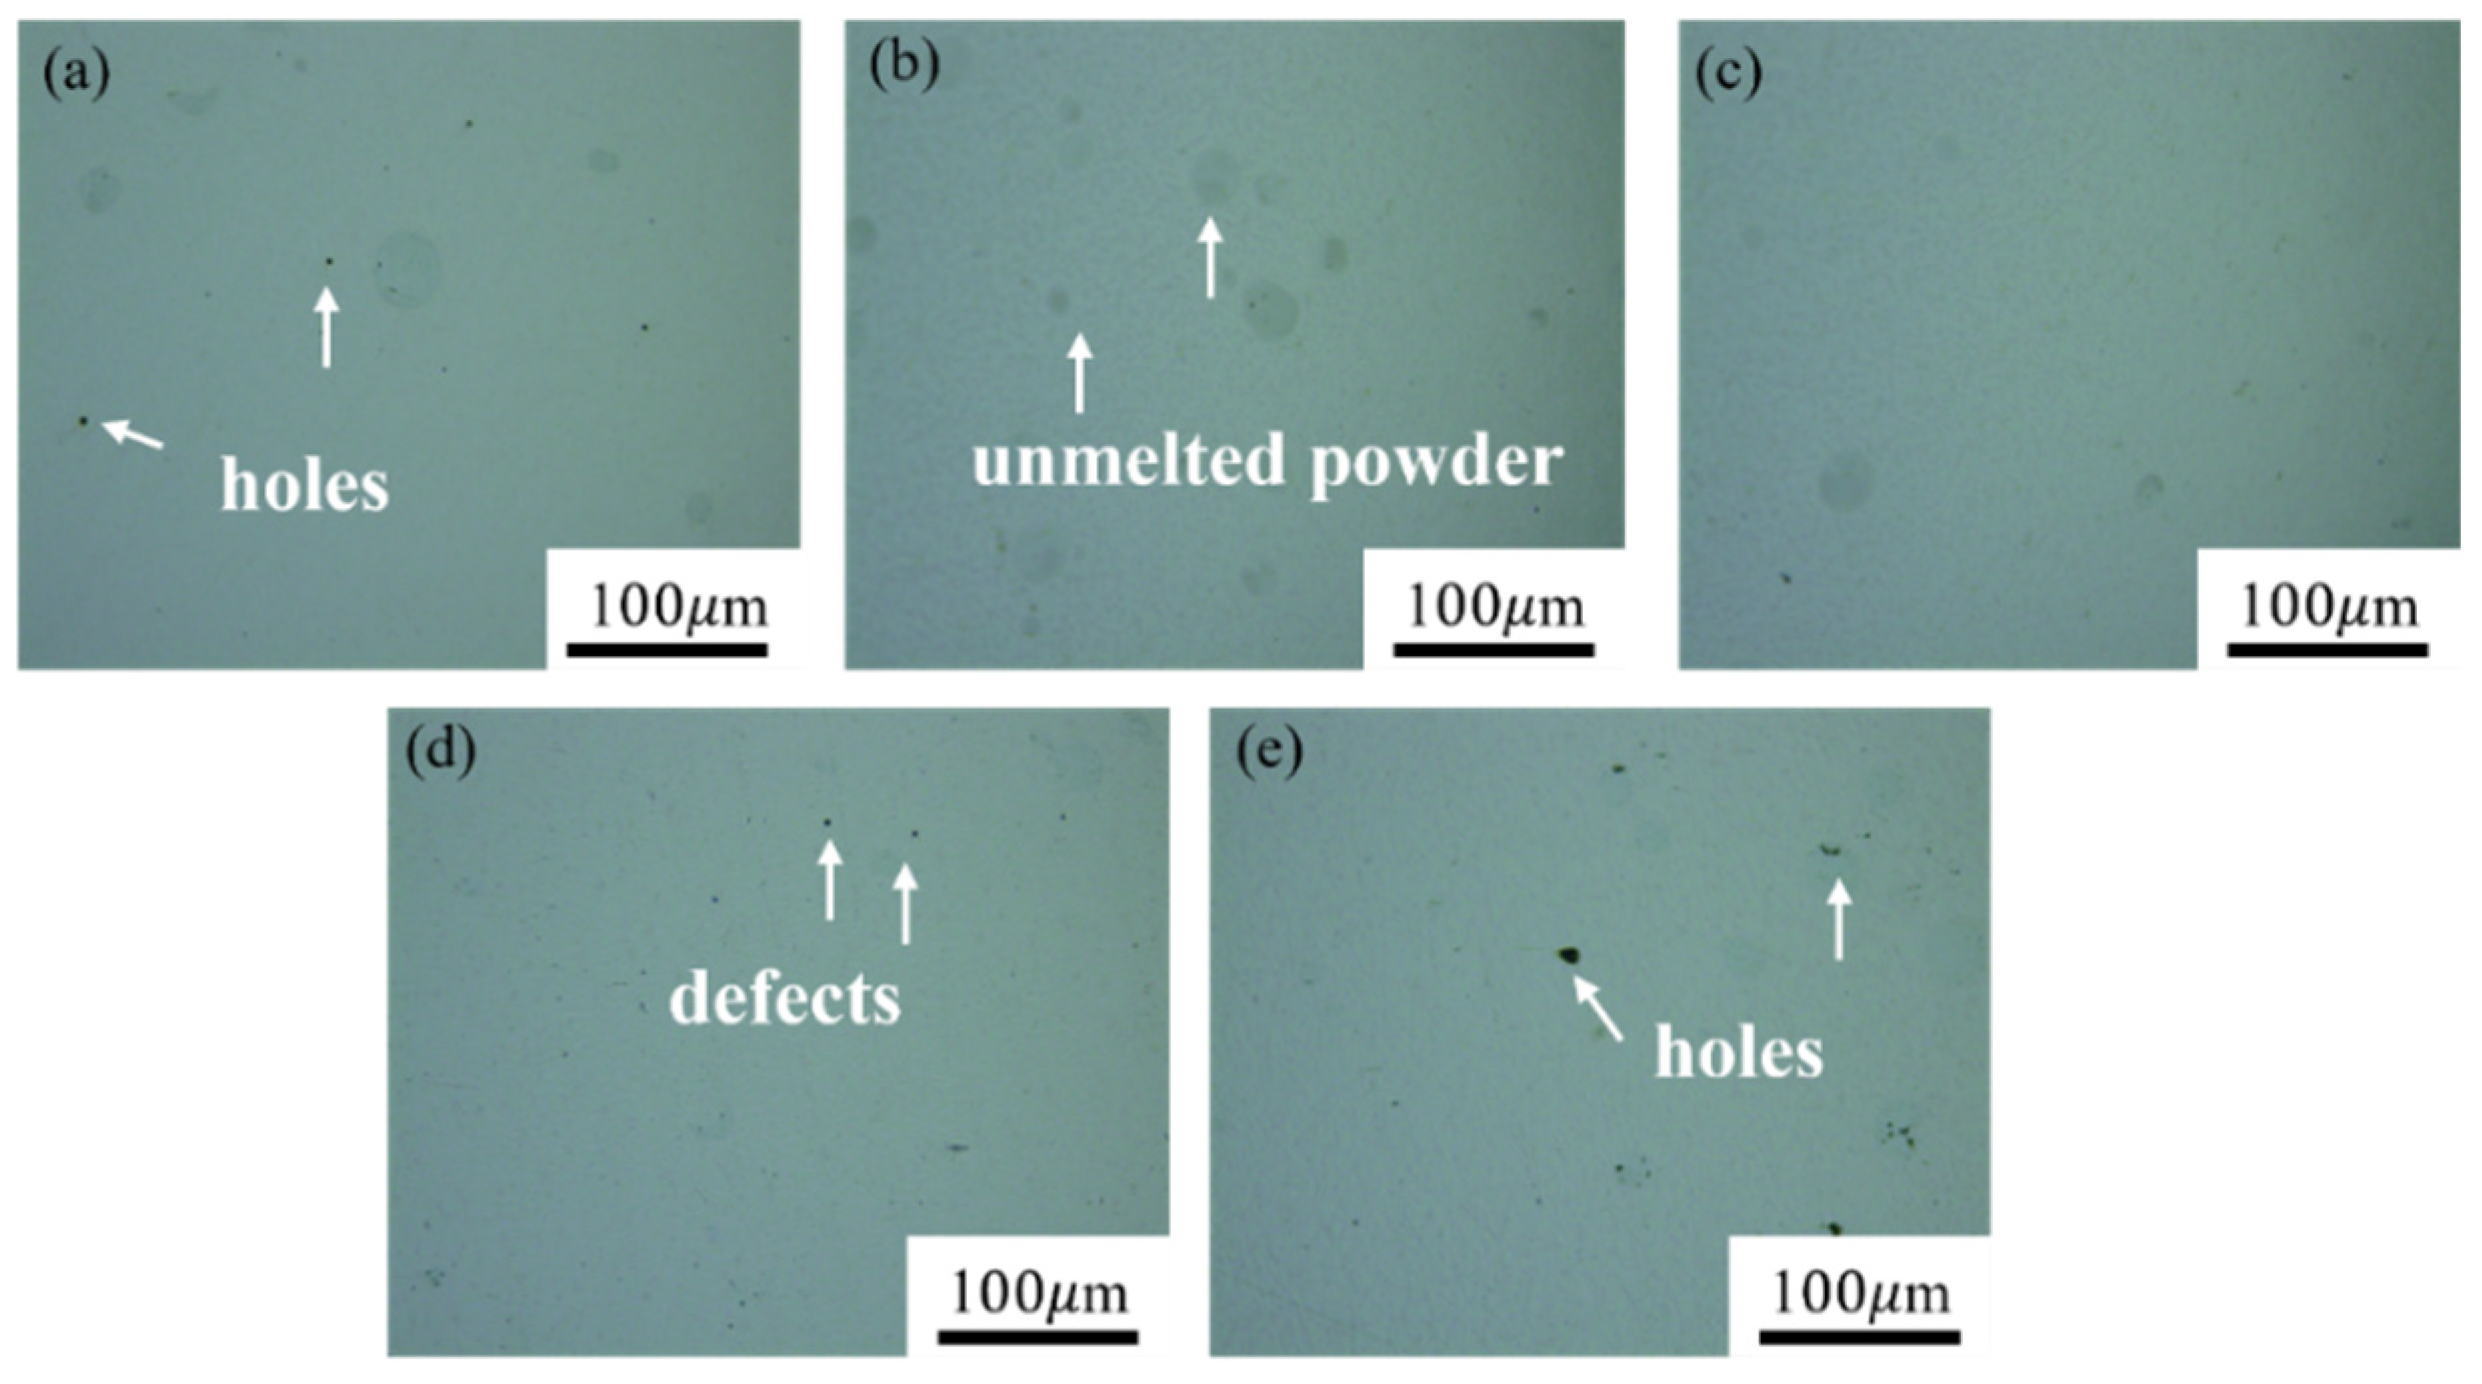
In order to explore the metallographic microstructure of LMD-forming CoCrMoNbTi0.4 RHEA at different laser processing parameters, the metallographic microstructure was detected by OM to obtain the porosity of thin-walled parts. Figure 6 is the surface microstructure of thin-walled parts at different laser linear energy density. It is shown that the densification behavior of thin-walled parts is best when the laser energy density is 3.6 J/mm. This is mainly because the interaction time between the high-energy laser beam and powder becomes longer, with the increase of the laser energy density. It means that the powder can absorb more energy in a unit time. The temperature in the molten pool increases, and the powder is melted to form more liquid phases. The viscosity of the liquid phase gradually decreases, and the fluidity gradually increases. The liquid phase is fully spread, and finally, a morphology of almost no defects is formed, showing excellent metallurgical bonding. Therefore, the density of the thin-walled forming parts is improved. However, the laser energy density continues to increase, the temperature in the molten pool is too high, and some metal elements evaporate to produce bubbles. The bubbles in the molten pool are solidified without discharge, and finally, the holes are formed, which reduces the density of the thin-walled parts. Based on the microscopic morphology of the alloy samples observed by the electron microscope in the previous experiment, and the cross-section morphology of the alloy samples observed by the laser confocal microscope is measured. It can be seen that when the laser energy density is 3.6 J/mm, the surface quality of LMD-forming CoCrMoNbTi0.4 RHEA is relatively excellent, so the alloy samples at this processing parameter were selected for microstructure morphology analysis.
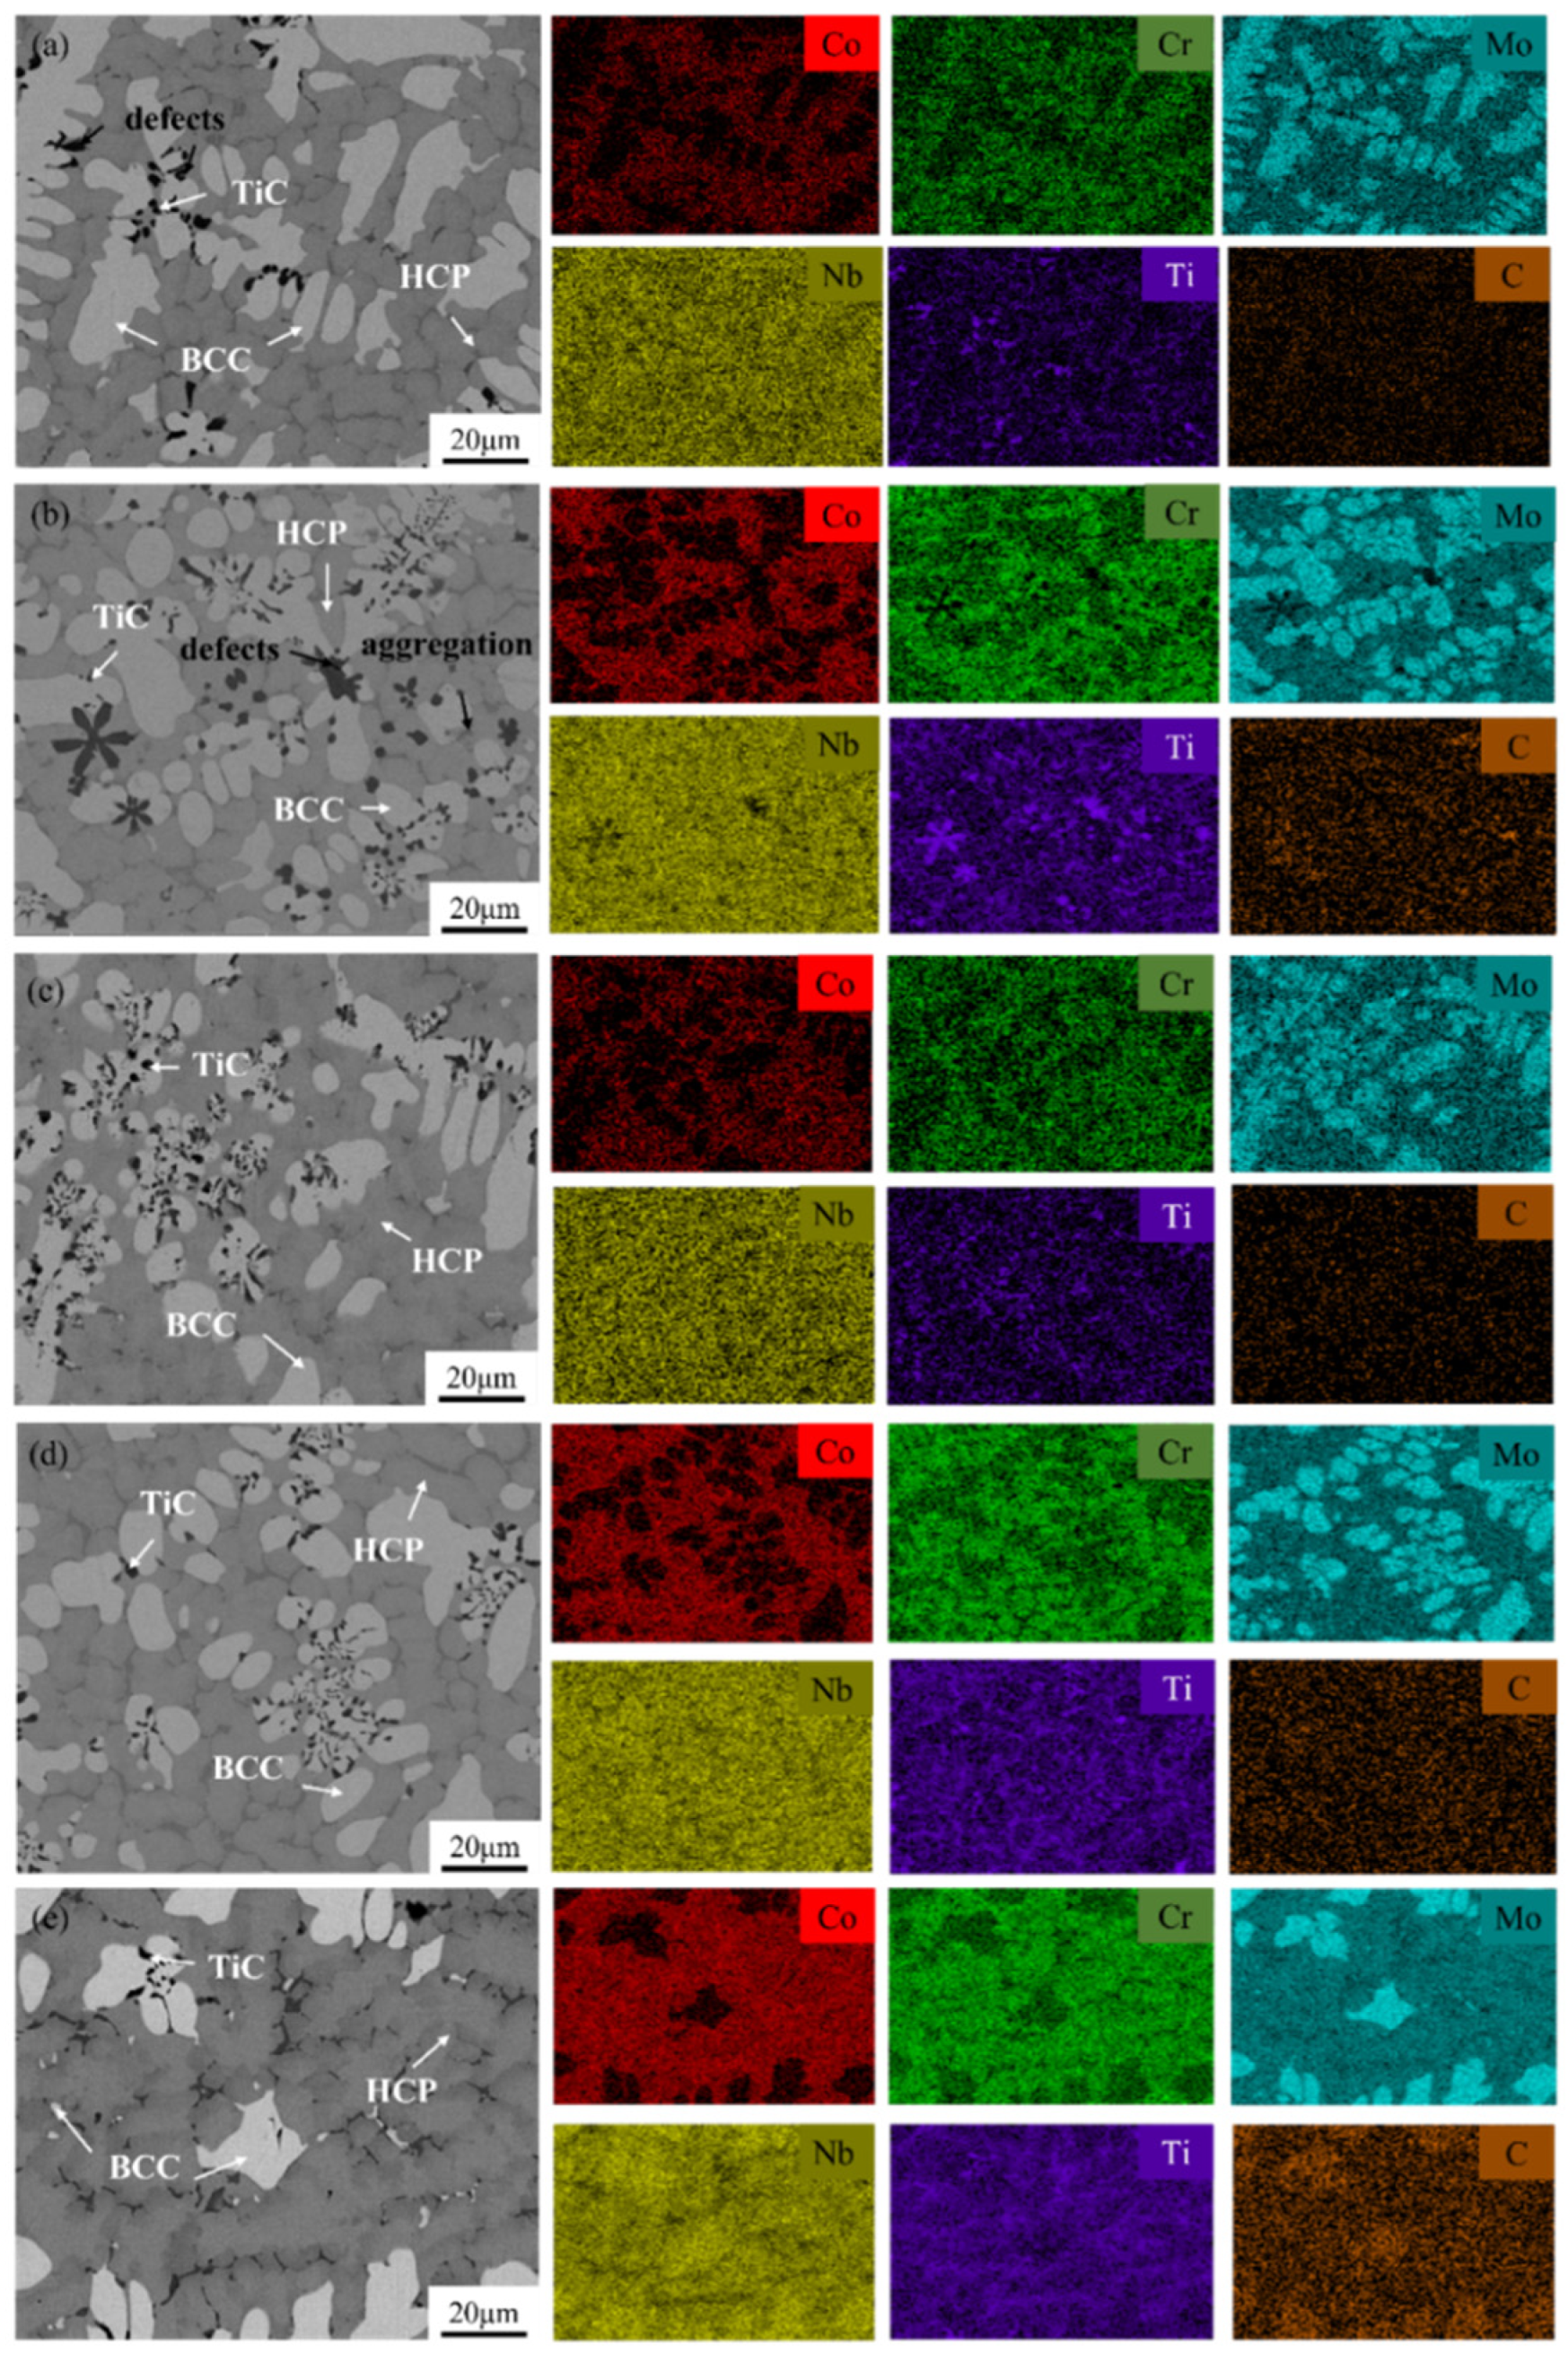
The chemical distribution is rather homogenous, which can be verified from the EDS maps as shown in Figure 7. It can be seen that the typical dendrite and interdendrite structure are observed. The EDS mapping results of the alloy specimens shown in Figure 7 show that the white phase in the dendrites is rich in Mo and Nb. This means that the content of Cr, Co and Ti in the white phase is lower than the nominal composition, the compositions of the gray particles in the interdendrites are enriched with Co and Cr, and the black particles in the alloy are TiC composed of the Ti element and C element, mixed in the industrial-grade CNTs. Therefore, the CNTs/CoCrMoNbTi0.4 alloy shows the polycrystalline structure.
When the laser energy density is too low, with less heat input, RHEA powder is not completely melted owing to its high melting point (Table 1), resulting in crack defects (Figure 7a). In addition, too low an input heat flow makes it too late for carbon nanotubes to disperse in the alloy and thus, they agglomerate inside the alloy (Figure 7b). When subjected to external force, the carbon nanotubes agglomerated in the alloy can easily become the source of cracks and deteriorate the properties of the alloys. The heat flux input is not sufficient to uniformly disperse the carbon nanotubes so that the carbon nanotubes are distributed both between and within the dendrites and are mainly distributed within the dendrites at an appropriate energy density (Figure 7c). It is known that carbon nanotubes act as second phase particles in the alloy, which can hinder the growth of grains and achieve grain refinement. Unfortunately, excessive energy input vaporizes the Ti element in the alloy to form pores, with the gradual transformation of the BCC phase into the HCP phase (Figure 7e)—because the hardness of the HCP phase is lower than that of BCC [28], explaining the change trend of microhardness, as shown in Figure 8a.

3.4. Properties

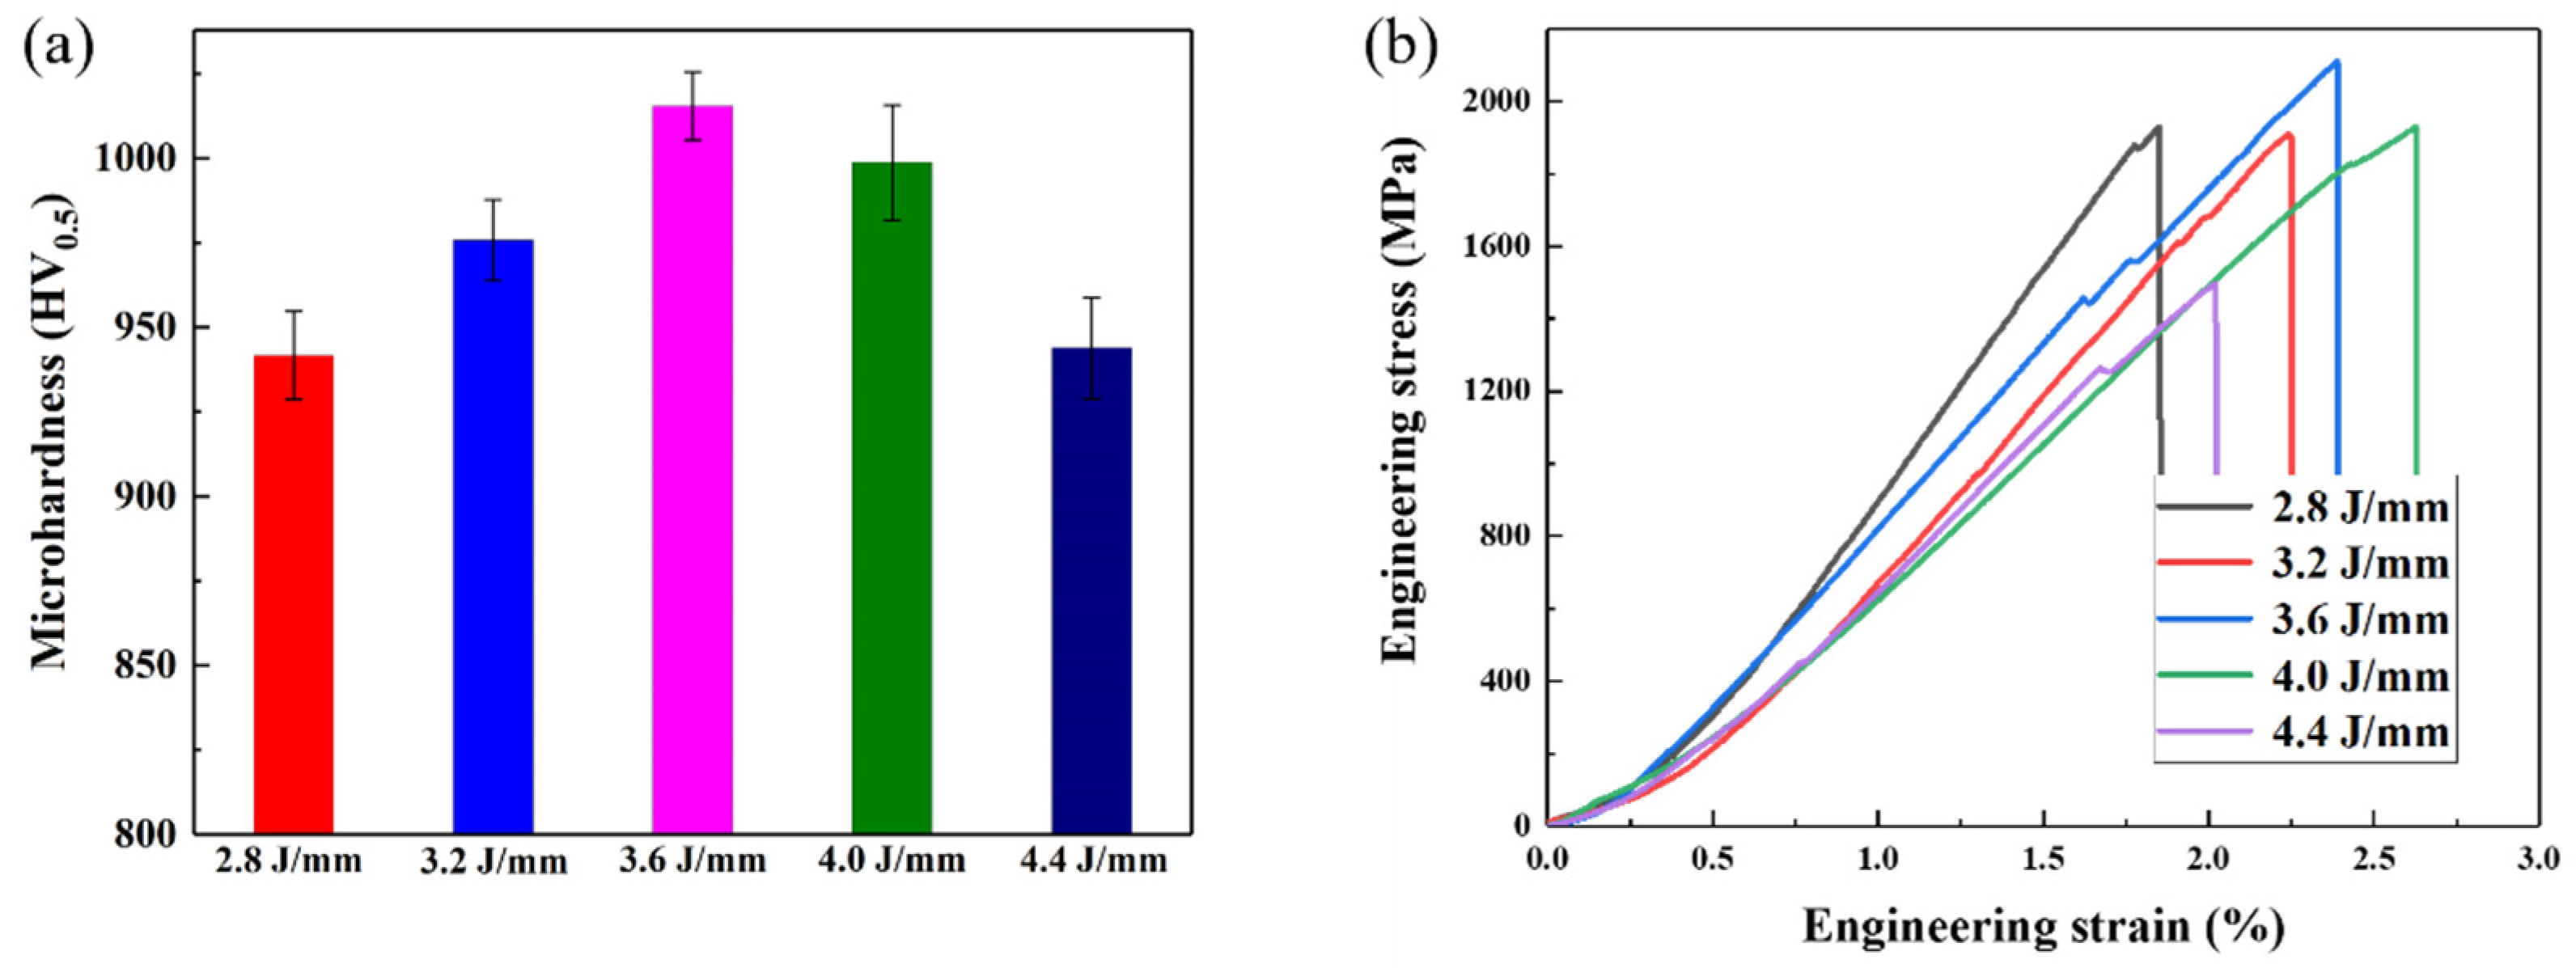
With the help of the laser confocal microscope and scanning electron microscope, it was known that during the preparation of thin-walled forming parts by LMD, the changes of temperature gradient and cooling rate in the molten pool due to different laser energy density will change the micro-structure of thin-walled forming parts, and finally, show different micro-hardness values. Figure 8a depicts the hardness change of CoCrMoNbTi0.4 RHEA prepared by LMD with different laser energy density, and the specific values of the microhardness of the alloy at various laser line energy densities are shown in Table 3. With a lower laser energy density (2.8 J/mm and 3.2 J/mm) and higher laser energy density (4.0 J/mm and 4.4 J/mm), the average micro-hardness of the prepared alloy is low, which may be due to the existence of micro-cracks, pores and other defects in thin-walled forming parts. Among these, the specimen at 3.6 J/mm shows the highest average microhardness of 1015 HV0.5. The main reasons for obtaining high hardness CoCrMoNbTi0.4 RHEA are as follows. First, the RHEA has the four effects of high entropy alloy (high entropy effect, hysteresis diffusion effect, cocktail effect, lattice distortion effect) and its high melting point characteristics. The BCC solid solution structure in the alloy plays a role in solid solution strengthening. Second, the LMD technology was used to prepare the alloy, and the rapid cooling in the forming process can achieve the effect of grain refinement, thus further improving the hardness of the alloy. Third, 0.8 wt.% CNTs with high strength, high hardness, low expansion coefficient, large specific strength are added to the alloy preparation process. Four, highly dense alloys, approximately 96.06%, are obtained at relatively suitable process parameters.
In order to further analyze the mechanical properties of the alloy, the room temperature compression properties of CoCrMoNbTi0.4 RHEA prepared by LMD were tested. Figure 8b is the engineering stress–strain curve of alloy with room temperature compression and the specific values of room temperature compression properties of the alloy at different laser energy densities are shown in Table 3. It can be clearly seen that CNTs-enhanced RHEA prepared by LMD exhibits compressive strength and plasticity. Among these, the specimen at 3.6 J/mm shows the highest compressive strength of 2110.50 MPa and ductility of 2.39%, which is superior to alloy processed via VAM (compressive strength of 800 MPa and ductility of 0.6%) [29]. Although the specimen at 4.0 J/mm showed the highest ductility of 2.63%, the compressive strength decreased to 1930.20 MPa, owing to low relative density (Table 2). The compression properties of the alloy are mainly due to the BCC solid solution structure and the micro-structure of fine grains. This was the same as the micro-hardness change of thin-walled forming parts with different power.
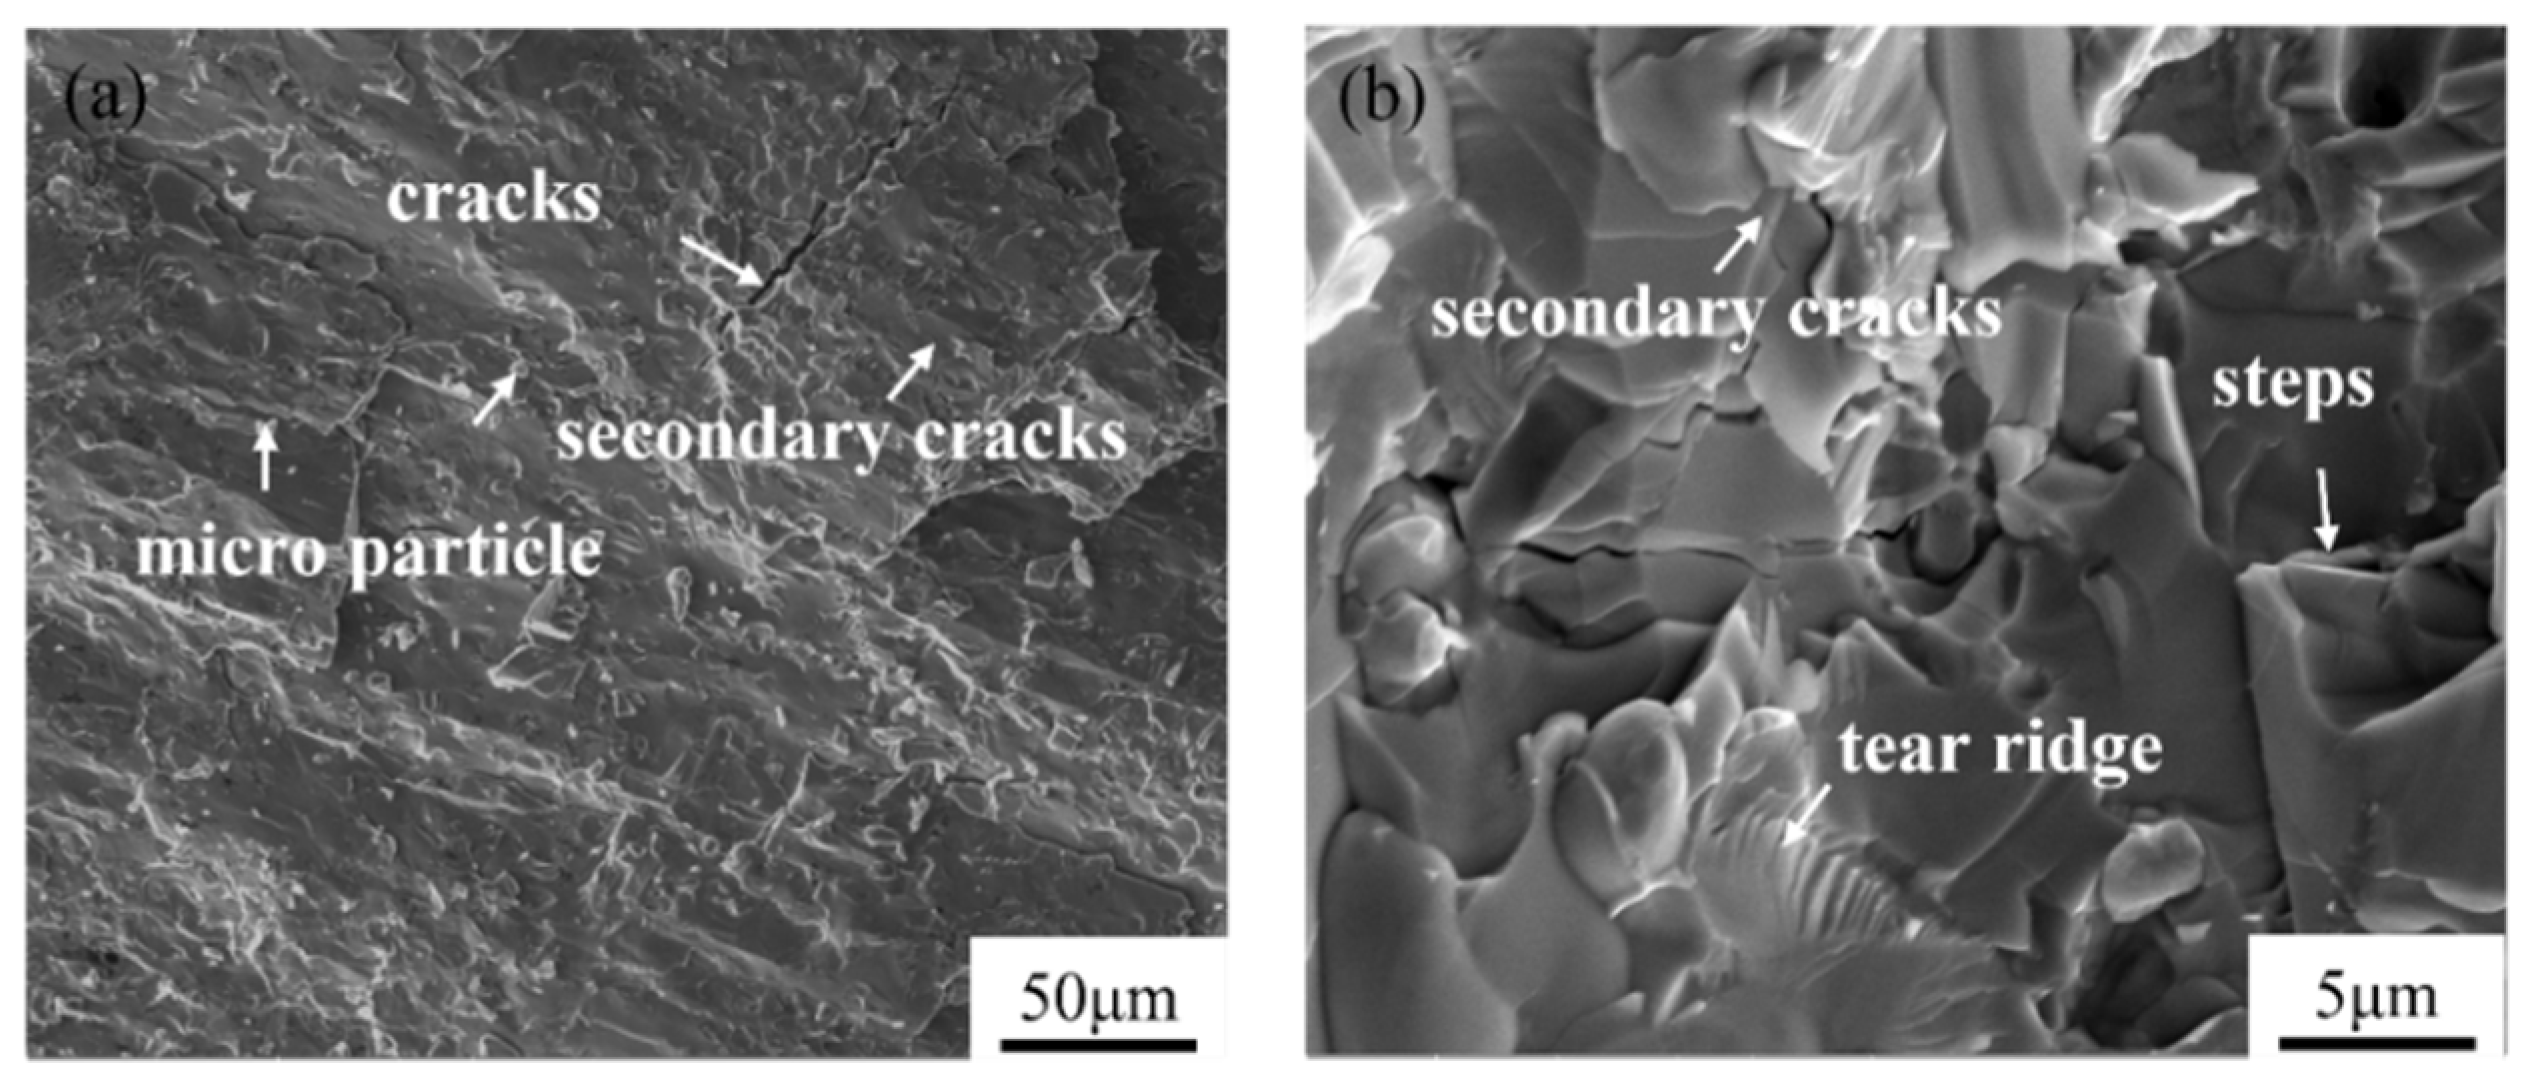
In order to further analyze the deformation mechanism of LMD-forming CoCrMoNbTi0.4 RHEA, the cross-section morphology of the alloy samples after the compression test was analyzed. Figure 9 shows the fracture morphology of the alloy with static compression. The fracture of the alloy specimens was usually accompanied by a relatively large burst of noise. It may be that the alloy specimens absorb a large amount of energy during compression, while the sliding system does not start or stop, resulting in the energy not being able to be released inside the alloy specimens. The final energy was released in the break moment, causing a strong vibration of the air and great noise. With low magnification (Figure 9a), cracks, stepped strips and tiny particles were easy to observe, which present the typical river-like patterns. Besides, with high magnification (Figure 9b), obvious micro-cracks and small particles attached to the cross section were observed. The crack extends around, the main crack propagation bifurcation was the secondary crack, and the secondary crack further extends the bifurcation, and finally, the alloy breaks. This indicates that the fracture mode of the alloy was brittle fracture. Many tiny planes (called cleavage planes) can be observed on the fracture surface of alloy samples. Besides, it was found that there was a tearing edge with flake distribution on the cleavage step, which was a typical feature of cleavage fracture. Therefore, the fracture mechanism of the alloy was obvious brittle-cleavage fracture.

4. Conclusions

In this study, laser melting deposition technology had been applied to the fabrication of CNTs/CoCrMoNbTi0.4 alloy. The surface morphology, microstructure and mechanical properties of informed parts at various process parameters of LMD was thoroughly investigated. Based on the experimental results and analysis, the main conclusions that could be drawn were the following:
(1) Laser energy density is a dominant factor in determining the LMD densification level. Large irregular pores disappear and the densification rate increases with an increase in the laser energy density. A laser energy density of 3.6 J/mm is optimized to yield a fully dense CNTs/CoCrMoNbTi0.4 alloy.
(2) Both the high densification level and significant grain refinement due to CNTs mainly distributed within the dendrites contributed to the high microhardness (1015 HV0.5) of LMD-processed CNTs/CoCrMoNbTi0.4 alloy. Two strengthening mechanisms of solid solution strengthening and load transfer occur simultaneously during deformation, leading to a considerably high fracture strength of 2110.50 MPa and fracture strain of 2.39% for the LMD-processed CNTs/CoCrMoNbTi0.4 alloy.
(3) The elements of the LMD samples are more homogeneously distributed than the VAM samples. This phenomenon can be attributed to the small molten size and rapid cooling rate in the LMD process, which results in a significant solute-trapping effect and thus avoids component segregation. Considering the potential ability to fabricate the CNTs/CoCrMoNbTi0.4 alloy with optimized microstructures and properties, the LMD technique is attractive for the manufacturing of components of the CNTs/CoCrMoNbTi0.4 alloy, which will contribute to the development of high temperature structural components in the field of aerospace.

Author Contributions

Conceptualization, methodology and writing—original draft, X.Y., formal analysis, L.H. and Y.Z.; writing—review and editing, Z.X.; visualization, X.Y. and L.H.; supervision, Z.X., D.W. and D.R.; resources and project administration, M.Z. and W.Z. All authors have read and agreed to the published version of the manuscript.

Funding

This work was supported by the National Natural Science Foundation of China (Grant No. 51901236) and the “Science and Technology Innovation 2025” Major Project of Ningbo City (2022Z073).

Institutional Review Board Statement

Not applicable.

Informed Consent Statement

Not applicable.

Data Availability Statement

Not applicable.

Acknowledgments

The authors gratefully acknowledge the Ningbo Institute of Materials Technology and Engineering, Chinese Academy of Sciences and the “Science and Technology Innovation 2025” Major Project of Ningbo City.

Conflicts of Interest

The authors declare that they have no known competing financial interests or personal relationships that could have appeared to influence the work reported in this paper.

References

  1. Yeh, J.-W.; Chen, S.-K.; Lin, S.-J.; Gan, J.-Y.; Chin, T.-S.; Shun, T.-T.; Tsau, C.-H.; Chang, S.-Y. Nanostructured high-entropy alloys with multiple principal elements: Novel alloydesign concepts and outcomes. Adv. Eng. Mater. 2004, 6, 299–303. [Google Scholar] [CrossRef]
  2. Senkov, O.N.; Wilks, G.B.; Miracle, D.B.; Chuang, C.P.; Liaw, P.K. Refractory high-entropy alloys. Intermetallics 2010, 18, 1758–1765. [Google Scholar] [CrossRef]
  3. Srikanth, M.; Annamalai, A.R.; Muthuchamy, A.; Jen, C.-P. A review of the latest developments in the field of refractory high-entropy alloys. Crystals 2021, 11, 612. [Google Scholar] [CrossRef]
  4. Wang, Z.; Yan, Y.; Wu, Y.; Huang, X.; Zhang, Y.; Su, Y.; Qiao, L. Corrosion and tribocorrosion behavior of equiatomic refrac-tory medium entropy TiZr (Hf, Ta, Nb) alloys in chloride solutions. Corros. Sci. 2022, 199, 110166. [Google Scholar] [CrossRef]
  5. Moghaddam, A.O.; Shaburova, N.A.; Samodurova, M.N.; Abdollahzadeh, A.; Trofimov, E.A. Additive manufacturing of high entropy alloys: A practical review. J. Mater. Sci. Technol. 2020, 77, 131–162. [Google Scholar] [CrossRef]
  6. Zhou, J.-L.; Cheng, Y.-H.; Chen, Y.-X.; Liang, X.-B. Composition design and preparation process of refractory highentropy al-loys: A review. Int. J. Refract. Met. Hard Mater. 2022, 105, 105836. [Google Scholar] [CrossRef]
  7. Senkov, O.N.; Wilks, G.B.; Scott, J.M.; Miracle, D.B. Mechanical properties of Nb25Mo25Ta25W25 and V20Nb20Mo20Ta20W20 refractory high entropy alloys. Intermetallics 2011, 19, 698–706. [Google Scholar] [CrossRef]
  8. Zhang, M.; Zhang, B.; Wen, Y.; Qu, X. Research progress on selective laser melting processing for nickel-based superalloy. Int. J. Miner. Met. Mater. 2022, 29, 369–388. [Google Scholar] [CrossRef]
  9. Liu, Q.; Wang, G.; Sui, X.; Liu, Y.; Li, X.; Yang, J. Microstructure and mechanical properties of ultra-fine grained MoNbTaTiV refractory high-entropy alloy fabricated by spark plasma sintering. J. Mater. Sci. Technol. 2019, 35, 2600–2607. [Google Scholar] [CrossRef]
  10. Duriagina, Z.; Kulyk, V.; Kovbasiuk, T.; Vasyliv, B.; Kostryzhev, A. Synthesis of functional surface layers on stainless steels by laser alloying. Metals 2021, 11, 434. [Google Scholar] [CrossRef]
  11. Cai, Y.; Zhu, L.; Cui, Y.; Han, J. Manufacturing of FeCoCrNi + FeCoCrNiAl laminated high-entropy alloy by laser melting deposition (LMD). Mater. Lett. 2021, 289, 129445. [Google Scholar] [CrossRef]
  12. Dobbelstein, H.; Gurevich, E.L.; George, E.P.; Ostendorf, A.; Laplanche, G. Laser metal deposition of a refractory TiZrN-bHfTa high-entropy alloy. Addit. Manuf. 2018, 24, 386–390. [Google Scholar]
  13. Chen, S.H.; Zhang, J.S.; Guan, S.; Li, T.; Liu, J.Q.; Wu, F.F.; Wu, Y.C. Microstructure and mechanical properties of WNbMoTaZrx (x = 0.1, 0.3, 0.5, 1.0) refractory high entropy alloys. Mater. Sci. Eng. A 2022, 835, 142701. [Google Scholar] [CrossRef]
  14. Lu, S.; Li, X.; Liang, X.; Shao, W.; Yang, W.; Chen, J. Effect of Al content on the oxidation behavior of refractory high-entropy alloy AlMo0.5NbTa0.5TiZr at elevated temperatures. Int. J. Refract. Met. Hard Mater. 2022, 105, 105812. [Google Scholar] [CrossRef]
  15. Li, Q.; Ma, T.; Jin, Y.; Wang, X.; Dong, D.; Zhu, D. Effect of Sn and Mo on microstructure and electrochemical property of TiZrTaNb high entropy alloys. Crystals 2021, 11, 1527. [Google Scholar] [CrossRef]
  16. Li, Y.; Liang, H.; Nie, Q.; Qi, Z.; Deng, D.; Jiang, H.; Cao, Z. Microstructures and wear resistance of CoCrFeNi2V0.5Tix High-Entropy Alloy Coatings Prepared by Laser Cladding. Crystals 2020, 10, 352. [Google Scholar] [CrossRef]
  17. Pu, Z.; Cai, S.-L.; Dai, L.-H. Effective strengthening and toughening in high entropy-alloy by combining extrusion machining and heat treatment. Scr. Mater. 2022, 213, 114630. [Google Scholar] [CrossRef]
  18. Tekin, M.; Polat, G.; Kalay, Y.E.; Kotan, H. Grain size stabilization of oxide dispersion strengthened CoCrFeNi-Y2O3 high entropy alloys synthesized by mechanical alloying. J. Alloys Compd. 2021, 887, 161363. [Google Scholar] [CrossRef]
  19. Wang, B.; Wang, Q.; Lu, N.; Liang, X.; Shen, B. Enhanced high-temperature strength of HfNbTaTiZrV refractory high-entropy alloy via Al2O3 reinforcement. J. Mater. Sci. Technol. 2022, 123, 191–200. [Google Scholar] [CrossRef]
  20. Yang, C.; Bian, H.; Aoyagi, K.; Hayasaka, Y.; Yamanaka, K.; Chiba, A. Synergetic strengthening in HfMoNbTaTi refractory high-entropy alloy via disordered nanoscale phase and semicoherent refractory particle. Mater. Des. 2021, 212, 110248. [Google Scholar] [CrossRef]
  21. Wang, P.; Zhang, B.; Tan, C.C.; Raghavan, S.; Lim, Y.-F.; Sun, C.-N.; Wei, J.; Chi, D. Microstructural characteristics and me-chanical properties of carbon nanotube reinforced Inconel 625 parts fabricated by selective laser melting. Mater. Des. 2016, 112, 290–299. [Google Scholar] [CrossRef]
  22. Chen, B.; Li, S.; Imai, H.; Jia, L.; Umeda, J.; Takahashi, M.; Kondoh, K. Carbon nanotube induced microstructural characteristics in powder metallurgy Al matrix composites and their effects on mechanical and conductive properties. J. Alloys Compd. 2015, 651, 608–615. [Google Scholar] [CrossRef]
  23. Iijima, S. Helical microtubules of graphitic carbon. Nature 1991, 354, 56–58. [Google Scholar] [CrossRef]
  24. Gu, D.; Rao, X.; Dai, D.; Ma, C.; Xi, L.; Lin, K. Laser additive manufacturing of carbon nanotubes (CNTs) reinforced aluminum matrix nanocomposites: Processing optimization, microstructure evolution and mechanical properties. Addit. Manuf. 2019, 29, 100801. [Google Scholar] [CrossRef]
  25. Li, Q.; Zhang, H.; Li, D.; Chen, Z.; Huang, S.; Lu, Z.; Yan, H. WxNbMoTa refractory high-entropy alloys fabricated by laser cladding deposition. Materials 2019, 12, 533. [Google Scholar] [CrossRef] [PubMed] [Green Version]
  26. Takeuchi, A.; Inoue, A. Classification of bulk metallic glasses by atomic size difference, heat of mixing and period of con-stituent elements and its application to characterization of the main alloying element. Mater. Trans. 2005, 46, 2817–2829. [Google Scholar] [CrossRef] [Green Version]
  27. Akira, Y.; Yutaka, K.; Yoshihiro, H. Full width at half maximum intensity of the G band in the first order Raman spectrum of carbon material as a parameter for graphitization. Lett. Ed. Carbon 2006, 4, 2330–2356. [Google Scholar]
  28. Varillas, J.; Očenášek, J.; Torner, J.; Alcalá, J. Understanding imprint formation, plastic instabilities and hardness evolutions in FCC, BCC and HCP metal surfaces. Acta Mater. 2021, 217, 117122. [Google Scholar] [CrossRef]
  29. Zhang, M.; Zhou, X.; Zhu, W.; Li, J. Influence of annealing on microstructure and mechanical properties of refractory CoCrMoNbTi0.4 high-entropy alloy. Met. Mater. Trans. A 2018, 49, 1313–1327. [Google Scholar] [CrossRef]
Figure 1. SEM image showing the morphology of 0.8 wt.% CNTs/CoCrMoNbTi0.4 mixed powder after ball milling.
Crystals 12 01678 g001
Figure 2. XRD patterns of LMD-fabricated specimens at various processing parameters.
Crystals 12 01678 g002
Figure 3. (a,b) Raman spectra of thin-walled forming parts at different processing parameters.
Crystals 12 01678 g003
Figure 4. Two-dimensional morphology profile and three-dimensional morphology surface morphologies of RHEA specimens corresponding to the linear densities of (a1,a2) El = 2.8 J/mm, (b1,b2) El = 3.2 J/mm, (c1,c2) El = 3.6 J/mm, (d1,d2) El = 4.0 J/mm, (e1,e2) El = 4.4 J/mm.
Crystals 12 01678 g004
Figure 5. OM image of cross-sectional morphology of thin-walled parts before etching at different processing parameters. (a) El = 2.8 J/mm, (b) El = 3.2 J/mm, (c) El = 3.6 J/mm, (d) El = 4.0 J/mm, (e) El = 4.4 J/mm.
Crystals 12 01678 g005
Figure 6. OM micro-structure of LMD-formed CoCrMoNbTi0.4 RHEA before etching at various processing parameters. (a) El = 2.8 J/mm, (b) El = 3.2 J/mm, (c) El = 3.6 J/mm, (d) El = 4.0 J/mm, (e) El= 4.4 J/mm.
Crystals 12 01678 g006
Figure 7. Characteristic microstructure of LMD-processed specimen fabricated at various processing parameters and EDS mapping showing the elemental distributions. (a) El = 2.8 J/mm, (b) El = 3.2 J/mm, (c) El = 3.6 J/mm, (d) El = 4.0 J/mm, (e) El = 4.4 J/mm.
Crystals 12 01678 g007
Figure 8. Property testing results of specimens at various processing parameters. (a) Average microhardness on cross-section of alloys, (b) engineering stress–strain curve of alloys at room temperature compression.
Crystals 12 01678 g008
Figure 9. Images of fracture morphology of LMD-formed CoCrMoNbTi0.4 high entropy alloy with static compression at El = 3.6 J/mm. (a) Low magnification; (b) high magnification.
Crystals 12 01678 g009
Table 1. Structure and properties of RHEA elements.
ElementsCoCrMoNbTi
r/Å1.251.251.361.431.46
Tm/K17682182289627501941
ρ 0 /(g/cm3)8.847.1910.238.584.50
VEC96654
χ1.881.662.161.601.54
Structure at RTHCPBCCBCCBCCHCP
Structure at TmFCCBCCBCCBCCBCC
Table 2. Density of LMD-processed specimens at different processing parameters.
Laser Energy Density, J/mmActual Density, g/cm3Relative Density, %
2.8 7.8190.60
3.2 8.0693.50
3.6 8.2896.06
4.0 8.1894.90
4.4 7.8490.95
Table 3. Properties of LMD-processed specimens at different processing parameters.
Laser Energy Density, J/mmMicrohardness, HV0.5Fracture Stress,
MPa
Fracture Strain,
%
2.8 9421930.601.85
3.2 9761907.992.25
3.6 10152110.502.39
4.0 9991930.202.63
4.4 9441496.282.02
Publisher’s Note: MDPI stays neutral with regard to jurisdictional claims in published maps and institutional affiliations.