Design and Validation of Elastic Dies for Enhanced Metal Powder Compaction: A FEM and Experimental Study
Abstract
Highlights
- Elastic-sleeve dies enhance densification in powder compaction. Optimal taper angle α ≈ 3° maximizes contact pressure and density.
- Axial pretension Δh = 1.0–1.5 mm improves uniformity without overstress.
- FEM–experiment agreement within ±5% validates the constitutive model.
- Elastic dies reduce ejection defects compared to conventional rigid dies.
Abstract
1. Introduction
2. Materials and Methods
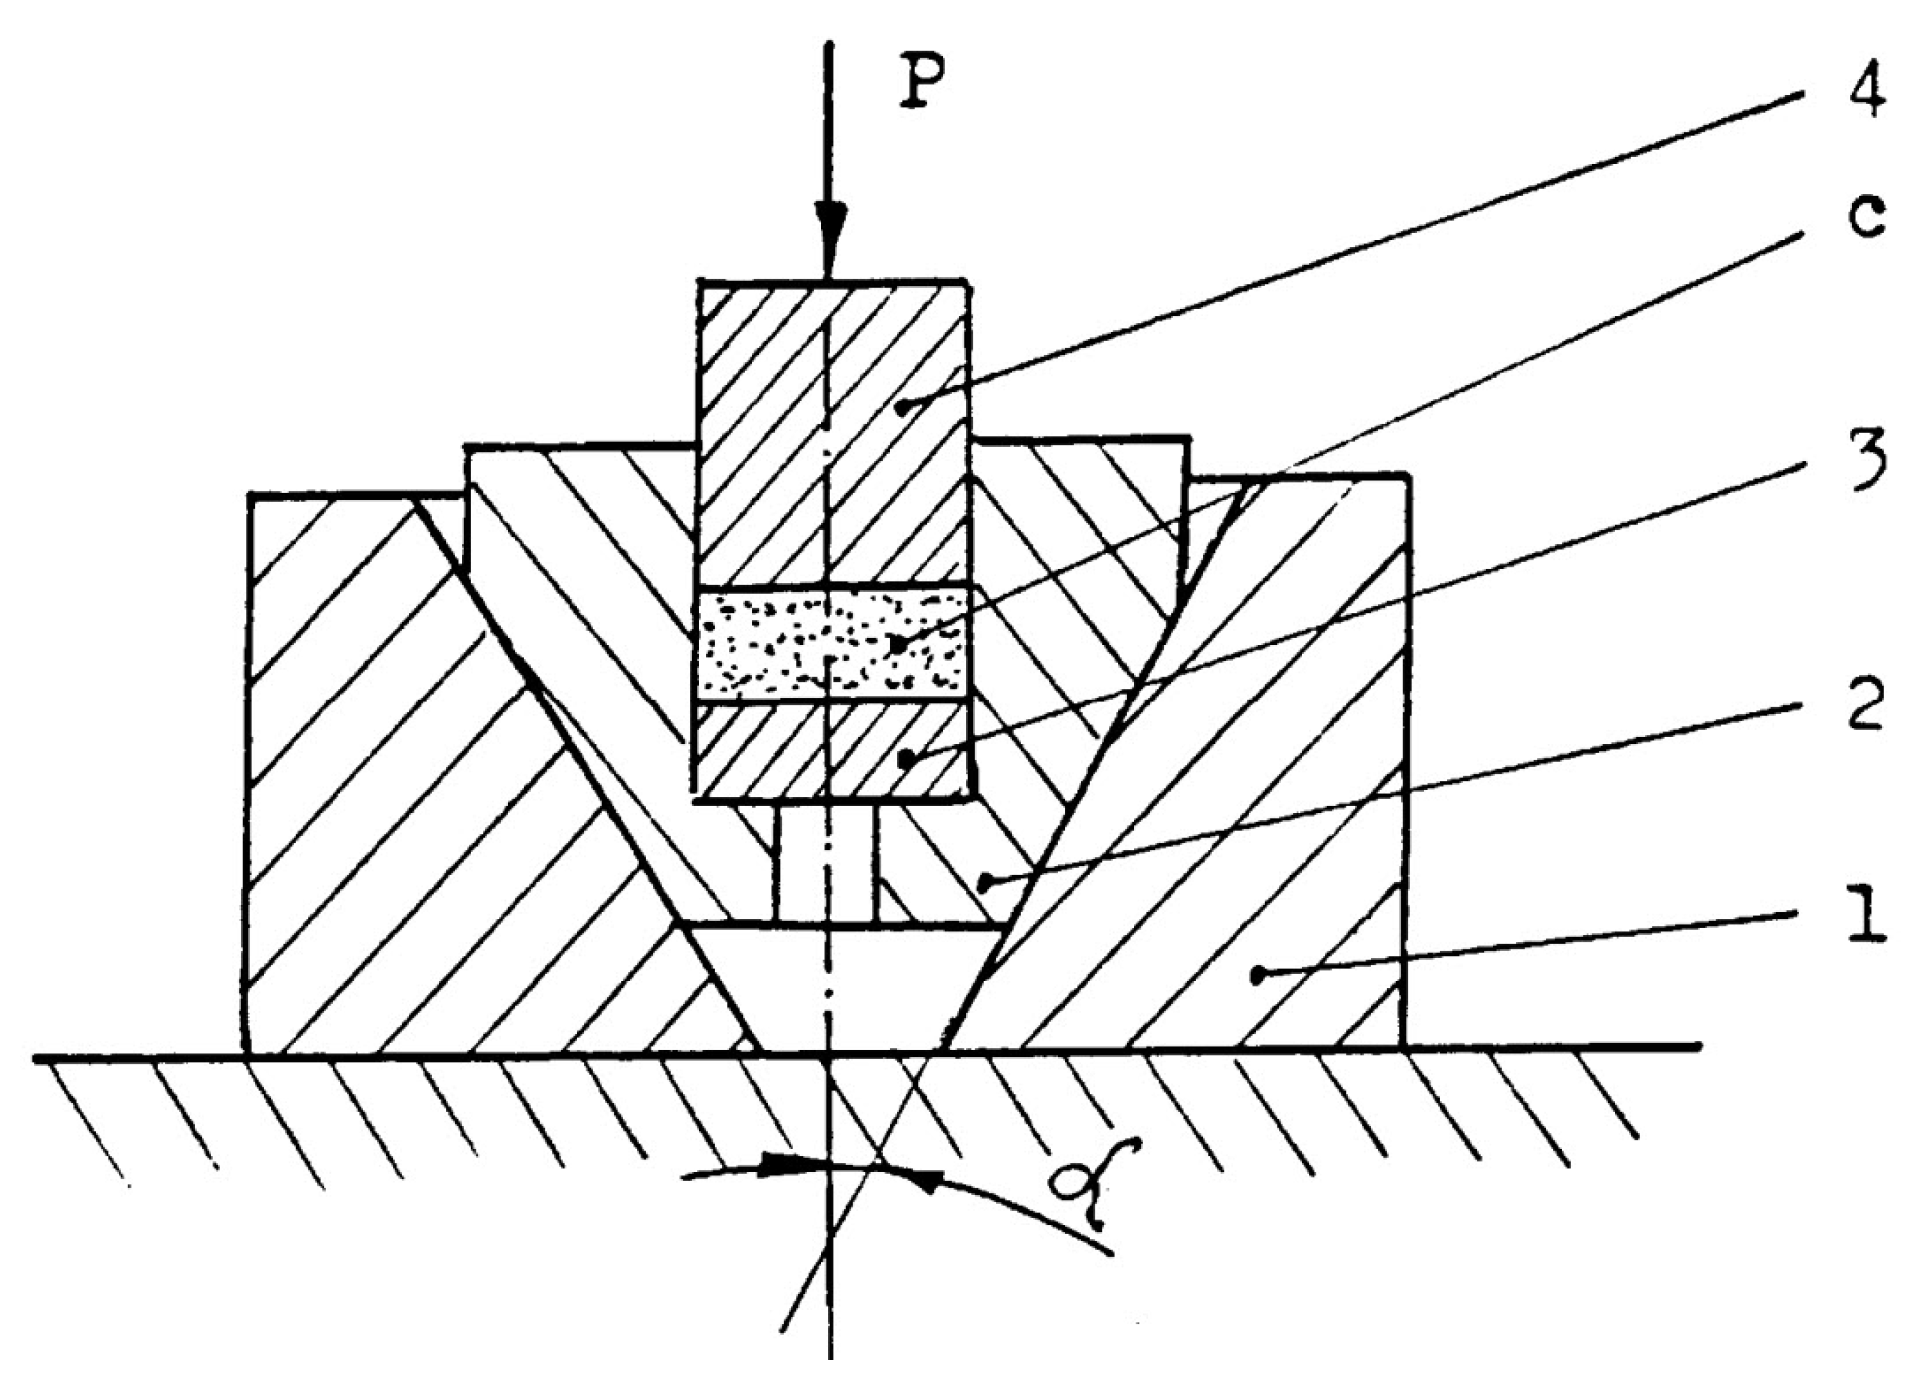
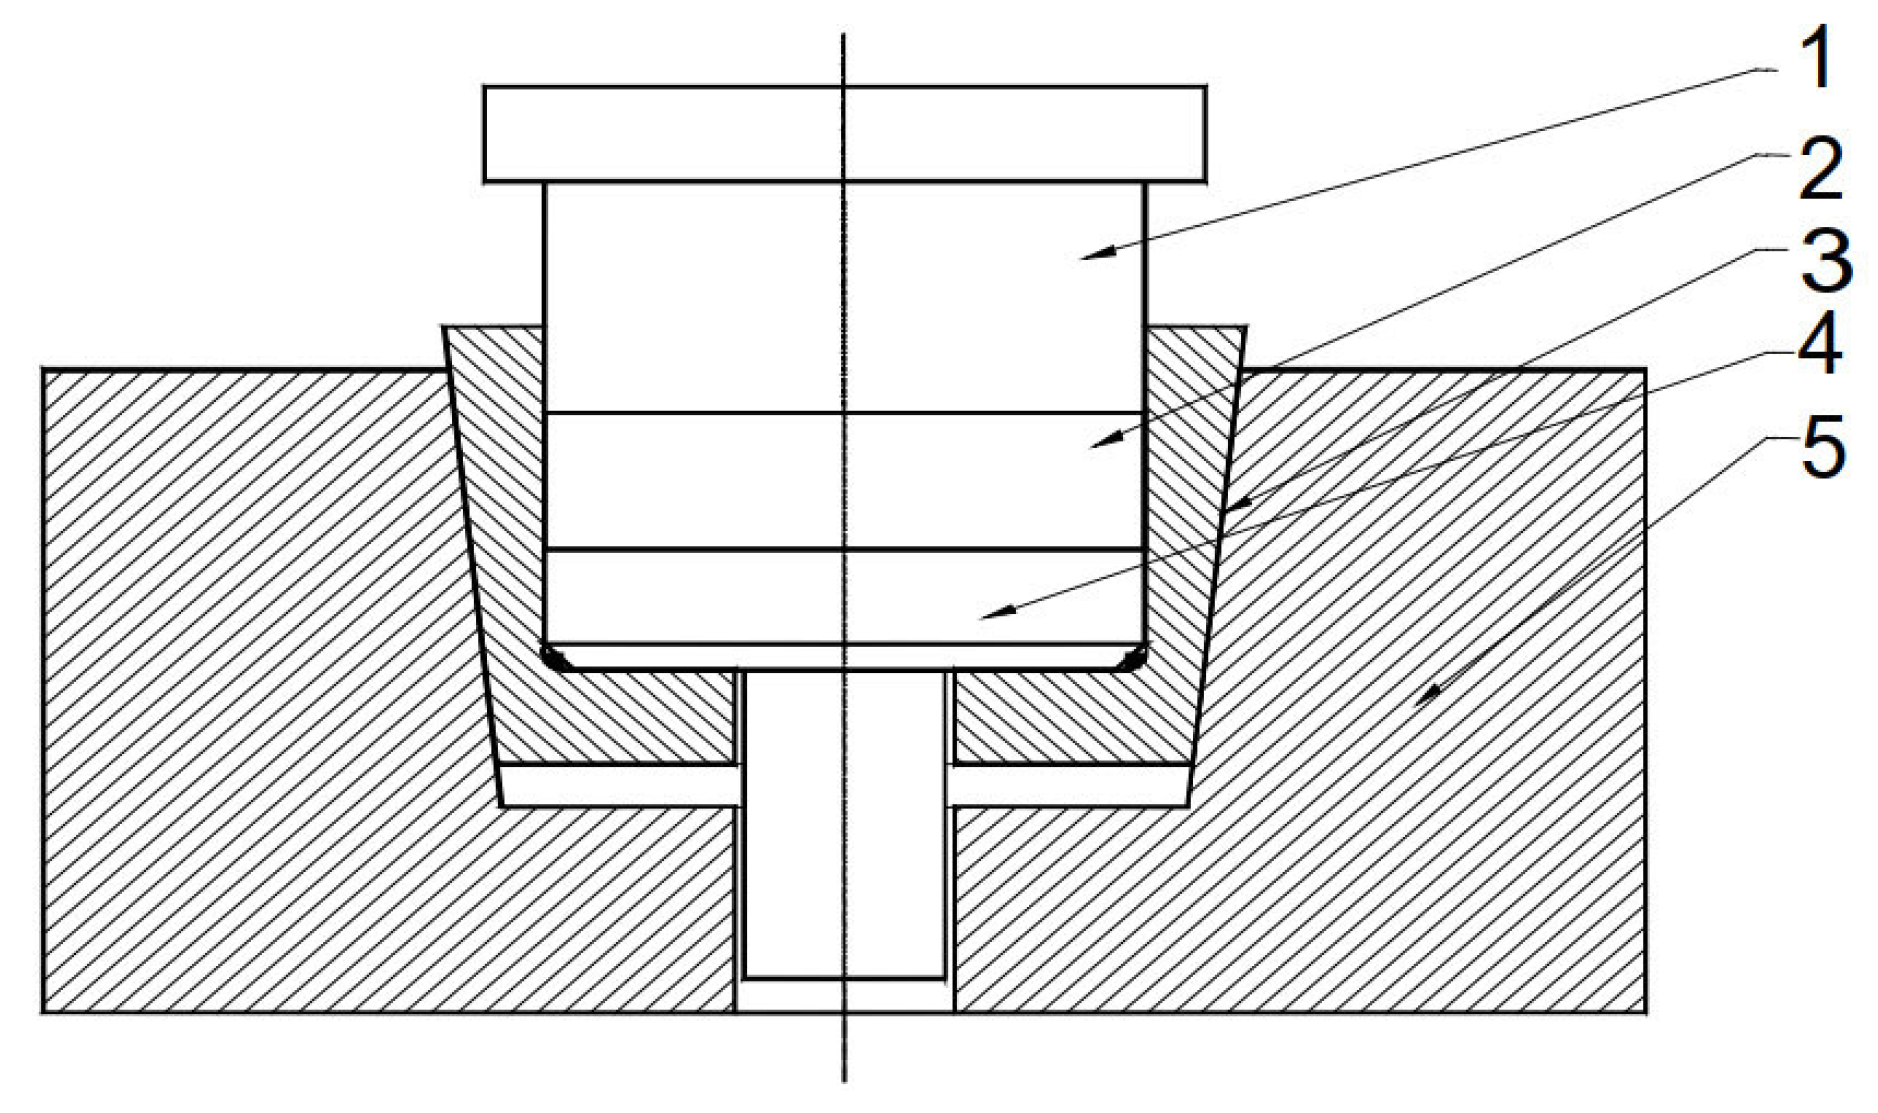
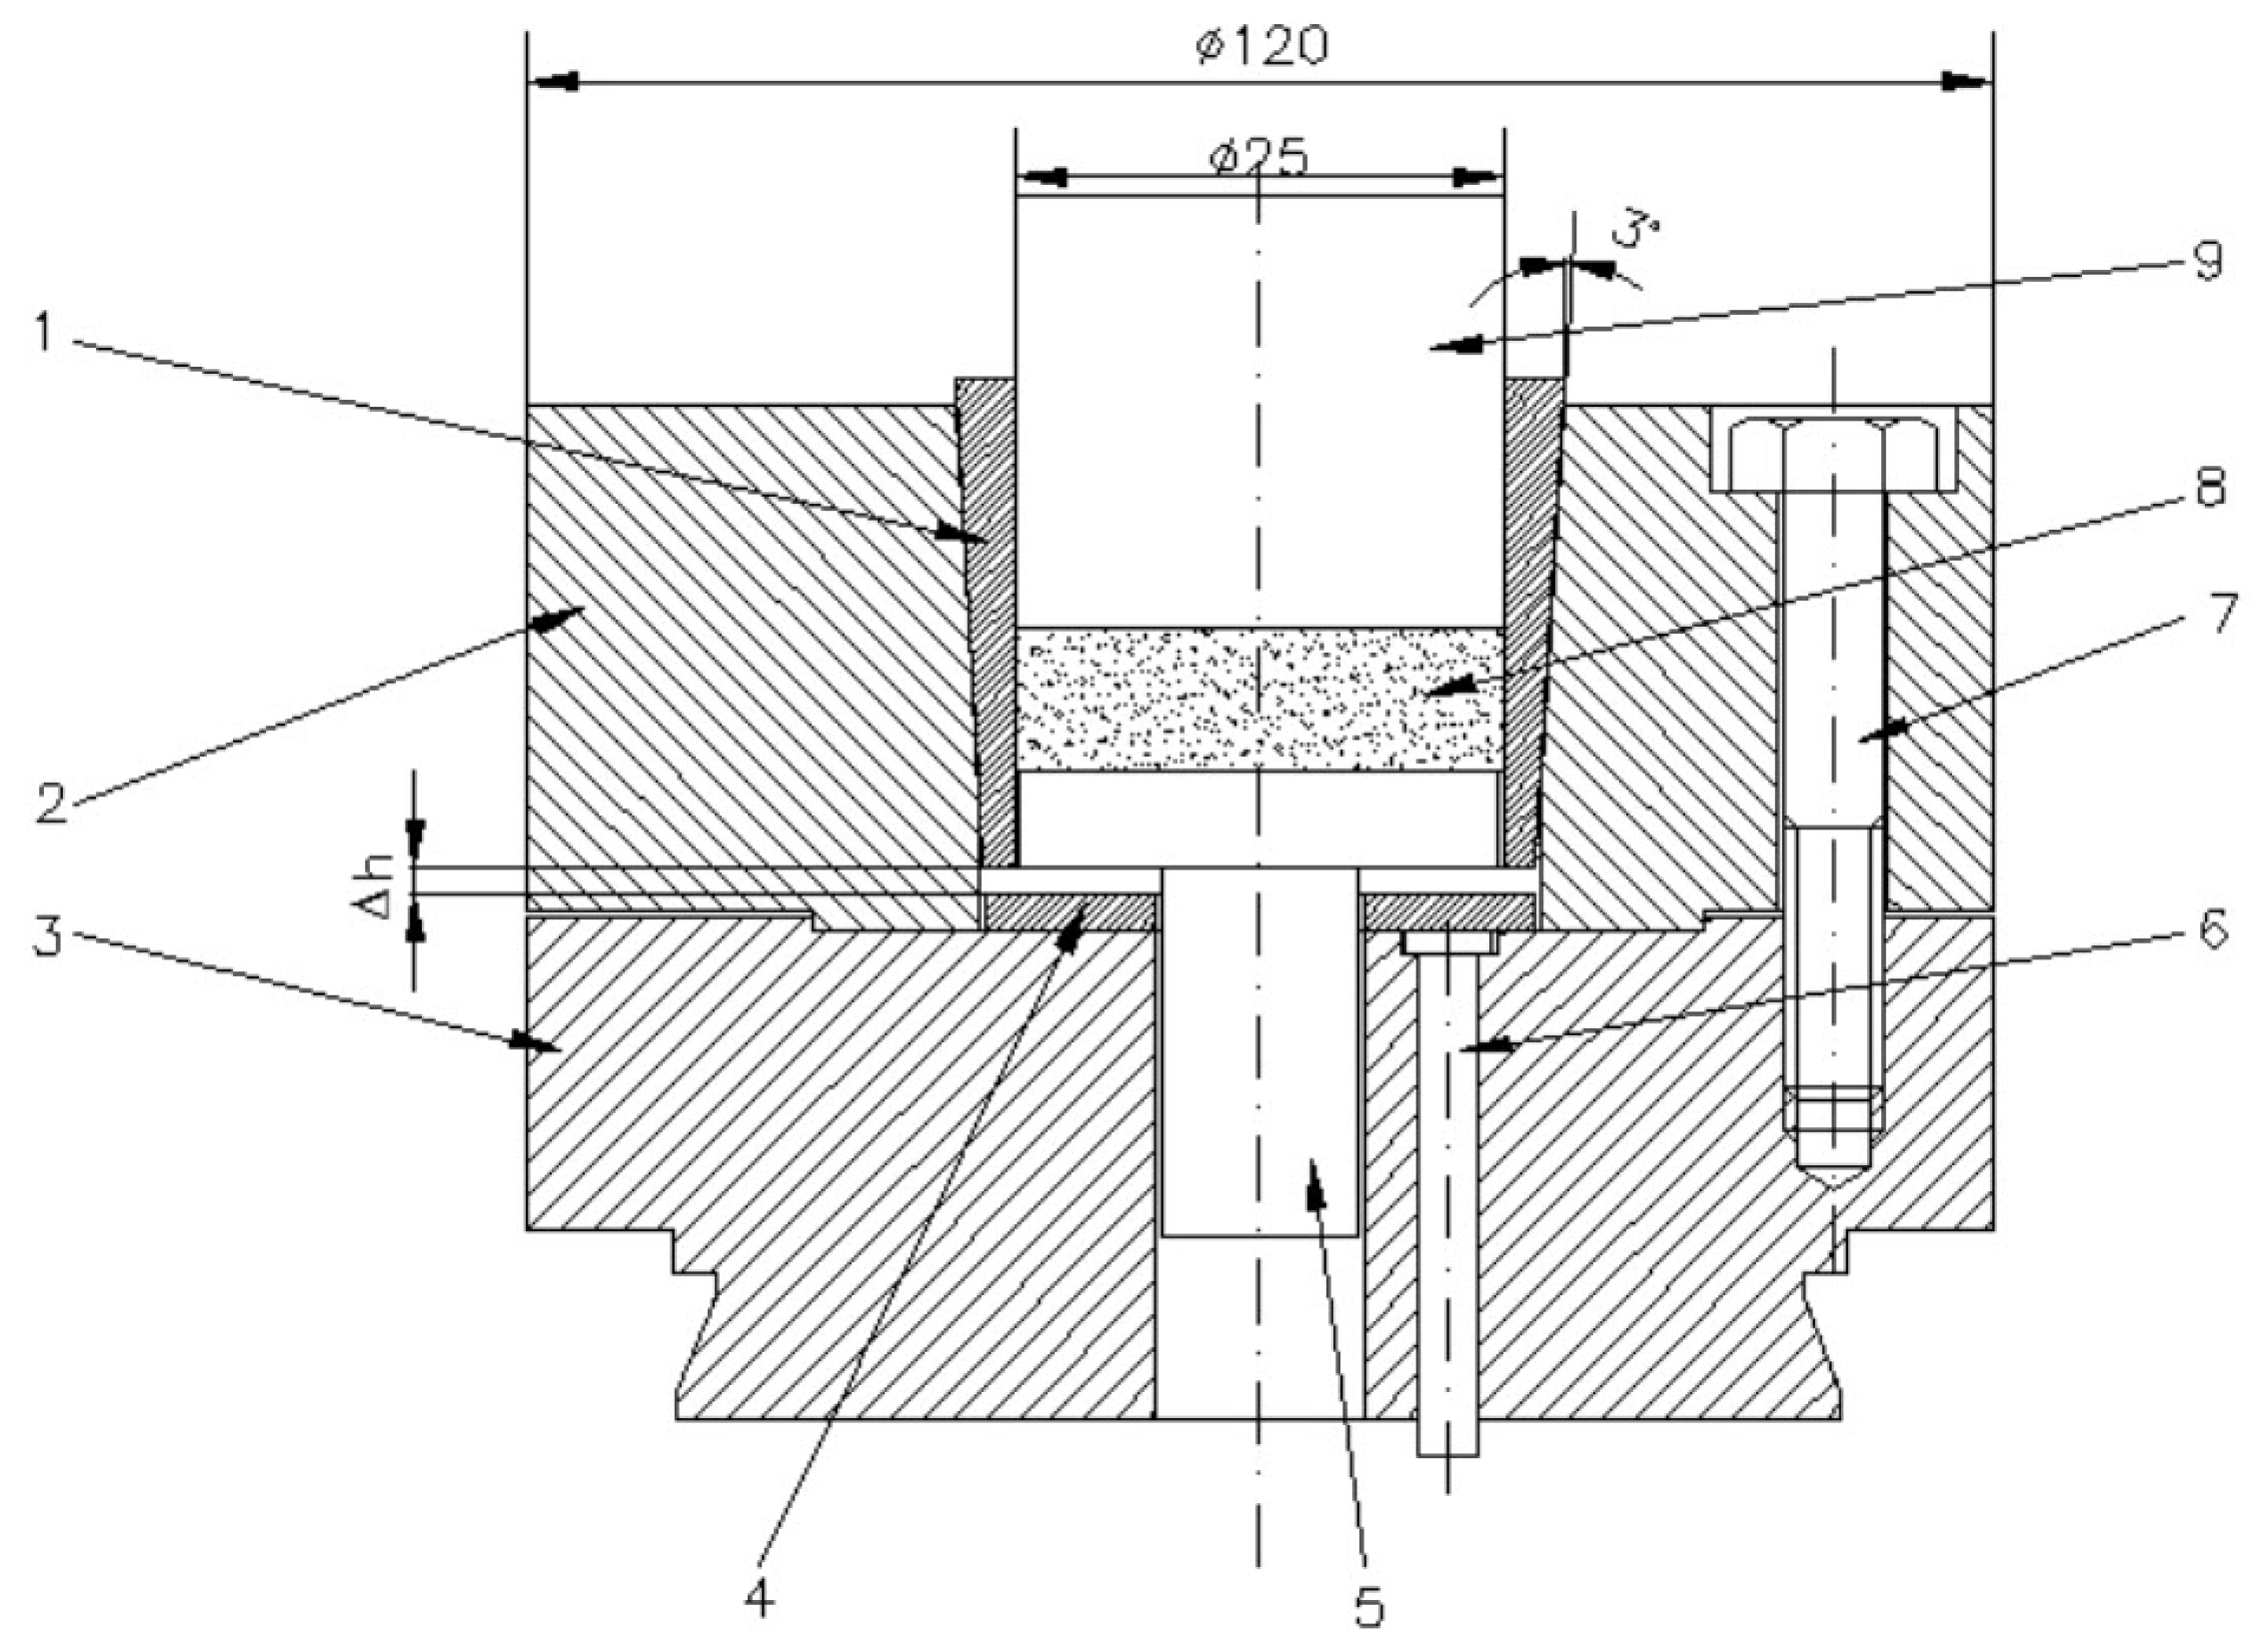
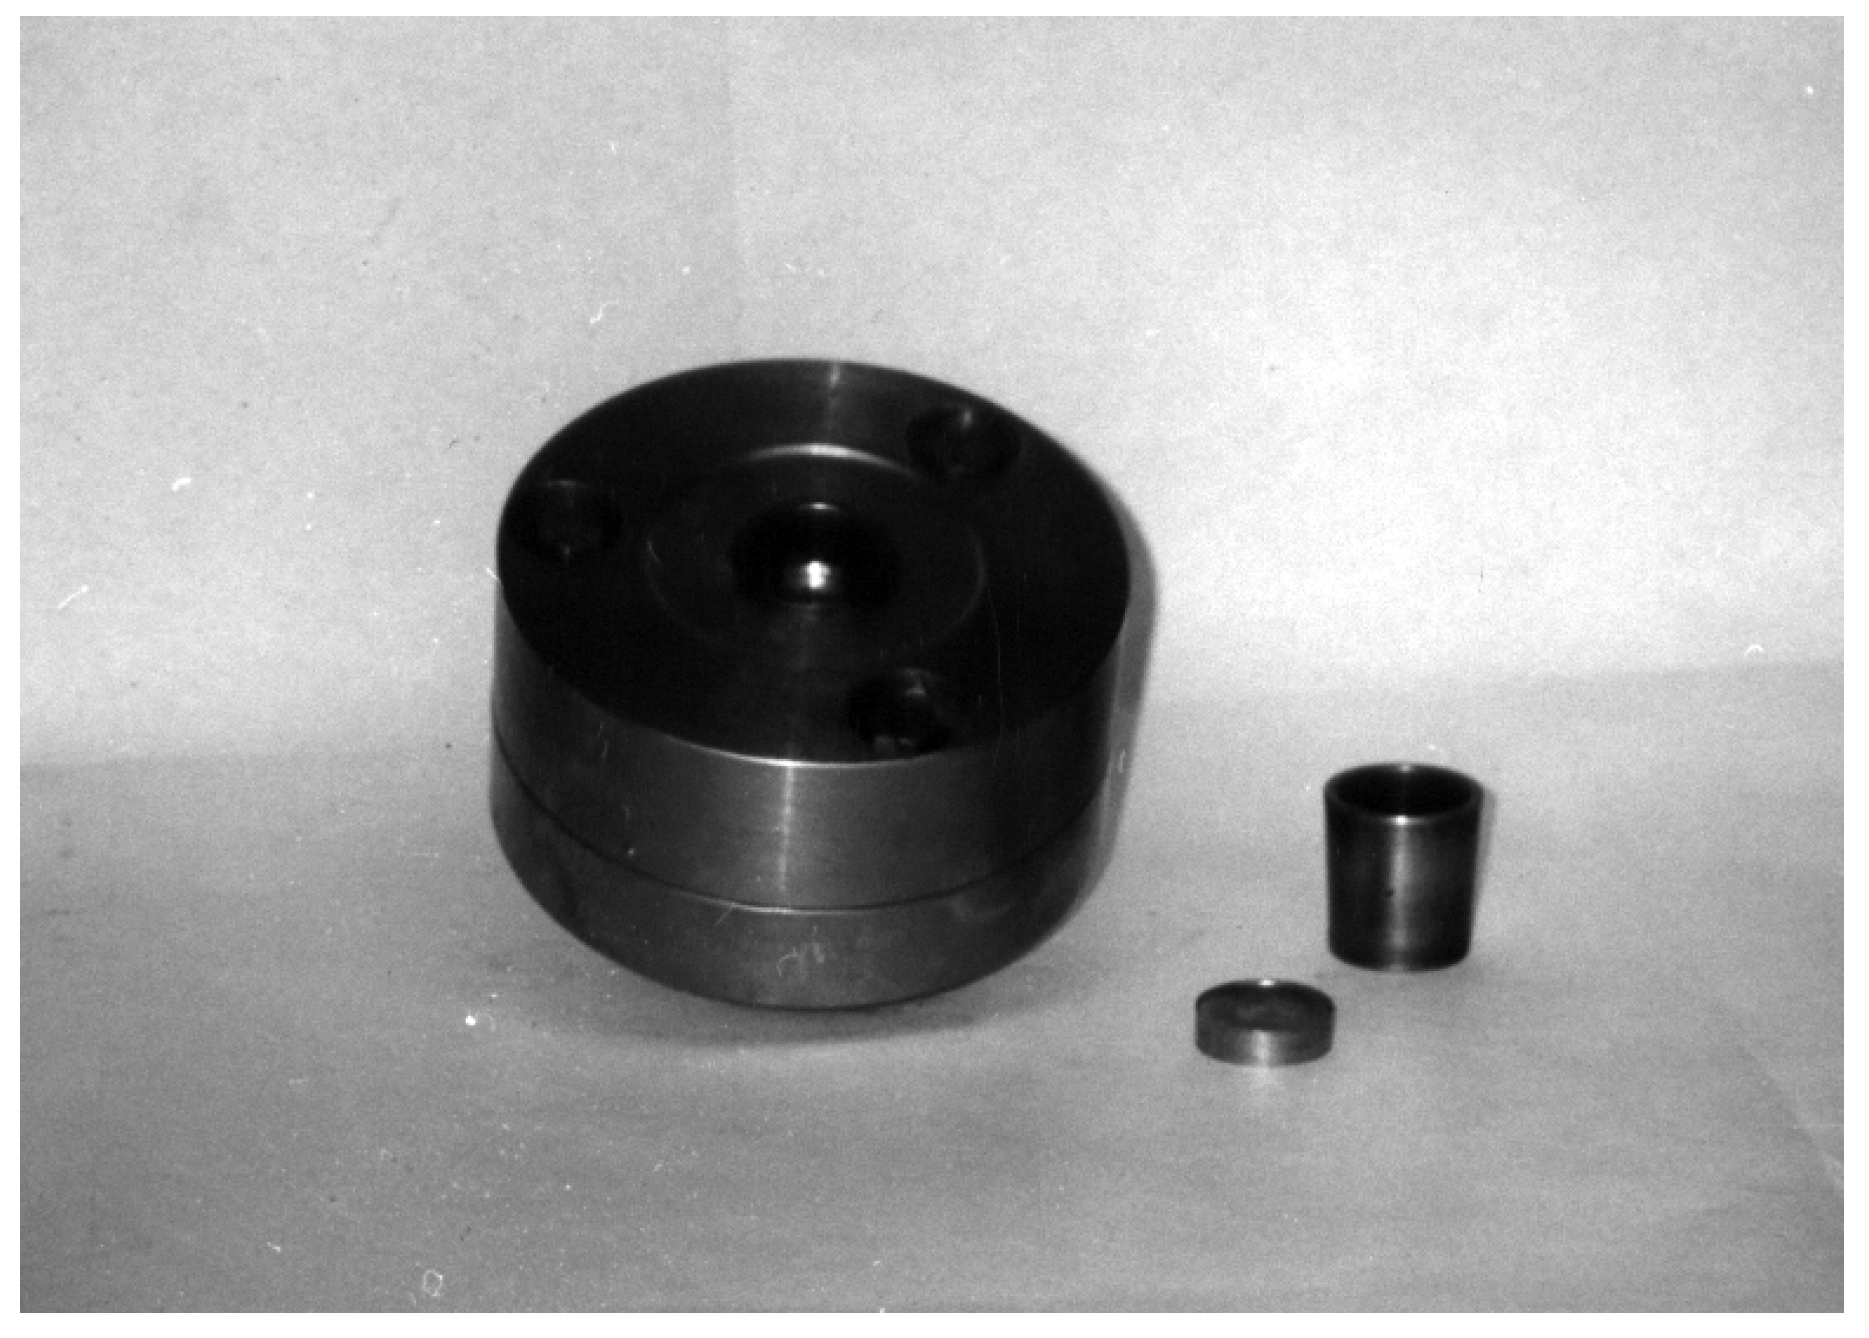
2.1. The Functional Principle of the Elastic Die
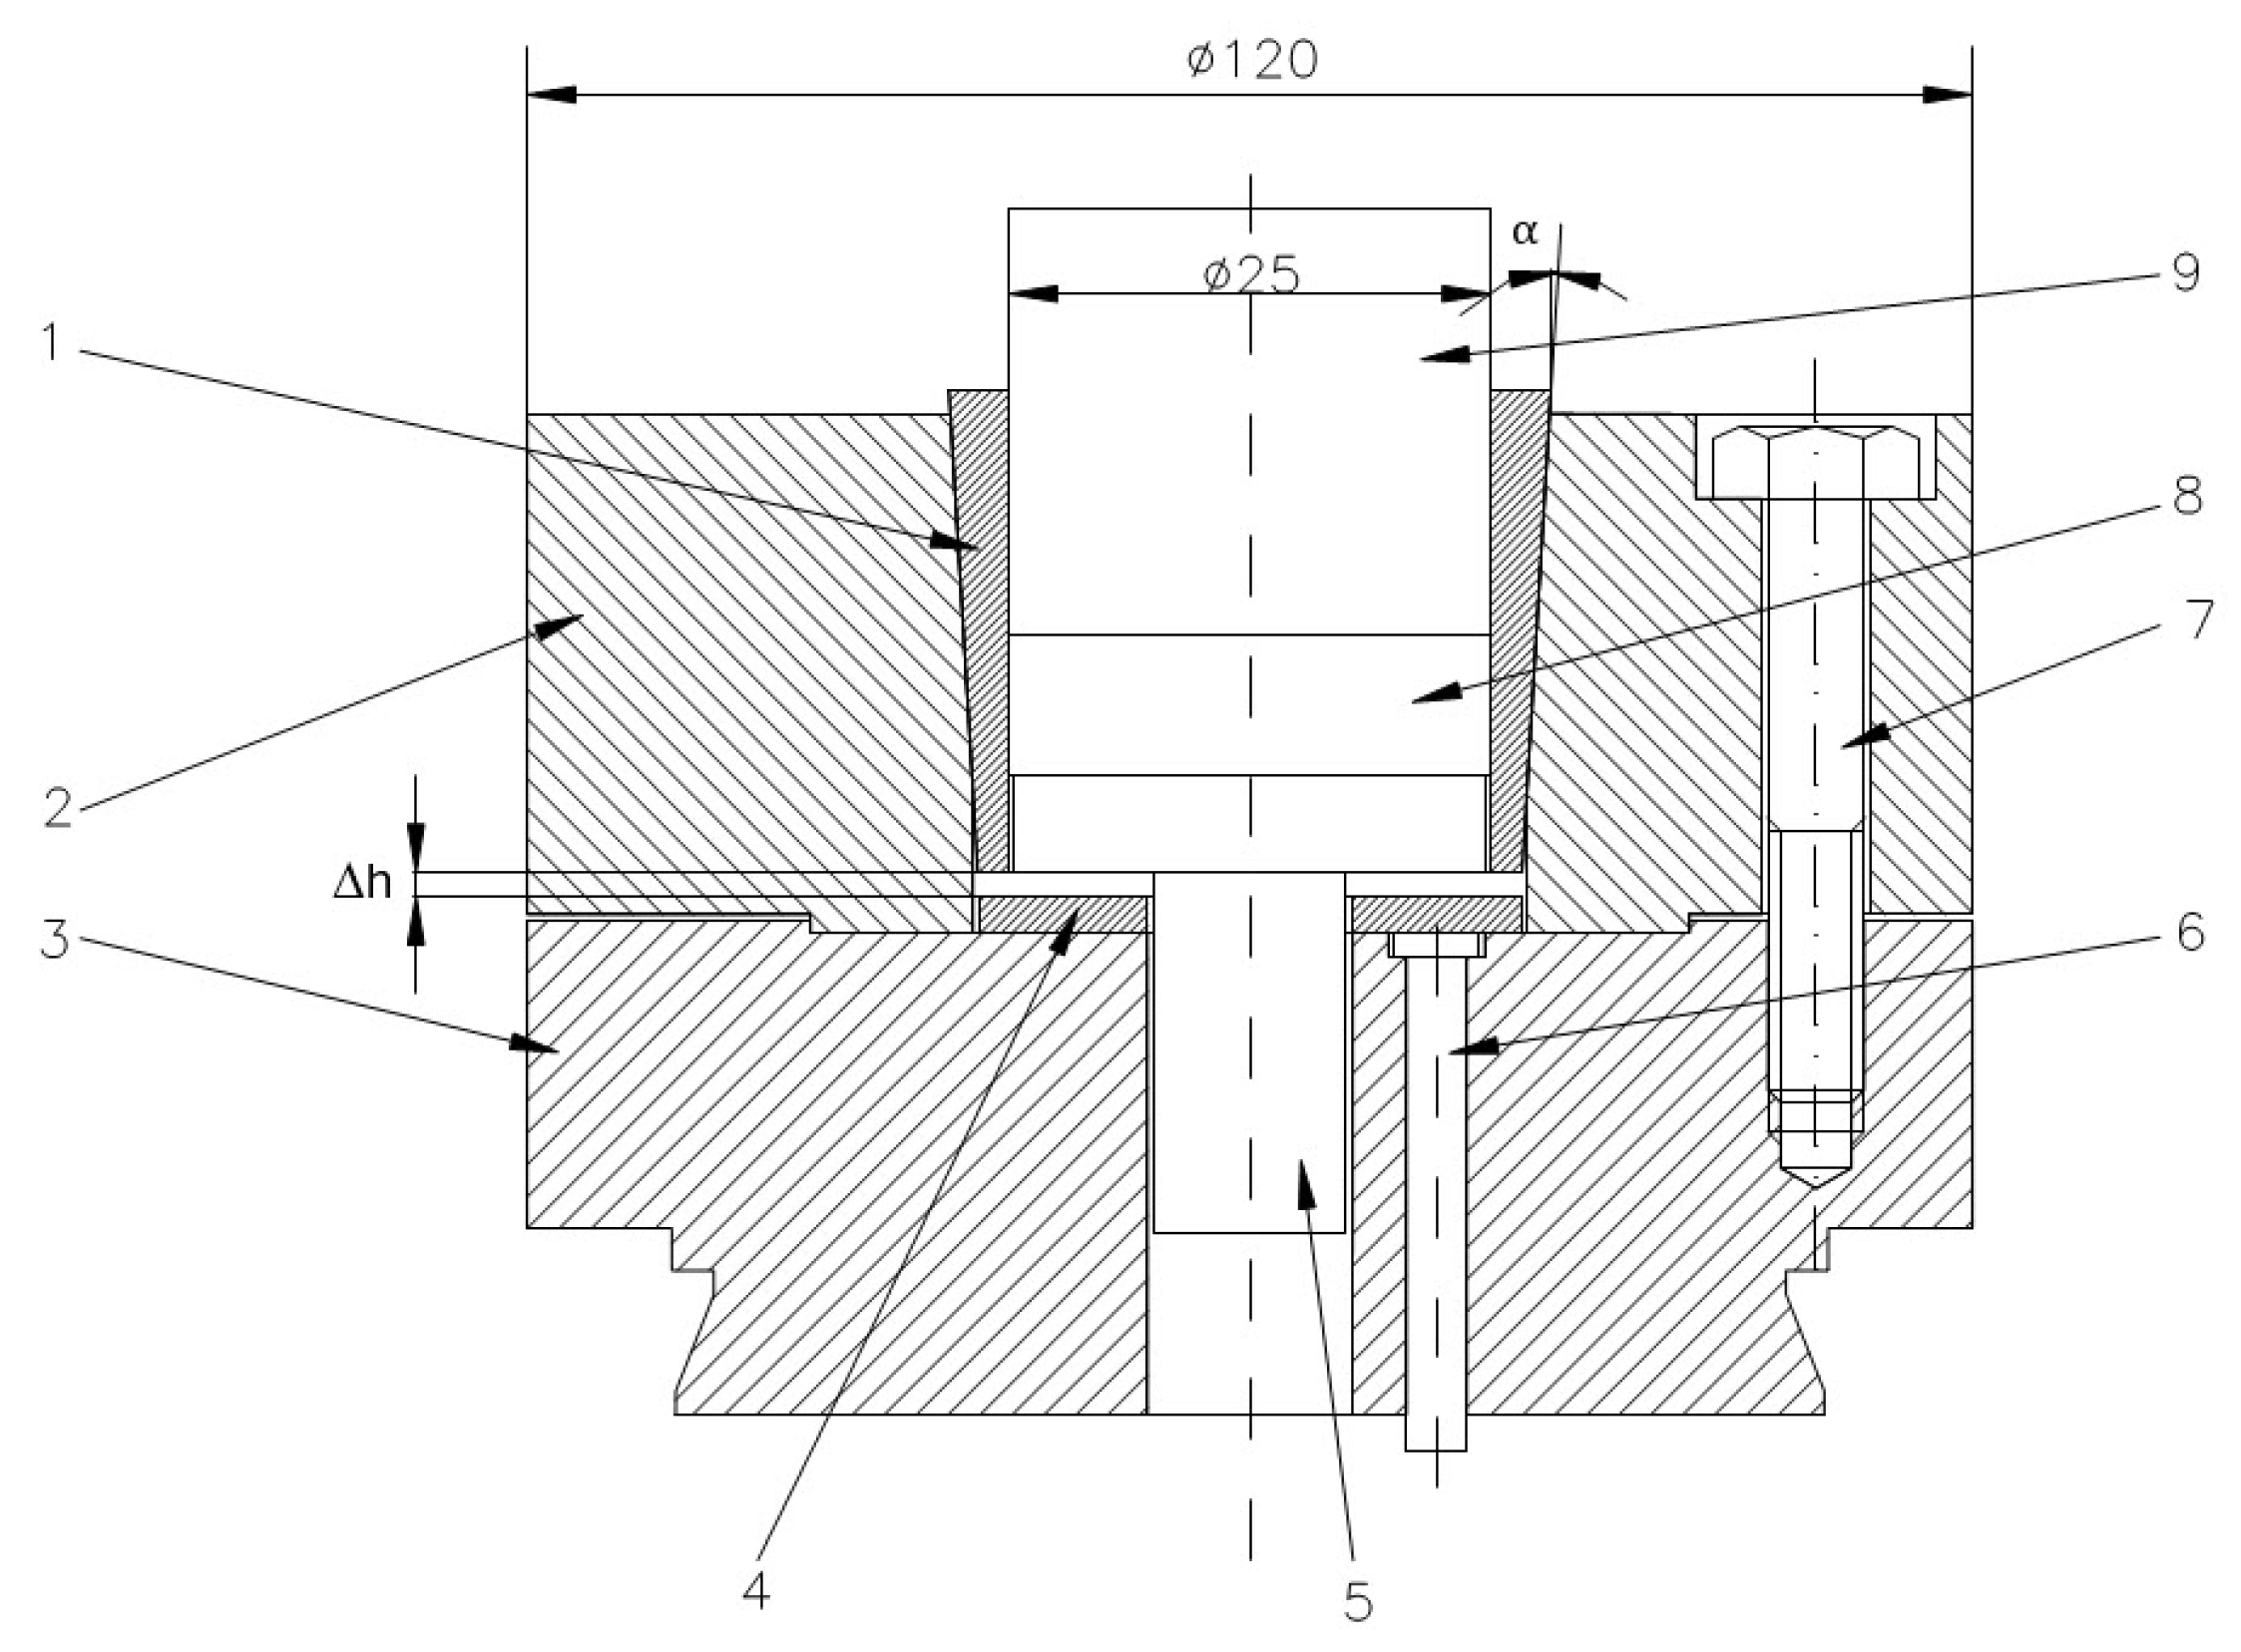
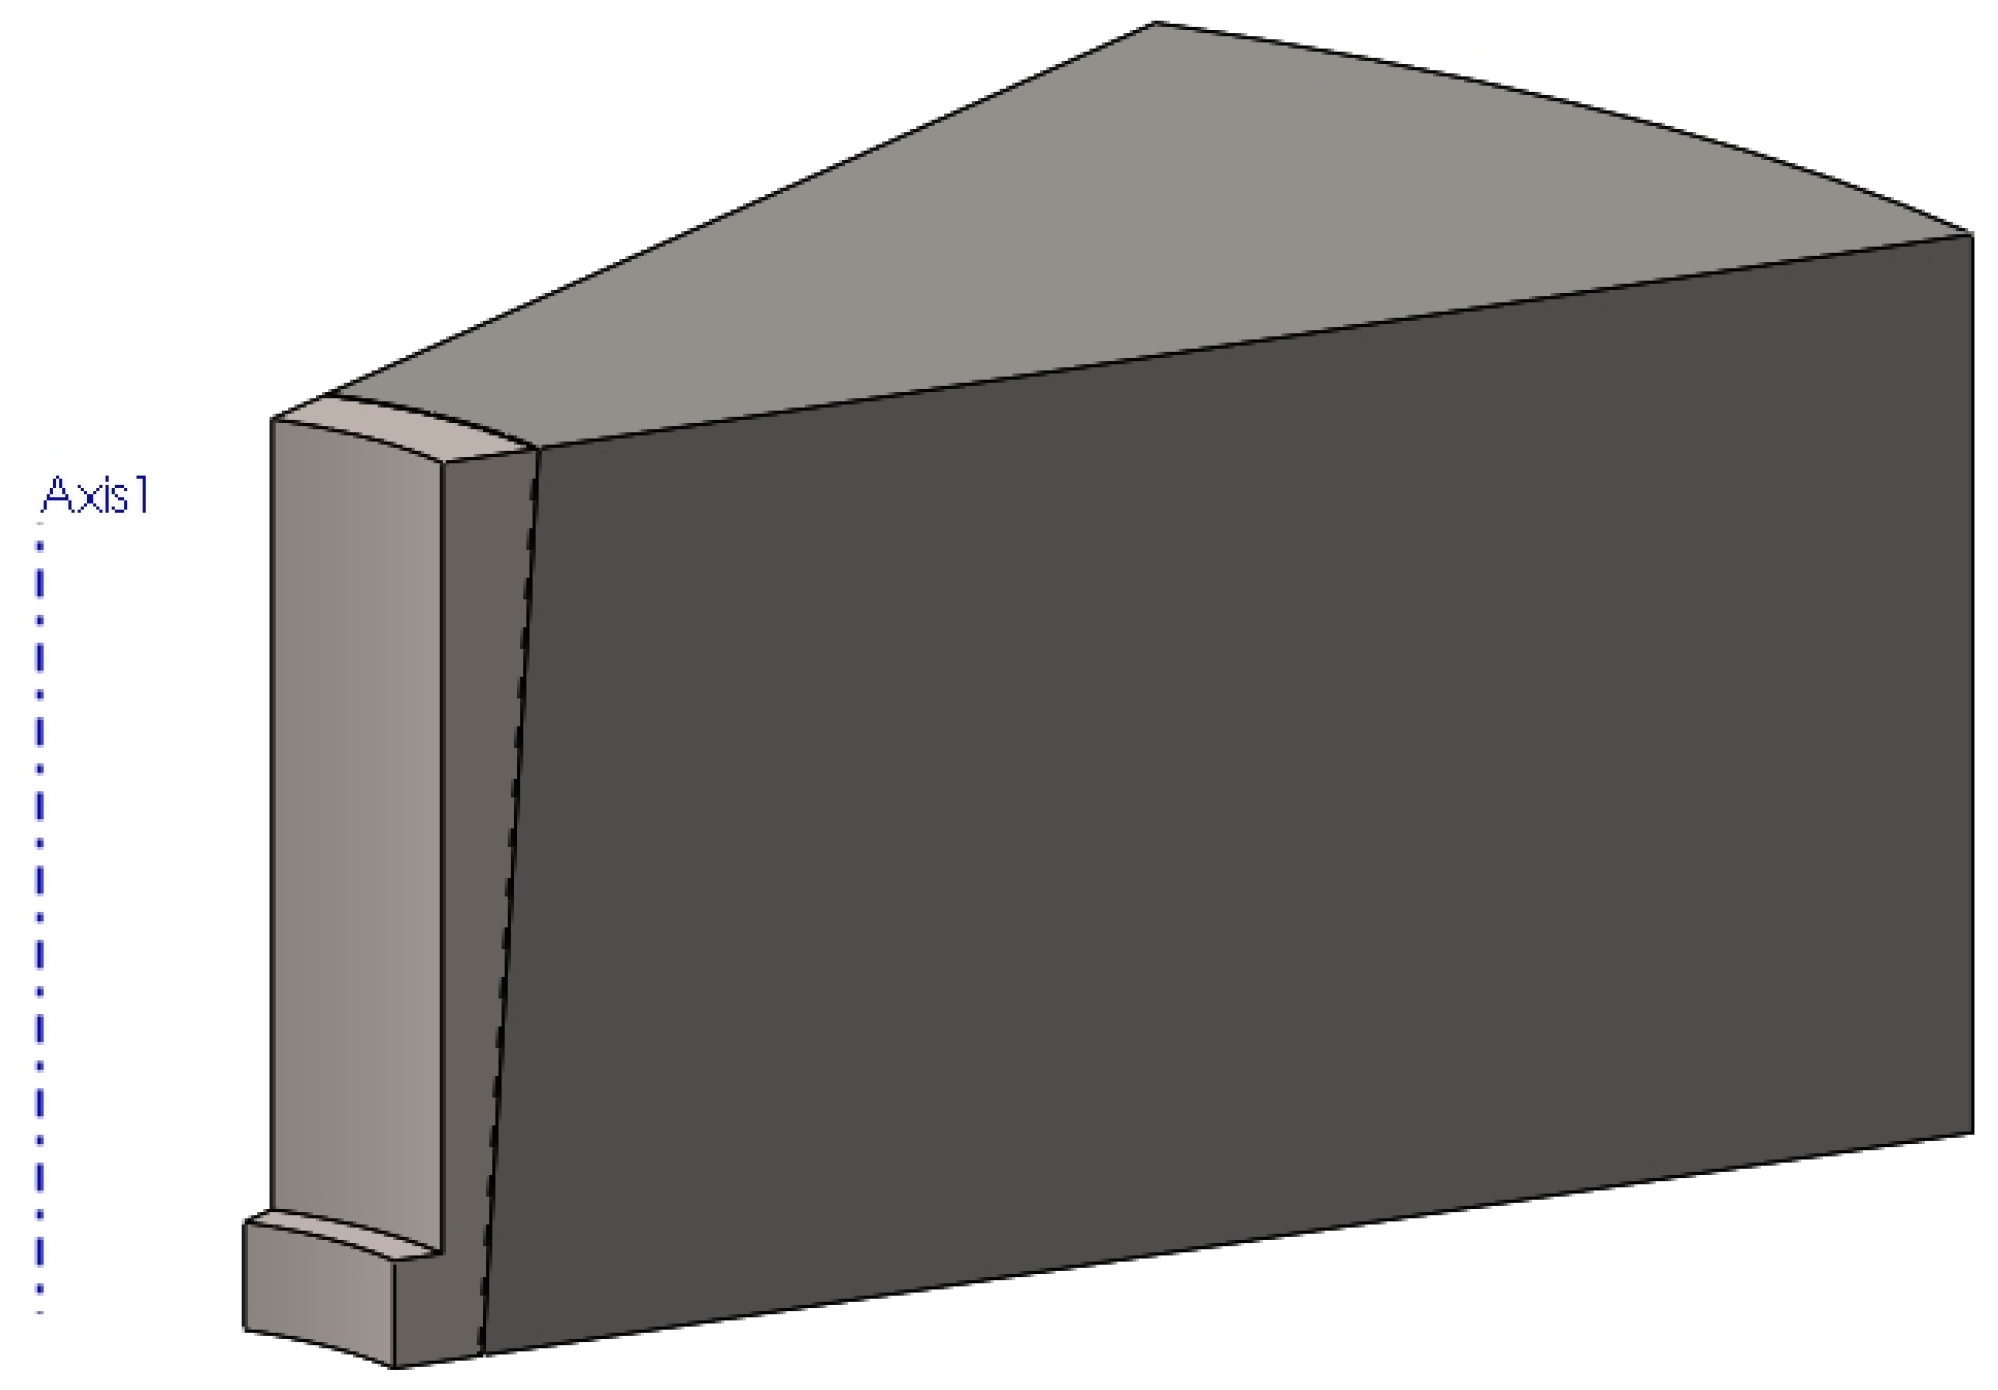
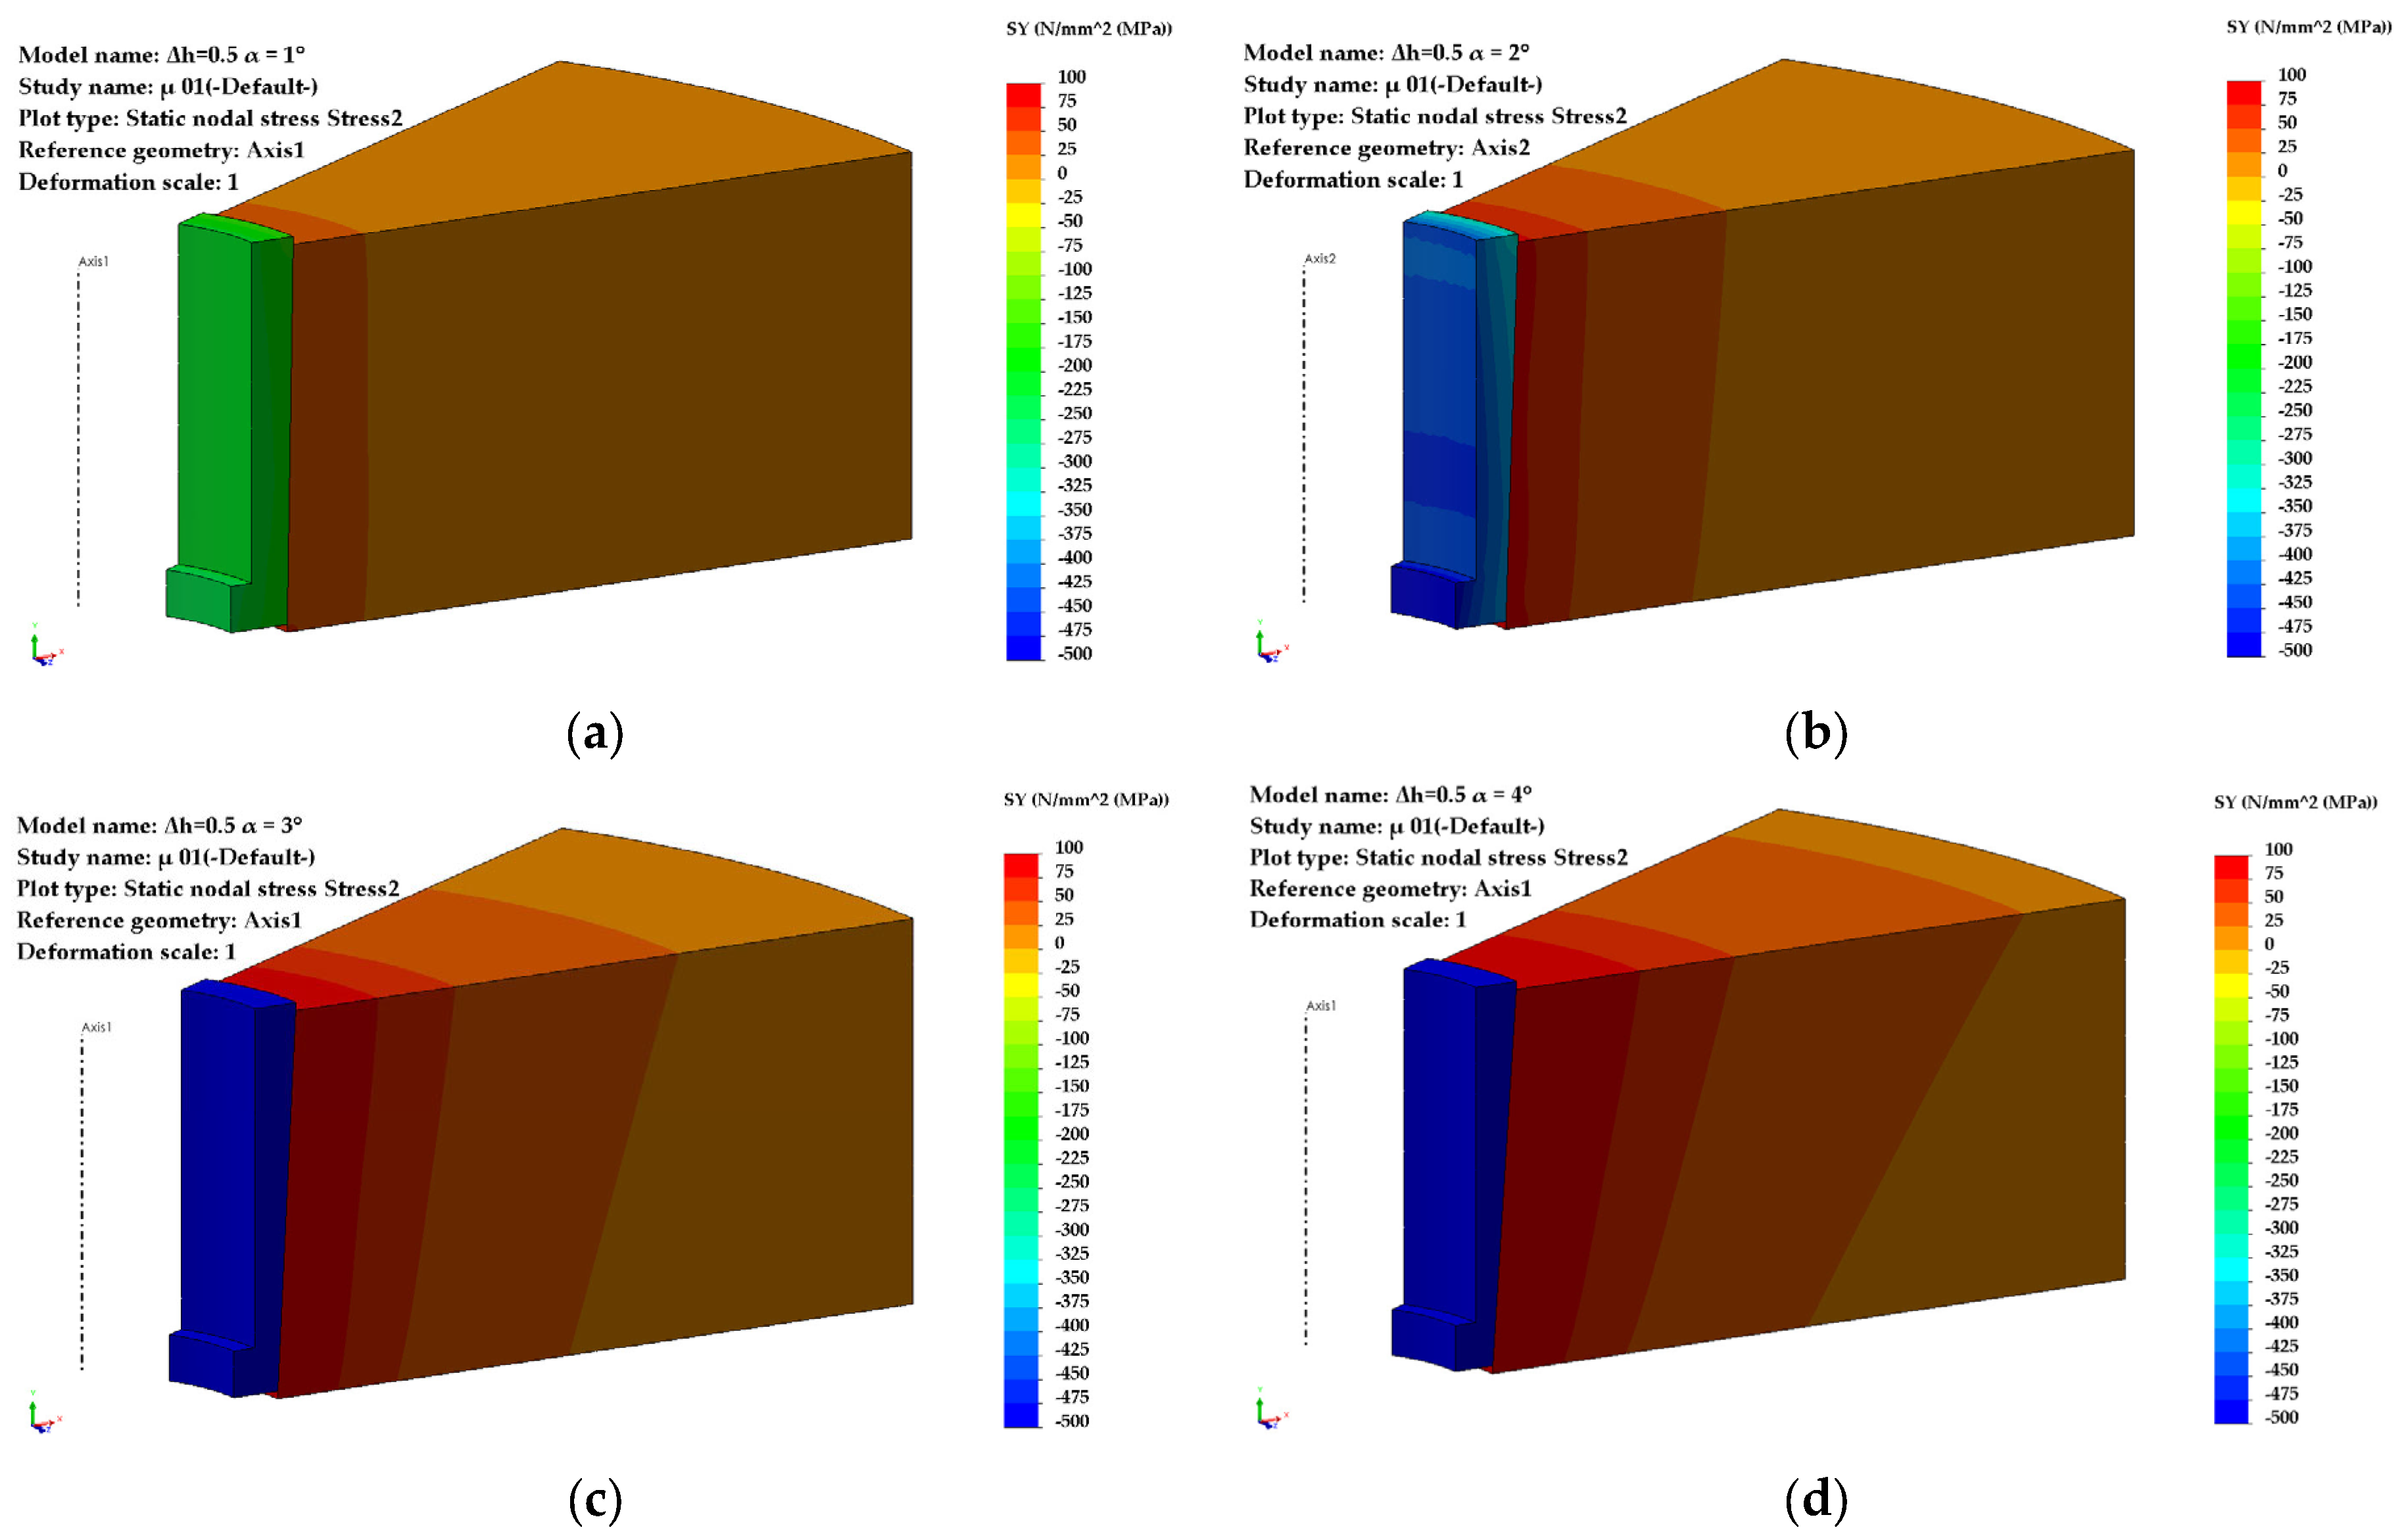
2.2. Determination of the Optimal Taper Angle of the Elastic Sleeve
2.3. Experimental Investigations on Deformation in Elastic Dies
2.3.1. Materials, Equipment, and Experimental Methods
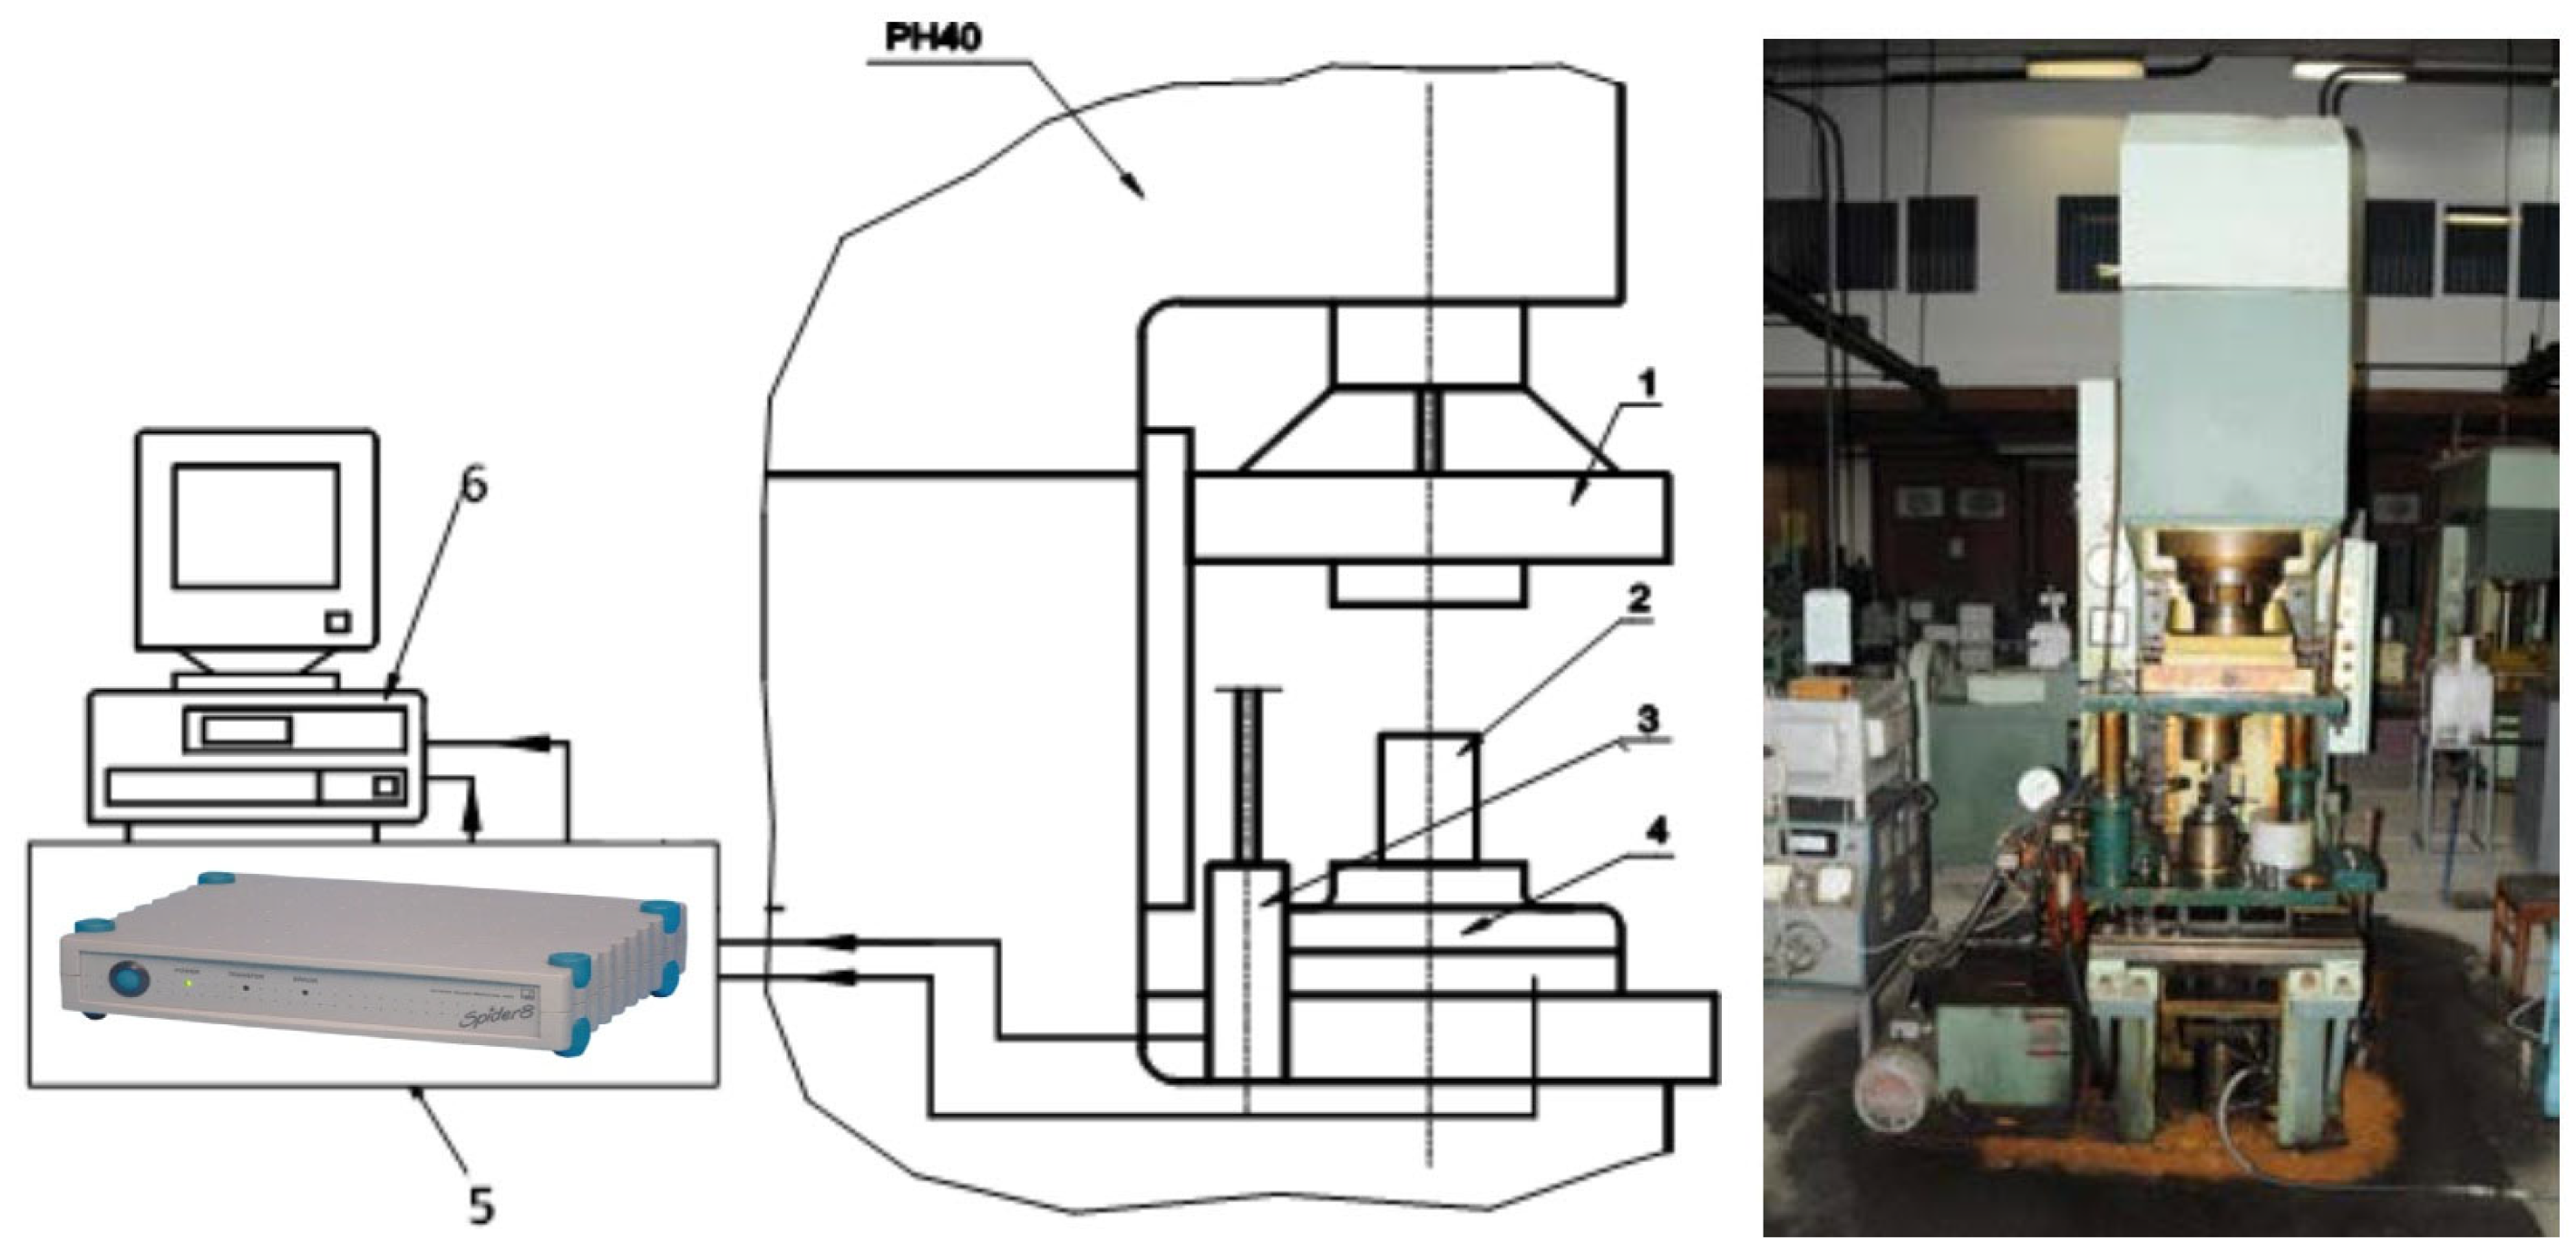
- Fe normal compressibility (NC)
- Fe super-compressibility (SC)
- Fe–Cu–graphite mixture
- Stainless steel 316L
2.3.2. Experimental Results
- 1.5% increase for pre-strain of 0.5 mm
- 0.6% increase for pre-strain of 1.5 mm (Figure 20a).
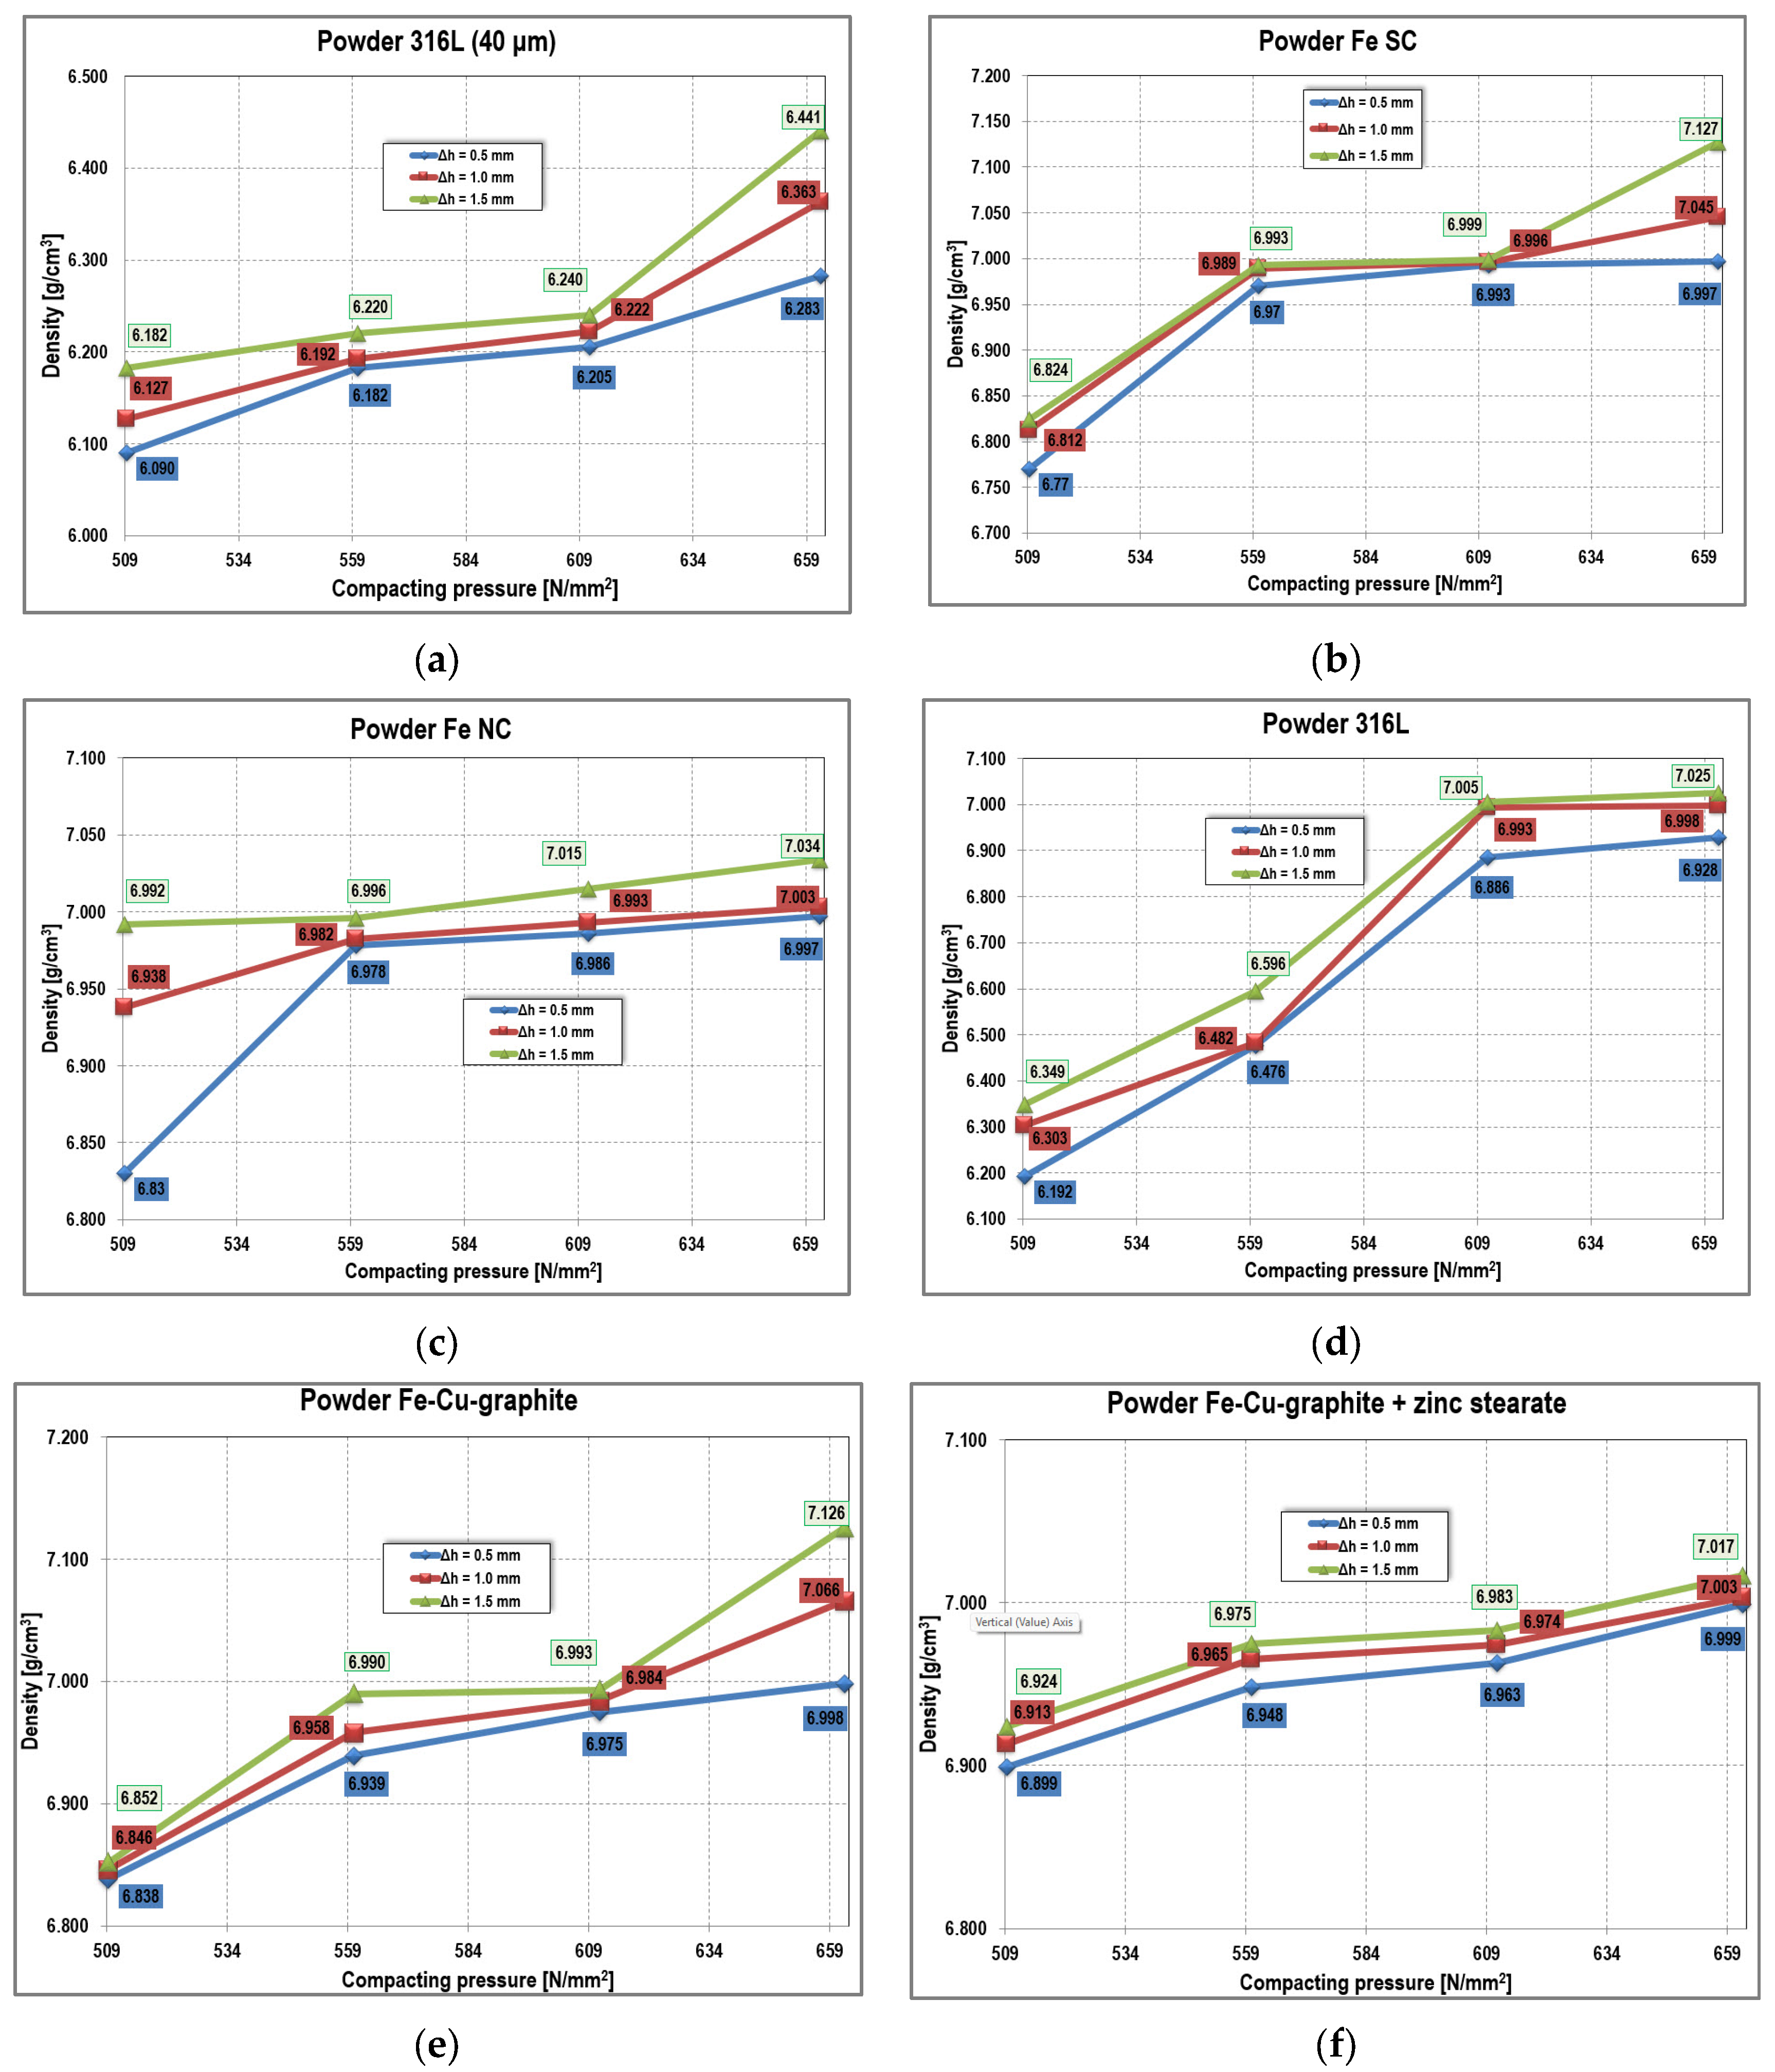
- 3.2% increase at pre-strain of 1.5 mm
- 1.2% increase at pre-strain of 0.5 mm.
2.4. Application of the Finite Element Analysis Code—MARC Mentat in Metal Powder Compaction
2.4.1. Presentation of Constitutive Equations Used in Numerical Calculation
- σy—uniaxial yield stress;
- σd—stress tensor deviator;
- p—hydrostatic pressure;
- γ and β—material parameters.
2.4.2. Identification of Material Behavior Parameters
2.4.3. Introduction of Boundary Conditions Required for Numerical Analysis
- σt—tangential friction stress
- σn—normal stress
- μ—friction coefficient
- t—tangential vector in the direction of relative velocity
- coefficient of friction between metallic powder particles and elastic sleeve: 0.15
- coefficient of friction between the other deformable components: 0.1
2.4.4. Simulation of Cylindrical Preform Compaction
- at the beginning of compaction (increment 10),
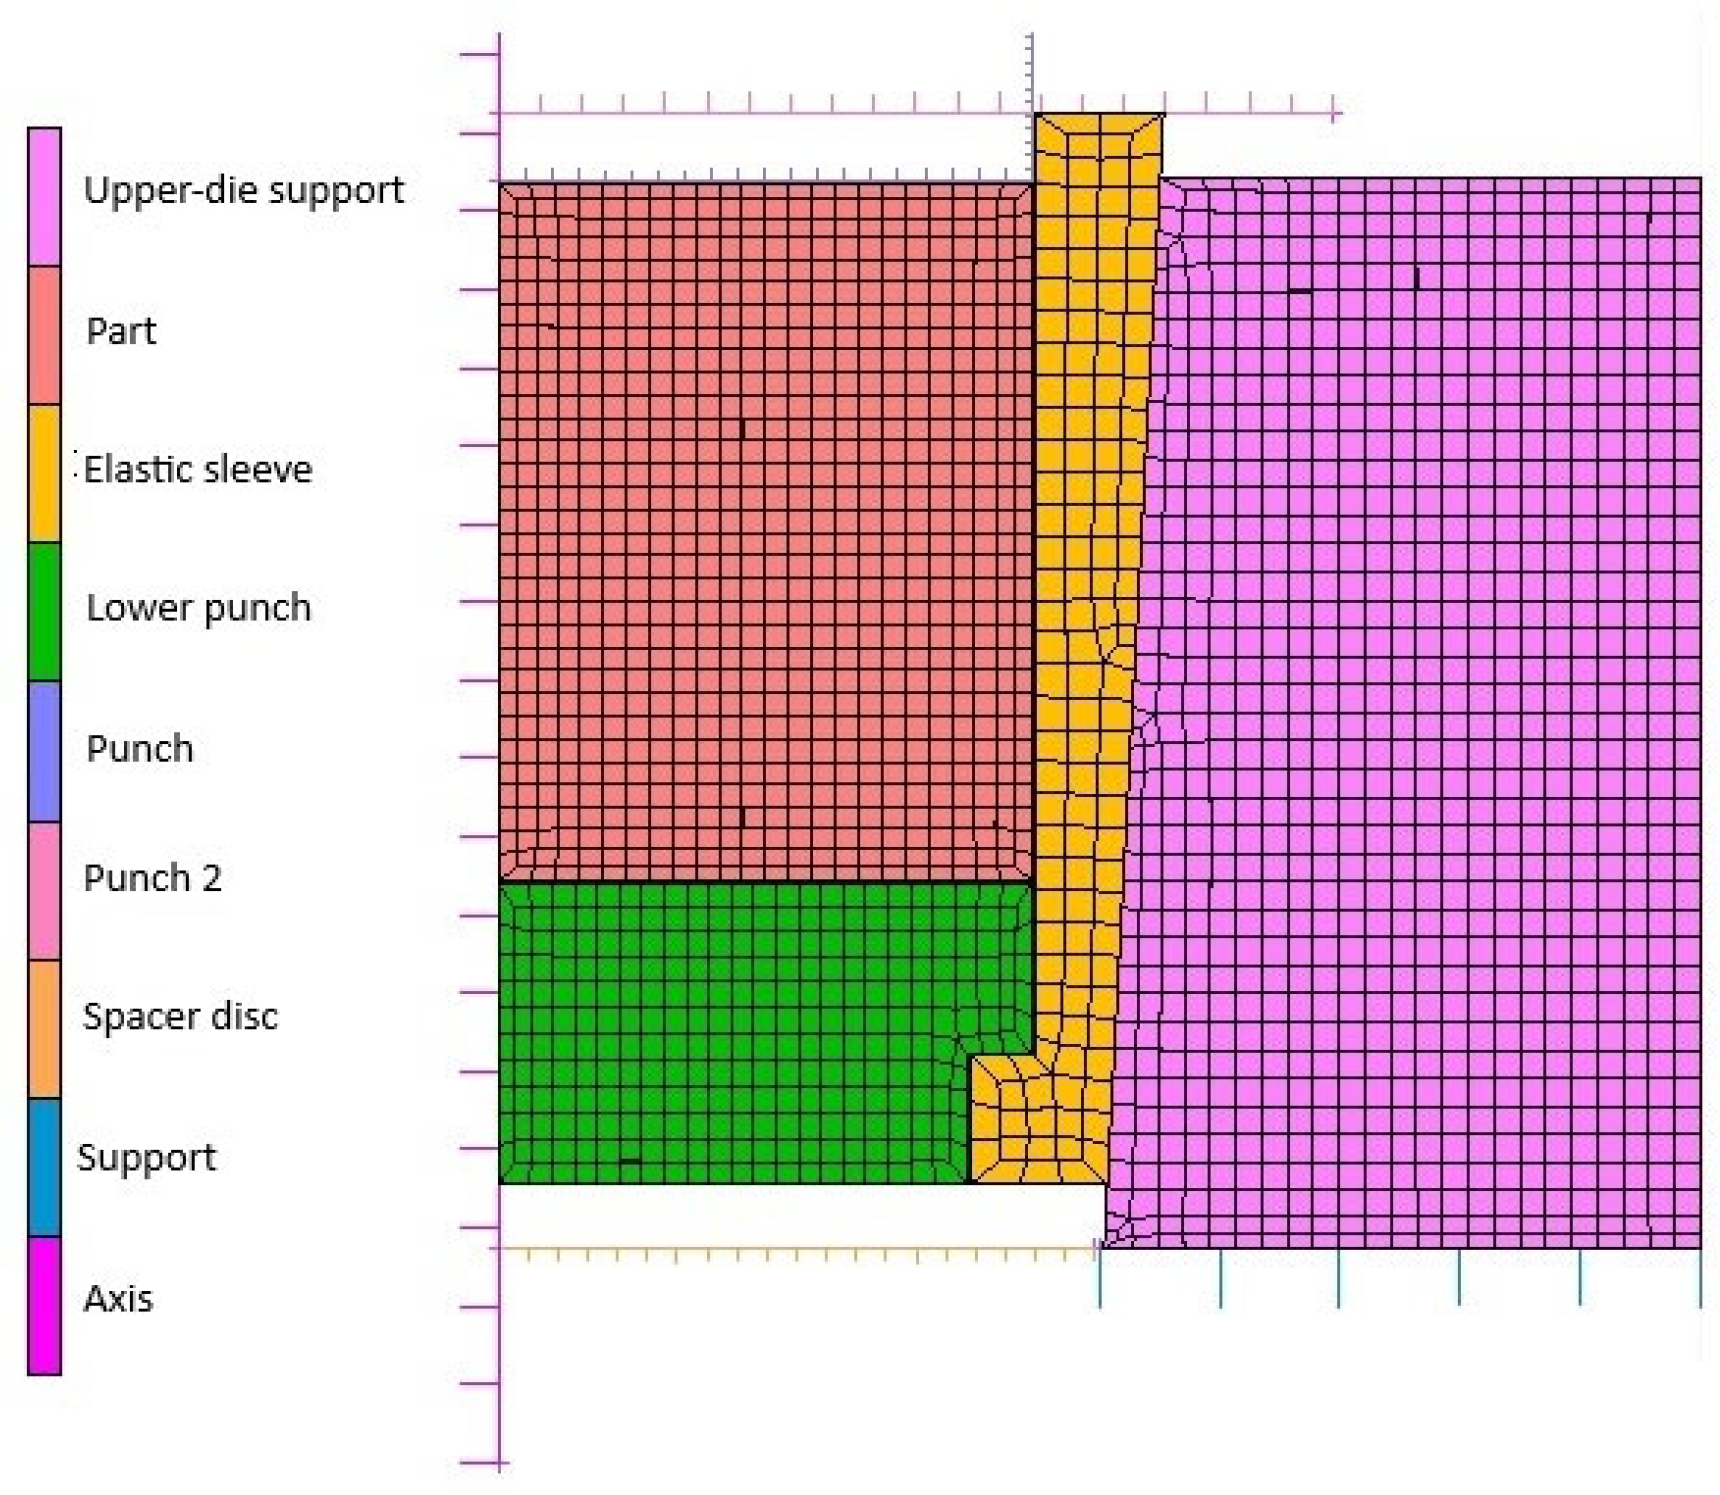
- at the end of compaction—when the elastic sleeve is in contact with the spacer ring (increment 500),
- and in the final stage of the extraction phase—after removal of the upper punch, when the sleeve relaxes elastically (increment 600).
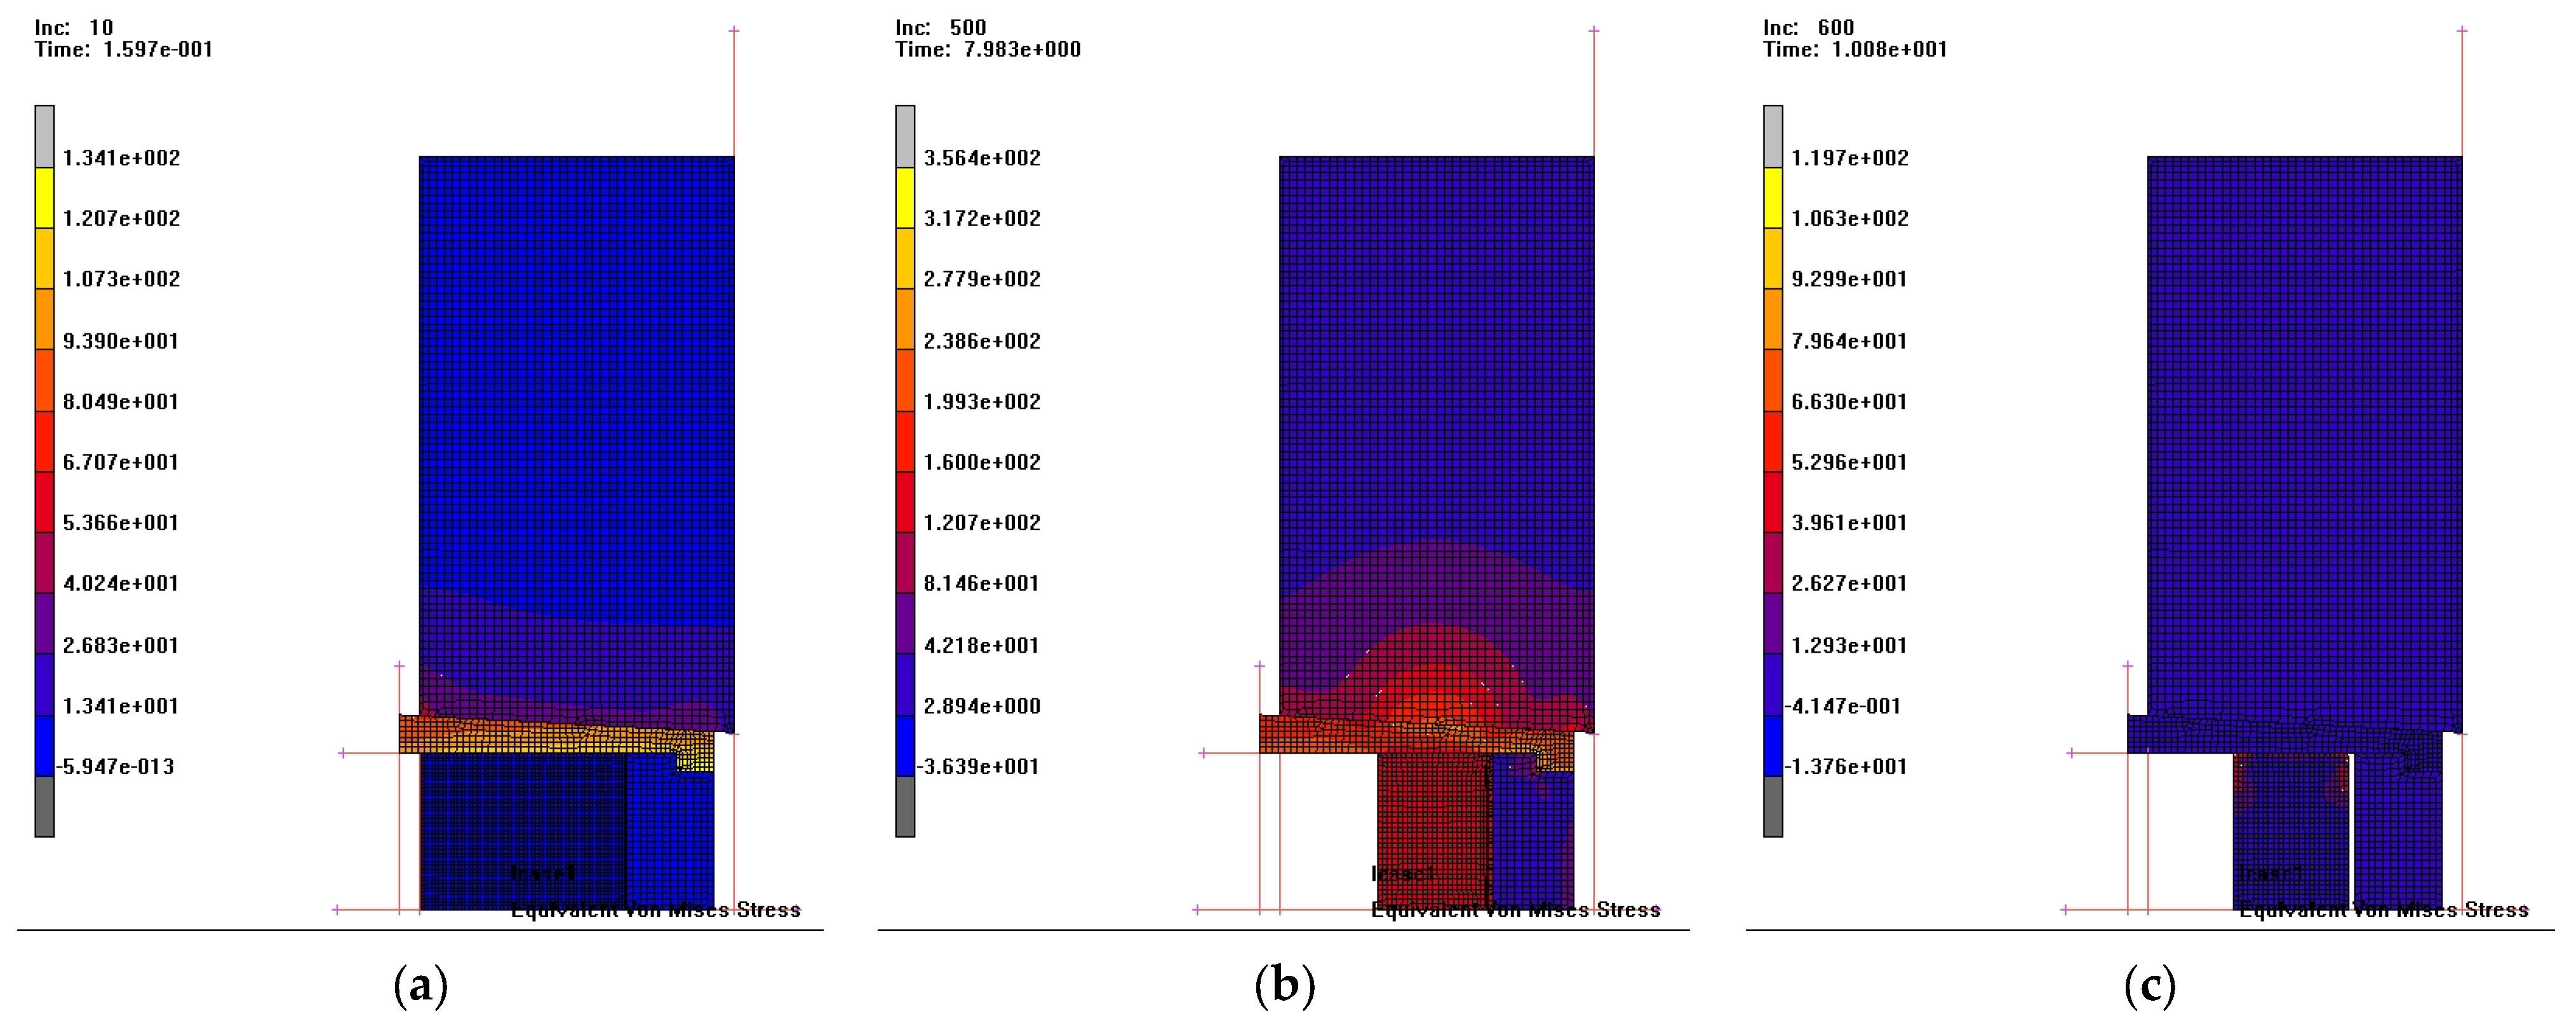
- 199.3–277.9 MPa in the part,
- 42–160 MPa in the lower punch.
2.4.5. Comparison of the Theoretical Model with the Experimental Results
3. Results
3.1. Numerical Analysis of the Elastic Die Assembly
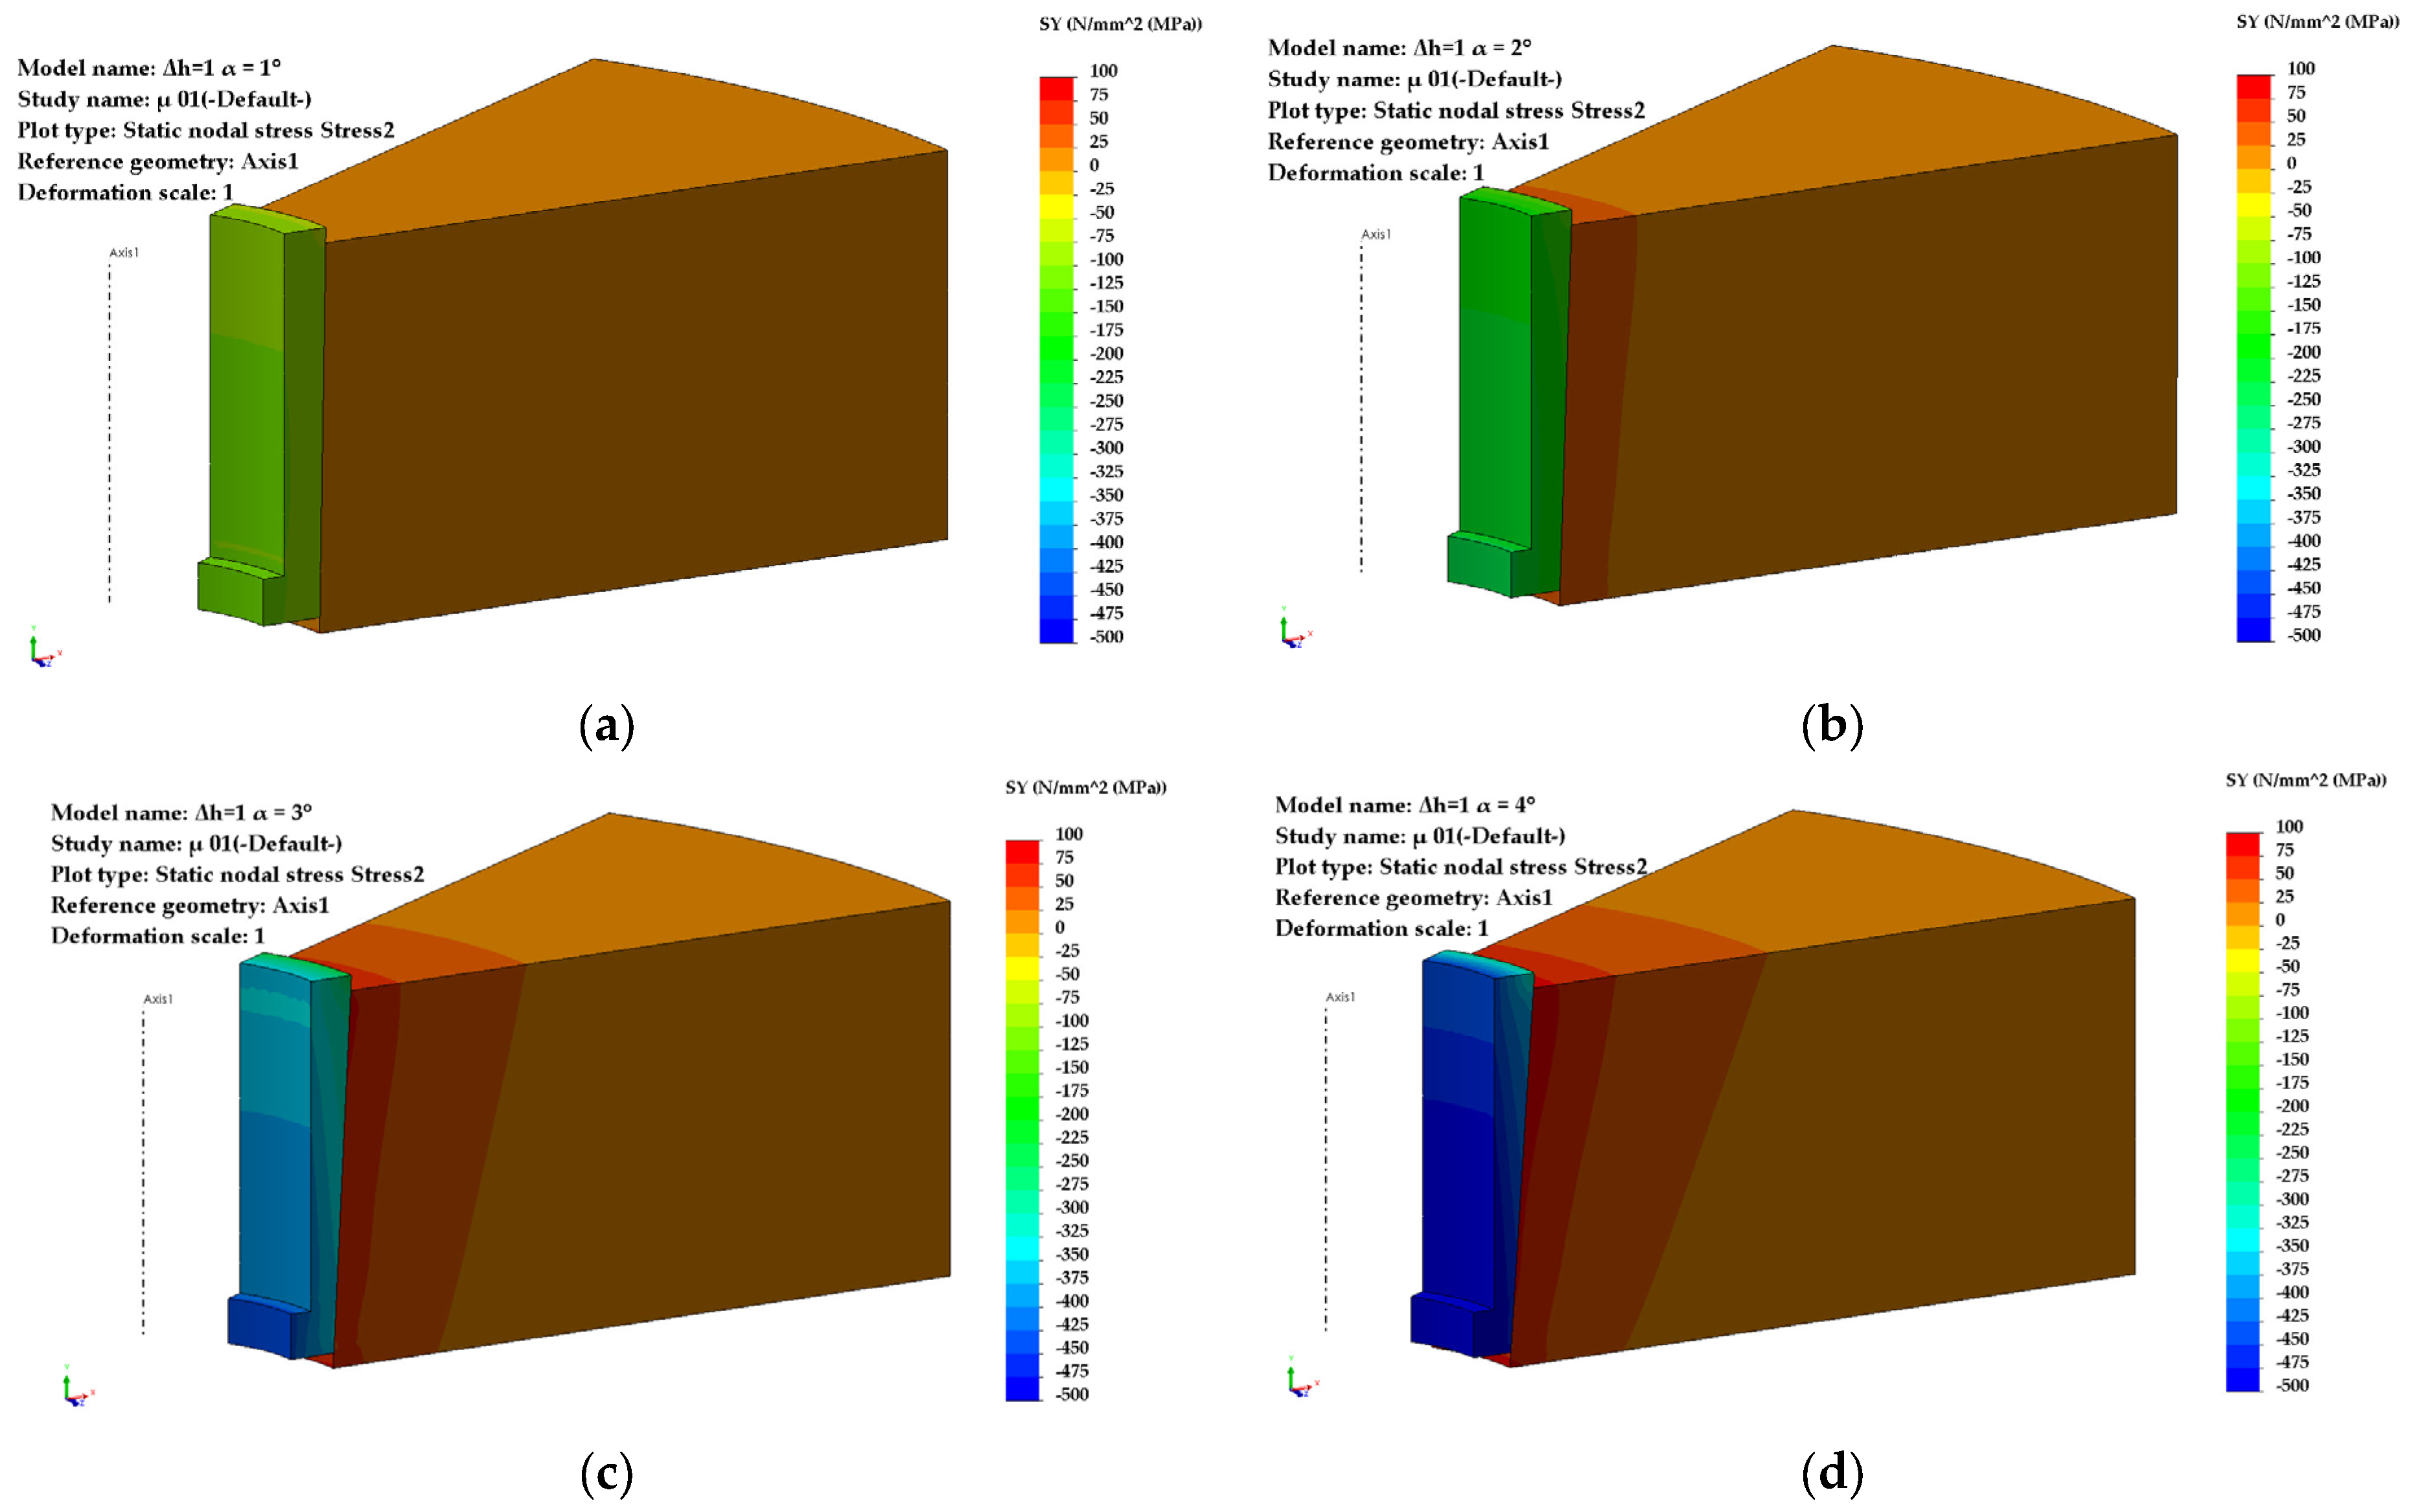
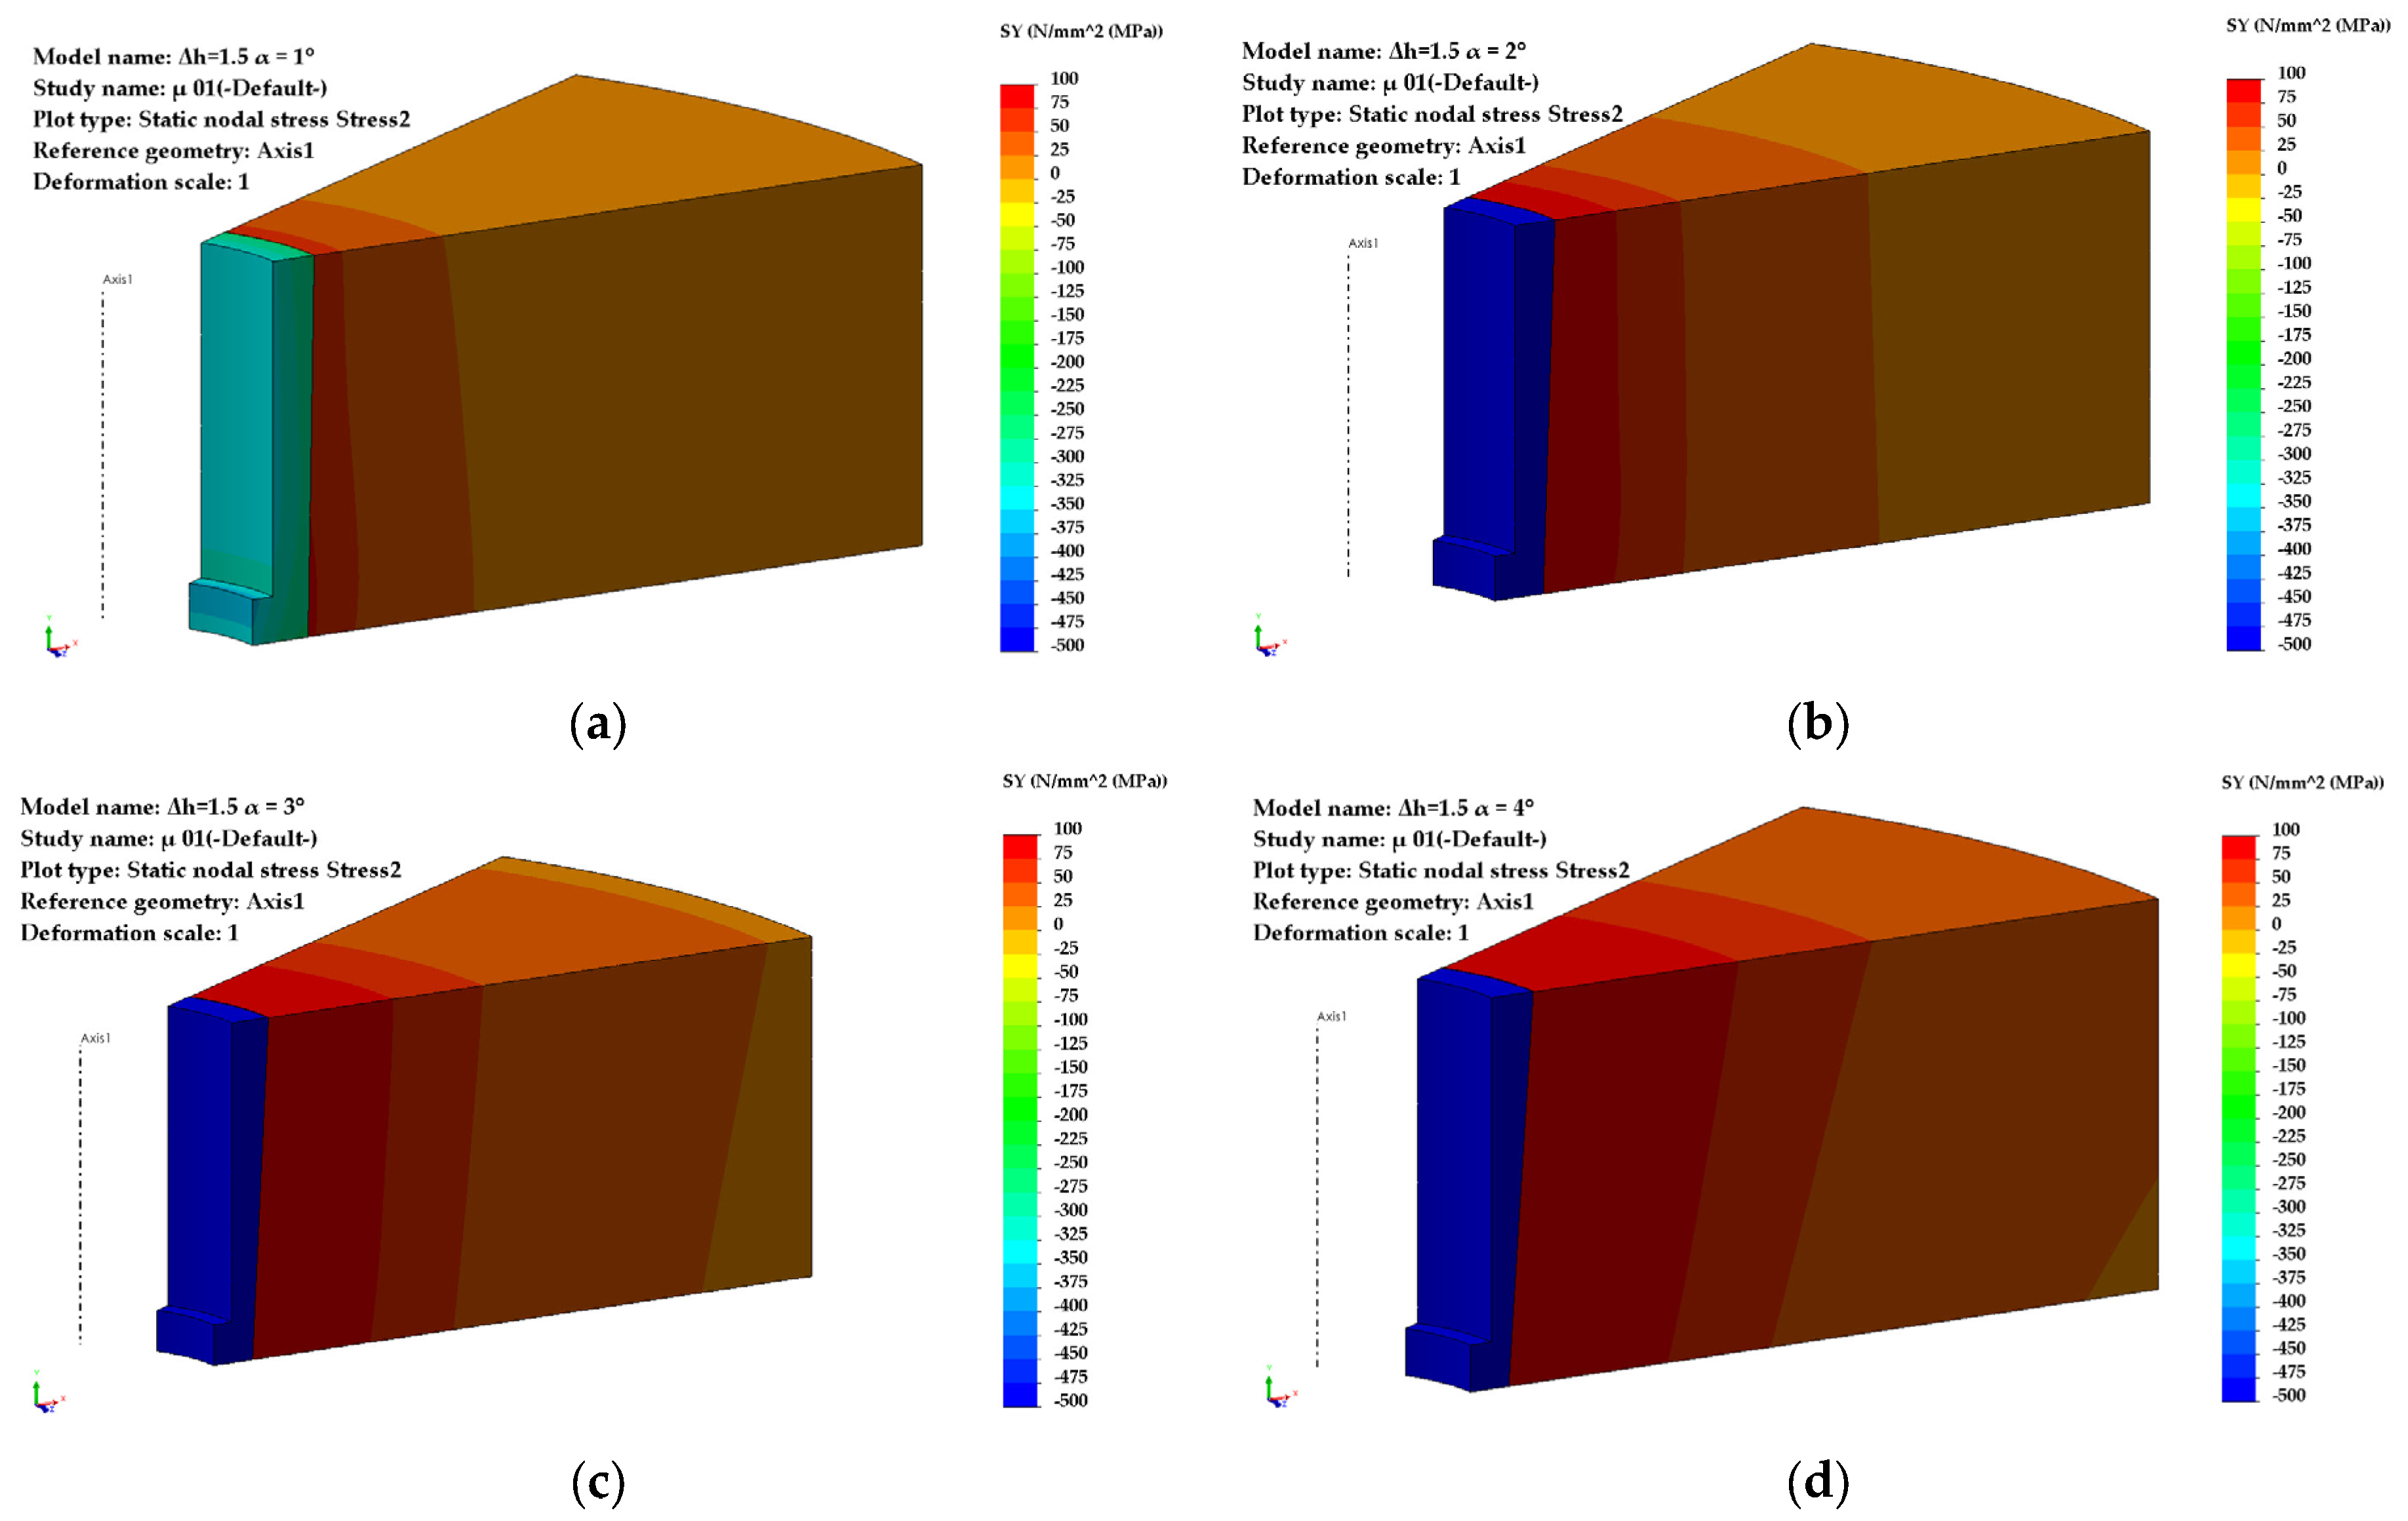
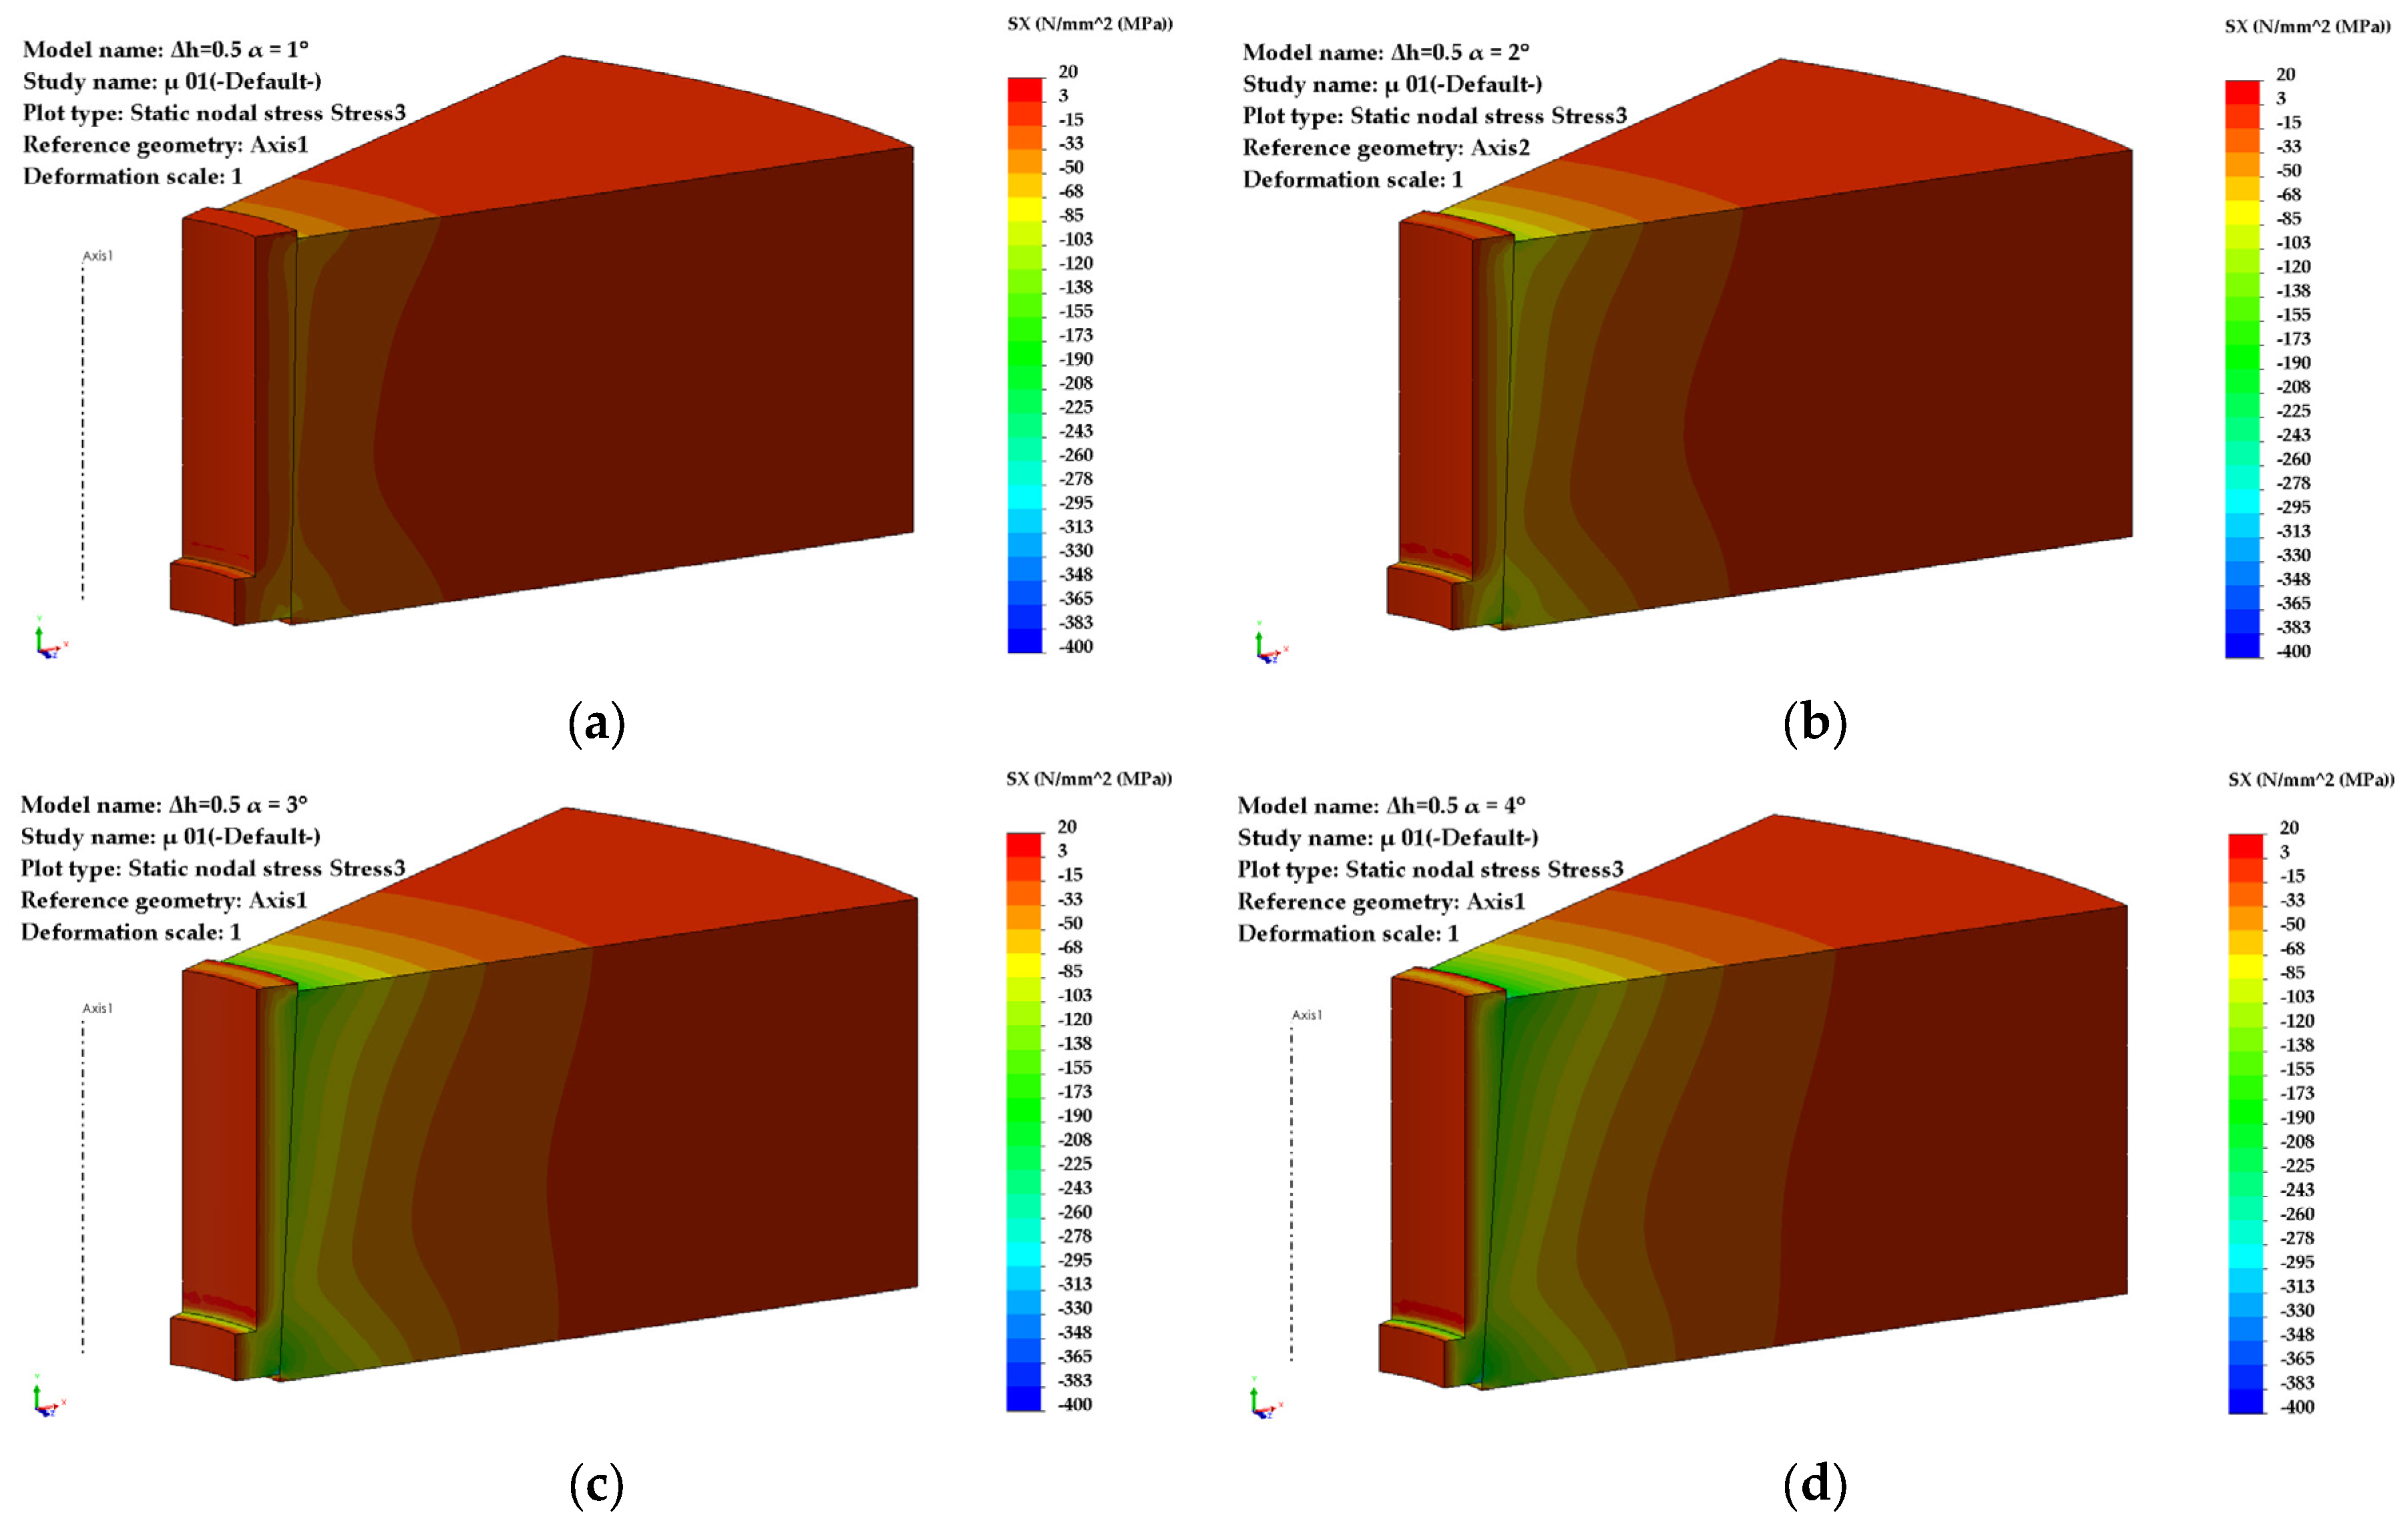
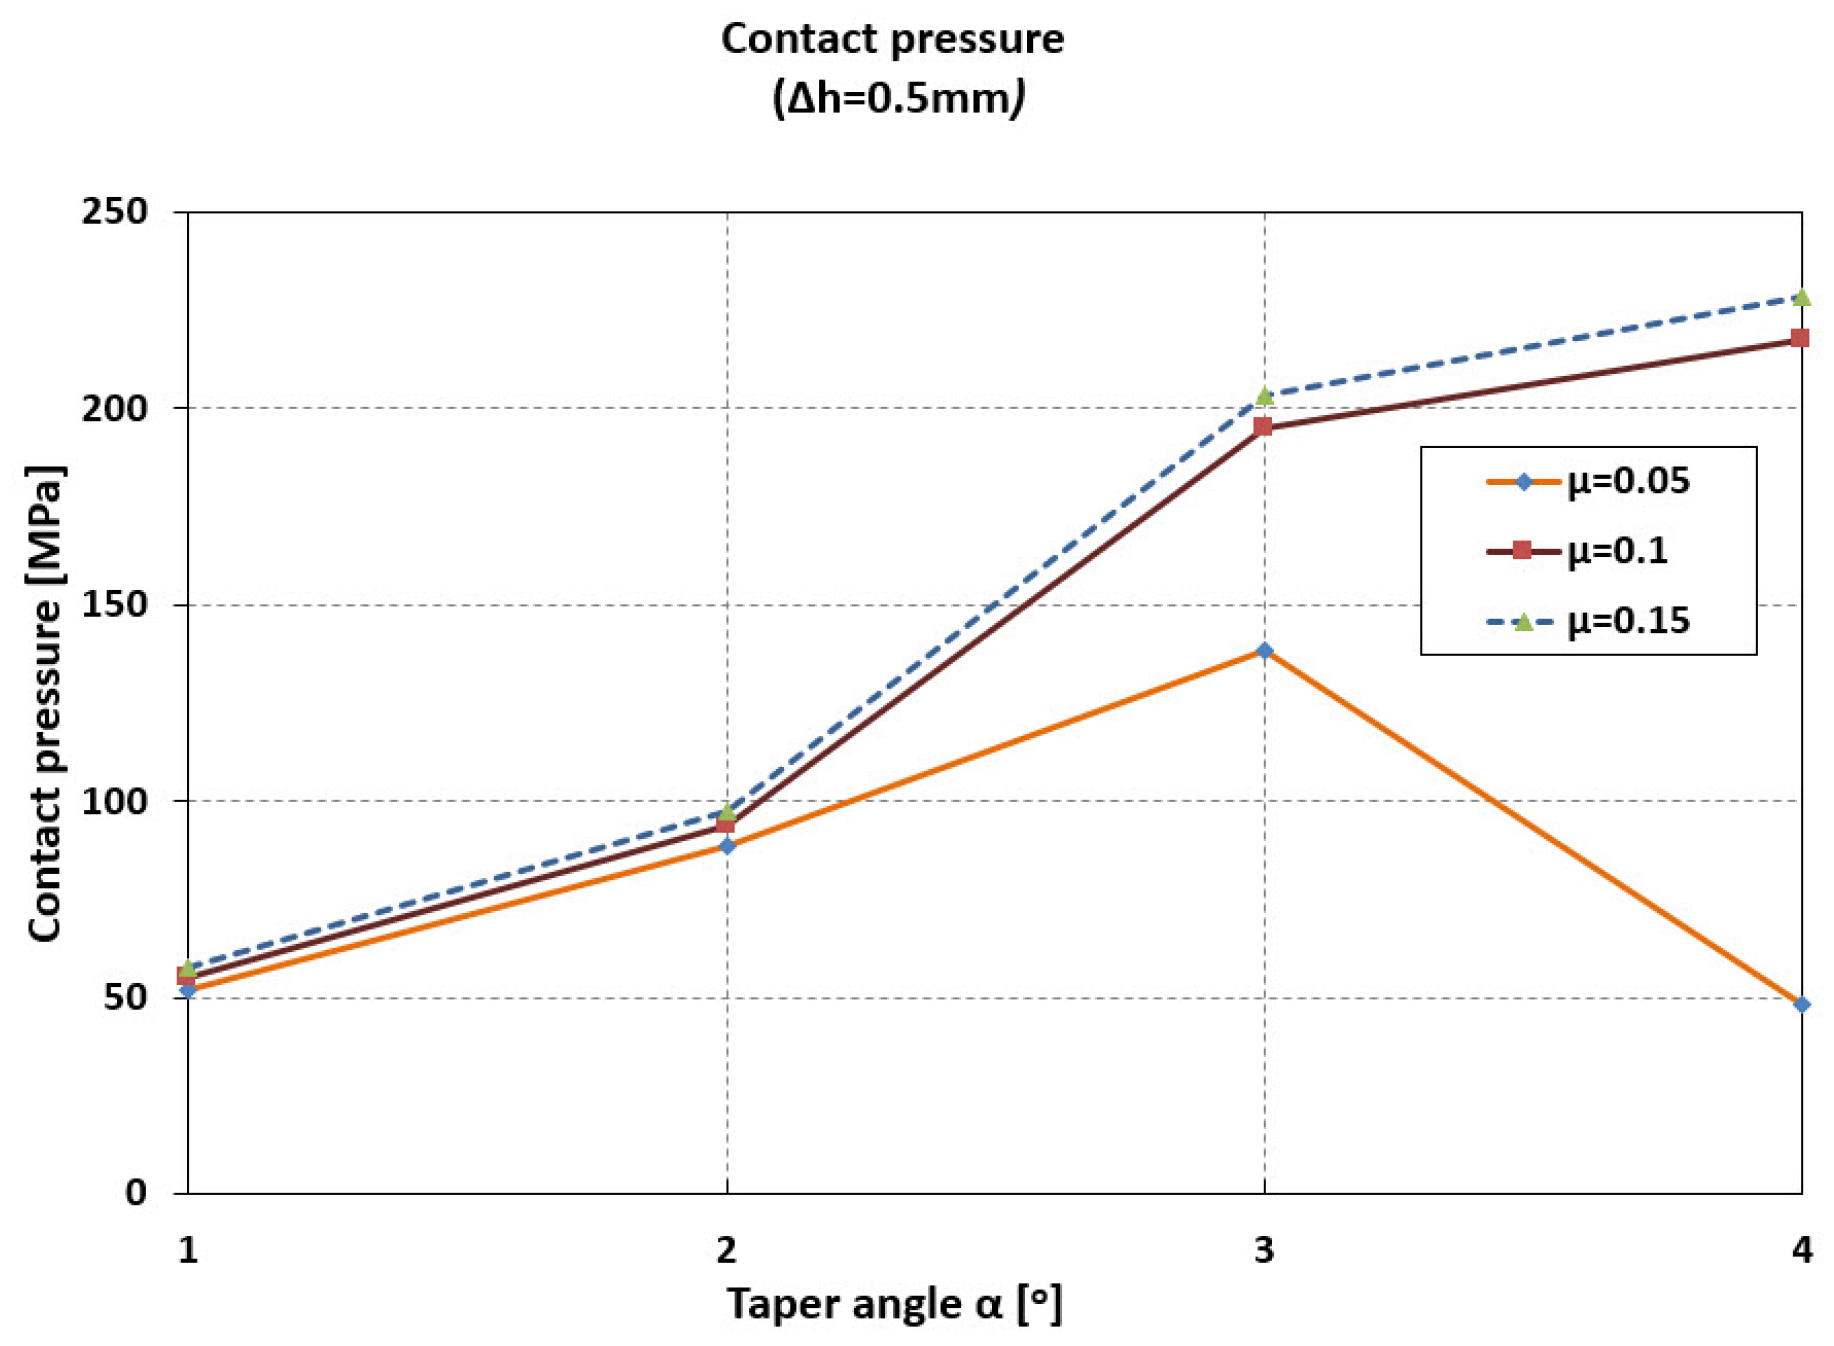
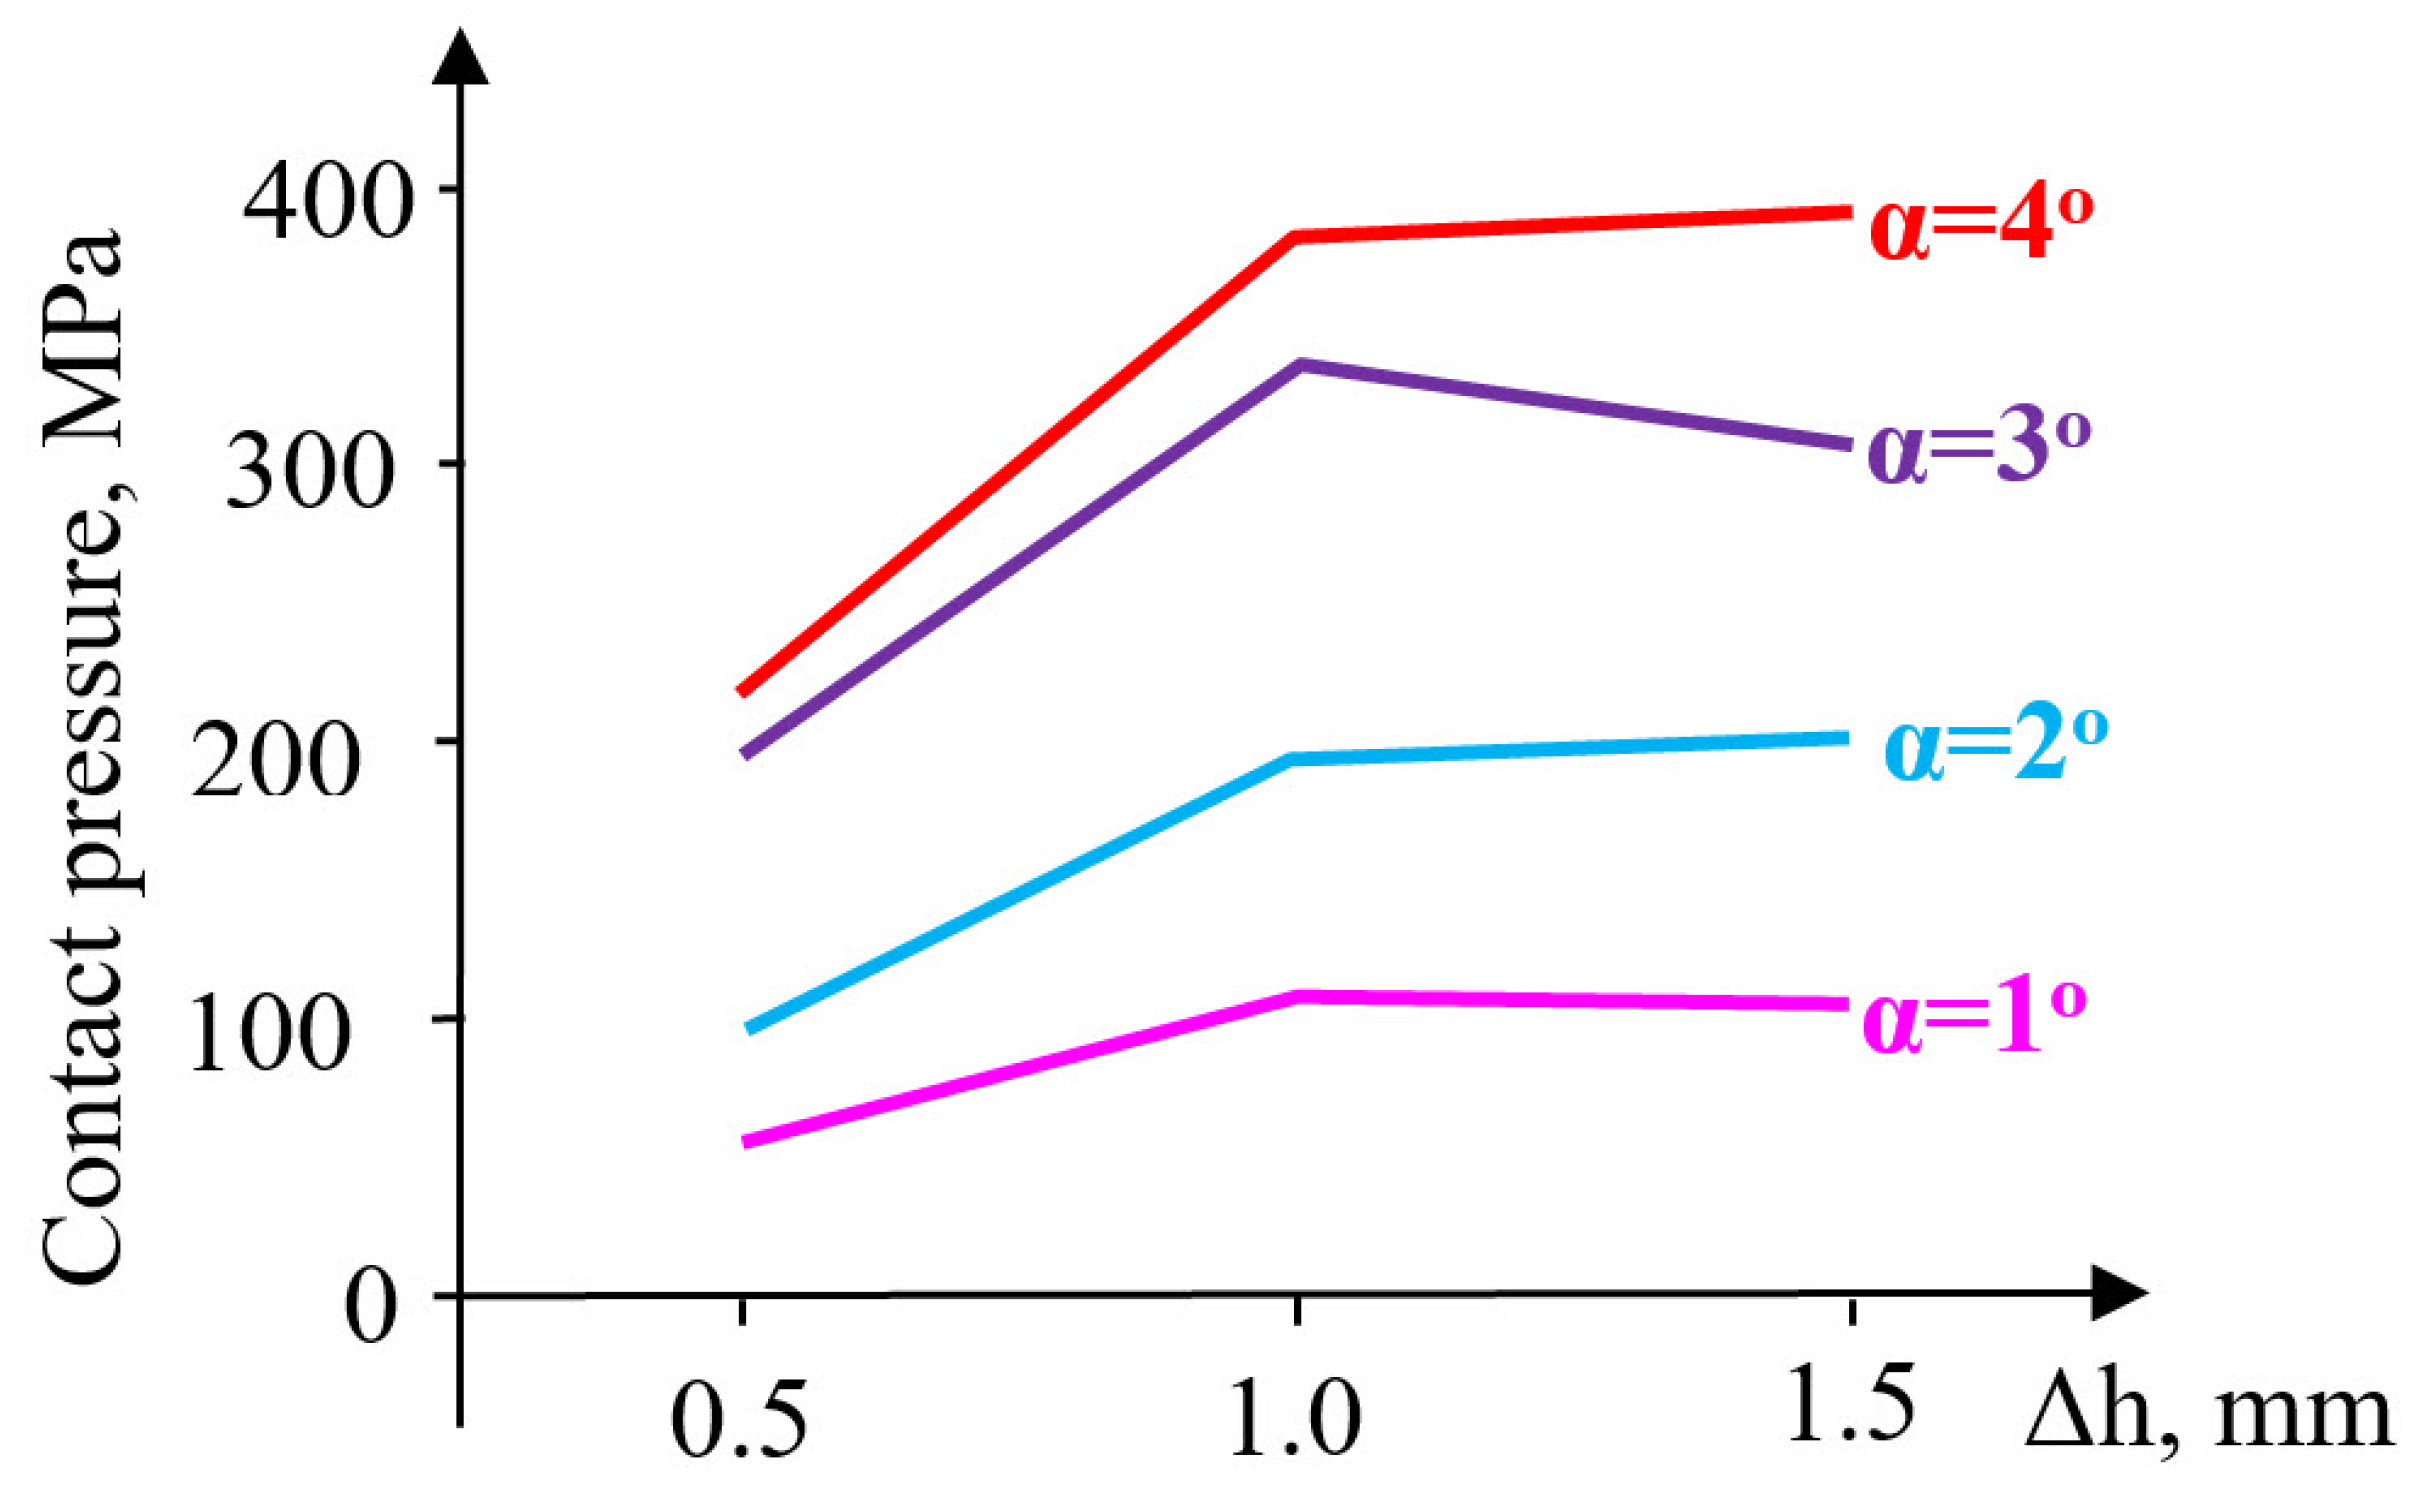
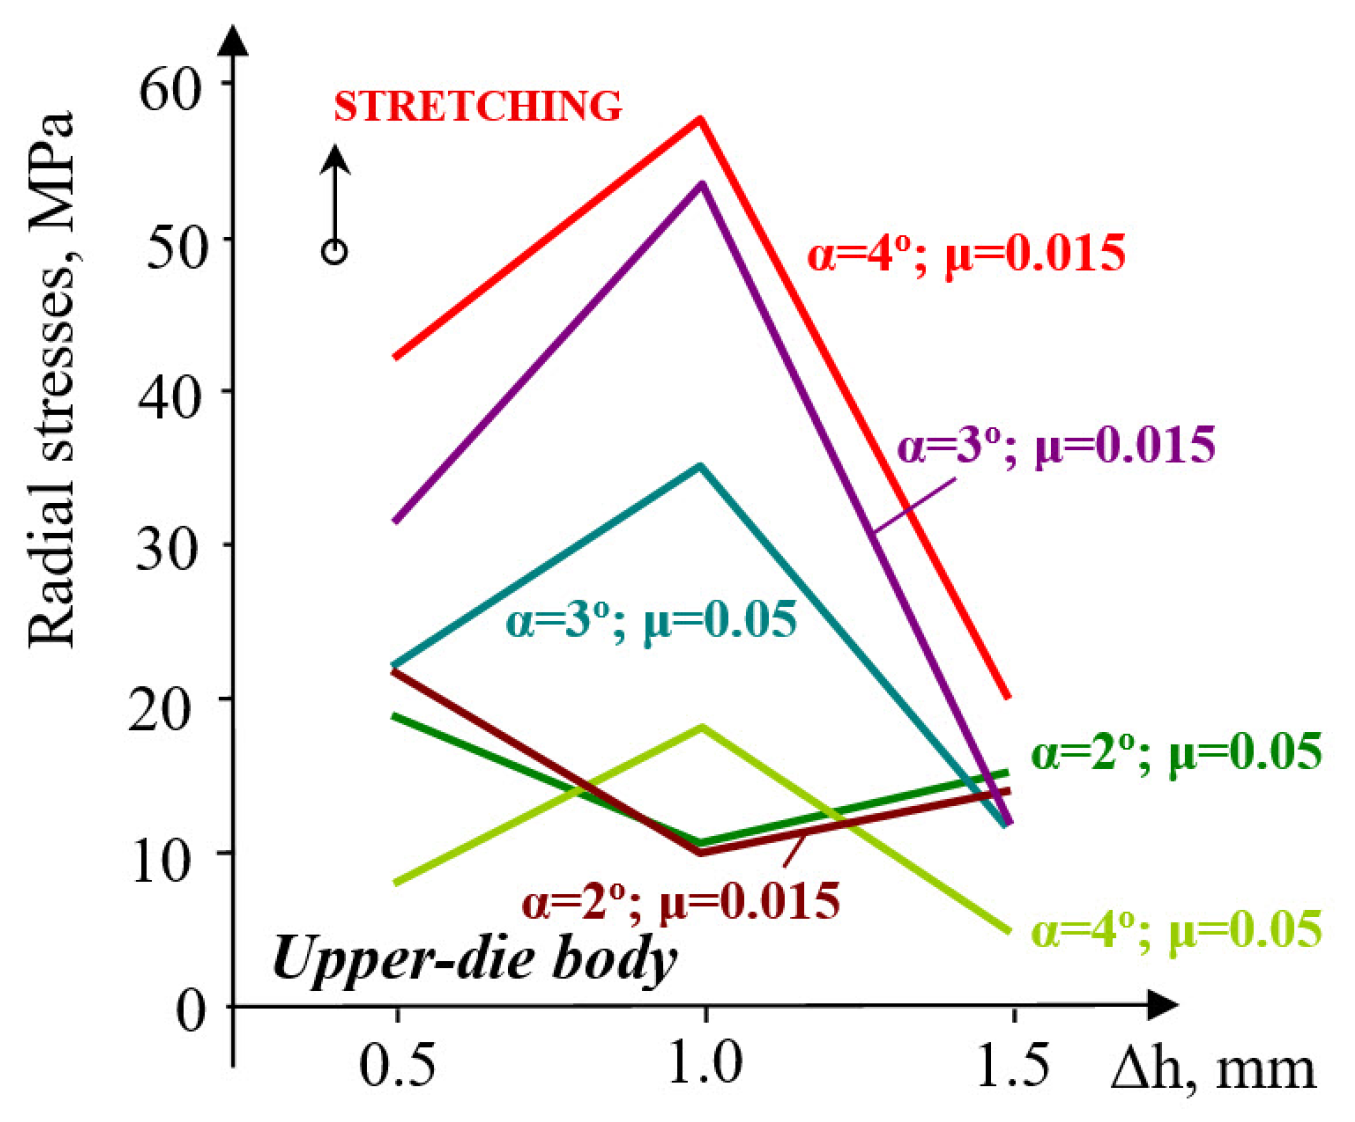
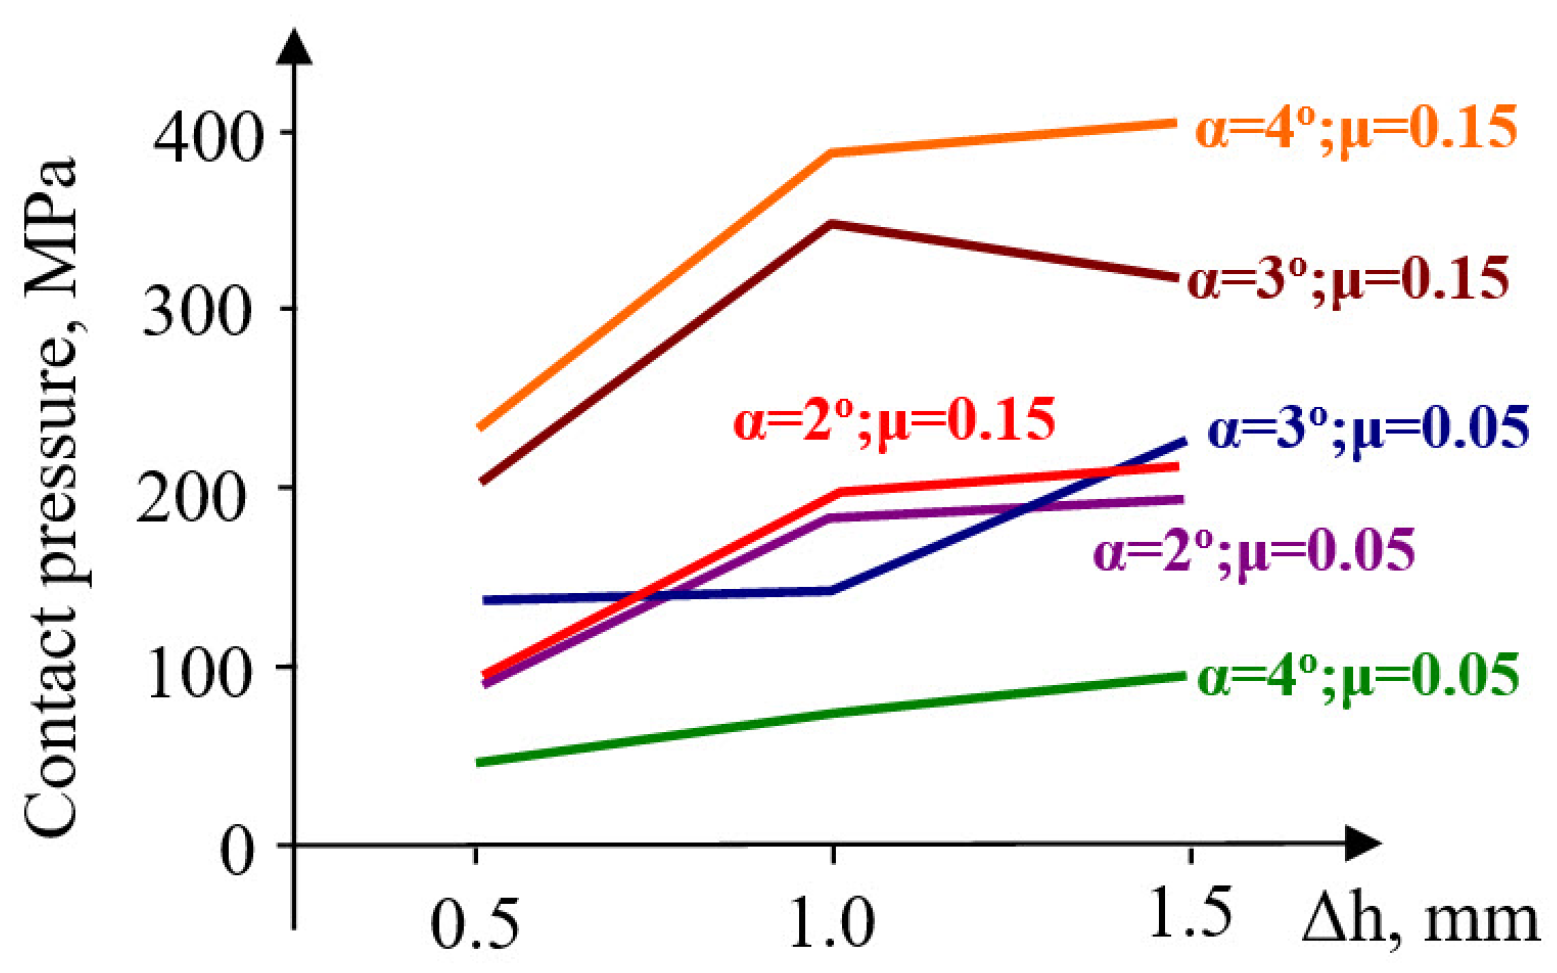
- Contact pressure: At Δh = 1.0 mm and μ = 0.10, the average contact pressure increased from ≈52 MPa (α = 1°) to a maximum of ≈200 MPa (α = 3°), followed by a slight reduction at α = 4°. Thus, a taper of 3° yields the most favorable stress transfer between the sleeve and holder, defined here by achieving both the highest average contact pressure (≈200 MPa) and a relatively uniform pressure distribution along the conical interface, without excessive stress concentration near the sleeve edges.
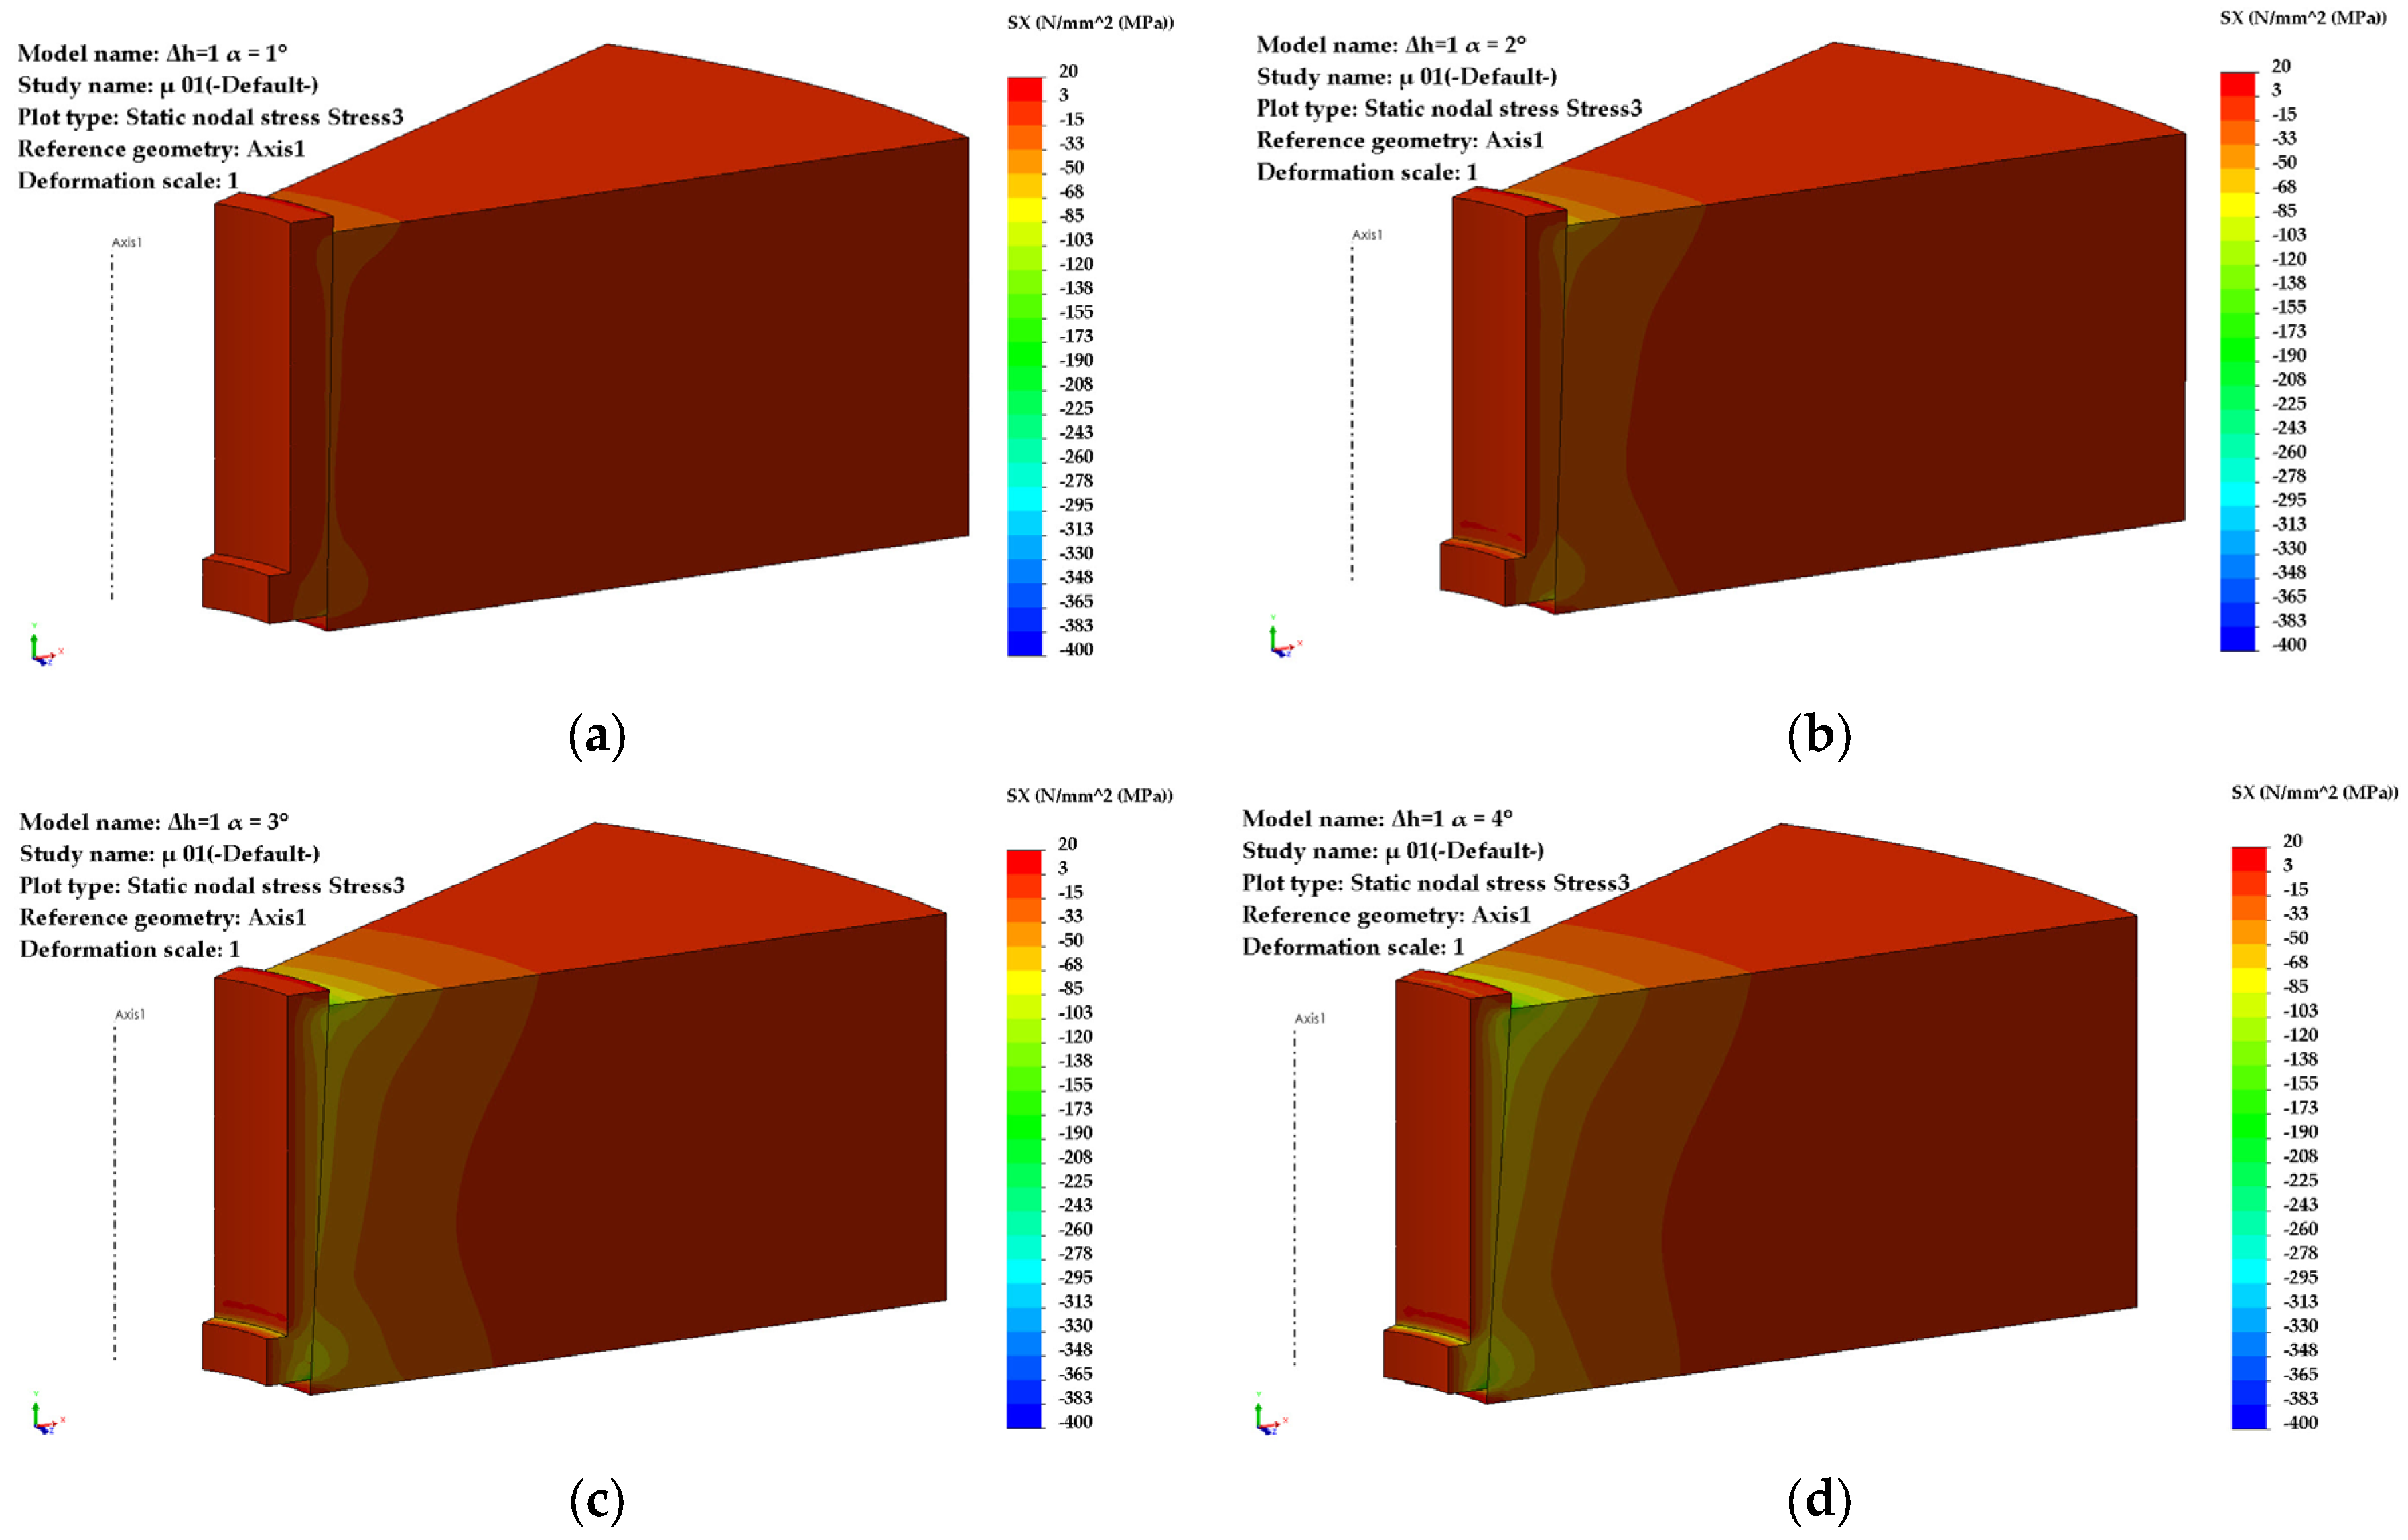
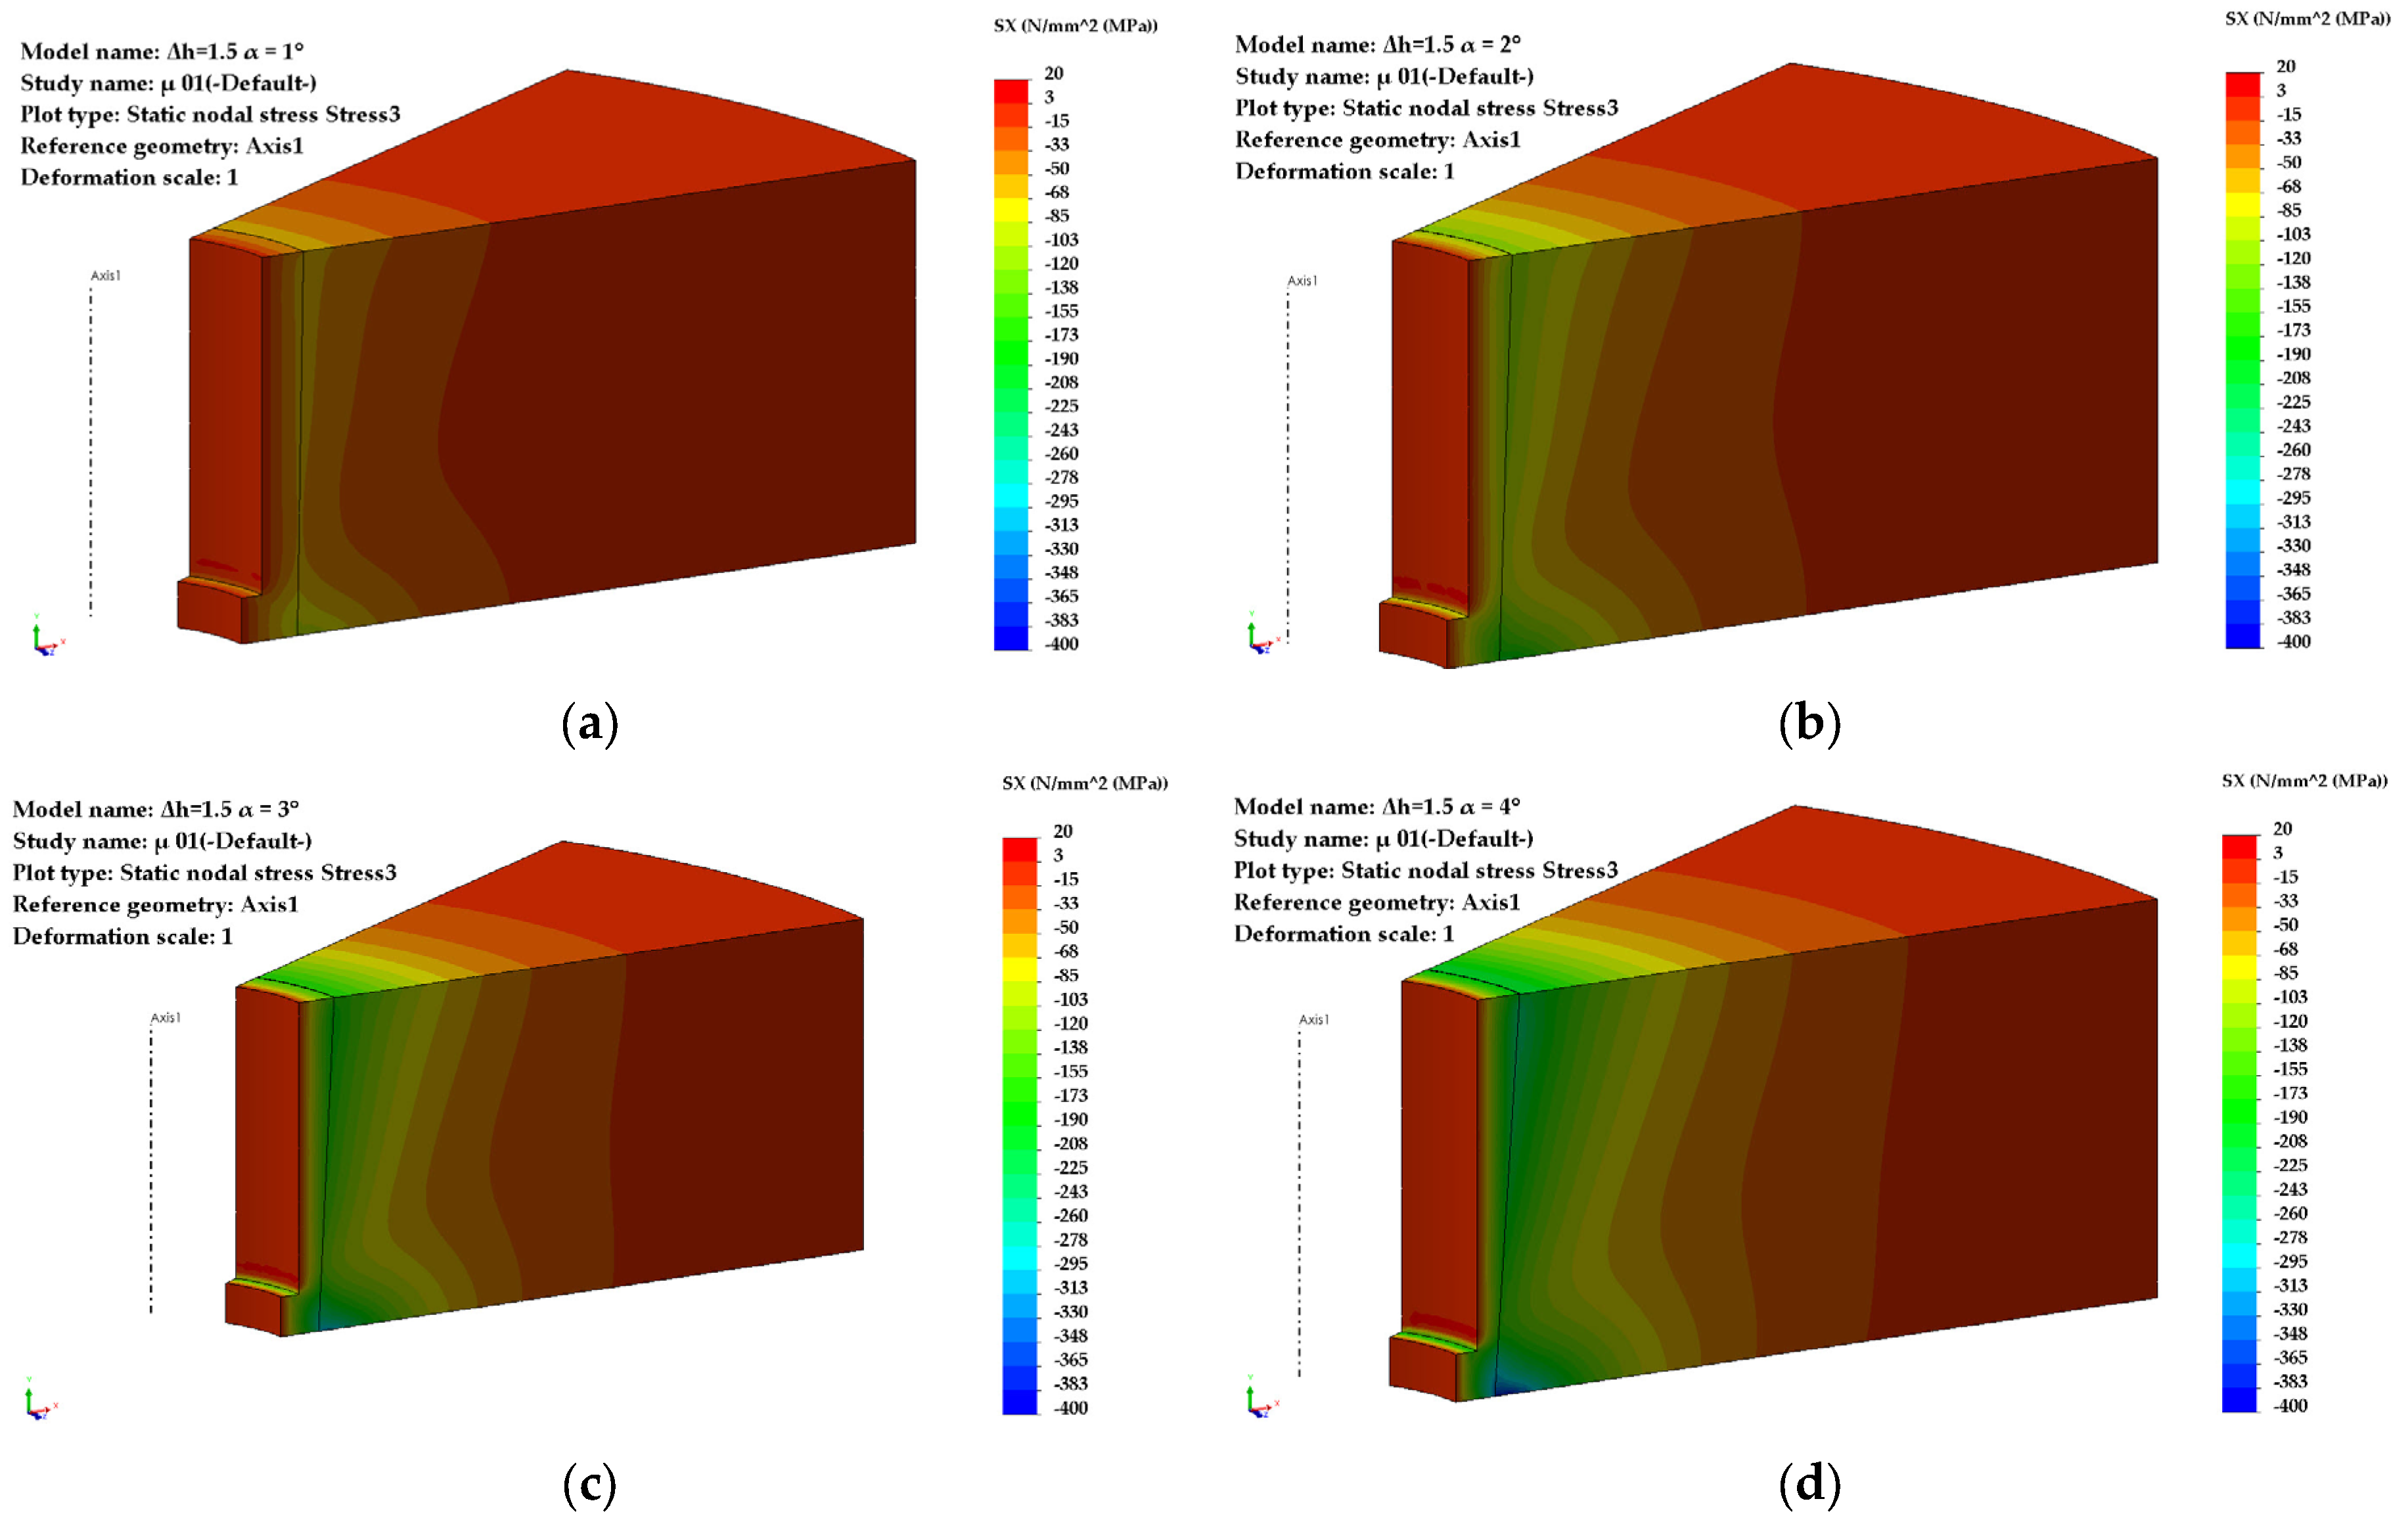
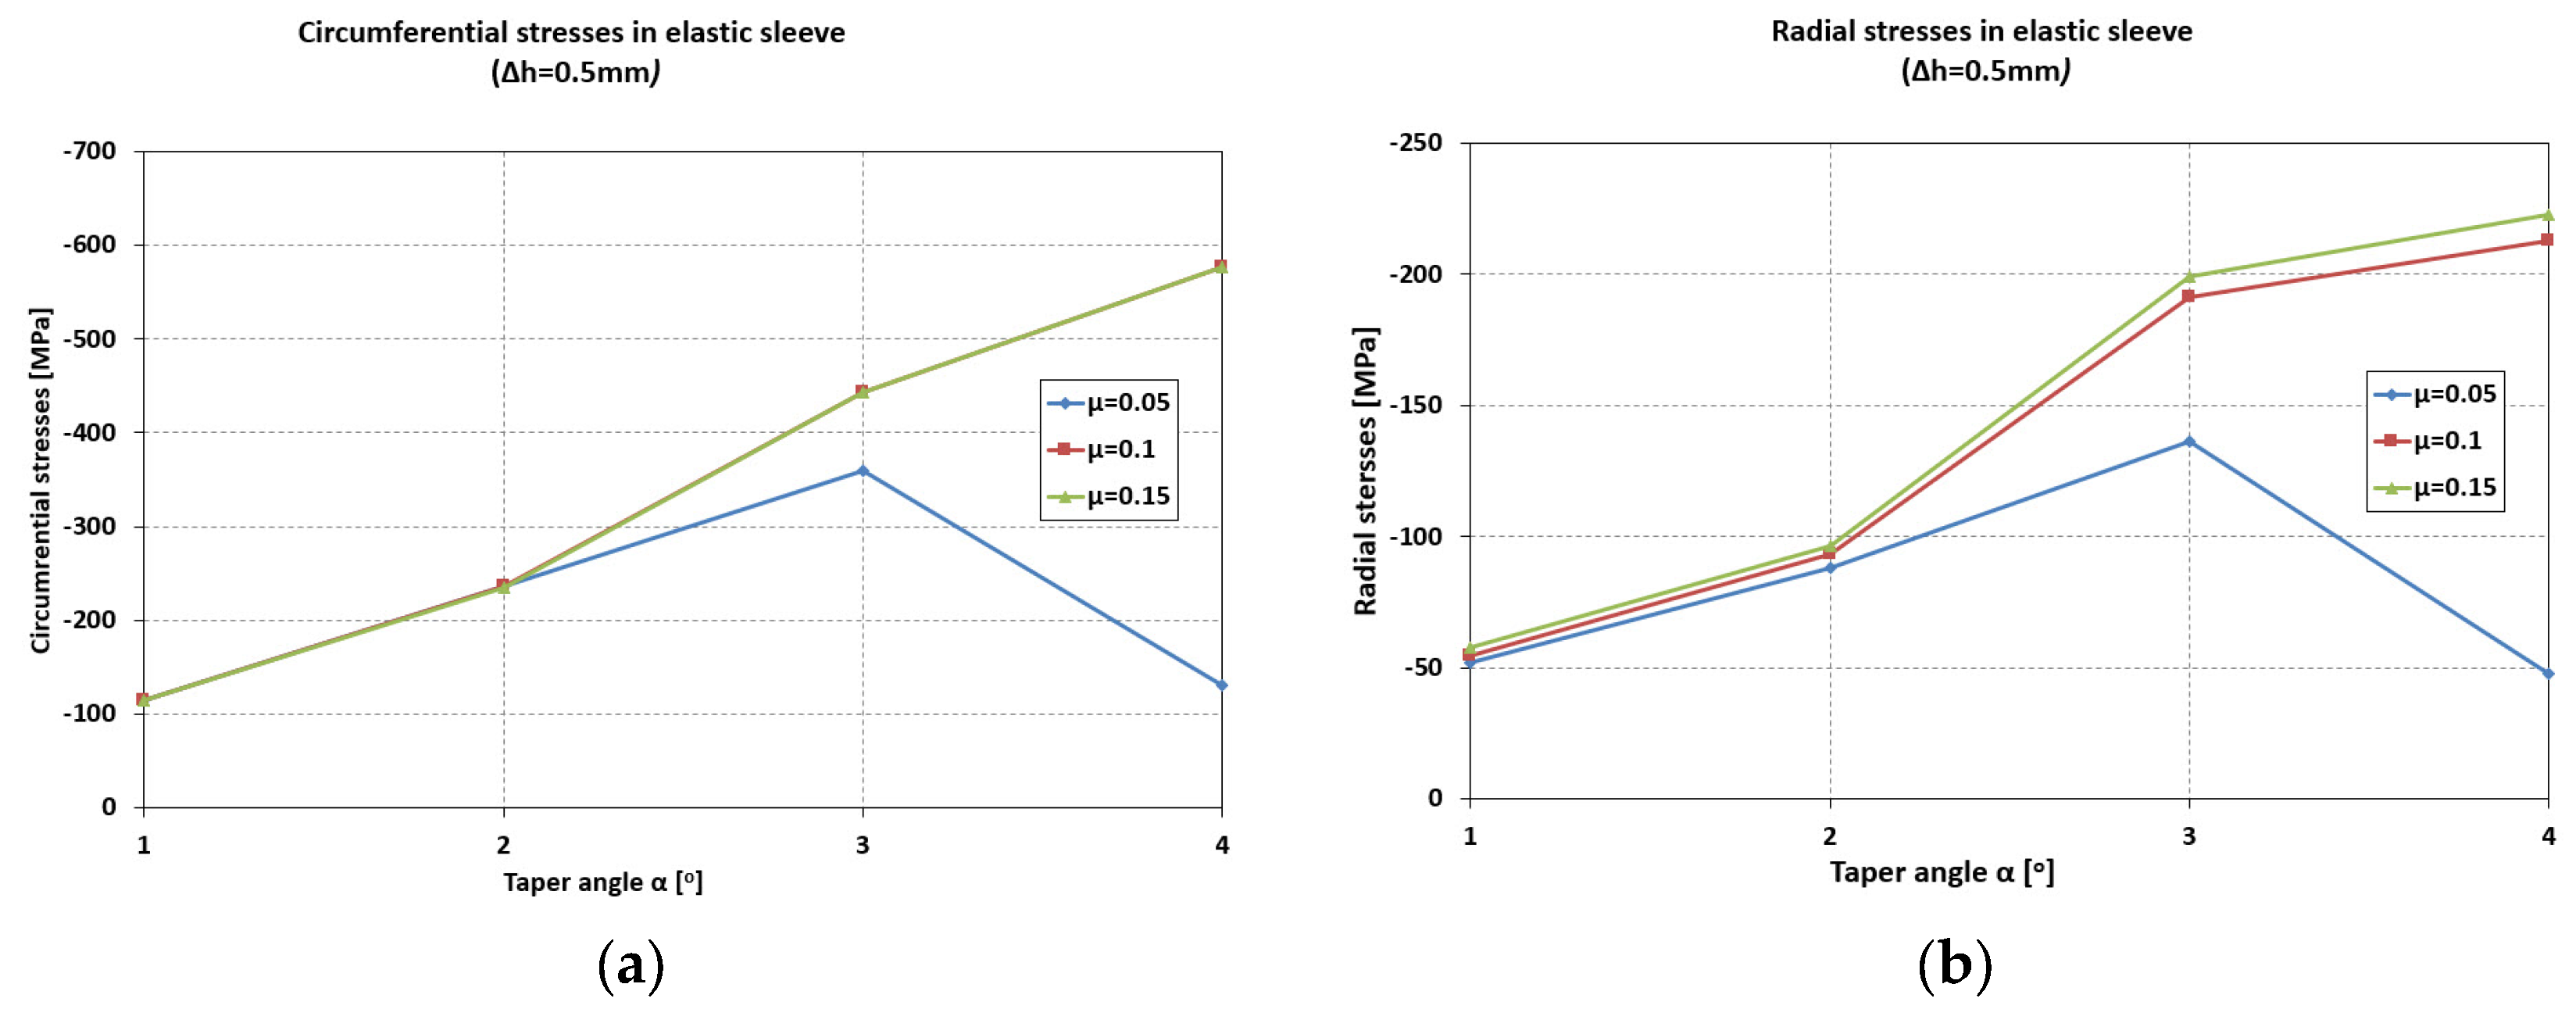
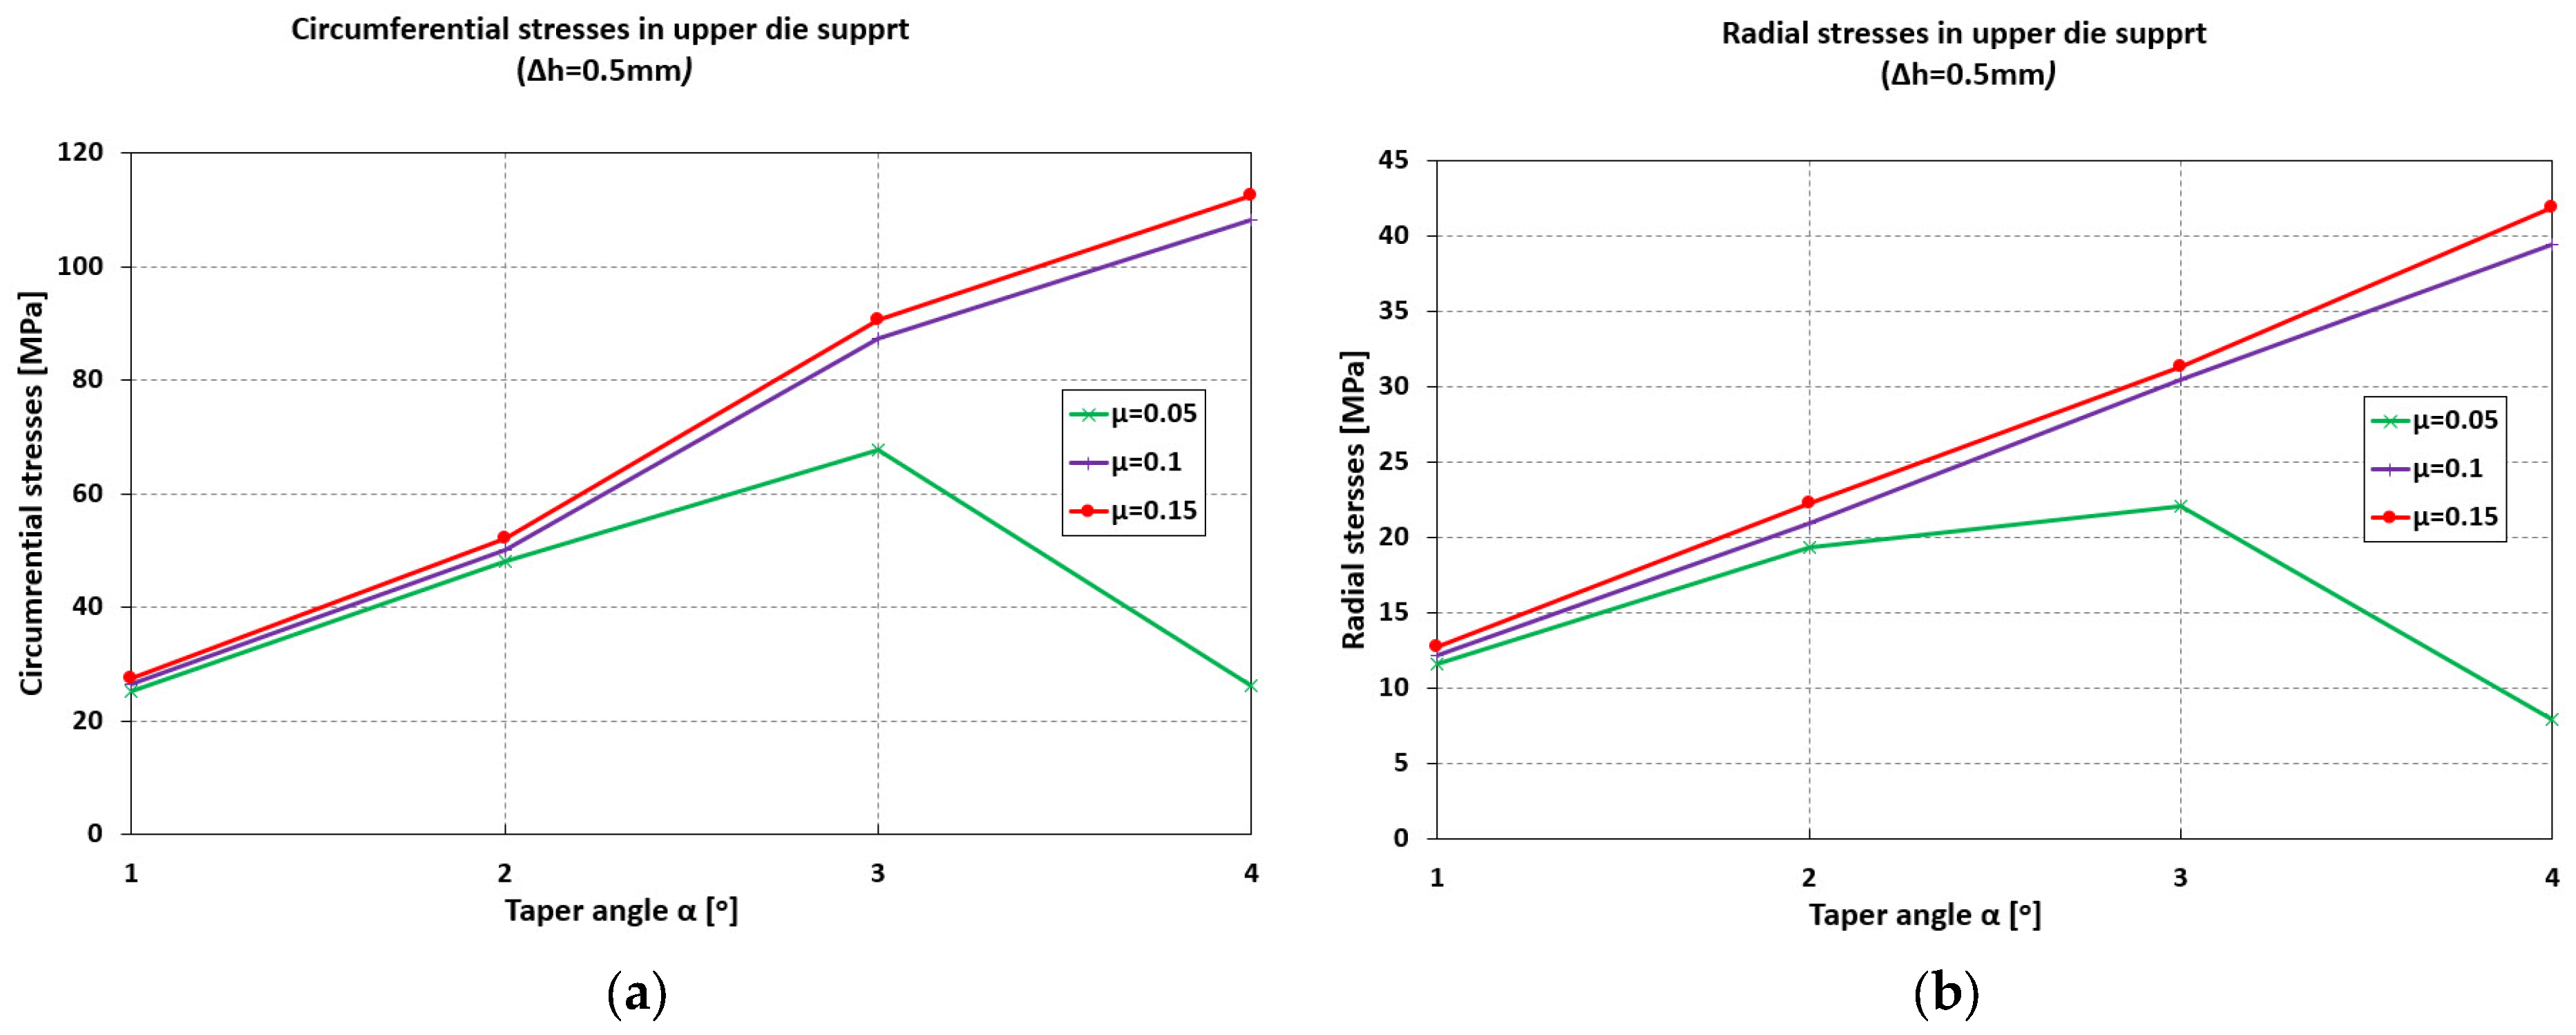
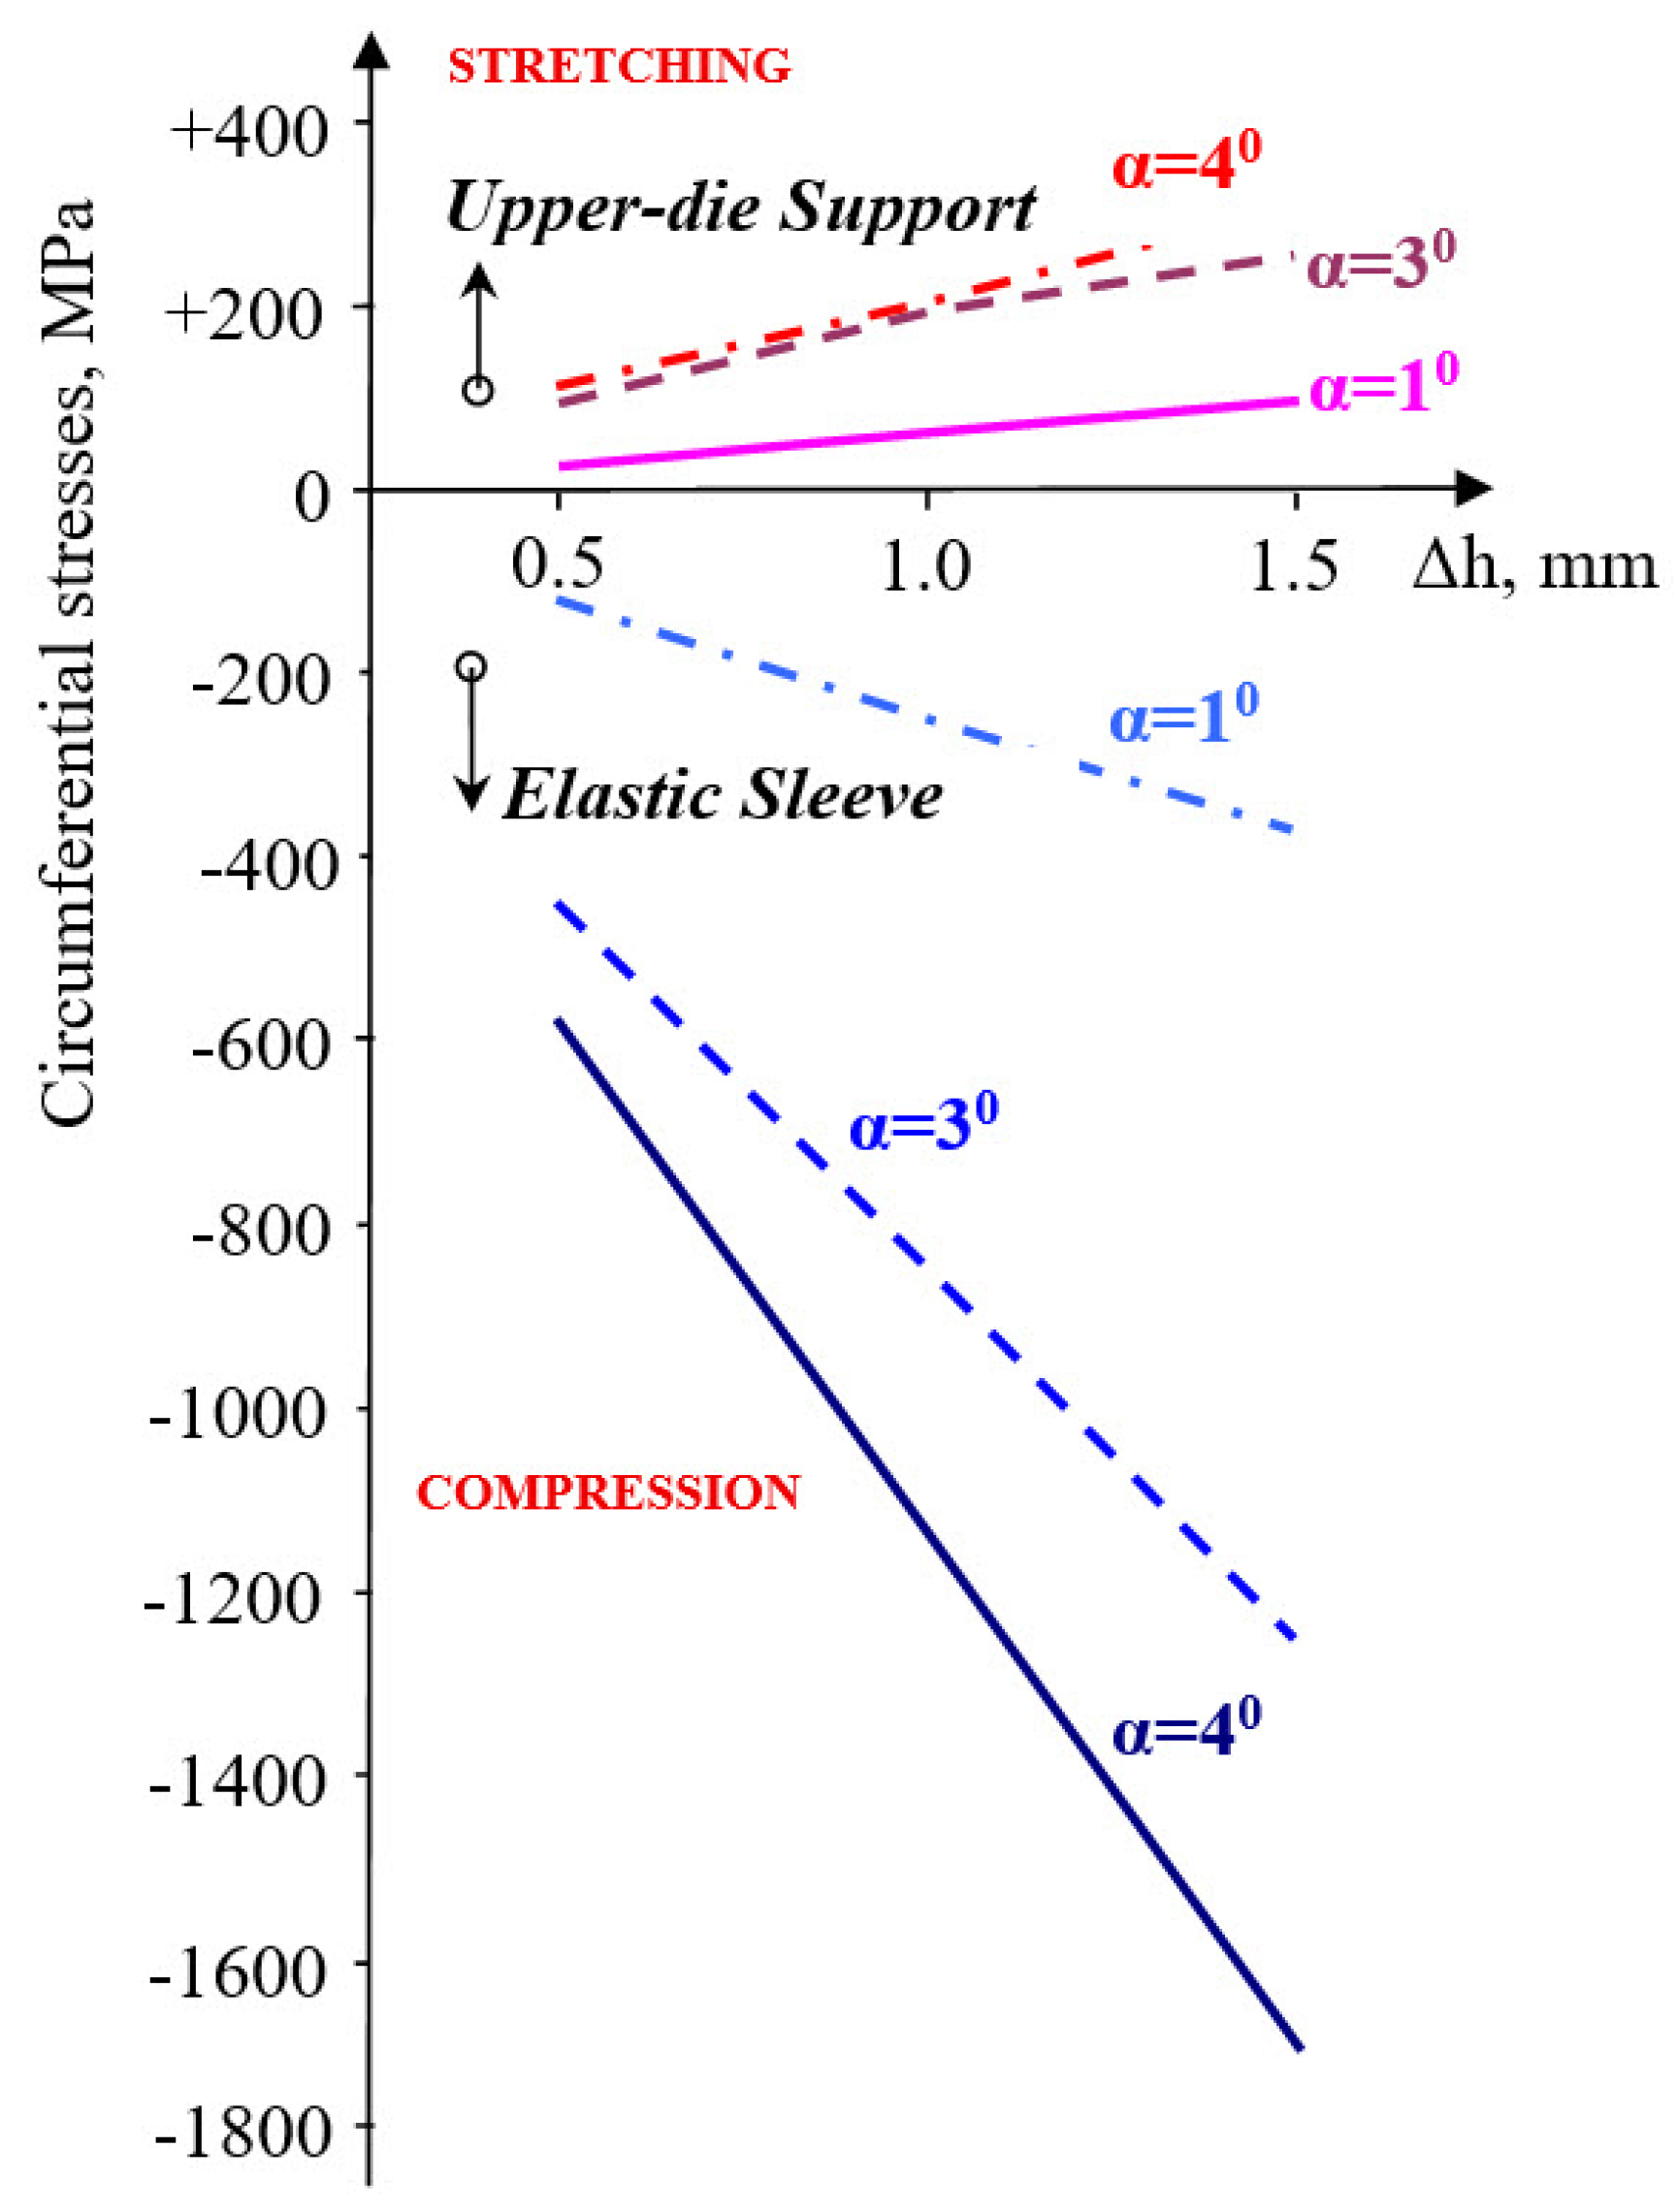
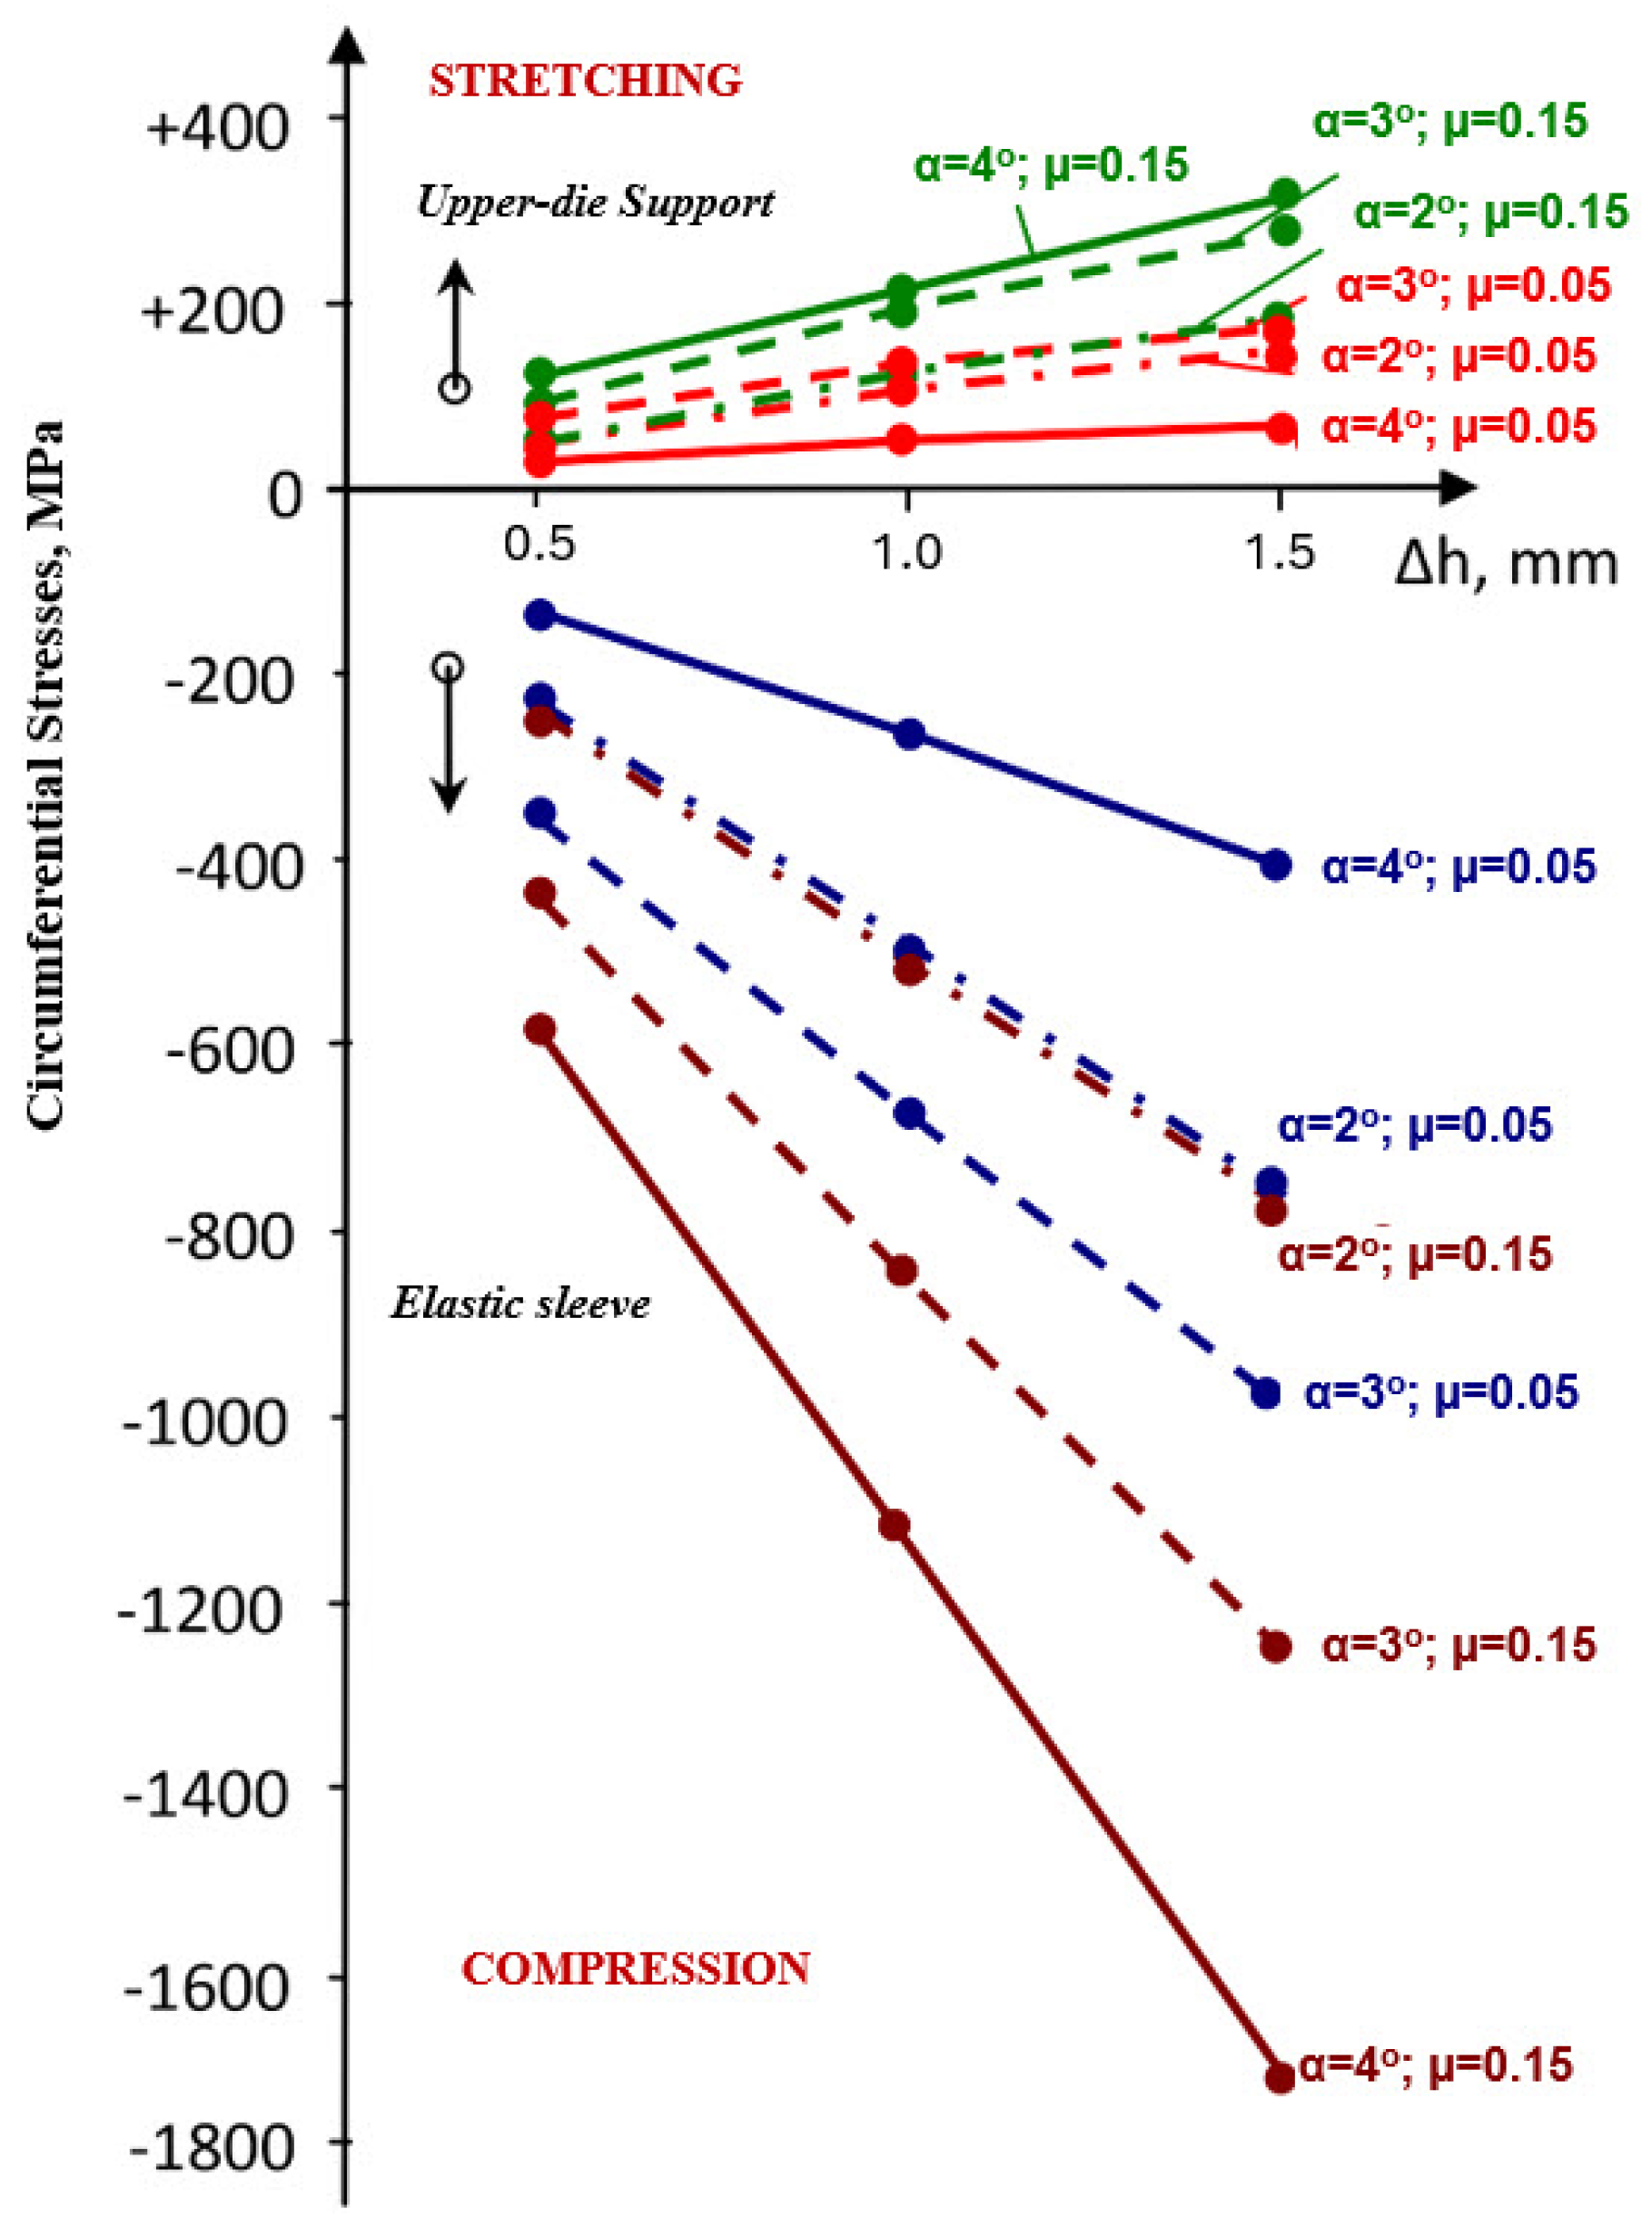
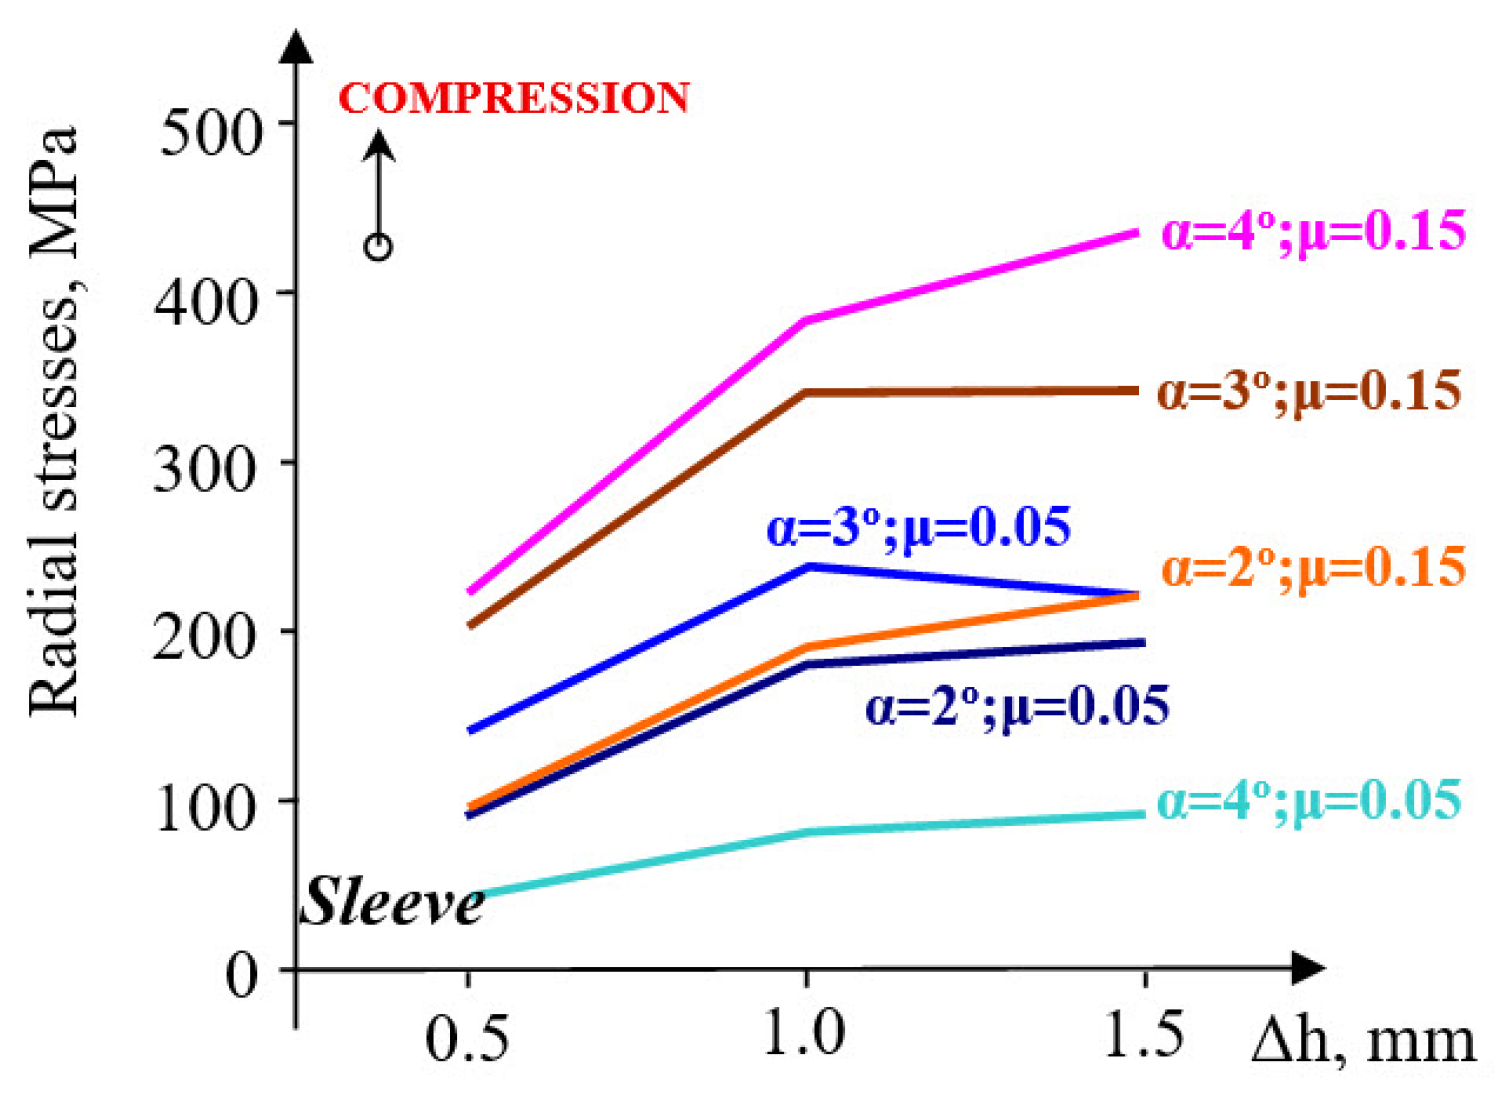
- Circumferential stresses: In the elastic sleeve, hoop stresses increased nearly linearly with Δh, reaching values above 900 MPa at Δh = 1.5 mm for α = 3°. The corresponding holder stresses were lower by ≈40–50%, confirming effective load sharing.
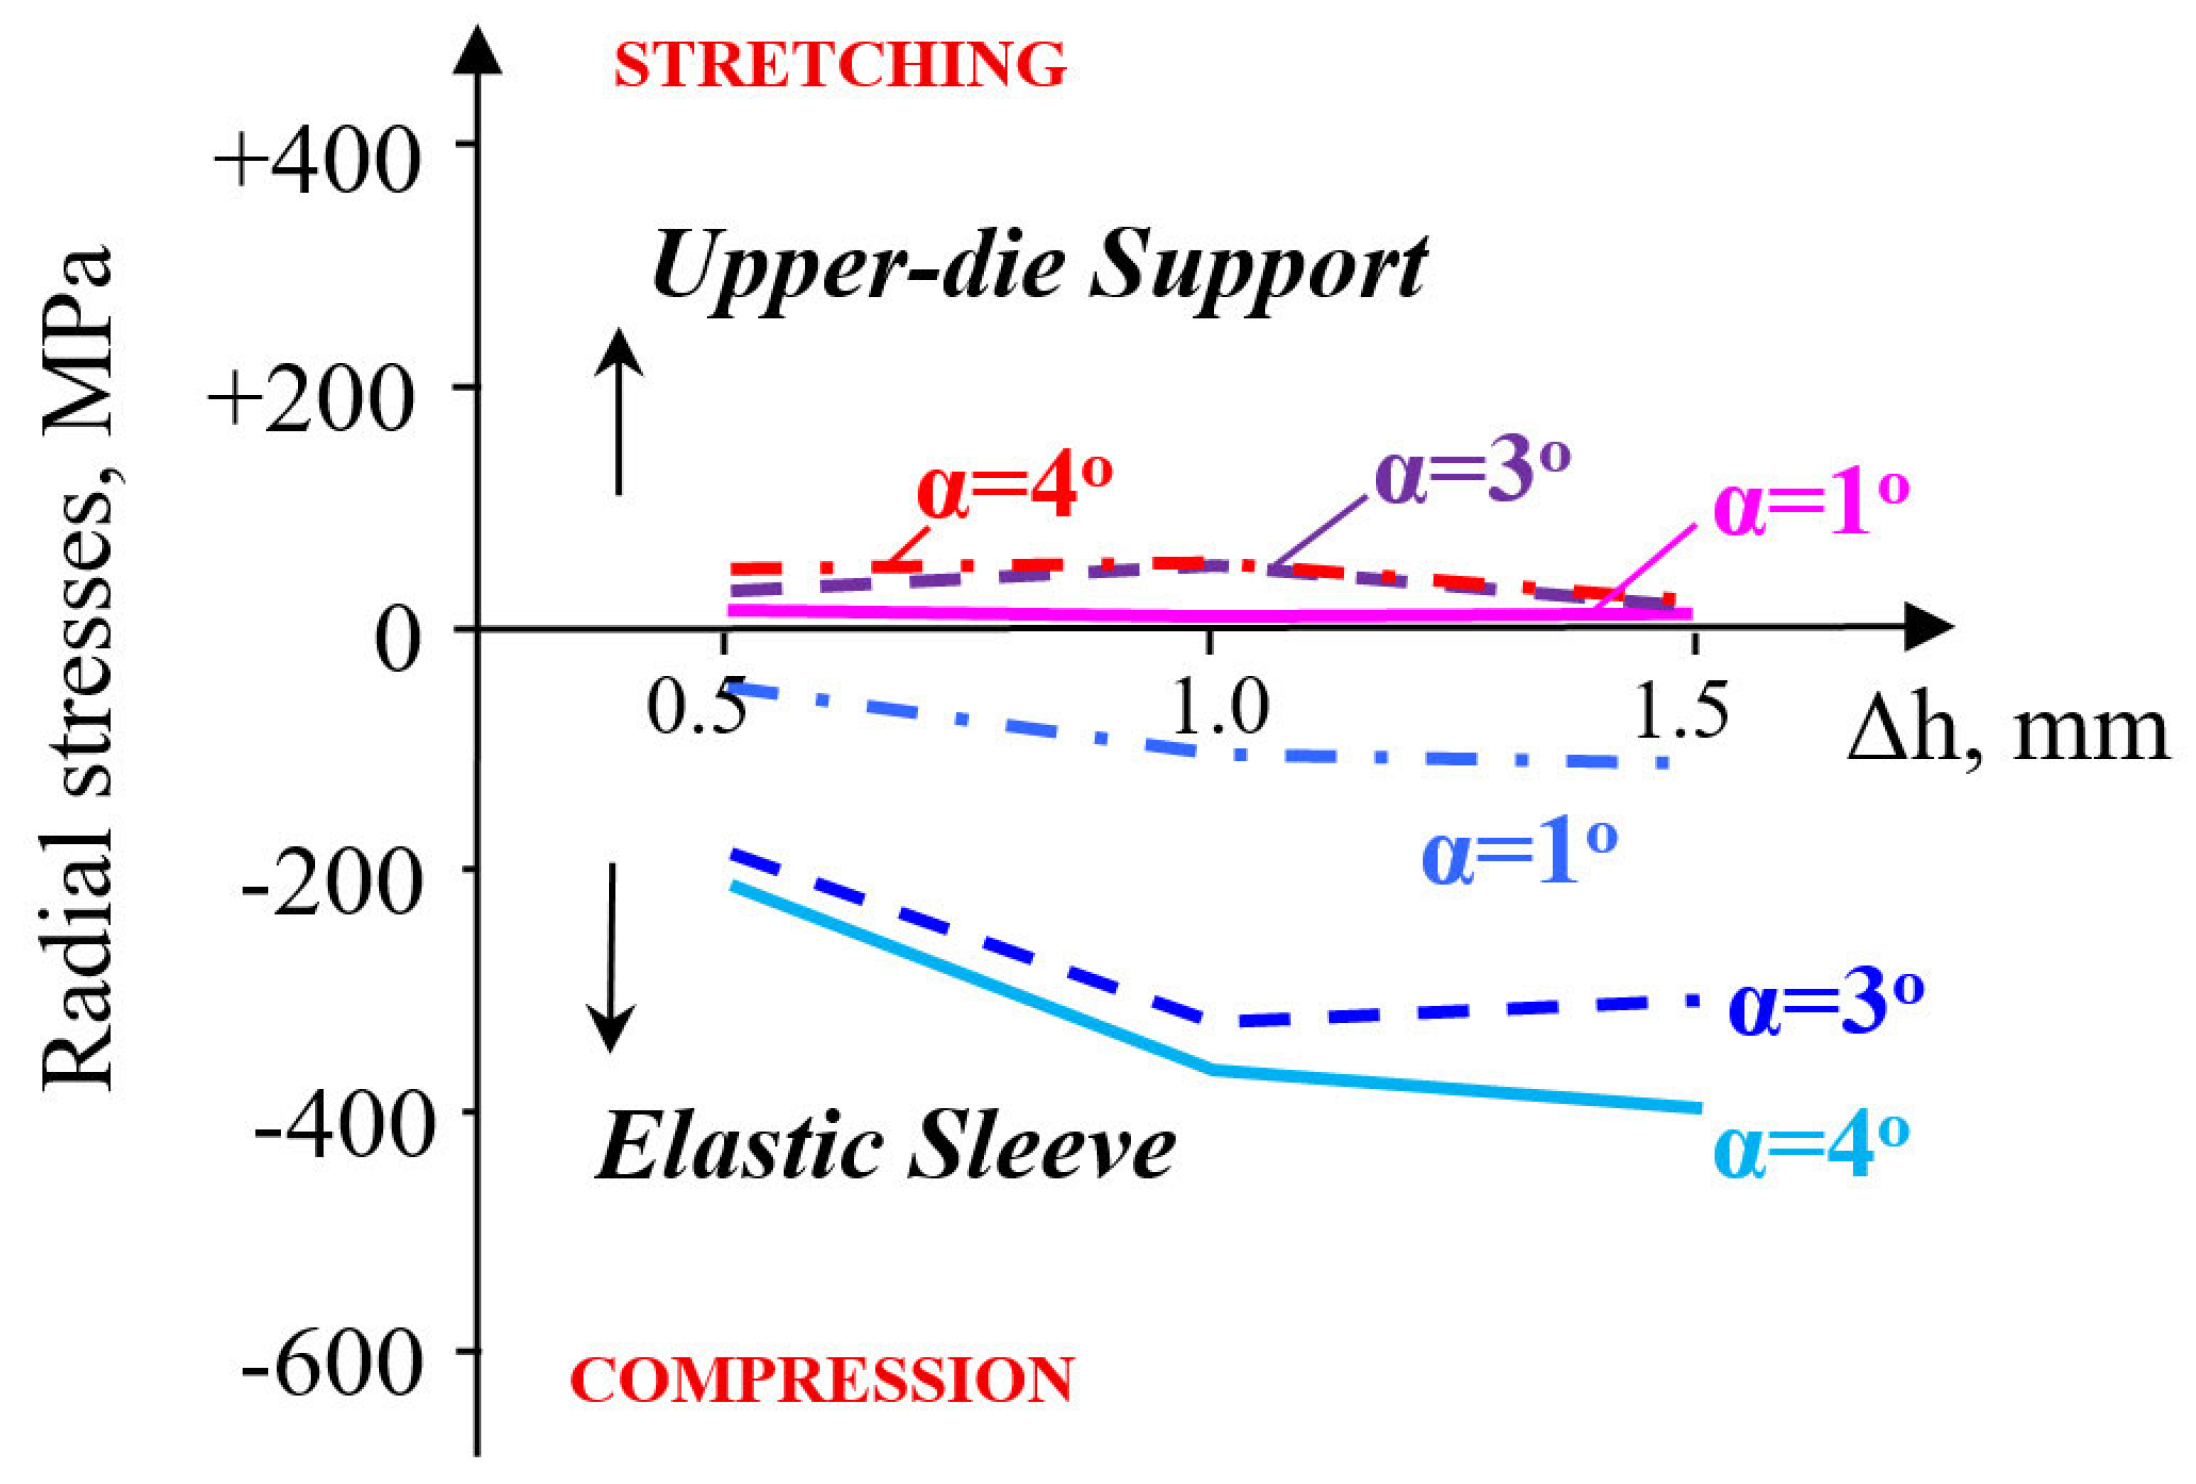
- Frictional influence: Increasing μ from 0.05 to 0.15 shifted the stress distribution toward the sleeve and reduced the effective radial compression on the powder, highlighting the importance of lubrication or surface finishing in the die–sleeve interface.
3.2. Constitutive Model Identification and Validation
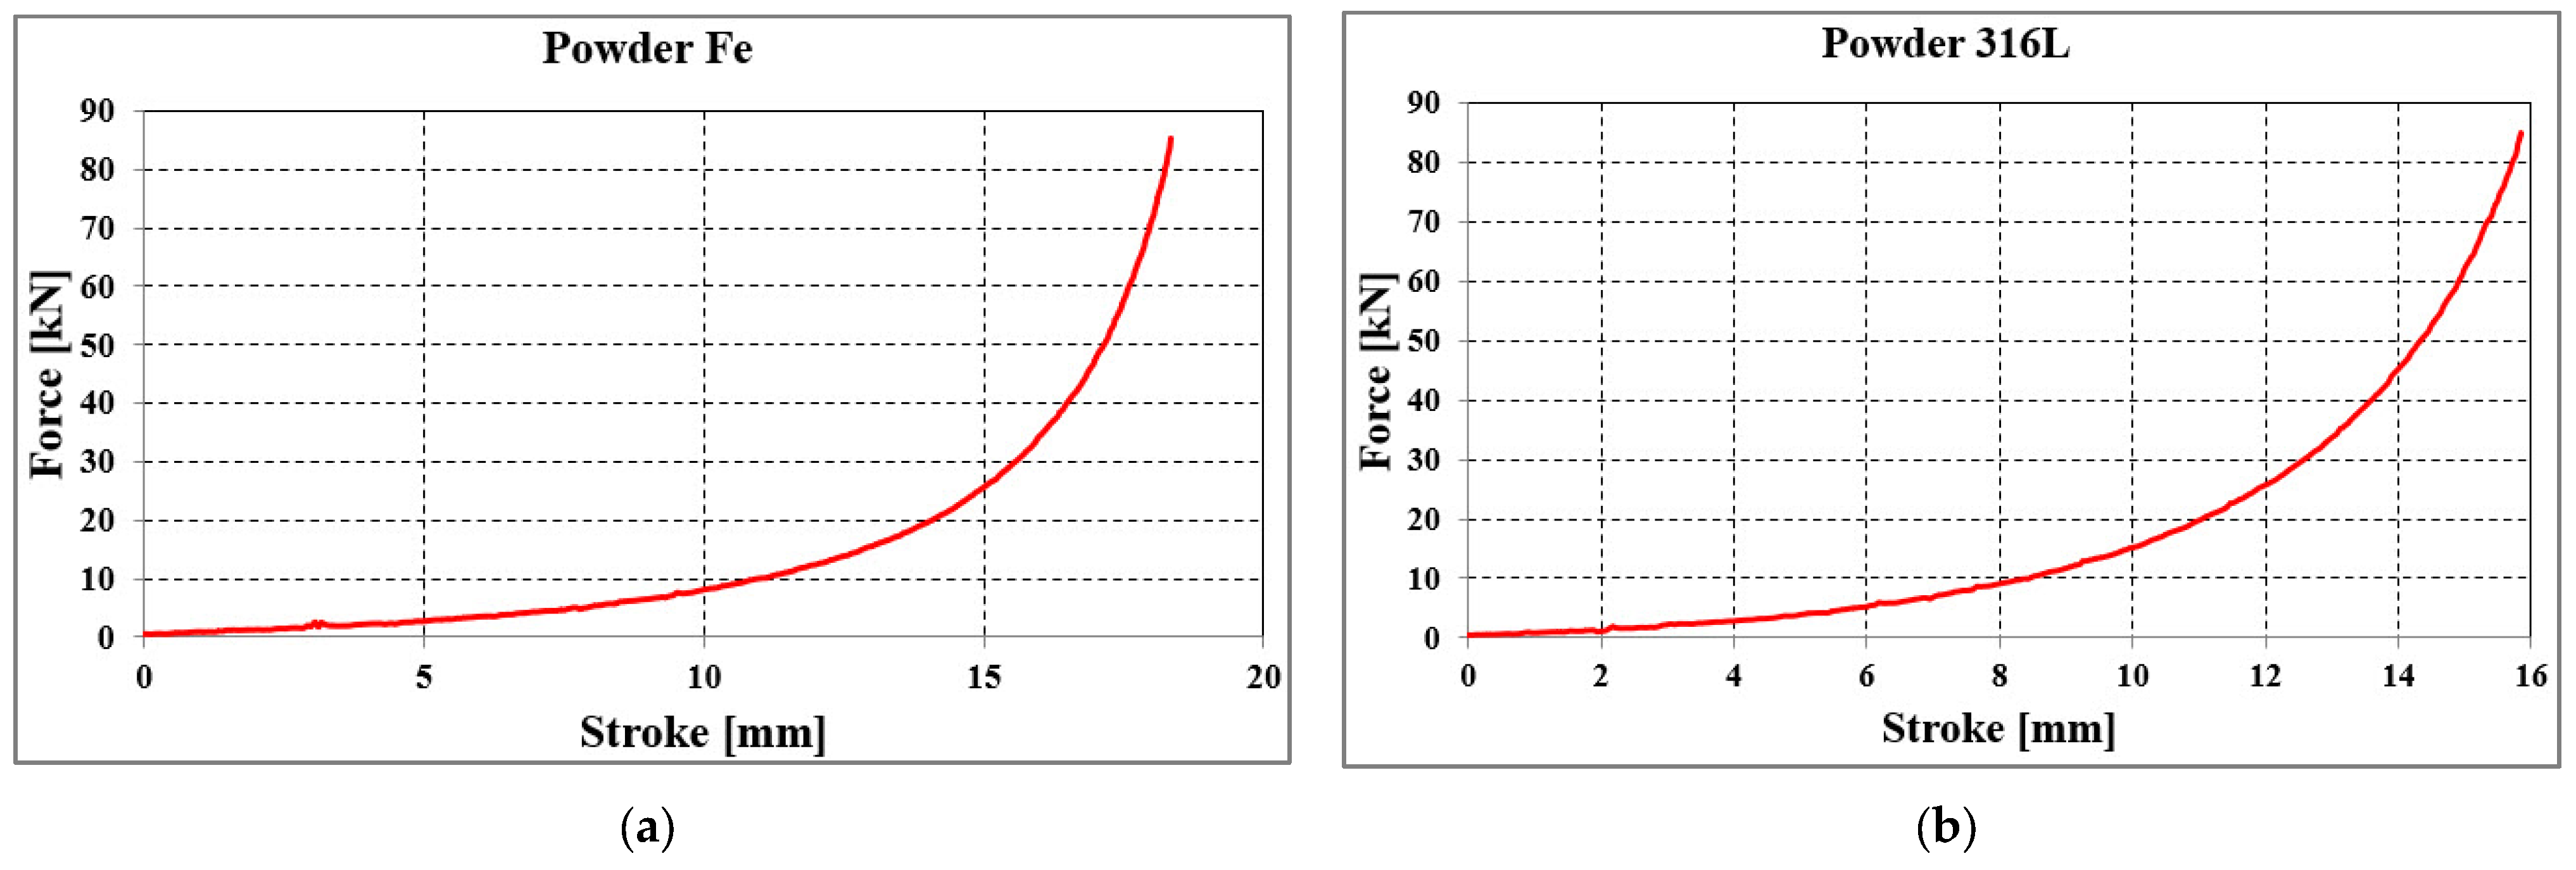
- Force–stroke curves: Simulations reproduced the experimental compaction curves with an average force prediction error of 15–20%, with the largest deviations occurring in the mid-stroke region.
- Density evolution: The predicted relative density–force relationship showed a mean error of ≈4.6% across the compaction range, confirming that the model is sufficiently accurate for subsequent parametric studies.
- Mesh sensitivity: Refinement studies confirmed that the predicted density distribution stabilized with <5% variation once the element size in the powder domain was reduced below 0.5 mm.
3.3. Experimental Compaction of Metallic Powders
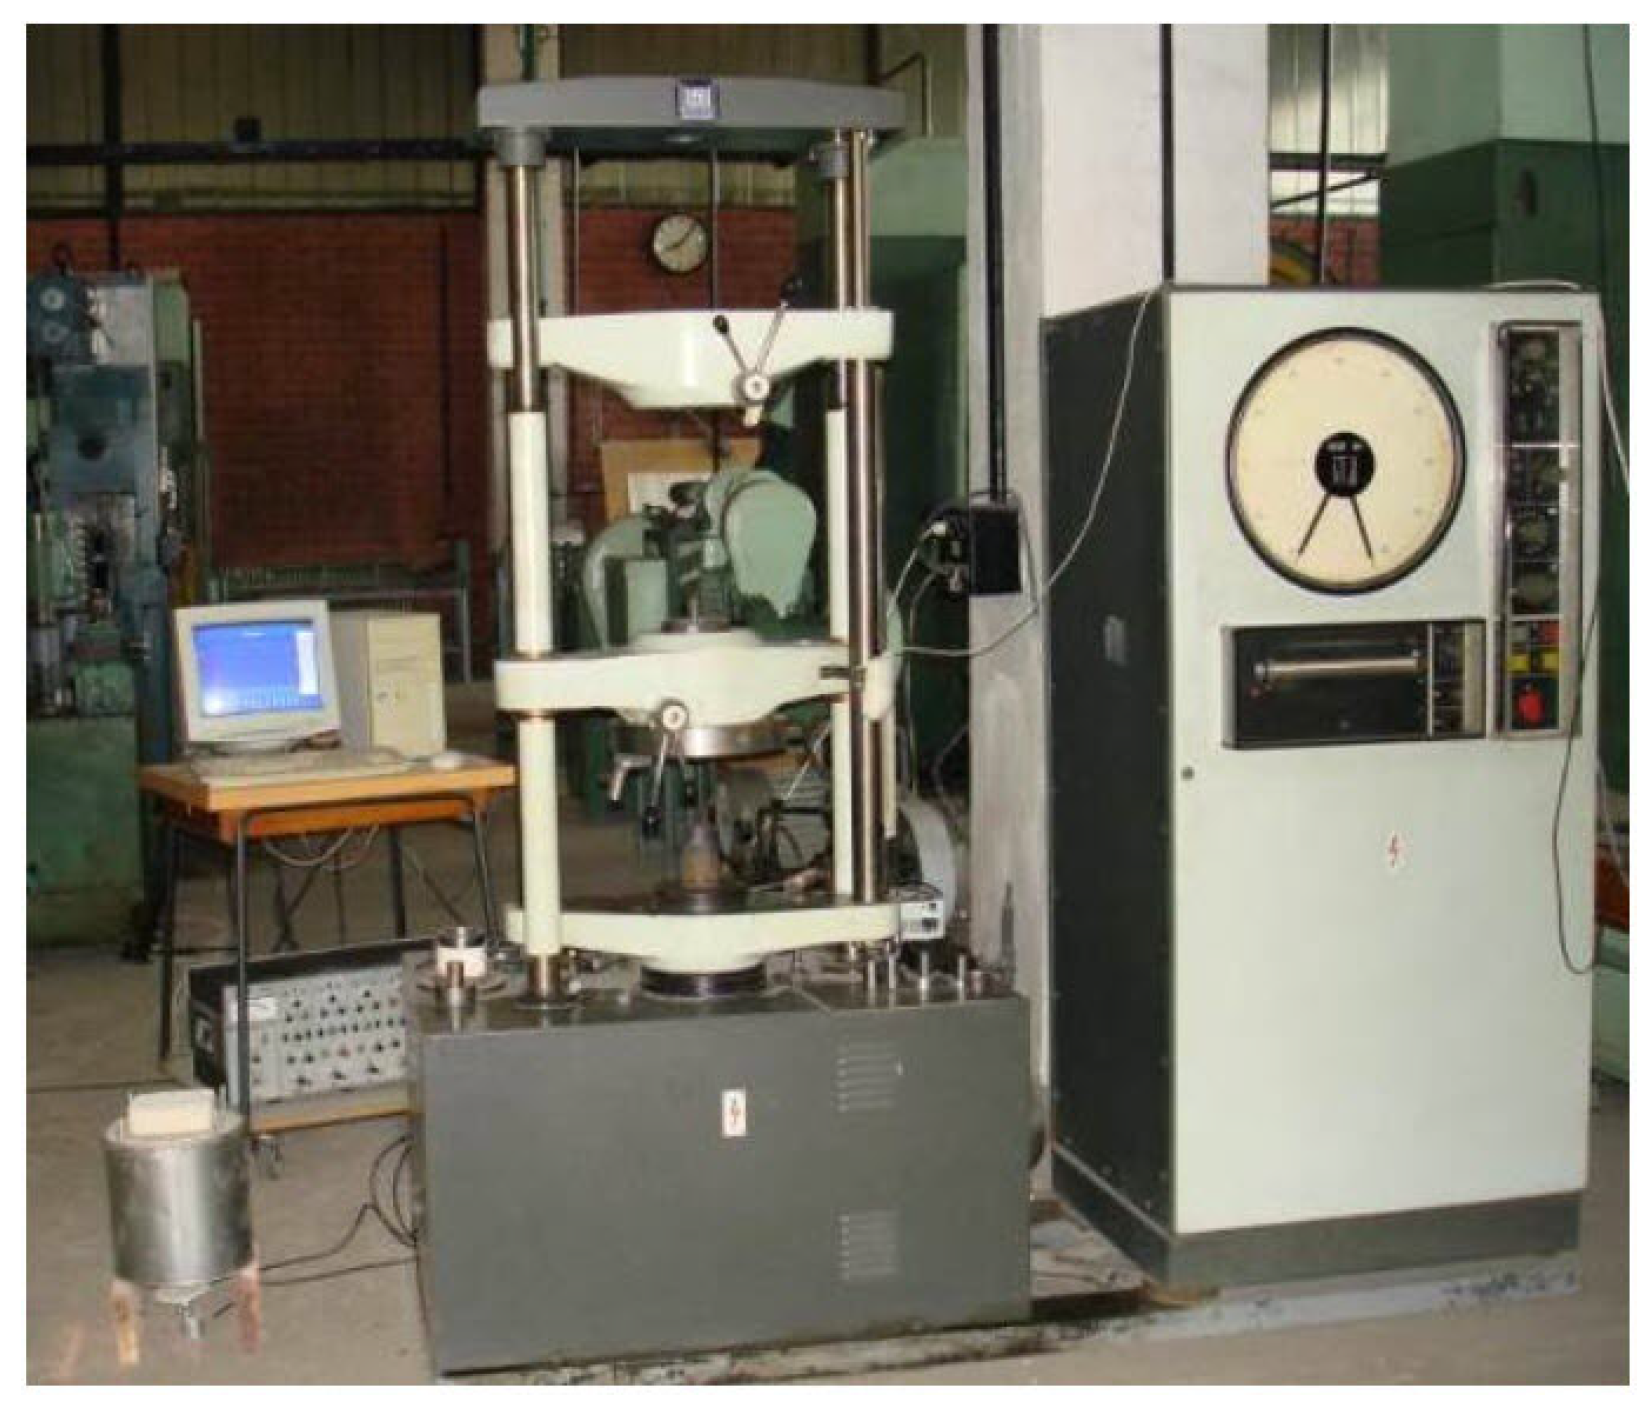
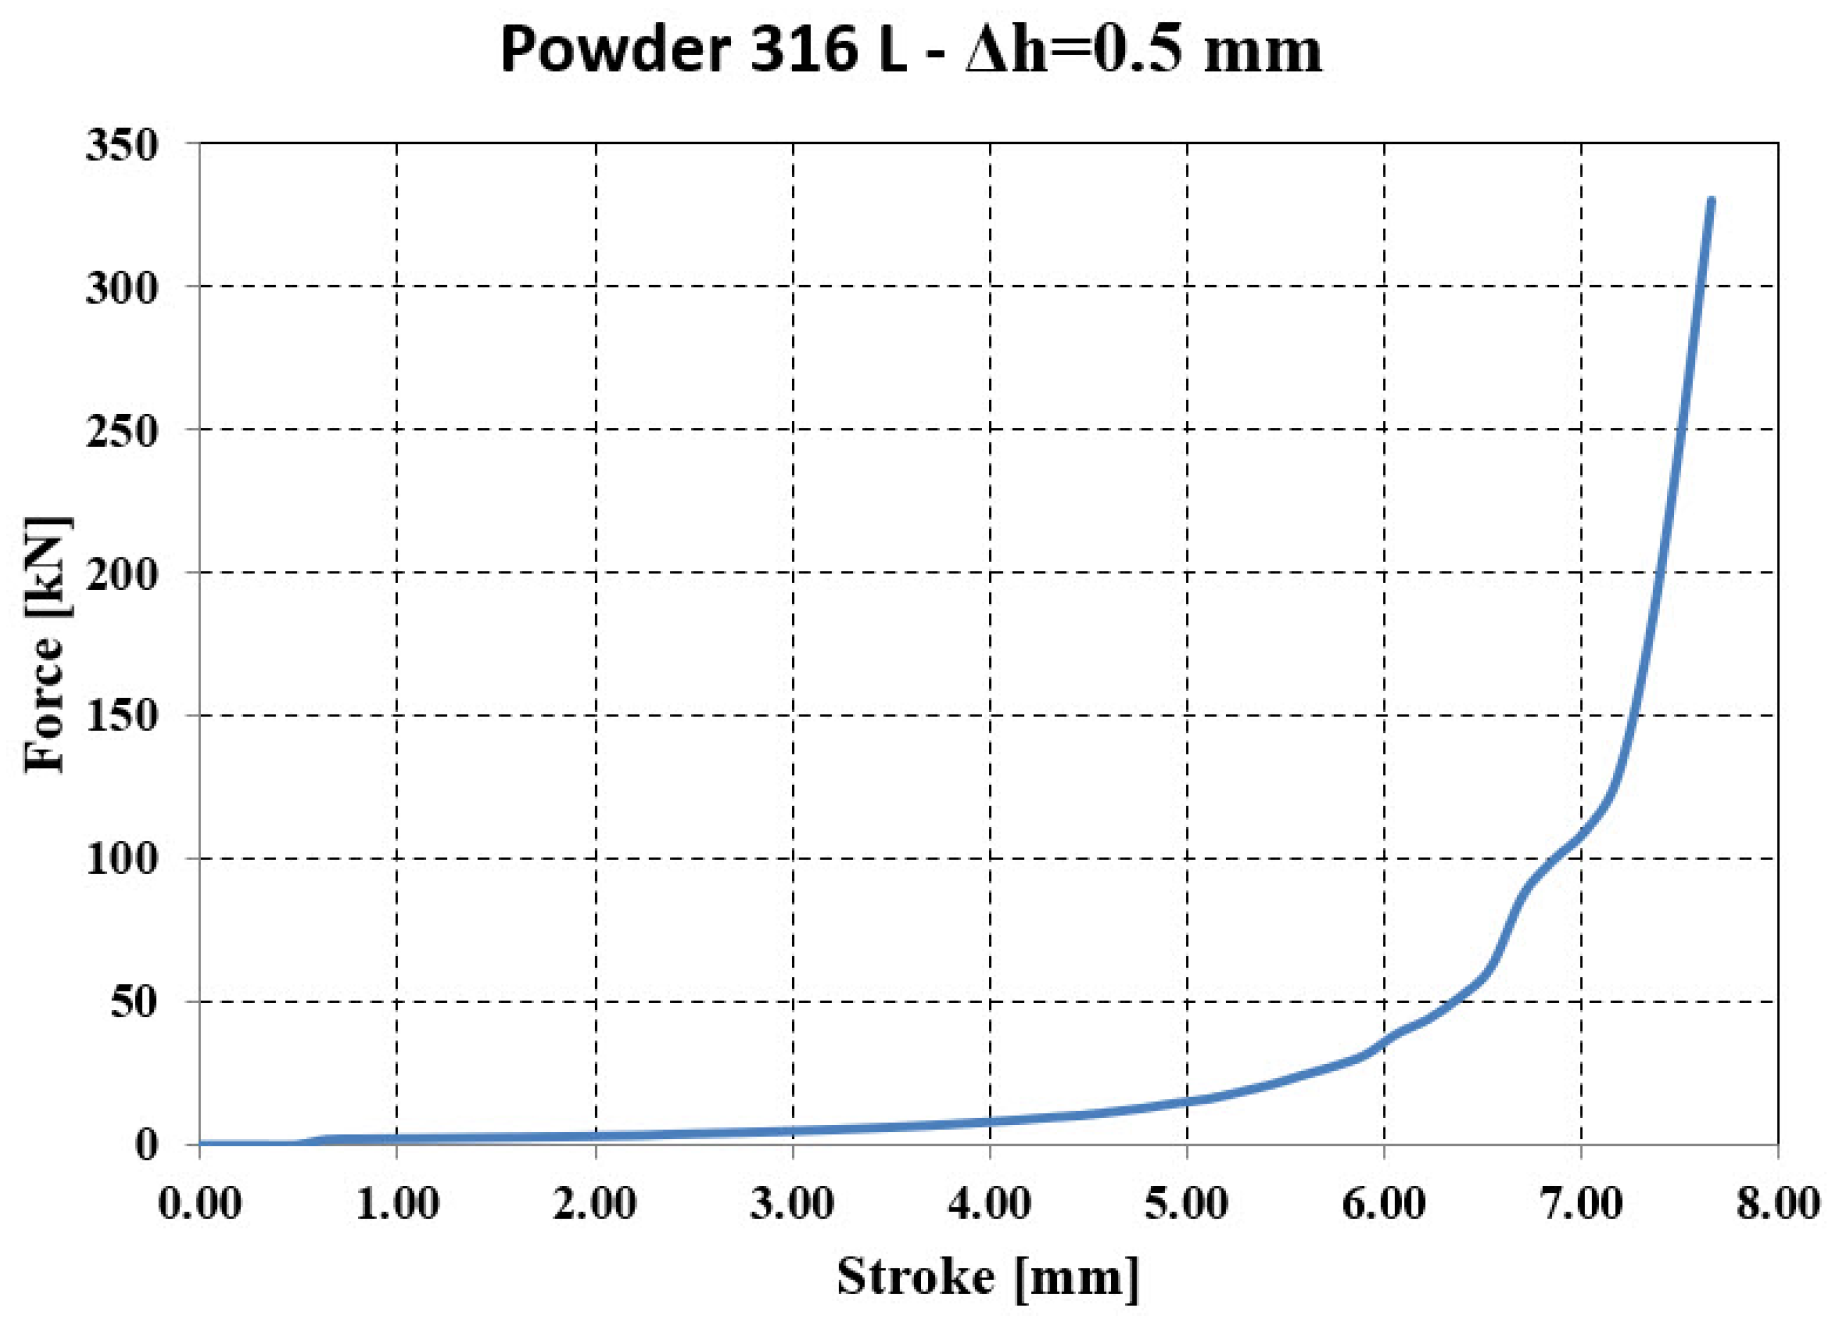
- Experimental validation was conducted on four powders: Fe normal compressibility (NC), Fe super-compressibility (SC), Fe–Cu–graphite mixture, and 316L stainless steel, each tested with and without zinc stearate lubrication. Cylindrical compacts were produced under applied forces up to 325 kN, using spacers to impose Δh values of 0.5, 1.0, and 1.5 mm.
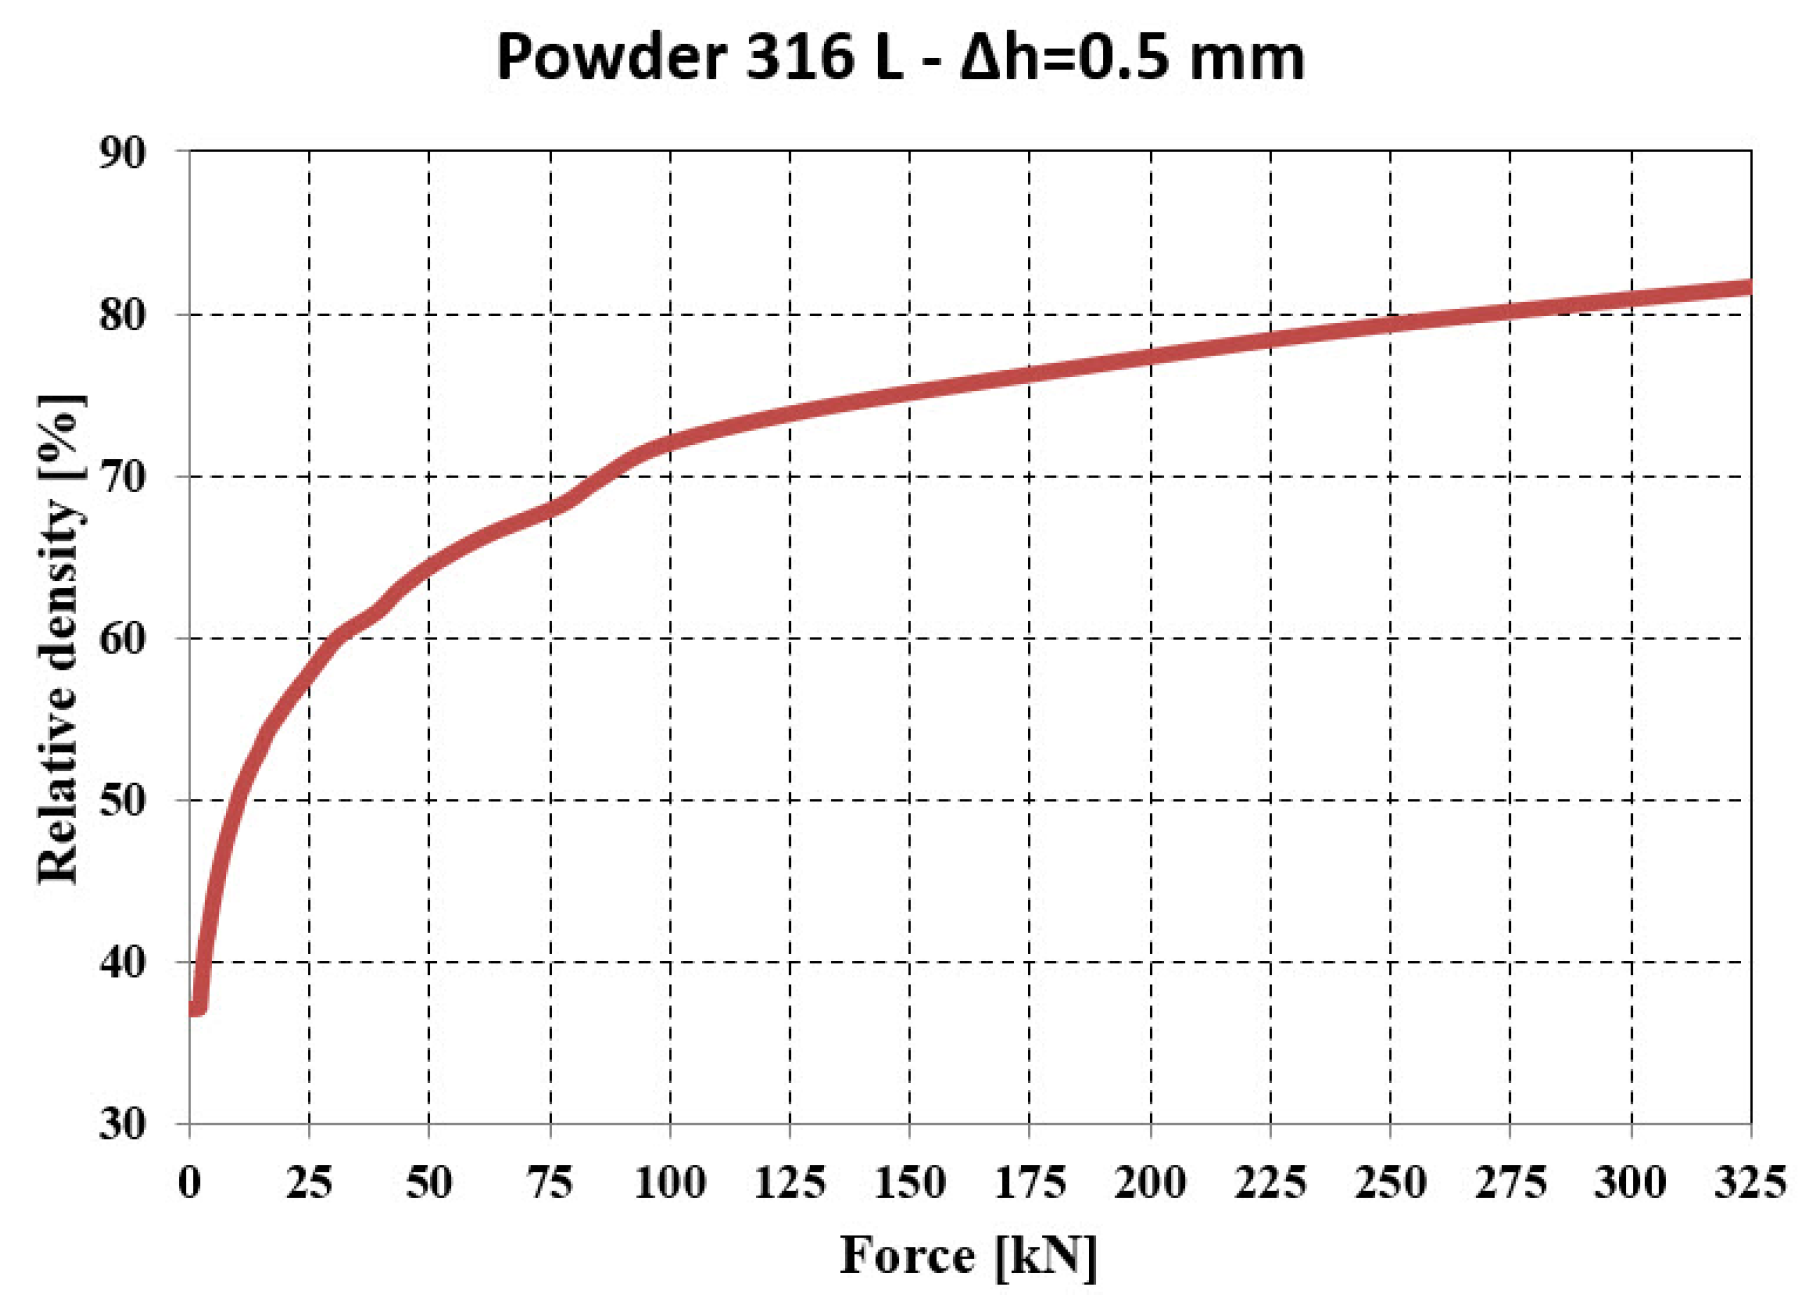
- Relative density trends: For 316L, density increased from an initial ρ0 ≈ 0.37 to a maximum of ρ ≈ 0.889 at Δh = 1.5 mm and 325 kN. For Fe–Cu–C, the final density reached ρ ≈ 0.865, while Fe-NC and Fe-SC exhibited lower densification levels under identical conditions.
- Effect of pretension (Δh): Increasing Δh consistently enhanced density by ~3–5% at the same pressing force, confirming that higher sleeve pre-compression improves radial support.
- Effect of lubrication: The addition of zinc stearate lowered the compaction force by ≈10–15% for a given density but did not significantly change the maximum achievable density.
3.4. Correlation of Numerical and Experimental Results
- Density agreement: Simulated final densities matched experimental values within ±5% for both 316L and Fe–Cu–C compacts. At 325 kN and Δh = 1.5 mm, experiments yielded ρ ≈ 0.889 for 316L and ρ ≈ 0.865 for Fe–Cu–C, while simulations predicted ρ ≈ 0.895 and ρ ≈ 0.870, respectively. This confirms that the calibrated material parameters reproduce densification trends with good accuracy.
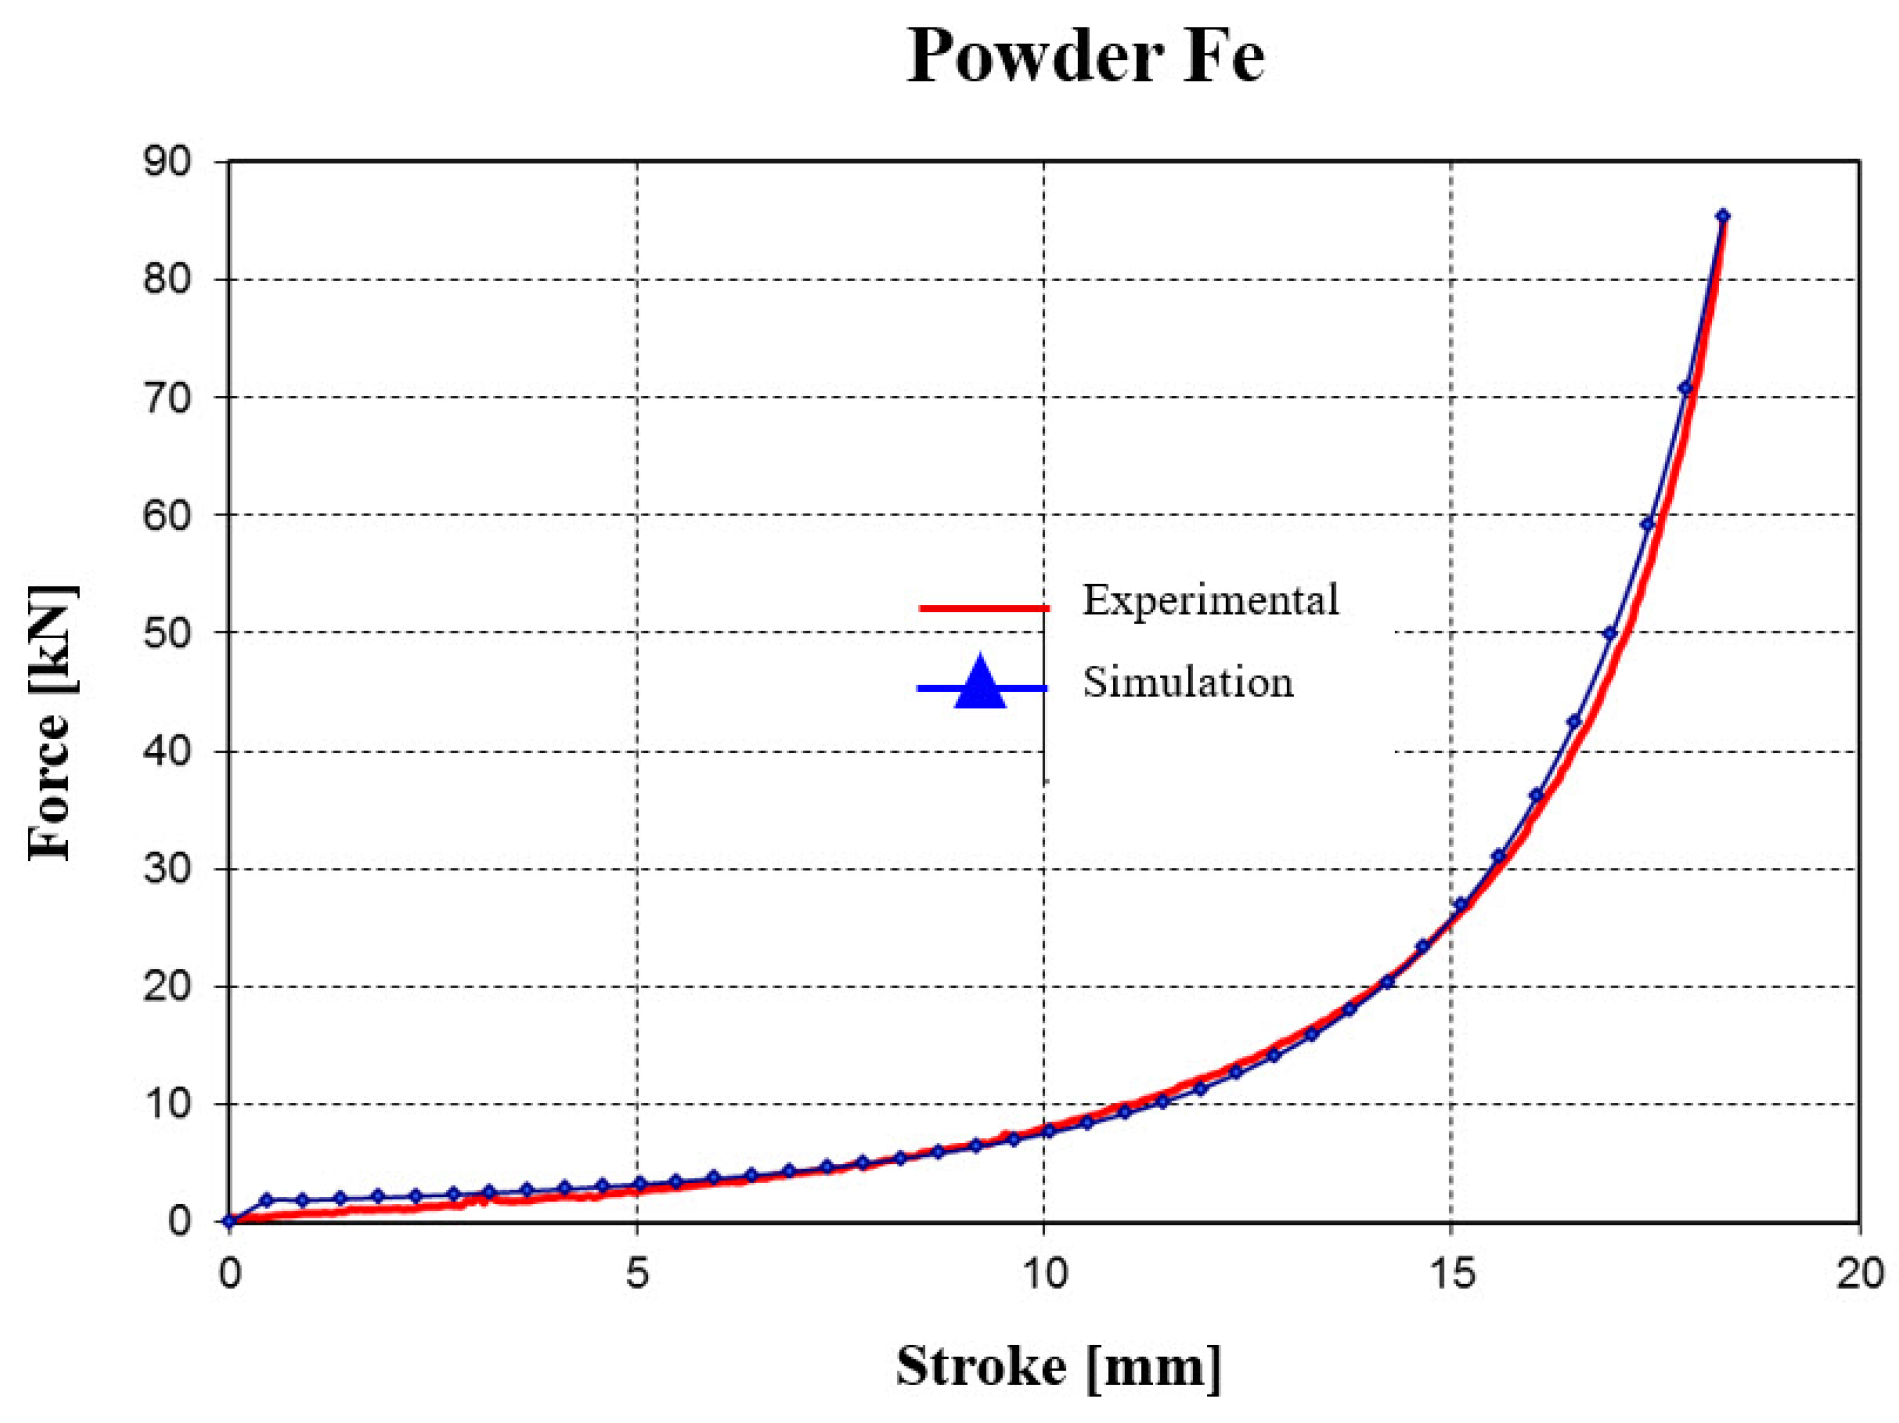
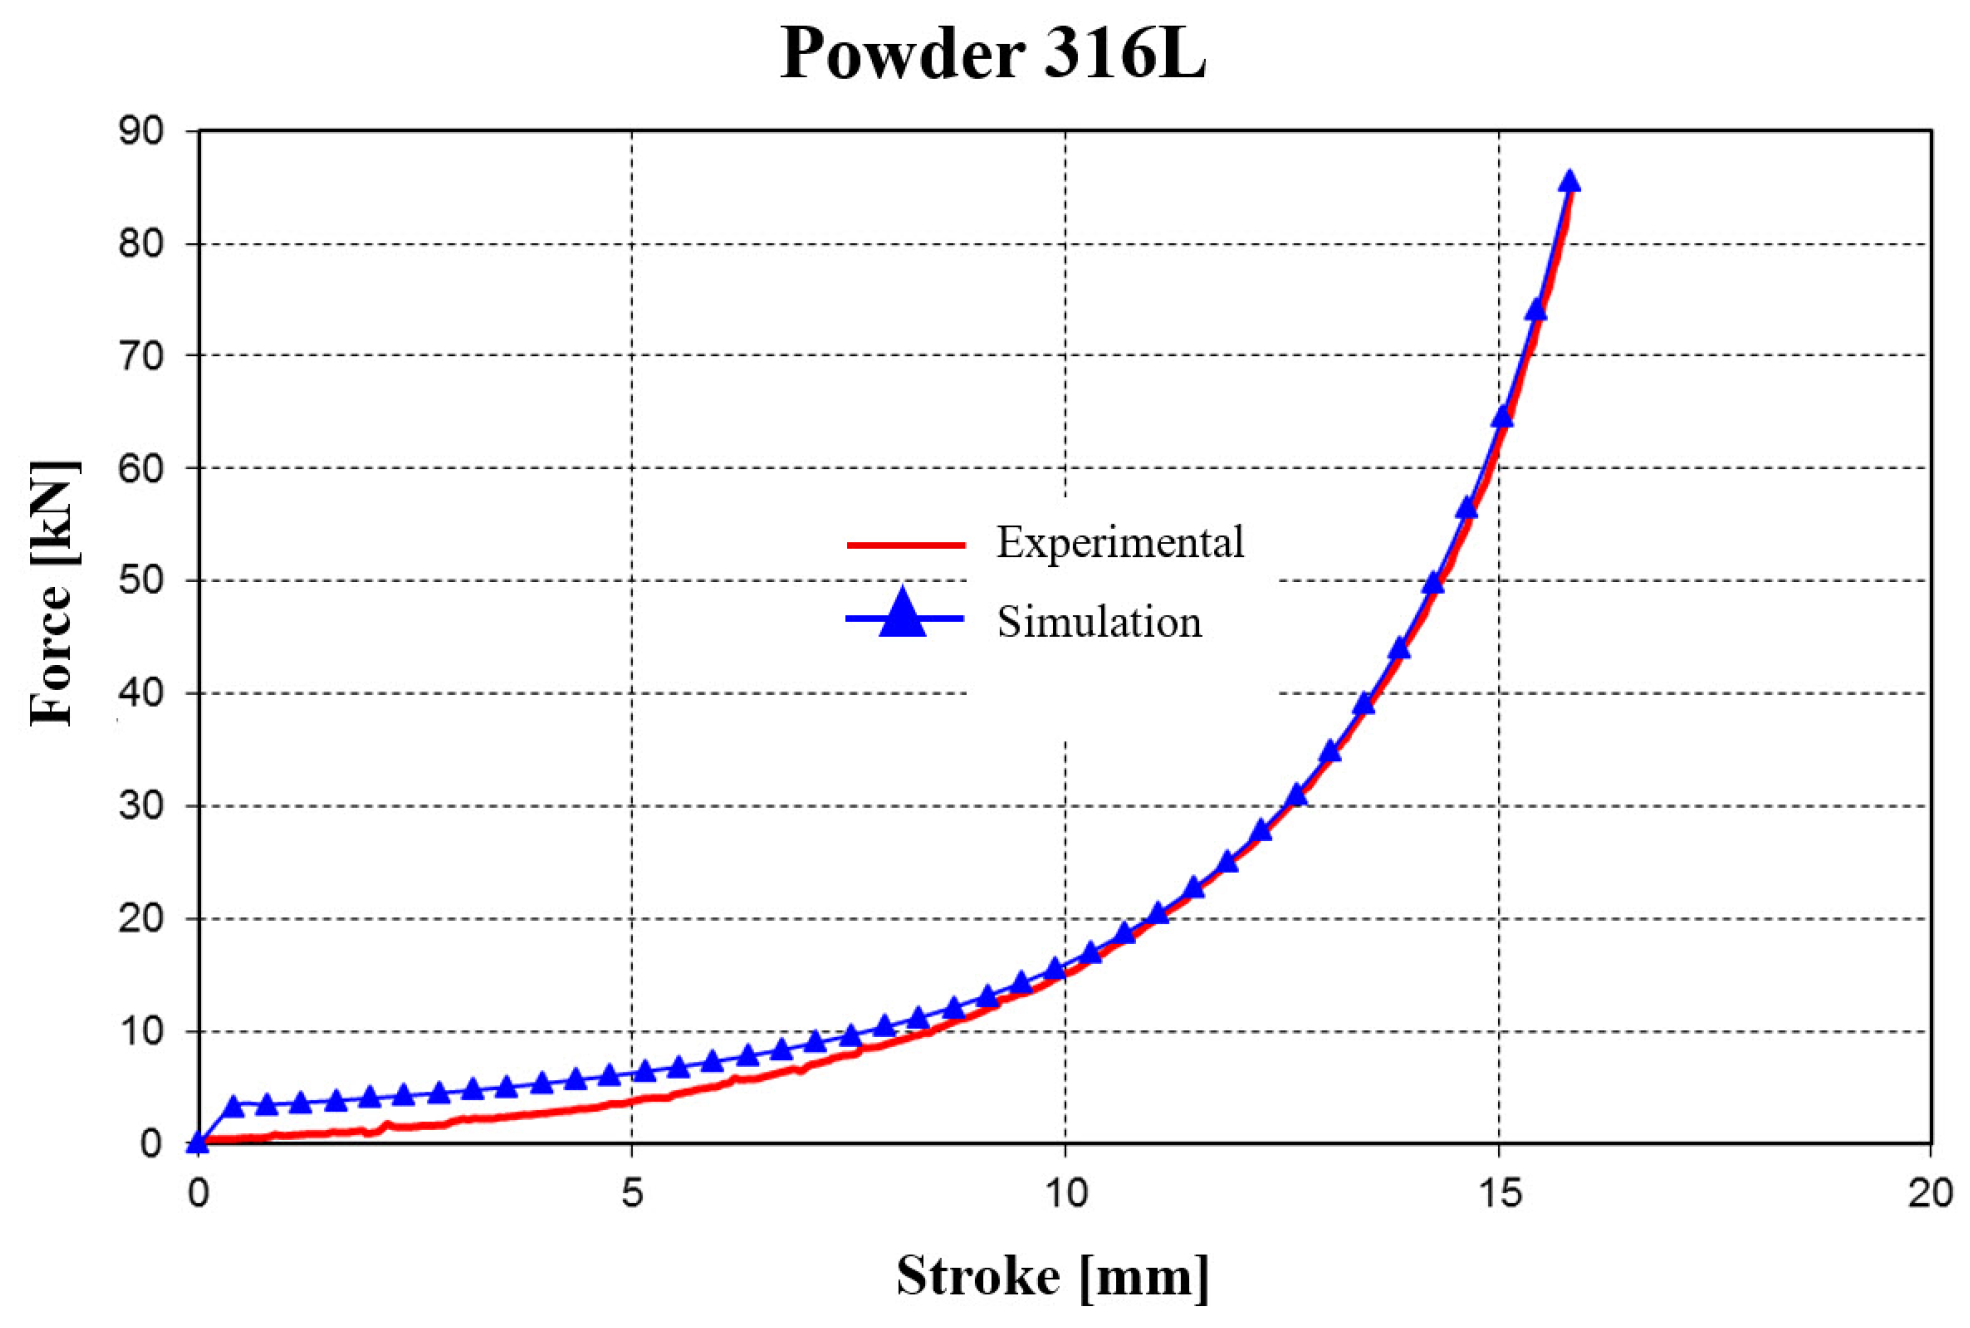
- Force–stroke correlation: The FEM-predicted compaction curves followed the experimental load–displacement profiles closely. For Fe-based powders, the average deviation was ≤15%, and for 316L, ≈20%. Differences were most pronounced in the mid-stroke region, where particle rearrangement and local friction effects, not explicitly captured by the constitutive model, contributed to higher experimental forces (Figure 22 and Figure 23).
- Stress evolution: The predicted circumferential stress distribution in the sleeve aligned qualitatively with strain-gauge measurements on the external surface. Both experiment and simulation identified peak hoop stresses near the mid-height of the sleeve. While quantitative strain validation requires additional tests, the current results support the FEM stress field predictions.
- Design optimization: The combined numerical–experimental evidence points to an optimal die geometry with α = 3° and Δh = 1.0–1.5 mm, balancing high density, controlled stresses, and favorable relaxation behavior that facilitates extraction.
4. Discussion
4.1. Influence of Taper Angle on Stress Transfer
- At small angles (α = 1–2°), the conical interface provides insufficient radial expansion, resulting in limited sleeve pre-stress and reduced powder confinement.
- At larger angles (α = 4°), the contact area shortens, and local sliding dominates, reducing uniformity of radial pressure.
4.2. Role of Axial Pretension (Δh)
4.3. Frictional Effects and Implications for Ejection
- Higher μ values transferred more stress to the sleeve but reduced the effective radial compression on the powder, lowering densification efficiency.
- From an operational perspective, upon unloading, the elastic sleeve relaxes and the wall pressure drops, which reduces the ejection effort. This behavior is supported by our Marc Mentat analysis: Figure 25c shows the von Mises stress distribution in the sleeve during the extraction phase, confirming a relaxation of stresses at the powder–die interface. Experimentally, the green parts were removed without sticking, although ejection forces were not instrumented. In line with prior balanced-die literature [25], we conclude that the elastic die design lowers ejection effort compared with rigid dies. Although the present study inferred easy ejection indirectly, future work should quantify the ejection force experimentally, since prior studies reported force reductions of up to 70% compared with rigid dies.
4.4. Material and Lubrication Effects
- 316L stainless steel achieved the highest final density (ρ ≈ 0.889), consistent with its finer particle morphology and greater compressibility.
- Fe–Cu–C powders compacted to slightly lower final densities, while Fe-NC and Fe-SC exhibited more limited densification, reflecting differences in flowability and particle bonding.
4.5. Correlation Between Simulation and Experiment
4.6. Practical Implications
- Taper angle near 3° yields the most efficient stress transfer.
- Pretension Δh = 1.0–1.5 mm enhances densification without overstressing the sleeve. However, excessive interference (beyond 1.5 mm) provides diminishing density gains while driving sleeve stresses above 900 MPa, which could compromise long-term durability. This conclusion is supported by parametric FEM analyses and by compaction tests performed at Δh = 0.5, 1.0, and 1.5 mm on both 316L and Fe–Cu–C powders under forces up to 325 kN.
- Lubrication reduces pressing force but does not significantly affect final density.
5. Conclusions
Author Contributions
Funding
Data Availability Statement
Conflicts of Interest
Appendix A
Appendix B
| Taper Angle | Δh = 0.5 mm | Δh = 1 mm | Δh = 1.5 mm | |||
|---|---|---|---|---|---|---|
| Sleeve | Upper Die Support | Sleeve | Upper Die Support | Sleeve | Upper Die Support | |
| 1° | −115.212 | 25.304 | −244.665 | 57.006 | −368.71 | 84.072 |
| 2° | −236.037 | 48.165 | −502.444 | 105.286 | −759.438 | 153.513 |
| 3° | −359.983 | 67.569 | −674.493 | 138.892 | −984.372 | 174.426 |
| 4° | −130.17 | 26.103 | −258.956 | 48.144 | −384.192 | 68.639 |
| Taper Angle | Δh = 0.5 mm | Δh = 1 mm | Δh = 1.5 mm | |||
|---|---|---|---|---|---|---|
| Sleeve | Upper Die Support | Sleeve | Upper Die Support | Sleeve | Upper Die Support | |
| 1° | −51.869 | 11.596 | −102.28 | 4.118 | −100.289 | 5.133 |
| 2° | −88.291 | 19.963 | −179.284 | 10.602 | −189.932 | 15.329 |
| 3° | −136.532 | 22.111 | −231.89 | 35.055 | −255.906 | 11.595 |
| 4° | −47.611 | 7.899 | −76.964 | 18.38 | −95.058 | 5.361 |
| Taper Angle | Δh = 0.5 mm | Δh = 1 mm | Δh = 1.5 mm |
|---|---|---|---|
| 1° | 52.071 | 102.676 | 100.293 |
| 2° | 88.78 | 181.397 | 190.0 |
| 3° | 138.465 | 139.465 | 226.034 |
| 4° | 48.228 | 75.497 | 93.149 |
| Taper Angle | Δh = 0.5 mm | Δh = 1 mm | Δh = 1.5 mm | |||
|---|---|---|---|---|---|---|
| Sleeve | Upper Die Support | Sleeve | Upper Die Support | Sleeve | Upper Die Support | |
| 1° | −115.044 | 26.326 | −244.191 | 59.056 | −367.729 | 89.021 |
| 2° | −235.988 | 50.074 | −501.794 | 111.21 | −757.611 | 163.674 |
| 3° | −443.122 | 87.342 | −853.437 | 192.745 | −1250.743 | 253.406 |
| 4° | −576.779 | 108.207 | −1138.79 | 203.737 | −1689.746 | 290.392 |
| Taper Angle | Δh = 0.5 mm | Δh = 1 mm | Δh = 1.5 mm | |||
|---|---|---|---|---|---|---|
| Sleeve | Upper Die Support | Sleeve | Upper Die Support | Sleeve | Upper Die Support | |
| 1° | −54.676 | 12.165 | −106.465 | 3.911 | −106.078 | 4.983 |
| 2° | −93.229 | 20.976 | −186.698 | 10.511 | −203.712 | 14.839 |
| 3° | −191.395 | 30.433 | −328.901 | 51.048 | −321.325 | 12.993 |
| 4° | −212.64 | 39.0 | −370.524 | 55.475 | −400.526 | 20.761 |
| Taper Angle | Δh = 0.5 mm | Δh = 1 mm | Δh = 1.5 mm |
|---|---|---|---|
| 1° | 54.947 | 106.984 | 103.913 |
| 2° | 93.917 | 189.261 | 200.129 |
| 3° | 194.818 | 333.455 | 309.841 |
| 4° | 217.255 | 378.756 | 391.85 |
| Taper Angle | Δh = 0.5 mm | Δh = 1 mm | Δh = 1.5 mm | |||
|---|---|---|---|---|---|---|
| Sleeve | Upper Die Support | Sleeve | Upper Die Support | Sleeve | Upper Die Support | |
| 1° | −114.924 | 27.49 | −243.858 | 60.87 | −367.011 | 94.665 |
| 2° | −235.621 | 52.071 | −500.932 | 111.455 | −755.804 | 172.685 |
| 3° | −442.887 | 90.563 | −851.885 | 202.3 | −1247.318 | 273.03 |
| 4° | −576.697 | 112.561 | −1138.07 | 216.719 | −1686.769 | 312.477 |
| Taper Angle | Δh = 0.5 mm | Δh = 1 mm | Δh = 1.5 mm | |||
|---|---|---|---|---|---|---|
| Sleeve | Upper Die Support | Sleeve | Upper Die Support | Sleeve | Upper Die Support | |
| 1° | −57.53 | 12.706 | −110.674 | 4.148 | −114.568 | 4.825 |
| 2° | −96.619 | 22.28 | −191.691 | 10.236 | −218.97 | 14.187 |
| 3° | −199.092 | 31.369 | −338.781 | 53.33 | −343.341 | 12.396 |
| 4° | −222.684 | 41.921 | −381.604 | 57.553 | −435.863 | 20.017 |
| Taper Angle | Δh = 0.5 mm | Δh = 1 mm | Δh = 1.5 mm |
|---|---|---|---|
| 1° | 57.873 | 111.325 | 107.608 |
| 2° | 97.518 | 194.713 | 208.347 |
| 3° | 203.242 | 344.553 | 319.891 |
| 4° | 228.414 | 391.632 | 405.584 |
Appendix C
| Powder Type | Diameter [mm] | Height [mm] | Mass [g] | Density [g/cm3] |
|---|---|---|---|---|
| 316L (40 μm) | 24.94 | 9.81 | 29.1873 | 6.090 |
| Fe SC | 24.95 | 9.10 | 30.1237 | 6.770 |
| Fe NC | 24.95 | 10.56 | 35.2633 | 6.830 |
| 316L | 25.05 | 10.89 | 33.2372 | 6.192 |
| Fe-Cu-graphite | 24.95 | 10.38 | 34.7042 | 6.838 |
| Fe-Cu-graphite+St. | 24.97 | 9.87 | 33.3475 | 6.899 |
| Powder Type | Diameter [mm] | Height [mm] | Mass [g] | Density [g/cm3] |
|---|---|---|---|---|
| 316L (40 μm) | 24.93 | 9.54 | 28.5352 | 6.127 |
| Fe SC | 24.94 | 9.16 | 30.2251 | 6.754 |
| Fe NC | 24.94 | 10.13 | 34.3349 | 6.938 |
| 316L | 25.01 | 10.83 | 33.5386 | 6.303 |
| Fe-Cu-graphite | 25.00 | 10.27 | 34.5148 | 6.913 |
| Fe-Cu-graphite+St. | 24.95 | 10.00 | 33.4947 | 6.850 |
| Powder Type | Diameter [mm] | Height [mm] | Mass [g] | Density [g/cm3] |
|---|---|---|---|---|
| 316L (40 μm) | 24.96 | 9.62 | 28.4316 | 6.040 |
| Fe SC | 24.92 | 9.00 | 29.8823 | 6.807 |
| Fe NC | 24.94 | 10.28 | 35.117 | 6.992 |
| 316L | 24.98 | 10.60 | 32.9877 | 6.349 |
| Fe-Cu-graphite | 24.92 | 10.40 | 34.6018 | 6.852 |
| Fe-Cu-graphite+St. | 24.95 | 10.05 | 33.876 | 6.924 |
| Powder Type | Diameter [mm] | Height [mm] | Mass [g] | Density [g/cm3] |
|---|---|---|---|---|
| 316L (40 μm) | 24.94 | 9.35 | 28.6961 | 6.282 |
| Fe SC | 24.96 | 8.63 | 29.4342 | 6.970 |
| Fe NC | 24.98 | 10.22 | 34.9519 | 6.978 |
| 316L | 24.97 | 10.47 | 33.2073 | 6.476 |
| Fe-Cu-graphite | 24.94 | 10.06 | 34.1059 | 6.939 |
| Fe-Cu-graphite+St. | 24.97 | 9.70 | 33.0075 | 6.948 |
| Powder Type | Diameter [mm] | Height [mm] | Mass [g] | Density [g/cm3] |
|---|---|---|---|---|
| 316L (40 μm) | 24.95 | 9.36 | 28.3371 | 6.192 |
| Fe SC | 24.93 | 8.80 | 29.7639 | 6.929 |
| Fe NC | 25.01 | 10.17 | 34.8846 | 6.982 |
| 316L | 25.00 | 10.84 | 34.1029 | 6.409 |
| Fe-Cu-graphite | 24.96 | 9.89 | 33.6758 | 6.958 |
| Fe-Cu-graphite+St. | 24.93 | 9.83 | 33.0987 | 6.965 |
| Powder Type | Diameter [mm] | Height [mm] | Mass [g] | Density [g/cm3] |
|---|---|---|---|---|
| 316L (40 μm) | 24.96 | 9.44 | 28.7335 | 6.220 |
| Fe SC | 25.00 | 8.81 | 29.5322 | 6.828 |
| Fe NC | 24.95 | 10.26 | 35.0937 | 6.996 |
| 316L | 24.96 | 10.53 | 32.7885 | 6.363 |
| Fe-Cu-graphite | 24.97 | 9.97 | 34.1299 | 6.990 |
| Fe-Cu-graphite+St. | 24.97 | 9.60 | 32.6516 | 6.975 |
| Powder Type | Diameter [mm] | Height [mm] | Mass [g] | Density [g/cm3] |
|---|---|---|---|---|
| 316L (40 μm) | 25.00 | 9.41 | 28.8471 | 6.245 |
| Fe SC | 25.00 | 8.98 | 30.354 | 6.886 |
| Fe NC | 25.01 | 9.99 | 34.043 | 6.936 |
| 316L | 25.00 | 10.69 | 33.7701 | 6.435 |
| Fe-Cu-graphite | 24.99 | 10.34 | 35.4796 | 6.975 |
| Fe-Cu-graphite+St. | 25.00 | 9.91 | 33.5024 | 6.963 |
| Powder Type | Diameter [mm] | Height [mm] | Mass [g] | Density [g/cm3] |
|---|---|---|---|---|
| 316L (40 μm) | 24.97 | 9.66 | 29.3859 | 6.212 |
| Fe SC | 24.94 | 8.95 | 29.8429 | 6.825 |
| Fe NC | 24.98 | 10.34 | 35.0333 | 6.913 |
| 316L | 24.97 | 10.66 | 33.496 | 6.416 |
| Fe-Cu-graphite | 24.95 | 10.35 | 35.1978 | 6.984 |
| Fe-Cu-graphite+St. | 24.97 | 9.82 | 32.97 | 6.974 |
| Powder Type | Diameter [mm] | Height [mm] | Mass [g] | Density [g/cm3] |
|---|---|---|---|---|
| 316L (40 μm) | 24.97 | 9.51 | 28.7932 | 6.182 |
| Fe SC | 24.96 | 9.04 | 30.0739 | 6.798 |
| Fe NC | 25.00 | 10.17 | 34.8926 | 6.989 |
| 316L | 25.01 | 10.71 | 33.8301 | 6.429 |
| Fe-Cu-graphite | 25,00 | 10.12 | 34.421 | 6.993 |
| Fe-Cu-graphite+St. | 25.00 | 9.97 | 33.7877 | 6.983 |
| Powder Type | Diameter [mm] | Height [mm] | Mass [g] | Density [g/cm3] |
|---|---|---|---|---|
| 316L (40 μm) | 24.93 | 9.22 | 28.6377 | 6.363 |
| Fe SC | 24.92 | 8.95 | 30.5463 | 6.997 |
| Fe NC | 24.96 | 10.18 | 34.8855 | 7.003 |
| 316L | 24.92 | 10.53 | 33.5552 | 6.533 |
| Fe-Cu-graphite | 24.92 | 10.08 | 34.7429 | 7.066 |
| Fe-Cu-graphite+St. | 24.92 | 9.67 | 33.0331 | 7.003 |
| Powder Type | Diameter [mm] | Height [mm] | Mass [g] | Density [g/cm3] |
|---|---|---|---|---|
| 316L (40 μm) | 24.95 | 9.01 | 28.3766 | 6.441 |
| Fe SC | 24.94 | 8.61 | 29.6346 | 7.045 |
| Fe NC | 24.97 | 9.95 | 34.2754 | 7.034 |
| 316L | 24.99 | 10.24 | 32.9541 | 6.561 |
| Fe-Cu-graphite | 24.99 | 9.73 | 34.0094 | 7.126 |
| Fe-Cu-graphite+St. | 24.96 | 9.83 | 33.7542 | 7.017 |
References
- German, R.M. ASM Handbook, Volume 7: Powder Metal Technologies and Applications; ASM International: Materials Park, OH, USA, 1998; Available online: https://dl.asminternational.org/handbooks/edited-volume/49/chapter/598231/Powder-Metallurgy (accessed on 18 September 2025).
- Metal Powder Industries Federation (MPIF). Advantages of Powder Metallurgy. Available online: https://www.pickpm.com/IntrotoPM/AdvantagesofPowderMetallurgy.aspx (accessed on 18 September 2025).
- Kulkarni, H.; Dabhate, V.V. Green machining of powder-metallurgy-steels (PMS): An overview. J. Manuf. Process. 2019, 44, 1–18. [Google Scholar] [CrossRef]
- Lo, K.H.; Lo, K.H.; Shek, C.H.; Lai, J.K.L. Recent developments in stainless steels. Mater. Sci. Eng. R Rep. 2009, 65, 39–104. [Google Scholar] [CrossRef]
- Tien, Y.M.; Wu, P.L.; Huang, W.H.; Kuo, M.F.; Chu, C.A. Wall friction measurement and compaction characteristics of bentonite powders. Powder Technol. 2007, 173, 140–151. [Google Scholar] [CrossRef]
- Bonaccorsi, L.; Proverbio, E. Powder compaction effect on foaming behavior of uni-axial pressed PM precursors. Adv. Eng. Mater. 2006, 8, 864–869. [Google Scholar] [CrossRef]
- Khoei, A.R.; Rezaei Sameti, A.; Kazempour, Z.; Pourkermani, A.G. Mechanical characteristics of die-wall friction on the compaction process of metal nano-powders. Powder Technol. 2024, 444, 119987. [Google Scholar] [CrossRef]
- Shima, S.; Oyane, M. Plasticity theory for porous metals. Int. J. Mech. Sci. 1976, 18, 285–291. [Google Scholar] [CrossRef]
- Sauceda, S.; Lascano, S.; Béjar, L.; Neves, G.O.; Chicardi, E.; Salvo, C.; Aguilar, C. Study of the effect of the floating die compaction on mechanical properties of titanium foams. Metals 2020, 10, 1621. [Google Scholar] [CrossRef]
- Lee, S.-C.; Kim, G.-T. Densification behavior of metal powder under cold compaction. Trans. Korean Soc. Mech. Eng. A. 2002, 26, 95–104. [Google Scholar] [CrossRef]
- Canta, T. The use of flexible die for powder metals compaction. In Proceedings of the First International Conference on Materials and Manufacturing Technologies, Cluj-Napoca, Romania, 18–20 May 1994; pp. 155–160. [Google Scholar]
- Beghenov, G.I.; Zlobin, G.P. Novel method of powder compaction. In Proceedings of the World Conference on Powder Metallurgy, London, UK, 2–6 July 1990; Volume 2, pp. 289–292. [Google Scholar]
- Canta, T. Potential application of the elastic die in manufacturing technology. In Proceedings of the 26th Israel Conference on Mechanical Engineering, Haifa, Israel, 21–22 May 1996; pp. 163–165. [Google Scholar]
- Canta, T. Research on backward extrusion using an elastic die. In Proceedings of the 9th International Cold Forging Congress, Solihull, UK, 22–24 May 1995. [Google Scholar]
- Canta, T.; Frunză, D. Development of elastic die for powder pressing of aluminum metal matrix composites. Powder Metall. 1997, 40, 189–192. [Google Scholar] [CrossRef]
- Noveanu, D. Simulation of Plastic Deformation Processes in Elastic Dies. Ph.D. Thesis, Technical University of Cluj-Napoca, Cluj-Napoca, Romania, 11 November 2024. [Google Scholar]
- Noveanu, D.; Frunză, D. Experimental researches and fem simulations of metal powder compaction in elastic dies. Metal. Int. 2013, 6, 5–9. [Google Scholar]
- Noveanu, D. Researches concerning a new method for obtaining spur gears by metal powder compaction in elastic dies. Metal. Int. 2013, 4, 35–39. [Google Scholar]
- Canta, T.; Noveanu, D. Researches on powder metal compaction using an elastic die. In Proceedings of the Second International Conference on Materials and Manufacturing Technologies, Cluj-Napoca, Romania, 1 September 1998; Volume 1, pp. 507–512. [Google Scholar]
- Canta, T.; Dragoste, A.; Frunză, D. Researches on the elastic die for forging of gear parts. In Proceedings of the 8th International Conference on Technology of Plasticity, Verona, Italy, 9–13 October 2005. [Google Scholar]
- Holownia, B.P. Balanced die method for metal powder compaction. Powder Metal. 1996, 39, 207–209. [Google Scholar] [CrossRef]
- Garner, S.; Ruiz, E.; Strong, J.; Zavaliangos, A. Mechanisms of crack formation in die compacted powders during unloading and ejection: An experimental and modeling comparison between standard straight and tapered dies. Powder Technol. 2014, 264, 114–127. [Google Scholar] [CrossRef]
- Behrens, B.-A.; Brunotte, K.; Petersen, T.; Bohr, D. Investigation of pressing and ejection performance of friction-reducing powder-compaction tool coatings. In Proceedings of the 30th Anniversary International Conference on Metallurgy and Materials, Brno, Czech Republic, 26–28 May 2021; pp. 759–765. [Google Scholar] [CrossRef]
- Ovcina, D. The Effect of Punch Contraction, Springback and Compaction Tooling Design on the Cutting Edge of Positive WC-Co Compacts. Master’s Thesis, University of the Witwatersrand, Johannesburg, South Africa, 2010. [Google Scholar]
- Armentani, E.; Bocchini, G.F.; Cricri, G.; Esposito, R. Compaction shelf dies with conical shrink-fitting surface: Fem analysis of stress and deformation behaviour. In Proceedings of the World Powder Metallurgy Congress & Exhibition PM2010, Florence, Italy, 10–14 October 2010; pp. 69–76. [Google Scholar]
- Richman, M.; Khambekar, J. The balanced die: A mechanism to reduce ejection forces. In Proceedings of the 2004 International Conference on Powder Metallurgy and Particulate Materials, Chicago, IL, USA, 13–17 June 2004. [Google Scholar]
- Cannella, E.; Nielsen, E.K.; Arentoft, M. Ejection Force Analysis of Sintered Aluminium Micro Gears Using a Shrink-Fit Die Principle. In Proceedings of the 11th International Conference on Multi-Material Micro Manufacture (4M2016): Co-Organised with 10th International Workshop on Microfactories (IWMF2016), Copenhagen, Denmark, 13–15 September 2016; pp. 41–44. Available online: https://orbit.dtu.dk/en/publications/ejection-force-analysis-of-sintered-aluminium-micro-gears-using-a (accessed on 18 September 2025).
- Cannella, E.; Nielsen, E.K.; Stolfi, A. Designing a tool system for lowering friction during the ejection of in-die sintered micro gears. Micromachines 2017, 8, 214. [Google Scholar] [CrossRef] [PubMed]
- Zahraee, S.E. Experimental investigation of metal powder compaction without using lubricant. J. Part. Sci. Technol. 2016, 2, 141–149. [Google Scholar] [CrossRef]
- Method of and Apparatus for Producing a Compression Product. U.S. Patent 21—US5694640A. Available online: http://www.google.com/patents/US5694640 (accessed on 13 February 2025).
- Wang, W.; Qi, H.; Liu, P.; Zhao, Y.; Chang, H. Numerical simulation of densification of Cu–Al mixed metal powder during axial compaction. Metals 2018, 8, 537. [Google Scholar] [CrossRef]
- Hernández, J.J.; Oliver, J.; Cante, J.C.; Weyler, R. Numerical modeling of crack formation in powder forming processes. Int. J. Solids Struct. 2011, 48, 292–316. [Google Scholar] [CrossRef]
- Cricri, G.; Perrella, M. Modelling the mechanical behavior of metal powder during die compaction process. Fract. Struct. Integr. 2016, 10, 333–341. [Google Scholar] [CrossRef]
- Hernandez, J.; Cante, J.C.; Oliver, J. Modelling of crack formation in PM compaction processes. In Proceedings of the World Powder Metallurgy Congress & Exhibition PM2010, Florence, Italy, 10–14 October 2010; pp. 85–90. [Google Scholar]
- Harthong, B.; Doremus, P.; Imbauld, D. Study of metal powders mechanical behaviour from finite-element discreet simulations. In Proceedings of the World Powder Metallurgy Congress & Exhibition PM2010, Florence, Italy, 10–14 October 2010; pp. 91–96. [Google Scholar]
- Chtourou, H.; Guillot, M.; Gakwaya, A. Finite element simulation of powder compaction of 316L stainless steel. Int. J. Solids Struct. 2002, 39, 1059–1075. [Google Scholar] [CrossRef]
- Frater, J.L. Application of finite element methods to the design of prestressed tooling. J. Mater. Shap. Technol. 1989, 7, 49–55. [Google Scholar] [CrossRef]
- Cocks, A.; Sinka, I. Constitutive modelling of powder compaction—I. Theoretical concepts. Mech. Mater. 2007, 39, 392–403. [Google Scholar] [CrossRef]
- Wagle, G.S.; Engel, R.S.; Ravi Bollina, R.; German, R.M. Statistical Analysis of Modified Drucker-Prager Cap Model Parameters for Application to Modeling Die Compaction. Adv. Powder Metall. Part. Mater. 2003, 4, 4–24. [Google Scholar]
- MARC Mentat. Volume A: Theory and User Information, Version K7.3; Chapter 7 Material Library; MARC Analysis Research Corporation: Palo Alto, CA, USA, 2005; pp. 7-40–7-41. Available online: https://www.sd.rub.de/downloads/links/marc_manuals/online_documentation_marc_k73/vola/vola.pdf (accessed on 18 September 2025).
| Material | C [%] | Ni [%] | Cu [%] | Mo [%] | Cr [%] |
|---|---|---|---|---|---|
| Fe NC | 0.01 | - | - | - | - |
| Fe SC | 0.01 | - | - | - | - |
| Fe-Cu-graphite | 0.30 | - | 3 | - | - |
| 316L | 0.03 | 10–14 | - | 2–3 | 16–18 |
| Material | >160 [%] | 160–100 [%] | 100–63 [%] | 63–40 [%] | <40 [%] |
|---|---|---|---|---|---|
| Fe NC | 5 | 38 | 32 | 15 | 10 |
| Fe-Cu-graphite | 5 | 35 | 40 | 13 | 7 |
| 316L | 7 | 15 | 18 | 28 | 32 |
| Powder Type | Mass [g] | Diameter [mm] | Height [mm] | Density [g/cm3] | Relative Density |
|---|---|---|---|---|---|
| 316L1 1 | 8.01 | 11.19 | 11.87 | 6.861706 | 0.858787 |
| 316L2 | 8.057 | 11.19 | 11.98 | 6.838595 | 0.855894 |
| Fe1 2 | 8.015 | 11.18 | 11.19 | 7.296260 | 0.934220 |
| Fe2 | 7.991 | 11.18 | 11.13 | 7.313628 | 0.936444 |
| Young’s Modulus [MPa] | Poisson’s Ratio | Yield Stress [MPa] | γ 1, Coefficients | β | |||
|---|---|---|---|---|---|---|---|
| b1 | b2 | b3 | b4 | ||||
| 210,000 | 0.297 | 260 | 0.001 | 2.85 | 5.2 | 0.685 | 1 |
| Young’s Modulus [MPa] | Poisson’s Ratio | Yield Stress [MPa] | γ 1, Coefficients | β | |||
|---|---|---|---|---|---|---|---|
| b1 | b2 | b3 | b4 | ||||
| 196,000 | 0.297 | 337 | 0.001 | 3.2 | 5.2 | 0.65 | 1 |
| Material 316L | Relative Density [%] | ||
|---|---|---|---|
| Δh = 0.5 mm | Δh = 1 mm | Δh = 1.5 mm | |
| Experimental | 86.71 | 87.58 | 88.86 |
| Numerical analysis | 81.87 | 83.29 | 85.80 |
Disclaimer/Publisher’s Note: The statements, opinions and data contained in all publications are solely those of the individual author(s) and contributor(s) and not of MDPI and/or the editor(s). MDPI and/or the editor(s) disclaim responsibility for any injury to people or property resulting from any ideas, methods, instructions or products referred to in the content. |
© 2025 by the authors. Licensee MDPI, Basel, Switzerland. This article is an open access article distributed under the terms and conditions of the Creative Commons Attribution (CC BY) license (https://creativecommons.org/licenses/by/4.0/).
Share and Cite
Noveanu, D.C.; Noveanu, S. Design and Validation of Elastic Dies for Enhanced Metal Powder Compaction: A FEM and Experimental Study. Materials 2025, 18, 4491. https://doi.org/10.3390/ma18194491
Noveanu DC, Noveanu S. Design and Validation of Elastic Dies for Enhanced Metal Powder Compaction: A FEM and Experimental Study. Materials. 2025; 18(19):4491. https://doi.org/10.3390/ma18194491
Chicago/Turabian StyleNoveanu, Dan Cristian, and Simona Noveanu. 2025. "Design and Validation of Elastic Dies for Enhanced Metal Powder Compaction: A FEM and Experimental Study" Materials 18, no. 19: 4491. https://doi.org/10.3390/ma18194491
APA StyleNoveanu, D. C., & Noveanu, S. (2025). Design and Validation of Elastic Dies for Enhanced Metal Powder Compaction: A FEM and Experimental Study. Materials, 18(19), 4491. https://doi.org/10.3390/ma18194491


