Study on In-Service Inspection of Nuclear Fuel Assembly Failure Using Ultrasonic Plate Wave
Abstract
1. Introduction
2. Methodology
2.1. Introduction of Ultrasonic Plate Wave
2.2. The Proposed Inspection Method
2.2.1. To Avoid the Influence of Near-Field Region
2.2.2. The Principle of Inspection
2.2.3. The proposed algorithm
3. Simulation and Experiments Setup
4. Results and Discussion
- (1)
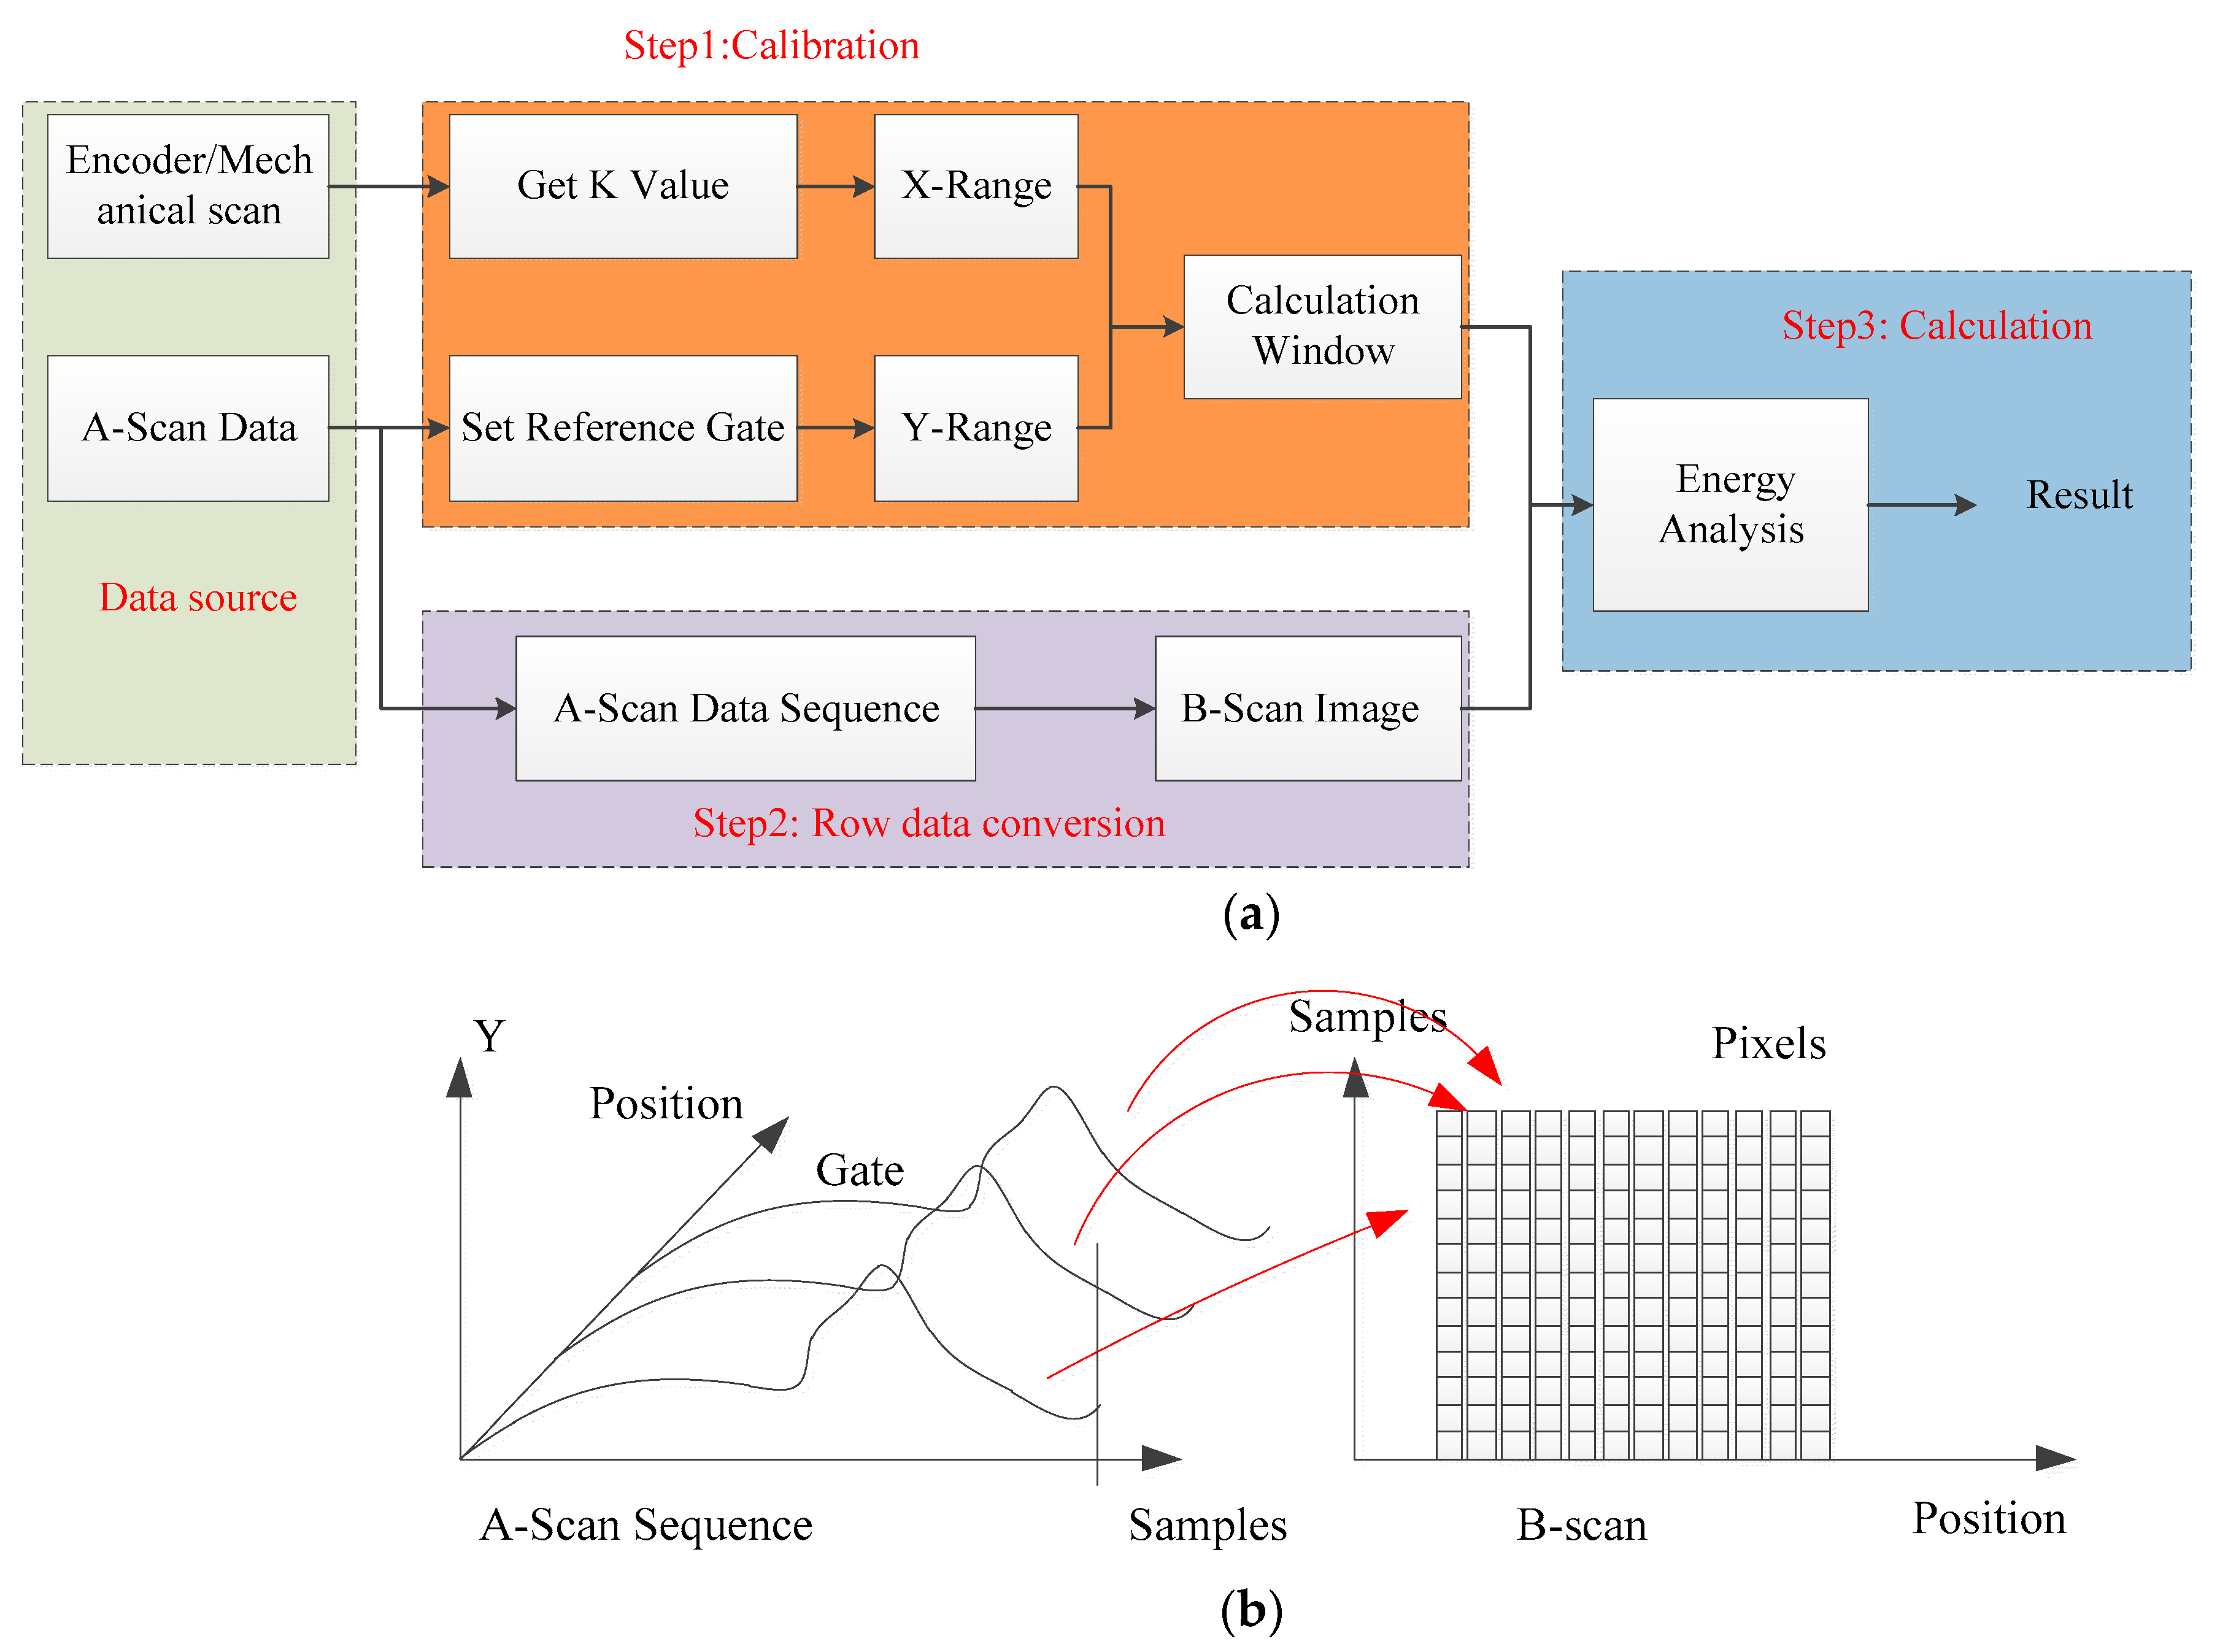
- Calibrate the mechanical K value and set the reference gate.
- (2)
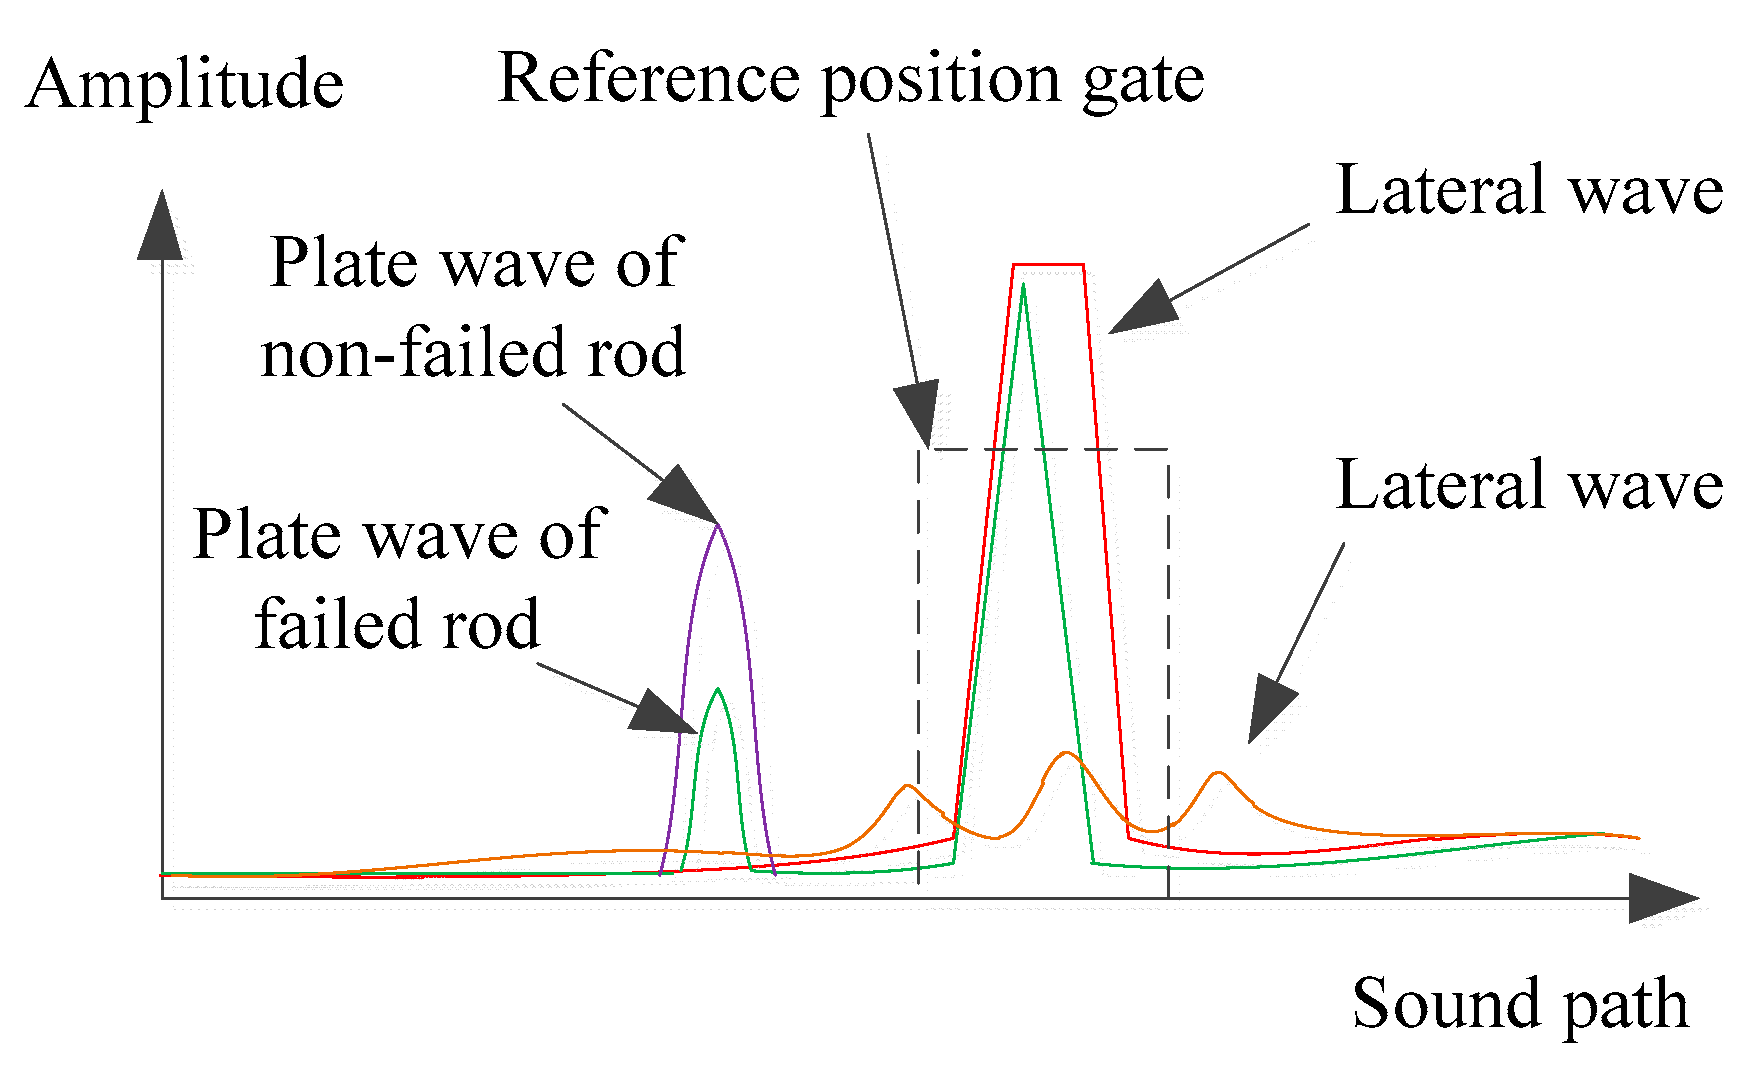
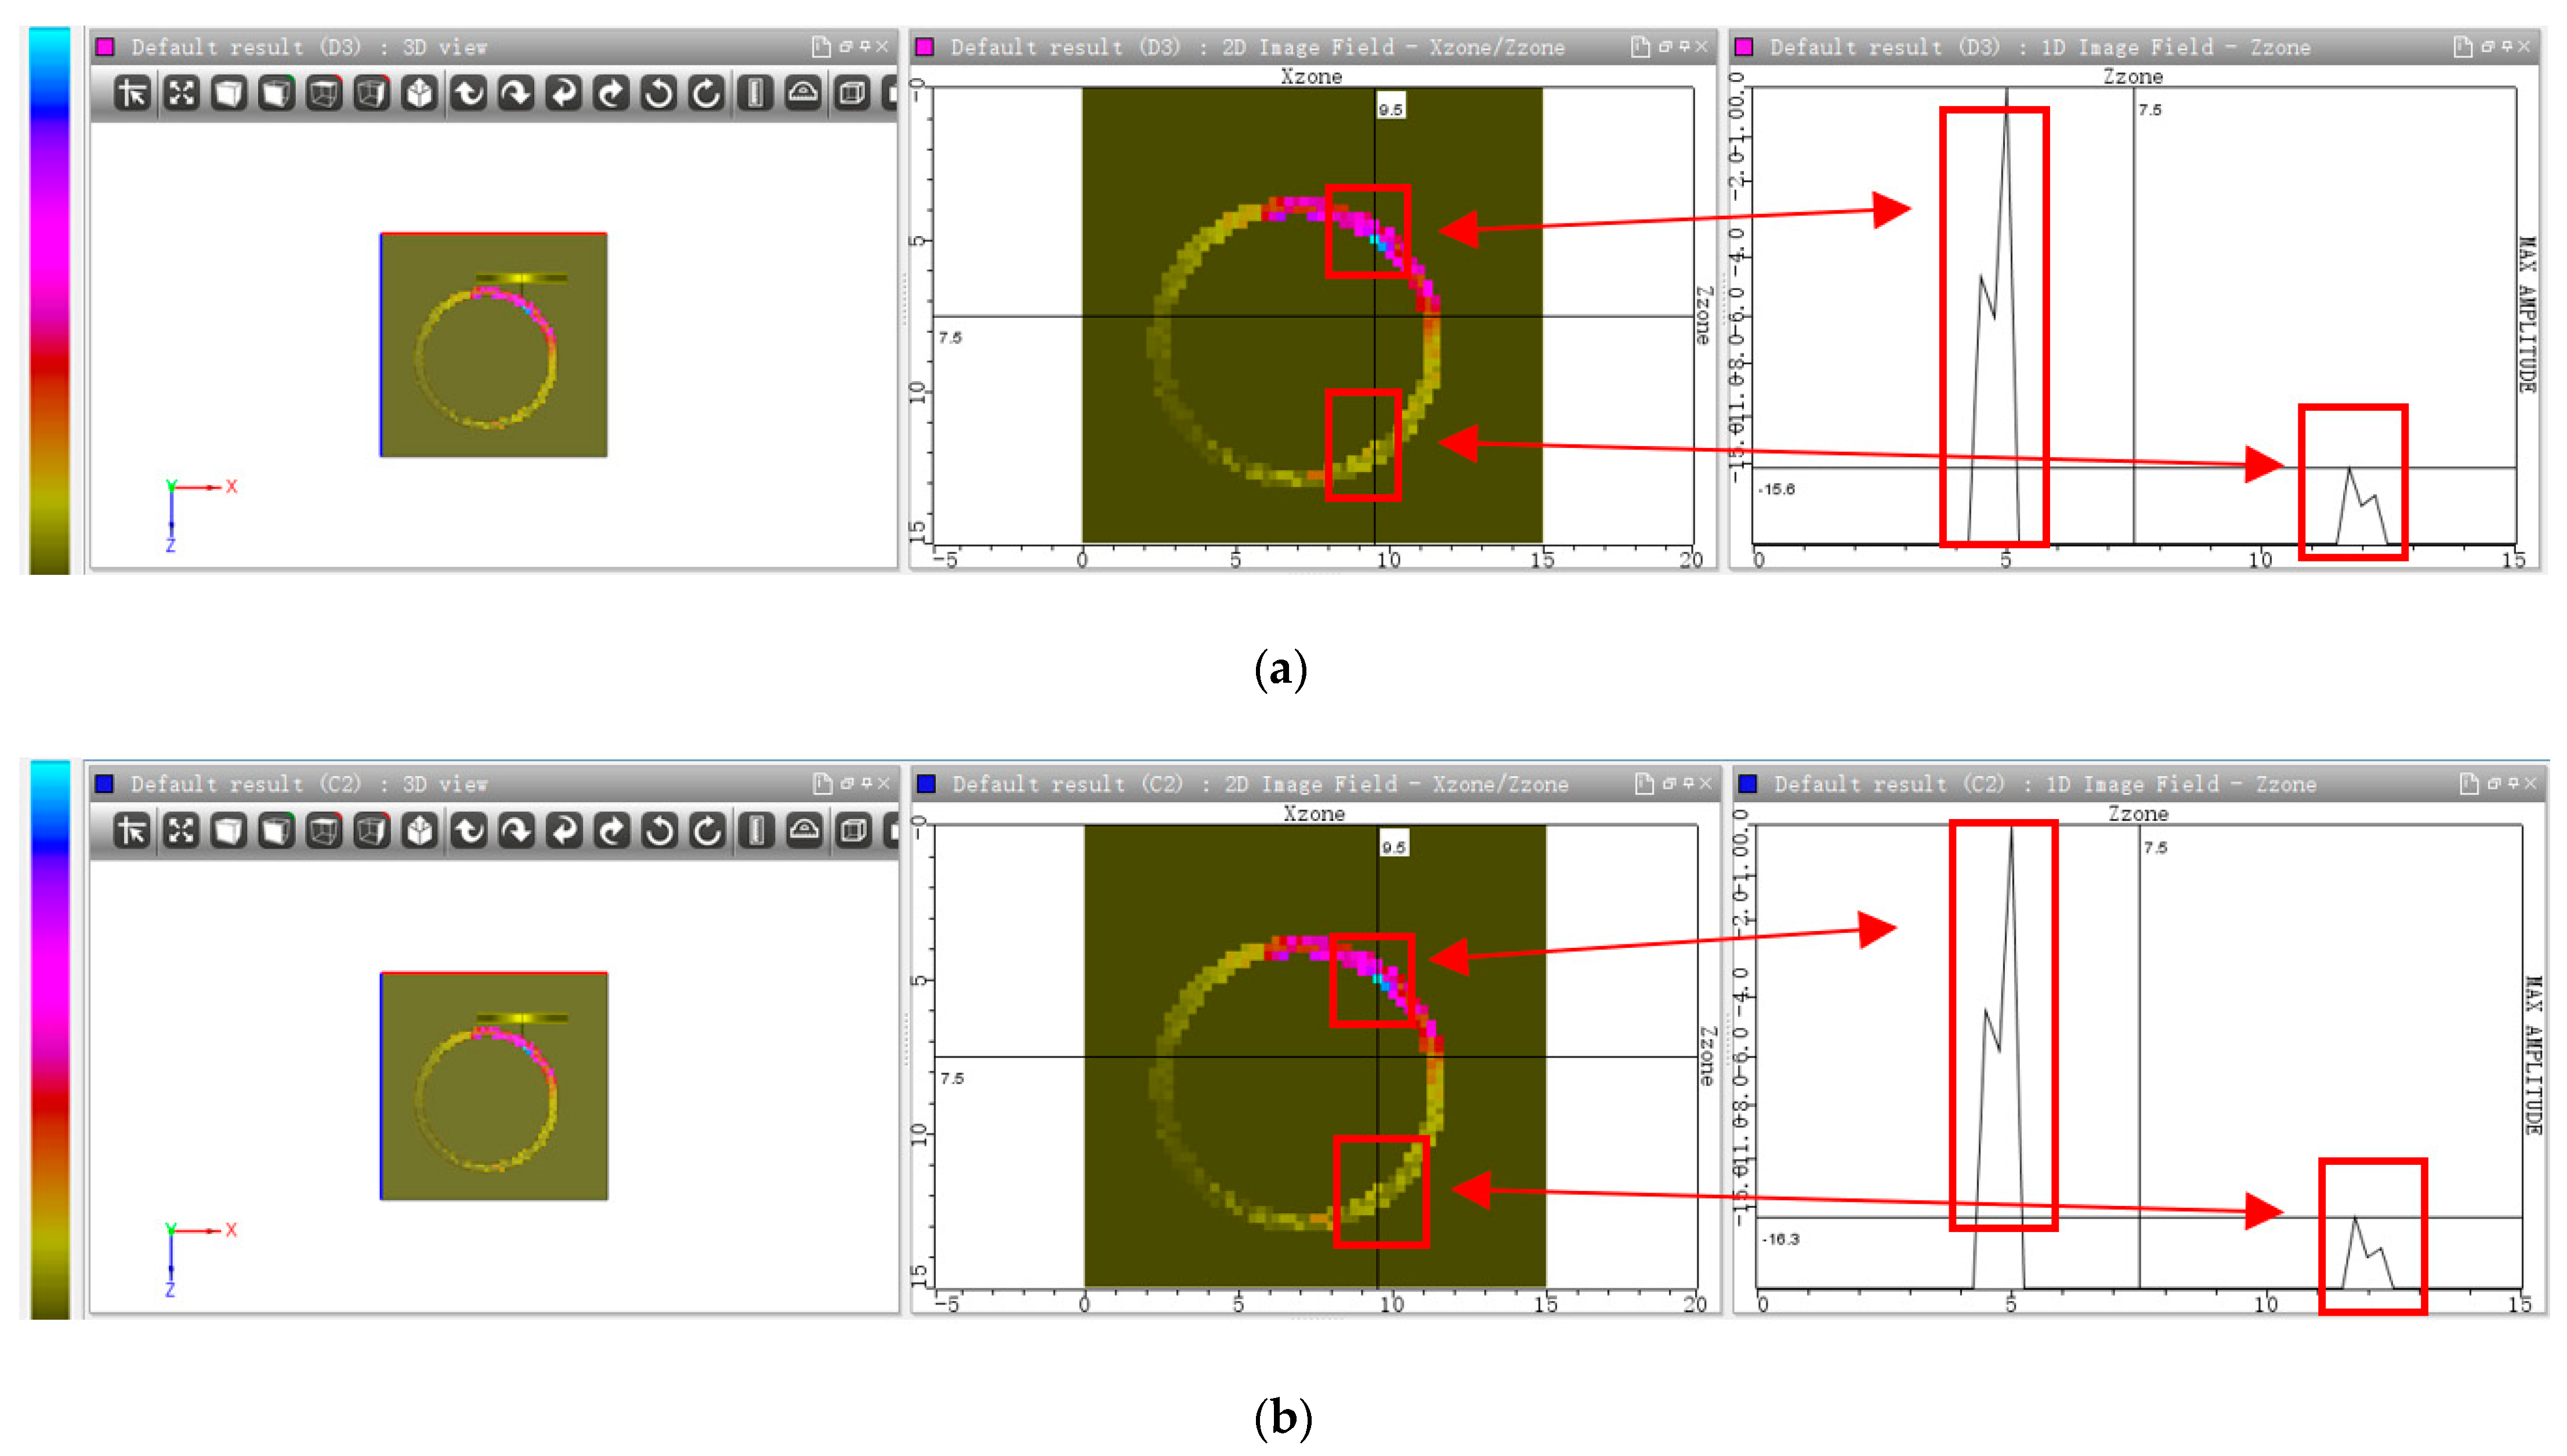
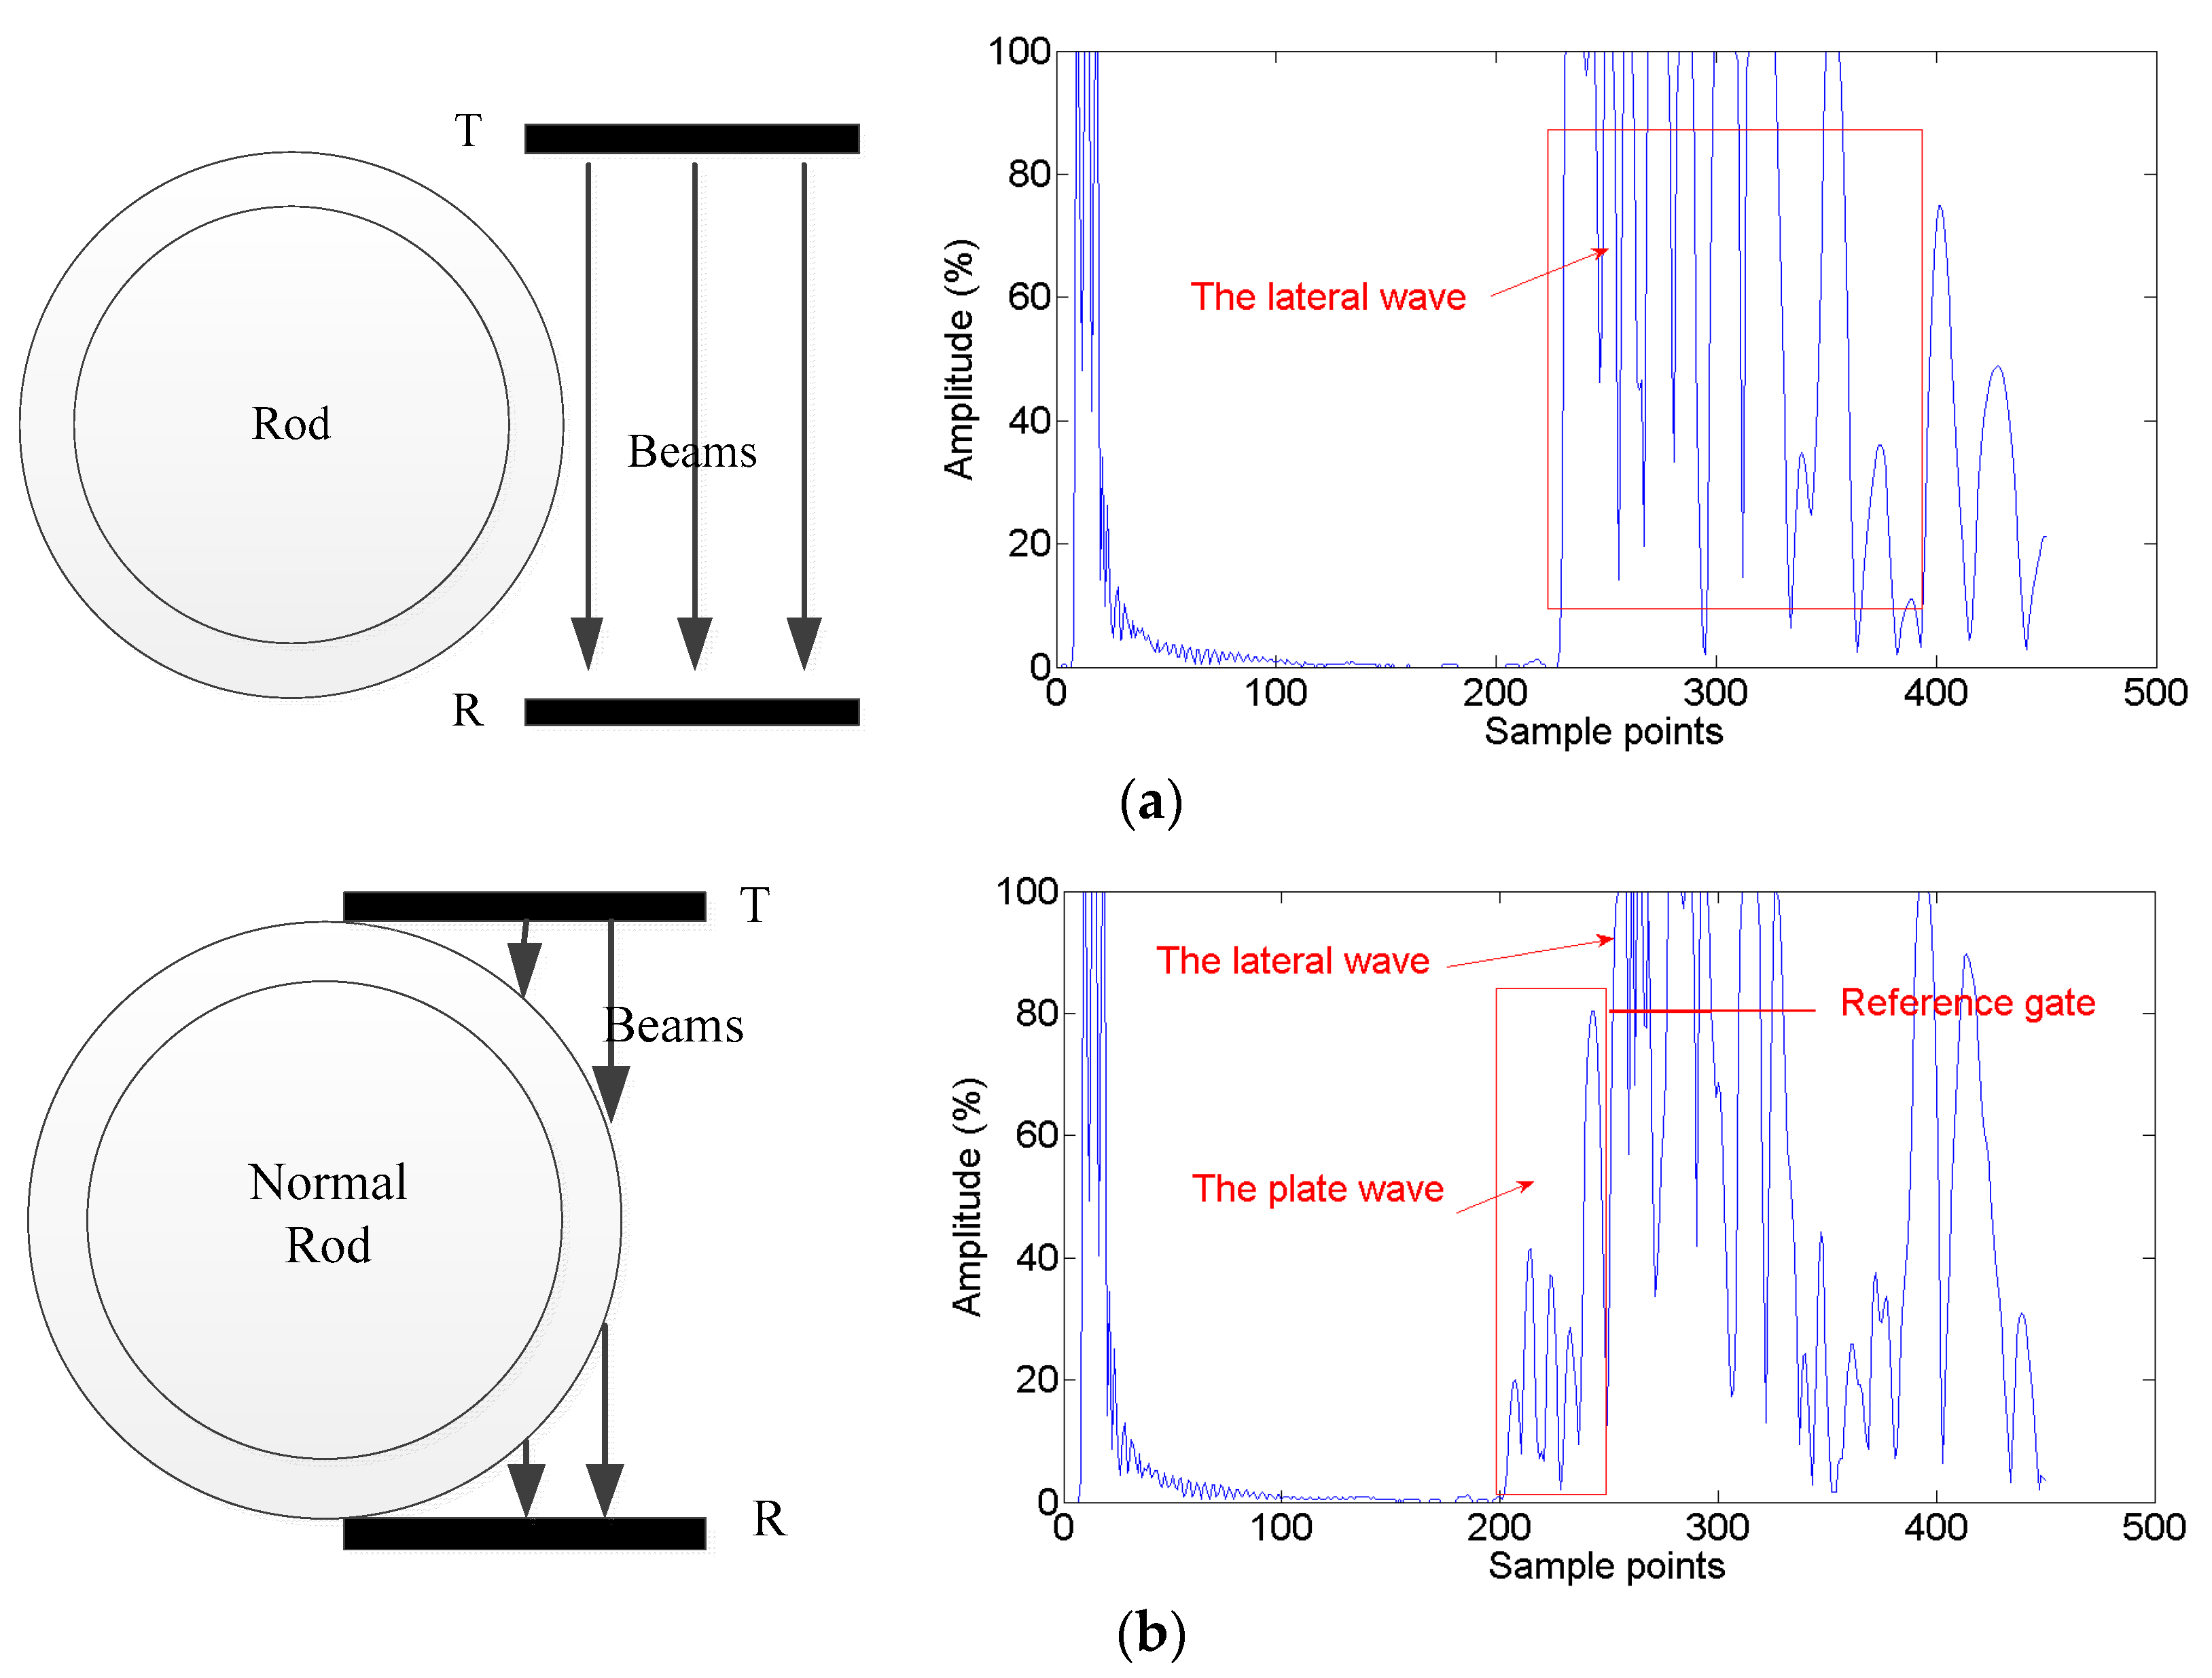
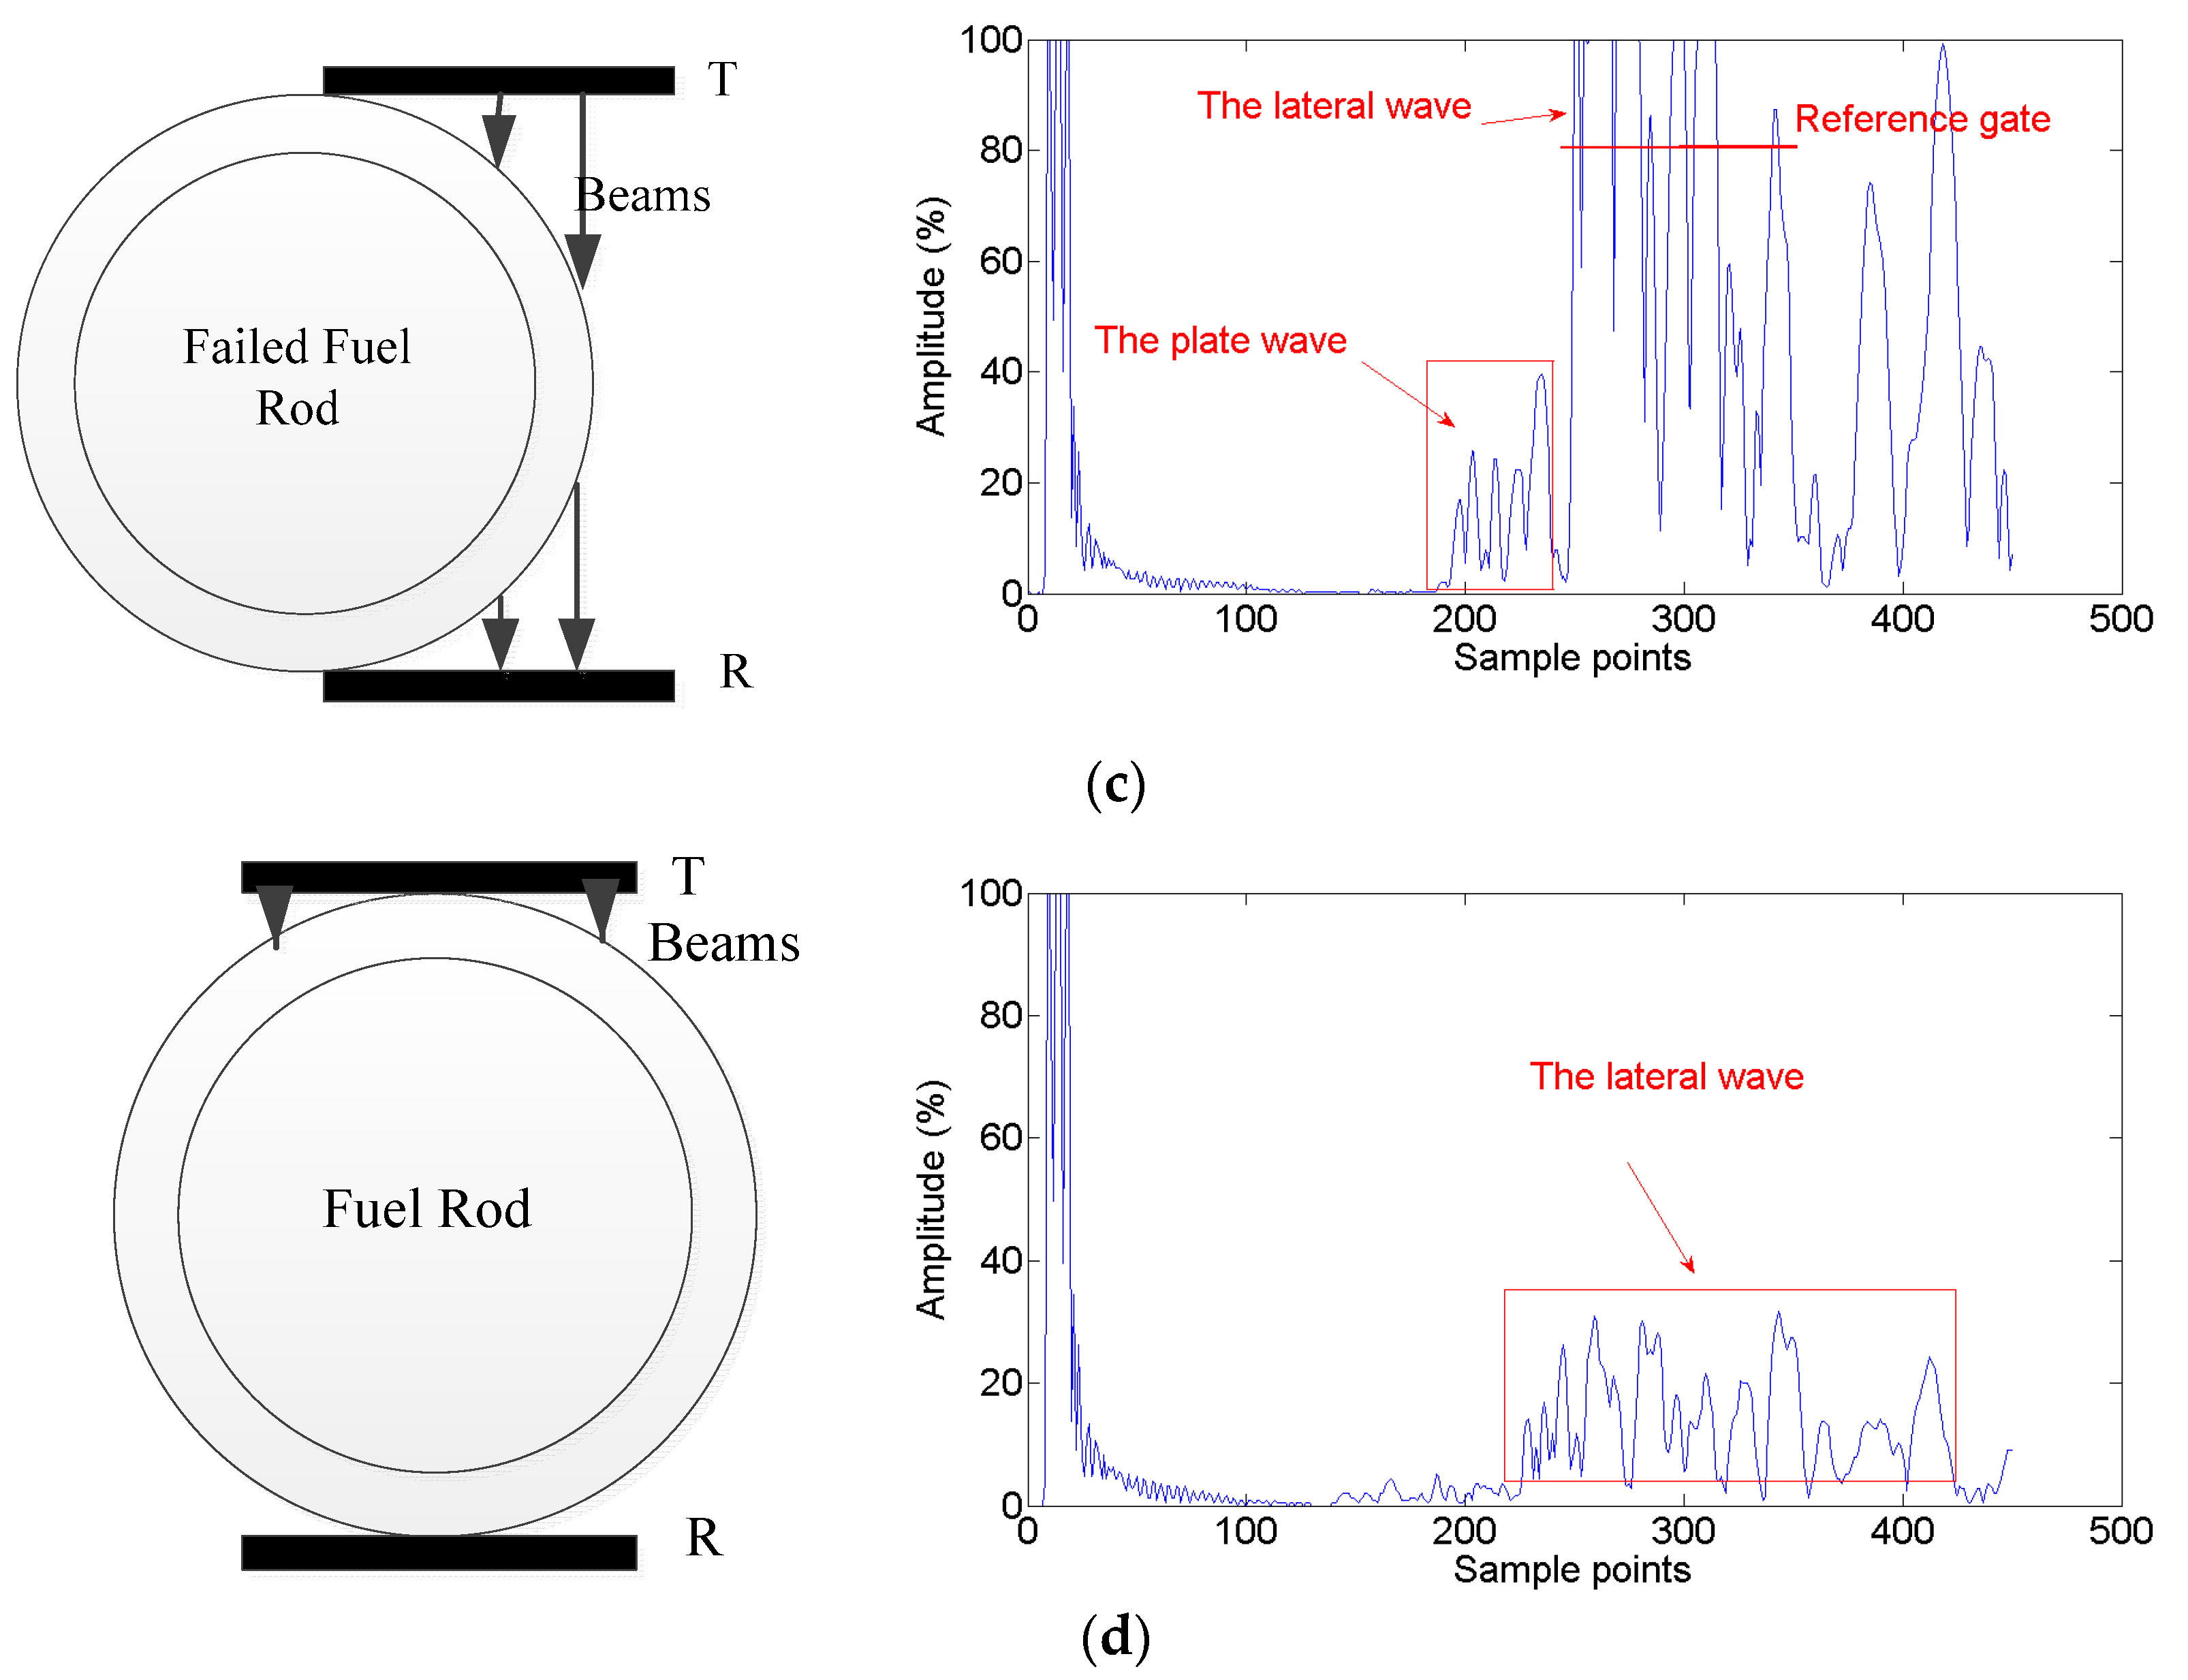
- The A-scan raw data are acquired from the instrument, as shown in Figure 9.
- (3)
- The sliding window is created based on the result of calibration.
- (4)
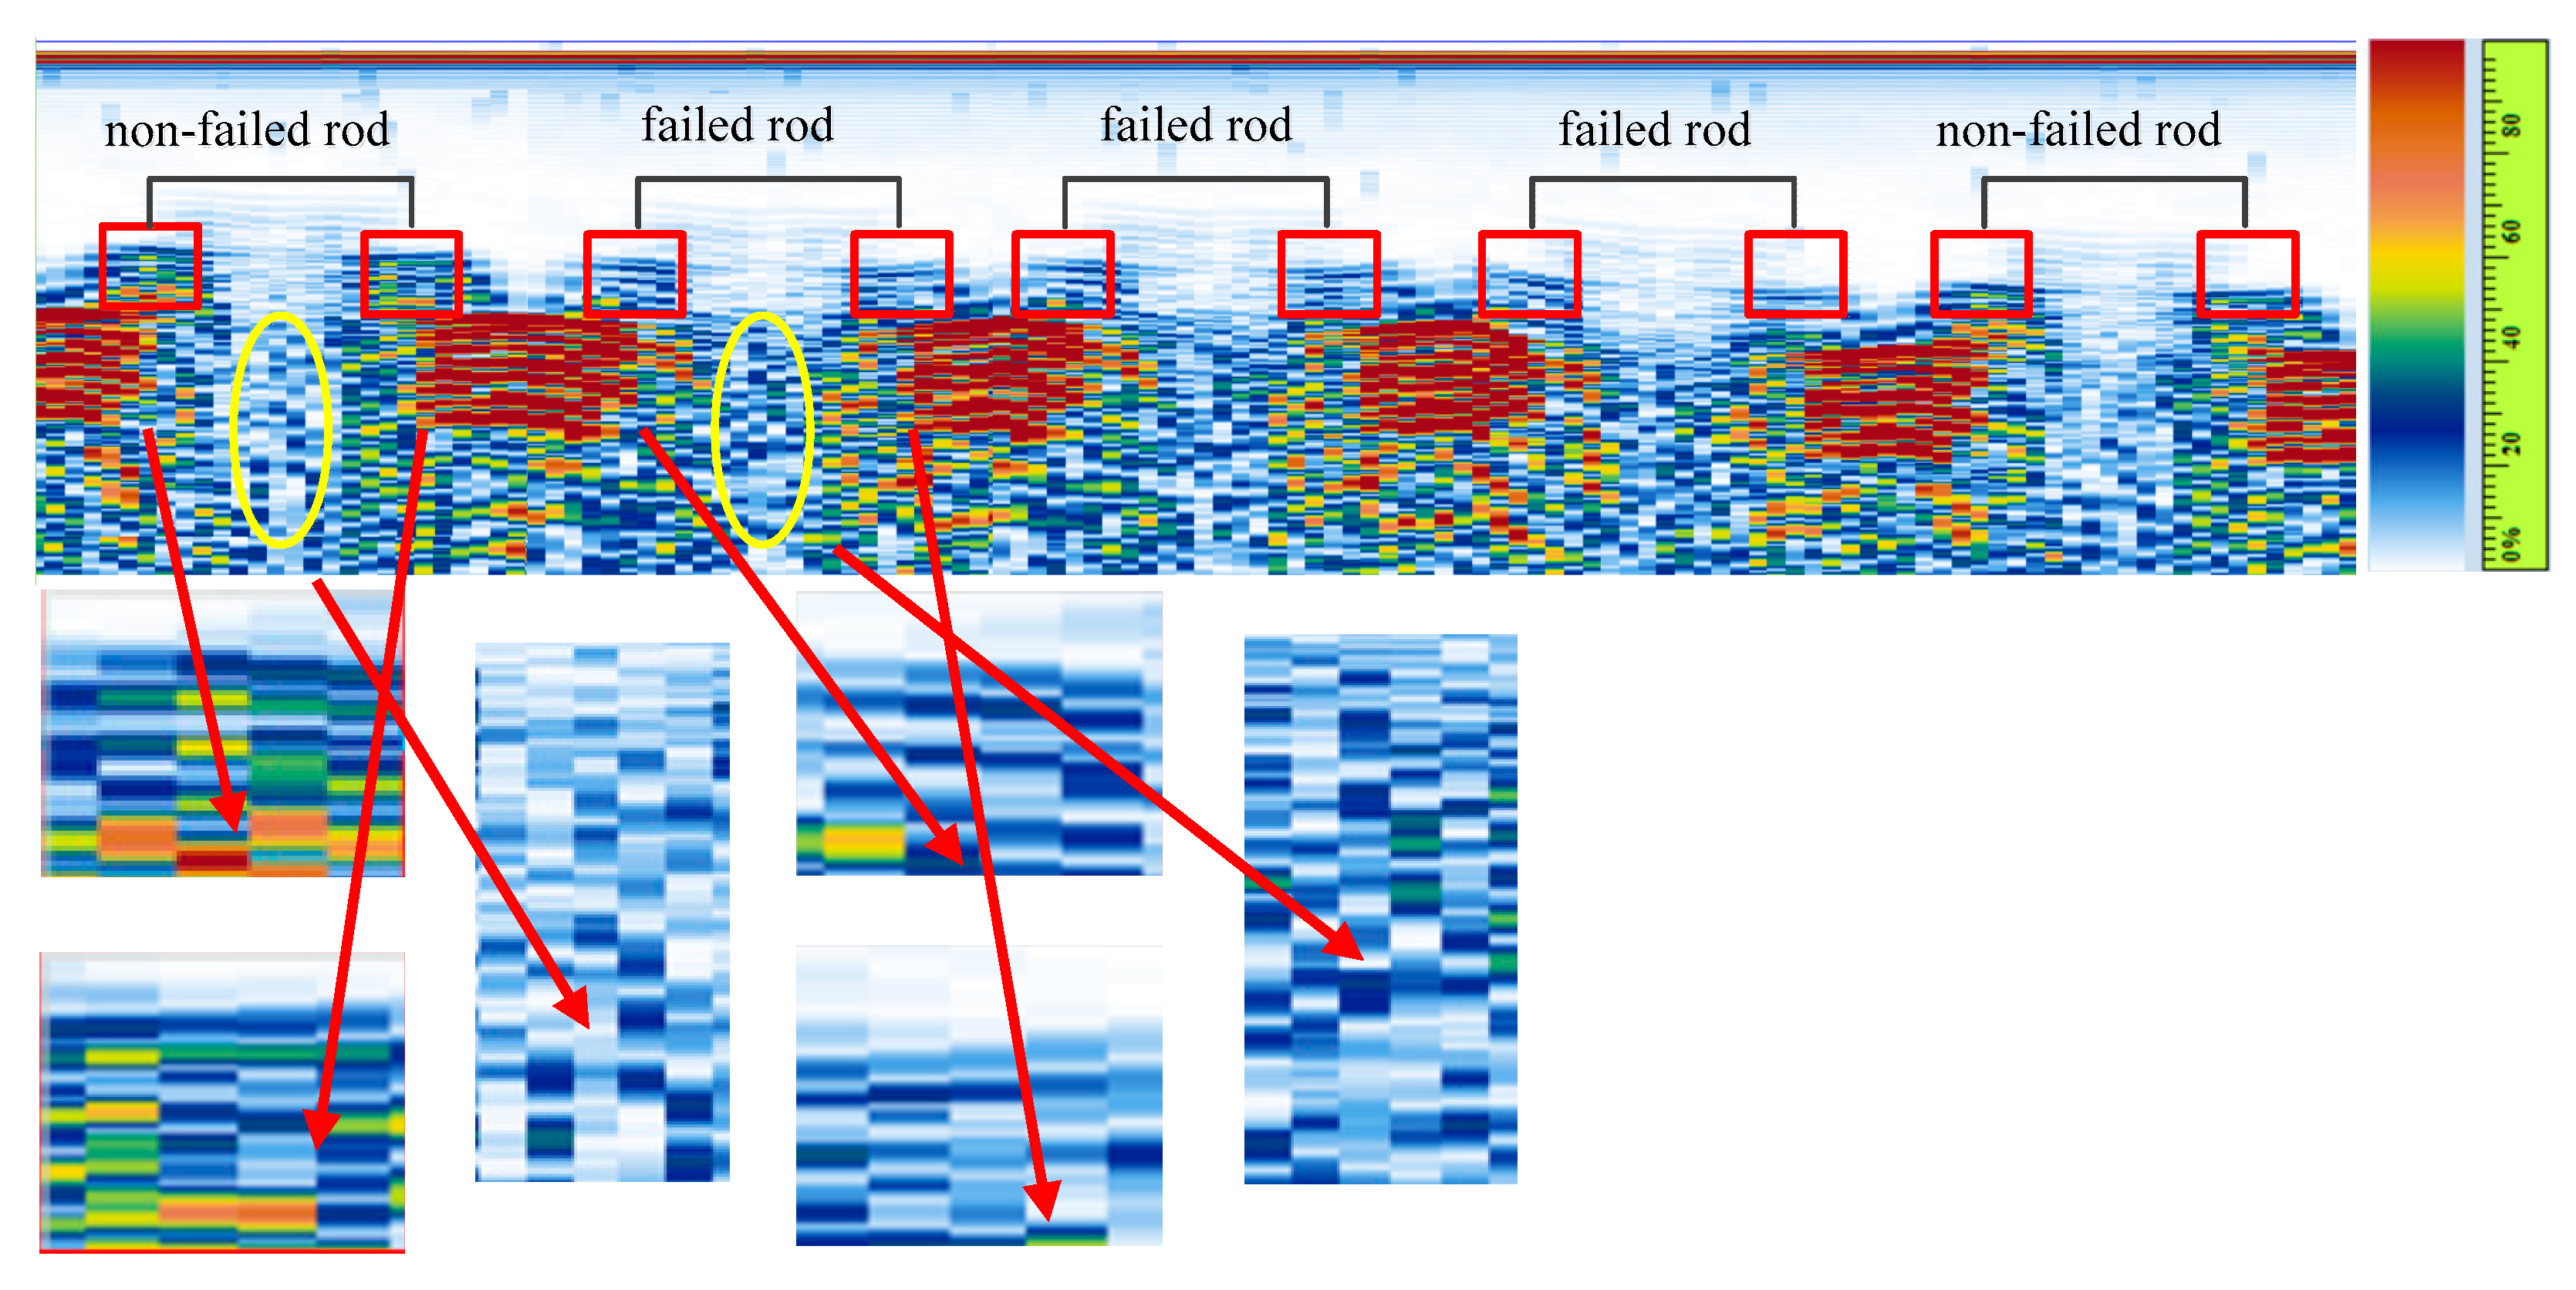
- The A-scan sequence is converted into a B-scan image, as shown in Figure 10.
- (5)
- Finally, according to Equation (19), the energy curve of the plate wave can be obtained by sliding the window on the B-scan image.
5. Conclusions and Future Work
Author Contributions
Funding
Institutional Review Board Statement
Informed Consent Statement
Data Availability Statement
Acknowledgments
Conflicts of Interest
Nomenclature
| FA | Fuel assembly |
| NDT | Non-destructive testing |
| VT | Visual testing |
| EC | Eddy Current |
| UT | Ultrasound testing |
| PWR | Pressurized water reactor |
| AFA 3G | Advanced fuel assembly 3 Generation |
| ISI | In-service inspection |
References
- Qin, G.; Wang, Q.; Chen, X.; Li, F.; Li, W.; Guoxiu, Q. Development of fuel rod failure character analysis code for pressurized water reactors. Nucl. Eng. Des. 2020, 361, 110515. [Google Scholar] [CrossRef]
- Electric Power Research Institute. Fuel Integrity Monitoring and Failure Evaluation Handbook Tr-1003407; Rev. 1; Electric Power Research Institute: Palo Alto, CA, USA, 2003. [Google Scholar]
- Thome, Z.D.; Pereira, W.C.A.; Machado, J.C.; Seixas, J.M.; Soares-Filho, W. A system for nuclear fuel inspection based on ultrasonic pulse-echo technique. IEEE Trans. Nucl. Sci. 2011, 58, 2452–2458. [Google Scholar] [CrossRef]
- Knaob, H.; Stark, R.; Sturm, R. Sipping equipment for leak testing of fuel assemblies in VVER-440 reactor. Kerntechnik 1991, 56, 94–97. [Google Scholar] [CrossRef]
- Slugen, V. Mast sipping VVER-440 fuel. Nucl. Eng. Int. 1994, 39, 29–31. [Google Scholar]
- Kim, J.W.; Yun, K.W.; Jung, H.C. Investigation of optimal thermal injection conditions and the capability of IRthermography for detecting wall-thinning defects in small-diameter piping components. Nucl. Eng. Des. 2013, 262, 39–51. [Google Scholar] [CrossRef]
- Guraksin, G.E.; Deperlioglu, O.; Kose, U. A novel underwater image enhancement approach with wavelet transform supported by differential evolution algorithm. In Nature Inspired Optimization Techniques for Image Processing Applications; Springer: Cham, Switzerland, 2019; pp. 255–278. [Google Scholar]
- Thirunavukkarasu, S.; Rao, B.P.C.; Mukhopadhyay, C.K. Development of a High-Sensitive Dual Frequency Remote Field Eddy Current Instrument for Inspection of Ferromagnetic Steam Generator Tubes. IETE Tech. Rev. 2019, 36, 203–208. [Google Scholar] [CrossRef]
- Yi, J.K.; Atherton, D.L. Remote field gap evaluation for nuclear fuel channel tubes. Mater. Eval. 1998, 56, 771–773. [Google Scholar]
- Gros, X.E.; Le, M.Q. Advanced eddy current sensor for improved inspection of steam generator tubes. Insight 2000, 42, 818–821. [Google Scholar]
- Machado, J.C.; Thomé, Z.D.; Xavier, A.J.; Soares, J.C.A.C.R. An ultrasonic probe for NDT inspection of fuel assembly used in nuclear power plant reactors. In Proceedings of the 15th World Conference on Non-Destructive Testing, Rome, Italy, 15–21 October 2000. Paper idn007. [Google Scholar]
- Singh, J.L.; Kumawat, N.; Sinha, A.K.; Bhat, S.; Jayarajan, K.; Dey, C. Development of a Set-Up for the Detection of Failed Fuels in TAPS BWR Spent Fuels Storage Bay; IAEA: Vienna, Austria, 2003; pp. 283–286. [Google Scholar]
- Pereira, W.C.A.; Thomé, Z.D.; Seixas, J.M.; Bossan, M.C. Ultrasonic pulse-echo method for failed rod detection based on neural network. In Proceedings of the 15th World Conference on Non-Destructive Testing, Rome, Italy, 15–21 October 2000. Paper idn008. [Google Scholar]
- Xiao, X.; Gao, B.; Tian, G.Y.; Zhang, Y.C.; Chen, S. Novel Ultrasound System With Intelligent Compensation for High Precision Measurement of Thin Wall Tube. IEEE Sens. J. 2018, 18, 6633–6643. [Google Scholar] [CrossRef]
- Xiao, X.; Gao, B.; Tian, G.Y.; Cai, Z.G.; Wang, K.Q. Physical perspective forward-inverse learning for ultrasonic sensing diagnosis in small diameter and thin-wall tube. Ultrasonics 2020, 105, 106115. [Google Scholar] [CrossRef]
- Park, M.H.; Kim, I.S.; Yoon, Y.K. Ultrasonic inspection of long steel pipes using Lamb waves. NDT E Int. 1996, 29, 13–20. [Google Scholar] [CrossRef]
- Liu, G.; Qu, J. Guided Circumferential Waves in a Circular Annulus. J. Appl. Mech. 1998, 65, 424–430. [Google Scholar] [CrossRef]
| Frequency | Shape | Size | Near-Field Region | Distance | Remaining Near-Field Region |
|---|---|---|---|---|---|
| 5 MHz | circle | Φ6 | 9.6 mm | 23.89 mm | −14.29 mm |
| Samples | Left Part | Right Part | Ground Truth | Proposed Method |
|---|---|---|---|---|
| 1 | 4.3417 × 10³ | 4.5467 × 10³ | non-failed | non-failed |
| 2 | 4.4861 × 10³ | 4.4369 × 10³ | non-failed | non-failed |
| 3 | 3.1913 × 10³ | 3.5308 × 10³ | failed | failed |
| 4 | 3.3125 × 10³ | 3.4235 × 10³ | failed | failed |
| 5 | 3.2957 × 10³ | 3.4621 × 10³ | failed | failed |
| 6 | 4.1068 × 10³ | 4.4032 × 10³ | non-failed | non-failed |
| 7 | 4.6394 × 10³ | 4.5393 × 10³ | non-failed | non-failed |
| 8 | 4.2454 × 10³ | 4.3478 × 10³ | non-failed | non-failed |
| 9 | 4.4921 × 10³ | 4.2879 × 10³ | non-failed | non-failed |
| 10 | 4.5265 × 10³ | 4.4766 × 10³ | non-failed | non-failed |
| 11 | 4.3577 × 10³ | 4.2398 × 10³ | non-failed | non-failed |
| 12 | 4.5231 × 10³ | 4.3433 × 10³ | non-failed | non-failed |
| 13 | 4.2463 × 10³ | 4.4513 × 10³ | non-failed | non-failed |
| 14 | 4.4254 × 10³ | 4.6833 × 10³ | non-failed | non-failed |
| 15 | 4.5286 × 10³ | 4.3724 × 10³ | non-failed | non-failed |
| 16 | 4.2985 × 10³ | 4.1284 × 10³ | non-failed | non-failed |
| 17 | 4.4943 × 10³ | 4.2652 × 10³ | non-failed | non-failed |
| Method | Accurate | Liftoff |
|---|---|---|
| bulk wave | 93% | 1 mm |
| plate wave | 100% | 0 mm |
Publisher’s Note: MDPI stays neutral with regard to jurisdictional claims in published maps and institutional affiliations. |
© 2022 by the authors. Licensee MDPI, Basel, Switzerland. This article is an open access article distributed under the terms and conditions of the Creative Commons Attribution (CC BY) license (https://creativecommons.org/licenses/by/4.0/).
Share and Cite
Xiao, X.; Zhou, G.Z.; Wang, K.Q.; Xi, F.; Zeng, K. Study on In-Service Inspection of Nuclear Fuel Assembly Failure Using Ultrasonic Plate Wave. Sensors 2022, 22, 7606. https://doi.org/10.3390/s22197606
Xiao X, Zhou GZ, Wang KQ, Xi F, Zeng K. Study on In-Service Inspection of Nuclear Fuel Assembly Failure Using Ultrasonic Plate Wave. Sensors. 2022; 22(19):7606. https://doi.org/10.3390/s22197606
Chicago/Turabian StyleXiao, Xiang, Guo Zheng Zhou, Ke Qing Wang, Feng Xi, and Kun Zeng. 2022. "Study on In-Service Inspection of Nuclear Fuel Assembly Failure Using Ultrasonic Plate Wave" Sensors 22, no. 19: 7606. https://doi.org/10.3390/s22197606
APA StyleXiao, X., Zhou, G. Z., Wang, K. Q., Xi, F., & Zeng, K. (2022). Study on In-Service Inspection of Nuclear Fuel Assembly Failure Using Ultrasonic Plate Wave. Sensors, 22(19), 7606. https://doi.org/10.3390/s22197606


