1. Introduction
The current trend toward energy efficiency combines many different approaches. First, it involves obtaining new materials with higher specific strength. This goal can be achieved using methods of intensive plastic deformation or by creating composite materials. Second, it involves the development of energy-saving technologies. Third, waste recycling is a popular area of development. These ways of developing modern industry converge in friction extrusion technology. This technology was developed and patented by The Welding Institute in 1991, along with friction stir welding and other similar technologies. Despite the rapid development of friction stir welding, friction extrusion was almost forgotten and remained unresearched for a long time until its distinctive features coincided with the modern tasks of industry. In particular, friction extrusion allows for recycling metal chips and powders. A recent study has shown that recycling waste by friction extrusion is 50% more economical than remelting. In addition, friction extrusion is a method of severe plastic deformation, so during the extrusion process, the microstructure is strongly refined, and the material is strengthened. The friction extrusion method can also be used to create composite materials, mainly with a macroheterogeneous structure [
1].
Several friction extrusion schemes are currently known. For example, friction extrusion is used to produce tubular products from metal materials and metal matrix composites. In the friction extrusion process, a material or mixture of materials is placed in a special container, then a rotating non-consumable tool is immersed in the container, where friction and high pressure heat the material to a plastic state. The plasticized material is extruded between the surface of the tool and the container, forming a tubular product, and the tool is immersed further. This method has been used to produce tubes from magnesium [
1] and aluminum alloys [
2].
Wire friction extrusion is also frequently used. It is similar to the previous method, but the wire is extruded into a hole inside the tool. This method has been used to produce wire from various light alloys, such as aluminum [
3], magnesium [
4], as well as Al-Ti-based composites [
5], aluminum alloys reinforced with Al
2O
3 powder [
6], and magnesium alloy with a bioactive glass composite [
7]. In fact, these two schemes are both backward, since the direction of force application and product extrusion are opposite. The most rare and innovative is the side friction extrusion scheme described in [
8]. In this scheme, the extruded material is fed under high pressure to the side surface of a rotating conical tool, which heats, plasticizes, and extrudes the material toward the top of the cone, forming a wire.
Although active research into friction extrusion began only in the last 10 years, researchers have already achieved some success by applying the knowledge base accumulated from other friction processes, such as friction stir welding and friction drilling. In particular, in [
6], the authors have succeeded in calculating the grain size in a magnesium alloy after friction extrusion with good accuracy using the cellular automaton method. The finite element method was also used to successfully simulate the temperature during extrusion [
9]. Despite similarities with friction stir welding, it was found that when extruding wire into the tool, the shape of the tool has a negligible effect on the result [
10]. Similarities were also found, such as the complexity of selecting the mode [
11] and the fact that a higher load leads to greater process stability, better quality, and energy savings [
12]. Similarities between the processes were also found due to the common approach of researchers to similar processes. In particular, in friction stir welding, friction drilling, and friction extrusion processes, researchers often do not control the axial load on the tool but instead set the feed rate (or plunge rate) of the tool. This “hard” mode leads to non-uniformity of stress distribution during extrusion and results in structural heterogeneity [
12]. One of the first studies also found that the friction coefficient varies greatly during extrusion, from 0.65 to 0.92 [
13]. This problem is partially solved by using a side extrusion scheme, but it is quite complex and requires the use of several motors at once, which is less economical. In addition, in all studies of friction extrusion of wire into a tool, the extrusion hole was naturally located in the center of the tool so that the wire would not deform upon exit. However, with this scheme, the wire rotates inside the tool along with it and is partially deformed upon exit. This problem has not yet been solved.
This paper proposes an original friction extrusion scheme with a “soft” mode. This means that the application of force and the direction of extrusion are aligned, and extrusion occurs under constant load. The aim of this work is to investigate the feasibility of the proposed scheme and to study the influence of technological parameters on the extrusion process and product properties.
2. Materials and Methods
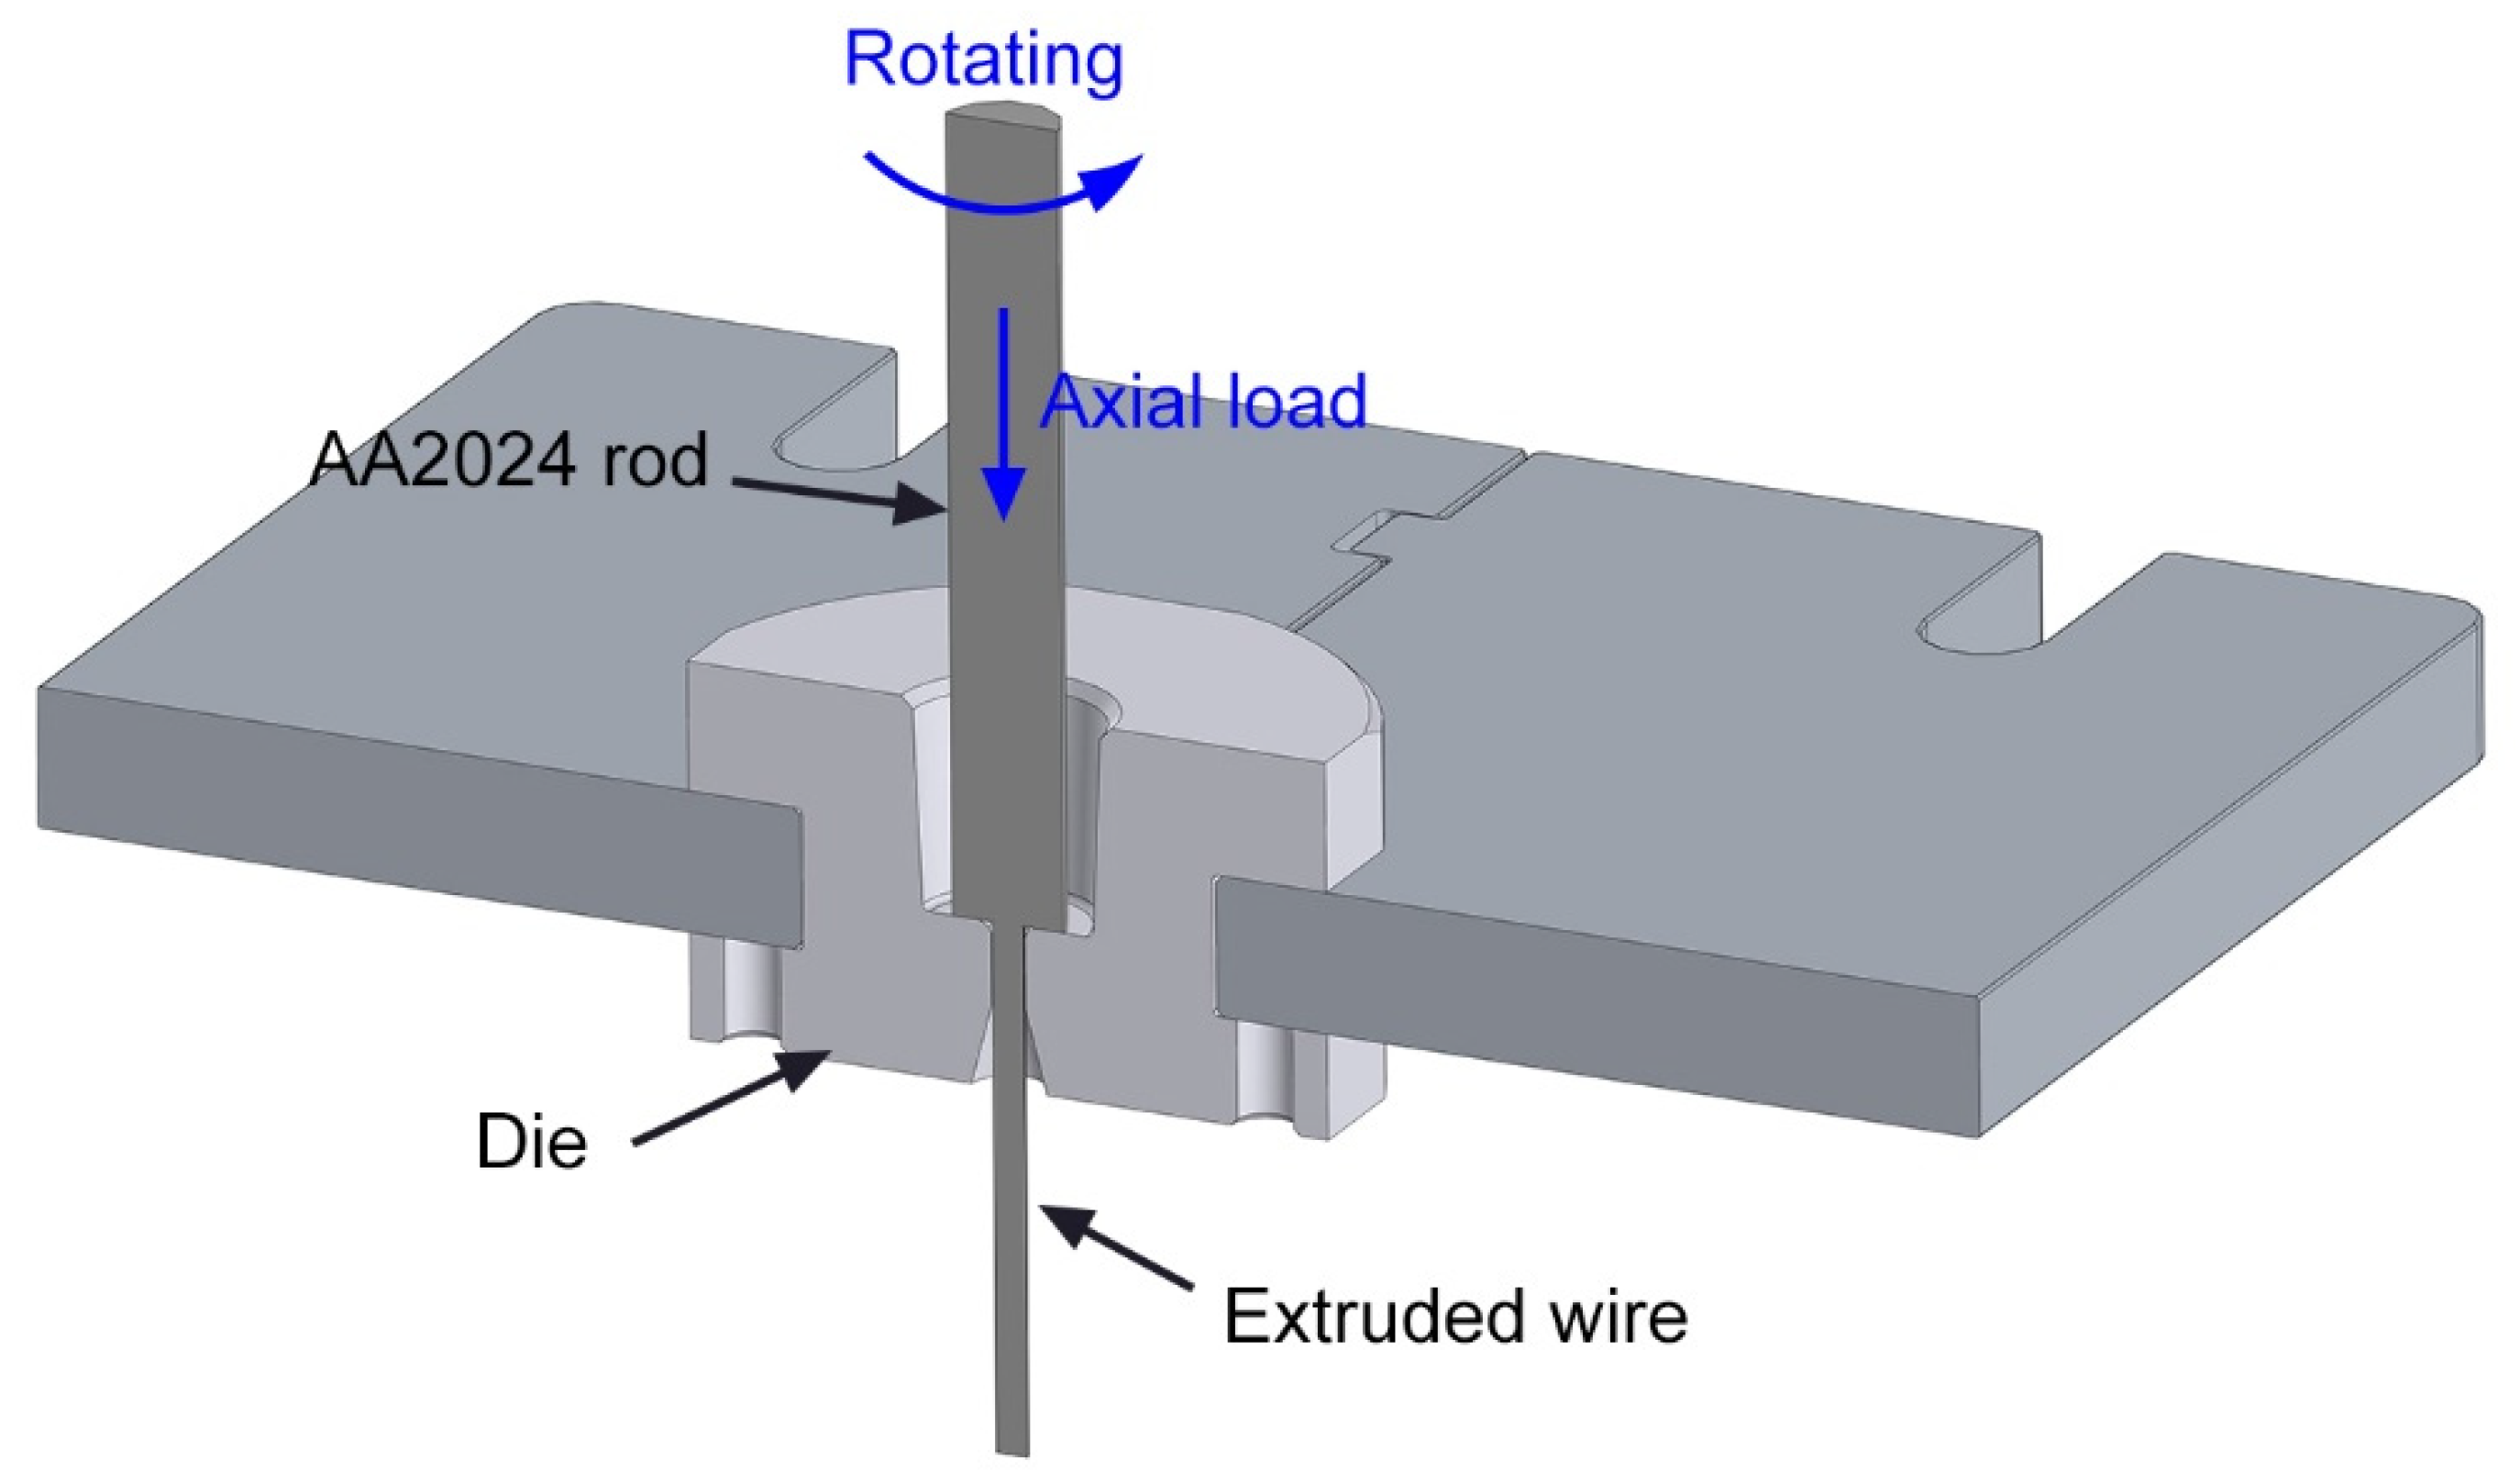
Figure 1 shows a schematic diagram of friction extrusion. During the extrusion process, the rotating rod of the initial material contacts the surface of the die, which is fixed in the attachment. As a result of friction against the die, the rod heats up and is extruded through the die under pressure. A 10 mm diameter rod of heat-hardened 2024 aluminum alloy was used as the initial material. This material was chosen for the study because it has been well researched and is often used in similar works, thus providing a good basis for comparison. The diameter of the die outlet was 3 mm. Thus, the extrusion ratio was 11.1. The die was made from D2 tool steel using a turning method. No surface treatment was performed. During the technological mode selection process, the axial load on the rod and the rod rotation rate were varied. The friction extrusion technological modes are shown in
Table 1. Each mode was repeated three times. The specified technological parameters allow control of heat generation during the extrusion process. Axial load affects the friction force, while rotation speed affects the friction rate. By analogy with friction stir welding and friction drilling, this research assumes that increasing axial load and rotation speed leads to increased heat generation. This assumption has been experimentally confirmed in studies on friction extrusion of aluminum alloys [
14,
15]. Thus, friction power
P can be calculated using the following equation:
where
Ff is a friction force;
F is an axial force;
µ is a friction coefficient; and
V is a friction velocity.
The microstructure of the obtained samples was studied by metallography using an Altami MET 1C light microscope (Altami, St. Petersburg, Russia). The ovality of the wire was determined from metallographic images of the cross-section. The diameter of the wire was measured 12 times on the sample at 15° intervals. The difference between the largest and smallest diameters was then calculated. Secondary particles were studied using an Apreo S LoVac scanning electron microscope (Thermo Fisher Scientific, Portland, OR, USA). The volume fraction of particles was estimated by measuring the cross-sectional areas of particles in digital images. For structural studies, the samples were cut using an electric spark method, then ground on abrasive paper and polished using diamond paste. To reveal the grain structure, chemical etching was performed using Keller’s reagent.
The microhardness of the samples was measured using the Vickers method with a Tochline TVM 5215A (ZIP, Ivanovo, Russia) microhardness tester. Measurements were taken at a load of 50 g with an exposure time of 10 s. Mechanical tests for uniaxial quasi-static tensile strength were performed using a BiSS UTM-100 testing machine (Bangalore Integrated System Solutions (P) Ltd., Bangalore, India) at a speed of 1 mm/min.
Residual stresses were evaluated by the sin
2ψ X-ray diffraction (XRD) method. The analysis was performed using a Dron-8N X-ray diffractometer (IC Bourevestnik, St. Petersburg, Russia) with a Cu
Kα1 radiation source (λ = 1.54 Å) with beam parameters of 40 kV and 20 mA. Measurements were carried out on longitudinal cross-sections of the as-received 2024 aluminum alloy rod and the extruded wire. The stress values were calculated using the following equation:
where
E is the elastic modulus of the material,
ν is Poisson’s ratio,
d0 is the interplanar spacing in the unstressed state, and
dΨφ is the interplanar spacing for characteristic reflection planes perpendicular to the direction (
Ψ) of the beam.
A symmetric diffraction geometry was employed to determine the 2
θ0 peak positions, enabling phase identification and assignment of Bragg reflections. For residual stress evaluation, the (331) and (420) reflections of the face-centered cubic (FCC) aluminum matrix were selected. Following reflection identification, a series of asymmetric scans was performed at tilt angles
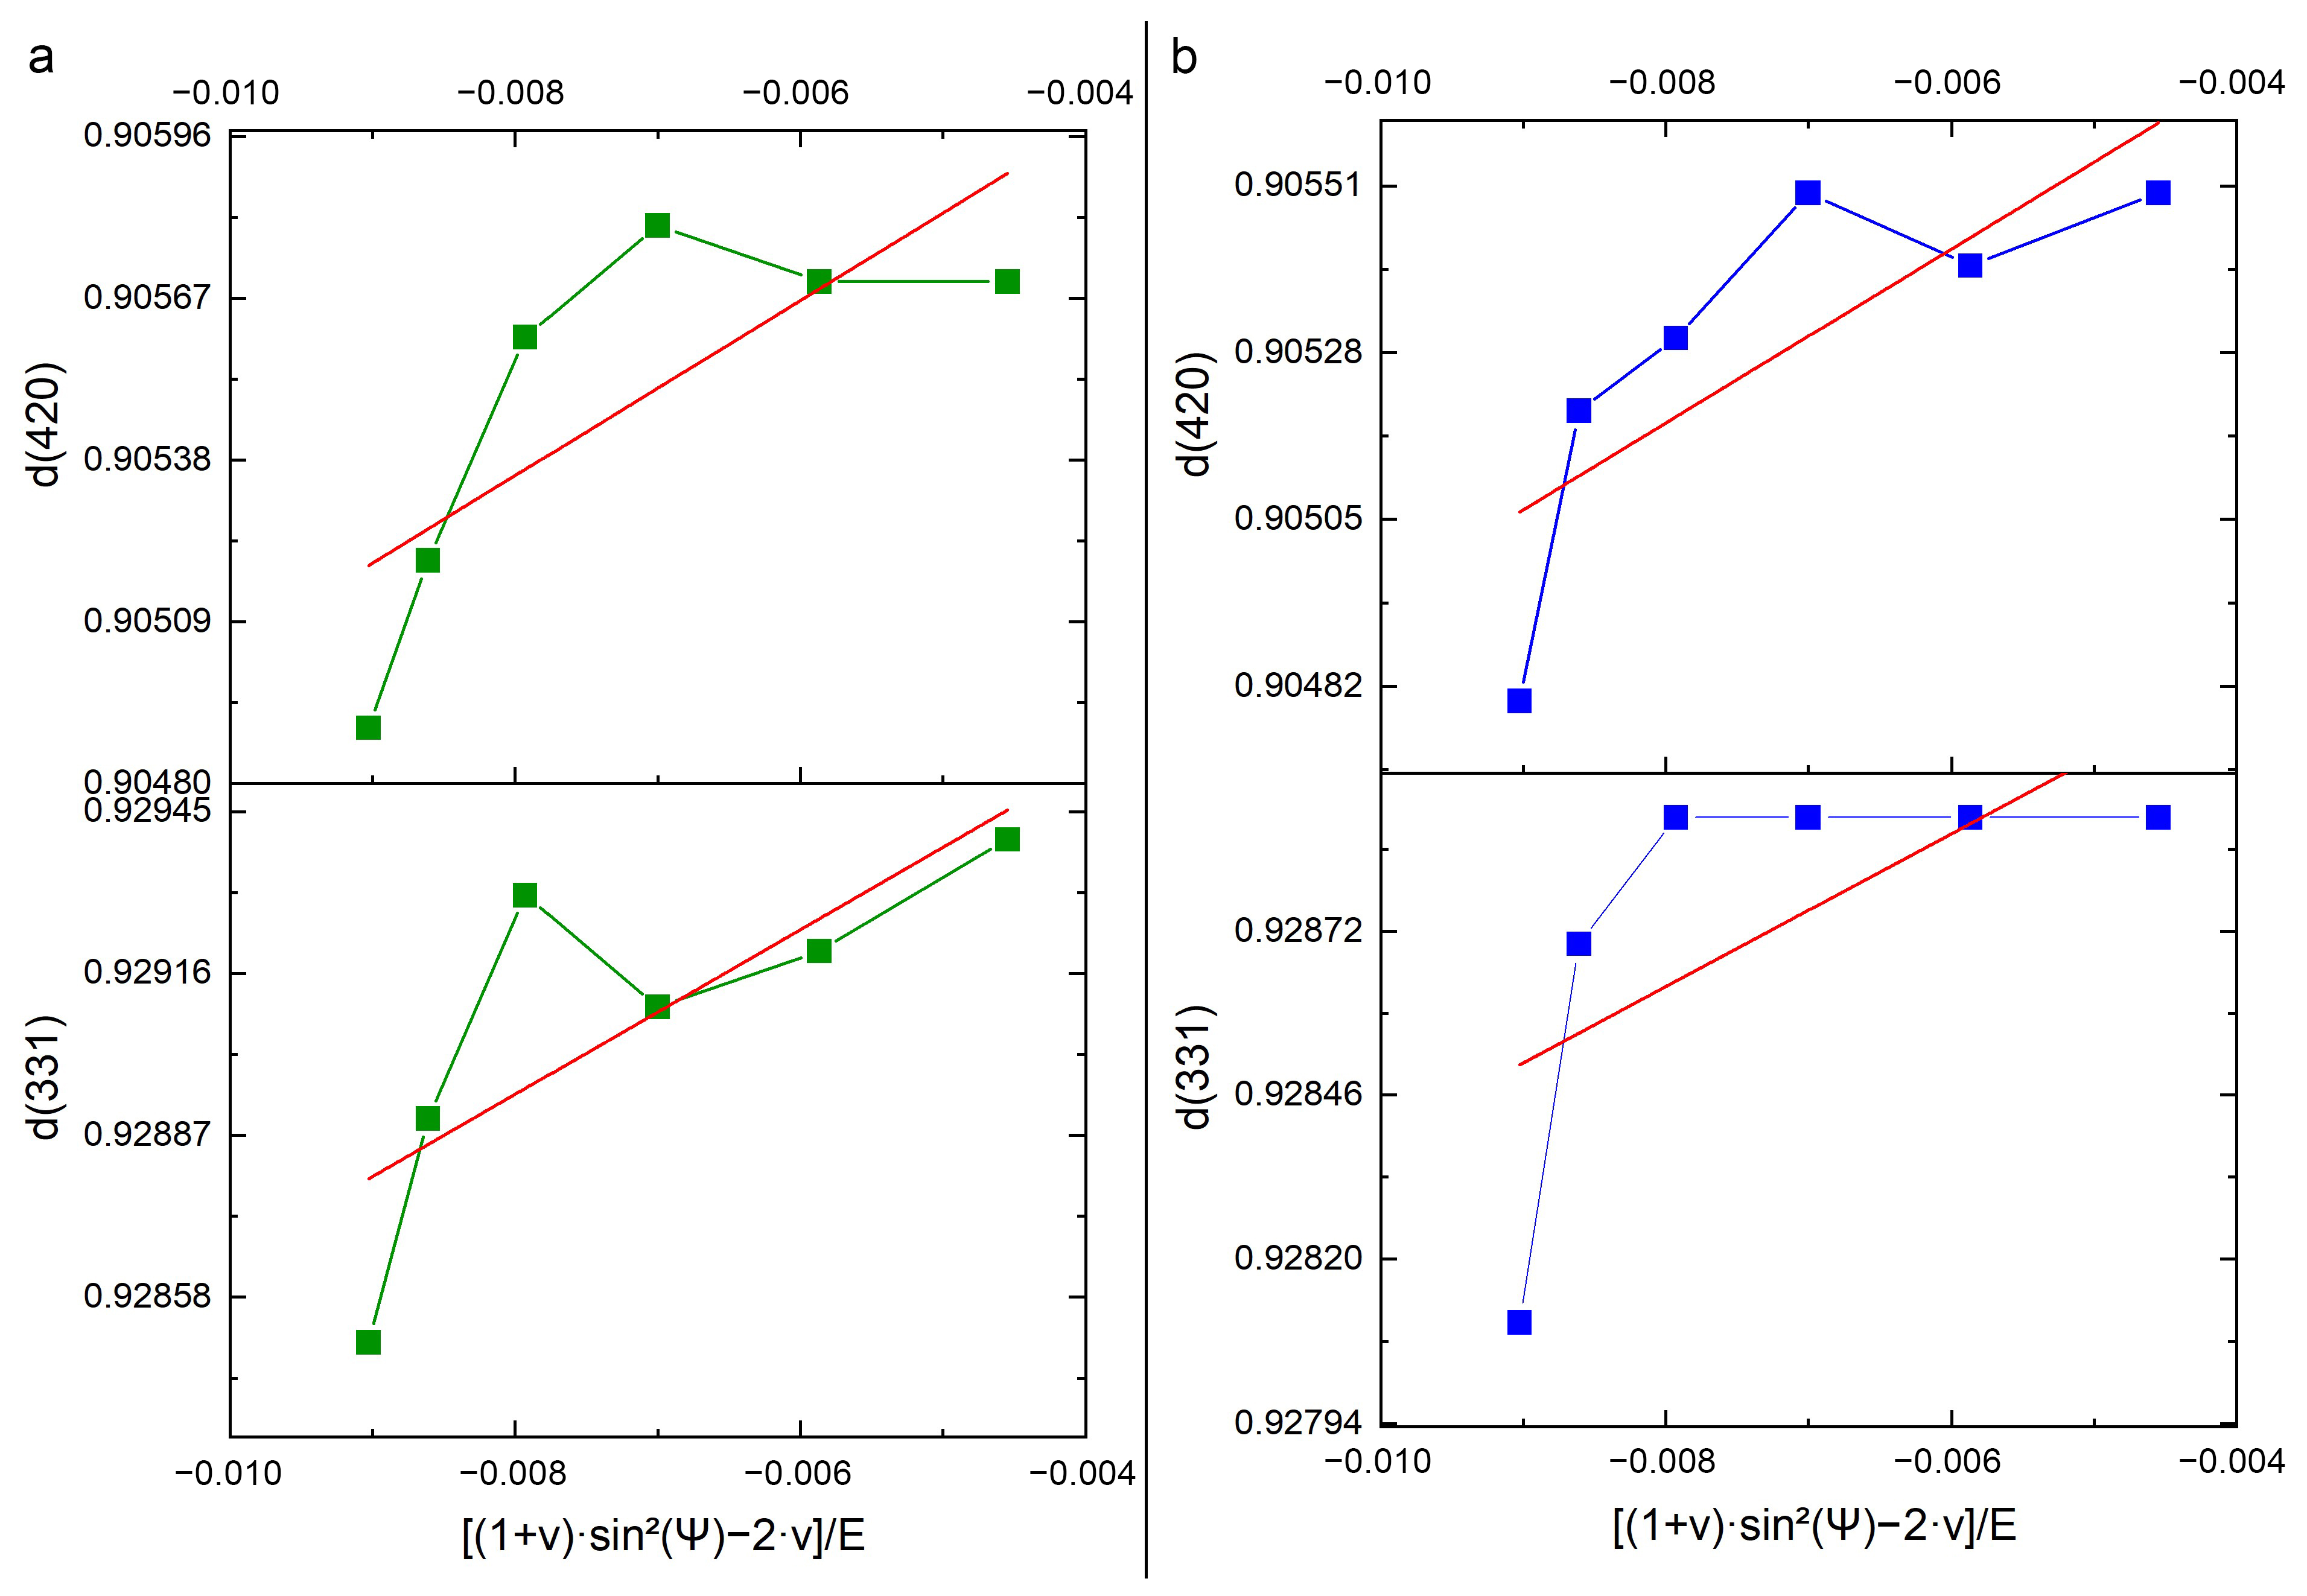
Ψ ranging from 10° to 60° in 10° increments. Peak centroids were determined, and the corresponding interplanar spacings,
dΨφ, were calculated using Bragg’s law. Subsequently, the data were plotted as
dΨφ versus [(1 +
ν)
·sin2(
ψ) − 2
·ν]/
E. Linear regression was applied to obtain the best-fit line; its intercept with the ordinate axis yields the stress-free lattice spacing
d0. The stress was calculated as the ratio of the tangent of the approximate line’s slope to
d0. A more detailed description of the sin
2Ψ method and its implementation is provided in [
16].
3. Results
During extrusion using the method employed, the rod heated up quickly due to the high thermal conductivity of the 2024 aluminum alloy. As a result of heating, the shear strength of the alloy became less than the shear stress on the die surface, and the rod broke before entering the die. For each extrusion process mode, the rod broke, and the process stopped at different times, so the lengths of the extruded samples varied.
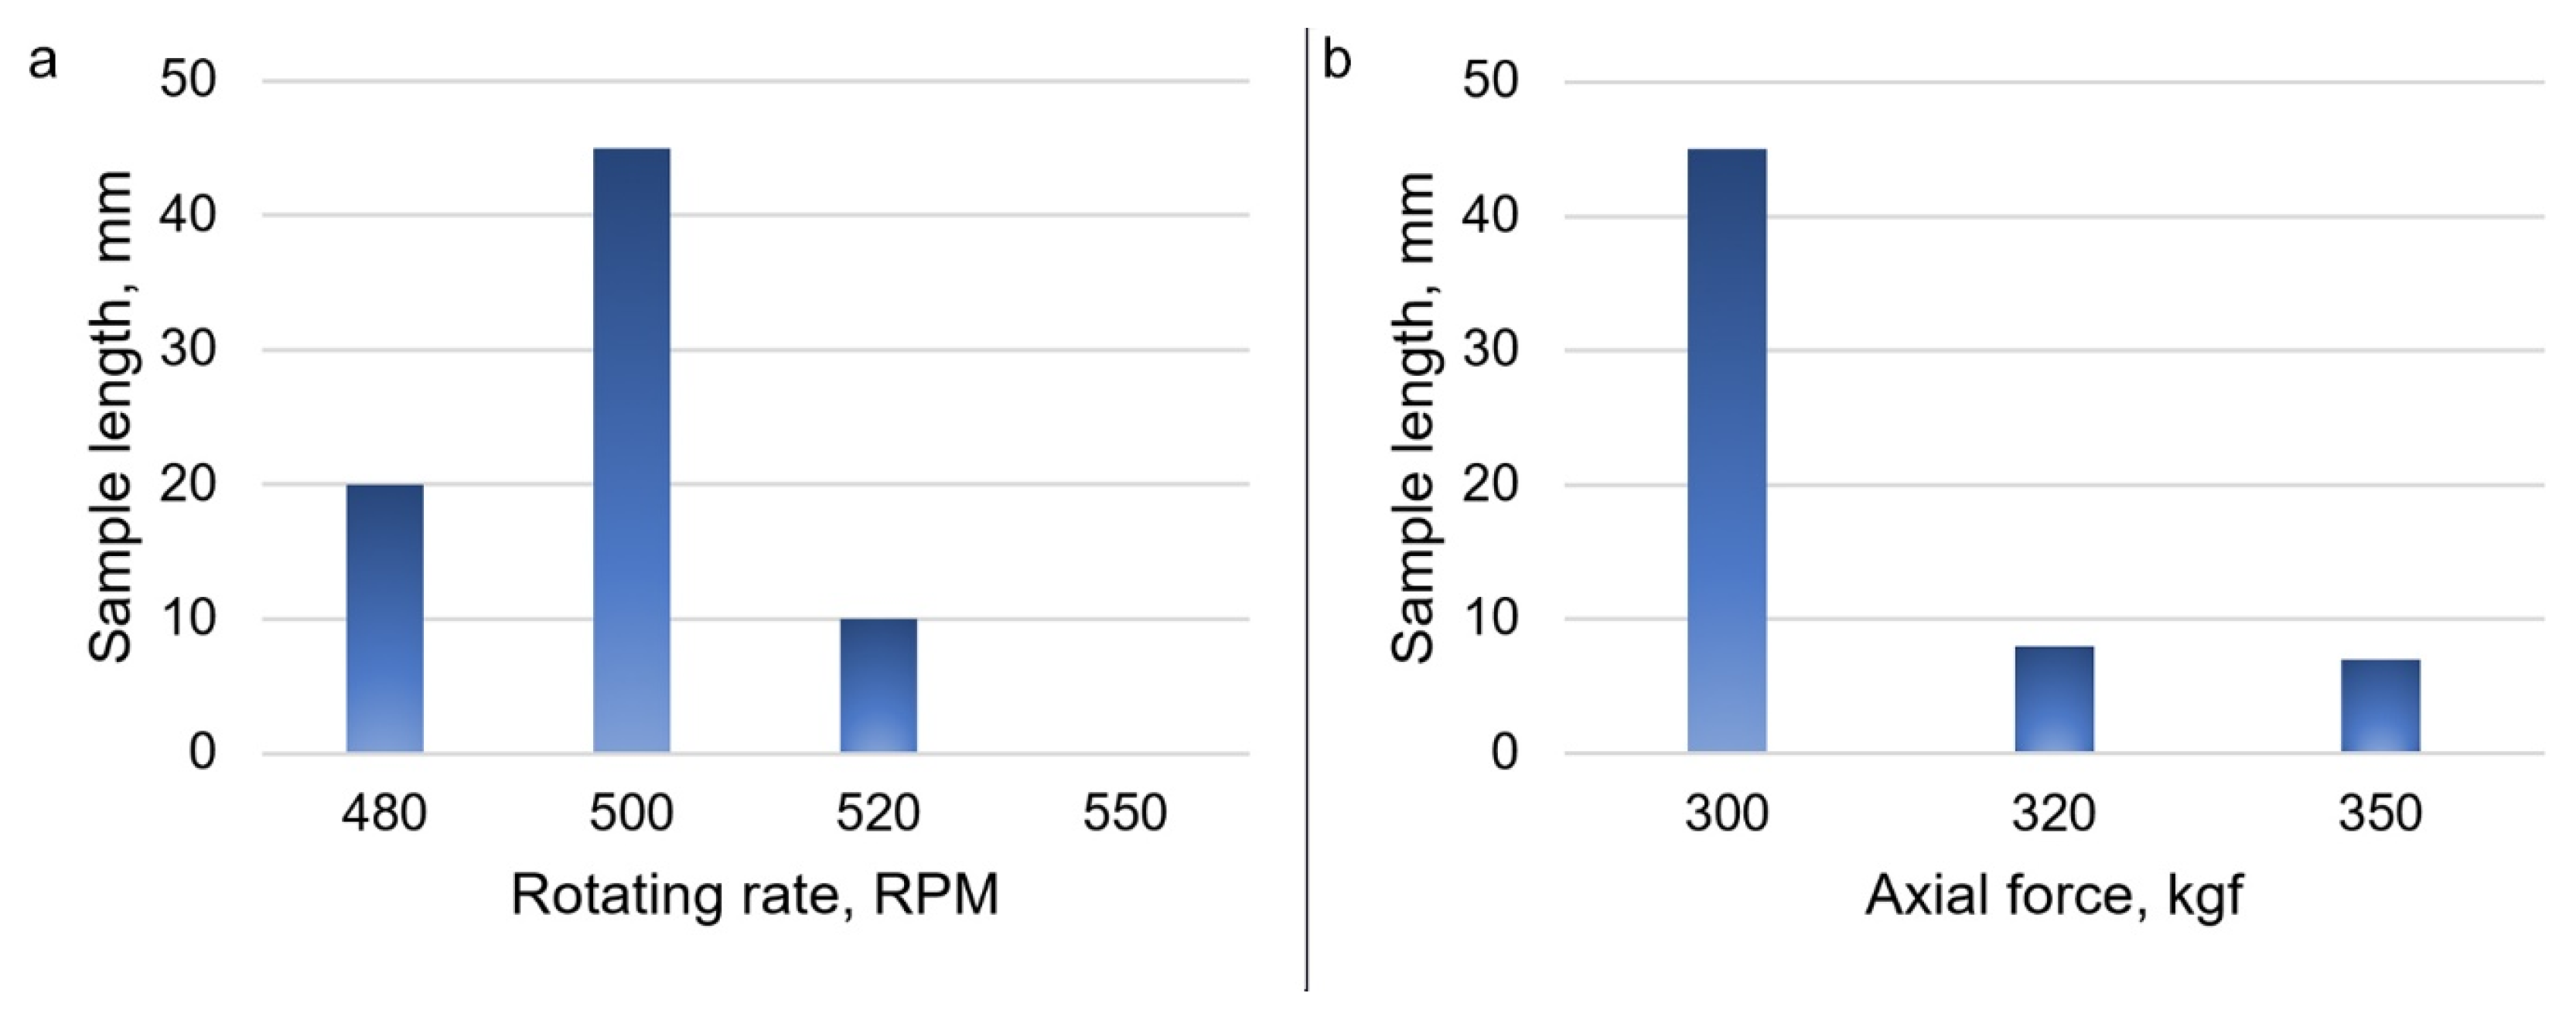
Table 1 shows the results of measuring the lengths of the wire samples obtained by friction extrusion. Preliminary tests showed that higher frequencies and loads led to the destruction of the input rod before extrusion began. At lower values, the rod did not break, but extrusion did not start either. These modes were not included in the table. Mode #3 proved to be the most productive, with a maximum extrusion length of 45 mm. A comparison of the sample lengths showed that the productivity of the mode strongly depends on both the axial load and the rod rotation speed. For example, a 20 kg change in load in modes #6 and #8 resulted in a 4.5-fold and 2.25-fold decrease in sample length, respectively, compared to mode #3 (
Figure 2). Increasing the rotation rate by 30 rpm in mode #2 compared to mode #6 led to extrusion stoppage and early failure of the input rod. Mode #3 was the most effective under these conditions because it provided the best balance of heat dissipation and stress.
During extrusion, the torque was monitored in real time using the built-in equipment sensors. The recorded values are summarized in
Table 1. Since torque is primarily governed by interfacial friction forces, it serves as a reliable indicator of extrusion process stability. The results demonstrate that the applied process parameters significantly influence the torque magnitude, with values ranging from 5.7 N·m to 8.9 N·m under the tested conditions. However, during extrusion, the torque exhibited only minor fluctuations, as evidenced by the low variance. During side friction extrusion (solid stir extrusion) of AA6061, torque values reached 35 N·m, while during reverse friction extrusion of AA1100, torque reached 300 N·m [
8,
10]. A direct proportionality was observed between axial load and torque, in agreement with the classical Coulomb friction model. In contrast, increasing the rotational speed resulted in a measurable torque reduction, likely attributable to enhanced frictional heating and the consequent decrease in the effective friction coefficient. Based on the measured torque values, the friction coefficient in this study ranged from 0.46 to 0.52. The friction coefficient
µ was calculated using the following equation:
where
Ff is a friction force,
F is an axial force,
M is a torque, and
R is an initial rod radius.
For comparison, in work [
13], during reverse extrusion of AA2024, the friction coefficient ranged from 0.7 to 0.9.
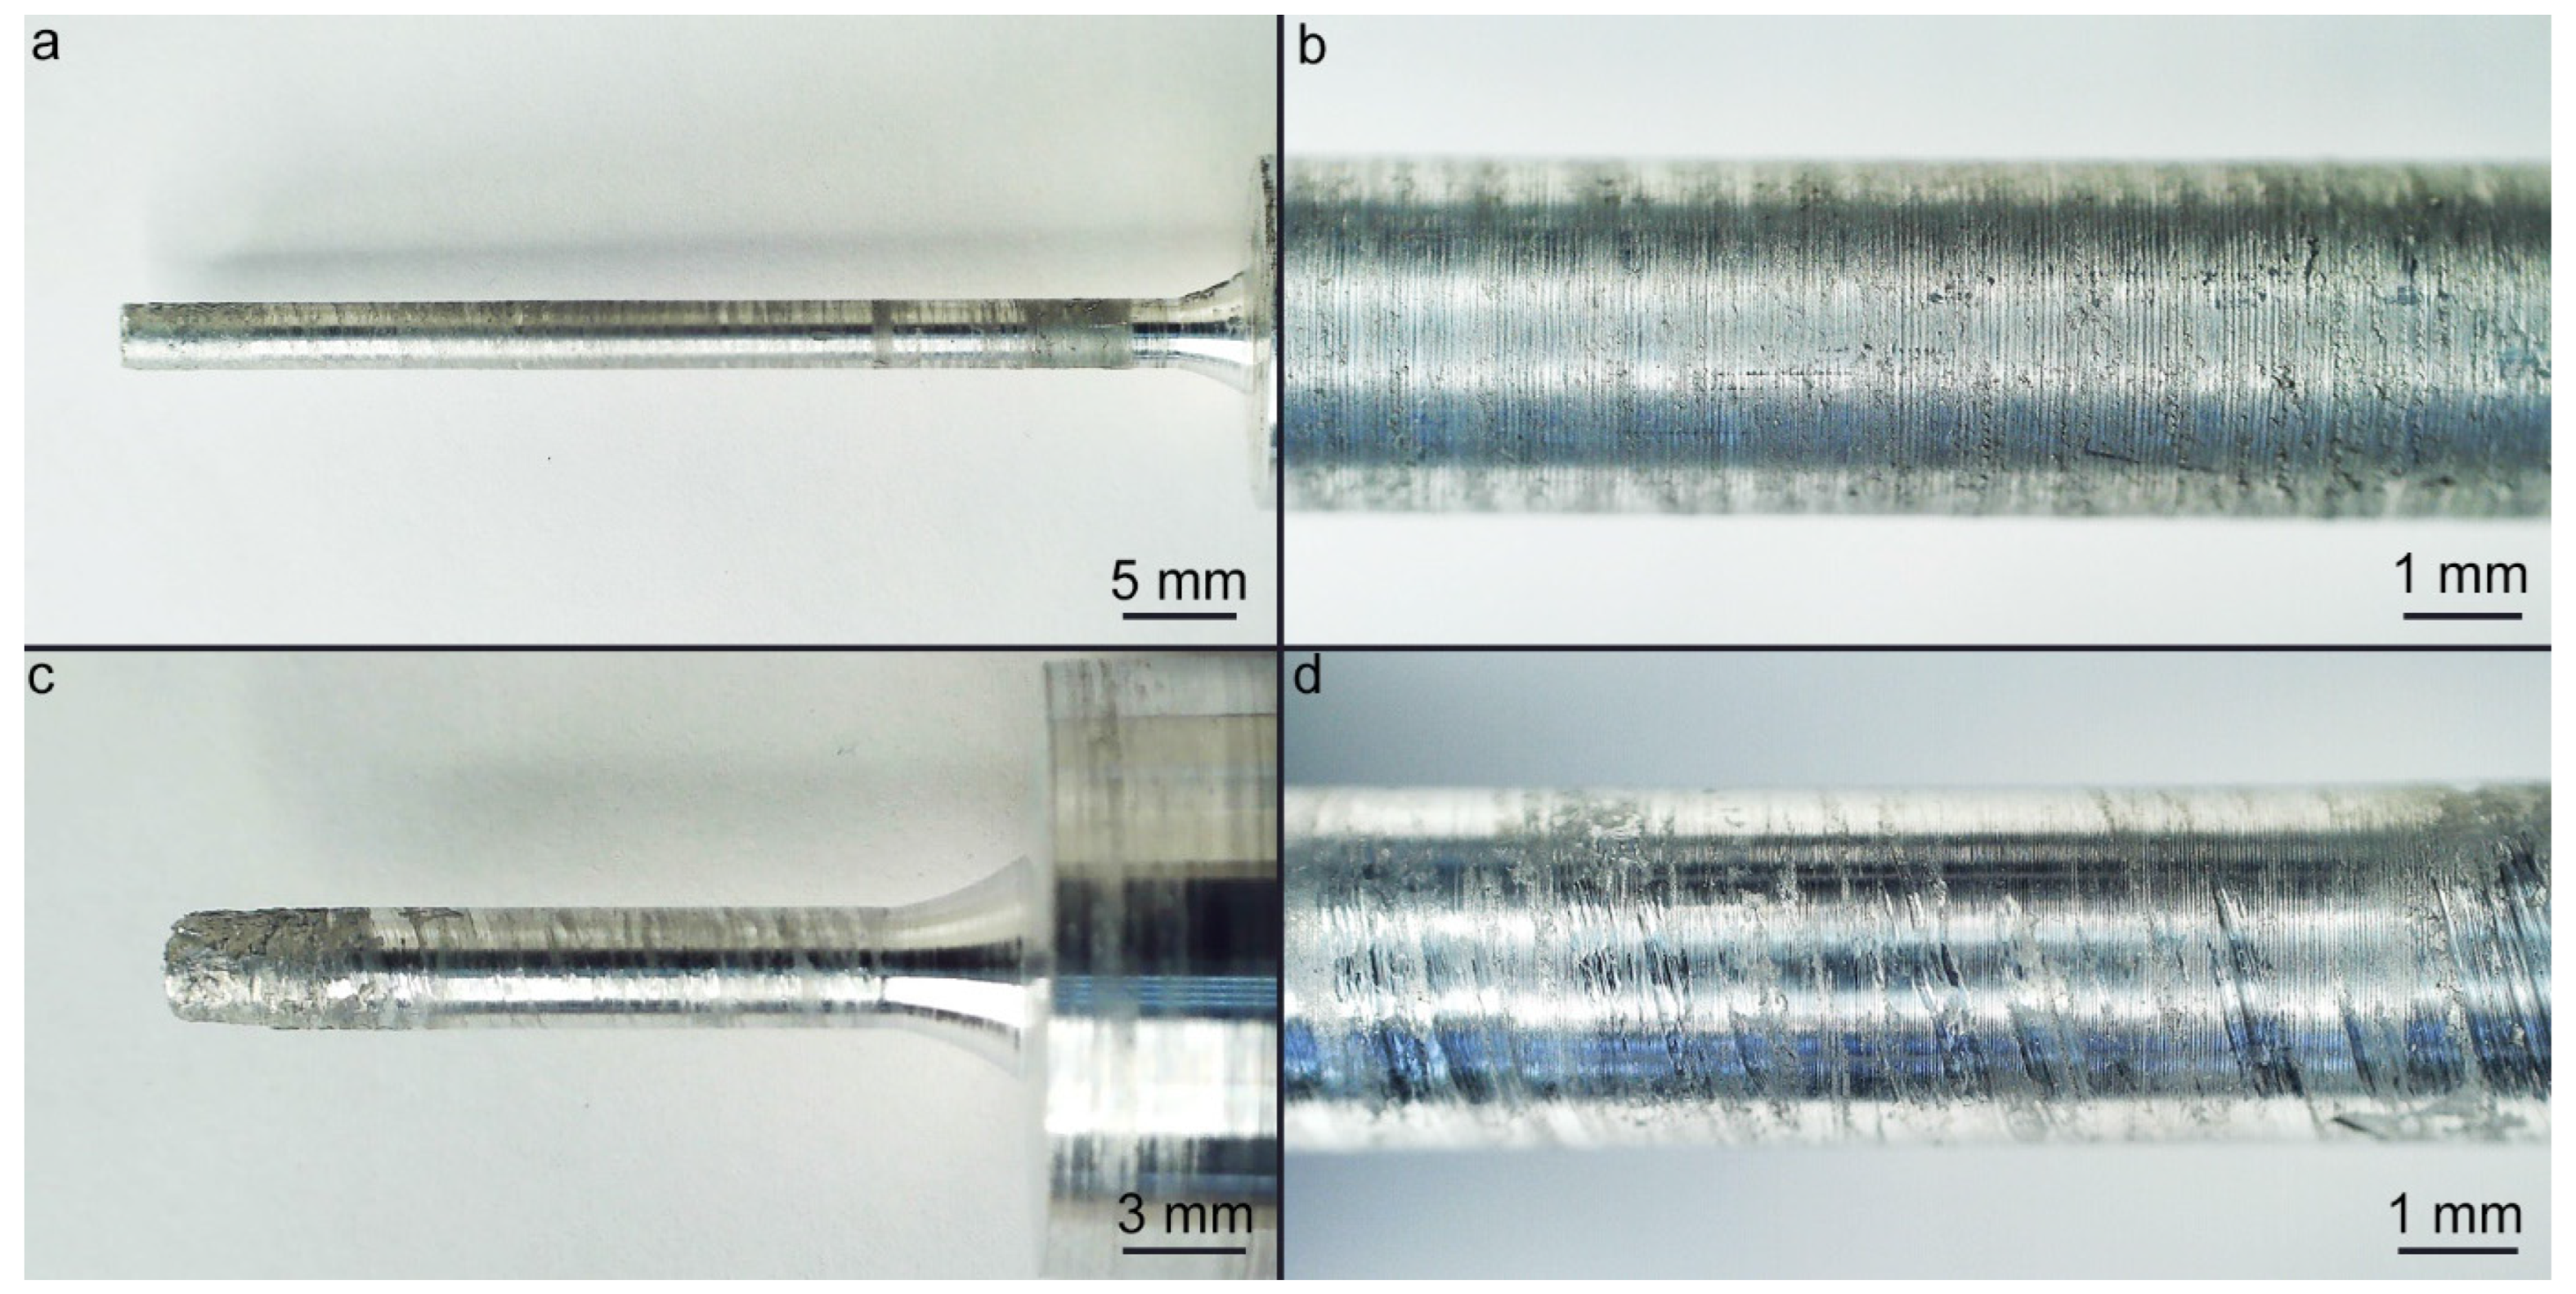
Figure 3 shows photographs of samples obtained under modes #3 and #8. There are no macrodefects on the surface of the samples. However, spiral grooves are observed on the surface of sample #8. There are no such grooves on the surface of sample #3, but there is a striped relief. Individual surface damage in the form of delamination can be observed on the first 2–3 mm of the wire. The diameter of the samples is relatively stable along the entire length and is 2.89 ± 0.03 mm and 2.94 ± 0.02 mm, respectively.
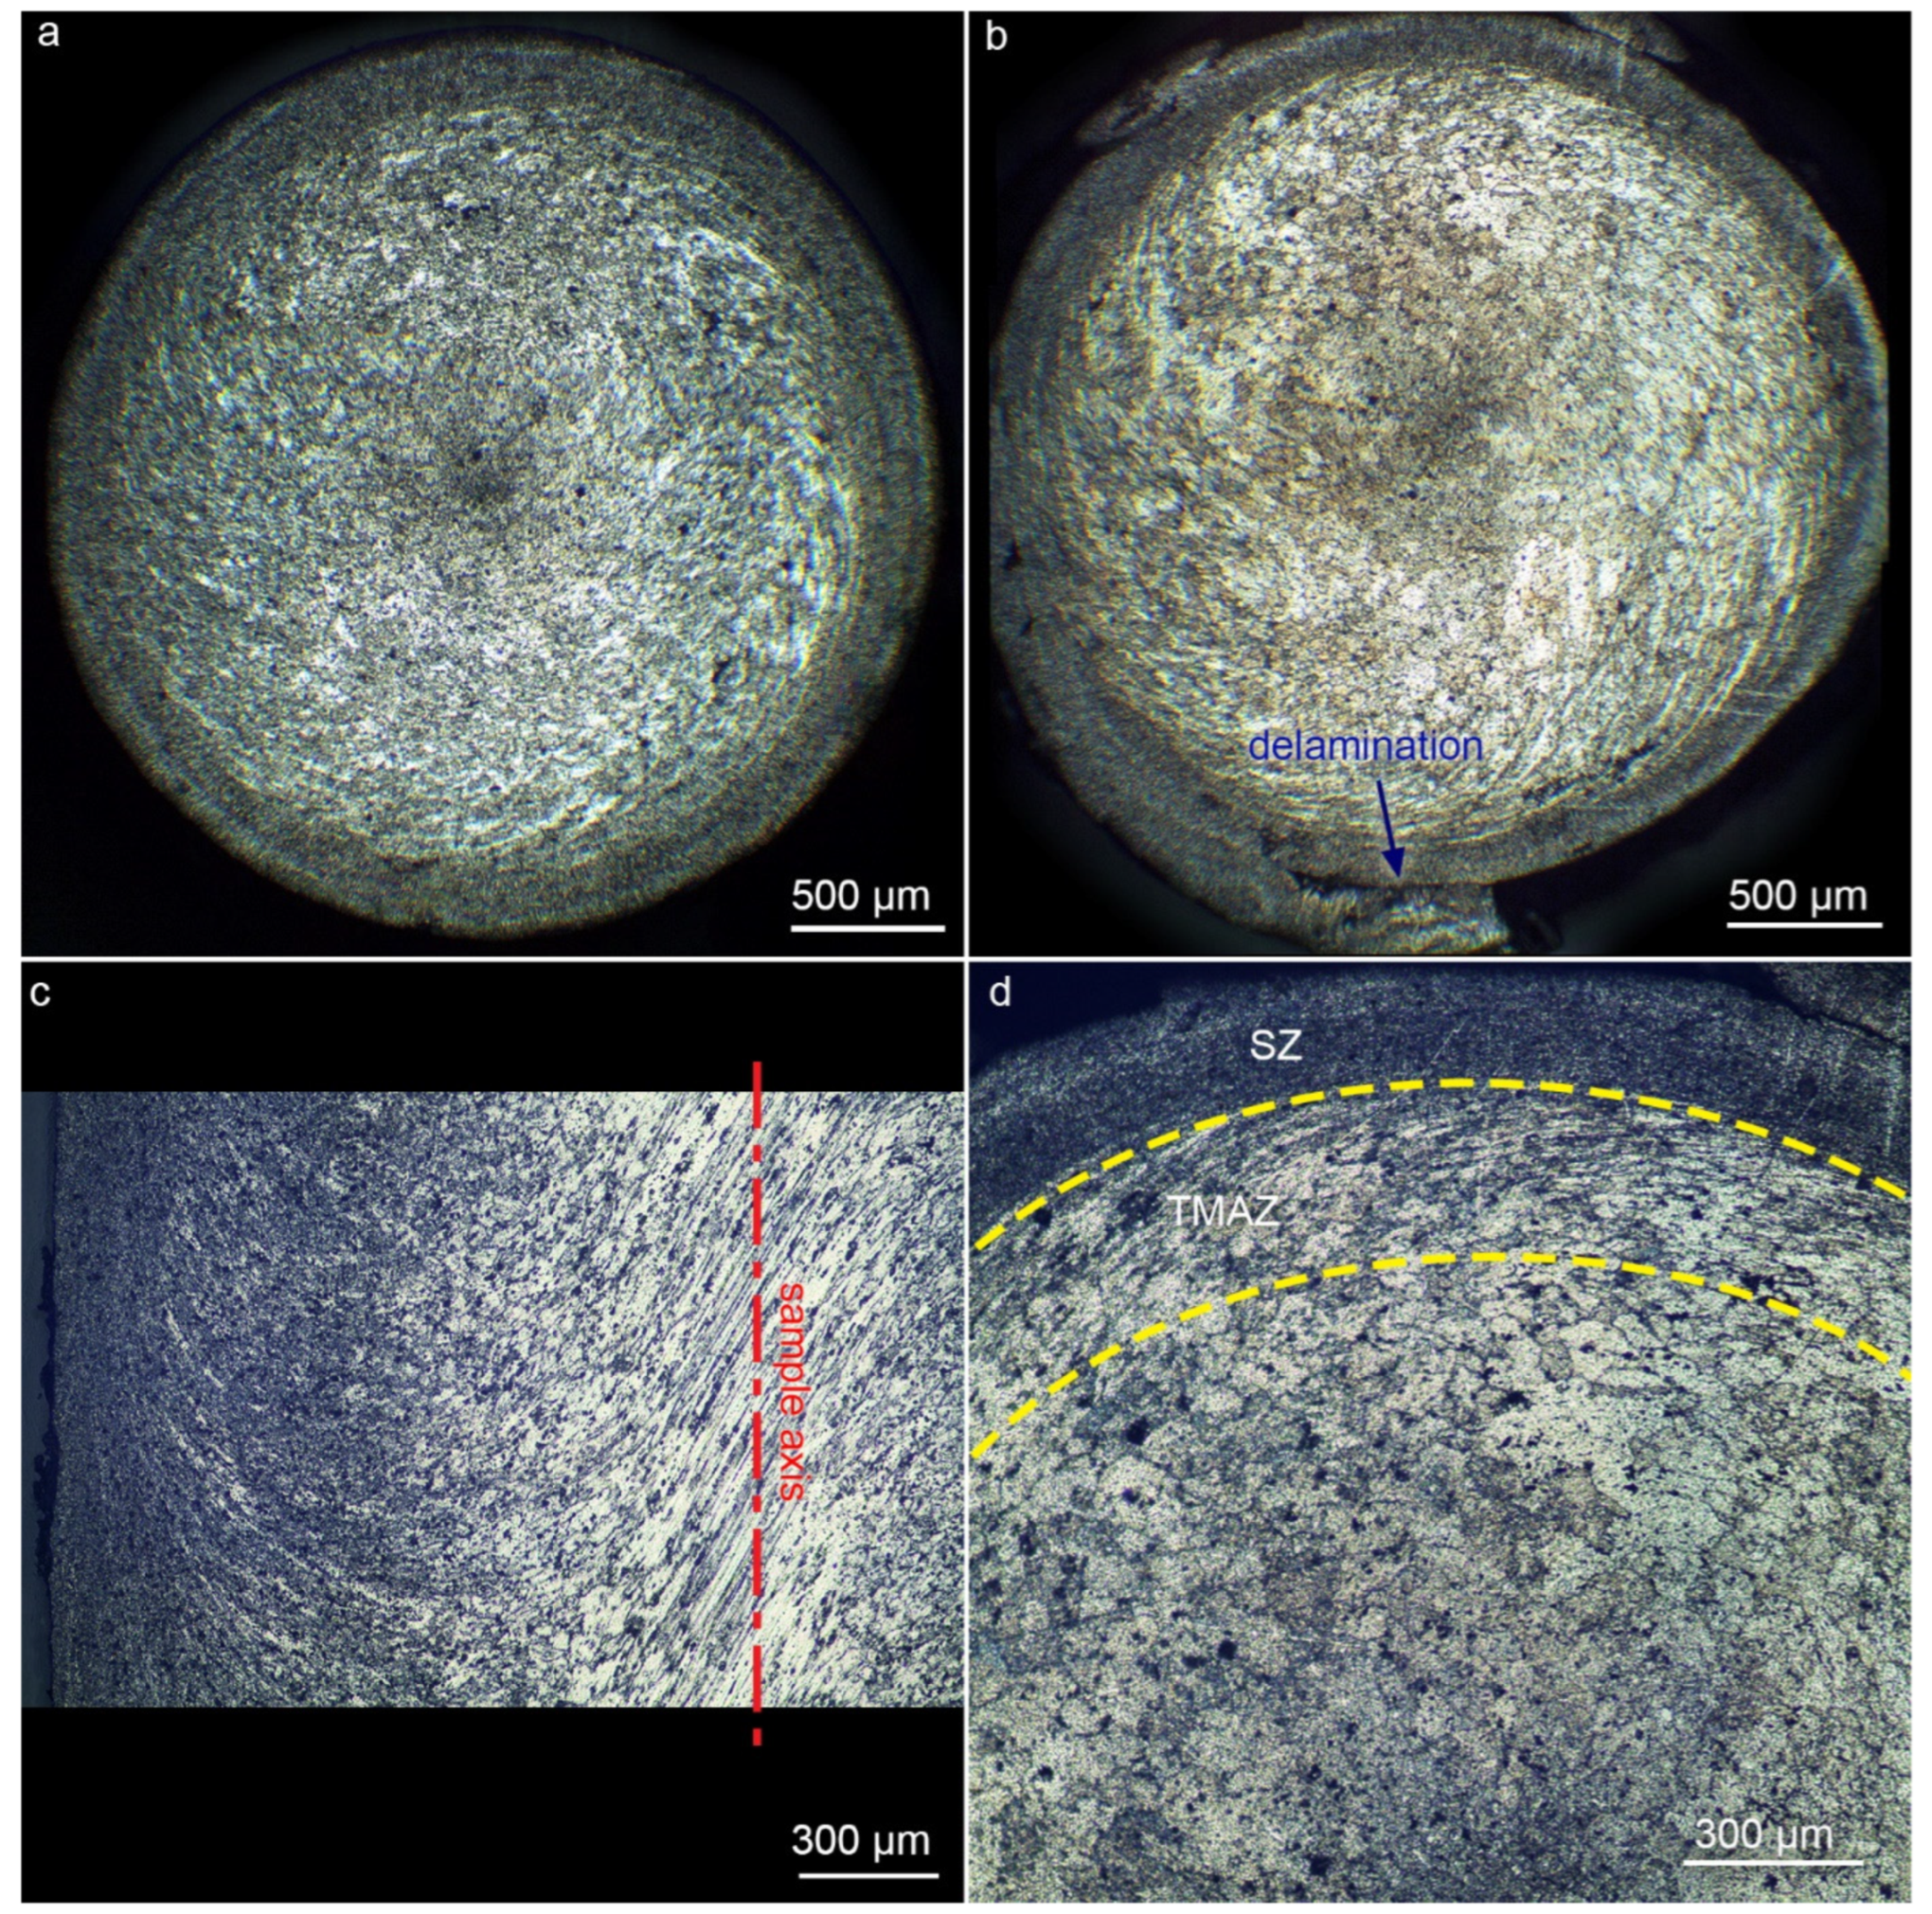
Figure 4 shows metallographic images of samples #3 in cross-section and longitudinal section, as well as sample #6 in cross-section. Measurements of the sample #3’s diameter showed that the ovality of the sample is no more than 0.01 mm. In the cross-section of sample #6, delamination was found, caused by the instability of the extrusion process. This defect can be caused by local overheating and adhesion to the die wall. This defect is not visible during visual inspection of the wire. The thickness of the delaminated layer is 0.2 mm.
The microstructure of the samples is characterized by solid solution grains. Three structural zones can be distinguished in the cross-section of the samples. Relatively large grains of solid solution of equiaxed shape are observed in the central zone. The average grain size in this area of sample #6 is 36 ± 6 μm. At the same time, closer to the center of the sample, the grain size gradually decreases to 28 μm. No grains are detected in the center of the zone. The diameter of the central zone reaches 1.5 mm. Further on is an area that can be called the thermomechanically affected zone (TMAZ) by analogy with the friction stir welding terminology. In this area, elongated grains of solid solution are observed, which bend in a spiral trajectory in the direction of strain. The length of such grains reaches 75 μm, and their thickness reaches 15 μm. The thickness of TMAZ is 0.4 ± 0.1 mm. Next is an area where no grain structure is detected. This area is in direct contact with the die walls during extrusion. Presumably, in this area, the grains are significantly crushed during friction and deformation. A similar area was observed in work [
17] during the friction of an aluminum pin against a steel disk. By analogy, it can be called a stir zone. The grain size in the central zone of sample #3 is smaller and is 28 ± 5 μm. This can be explained by lower heat generation during extrusion, since the rod rotation rate is lower in mode #3. The grain size in the TMAZ of sample #3 differs within the margin of error, as does the size of the structural zones. It should be noted that the boundaries of the structural zones are conditional, and there is no sharp transition between the zones. A nominal boundary between zones can be drawn where grains are not revealed, as well as where grains begin to elongate. When using side friction extrusion (continuous friction stir extrusion) of AA2024, the grain size was smaller, reaching 20 μm [
18]. In a similar alloy in 2017, after reverse extrusion, the grains were even smaller (up to 10 μm) [
12].
In the longitudinal section of sample #3, these structural zones can also be distinguished, but other features are observed here. A banded grain structure is observed in the central zone. The grains are elongated in the direction of extrusion but tilted at 27° from the axis of rotation of the sample. The thickness of these grains is 16 ± 4 μm, and their length is 137 ± 58 μm. The diameter of this area is 0.4 mm. Further on, grains close to equiaxed are observed. Their size corresponds to the size in the cross-section of the sample. Further, the grains are also elongated in the TMAZ and flow into the stir zone, where the grain structure is not revealed. A similar grain structure of the AA7075 alloy with analogous zones was observed in [
14], despite different technological modes. In [
3], it was shown on the Al10Cu alloy that a similar structure is observed only during the extrusion of bulk material.
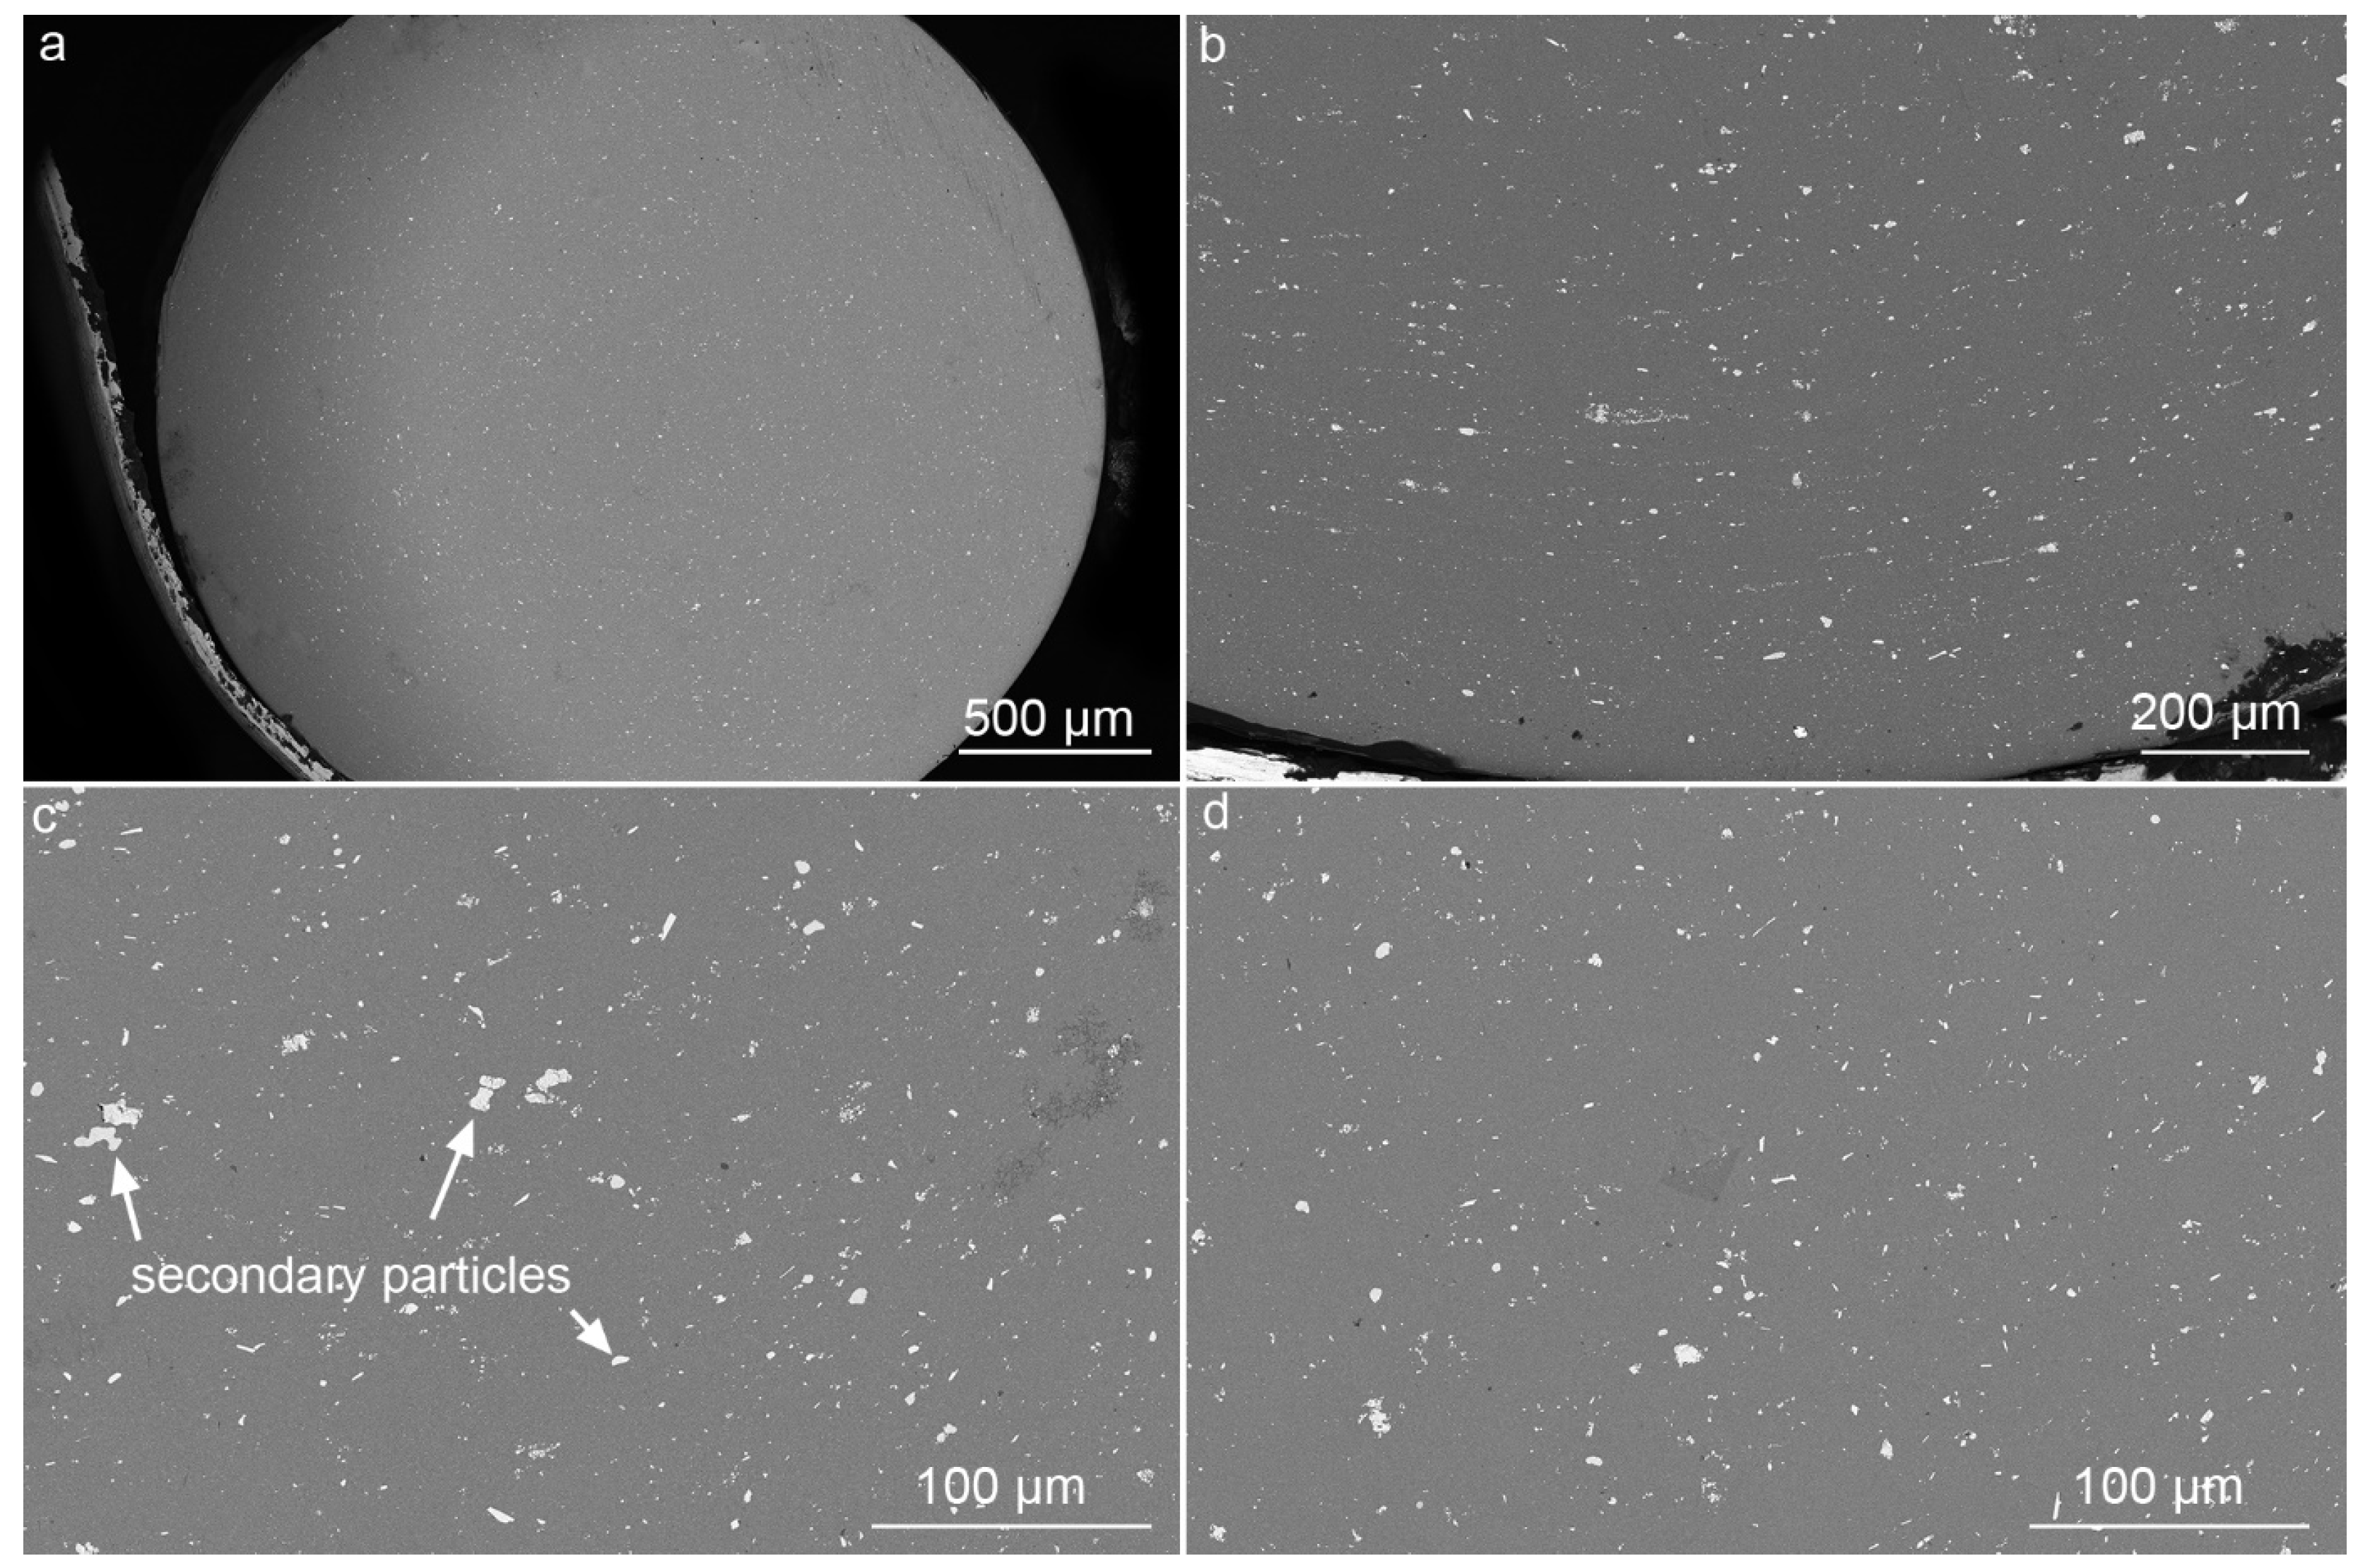
Figure 5 shows SEM images of sample #3 in cross-section. The images were obtained in backscattered electron mode. Large incoherent particles of secondary phases typical for this alloy were found in the sample. These particles have a complex non-stoichiometric composition and contain Al, Cu, and Mg, as well as metallurgical impurities Si, Mn, and Fe. The particles vary in size and shape, depending on their location in the cross-section. Near the friction surface in the stir zone, there are mainly small particles, similar in shape to equiaxed ones. Larger irregularly shaped particles are observed in the TMAZ, some of which begin to break down during extrusion under the strain. In this area, the particles are predominantly oriented in the direction of deformation. Large, irregularly shaped grains, including rod-shaped particles, are observed in the central zone and on the axis of the sample.
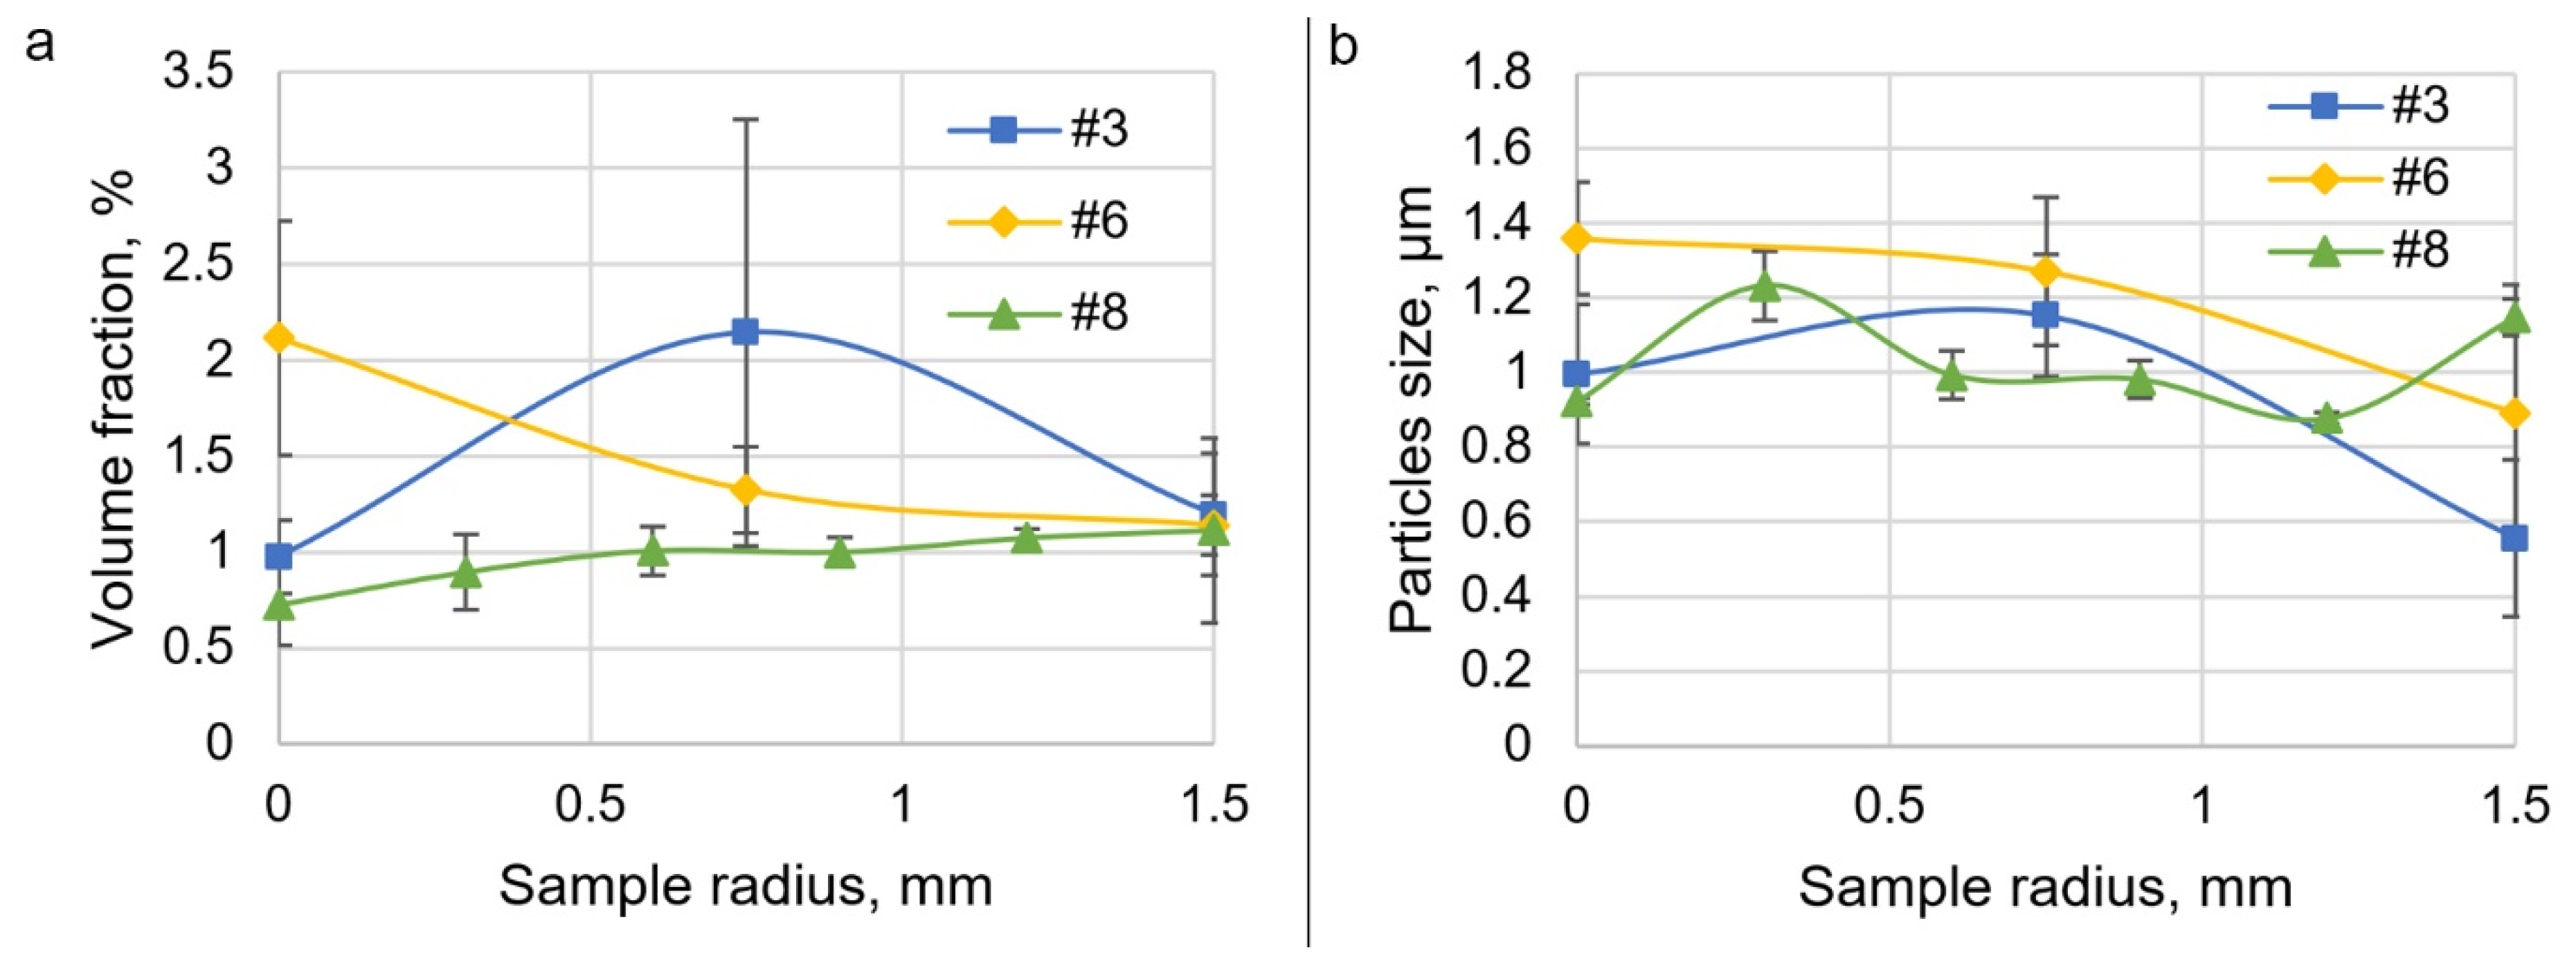
Figure 6 shows the results of measuring the volume fraction of secondary phase particles in samples #3, #6, and #8. Measurements were taken in a cross-section from the center of the samples to the edge. Each sample exhibits a different pattern of change in volume fraction. In sample #8, the volume fraction of particles increases from the center to the edge of the sample. The particles’ growth might be caused by heat release on the friction surface. In sample #3, there is an increase in the volume fraction of particles in the TMAZ, which might be caused by their increased growth, since in this mode, the rotation rate and heat release are higher. However, in the center of the sample and close to the friction surface, the particles have the same volume fraction as in sample #8. Sample #6 had the highest heat release, so the volume fraction increased significantly in the center of the sample and then decreased toward the edge as a result of strain-induced dissolution. Near the friction surface in the stir zone in sample #6, the volume fraction is the same as in samples #3 and #8. The size of the secondary phase particles changes in a more complex way. In general, it can be observed that the particle size decreases towards the edge of the sample, and in sample #6 with the highest heat release, the particle size is larger. In the initial material, the volume fraction of particles was 2.1 ± 0.5%, and the average particle size was 0.9 ± 0.3 μm. Thus, the volume fraction of particles in the wire samples decreased as a result of phase dissolution, and the average particle size increased slightly in some areas of the wires. It was also found that the average volume fraction of secondary particles increases with increasing rotational speed.
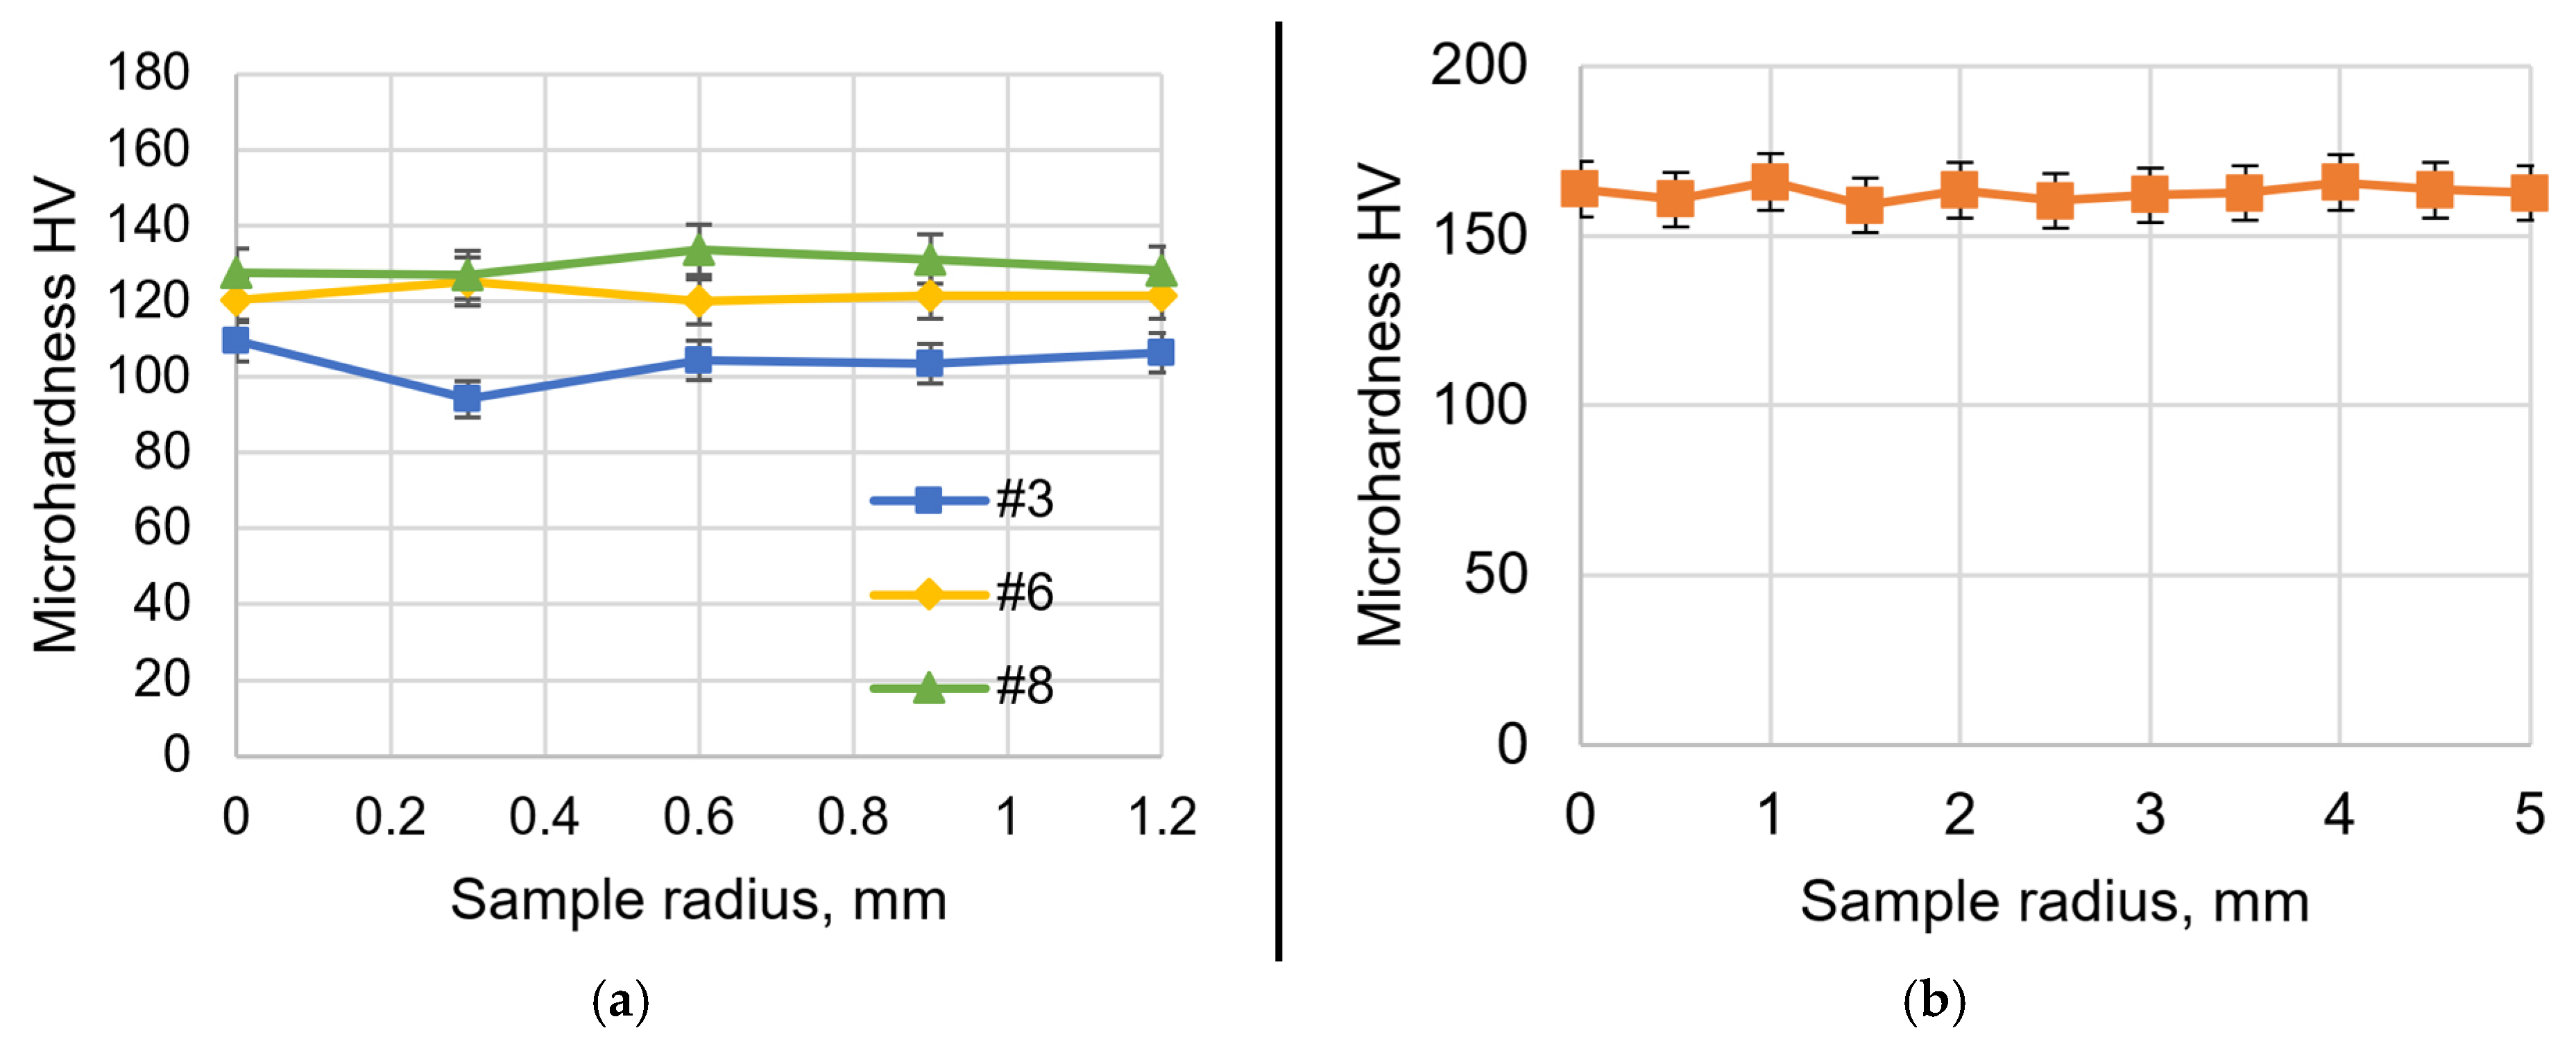
Figure 7 shows the results of microhardness measurements of samples #3, #6, and #8 and the initial rod in cross-section. Measurements were taken from the center of the samples to the edge. In the initial rod, there is a tendency for microhardness to increase toward the edge. No such trend is observed in the samples obtained. There is also no correlation between changes in grain size or volume fraction and the size of secondary particles. However, it can be seen that the microhardness of sample #3 is generally lower than that of samples #6 and #8. It was also found that the average microhardness in all samples is 18–26% lower than in the initial metal. In general, the microhardness in the obtained samples is more stable than that reported in [
12,
18,
19].
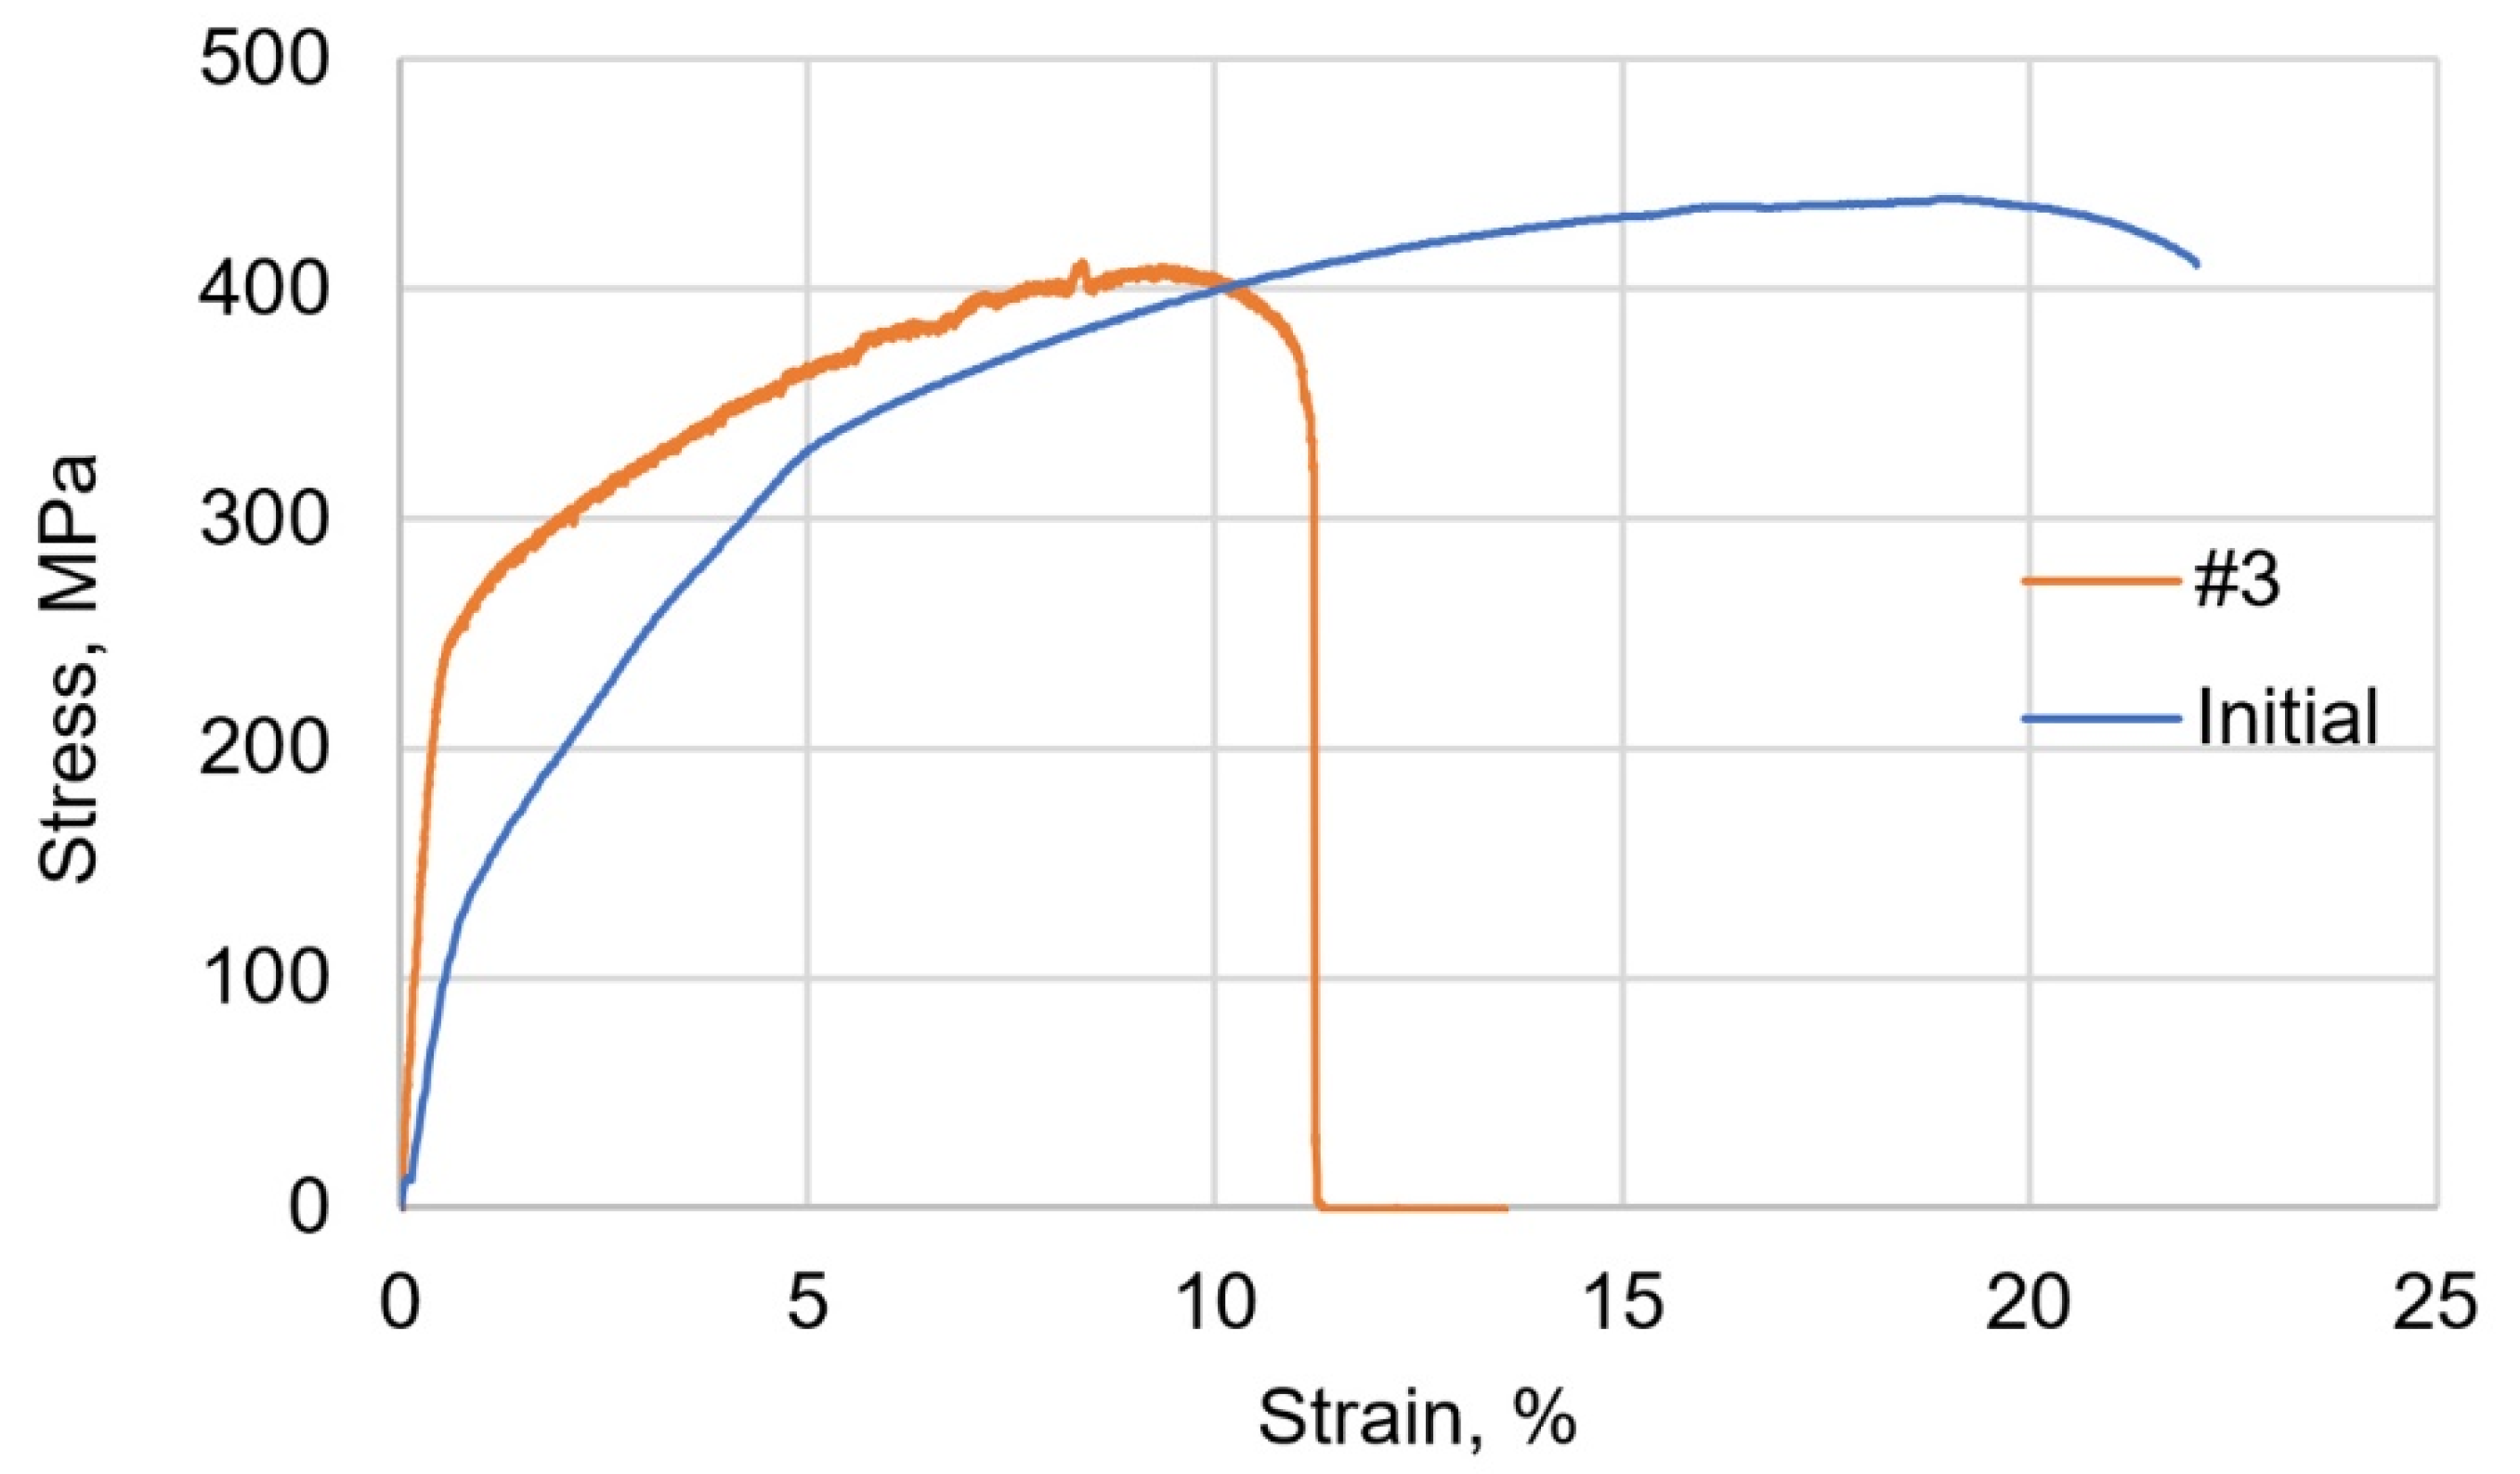
Figure 8 shows a tensile test diagram for sample #3 and the initial 2024 alloy rod sample. The tensile strength of sample #3 was 411 MPa, which is 0.9 times the tensile strength of the initial material. The maximum relative elongation of sample #3 during tensile testing was 13%, which is 0.59 times the relative elongation of the original material. The ductility drop is significant but statistically unsupported, as only one sample was tested. For comparison, in [
12], the strength of the AA2017A sample was also lower than that of the original metal, but the plasticity increased. In the study [
18], the strength of AA2024 was also significantly lower after side extrusion. The high tensile strength of alloy 6061 was obtained by friction extrusion using a similar method in [
6], although the resulting wire had significant curvature. After reverse extrusion, AA7075 had low strength but retained its ductility [
14]. The tensile diagram of sample #3 shows discontinuous flow, which may be due to the influence of secondary particles on the deformation of the material as a result of the Portevin–Le Chatelier effect [
20].
As shown in other studies of 2024 alloy, large secondary particles have a softening effect. That is, the smaller their volume fraction, the higher the microhardness should be. However, in this case, a different effect is observed. The average volume fraction of secondary particles in the obtained samples is 2 times lower than in the initial metal, but the microhardness is also lower. The decrease in microhardness can be explained by a decrease in residual stresses after extrusion.
Figure 9 presents the XRD analysis results for the initial 2024 aluminum alloy and sample #3, both measured in the longitudinal cross-section. The residual stress values were determined to be 165 ± 7 MPa in the as-received rod and 131 ± 1 MPa in sample #3. Hence, extrusion leads to a reduction in residual stresses. This decrease can be attributed to partial annealing during the extrusion process: following plastic deformation, the high thermal conductivity of aluminum promotes rapid heat dissipation, resulting in a brief but sufficient thermal exposure that facilitates stress relaxation.
4. Conclusions
This paper presents a new direct friction extrusion scheme. The influence of extrusion process parameters on the microstructure and mechanical properties of samples was investigated. The results showed that the proposed scheme allows obtaining a wire without macrodefects and with minimal ovality. It was found that the extrusion process in this scheme is highly dependent on the parameters. In particular, the most productive mode was found to be 300 kgf, 500 rpm. A 10% change in load or rotation speed relative to the specified mode led to the cessation of extrusion. At present, the maximum length of extruded wire is 45 mm. Upon reaching this length, the initial rod overheated and broke due to the high thermal conductivity of aluminum, as the contact stresses during friction against the die exceeded the strength of the initial rod. Microhardness measurements showed a stable microhardness value from the center of the resulting wire to the surface. The microhardness of the samples ranged from 103 HV to 135 HV (63–83% of the microhardness of the AA2024 initial material). At the same time, the minimum microhardness was observed in the sample obtained at the most productive mode. The residual stresses in the extruded wire are 21% lower than those in the as-received rod (131 ± 1 MPa vs. 165 ± 7 MPa), which correlates with the observed reduction in microhardness. The maximum strength of the sample was 411 MPa (90% of the strength of the AA2024). Thus, it has been shown that the proposed extrusion scheme is essentially feasible. Compared to other friction extrusion methods, the proposed scheme made it possible to obtain 2024 alloy wire with higher strength and more stable microhardness, although the plasticity of the samples and the productivity of the method are still low.
In the future, to increase productivity, it is planned to cool the rod before the die to prevent its destruction. Air or water cooling of the rod is planned. A more detailed study of the microstructure using transmission electron microscopy is also planned, especially in the stir zone. In addition, future work should include direct measurement of extrusion speed and an expanded dataset to improve statistical reliability and further validate the observed trends.
