Abstract
Dissatisfaction among upper limb prosthetic users is high, reaching over 70%, and 52% of upper limb amputees abandon their prosthetic devices due to limitations such as limited functionality, poor design/aesthetic, and improper fit. The conventional procedure of making prosthetics is time-consuming and expensive. This study was conducted to provide an alternative solution for the several issues of current prosthetic devices. 3D printing technology offers a promising alternative, providing greater accuracy, reduced labor time, and improved fit and comfort. This research explores the application of 3D printing for creating custom silicone prosthetic fingers, using Fused Deposition Modelling (FDM) for the mold. A high-resolution 3D scanner was employed to capture the precise anatomy of the patient’s hand, and CAD software was used to design molds that satisfied the patient preference and were reusable. The resulting prosthetics demonstrated good fit and patient satisfaction, though exact color matching remains a challenge, but still, it did demonstrate that it is possible to fabricate colored prosthetics. Performance tests, such as the Jebsen–Taylor Hand Function Test, indicated that while initial performance with the prosthetic was slightly lower, patient satisfaction and potential for improved functionality over time were high. This study underscores the potential of 3D printing to enhance the customization, cost-effectiveness, and overall quality of prosthetic devices, contributing to Sustainable Development Goals related to health and industry innovation.
1. Introduction
Amputations of the fingers and partial amputations of the fingers are common types of partial hand loss [1,2]. Finger amputation is common and has a significant impact on function, coordination, and quality of life, interfering with daily activities [3]. Prosthetics have been shown to improve daily duties, psychological well-being, and professional and social lives [4,5,6]. However, dissatisfaction among upper limb prosthetic users is high, reaching over 70% [7], and 52% of upper limb amputees abandon their prosthetic devices due to limitations such as limited functionality, poor design/aesthetic, and improper fit [8,9]. To address this, custom prosthetics matched to the physical characteristics of the patient provide better fit, comfort, and performance than non-custom off-the-shelf solutions [10].
A certified prosthetist performs the traditional manufacturing process for custom static and passive prosthetic fingers, which includes at least two waxes [11] or alginate [12,13] impressions for the residual digit and the contralateral finger. To generate the final shape, a lost-wax process with dental stone is used with silicone molding. Although dental stone prostheses achieve remarkable anatomical accuracy [14], the construction procedure is time-consuming and expensive [15]. Another shortcoming for the traditional process such as plaster cast is that the skin topology mapping phases can be relatively invasive and uncomfortable for the patient [16].
3D printing is highly suitable for fabricating prosthetic parts [17], with numerous publications showing success in developing prosthetic parts with 3D printing technologies. 3D printing can be used in different ways to create prosthetic parts. One primary way is to directly 3D print the prostheses. The examples can be seen in several publications of 3D-printed prostheses [18,19,20]. Directly 3D printing prostheses is especially useful for making active prostheses, allowing for actuators and specific designs.
Another way is to use 3D printing to replace traditionally plaster-made molds. 3D-printed molds as alternatives to shape prostheses have been well studied [21,22,23,24]. One research study by Cabibihan et al. [25] achieved high accuracy in the resulting prosthesis created using 3D-printed molds, showing promise of comparable quality to traditional molds. Compared to traditional methods, the 3D printing-based approach offers several advantages, including greater accuracy (due to the ability to mirror the contralateral limb), reduced labor time, improved prosthetic fit and comfort, a more straightforward process for both manufacturers and patients, and a digital record of the prosthesis and mold shape [26,27].
There is a growing recognition of 3D printing-based solutions for partial hand and finger amputation prostheses [28]. The topics can then be connected to the Sustainable Development Goals (SDGs). For example, enhancing the functionality and comfort of prosthetic fingers through 3D printing and or materials selection can contribute to the goal of ensuring healthy lives (SDG 3); furthermore, the topics also discussed the possibility of enhancing cost-effective production and improved fit in regards to SDGs 9 and 12. However, common materials used for 3D-printed prosthetics are from harder materials, which is less suitable for human fingers, and also, it is harder to customize the color as well as post-processing such as painting.
Silicone, on the other hand, is the common material choice for prostheses as it is not irritating to the skin, it is hypoallergenic, and can withstand long-term wear and everyday stretching, while being closer to the characteristics of human fingers. Silicone is difficult to directly 3D print; however, it could easily be molded to form various forms and sizes due to their diverse physical properties [29]. Furthermore, it is possible to add and mix dye to color silicones. However, the ability to 3D print silicone is not yet widely available. Alternatives such as TPU (Thermoplastic Polyurethane) can be 3D printed, and offer high elasticity and abrasion resistance, but they are more challenging to recolor and provide a less realistic look and texture compared to silicone-based products. Silicone is then a better choice, resulting in more natural aesthetics and better resistance for heat and chemical degradation that can be found in day-to-day life.
For 3D printing itself, there are plenty of options on fabrication methods such as Fused Deposition Modelling (FDM), Stereolithography (SLA), and Selective Laser Sintering (SLS), as well as materials that can be used for the fabrication process. All of these methods and materials come with different cost ranges as well as advantages and disadvantages. It was decided that the fabrication method to be used is SLA, with resin as the mold for silicone, considering that the aesthetic is an important factor as well.
Polylactic Acid (PLA)-based prosthetics perform well, resulting in almost an 80% improvement in the time needed to perform certain tasks compared to the unaffected hand [30]. The Acrylonitrile Butadiene Styrene (ABS) study, however, only details grip strength, which remains underwhelming, even though silicone gloves provide a significant increase in grip strength [31]. Thermoplastic Elastomer (TPE)- based prosthetics scored well on the Orthotics Prosthetics Users Survey (OPUS) but showed only a 20% improvement in task performance time in the Jebsen test compared to a normal hand [32]. TPU-based prosthetics with soft fingertips achieved over 80% of the performance of a normal hand in both the Action Research Arm Test (ARAT) and writing speed test, specifically in terms of task completion time [33]. Polyamide-based prosthetics using SLS showed an improvement of up to 70% in task performance time compared to a normal hand [34]. Photopolymer resin molds created with SLA scored well on both the Jebsen and OPUS tests, but the results for the grip strength test remain inconclusive [35].
This research was conducted with the aim to ease the cost of fabrication of silicone prosthetics while also experimenting with adding colors for the fabricated prosthetic with the aid of 3D technologies by using 3D print and 3D scanning. The study will also provide a method of fabrication and mold design that contributes to cheaper production costs while retaining the qualities of the fabricated prosthetics. This paper consists of the Introduction in Section 1, to provide general insight into the prosthetics world, and then narrows into the problems and state of the art of current prosthetic technologies. Section 2 details the research methods on what and how this paper provides an alternative solution/innovation. Section 3 comprises the results and discussion in which will be discussed the effect of the fabricated prosthetics. Lastly, the conclusion in Section 4 discusses the results by comparing them to previous results, and new problems arise.
2. Research Methods
The overall process for creating a customized silicone prosthetic, as shown in Figure 1, begins with selecting materials and a fabrication method. The patient’s fingers are then 3D scanned, and these data are used to design and print an accurate mold. Silicone is then mixed with pigment color and casted on the printed mold that follows, where the mold is cast with RTV silicone mixed with pigments to match the patient’s skin tone. After curing, the prosthetic is removed and undergoes fitting and functionality testing to ensure that it meets the patient’s needs.
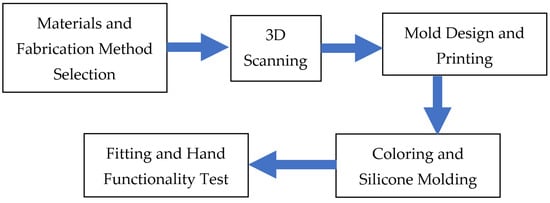
Figure 1.
Diagram of the silicone prosthetic fabrication process.
2.1. Material and Fabrication Method Selection
Considering the dissatisfaction of patients, as stated in Section 1, the main consideration to select materials and the fabrication is determined by fit, quality, ergonomics, and aesthetics. With the main focus on attaining high quality, ergonomics, and aesthetics prosthetics, it was decided that silicone-based prosthetics is the superior choice. In addition, it is also possible to fine-tune colors of silicone prosthetics by mixing primer colors to obtain the desired colors that match patients’ skin color. But to fabricate silicone-based prosthetics, they need to be casted and cured in a mold. The mold needs to be highly accurate to capture the features and details of the 3D-scanned fingers. In recent years, advancements in 3D printing technologies, particularly in FDM, have enabled cost-effective, high-accuracy results with a line height of 0.05 mm, previously limited to an inadequate 0.1 mm.
The fabrication process of prosthetics from 3D print mostly consisted in three steps. The first step is to 3D scan the corresponding hand. A 3D scan of the hand for a prosthetic hand provides at least two advantages: the first one is easier or even skips the designing process to obtain the 3D model needed in 3D print; the second allows a specific model of prosthetic that has a design that is much more similar to the subject hand. The second step requires modifying the scan results on Computer-Aided Design (CAD) software to design the mold. The third step is then to fabricate the prosthetic itself by casting the silicone on a 3D-printed mold.
2.2. 3D Scanning
3D scanning was employed to capture the shape and dimensions of the patient’s severed hands and the contralateral side. To record the shapes of the fingers, the researchers used a high-resolution 3D optical scanner. The 3D scanner used is a Revopoint Mini 3D scanner, with an accuracy of 0.02 mm. The anatomical precision of the fingers was captured using a 3D scanner, which is critical for the appearance and fit of the prosthesis. The 3D scans obtained were then mirrored, and we modified the design of the prosthetic fingers to generate molds for 3D printing. The 3D scanner precision influenced the final appearance and fit of the prosthetic fingers. The use of 3D scanning technology enables the creation of precisely formed finger prosthetics for certain actions in amputated patients, resulting in a more tailored and exact solution.
2.3. Mold Design and Printing
Two CAD software programs, Revo Scan 5 and Fusion 360, were utilized in the mold design process. Revo Scan 5 was first employed to process raw 3D scan data, refining them into clean, usable data. These refined data were then imported into Fusion 360, where the actual mold design took place.
The design featured a two-part outer mold and an inner mold. The inner mold was crafted to accommodate the disabled fingers, ensuring a snug fit. The outer mold was designed to replicate the texture and shape of the corresponding healthy finger. For precise alignment and ease of assembly, the outer mold included four pins, while the inner mold had two pins that connected it securely to both parts of the outer mold.
This straightforward design allows for easy disassembly and reuse of the mold. Once the design was finalized in Fusion 360, the mold components were 3D printed using a chosen printing method, resulting in a practical and efficient mold for creating the silicone finger prostheses.
2.4. Coloring and Silicone Molding
The coloring process of RTV silicone involves mixing primary colors—red, green, and blue (RGB). By adjusting these primary colors, a wide range of skin tones can be achieved. The specific pigment-to-silicone ratio plays a crucial role in determining the final color intensity. For optimal results, it is recommended that the pigment-to-silicone ratio be between 0.1% and 3% of the total silicone weight [36]. This precise ratio ensures a balanced and realistic color match while maintaining the material’s integrity and durability.
The L’Oréal skin color chart [37] was used for skin color identification. The L’Oréal reference chart, widely used in the cosmetic industry for matching makeup to skin tones, was deemed a convenient tool for matching skin colors for prostheses. However, it is important to note that skin tones can vary significantly among individuals, presenting challenges in achieving an exact match—an issue long recognized in the cosmetic industry. This limitation should be considered, ensuring that color modification for prostheses can be customized for everyone. The patient’s hand was directly compared to the chart, and paints were mixed to match the patient’s skin color accordingly. Several trials and errors were conducted using four pigments—white, red, blue, and yellow—until the exact skin tone was achieved. Initially, the base color was chosen based on the lightest average color profile of the patient, referring to the palest color of the palmar sides. The mixture was then combined with a two-part room-temperature-vulcanized (RTV) clear-colored silicone, platinum-cured with a Shore A 30 hardness, in a 1:1 catalyst ratio.
Before the silicone mixture is poured into the assembled molds, a mold release agent is applied to the surface of the inner mold to facilitate demolding. After 24 h of curing, the outer mold is opened, and the finished prosthesis is removed. This method ensures that the unique skin texture captured with a 3D scanner is replicated in the final prosthetic product, providing a high level of detail and realism. Multiple prosthetics were fabricated in various colors to find the best match for the patient’s skin tone. This method provides an effective solution for patients with skin tones that differ from standard-colored imported prosthetics.
2.5. Hand Functionality Test
The Hand Functionality Test is conducted with the Jebsen–Taylor test. The Jebsen Hand Function Test is designed to assess the individual’s functional hand abilities, particularly those with hand limitations or impairments. It focuses on testing the fine motor abilities and hand dexterity required for everyday life tasks. It is made up of seven components and takes between 15 and 45 min to administer. The Jebsen test consists of seven subtests that represent fine motor, non-weighted, and weighted hand function in daily life, which includes:
- Printing a 24-letter, third-grade reading difficulty sentence;
- Turning over 7.6 × 12.7 cm (3 × 5-inch) cards (simulated page turning);
- Picking up small, common objects (e.g., pennies, paper clips, bottle caps) and placing them in a container;
- Stacking checkers (test of eye–hand co-ordination);
- Simulated feeding;
- Moving large empty cans;
- Moving large weighted [0.45 kg (l lb)] cans.
3. Results and Discussion
The patient’s right index finger is amputated from the proximal interphalangeal joint (PIP) to the tip, also known as the intermediate phalanges. Based on the patient’s experience and needs, they prefer a slightly bent prosthetic rather than a straight one for daily use. Therefore, we scanned the contralateral finger at a 15° angle. The 3D scan results of the patient’s severed hand are shown in Figure 2. The scan of the patient’s contralateral finger was then modified in Revo Scan 5 to clean, refine, and mirror the data, creating a usable 3D model for the prosthetic design, as illustrated in Figure 3.
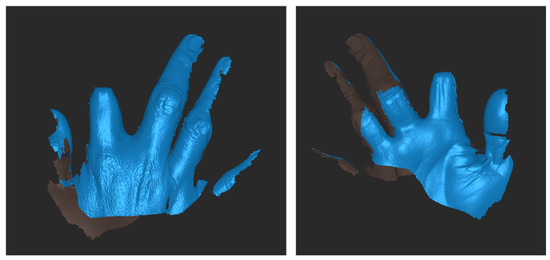
Figure 2.
3D scanner result on amputated finger.
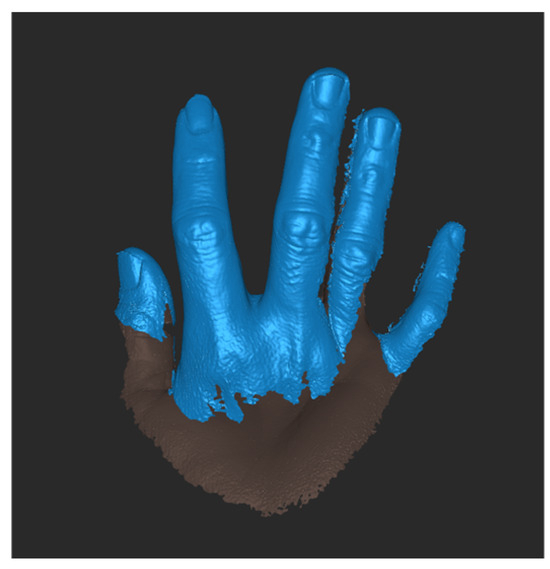
Figure 3.
3D-scanned and mirrored results of contralateral patient fingers.
The mirrored finger from the contralateral hand was exported to Fusion 360 to design the mold. A cylindrical object was cut by the mirrored finger to create the outer mold, which was then split into two parts with four pins for alignment. The process of outer mold design can be seen in Figure 4. For the inner mold, the proximal phalanges of the mirrored finger were used. In Revo Scan, the proximal phalanges part of the finger was simplified and smoothed to provide better comfort for the patient. The simplified shape was then exported to Fusion 360, where it was attached to a connector for the outer mold. The process of inner mold design can be seen in Figure 5. Although it is possible to design the inner mold using the stump of the severed hand as the base design, it is much harder to properly align it with the outer mold without making an oversized outer mold.
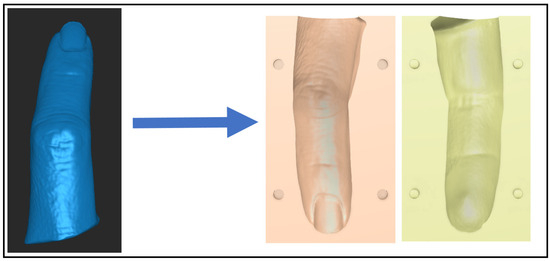
Figure 4.
Outer mold design.
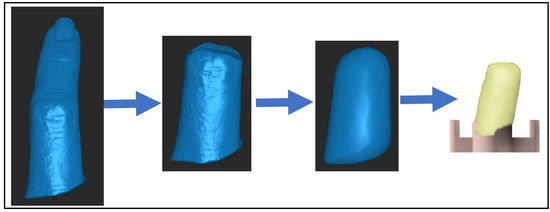
Figure 5.
Inner mold design process.
The final mold design comprises three parts, as illustrated in Figure 6A. The top part functions as the inner mold, creating space for the stump to be properly molded inside the prosthetic. The tube-like parts are split to facilitate the easy removal of the prosthetic once it has fully cured. This feature allows the mold to be reused, unlike common designs where the mold must be destroyed to remove the prosthetic. The reusability will help streamline and minimize the process of fabricating prototypes or variants of the prosthetics.
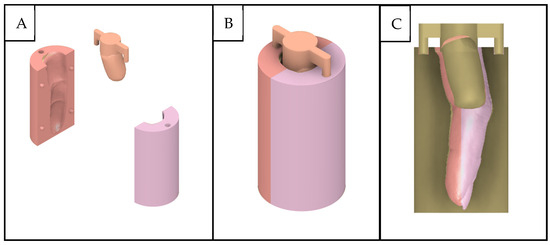
Figure 6.
Exploded view of the mold design (A), final mold design (B), and section view of the mold (C).
The inner mold is crucial as it forms the cavity where the patient’s stump will be placed. Its design ensures that the prosthetic will have a precise fit, accommodating the unique contours of the stump. The split design of the tube-like part allowed for the prosthetic to be removed without damaging the mold.
Figure 6B demonstrates the fully assembled mold, which involves connecting four pins in the outer mold and then attaching two pins from the inner mold to the top of both outer molds. This assembly process is straightforward, ensuring that the molds align perfectly, maintaining the accuracy of the prosthetic’s shape. The use of pins helps in keeping the molds securely in place during the curing process, preventing any misalignment that could compromise the prosthetic’s fit and functionality.
Figure 6C shows a sectional view of the inner mold’s position inside the outer mold. This view highlights the importance of the gap between the inner and outer molds. It is designed to be slightly smaller than the outer mold to provide the necessary thickness for the prosthetic’s durability. The uniformity of this gap is critical, as it ensures that the prosthetic will have a consistent thickness, contributing to its strength and longevity.
However, this might result in the prosthetic not fitting comfortably on the patient’s severed finger. Additionally, there is a possibility of the prosthetic expanding slightly, but the flexibility of the silicone material allows it to fit larger severed fingers as well. To address these variations, the mold is designed with multiple linear scales of the original hand size: 105%, 100%, and 95%. This ensures a better fit for the patient’s needs and preference.
The mold was 3D-printed using FDM technology with PLA as the material, with the results shown in Figure 7. The printing was executed with a 0.05 mm layer height, ensuring high precision and detail in the final product. For the outer mold, a 20% infill ratio was used, which is more than sufficient for maintaining structural integrity. In contrast, the inner mold required at least an 80% infill ratio to prevent it from breaking easily due to its more delicate structure.
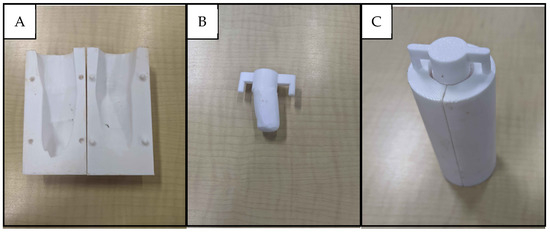
Figure 7.
Two parts of 3D-printed outer molds (A), 3D-printed part of inner mold (B), and the assembled 3D-printed mold (C).
These specific 3D printing parameters, including the chosen infill ratios and layer height, were crucial in accurately capturing and preserving the intricate features of the scanned finger within the mold. The design of the mold also allows for multiple uses, making it a practical and cost-effective solution. The removal process is straightforward: first, the inner mold is extracted, and then the outer mold is split open. This method ensures that the mold can be preserved and reused without damage, further contributing to its practicality and sustainability.
Various color compositions can be achieved by mixing basic silicone colorings by hand. A skin color chart guide by L’Oréal was used as a standard reference for matching patients’ skin color. For the study, the patient’s skin color was matched with the reference chart and then found by mixing basic coloring by hand until the dye was of a similar color to the reference picked out earlier. The coloring was mixed into the silicone mixture and poured into the mold to produce the prothesis. The finished prosthetics can be seen in Figure 8. The closest match to the patient’s skin on the color chart was B5 for the palmar side of the hand and C9 for the dorsal side. The resulting prosthesis notably matches the patient’s palmar skin tone as intended. However, the prosthesis only has one skin tone, while the patient has notably different skin tones between the palmar and dorsal sides, as shown in Figure 9. Further finishing techniques should be explored to be able to make the prosthesis have different color tones for each side, to achieve closer resemblance to the natural look.
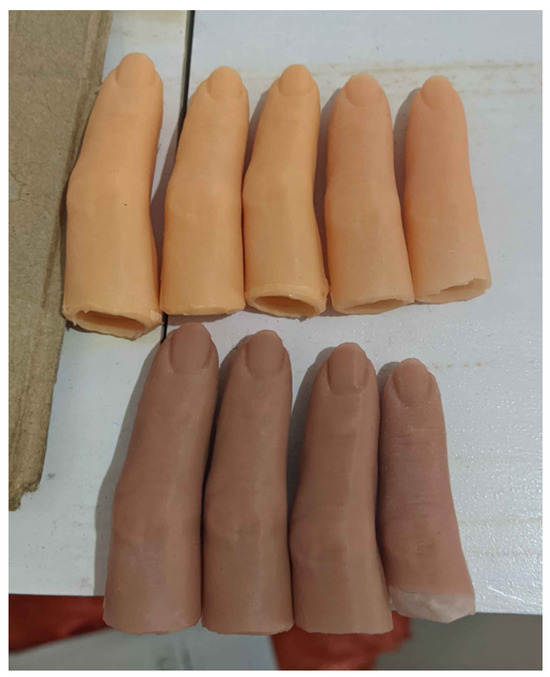
Figure 8.
Finished prosthetics.
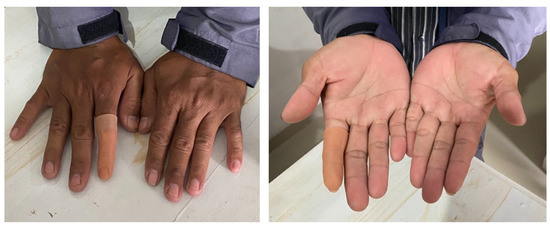
Figure 9.
Prosthetic fitted on patient.
Further advancements in coloring techniques are still limited, as much of the expertise is closely guarded within the prosthetics industry. However, some color-mixing machines could potentially be utilized in combination with 3D technologies, particularly 3D scanning, to capture accurate skin tones and reproduce them precisely.
The texture of the prosthetic is as soft as human skin and captures the finger’s details. Overall, the results demonstrate that it is possible to fabricate a colored prosthetic without compromising its texture and features. Further understanding of the effects of the silicone mixture and post-processing techniques, such as air-spraying, could help achieve a closer match for patients with multiple skin tones, especially for the dorsal side.
The custom-made prosthetic was fitted on the patient, as shown in Figure 9. The patient expressed great satisfaction with the custom prosthetic, noting that it provided a significantly better fit compared to pre-fabricated alternatives. The use of precise 3D scanning and customized fabrication techniques ensured that the prosthetic was tailored to the patient’s unique anatomy and preference, resulting in a perfect fit that pre-fabricated options could not achieve. The patient reported that the prosthetic at 100% linear scale (original size) feels and fits perfectly. This exact scaling was critical in achieving a natural size and comfortable fit for the patient.
Furthermore, the angled design of the prosthetic was deemed much more natural for both idle positioning and a variety of activities, such as using a phone, driving, picking up objects, and holding items. The patient highlighted that the angled prosthetic enhanced comfort and functionality during daily tasks, making it superior to a straight design. This ergonomic consideration in the design ensured that the prosthetic would support the natural movements and postures of the hand.
The Jebsen test conducted as shown in Figure 10 and the results of the Jebsen test, as detailed in Table 1, demonstrate that the performance of the patient with the prosthetic is slightly lower compared to when the patient does not use the prosthetic. The difference is noteworthy considering that the patient has been living with their disability for a significant period. This shows that the prosthetic does not hinder the daily activities of the patient, and, given enough time with the prosthetic, the patient might achieve better results and become more accustomed to the prosthetic. Overall, the patient is satisfied with the custom prosthetic that offers a perfect fit, which not only enhances comfort but also makes the patient disability less conspicuous.
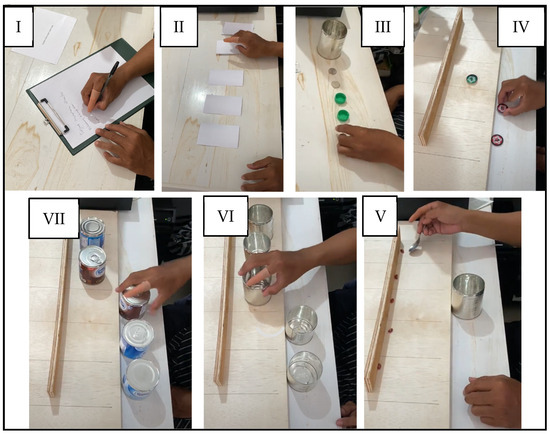
Figure 10.
Jebsen test clockwise from top left for writing (I), flipping paper (II), picking up small object (III), stacking checkers (IV), simulated feeding (V), moving empty can (VI), and moving large weighted can (VII).

Table 1.
Results of Jebsen test.
The process can be completed in under 3 days without color testing: one day for scanning and mold design, one day for mold fabrication and silicone casting, and another for curing. While color matching may take additional time, it improves with experience. This method is faster and less tedious than conventional silicone prosthetic fabrication, with a cost of under USD 10 per prosthetic. Mold fabrication, which accounts for nearly 50% of the cost, is made more cost-effective by using FDM technology.
FDM is a highly cost-effective method for fabricating prosthetic molds, especially when compared to SLA (stereolithography) technology. SLA, a more commonly used method for silicone-based prosthetics, can be up to three times more expensive. Recent advancements in FDM technology have greatly enhanced its capability to produce highly accurate textures and features, bringing its results in line with those of SLA. This combination of cost-effectiveness and precision makes FDM an excellent choice for prosthetic manufacturing, offering an affordable solution without compromising on quality.
4. Conclusions
One of the key innovations discussed is the use of 3D printing technology for molding prostheses. This technology offers several advantages, including greater accuracy, reduced labor time, and improved fit and comfort for the prosthetic. It also simplifies the process for both manufacturers and patients. A major contribution to patient satisfaction is the ability to customize the prosthetic to individual preferences. The ergonomic design further enhances comfort, leading to a prosthetic that is generally better received compared to pre-fabricated options.
The use of PLA for 3D printing the mold has demonstrated cost-effectiveness without sacrificing quality. Additionally, the mold’s design that allows it to be reusable contributes to further cost savings. The color of the prosthetic has been matched closely to the patient’s palmar skin tone, demonstrating the feasibility of mixing color pigments in a 3D-printed mold. To achieve even better results, further understanding of the silicone mixture and color may be required. Post-processing techniques, such as air-spraying, could also be employed to create prosthetics with multiple skin tones or gradient effects.
The Jebsen test results indicate that while the custom-made prosthetic may slightly reduce performance compared to not using a prosthetic, patient satisfaction remains high. This suggests that the enhanced fit and comfort outweigh the minor performance reduction. Personalized prosthetic solutions are emphasized as important for maintaining overall satisfaction. With time, patients may adapt to the prosthetic and potentially achieve performance levels that match or exceed those without a prosthetic. This indicates that the prosthetic not only integrates well into daily life but may also improve task performance over time.
Author Contributions
Conceptualization: C.H. and G.K.A.; methodology: W.S.T., C.H. and G.K.A.; formal analysis: W.S.T. and N.C.; investigation: M.M. and N.C.; data curation: M.M.; writing—original draft preparation: W.S.T. and M.M.; writing—review and editing: W.S.T., C.H., G.K.A., M.M., M.S. (Muhammad Syafrudin), and K.B.P.; visualization: C.H. and M.S. (Muhammad Syafrudin); supervision: M.S. (Muhammad Syafi’i), M.S. (Muhammad Syafrudin); funding acquisition: C.H. and M.S. (Muhammad Syafrudin), and K.B.P. All authors have read and agreed to the published version of the manuscript.
Funding
This work is supported by Bina Nusantara University as a part of Bina Nusantara University’s BINUS International Research—Applied entitled “Development of 3D Printed based Partial Finger Prosthesis Adjusted to Patient Skin Colour” with contract number: 069C/VRRTT/III/2024 and contract date: 18 March 2024.
Institutional Review Board Statement
The study was conducted according to the guidelines of the Declaration of Helsinki, and approved by the Institutional Review Board of the Komite Etik Penelitian Kedokteran Fakultas Kedokteran Universitas Jendral Soedirman (010/KEPK/PE/I/2024 and date of approval 20 March 2024).
Informed Consent Statement
Informed consent was obtained from all subjects involved in the study.
Data Availability Statement
Data are available upon request due to privacy restrictions.
Conflicts of Interest
Author Ketut Bagus Putra was employed by the company PT Teknomedika Manufaktur Inovasi, Semarang, 50266, Indonesia. The remaining authors declare that the research was conducted in the absence of any commercial or financial relationships that could be construed as a potential conflict of interest.
References
- Dillingham, T.R.; Pezzin, L.E.; MacKenzie, E.J. Incidence, acute care length of stay, and discharge to rehabilitation of traumatic amputee patients: An epidemiologic study. Arch. Phys. Med. Rehabil. 1998, 79, 279–287. [Google Scholar] [CrossRef]
- Aydin, C.; Karakoca, S.; Yilmaz, H. Implant-retained digital prostheses with custom-designed attachments: A clinical report. J. Prosthet. Dent. 2007, 97, 191–195. [Google Scholar] [CrossRef] [PubMed]
- Kuret, Z.; Burger, H.; Vidmar, G.; Maver, T. Adjustment to finger amputation and silicone finger prosthesis use. Disabil. Rehabil. 2019, 41, 1307–1312. [Google Scholar] [CrossRef] [PubMed]
- Shirota, C.; Jansa, J.; Diaz, J.; Balasubramanian, S.; Mazzoleni, S.; Borghese, A.N.; Calderon, M.A. On the assessment of coordination between upper extremities: Towards a common language between rehabilitation engineers, clinicians and neuroscientists. J. Neuroeng. Rehabil. 2016, 13, 80. [Google Scholar] [CrossRef]
- Bosmans, J.; Geertzen, J.; Dijkstra, P.U. Consumer satisfaction with the services of prosthetics and orthotics facilities. Prosthet. Orthot. Int. 2009, 33, 69–77. [Google Scholar] [CrossRef] [PubMed]
- Pillet, J. Aesthetic hand prostheses. J. Hand Surg. Am. 1983, 8, 778–781. [Google Scholar] [CrossRef]
- Jang, C.H.; Yang, H.S.; Yang, H.E.; Lee, S.Y.; Kwon, J.W.; Yun, B.D.; Choi, J.Y.; Kim, S.N.; Jeong, H.W. A survey on activities of daily living and occupations of upper extremity amputees. Ann. Rehabil. Med. 2011, 35, 907. [Google Scholar] [CrossRef]
- Biddiss, E.; Chau, T. Upper limb prosthesis use and abandonment: A survey of the last 25 years. Prosthet. Orthot. Int. 2007, 31, 236–257. [Google Scholar] [CrossRef]
- Difonzo, E.; Zappatore, G.; Mantriota, G.; Reina, G. Advances in finger and partial hand prosthetic mechanisms. Robotics 2020, 9, 80. [Google Scholar] [CrossRef]
- Kini, A.Y.; Byakod, P.P.; Angadi, G.S.; Pai, U.; Bhandari, A.J. Comprehensive prosthetic rehabilitation of a patient with partial finger amputations using silicone biomaterial: A technical note. Prosthet. Orthot. Int. 2010, 34, 488–494. [Google Scholar] [CrossRef]
- Singhal, S.; Chand, P.; Singh, S.V.; Tripathi, S. Case report: Modifications to simplify fabrication of finger prosthesis: A case series. J. Prosthet. Orthot. 2011, 23, 30–33. [Google Scholar] [CrossRef]
- Jacob, P.C.; Shetty, K.H.; Garg, A.; Pal, B. Silicone finger prosthesis. A clinical report. J. Prosthodont. 2012, 21, 631–633. [Google Scholar] [CrossRef] [PubMed]
- Kamble, V.B.; Desai, R.G.; Panigrahi, D.; Kumar, M. Silicone finger prostheses for single finger partial amputations: Two case reports. Indian J. Dent. 2012, 5, 128–134. [Google Scholar] [CrossRef]
- Fiorenza, L.; Benazzi, S.; Kullmer, O. Morphology, wear and 3D digital surface models: Materials and techniques to create high-resolution replicas of teeth. J. Anthropol. Sci. 2009, 87, 211–218. [Google Scholar]
- Almond, B.S. Early and temporary use of finger prosthetics to aid rehabilitation. J. Hand Ther. 2011, 24, 62–65. [Google Scholar] [CrossRef]
- Zuniga, J.; Katsavelis, D.; Peck, J.; Stollberg, J.; Petrykowski, M.; Carson, A.; Fernandez, C. Cyborg beast: A low-cost 3D-printed prosthetic hand for children with upper-limb differences. BMC Res. Notes 2015, 8, 10. [Google Scholar] [CrossRef]
- Ryu, W.; Choi, Y.; Choi, Y.J.; Lee, S. Development of a Lightweight Prosthetic Hand for Patients with Amputated Fingers. Appl. Sci. 2020, 10, 3536. [Google Scholar] [CrossRef]
- Esposito, D.; Savino, S.; Andreozzi, E.; Cosenza, C.; Niola, V.; Bifulco, P. The “Federica” Hand. Bioengineering 2021, 8, 128. [Google Scholar] [CrossRef]
- Moodley, K.; Fourie, J.; Imran, Z.; Hands, C.; Rall, W.; Stopforth, R. Touch Hand 4.5: Low-cost additive manufacturing prosthetic hand participated in Cybathlon 2020 ARM discipline. J. NeuroEng. Rehabil. 2022, 19, 130. [Google Scholar] [CrossRef]
- Yoshikawa, M.; Ogawa, K.; Yamanaka, S.; Kawashima, N. Finch: Prosthetic Arm with Three Opposing Fingers Controlled by a Muscle Bulge. IEEE Trans. Neural. Syst. Rehabil. Eng. 2023, 31, 377–386. [Google Scholar] [CrossRef]
- Ciocca, L.; Fantini, M.; Crescenzio, F.D.; Persiani, F.; Scotti, R. New protocol for construction of eyeglasses-supported provisional nasal prosthesis using CAD/CAM techniques. J. Rehabil. Res. Dev. 2010, 47, 595–604. [Google Scholar] [CrossRef] [PubMed]
- Chiu, M.; Hong, S.C.; Wilson, G. Digital fabrication of orbital prosthesis mold using 3D photography and computer-aided design. Graefes Arch. Clin. Exp. Ophthalmol. 2017, 255, 425–426. [Google Scholar] [CrossRef] [PubMed]
- Huang, Y.H.; Arias, E. Advanced 3-dimensional printed molds for facial prostheses. J. Am. Coll. Surg. 2018, 227, S204. [Google Scholar] [CrossRef]
- Putra, K.B.; Wood, H.; Wensman, J.; Leonard, J.A.; Shih, A. A custom silicone foot orthosis for partial calcanectomy fabricated using a 3D-printed mold. Prosthet. Orthot. Int. 2022, 35, 224–228. [Google Scholar] [CrossRef]
- Cabibihan, J.J.; Abubasha, M.K.; Thakor, N. A method for 3-D printing patient-specific prosthetic arms with high accuracy shape and size. IEEE Access 2018, 6, 25029–25039. [Google Scholar] [CrossRef]
- Chimento, J.; Highsmith, M.J.; Crane, N. 3D printed tooling for thermoforming of medical devices. Rapid Prototyp. J. 2011, 17, 387–392. [Google Scholar] [CrossRef]
- Kim, G.M.; Powell, J.E.; Lacey, S.A.; Butkus, J.A.; Smith, D.G. Current and emerging prostheses for partial hand amputation: A narrative review. PM&R 2022, 15, 392–401. [Google Scholar]
- Young, K.J.; Pierce, J.E.; Zuniga, J.M. Assessment of body-powered 3D printed partial finger prostheses: A case study. 3D Print. Med. 2019, 5, 7. [Google Scholar] [CrossRef]
- Mio, R.; Bustamante, M.; Salazar, G.; Elias, D. A 3D-printed prosthetic hand with modular reconfigurable fingers. In Robotic Systems: Applications, Control and Programming; Springer: Cham, Switzerland, 2019; pp. 123–134. [Google Scholar] [CrossRef]
- Lee, K.H.; Kim, S.J.; Cha, Y.H.; Kim, J.L.; Kim, D.K.; Kim, S.J. Three-dimensional printed prosthesis demonstrates functional improvement in a patient with an amputated thumb: A technical note. Prosthet. Orthot. Int. 2018, 42, 107–111. [Google Scholar] [CrossRef]
- Hassan, M.; Shimizu, Y.; Kikuchi, A.; Hada, Y.; Suzuki, K. Rapid and flexible 3D printed finger prostheses with soft fingertips: Technique and clinical application. IEEE Access 2022, 10, 60417–60419. [Google Scholar] [CrossRef]
- Dumitrescu, G.C.; Braileanu, P. Custom prosthetic finger device using 3D printable PA11 CF powder. Mod. Manuf. Syst. 2023, 46, 33–36. [Google Scholar] [CrossRef]
- Putra, K.B.; Montgomery, N.; Kalamdani, S.; Chen, L.; Kelly, B.; Wensman, J.; Shih, A. Fabrication and assessment of partial finger prostheses made using 3D-printed molds: A case study. Prosthet. Orthot. Int. 2023, 47, 327–335. [Google Scholar] [CrossRef] [PubMed]
- Zaccagni, L.; Toselli, S.; Bramanti, B.; Gualdi-Russo, E.; Mongillo, J.; Rinaldo, N. Handgrip strength in young adults: Association with anthropometric variables and laterality. Int. J. Environ. Res. Public Health 2020, 17, 4273. [Google Scholar] [CrossRef] [PubMed]
- Maat, B.; Smit, G.; Plettenburg, D.; Breedveld, P. Passive Prosthetic Hands and Tools: A Literature Review. Prosthet. Orthot. Int. 2017, 42, 66–74. [Google Scholar] [CrossRef] [PubMed]
- Enrique. Mastering Silicone Coloring Techniques. Available online: https://www.newtopsilicone.com/mastering-silicone-coloring-techniques/#Retaining_Silicones_Flexibility_and_Durability_Post-Coloring (accessed on 23 July 2023).
- Jain, N.; Olmo, A.; Sengupta, S.; Manikonda, L.; Kambhampati, S. Imperfect ImaGANation: Implications of GANs Exacerbating Biases on Facial Data Augmentation and Snapchat Selfie Lenses. Artif. Intell. 2020, 304, 103652. [Google Scholar] [CrossRef]
Disclaimer/Publisher’s Note: The statements, opinions and data contained in all publications are solely those of the individual author(s) and contributor(s) and not of MDPI and/or the editor(s). MDPI and/or the editor(s) disclaim responsibility for any injury to people or property resulting from any ideas, methods, instructions or products referred to in the content. |
© 2024 by the authors. Licensee MDPI, Basel, Switzerland. This article is an open access article distributed under the terms and conditions of the Creative Commons Attribution (CC BY) license (https://creativecommons.org/licenses/by/4.0/).