Figure 1.
Pressure conversion factor for a Battenfeld TM 1000/525.
Figure 1.
Pressure conversion factor for a Battenfeld TM 1000/525.
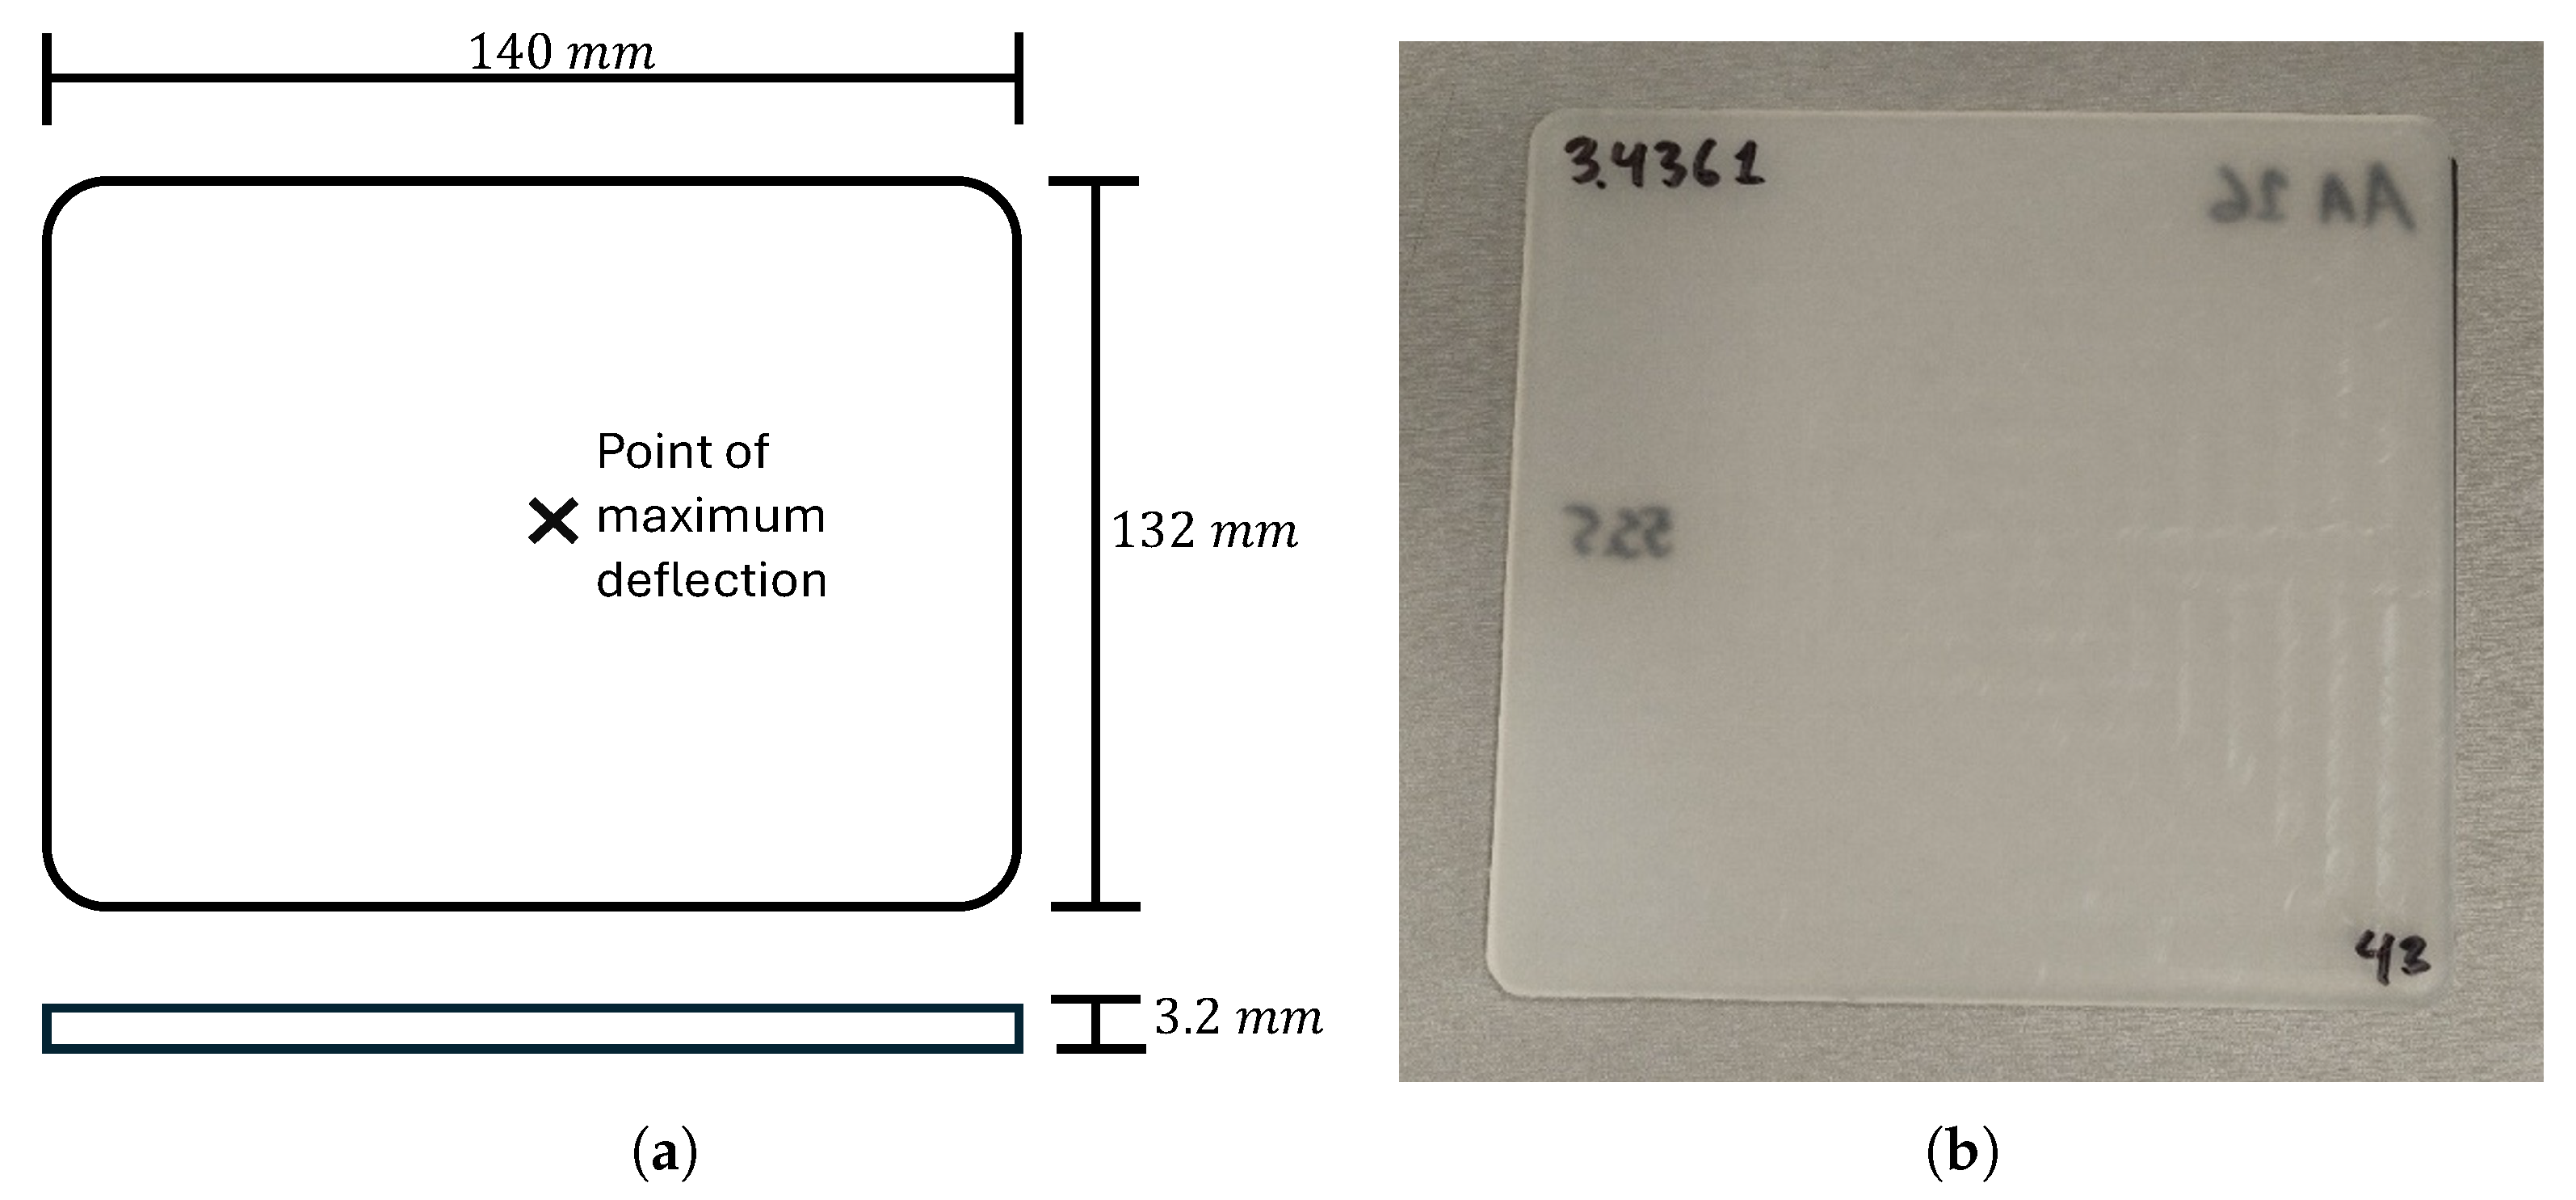
Figure 2.
Dimensions of the specimen plate obtained from injection molding and point of maximum deflection; (a) CAD design, (b) plate for measurement.
Figure 2.
Dimensions of the specimen plate obtained from injection molding and point of maximum deflection; (a) CAD design, (b) plate for measurement.
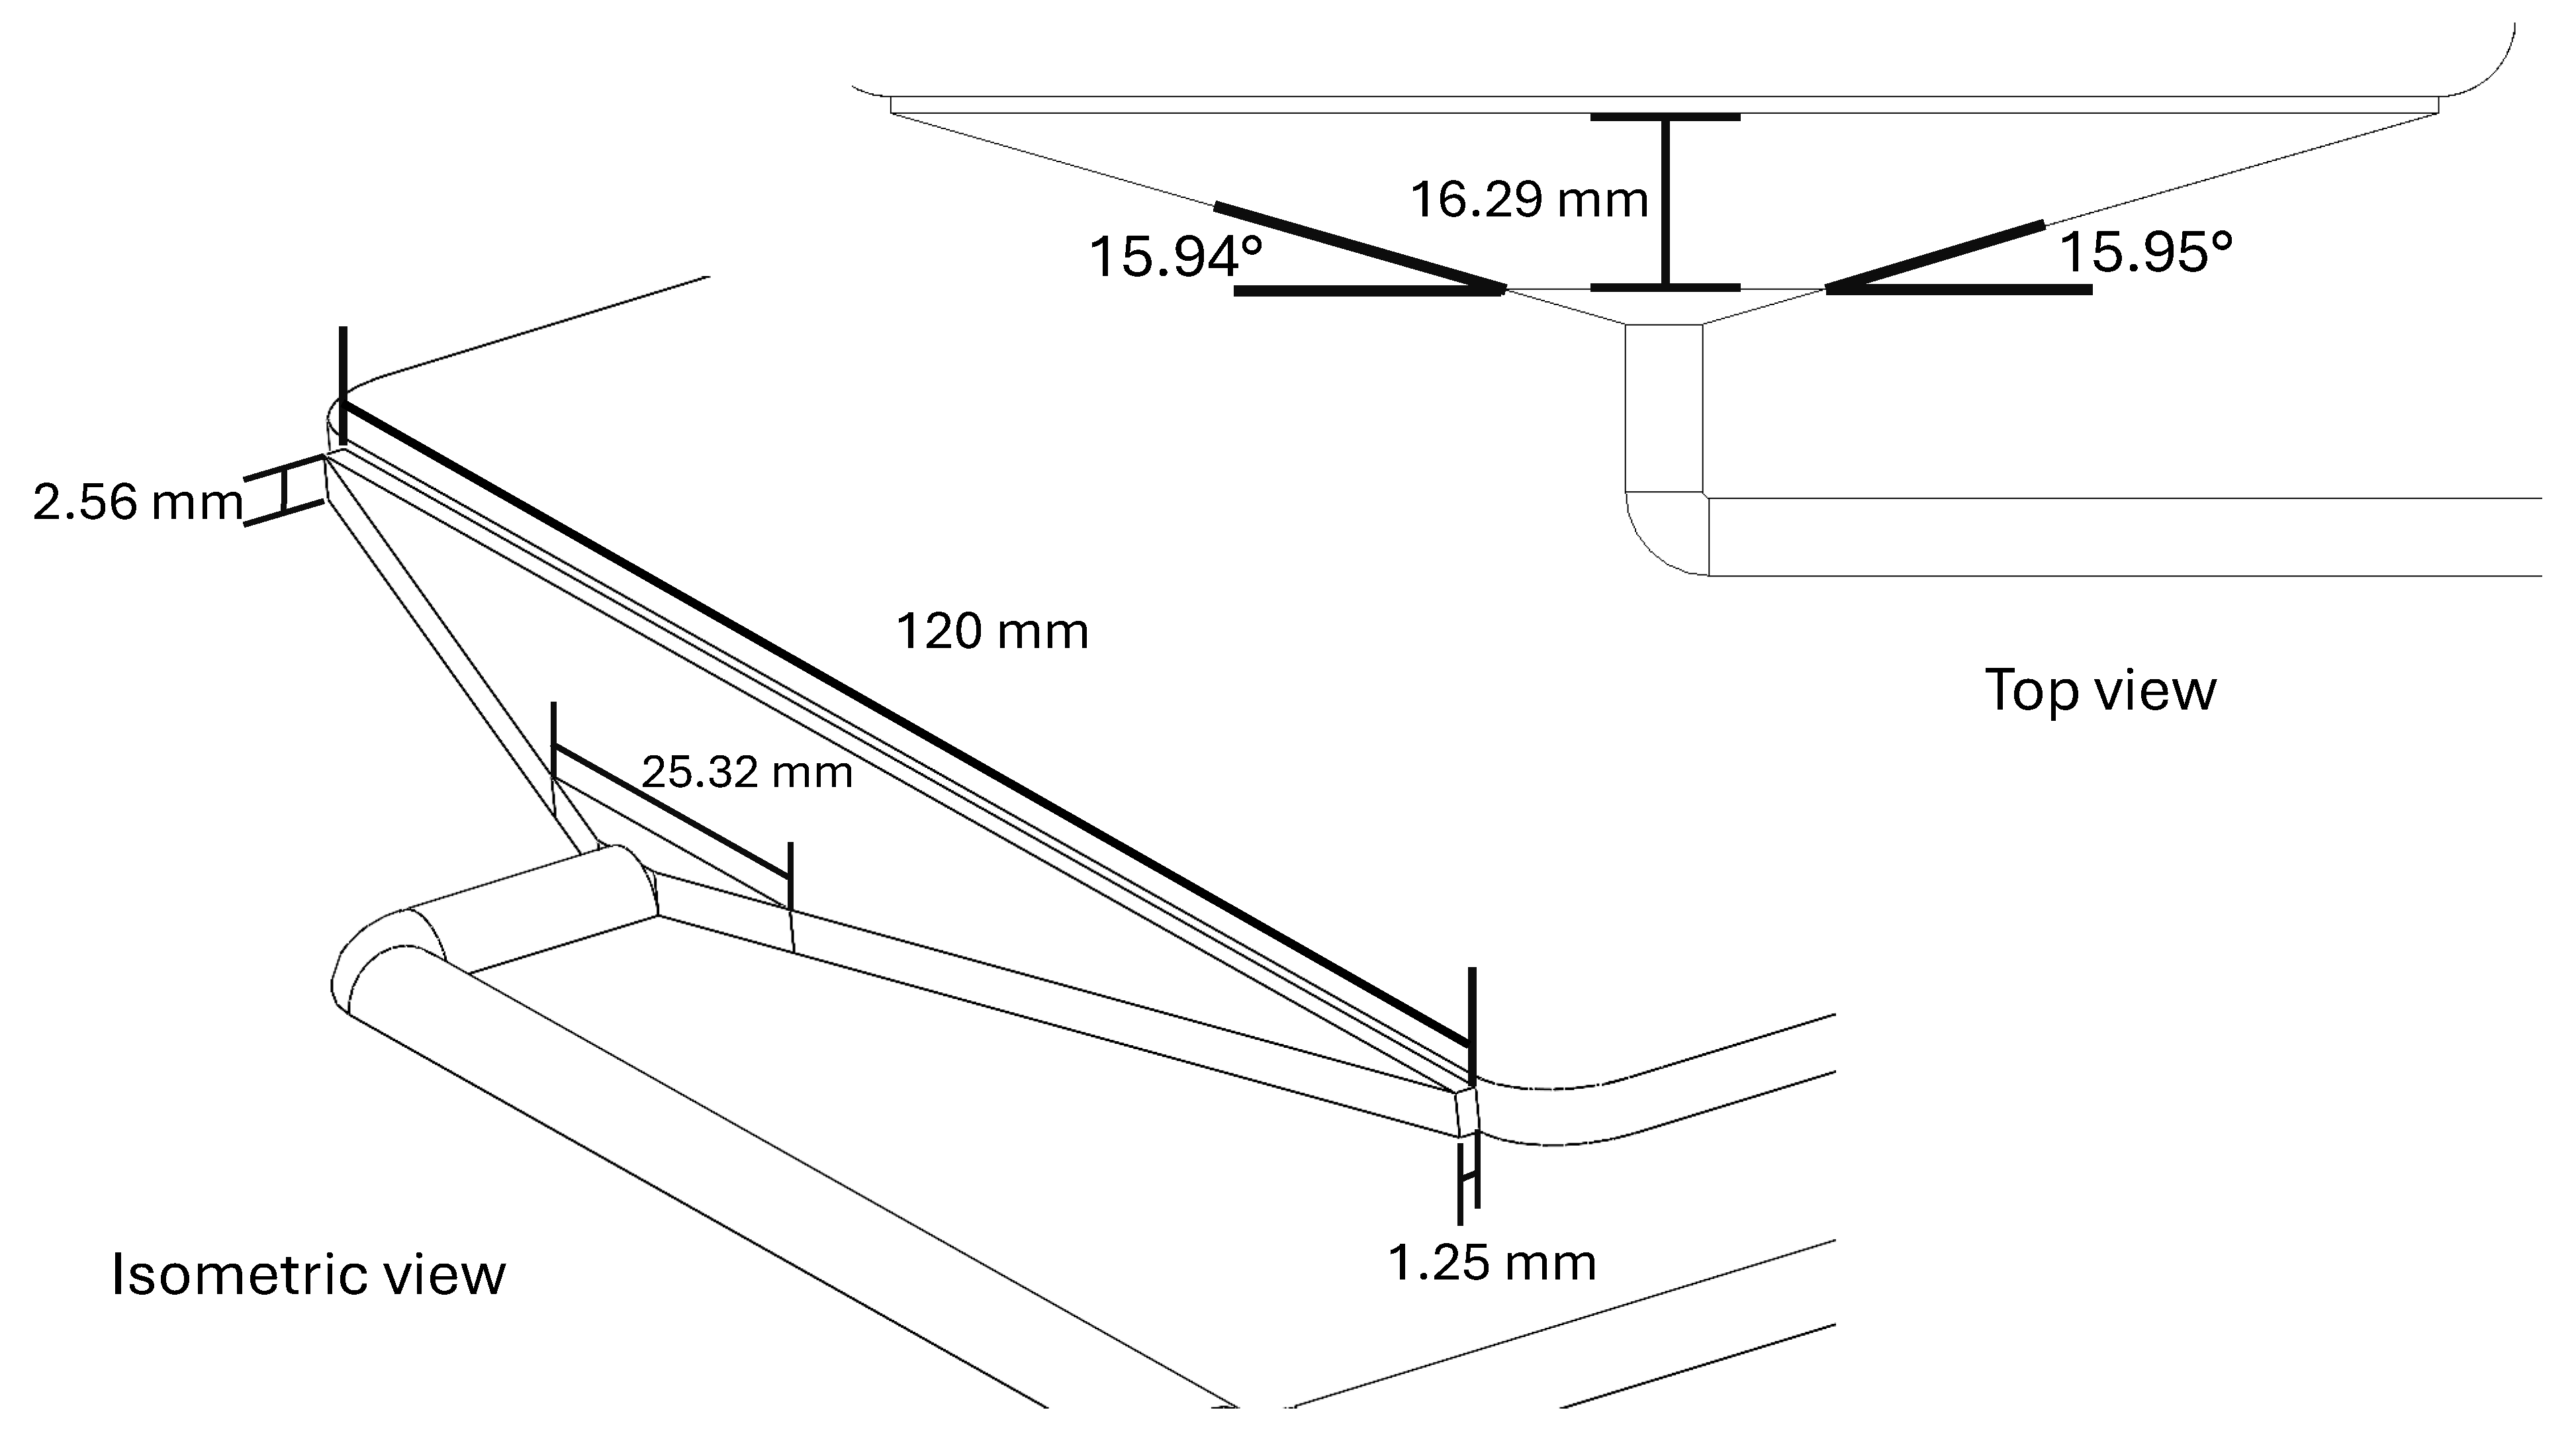
Figure 3.
Feeding fan gate measurements.
Figure 3.
Feeding fan gate measurements.
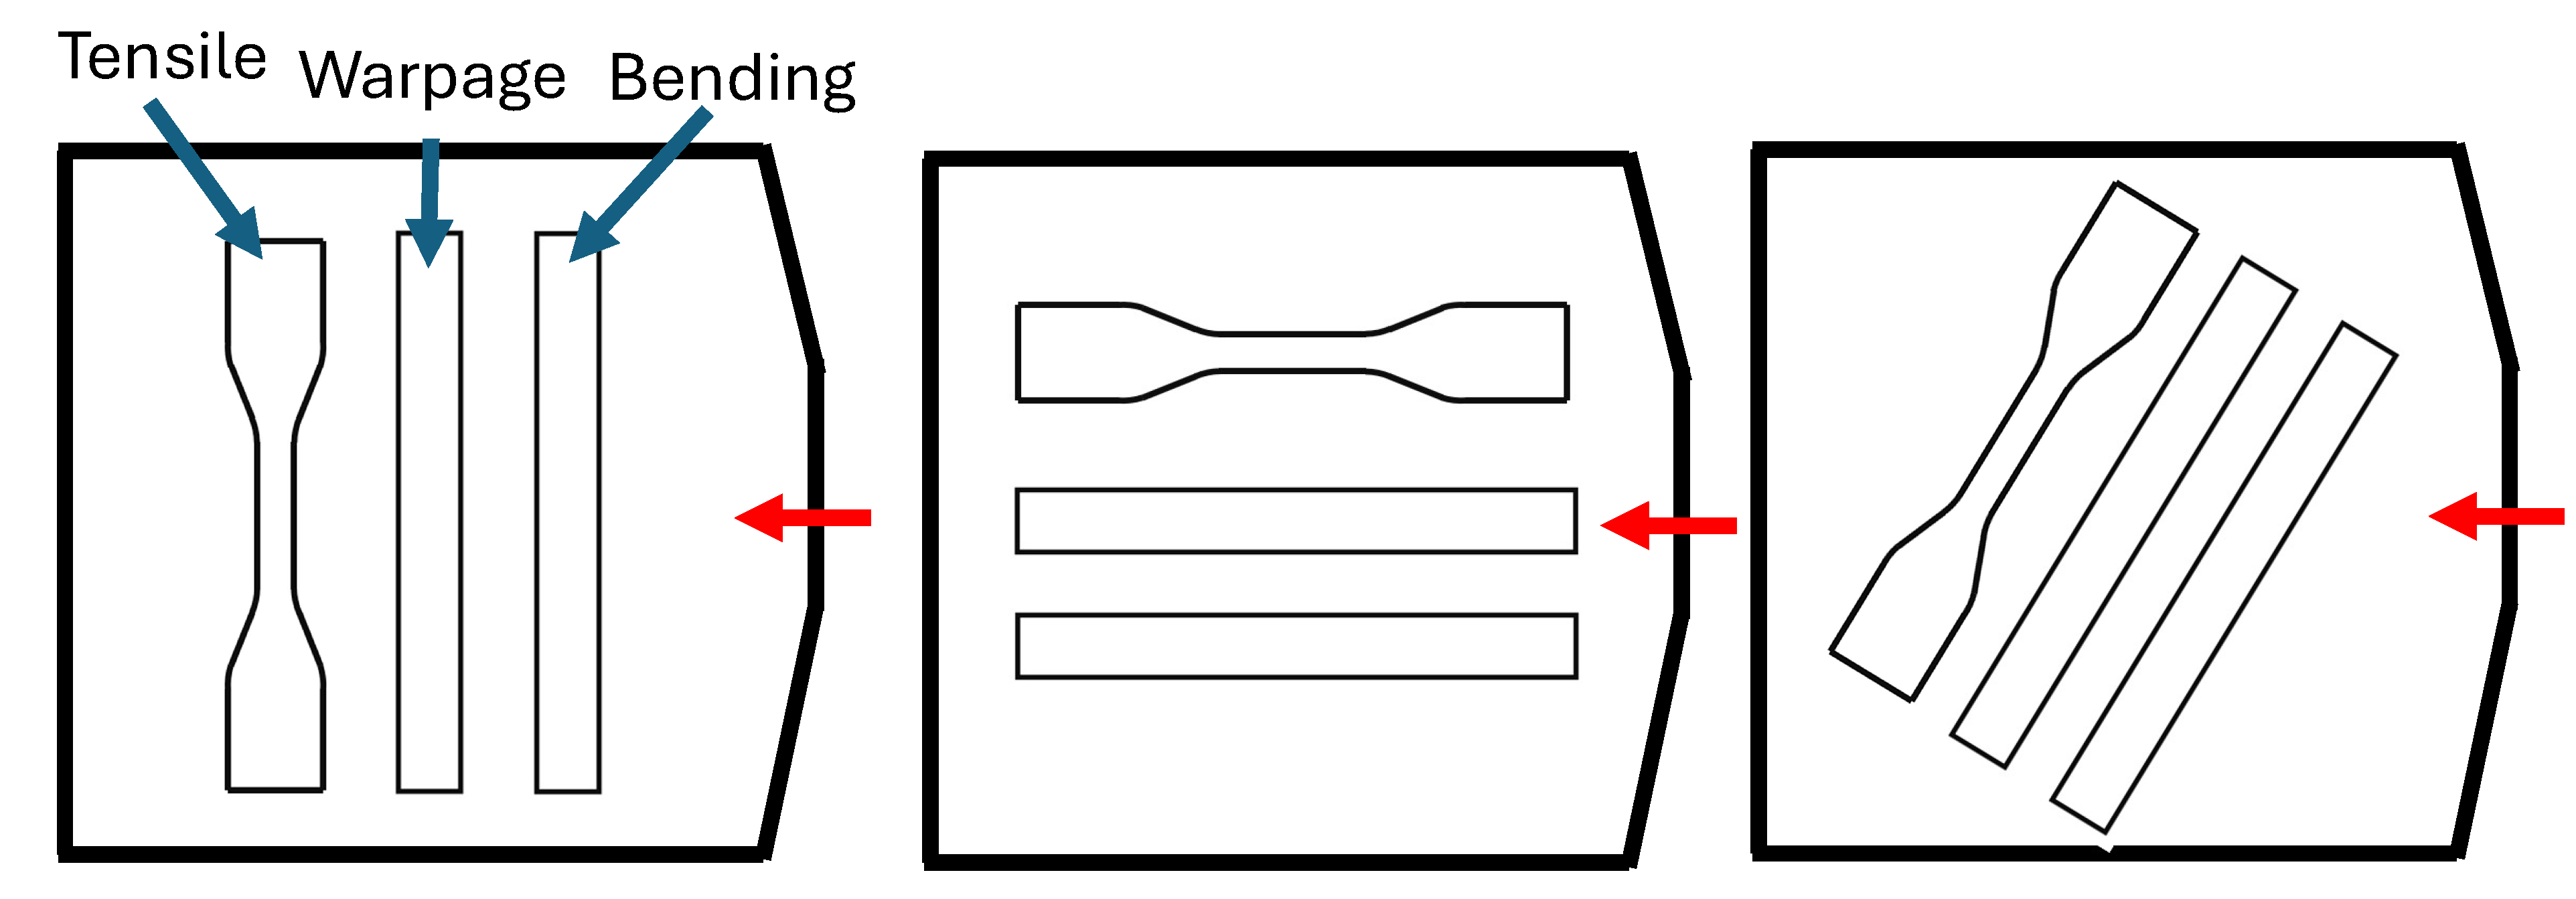
Figure 4.
Specimens with 90°, 0°, and 45° of orientation with injection direction. Red arrow indicates injection flow direction.
Figure 4.
Specimens with 90°, 0°, and 45° of orientation with injection direction. Red arrow indicates injection flow direction.
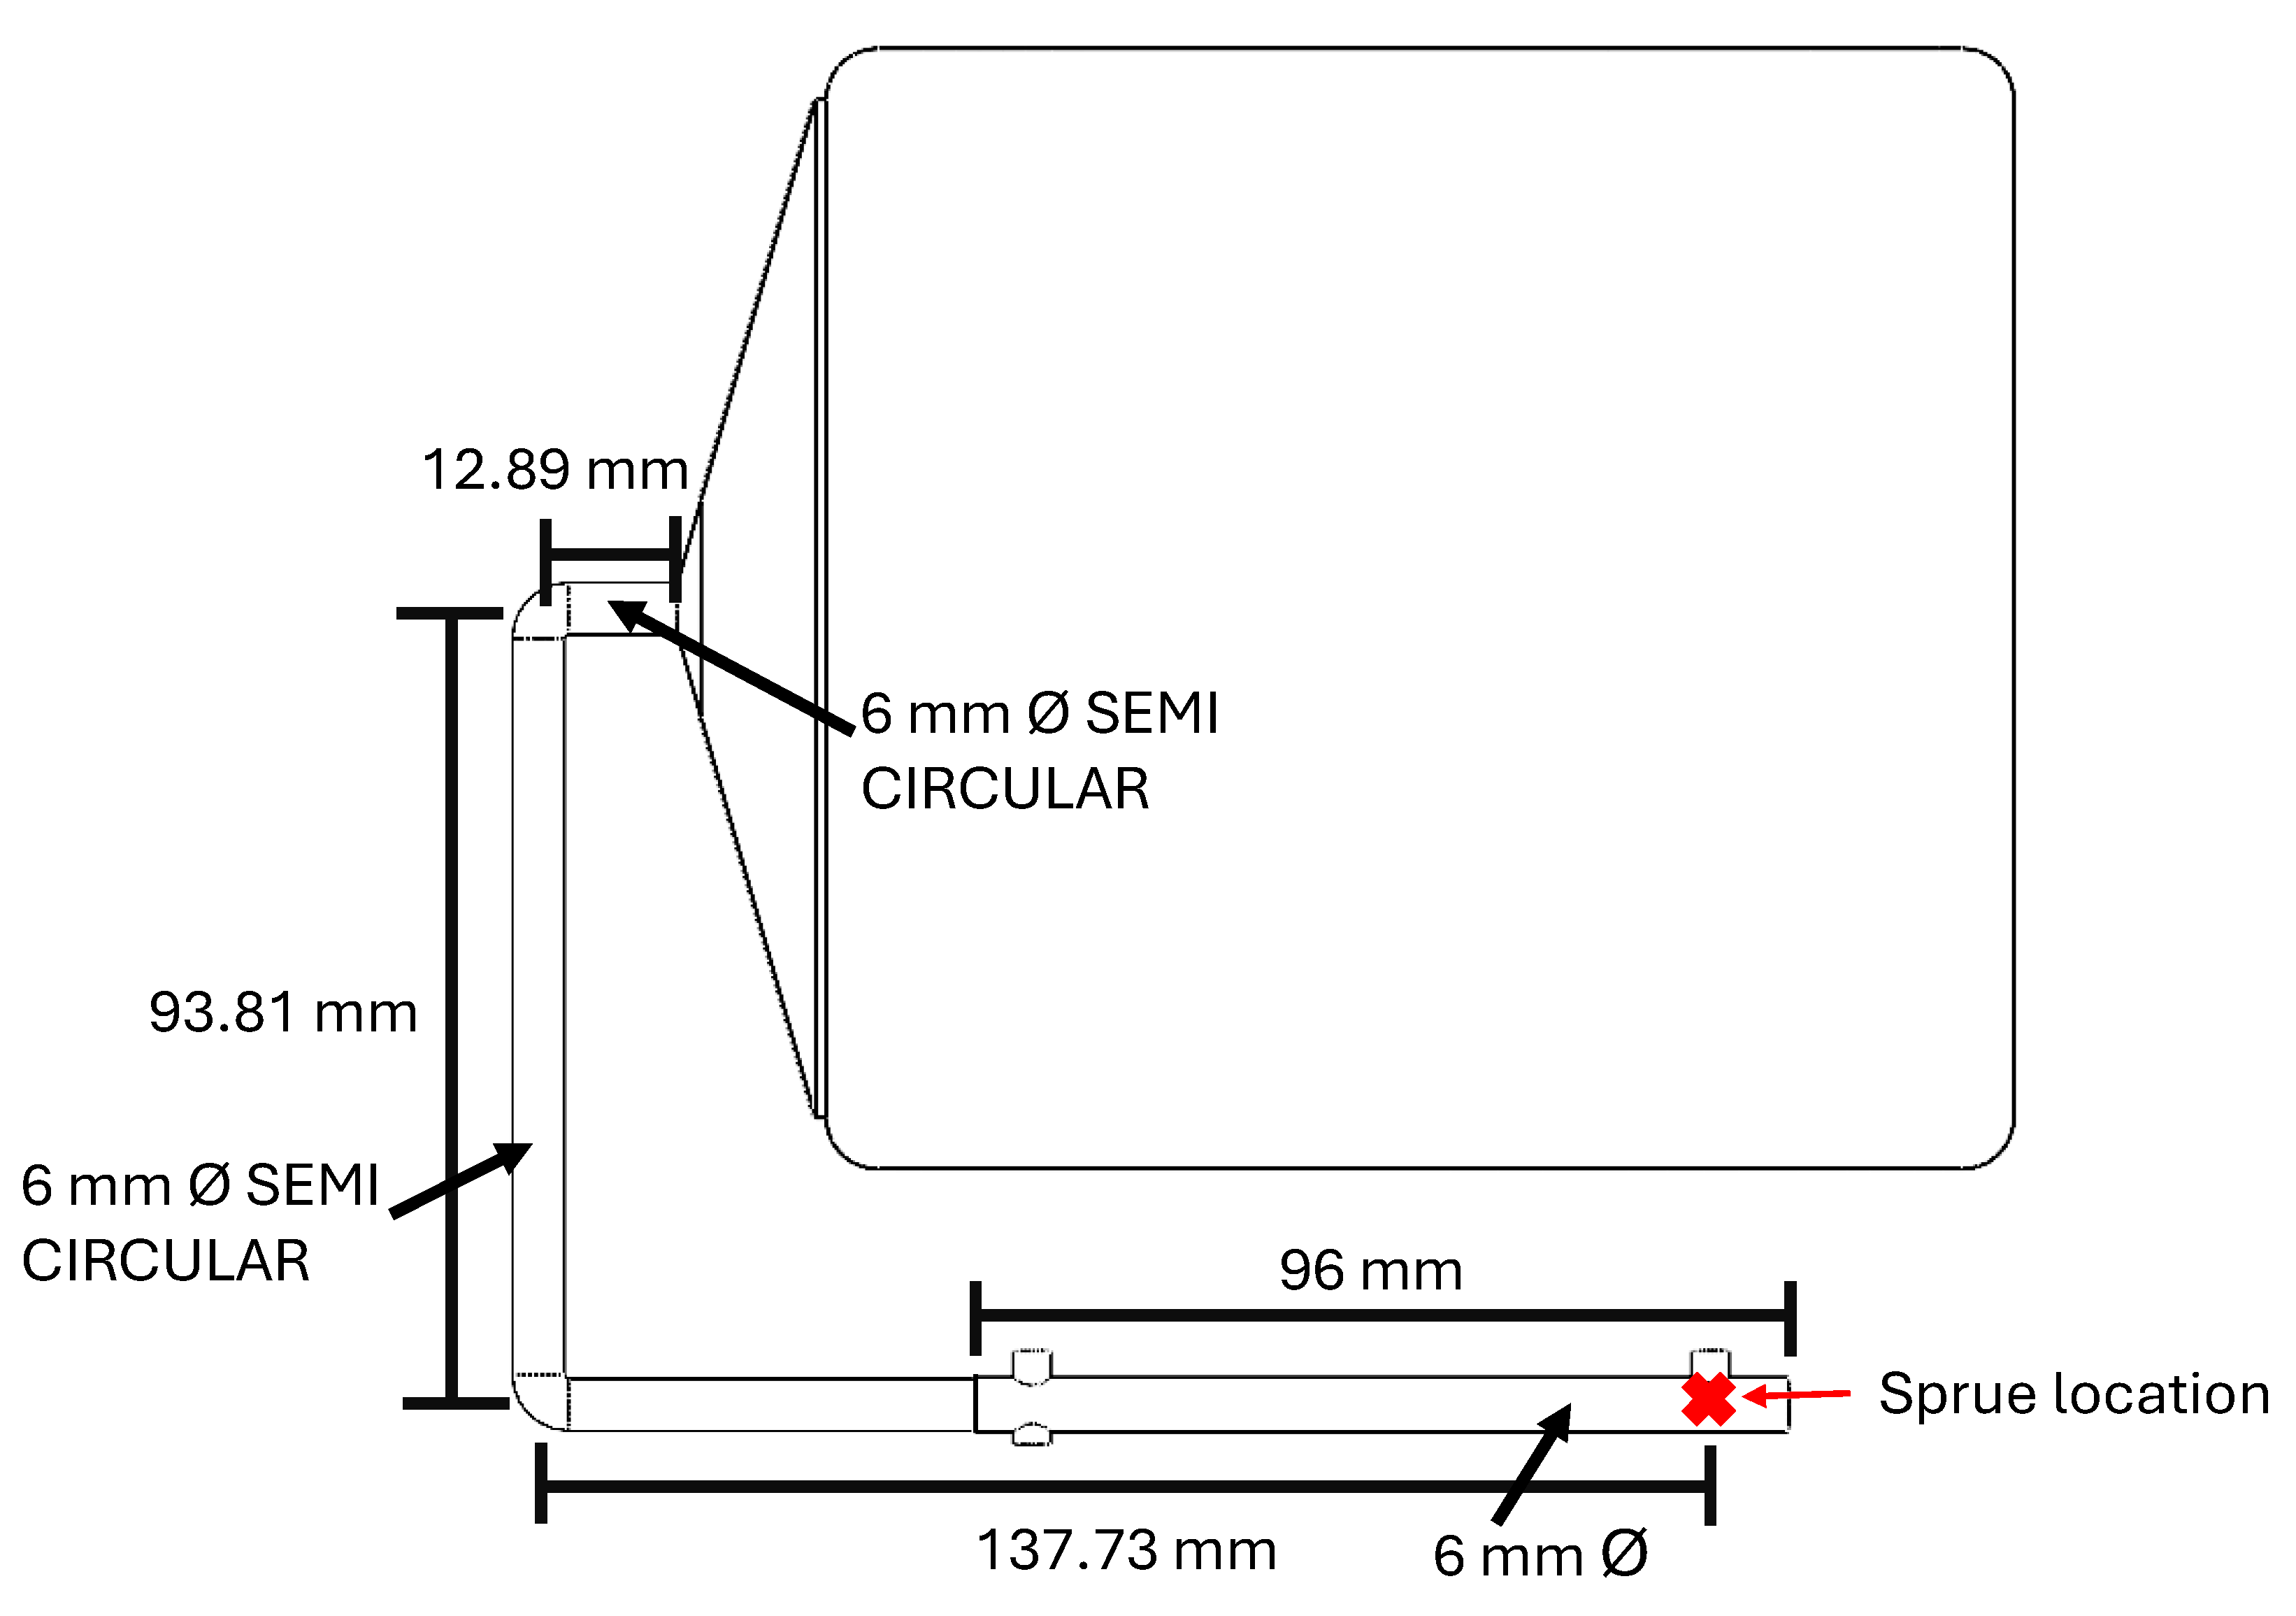
Figure 5.
Runners in cavity measurements.
Figure 5.
Runners in cavity measurements.
Figure 6.
Dimensions of quasi-static specimens according to standards: (a) tensile test specimen according to ASTM D638; (b) bending test specimen according to ASTM D790.
Figure 6.
Dimensions of quasi-static specimens according to standards: (a) tensile test specimen according to ASTM D638; (b) bending test specimen according to ASTM D790.
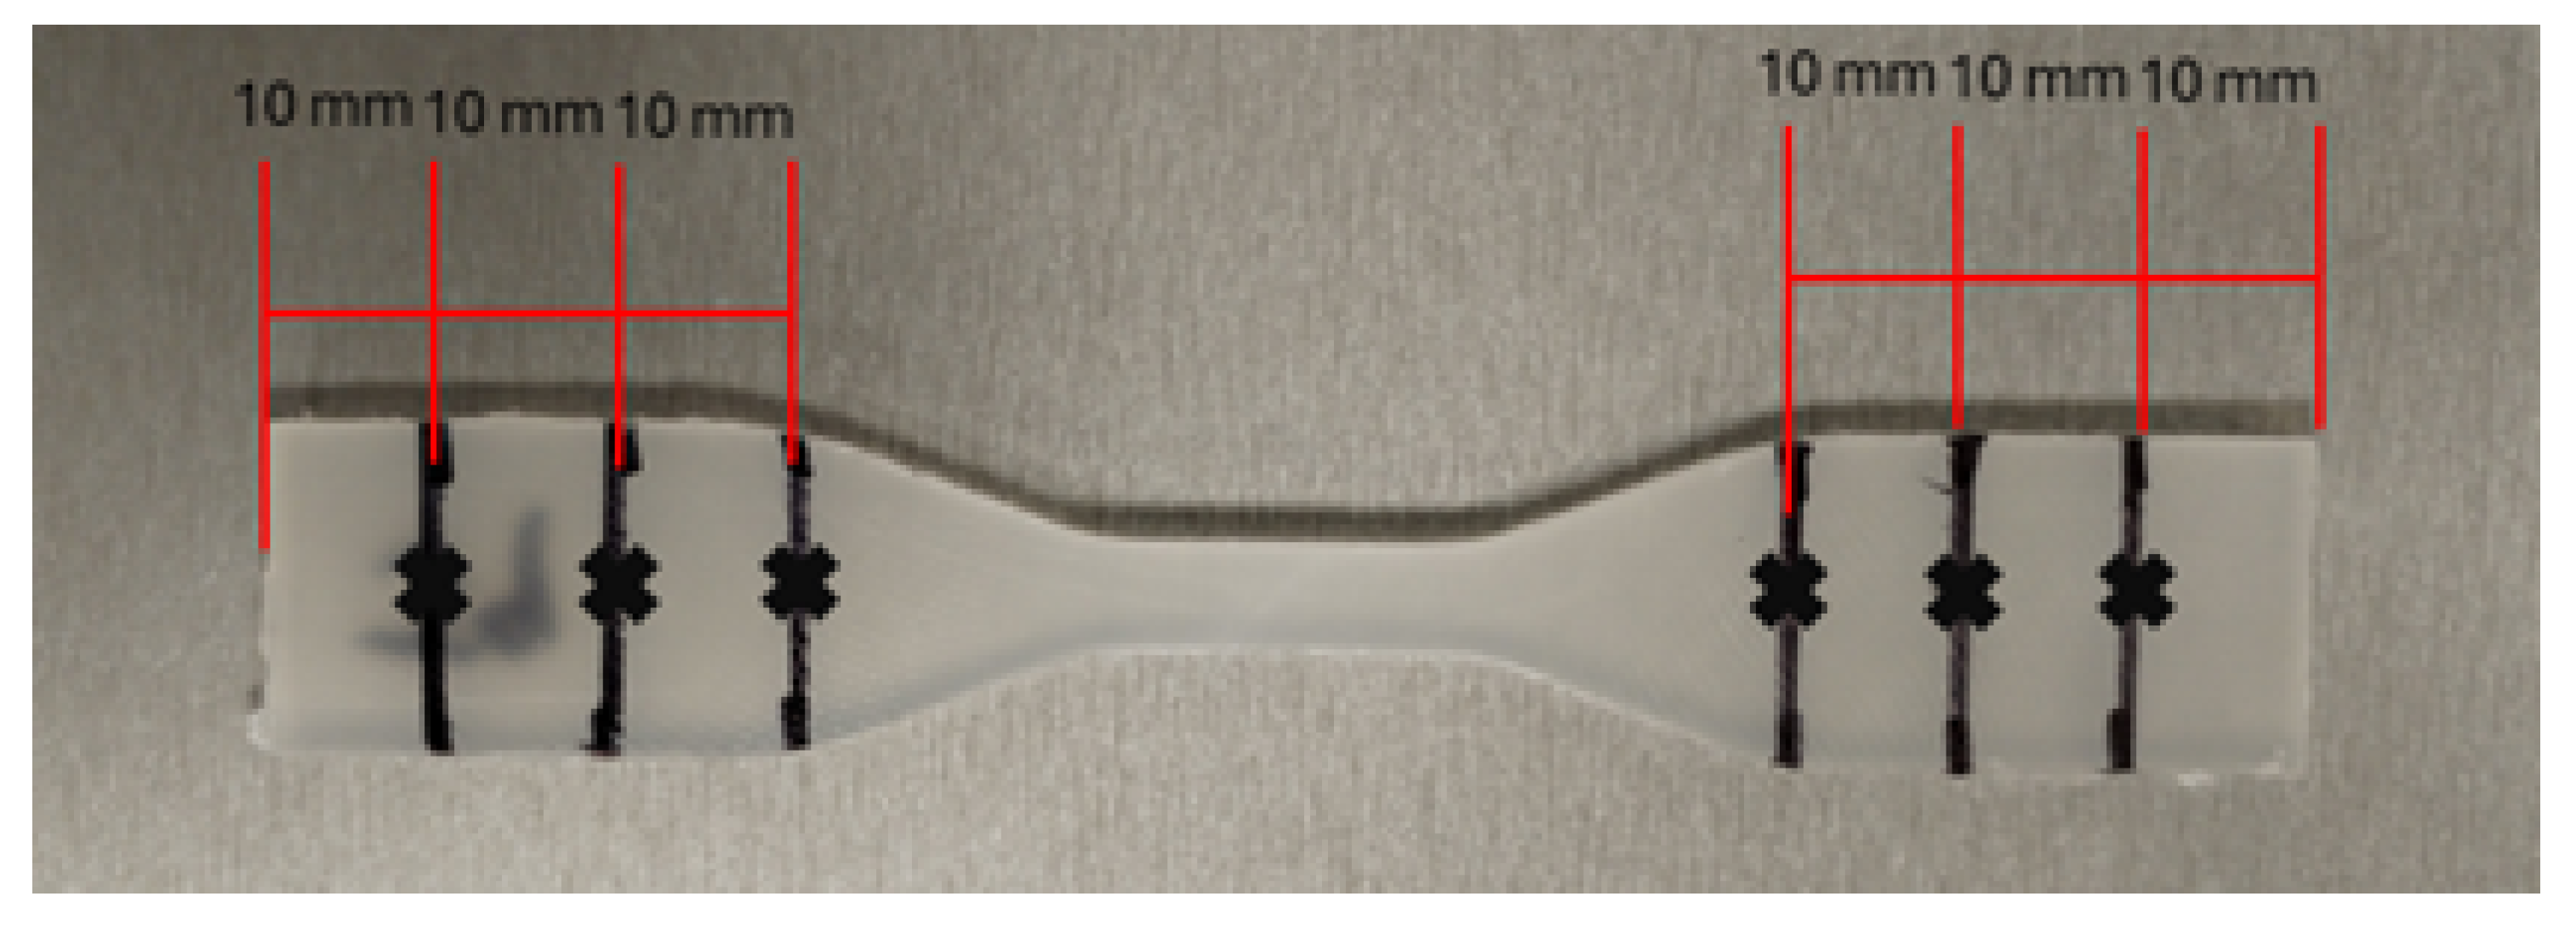
Figure 7.
Location of measurements along the length of the tensile test specimen; each marking has a separation of 10 mm.
Figure 7.
Location of measurements along the length of the tensile test specimen; each marking has a separation of 10 mm.
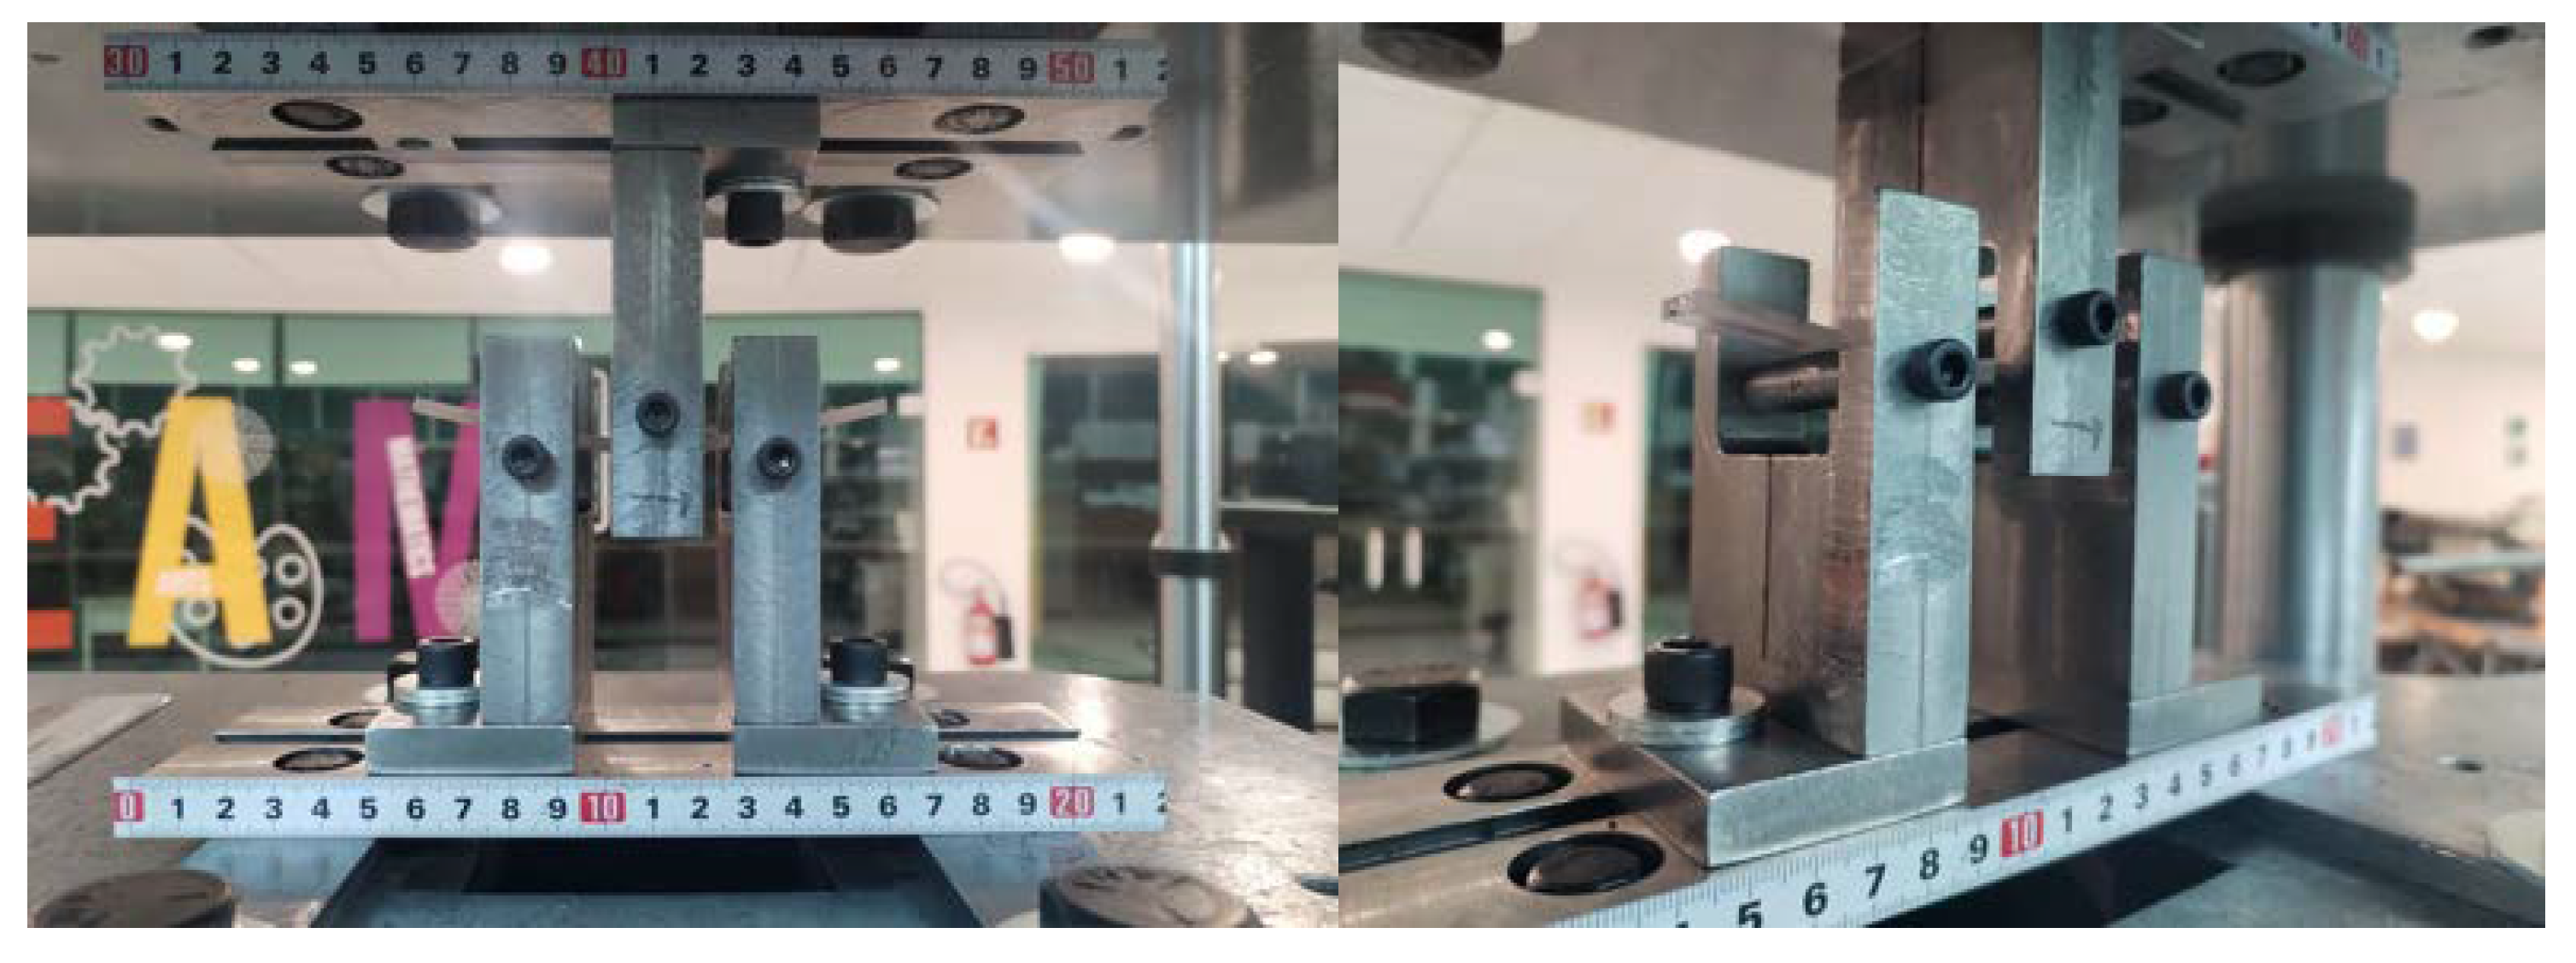
Figure 8.
Three-point bending flexural test device. Frontal view; isometric view.
Figure 8.
Three-point bending flexural test device. Frontal view; isometric view.
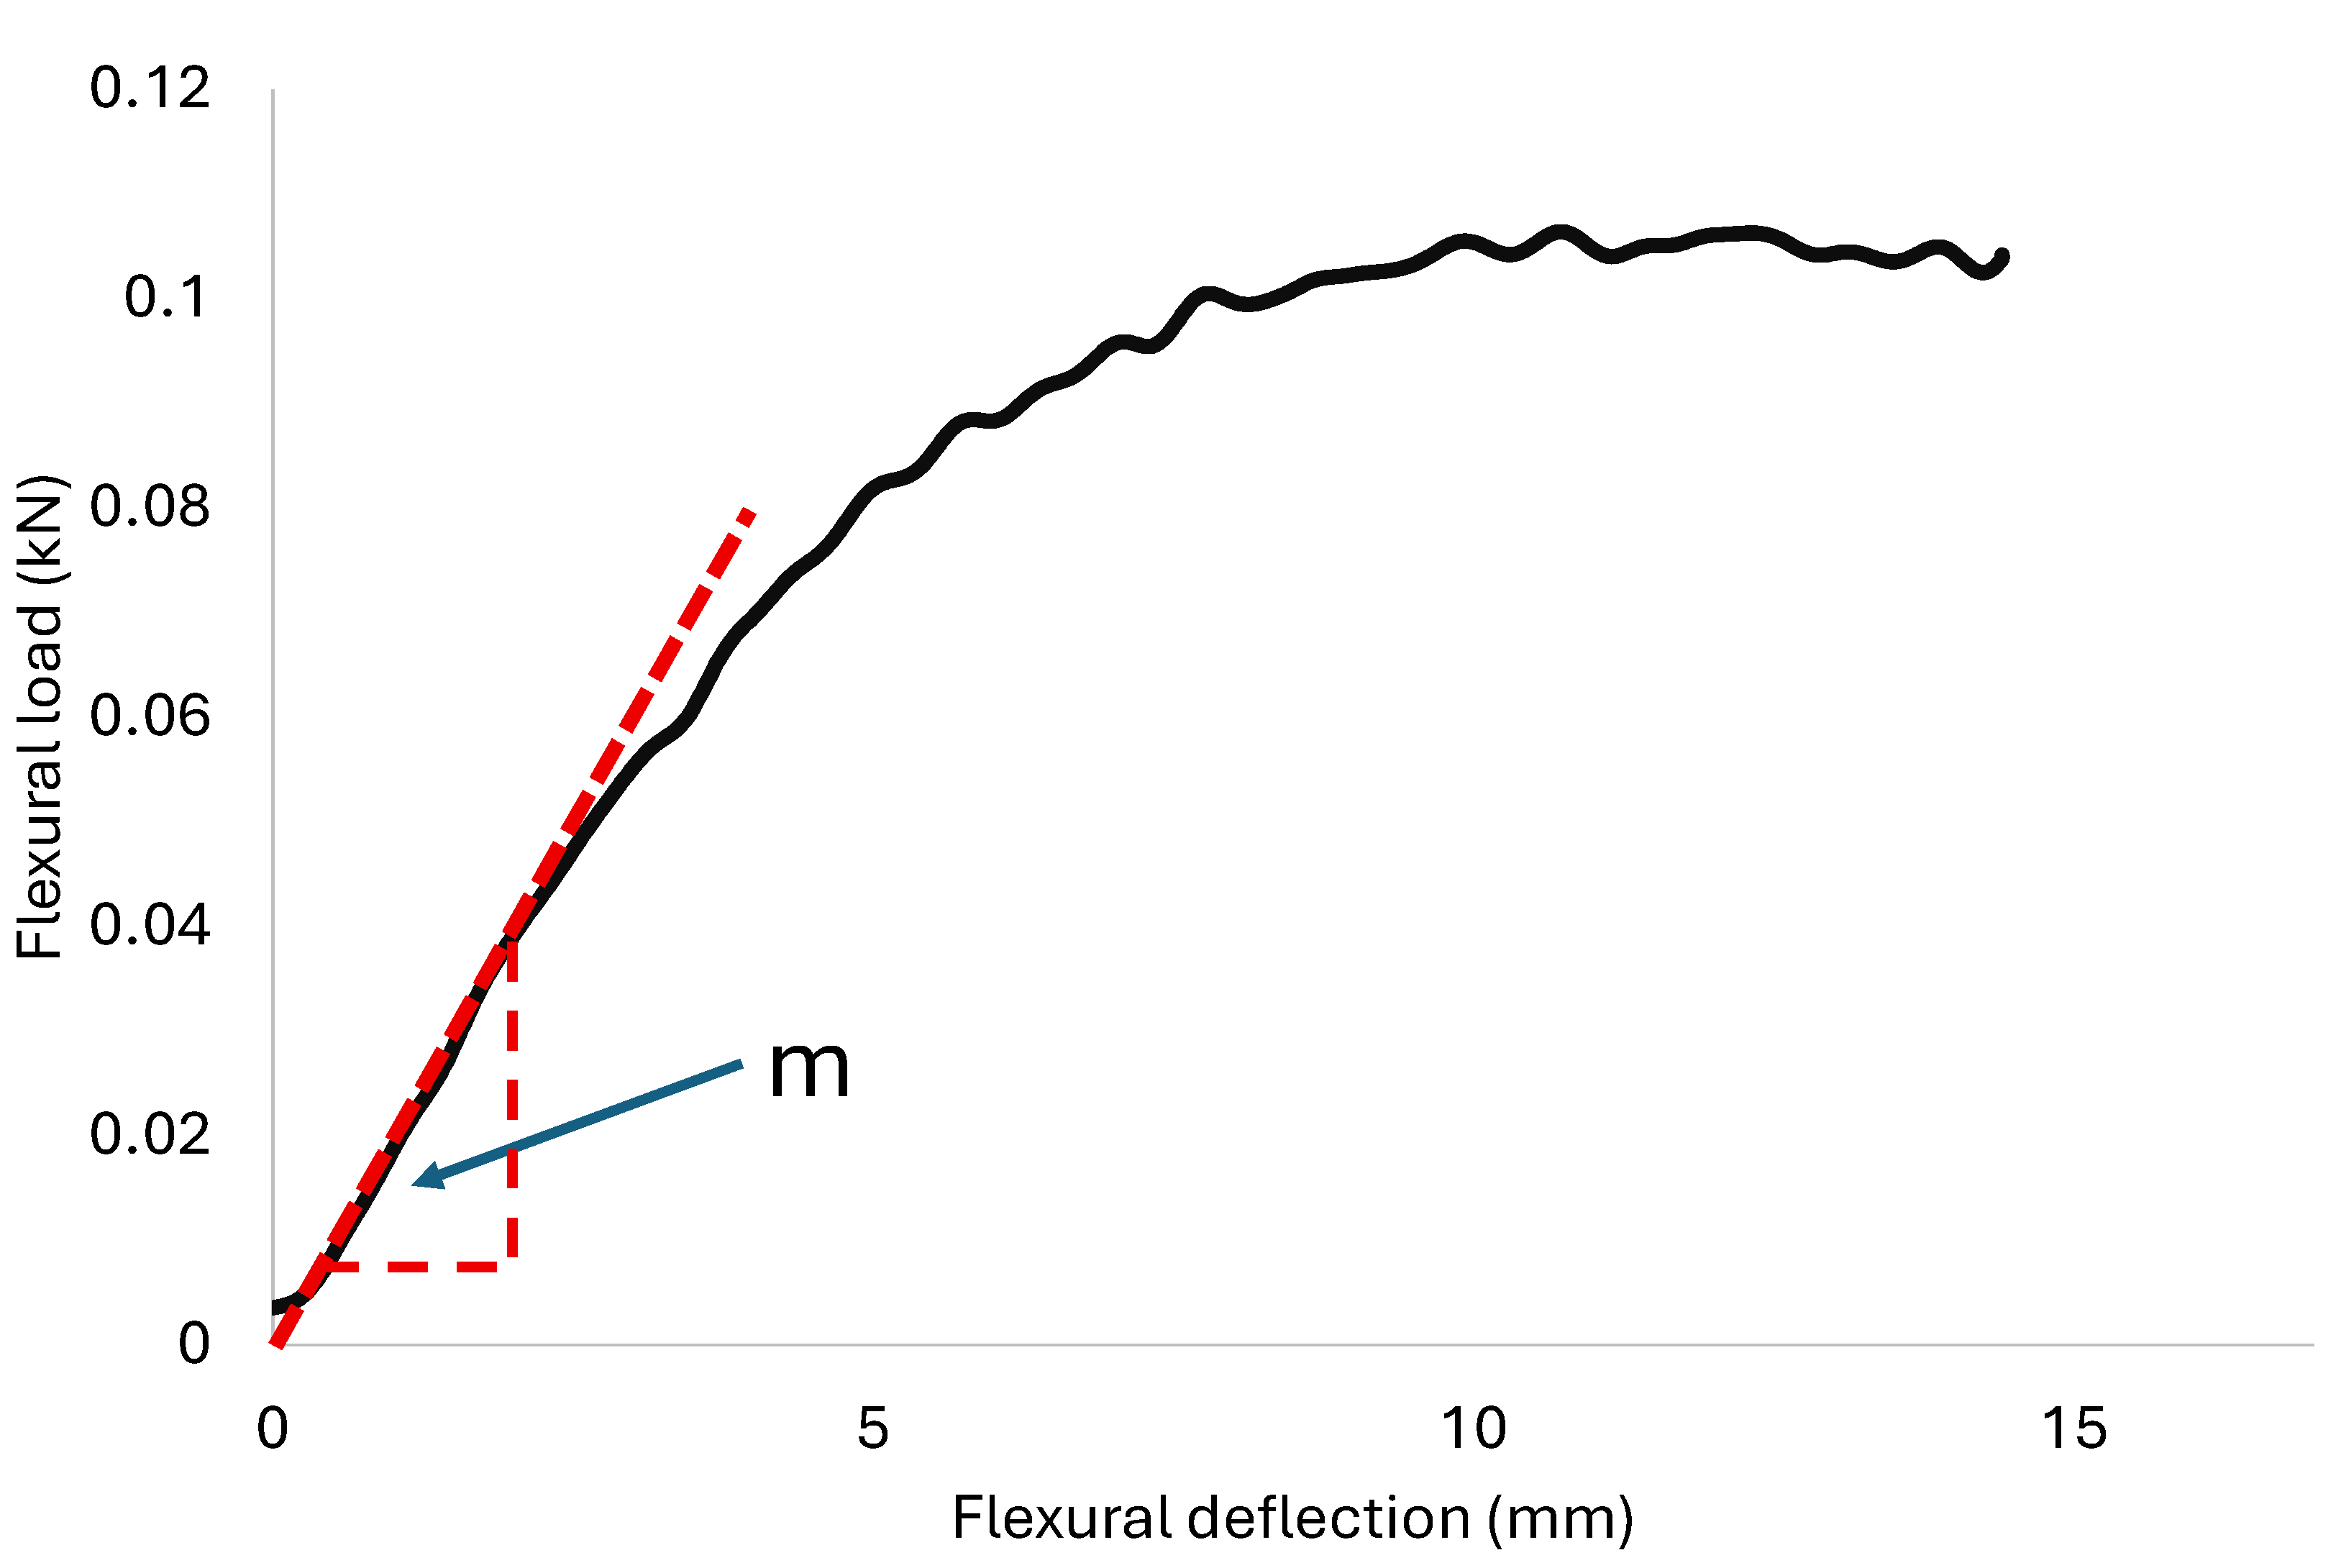
Figure 9.
Slope of tangent to initial straight-line portion (m) identified in load–deflection curve.
Figure 9.
Slope of tangent to initial straight-line portion (m) identified in load–deflection curve.
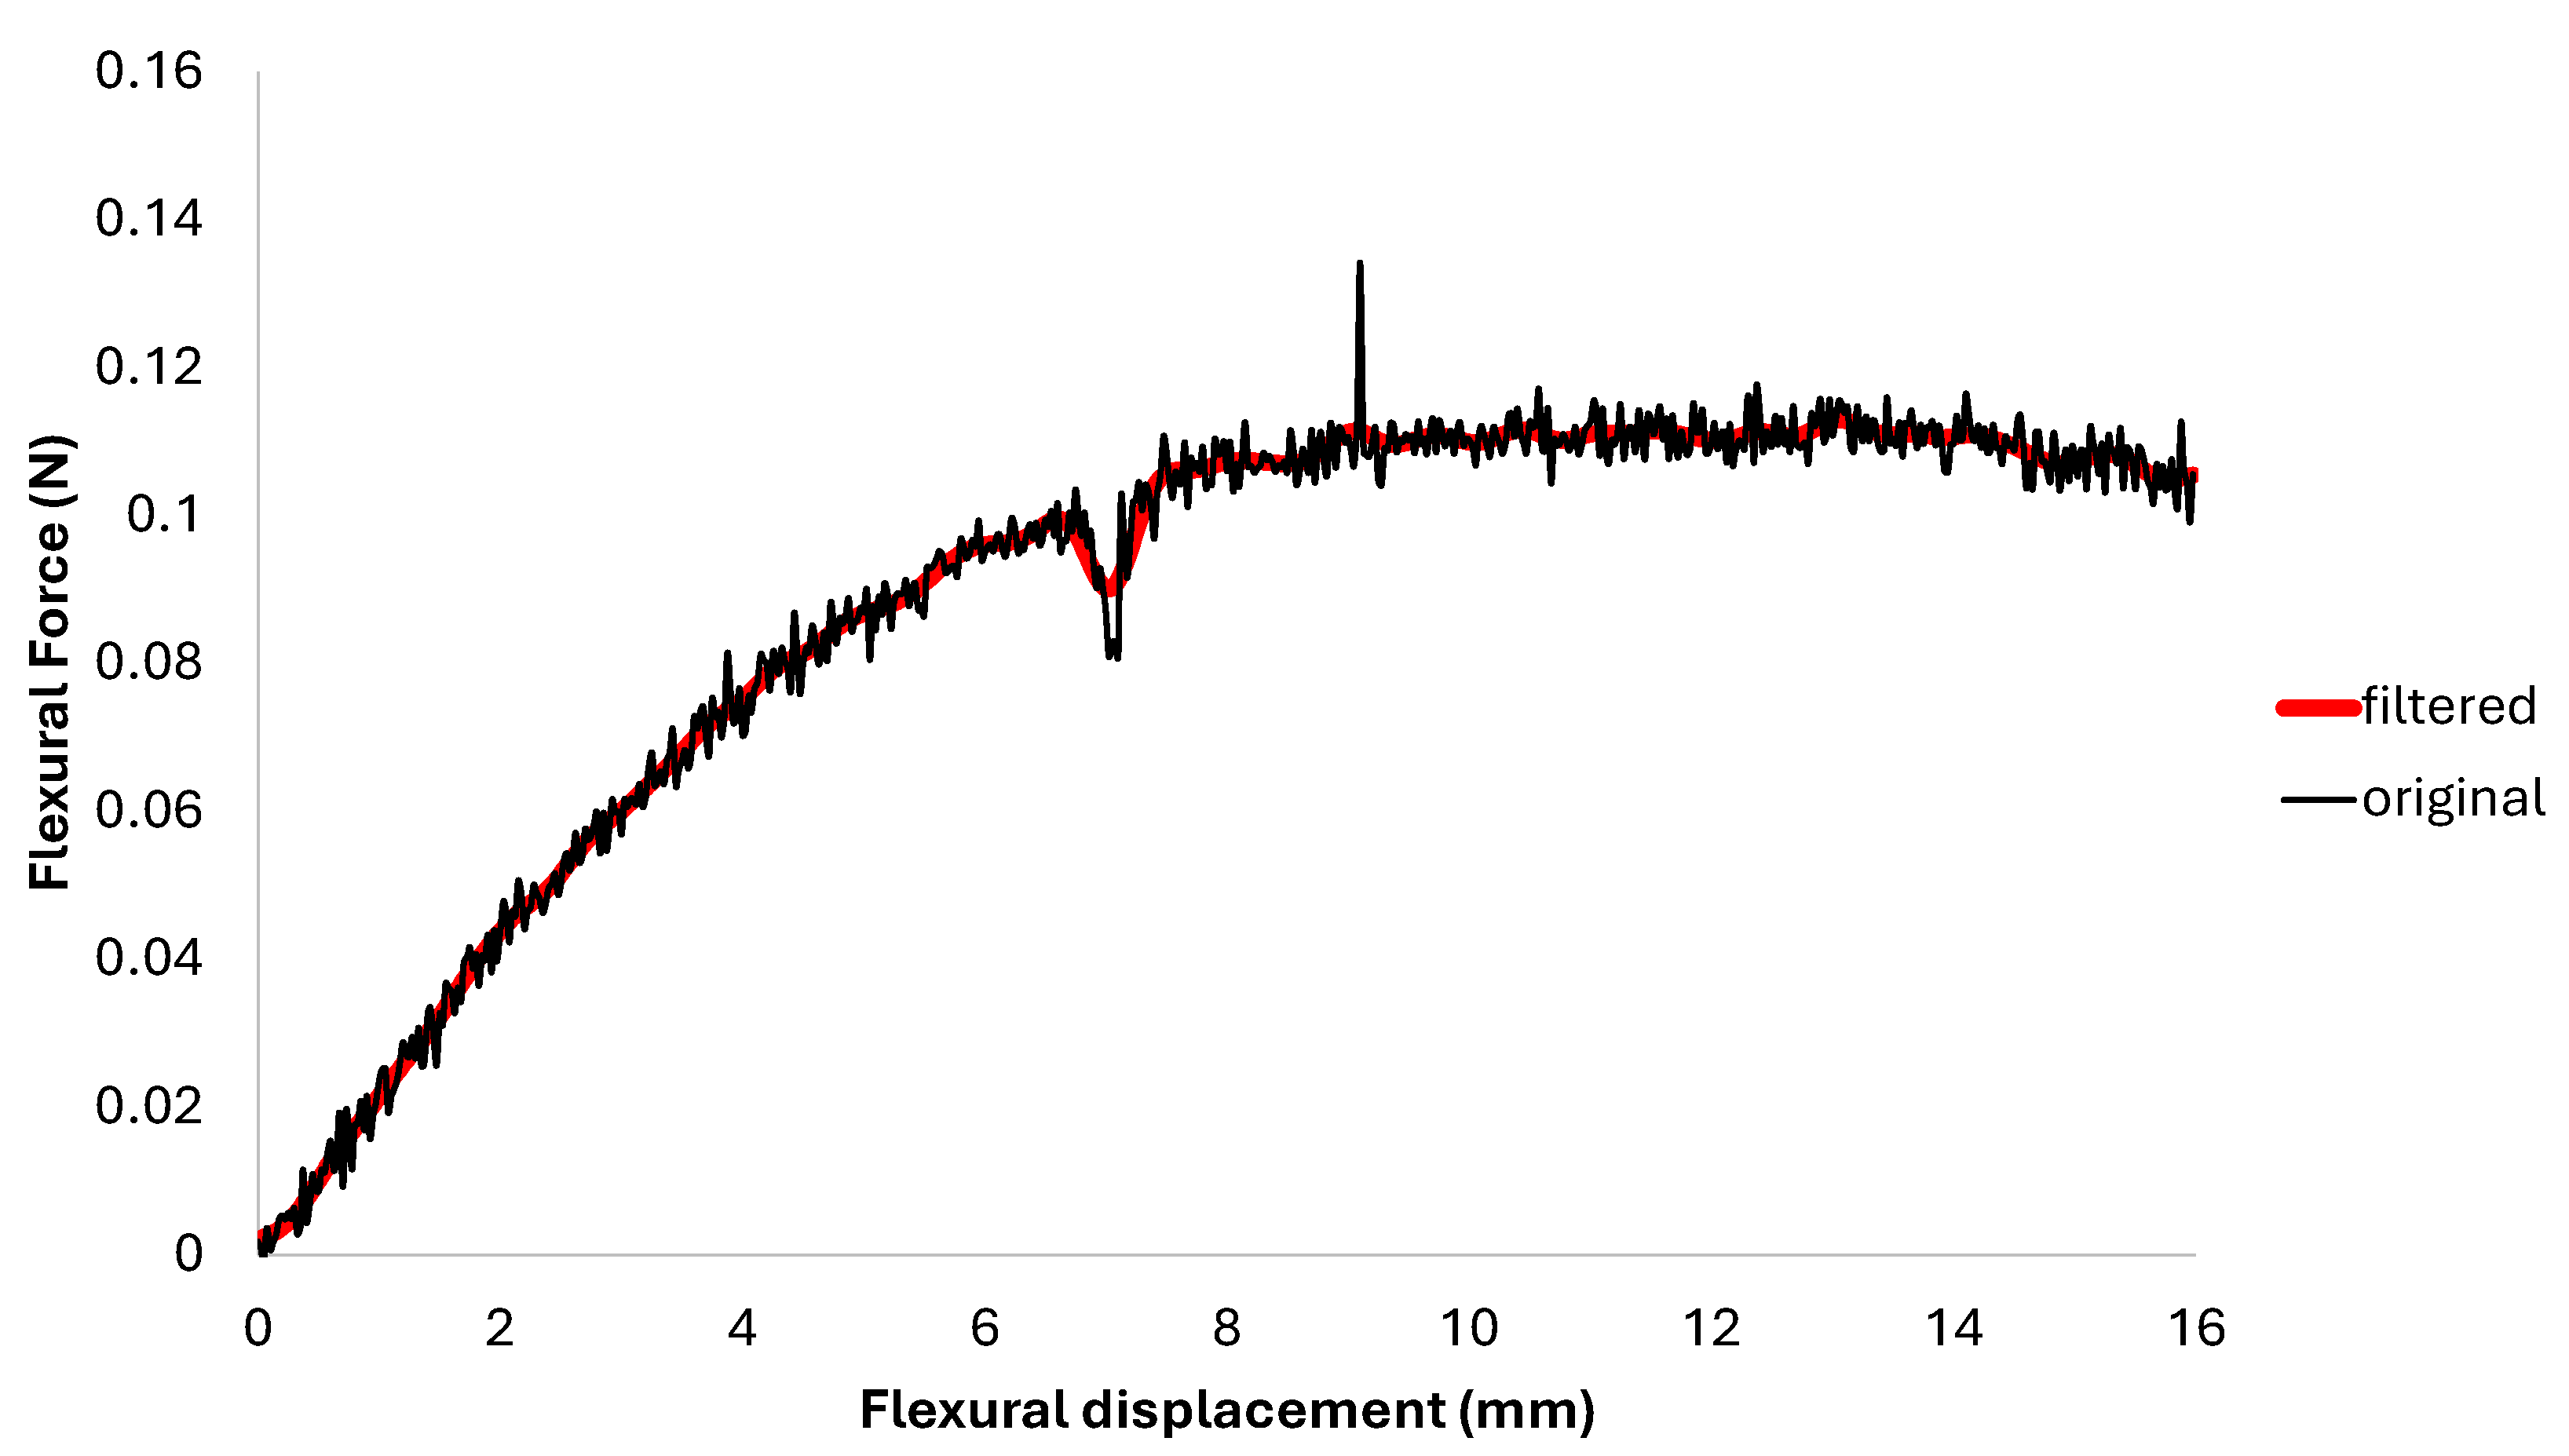
Figure 10.
Low-pass filter overlap with original data.
Figure 10.
Low-pass filter overlap with original data.
Figure 11.
Main effects plots of hardness versus process parameters are shown. (a) Injection temperature vs. hardness, (b) packing pressure vs. hardness, (c) packing time vs. hardness, and (d) orientation vs. hardness. The dotted red line is the reference value.
Figure 11.
Main effects plots of hardness versus process parameters are shown. (a) Injection temperature vs. hardness, (b) packing pressure vs. hardness, (c) packing time vs. hardness, and (d) orientation vs. hardness. The dotted red line is the reference value.
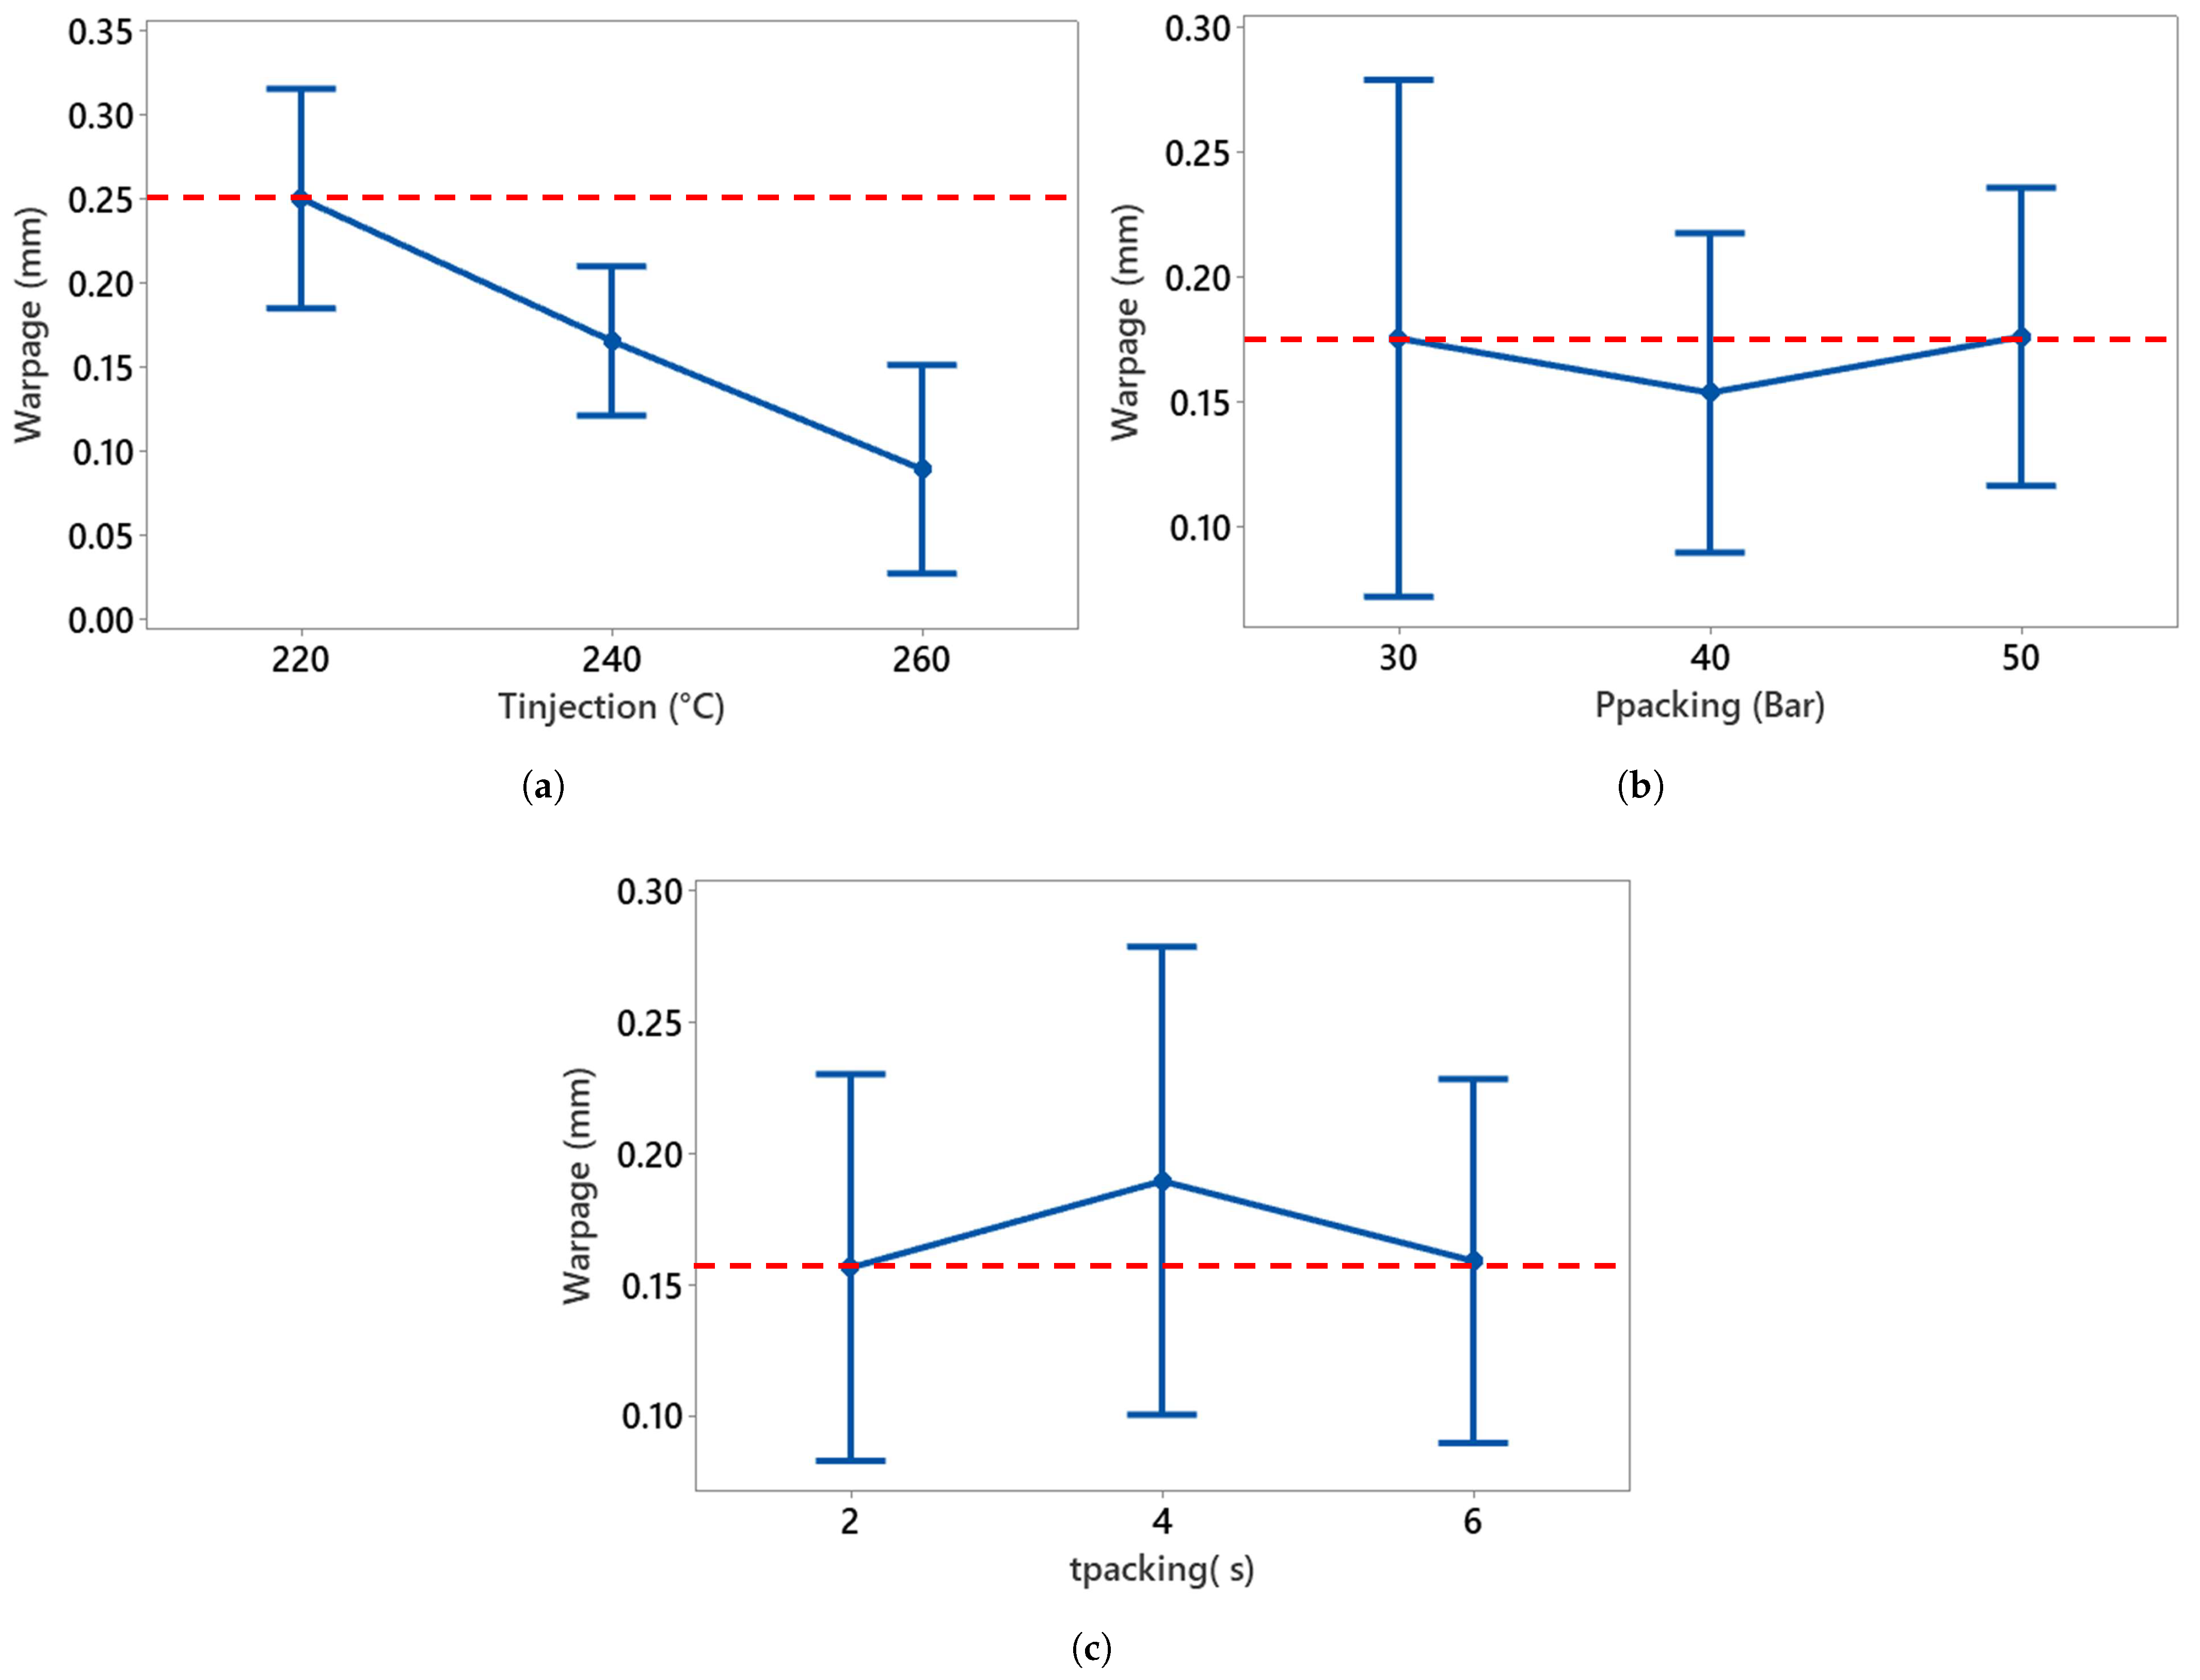
Figure 12.
Main effects of process parameters on plate warpage. (a) Injection temperature vs. warpage, (b) packing pressure vs. warpage, and (c) vs. warpage. The dotted line is the reference value.
Figure 12.
Main effects of process parameters on plate warpage. (a) Injection temperature vs. warpage, (b) packing pressure vs. warpage, and (c) vs. warpage. The dotted line is the reference value.
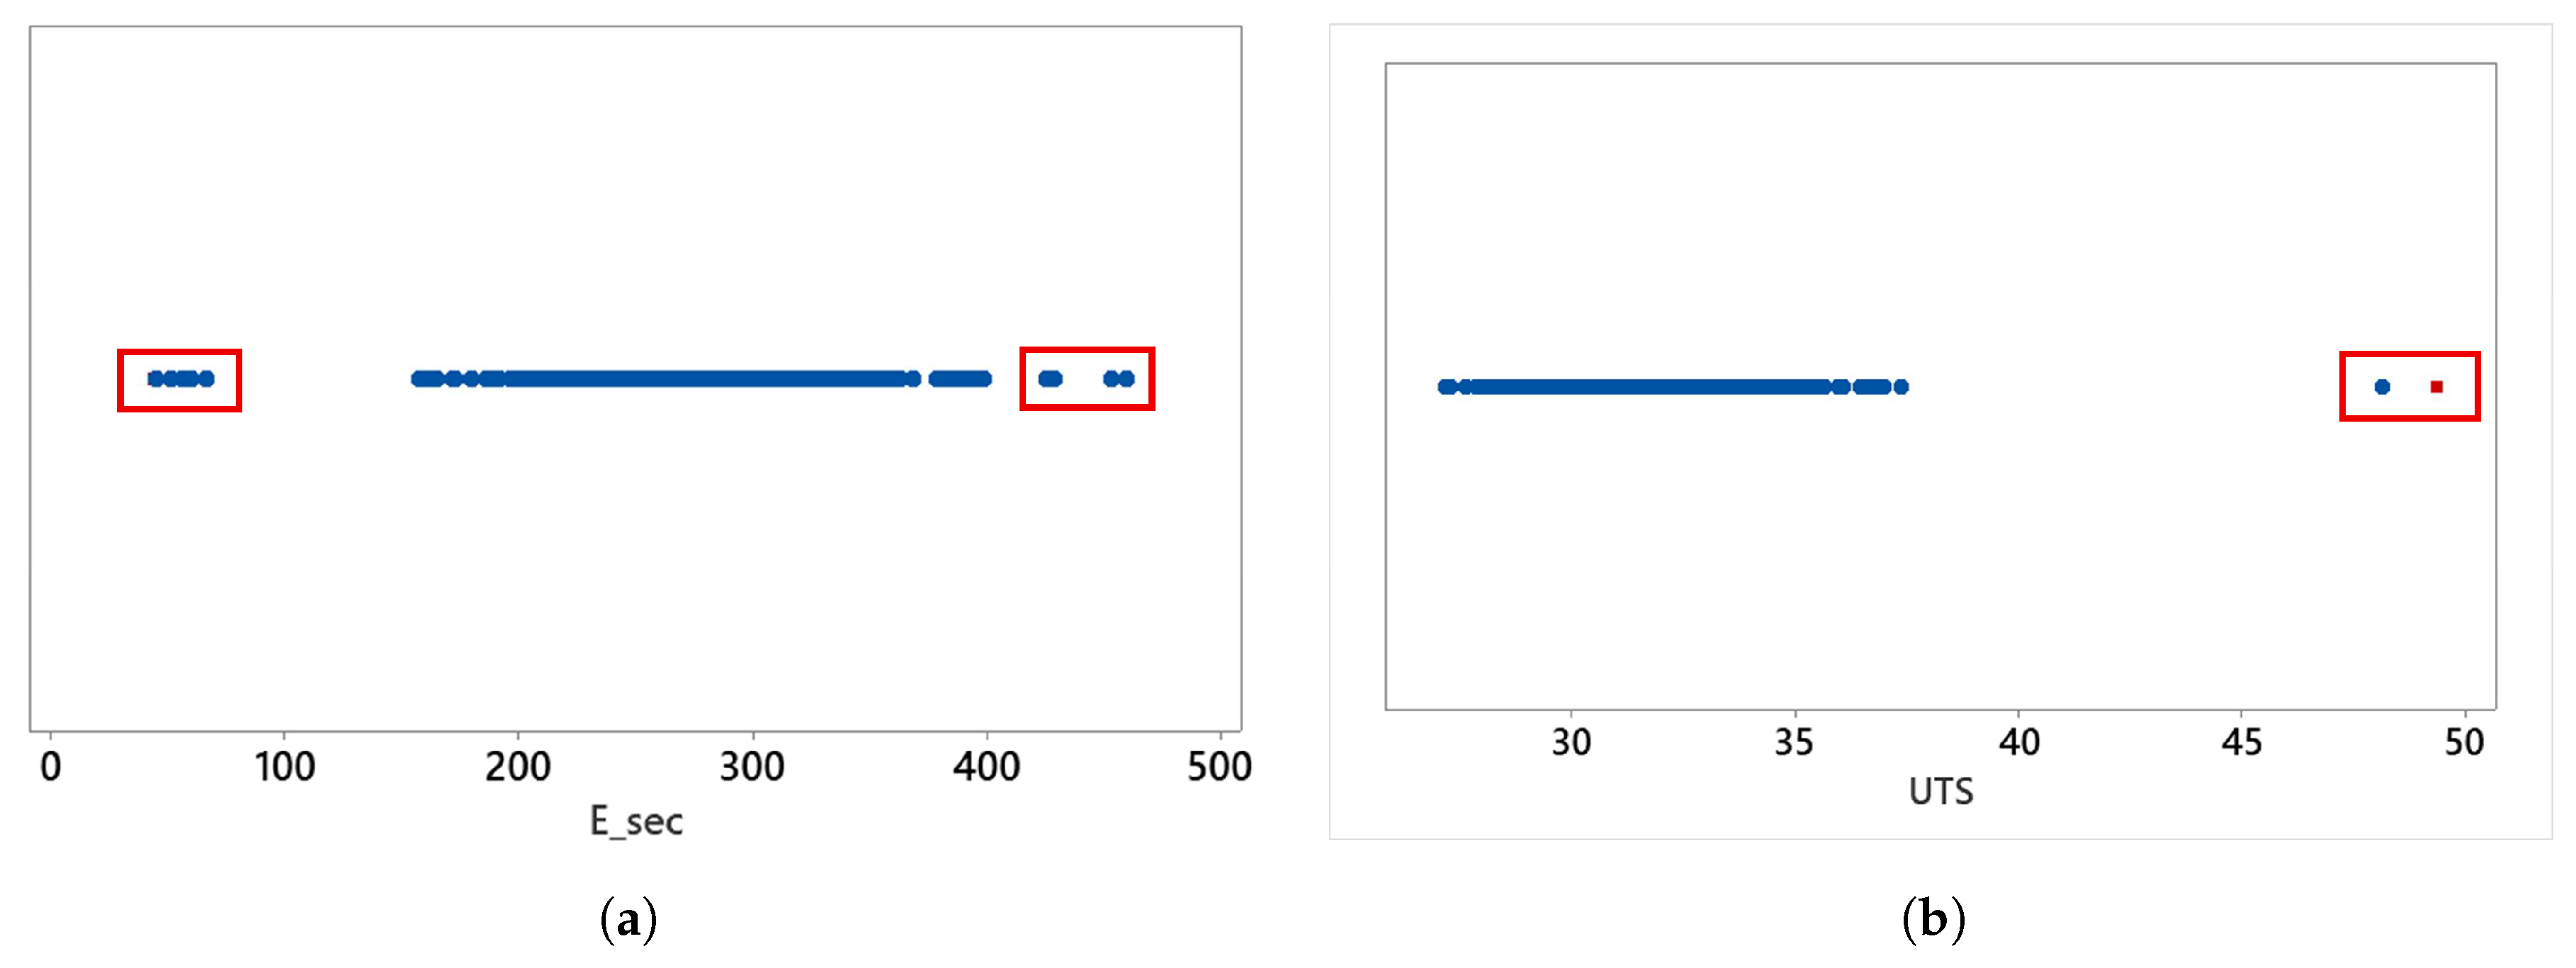
Figure 13.
Outliers for all samples (a) and all UTS samples (b). The red square box represents the reference value, with scattered dots indicating the results for and UTS, respectively.
Figure 13.
Outliers for all samples (a) and all UTS samples (b). The red square box represents the reference value, with scattered dots indicating the results for and UTS, respectively.
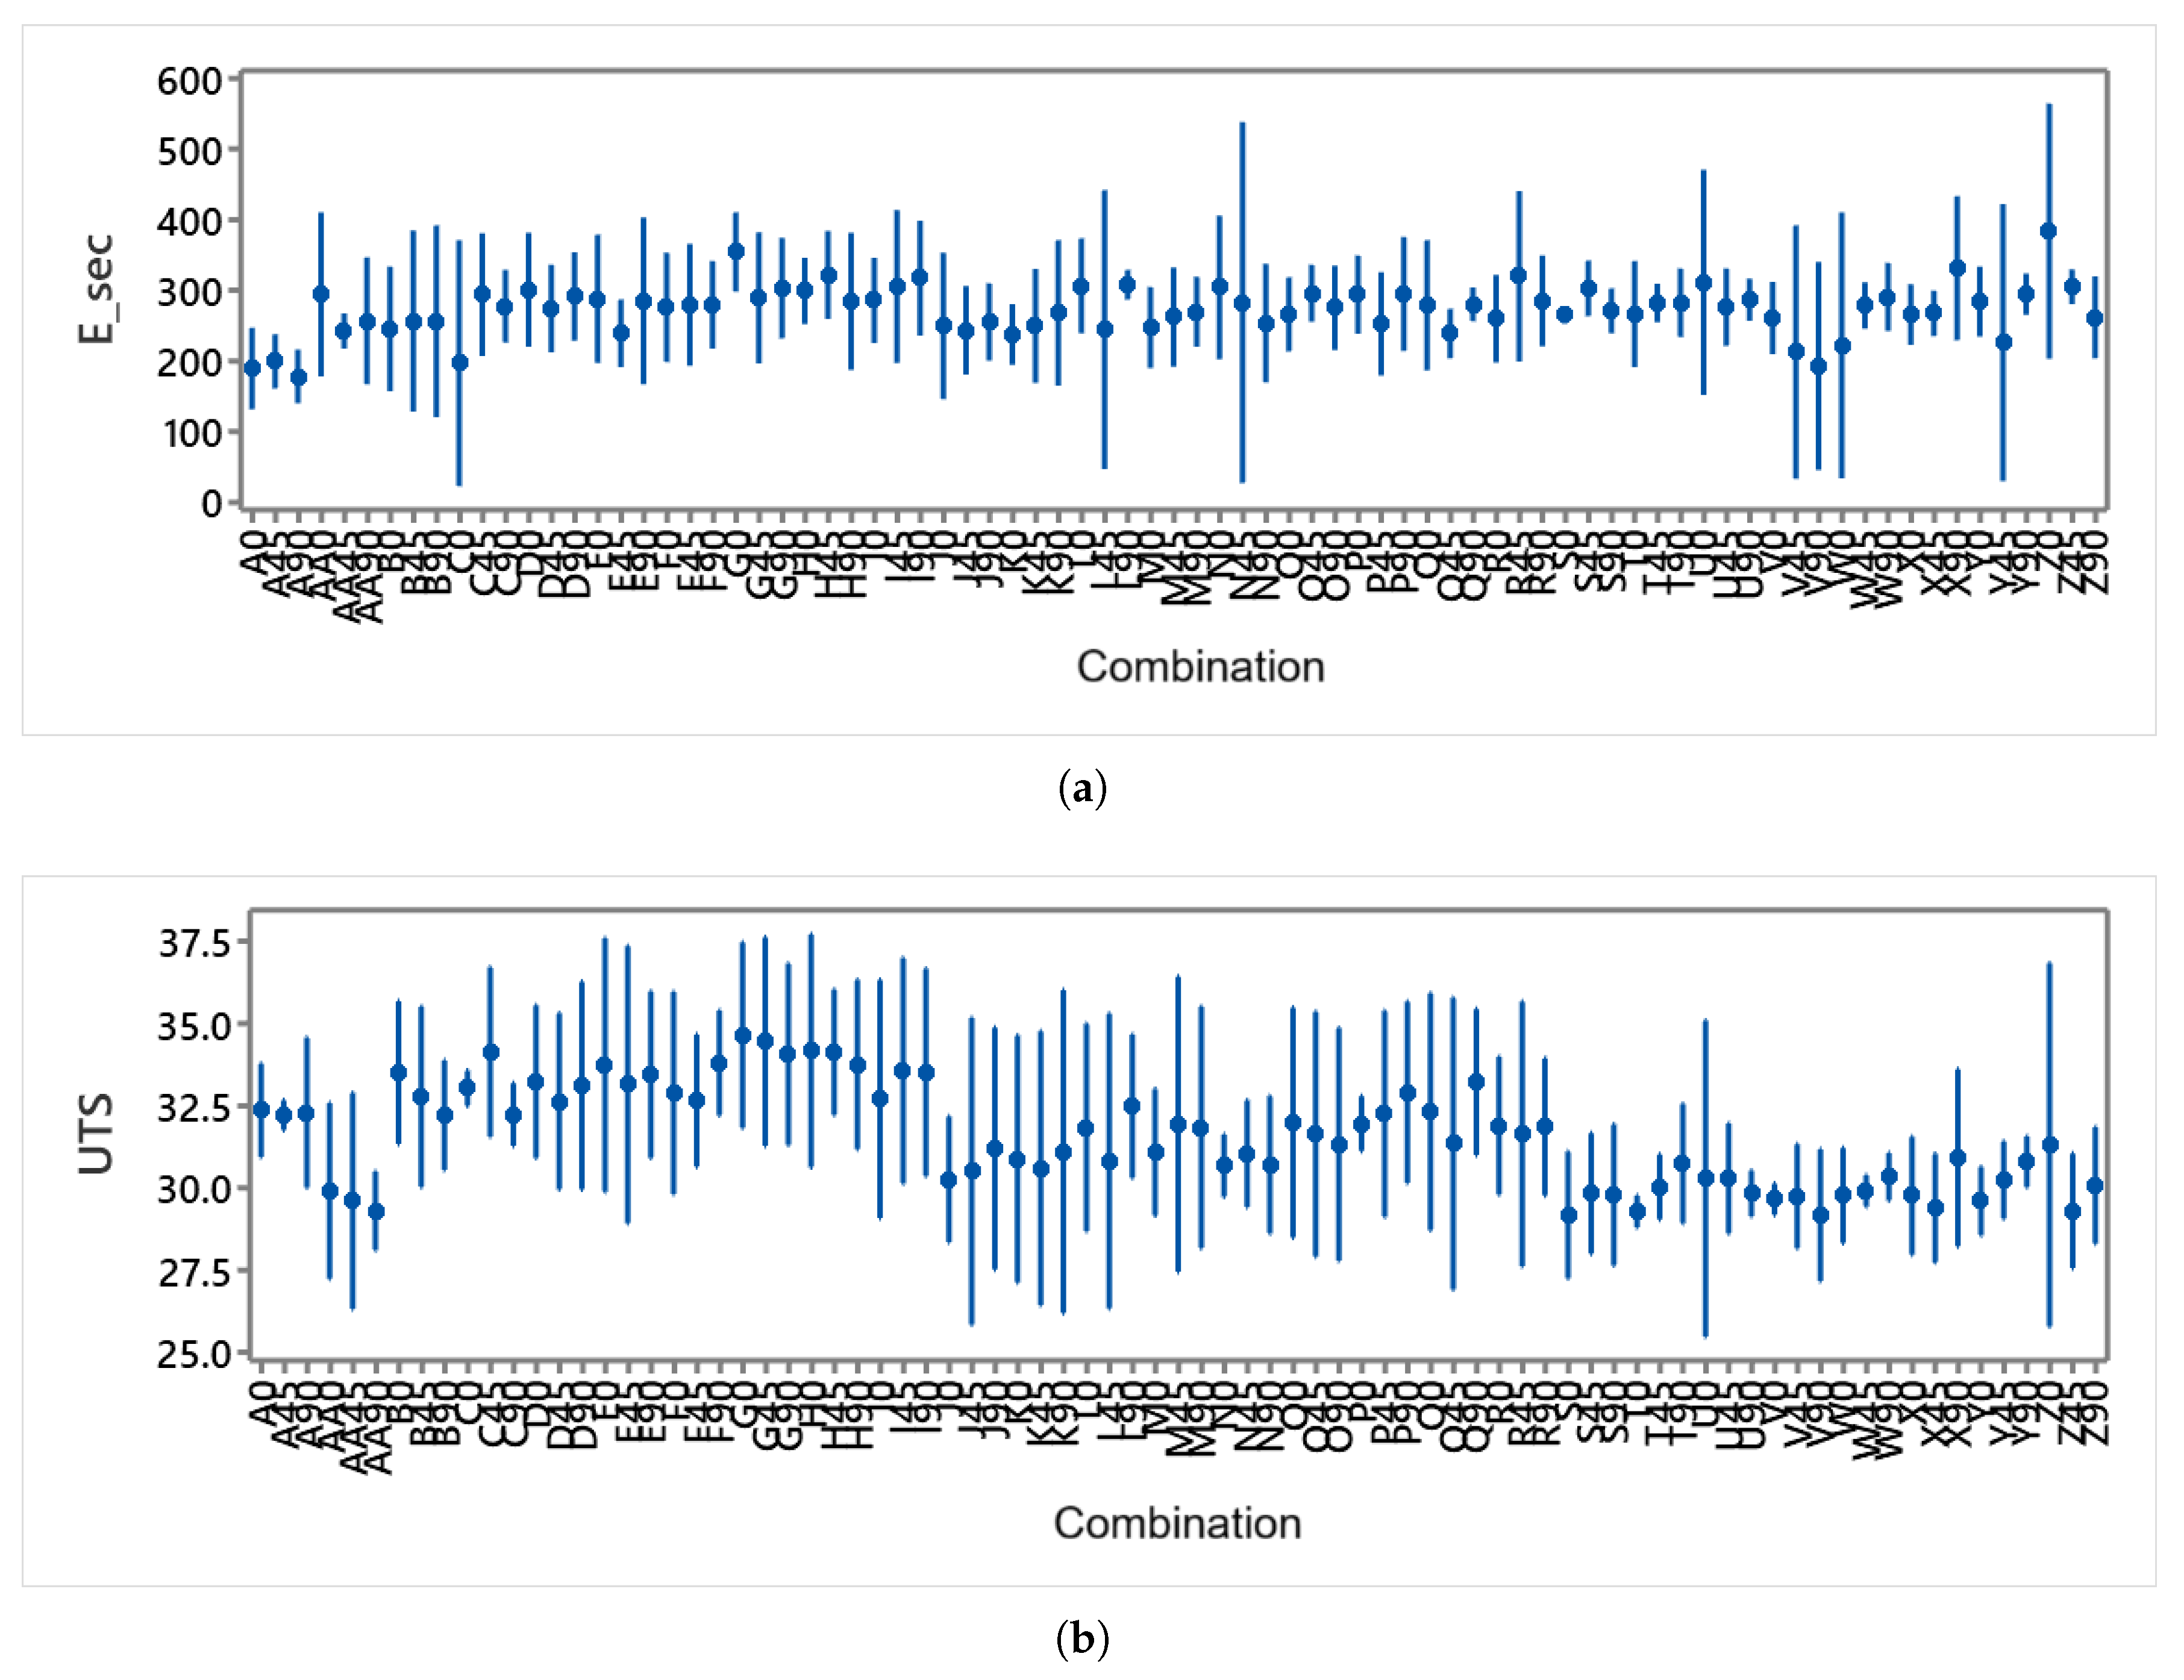
Figure 14.
(a) Range of values for each combination of parameters and orientation. (b) Range of UTS values for each combination of parameters and orientation. Outliers removed.
Figure 14.
(a) Range of values for each combination of parameters and orientation. (b) Range of UTS values for each combination of parameters and orientation. Outliers removed.
Figure 15.
Effects of injection parameters on compared to the reference (dotted red line). (a) , (b) , (c) , and (d) orientation.
Figure 15.
Effects of injection parameters on compared to the reference (dotted red line). (a) , (b) , (c) , and (d) orientation.
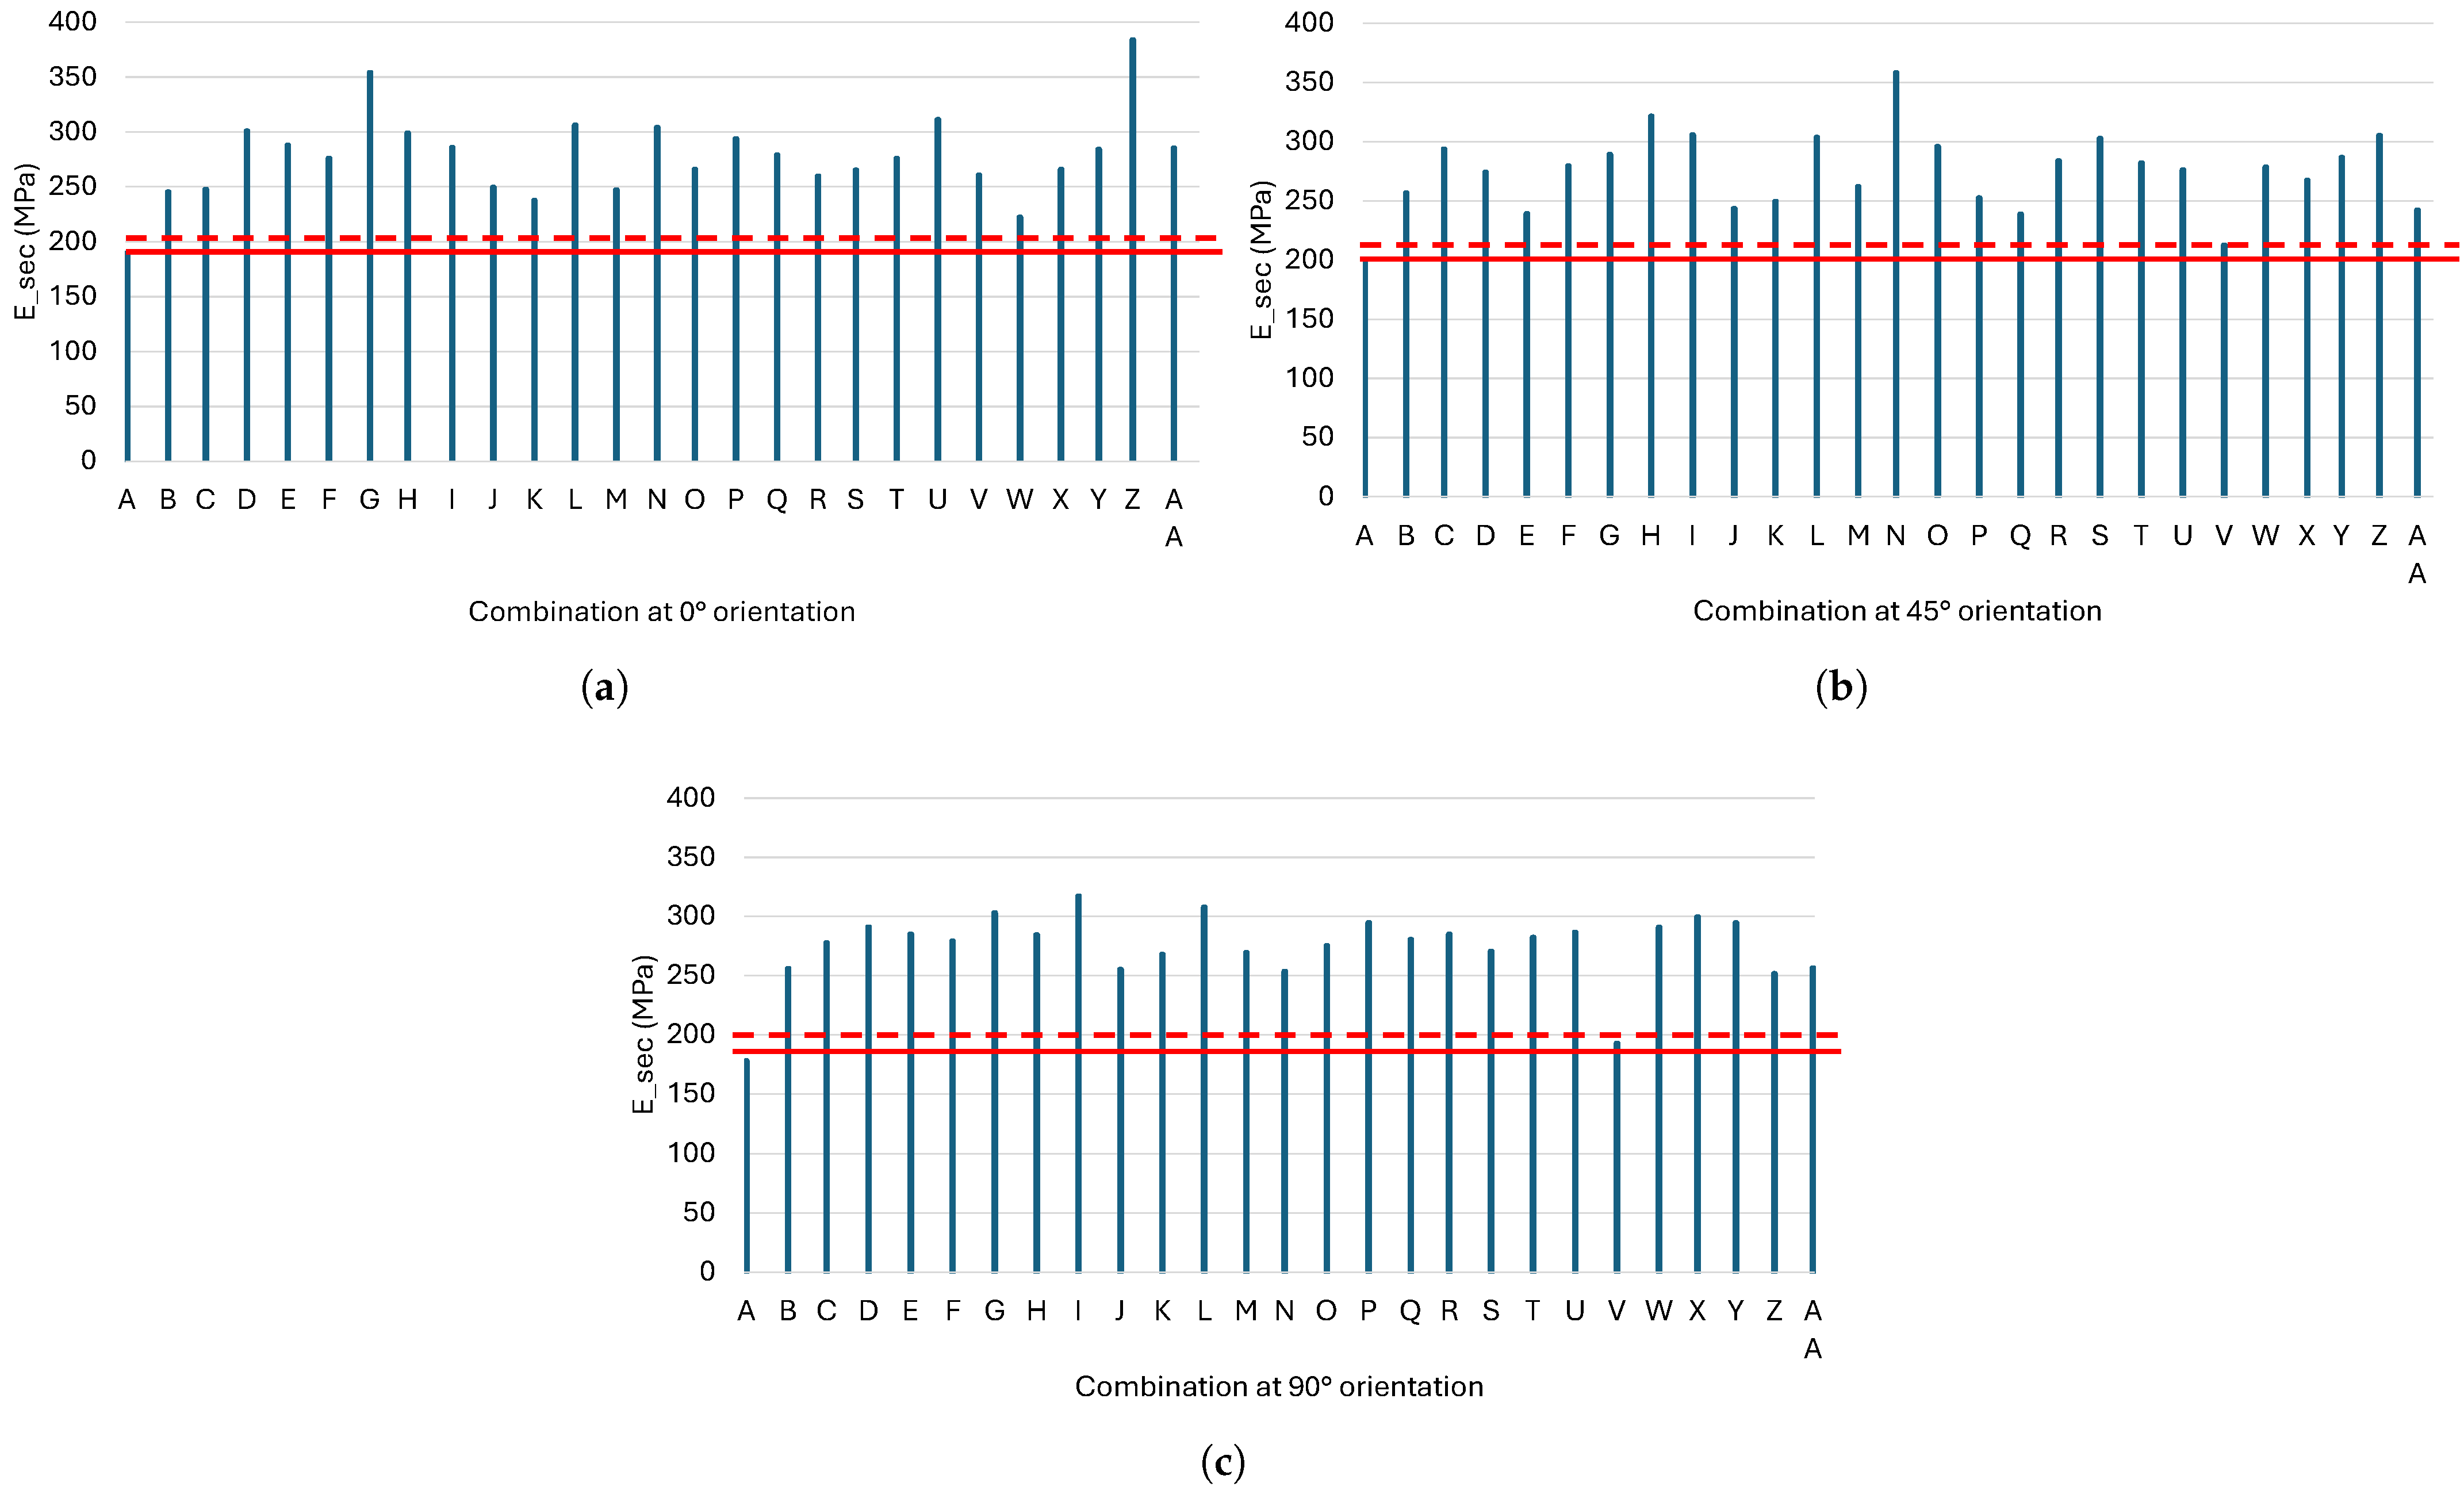
Figure 16.
Comparison of the of the reference combination (red line) with the value of all combinations for the three main orientations: (a) 0°, (b) 45°, and (c) 90°. The dotted line equals 1.05 times the reference value.
Figure 16.
Comparison of the of the reference combination (red line) with the value of all combinations for the three main orientations: (a) 0°, (b) 45°, and (c) 90°. The dotted line equals 1.05 times the reference value.
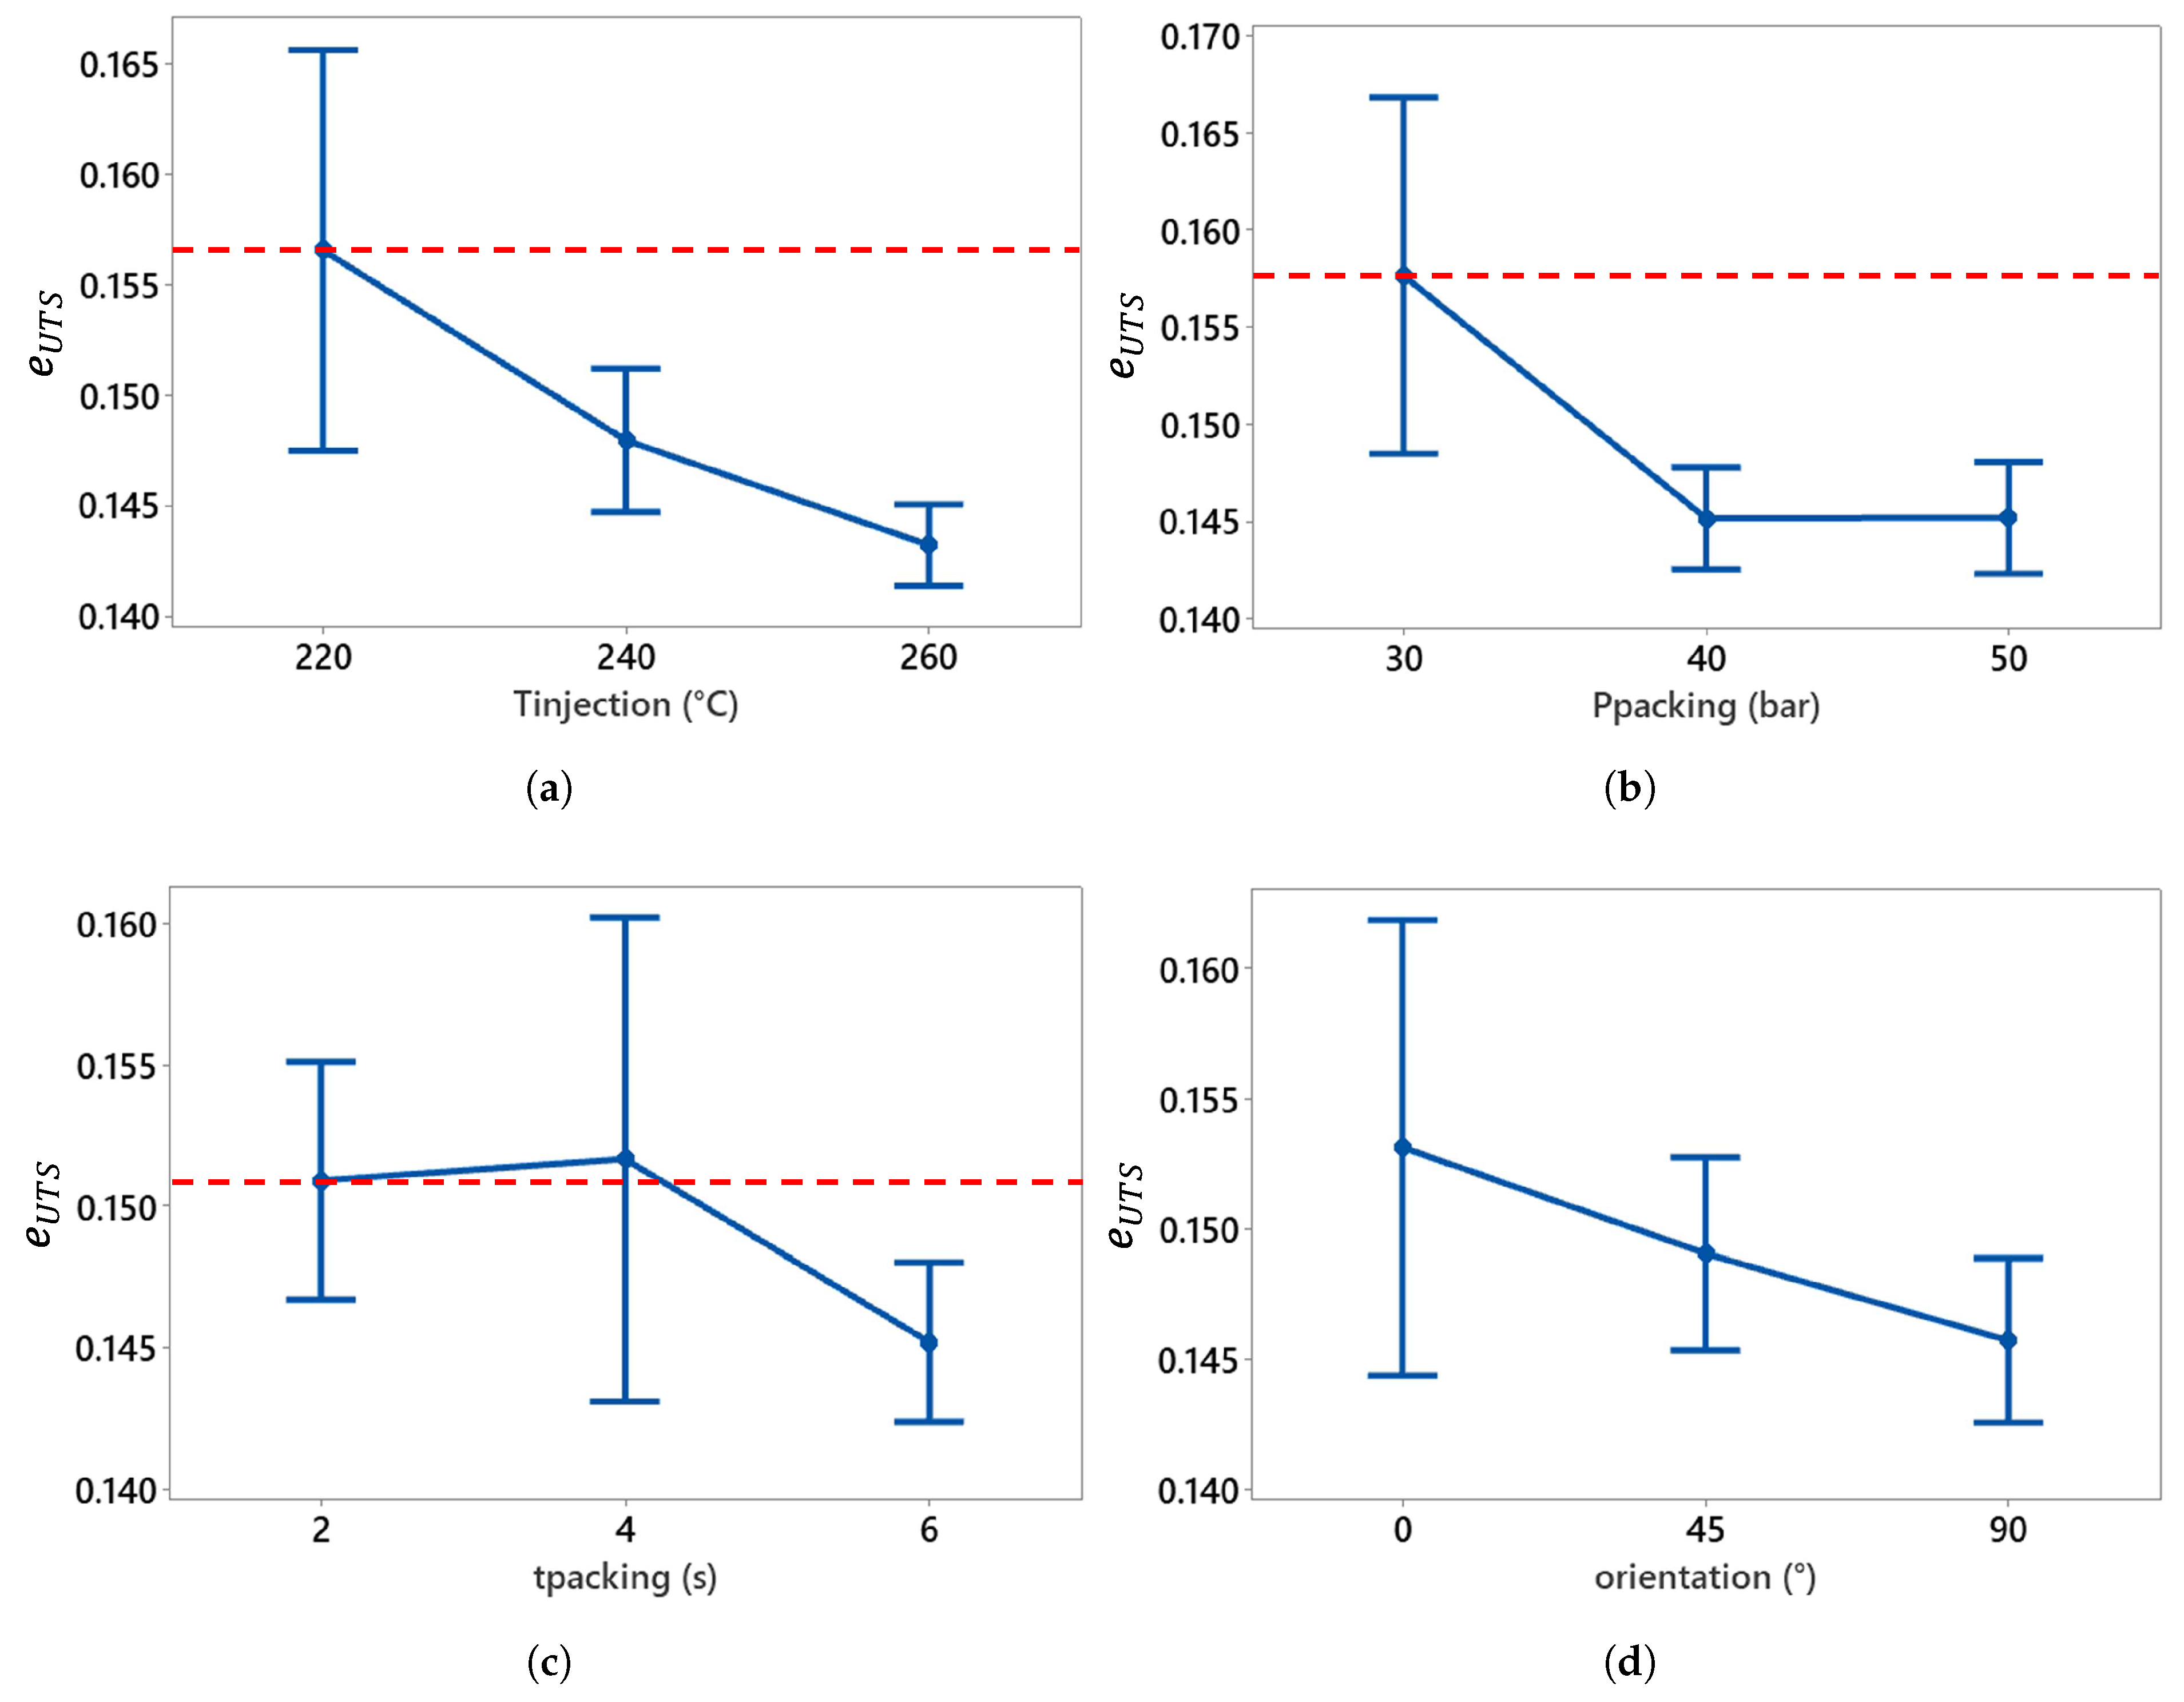
Figure 17.
Effect of injection parameters on strain at ultimate tensile strength compared to the reference (dotted red line). (a) , (b) , (c) , and (d) orientation.
Figure 17.
Effect of injection parameters on strain at ultimate tensile strength compared to the reference (dotted red line). (a) , (b) , (c) , and (d) orientation.
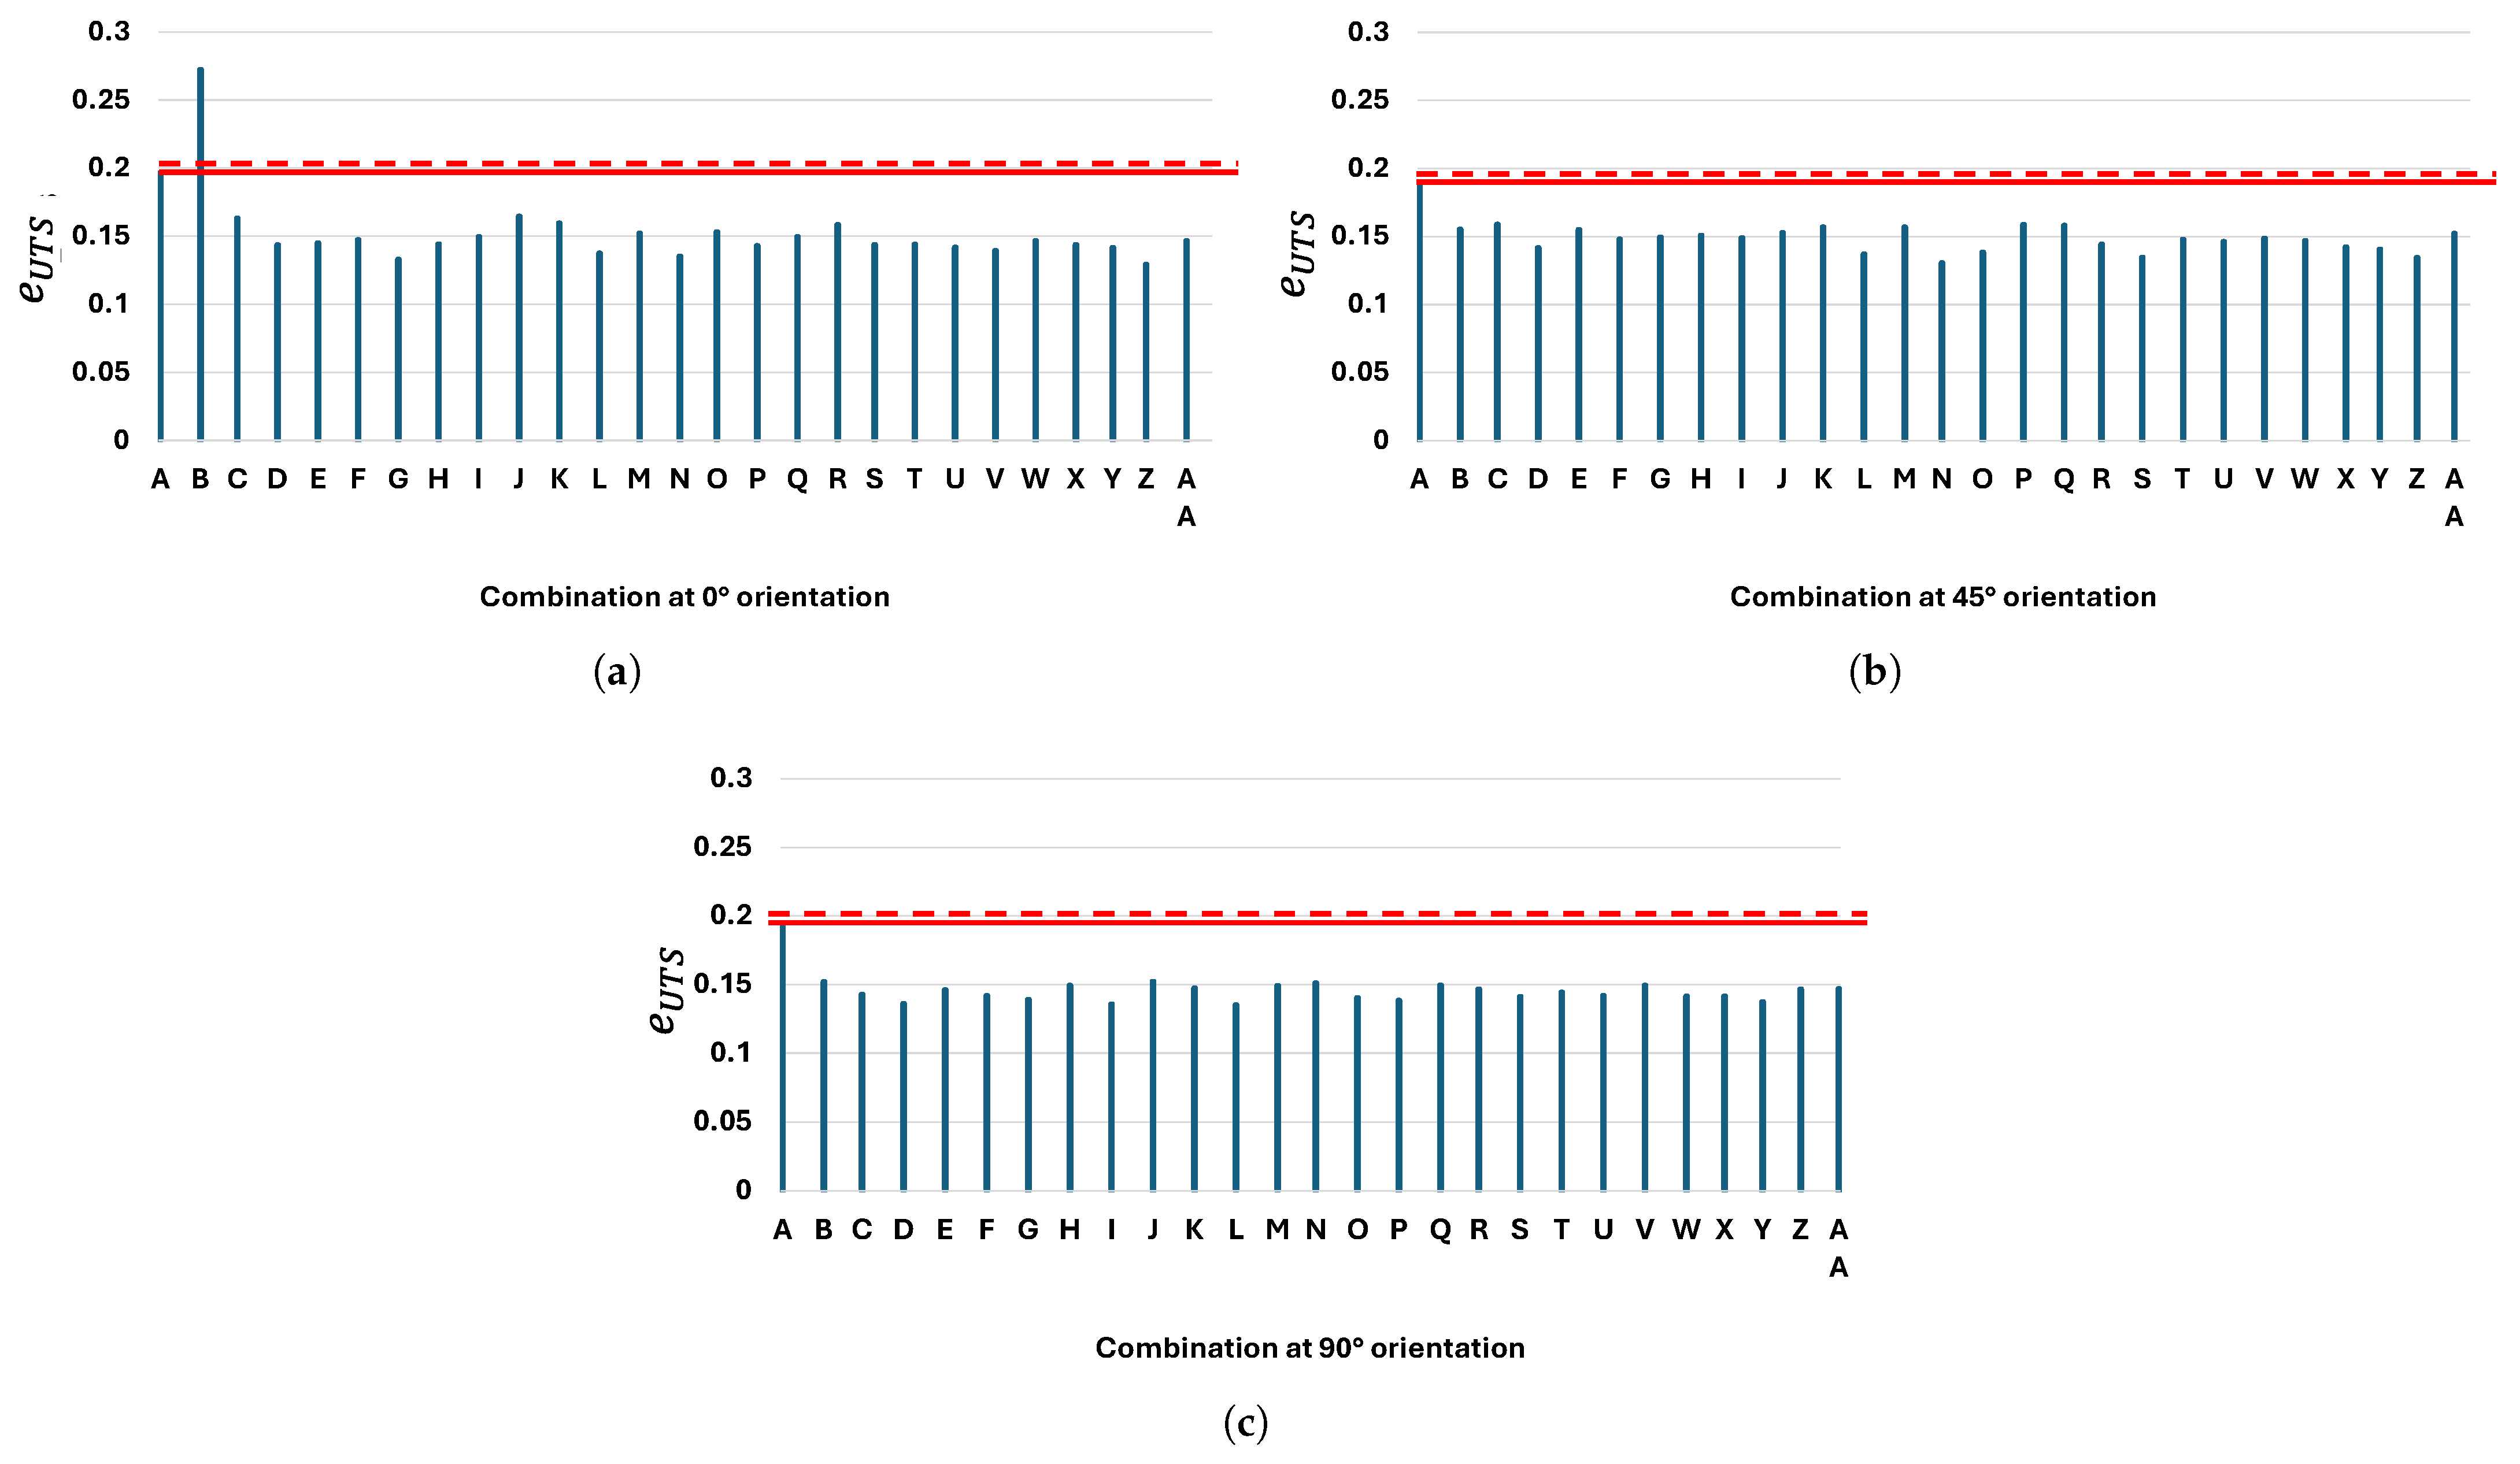
Figure 18.
Comparison of the of the reference combination (red line) with the value of all combinations for the three main orientations: (a) 0°, (b) 45°, and (c) 90°. The dotted line equals 1.05 times the reference value.
Figure 18.
Comparison of the of the reference combination (red line) with the value of all combinations for the three main orientations: (a) 0°, (b) 45°, and (c) 90°. The dotted line equals 1.05 times the reference value.
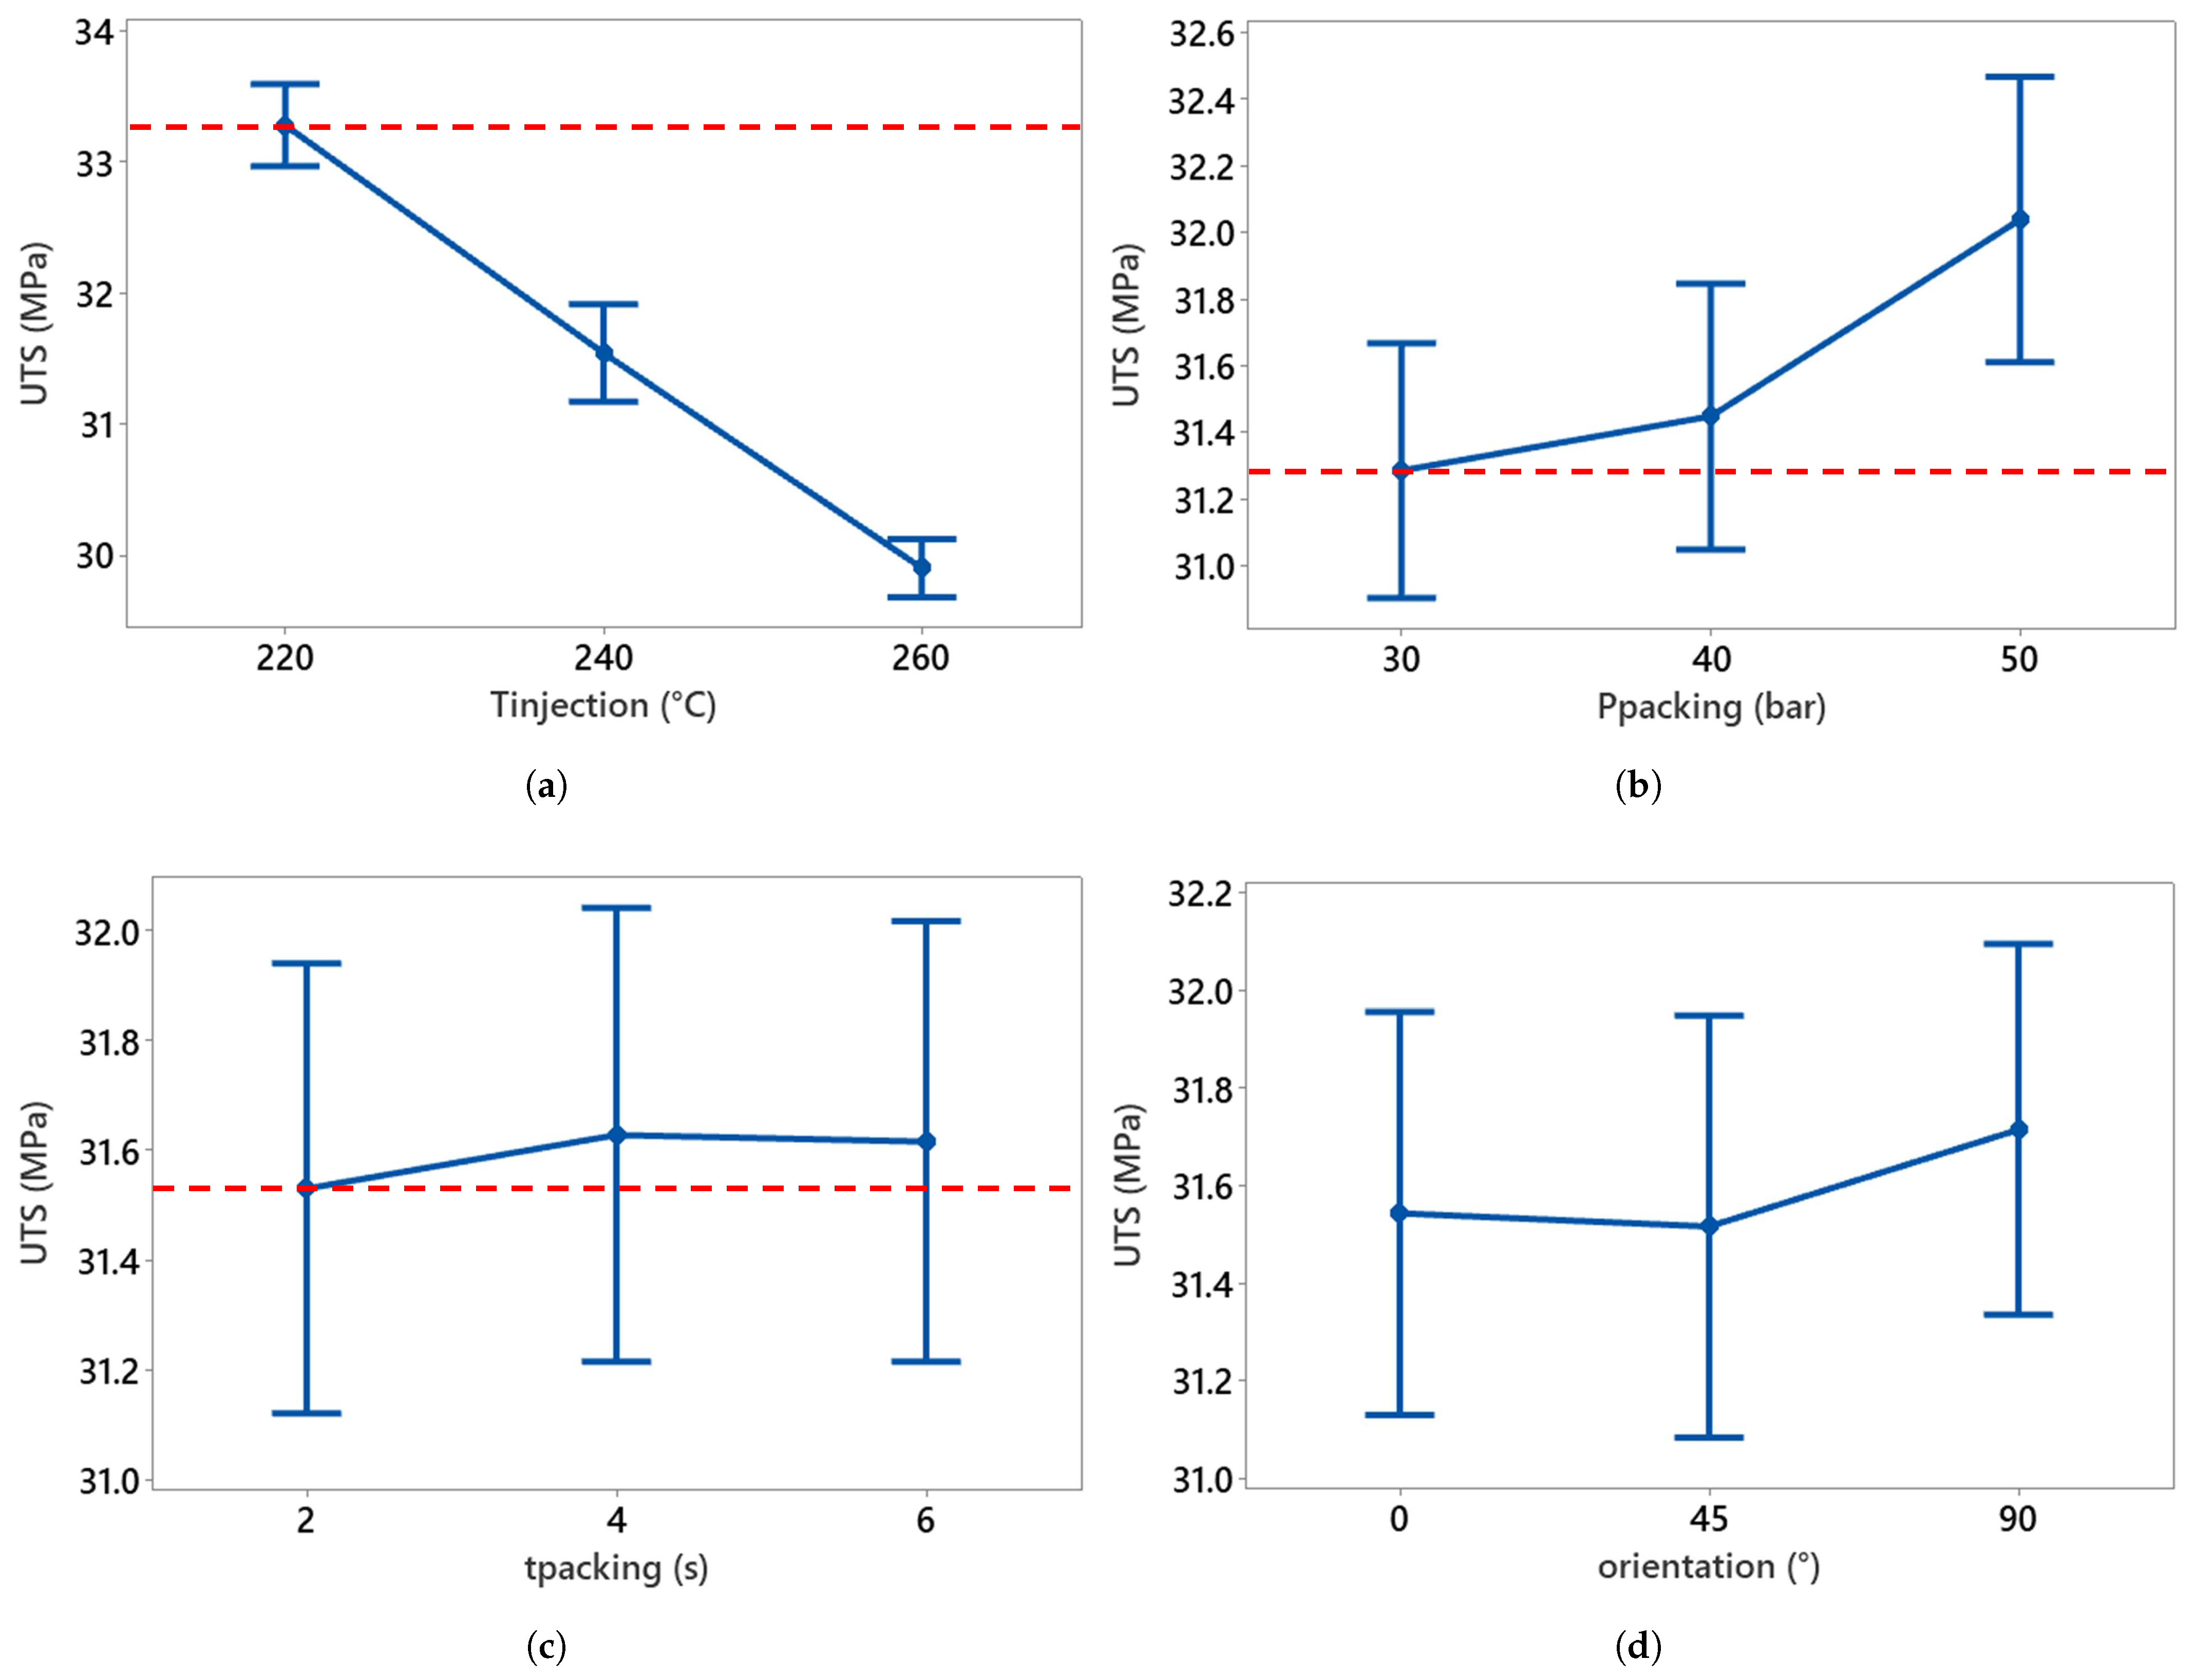
Figure 19.
Effects of UTS injection parameters compared to the reference (dotted red line). (a) , (b) , (c) , and (d) orientation.
Figure 19.
Effects of UTS injection parameters compared to the reference (dotted red line). (a) , (b) , (c) , and (d) orientation.
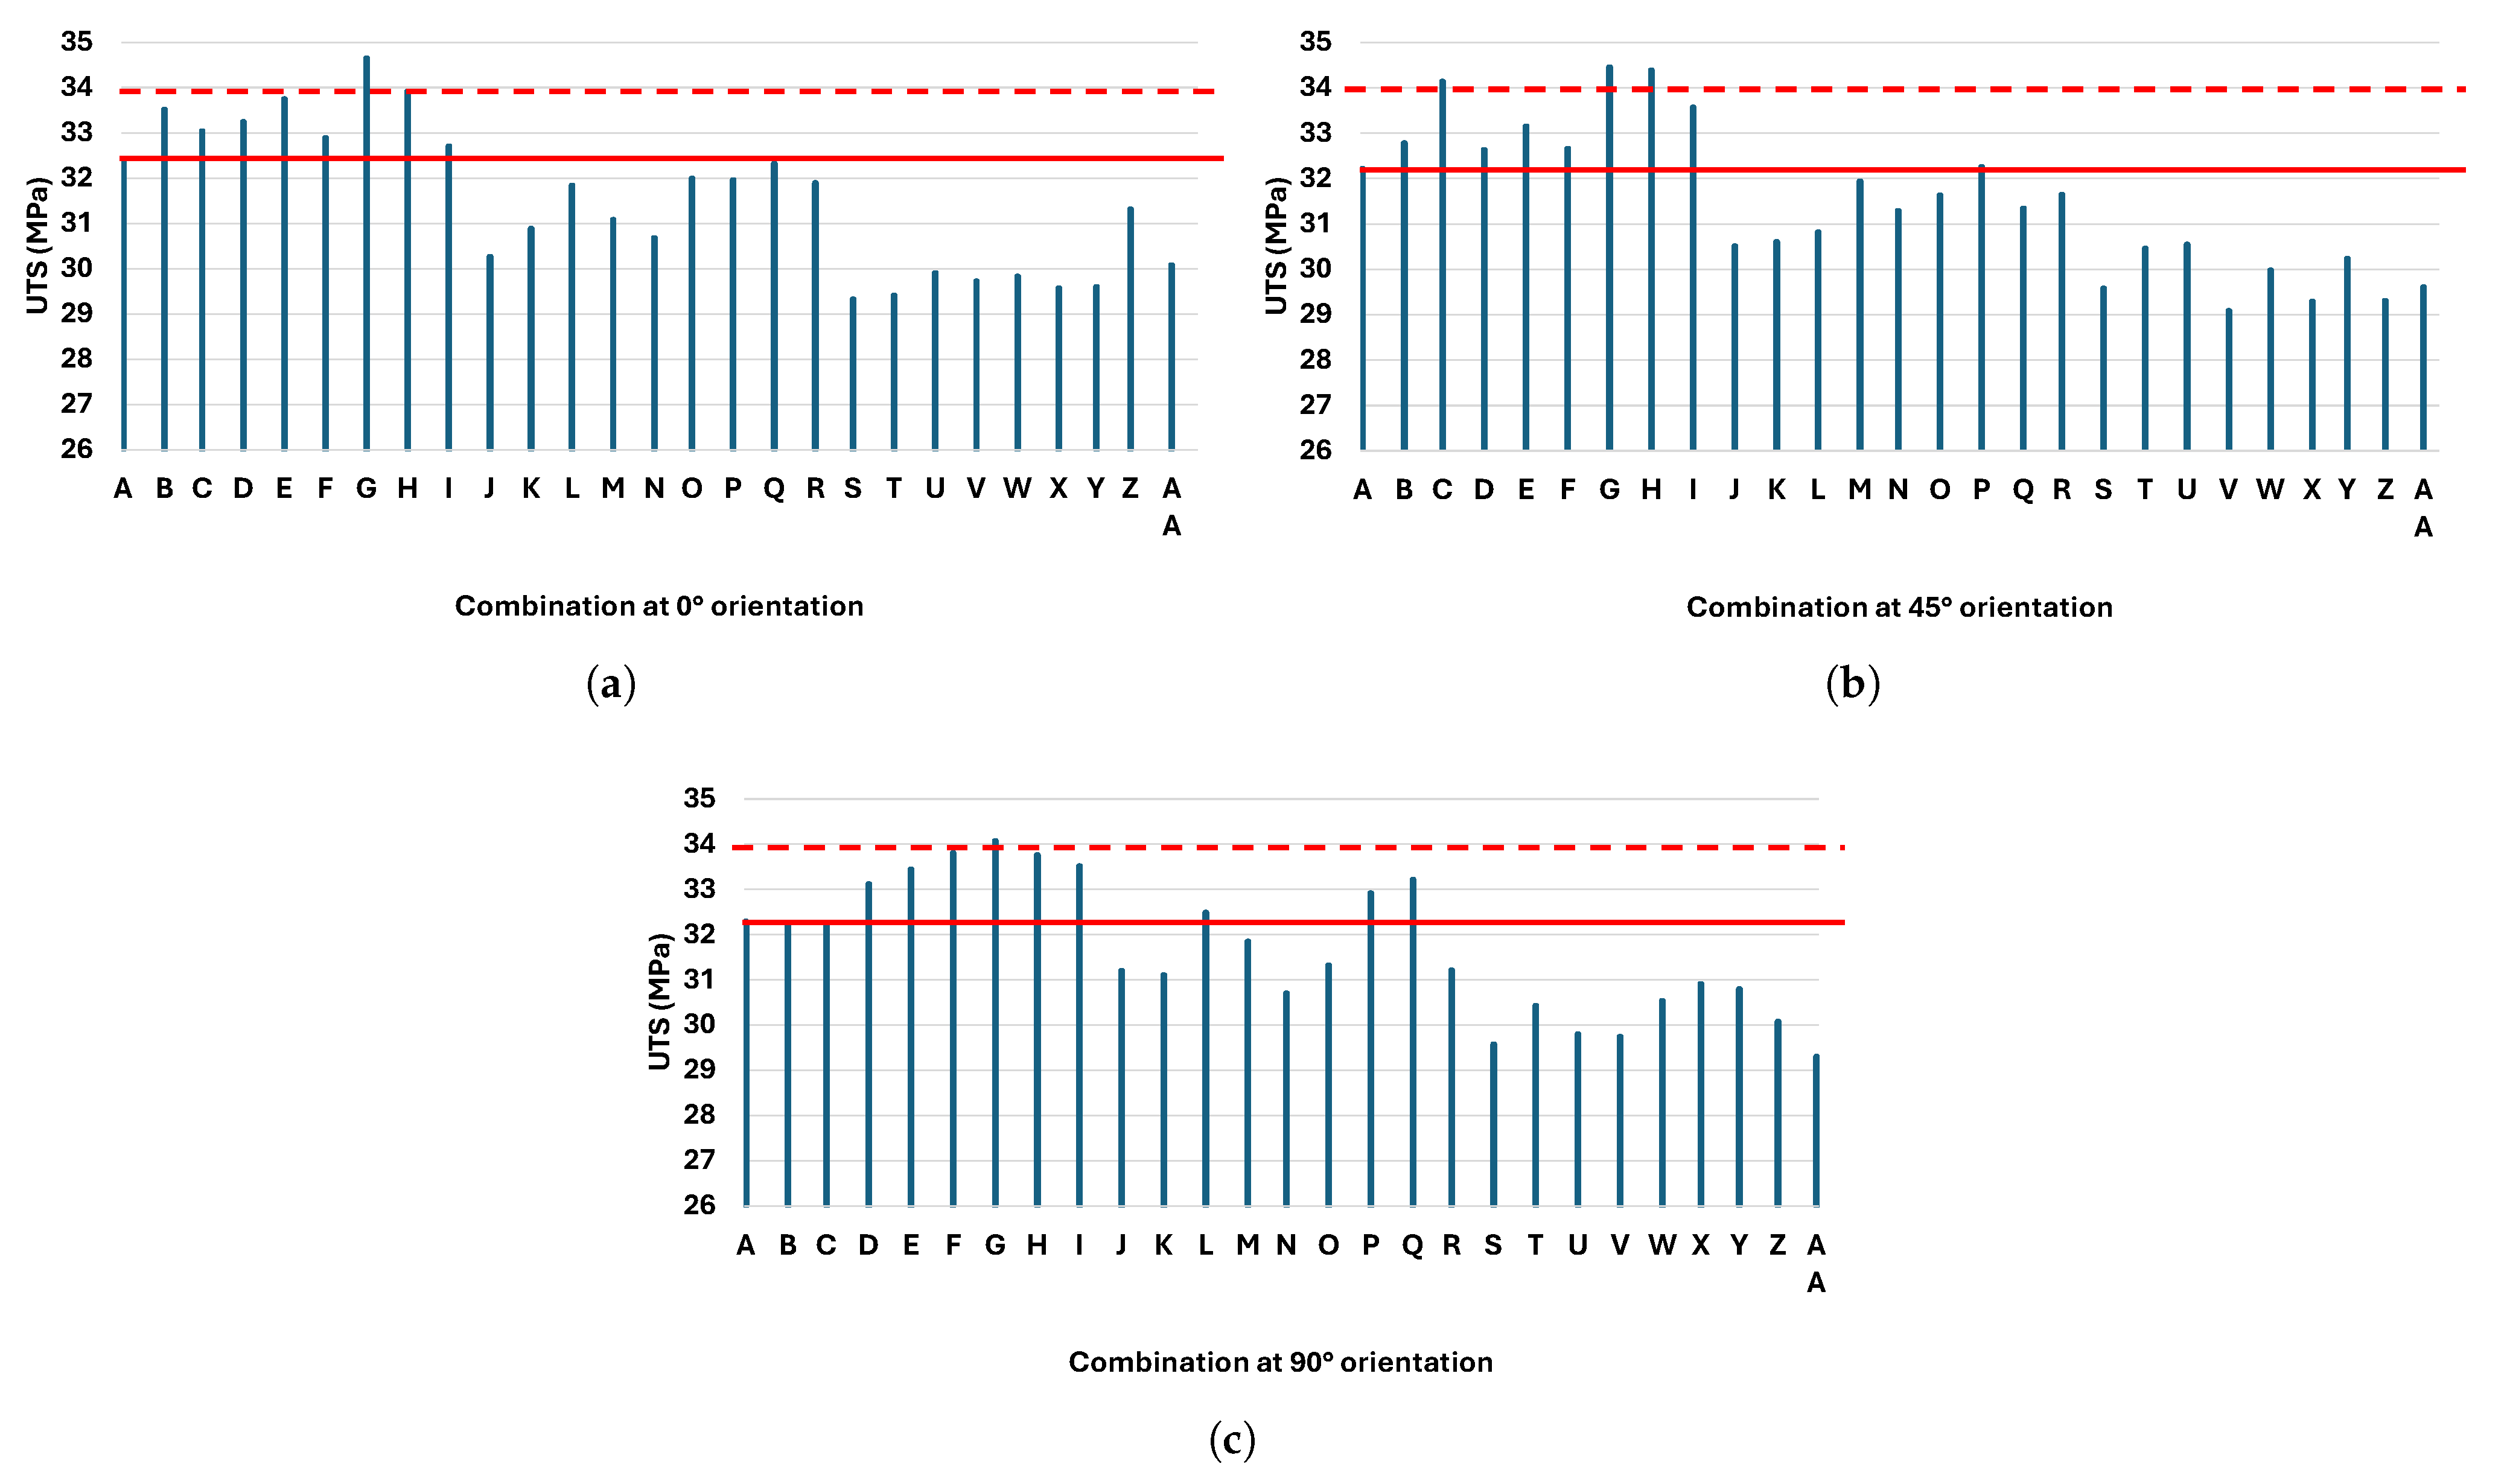
Figure 20.
Comparison of the UTS of the reference combination (red line) with the UTS value of all combinations for the three main orientations: (a) 0°, (b) 45°, and (c) 90°. The dotted line equals 1.05 times the reference value.
Figure 20.
Comparison of the UTS of the reference combination (red line) with the UTS value of all combinations for the three main orientations: (a) 0°, (b) 45°, and (c) 90°. The dotted line equals 1.05 times the reference value.
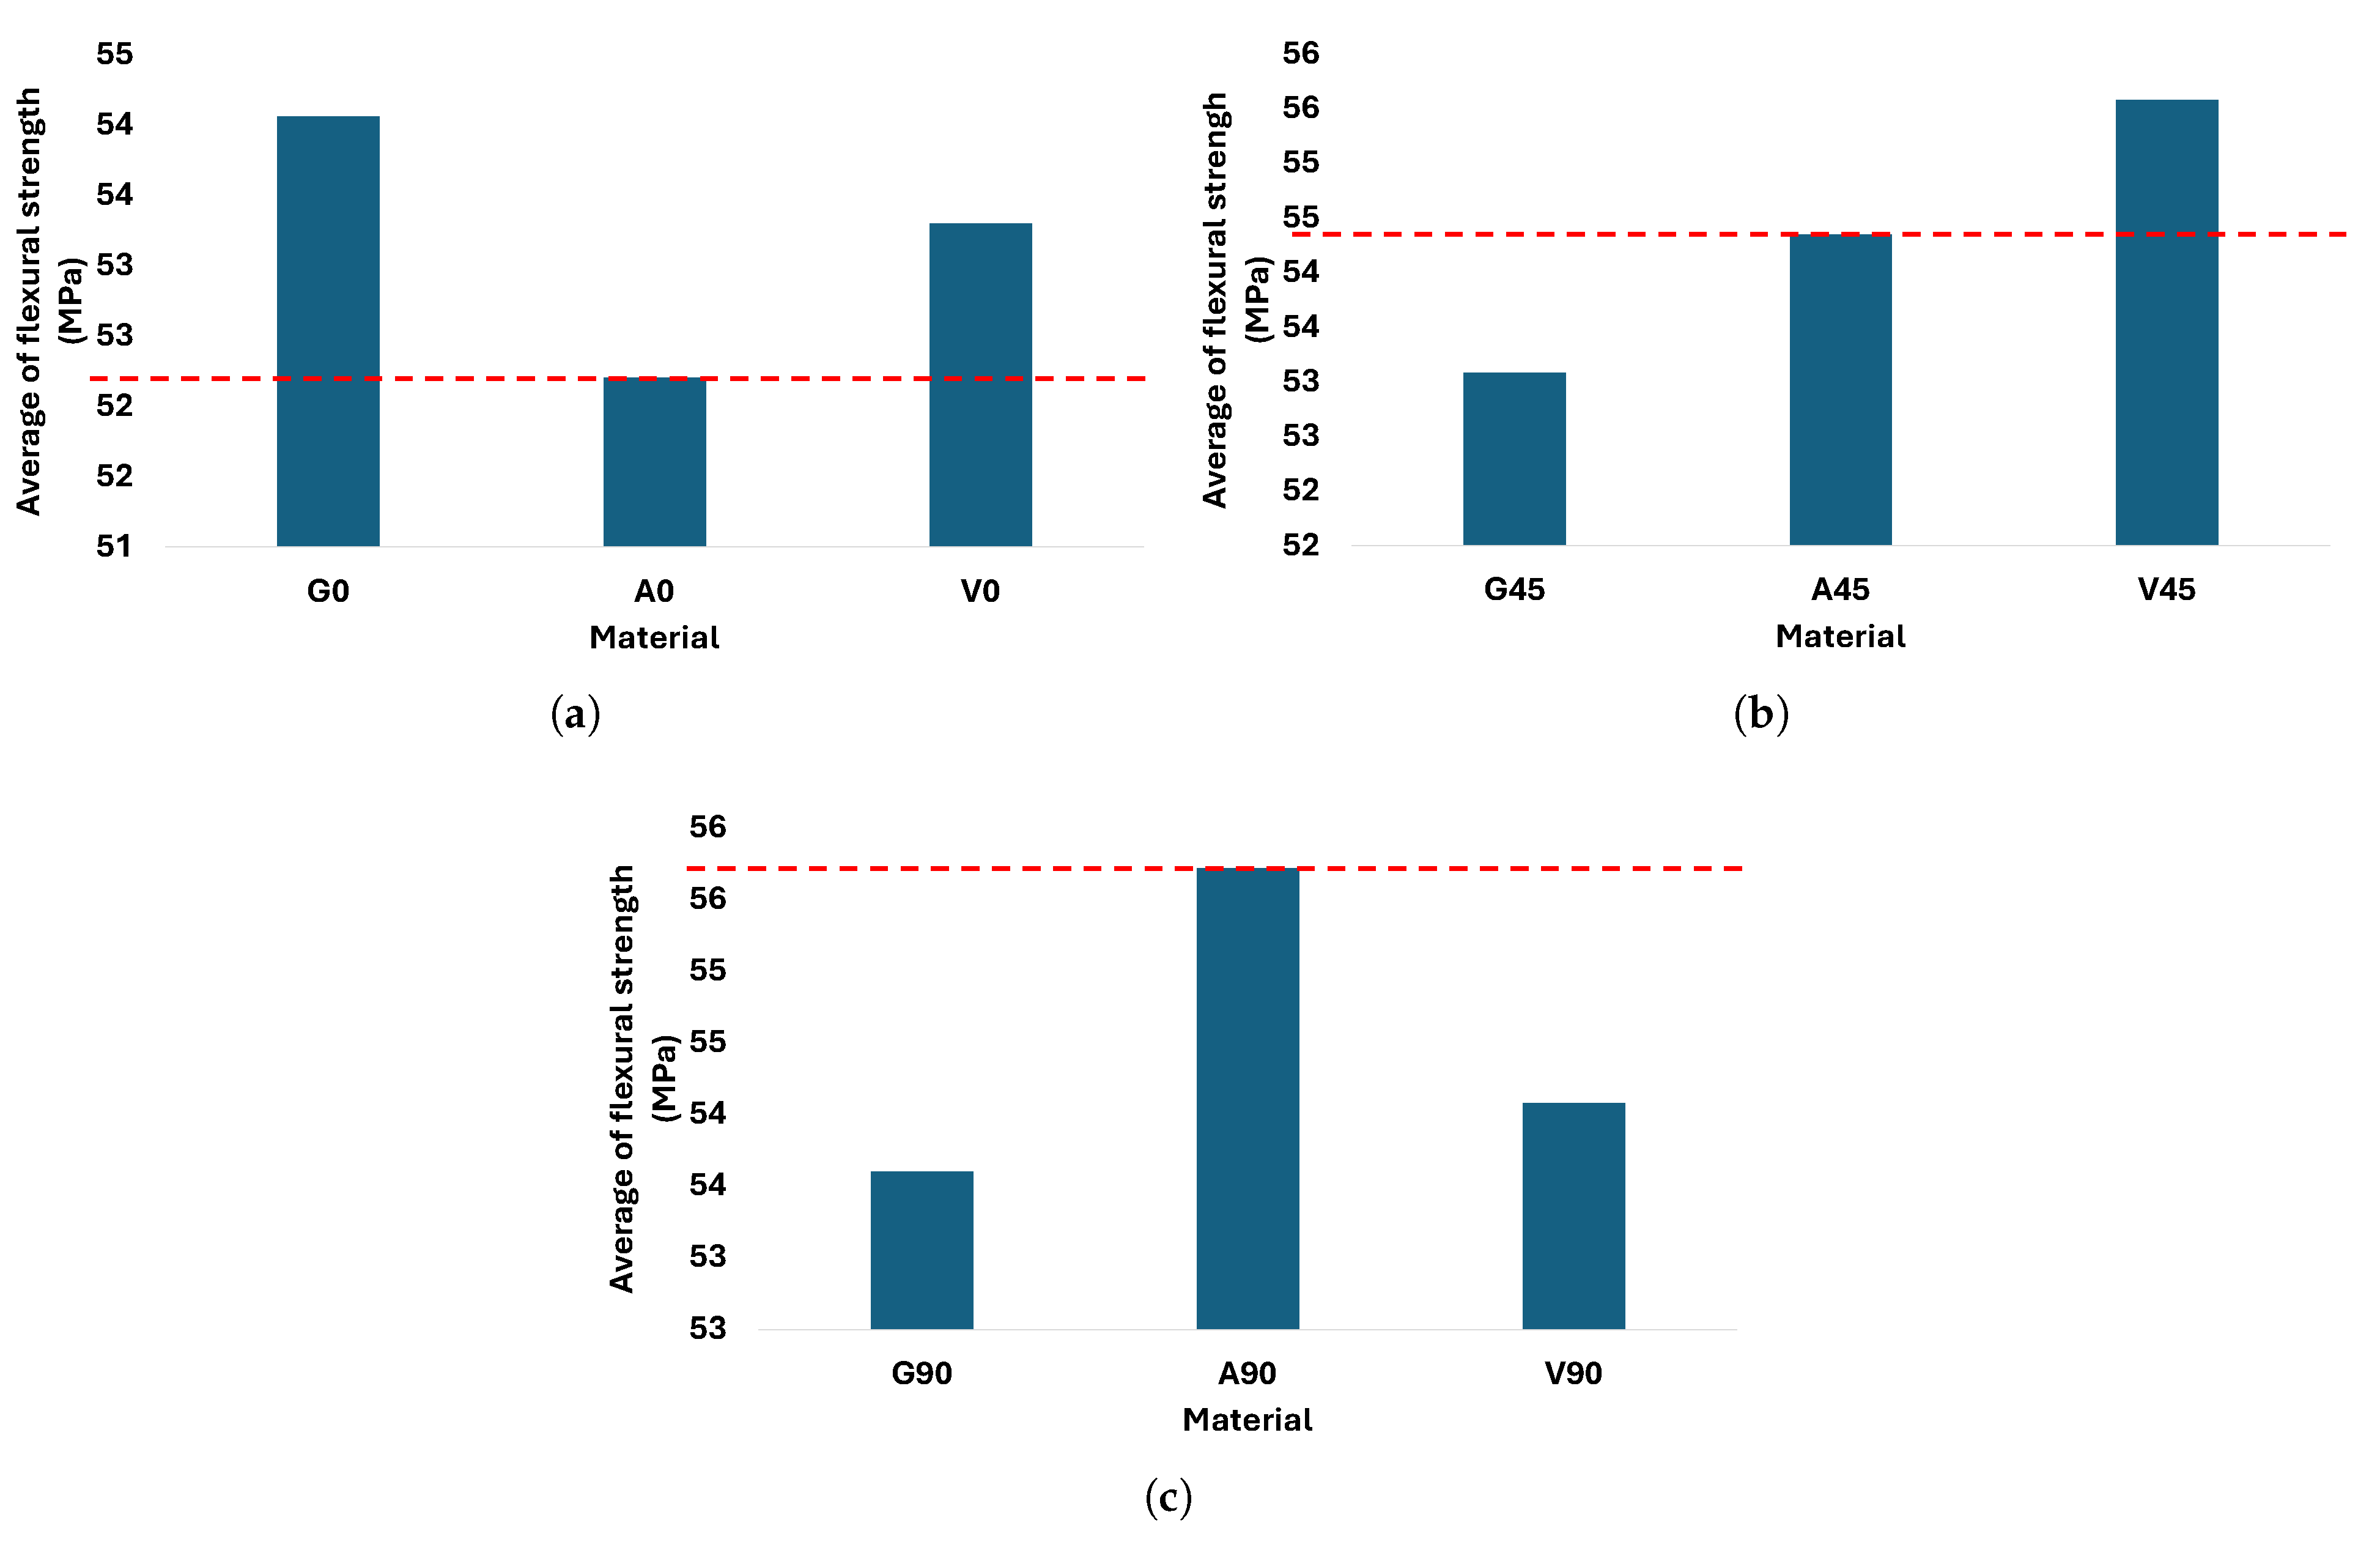
Figure 21.
Average flexural strength for the best, reference, and worst combination under the three main orientations compared to the reference ((dotted red line). (a) 0° orientation, (b) orientation, and (c) 90° orientation.
Figure 21.
Average flexural strength for the best, reference, and worst combination under the three main orientations compared to the reference ((dotted red line). (a) 0° orientation, (b) orientation, and (c) 90° orientation.
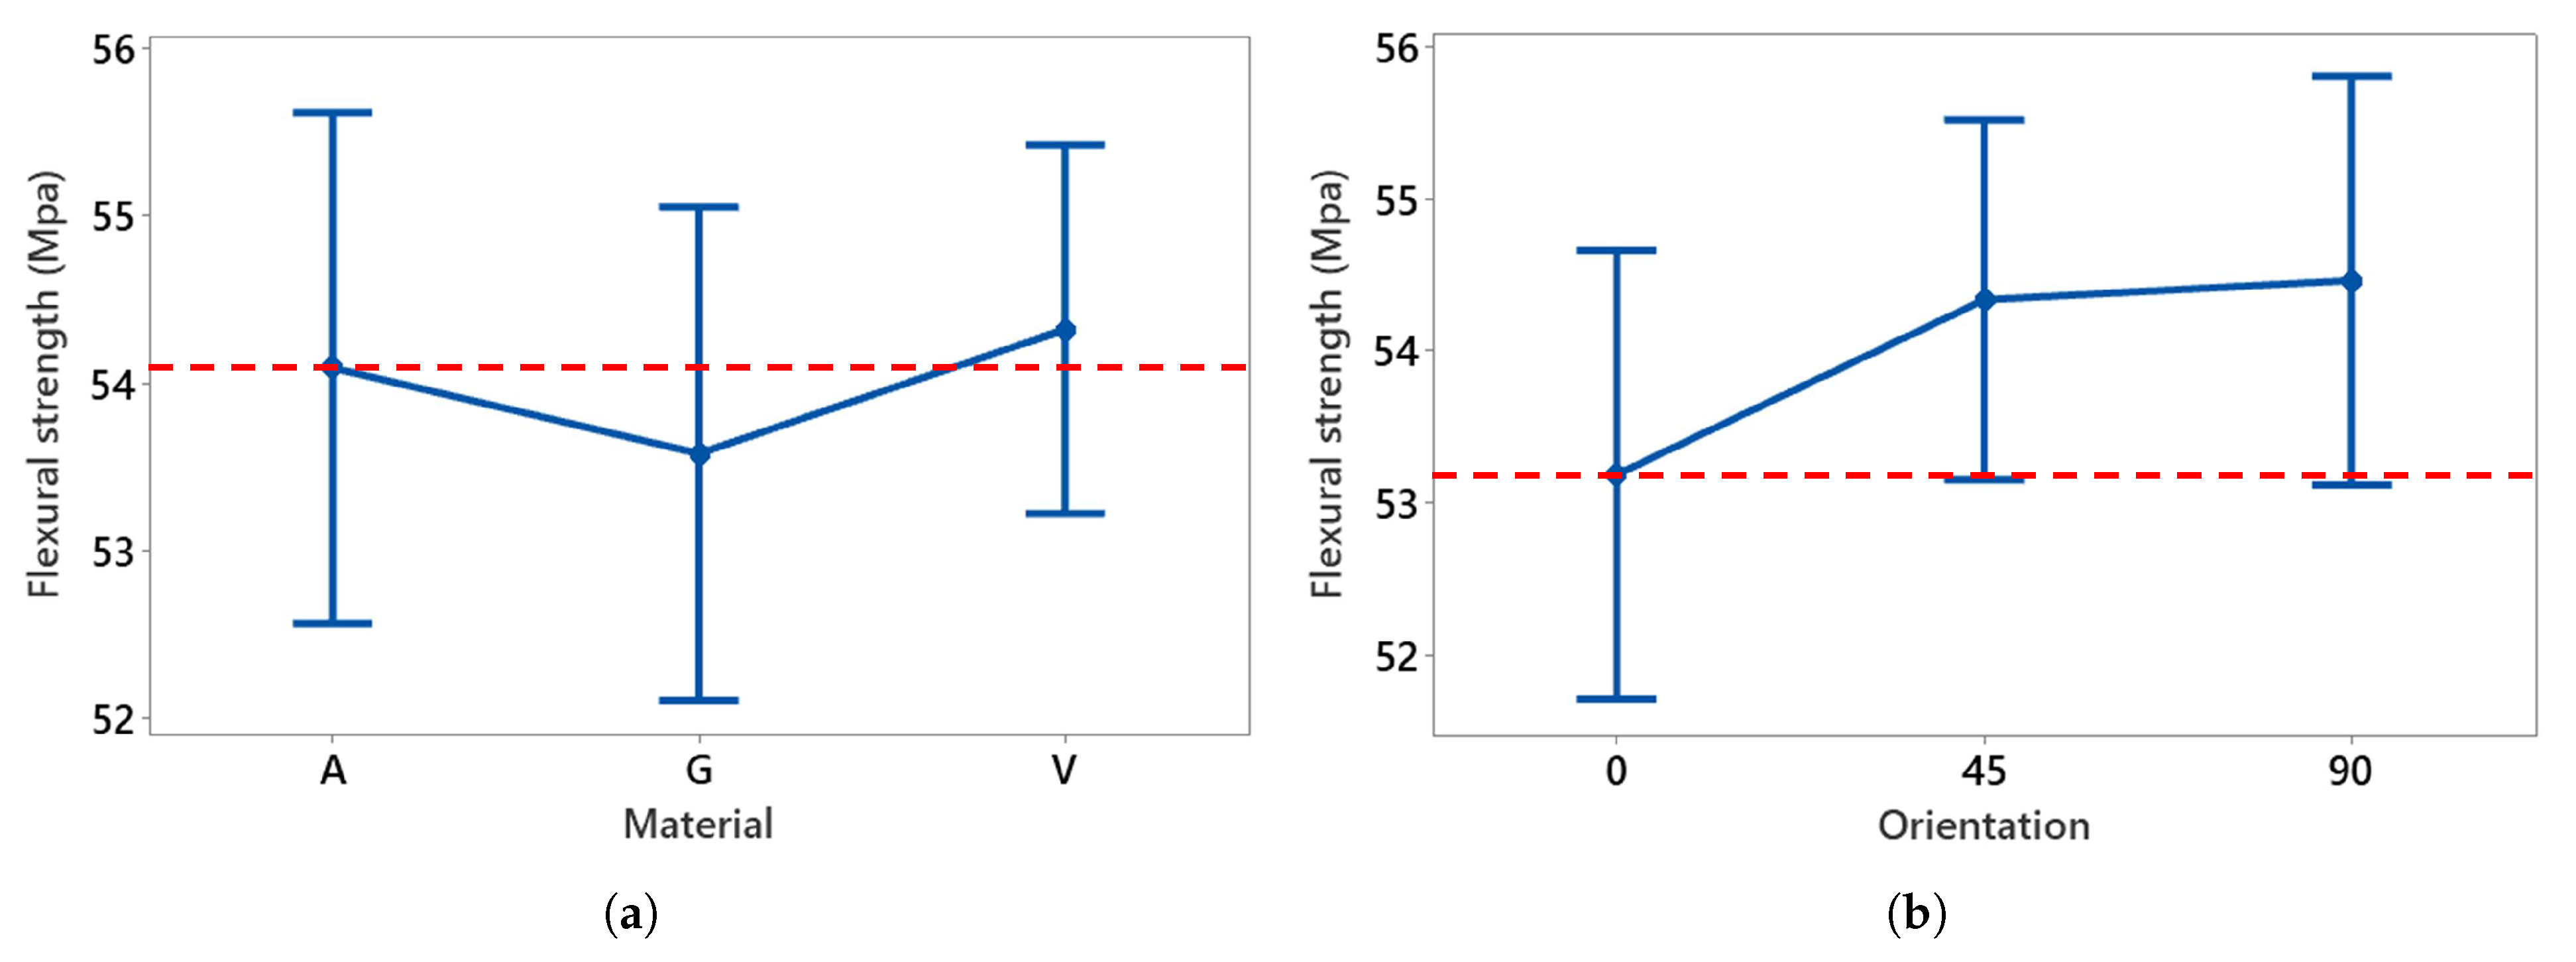
Figure 22.
Main effect plots of (a) material and (b) orientation on flexural strength compared to reference (dotted red line).
Figure 22.
Main effect plots of (a) material and (b) orientation on flexural strength compared to reference (dotted red line).
Figure 23.
Average flexural modulus for the best, reference, and worst combination under the three main orientations compared to the reference (dotted red line). (a) 0° orientation, (b) orientation, and (c) 90° orientation.
Figure 23.
Average flexural modulus for the best, reference, and worst combination under the three main orientations compared to the reference (dotted red line). (a) 0° orientation, (b) orientation, and (c) 90° orientation.
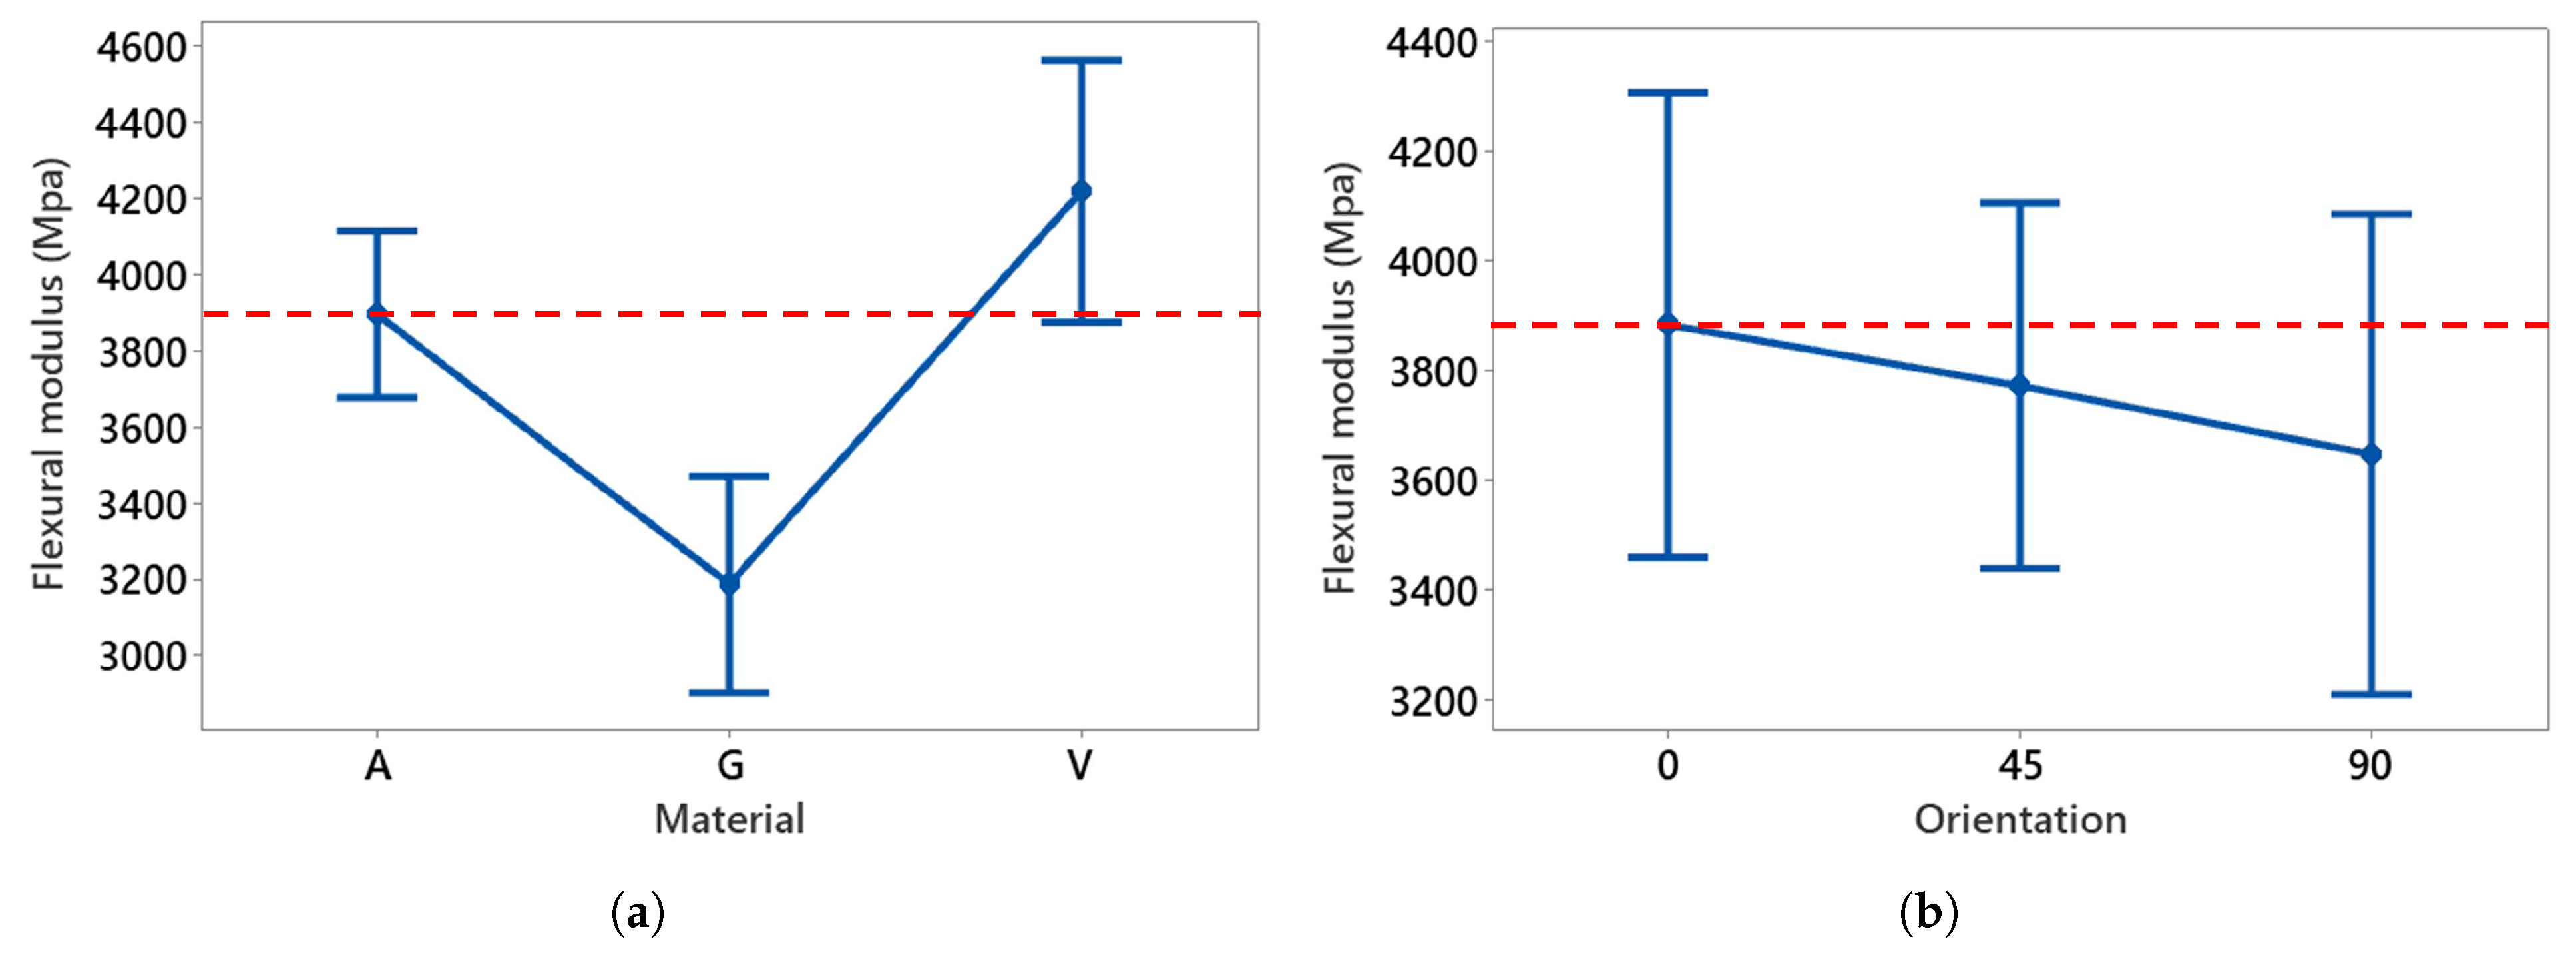
Figure 24.
Main effect plots of (a) material and (b) orientation on flexural modulus compared to reference (dotted red line).
Figure 24.
Main effect plots of (a) material and (b) orientation on flexural modulus compared to reference (dotted red line).
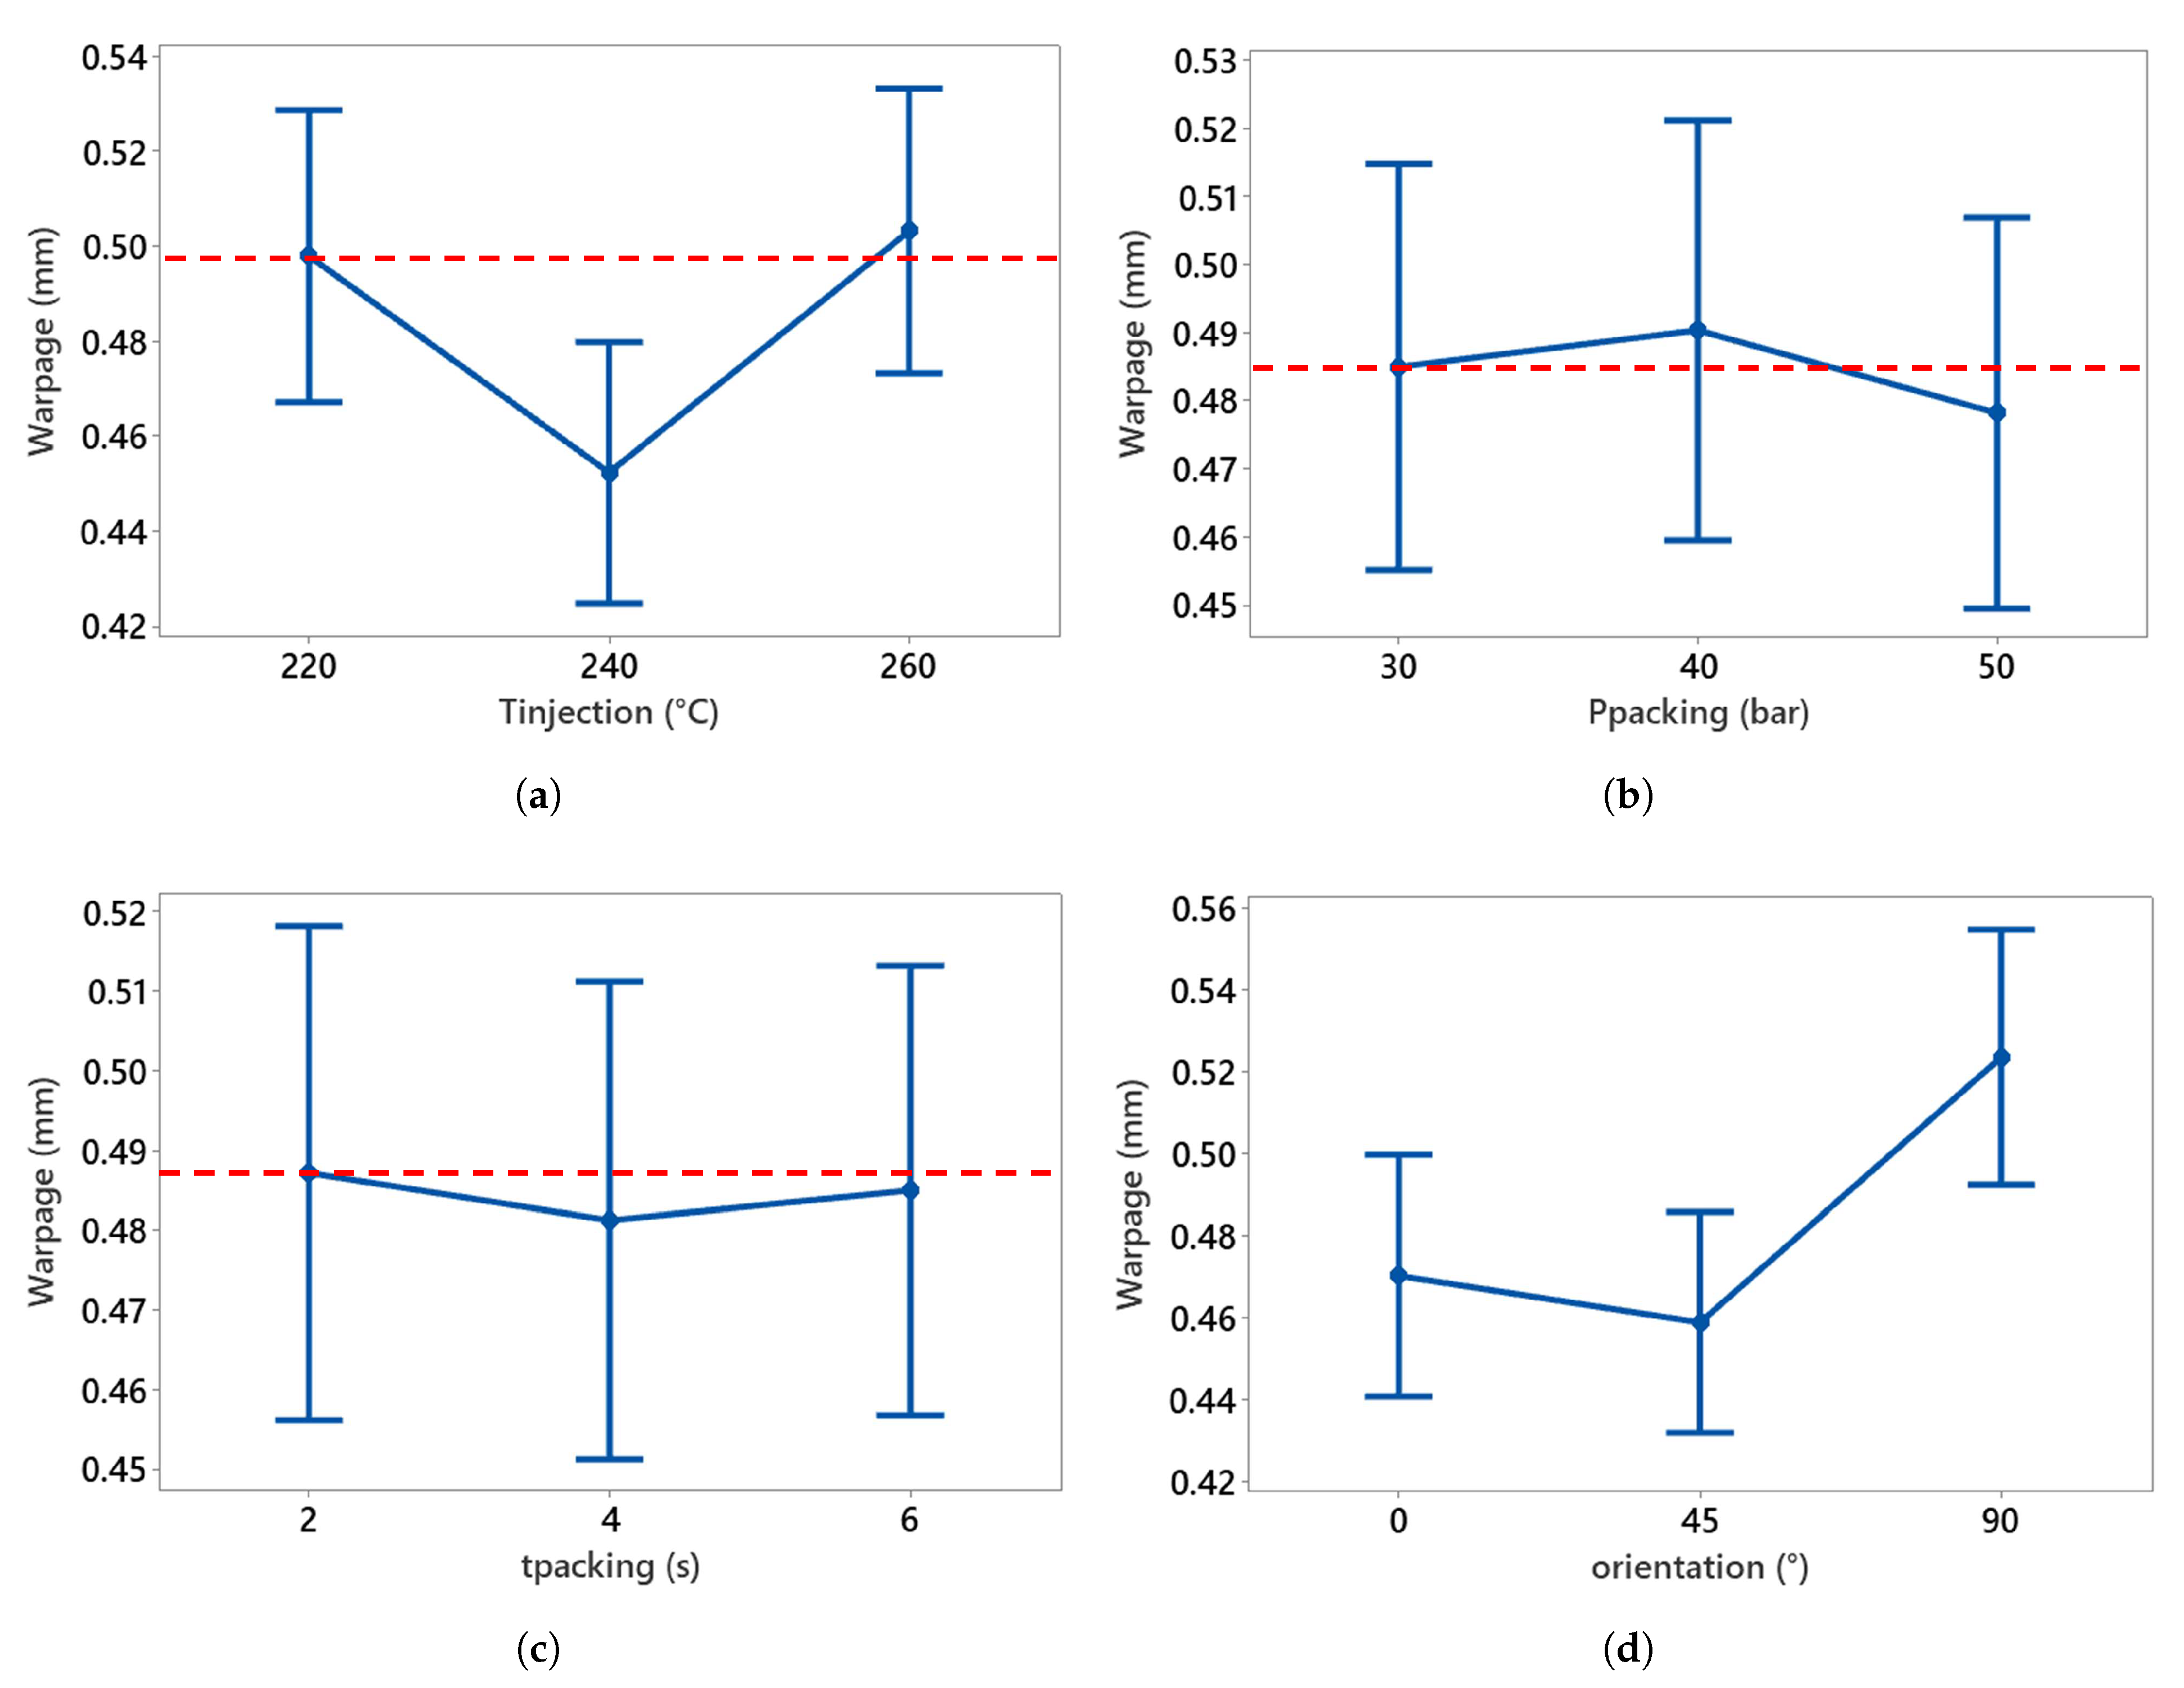
Figure 25.
Main effect plot of warpage with process parameters. (a) Injection temperature vs. warpage, (b) packing pressure vs. warpage, (c) packing time vs. warpage, and (d) orientation vs. warpage. Reference is the dotted red line.
Figure 25.
Main effect plot of warpage with process parameters. (a) Injection temperature vs. warpage, (b) packing pressure vs. warpage, (c) packing time vs. warpage, and (d) orientation vs. warpage. Reference is the dotted red line.
Figure 26.
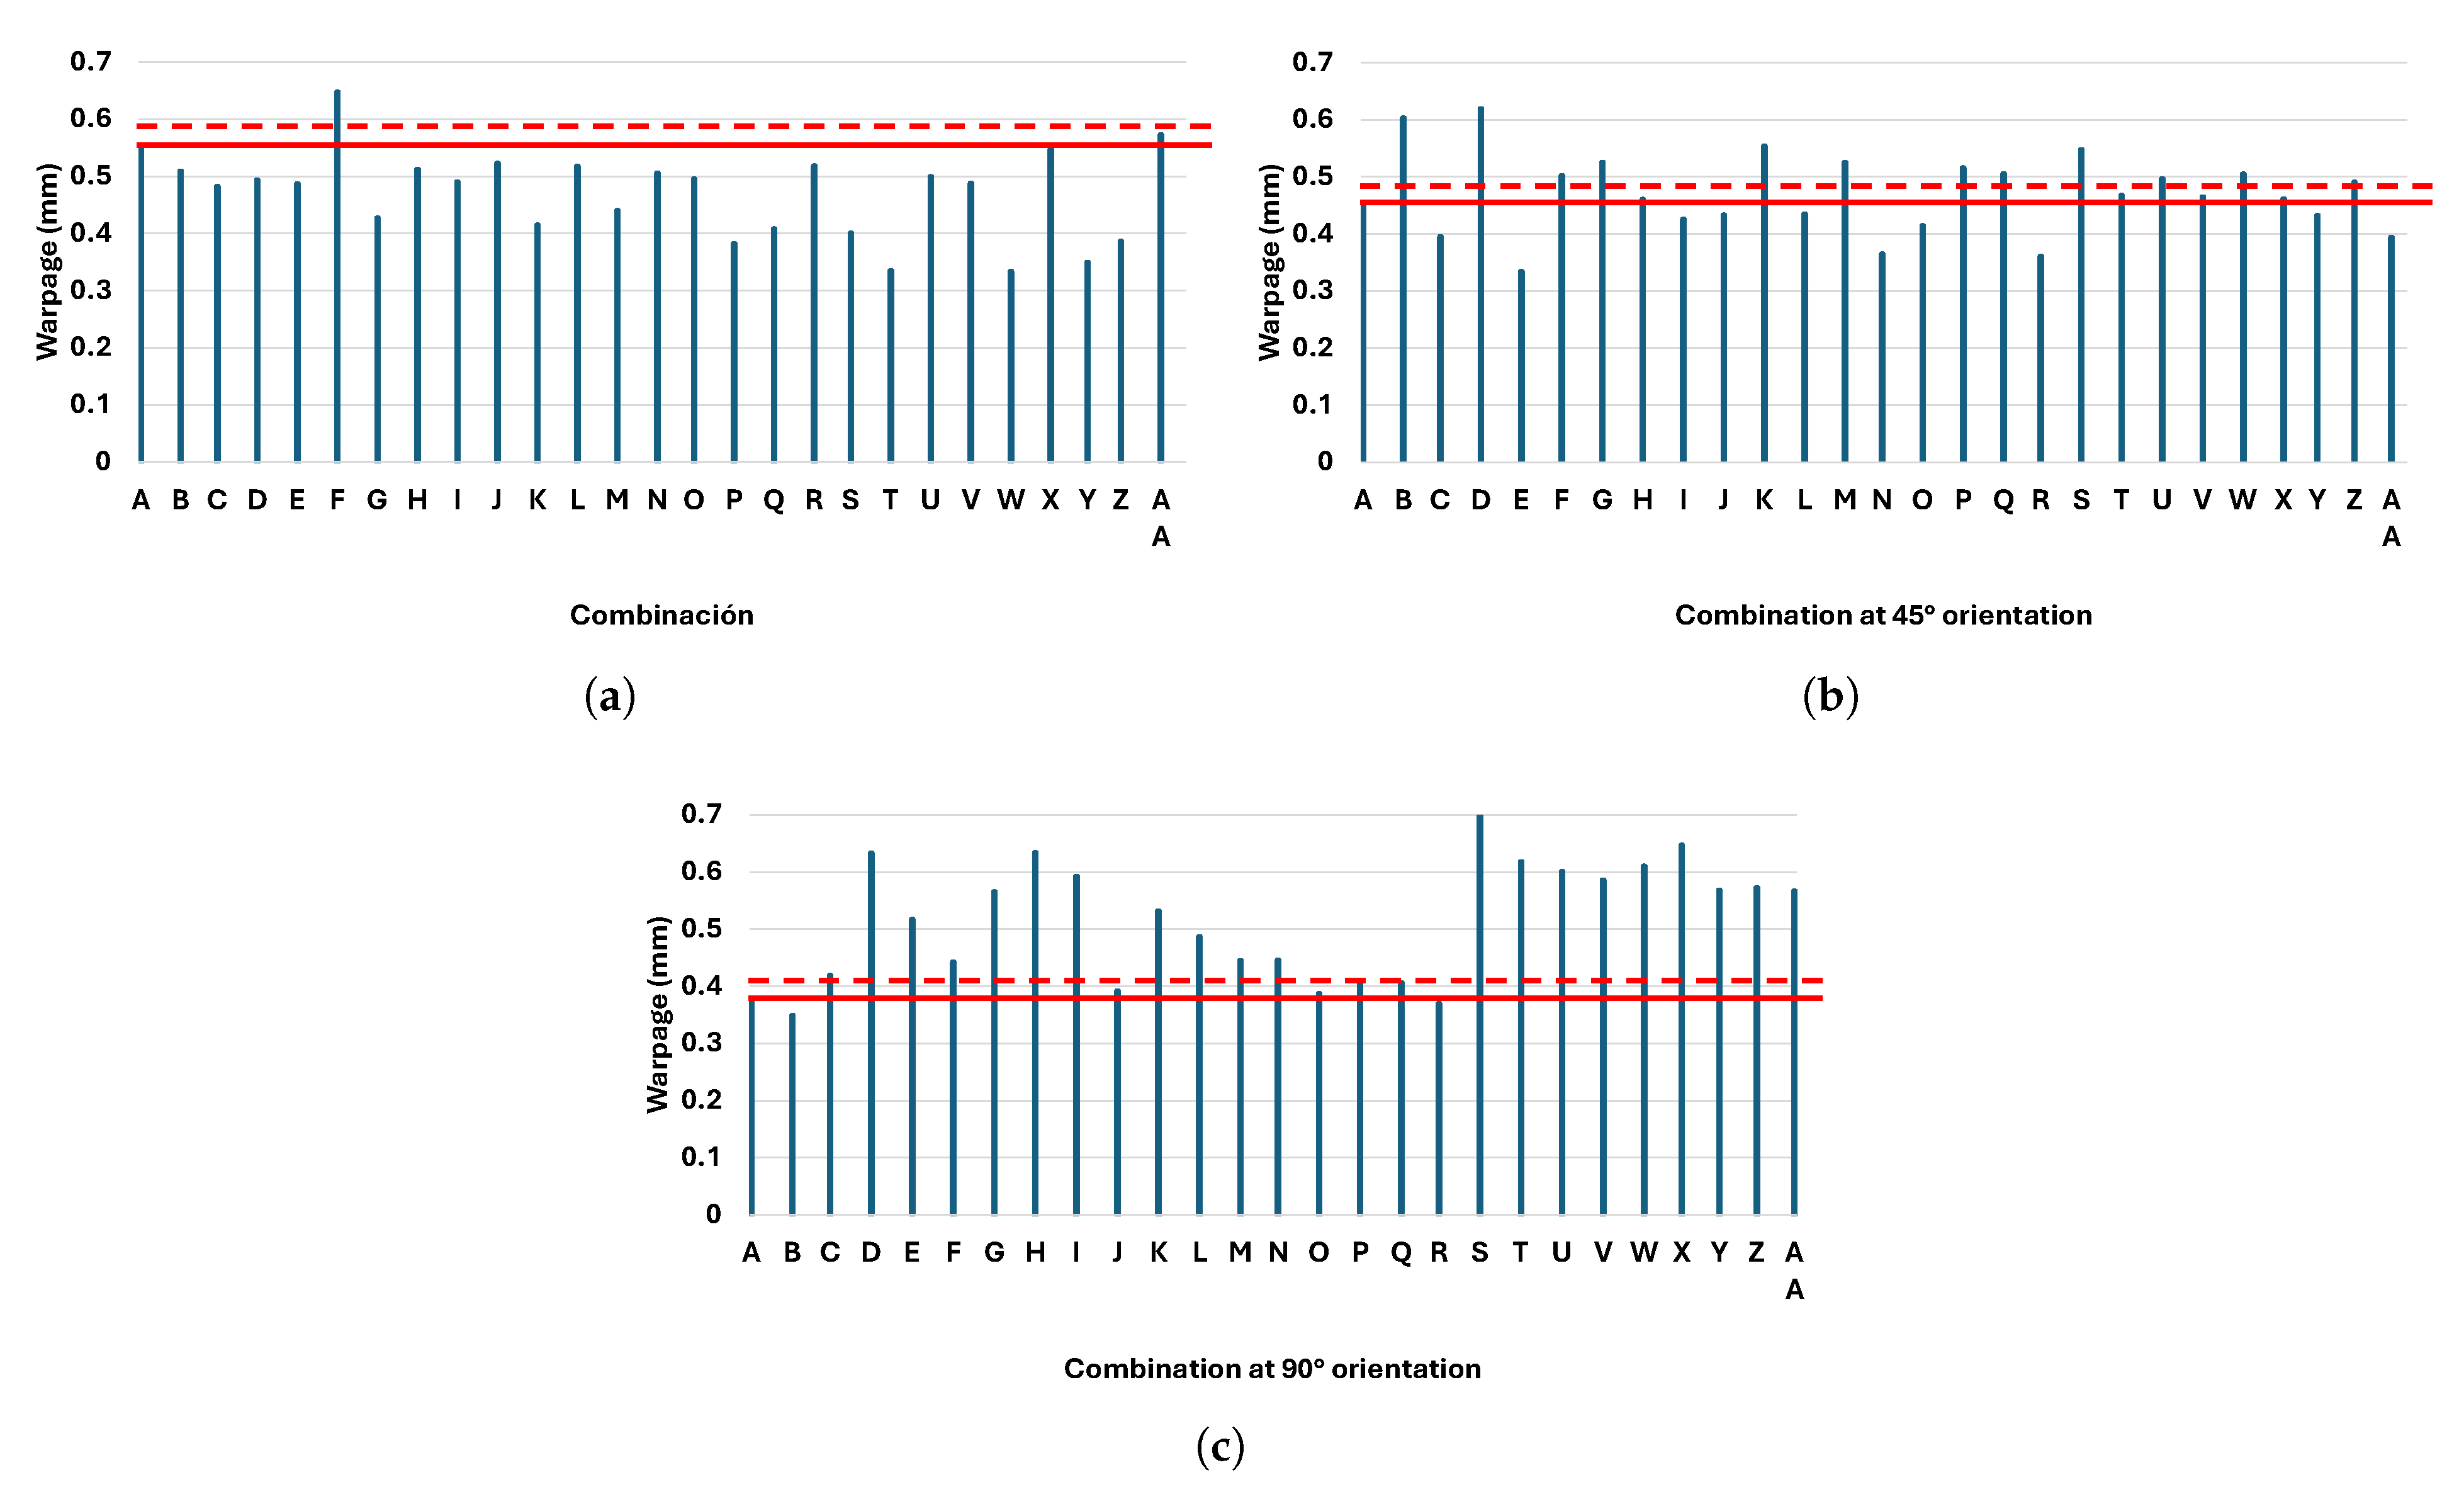
Comparison of the warpage of the reference combination (red line) with the warpage value of all combinations for the three main orientations: (a) 0°, (b) 45°, and (c) 90°. The dotted line equals 1.05 times the reference value.
Figure 26.
Comparison of the warpage of the reference combination (red line) with the warpage value of all combinations for the three main orientations: (a) 0°, (b) 45°, and (c) 90°. The dotted line equals 1.05 times the reference value.
Table 1.
Injection molding parameters—common ranges.
Table 1.
Injection molding parameters—common ranges.
| Parameter | Range |
|---|
| Injection temperature (°C) | 220–270 |
| Mold temperature (°C) | 30–80 |
| Packing pressure (%) | 60–110 |
| Injection speed (cm3/s) | 15.3–25.5 |
Table 2.
Factors and levels for the experimental design.
Table 2.
Factors and levels for the experimental design.
| (°C) | (bar) | (s) |
|---|
| 220 | 30 | 2 |
| 240 | 40 | 4 |
| 260 | 50 | 6 |
Table 3.
Combinations of factors and levels resulting from the experimental design.
Table 3.
Combinations of factors and levels resulting from the experimental design.
| Combination | (°C) | (bar) | (s) |
|---|
| A | 220 | 30 | 2 |
| B | 220 | 30 | 4 |
| C | 220 | 30 | 6 |
| D | 220 | 40 | 2 |
| E | 220 | 40 | 4 |
| F | 220 | 40 | 6 |
| G | 220 | 50 | 2 |
| H | 220 | 50 | 4 |
| I | 220 | 50 | 6 |
| J | 240 | 30 | 2 |
| K | 240 | 30 | 4 |
| L | 240 | 30 | 6 |
| M | 240 | 40 | 2 |
| N | 240 | 40 | 4 |
| O | 240 | 40 | 6 |
| P | 240 | 50 | 2 |
| Q | 240 | 50 | 4 |
| R | 240 | 50 | 6 |
| S | 260 | 30 | 2 |
| T | 260 | 30 | 4 |
| U | 260 | 30 | 6 |
| V | 260 | 40 | 2 |
| W | 260 | 40 | 4 |
| X | 260 | 40 | 6 |
| Y | 260 | 50 | 2 |
| Z | 260 | 50 | 4 |
| AA | 260 | 50 | 6 |
Table 4.
Most common reference injection parameters.
Table 4.
Most common reference injection parameters.
| Parameter | Level |
|---|
| Injection temperature (°C) | 220 |
| Injection speed (cm3/s) | 50 |
| Packing pressure (% Pinjection) | 70–100 |
| Packing time (s) | 15 |
Table 5.
ANOVA table for hardness.
Table 5.
ANOVA table for hardness.
| Factor | p-Value | Intepretation |
|---|
| 0 | Has a significant effect |
| 0 | Has a significant effect |
| 0.185 | Does not have a significant effect |
| Orientation | 0.533 | Does not have a significant effect |
| × | 0 | Has a significant effect |
| × | 0.281 | Does not have a significant effect |
| × orientation | 0.663 | Does not have a significant effect |
| × | 0.405 | Does not have a significant effect |
| × | 0.972 | Does not have a significant effect |
| × orientation | 0.799 | Does not have a significant effect |
Table 6.
Combination of process parameters for the best and worst hardness.
Table 6.
Combination of process parameters for the best and worst hardness.
| Combination | A | H | U |
|---|
| (°C) | 220 | 220 | 260 |
| (bar) | 30 | 50 | 30 |
| (s) | 2 | 4 | 6 |
| Orientation | 0° | 90° | 0° |
| Hardness | 72.7467 | 73.8159 | 72.2985 |
| Percentage of enhancement | Reference | +1.47% | −0.67% |
Table 7.
Average warpage obtained from injected plate.
Table 7.
Average warpage obtained from injected plate.
| Combination | Thickness (mm) | Z Height (mm) | Warpage (m) |
|---|
| A | 3.713 | 4.087 | 0.374 |
| B | 3.707 | 4.057 | 0.349 |
| C | 3.690 | 3.997 | 0.307 |
| D | 3.722 | 3.893 | 0.172 |
| E | 3.733 | 4.010 | 0.277 |
| F | 3.717 | 3.977 | 0.260 |
| G | 3.703 | 3.877 | 0.174 |
| H | 3.747 | 3.953 | 0.206 |
| I | 3.730 | 3.860 | 0.130 |
| J | 3.604 | 3.703 | 0.099 |
| K | 3.372 | 3.440 | 0.068 |
| L | 3.345 | 3.547 | 0.201 |
| M | 3.591 | 3.787 | 0.195 |
| N | 3.590 | 3.737 | 0.147 |
| O | 3.560 | 3.713 | 0.153 |
| P | 3.567 | 3.737 | 0.170 |
| Q | 3.593 | 3.853 | 0.260 |
| R | 3.647 | 3.843 | 0.197 |
| S | 3.383 | 3.450 | 0.067 |
| T | 3.391 | 3.437 | 0.046 |
| U | 3.387 | 3.453 | 0.067 |
| V | 3.452 | 3.517 | 0.065 |
| W | 3.409 | 3.460 | 0.051 |
| X | 3.385 | 3.447 | 0.062 |
| Y | 3.392 | 3.483 | 0.092 |
| Z | 3.406 | 3.707 | 0.301 |
| AA | 3.386 | 3.440 | 0.054 |
Table 8.
ANOVA table for warpage measured on plate.
Table 8.
ANOVA table for warpage measured on plate.
| Factor | p-Value | Intepretation |
|---|
| 0.002 | Has a significant effect |
| 0.795 | Does not have a significant effect |
| 0.626 | Does not have a significant effect |
| × | 0.016 | Has a significant effect |
| × | 0.643 | Does not have a significant effect |
| × | 0.161 | Does not have a significant effect |
Table 9.
Combination of process parameters for best and worst warpage on plate value.
Table 9.
Combination of process parameters for best and worst warpage on plate value.
| | Combination |
|---|
| | A | V | B |
| (°C) | 220 | 260 | 220 |
| (bar) | 30 | 40 | 30 |
| (s) | 2 | 2 | 4 |
| Warpage | 37.40% | 6.29% | 34.90% |
| Warpage reduction | Reference | 98.32% | 6.68% |
Table 10.
ANOVA table of secant modulus.
Table 10.
ANOVA table of secant modulus.
| Factor | p-Value | Intepretation |
|---|
| 0.899 | Does not have a significant effect |
| 0.001 | Has a significant effect |
| 0.042 | Has a significant effect |
| Orientation | 0.758 | Does not have a significant effect |
| × | 0 | Has a significant effect |
| × | 0.898 | Does not have a significant effect |
| × orientation | 0.854 | Does not have a significant effect |
| × | 0.012 | Has a significant effect |
| × | 0.713 | Does not have a significant effect |
| × orientation | 0.827 | Does not have a significant effect |
Table 11.
Percentage improvement in compared to the reference.
Table 11.
Percentage improvement in compared to the reference.
| | Combination |
|---|
| | A | V | G |
| (°C) | 220 | 260 | 220 |
| (bar) | 30 | 40 | 50 |
| (s) | 2 | 2 | 4 |
| 0° orientation | - | 37.6% | 87.0% |
| 45° orientation | - | 6.7% | 45.2% |
| 90° orientation | - | 8.4% | 70.4% |
| Average | - | 17.6% | 67.5% |
Table 12.
ANOVA table for .
Table 12.
ANOVA table for .
| Factor | p-Value | Intepretation |
|---|
| 0.003 | Has a significant effect |
| 0.002 | Has a significant effect |
| 0.241 | Does not have a significant effect |
| Orientation | 0.154 | Does not have a significant effect |
| × | 0 | Has a significant effect |
| × | 0.411 | Does not have a significant effect |
| × orientation | 0.241 | Does not have a significant effect |
| × | 0.064 | Does not have a significant effect |
| × | 0.134 | Does not have a significant effect |
| × orientation | 0.746 | Does not have a significant effect |
Table 13.
Percentage improvement in compared to the reference.
Table 13.
Percentage improvement in compared to the reference.
| | Combination |
|---|
| | A | V | G |
| (°C) | 220 | 260 | 220 |
| (bar) | 30 | 40 | 50 |
| (s) | 2 | 2 | 4 |
| 0° orientation | - | −29.1% | −32.3% |
| 45° orientation | - | −21.6% | −21.2% |
| 90° orientation | - | −23.3% | −28.6% |
| Average | - | −24.6% | −27.3% |
Table 14.
ANOVA table for UTS.
Table 14.
ANOVA table for UTS.
| Factor | p-Value | Intepretation |
|---|
| 0.000 | Has a significant effect |
| 0.002 | Has a significant effect |
| 0.818 | Does not have a significant effect |
| Orientation | 0.549 | Does not have a significant effect |
| × | 0.231 | Does not have a significant effect |
| × | 0.701 | Does not have a significant effect |
| × orientation | 0.724 | Does not have a significant effect |
| × | 0.036 | Has a significant effect |
| × | 0.985 | Does not have a significant effect |
| × orientation | 0.929 | Does not have a significant effect |
Table 15.
Percentage improvement for UTS compared to the reference.
Table 15.
Percentage improvement for UTS compared to the reference.
| | Combination |
|---|
| | A | V | G |
| (°C) | 220 | 260 | 220 |
| (bar) | 30 | 40 | 50 |
| (s) | 2 | 2 | 4 |
| 0° orientation | - | −8.16% | 7.06% |
| 45° orientation | - | −9.71% | 6.95% |
| 90° orientation | - | −7.89% | 5.51% |
| Average | - | −8.60% | 6.50% |
Table 16.
ANOVA table for flexural strength.
Table 16.
ANOVA table for flexural strength.
| Factor | p-Value | Intepretation |
|---|
| Orientation | 0.291 | Does not have a significant effect |
| Material | 0.692 | Does not have a significant effect |
Table 17.
ANOVA table for flexural modulus.
Table 17.
ANOVA table for flexural modulus.
| Factor | p-Value | Intepretation |
|---|
| Orientation | 0.456 | Does not have a significant effect |
| Material | 0.000 | Has a significant effect |
Table 18.
Percentage improvement in flexural modulus compared to the reference.
Table 18.
Percentage improvement in flexural modulus compared to the reference.
| | Combination |
|---|
| | A | V | G |
| (°C) | 220 | 260 | 220 |
| (bar) | 30 | 40 | 50 |
| (s) | 2 | 2 | 4 |
| 0° orientation | - | 18.83% | −12.60% |
| 45° orientation | - | 5.48% | −19.00% |
| 90° orientation | - | −0.93% | −22.77% |
| Average | - | 4.41% | −18.13% |
Table 19.
ANOVA table for warpage value and process parameters.
Table 19.
ANOVA table for warpage value and process parameters.
| Factor | p-Value | Intepretation |
|---|
| 0.027 | Has a significant effect |
| 0.828 | Does not have a significant effect |
| 0.955 | Does not have a significant effect |
| Orientation | 0.004 | Has a significant effect |
| × | 0.2 | Does not have a significant effect |
| × | 0.649 | Does not have a significant effect |
| × orientation | 0 | Has a significant effect |
| × | 0.0347 | Has a significant effect |
| × | 0.757 | Does not have a significant effect |
| × orientation | 0.052 | Does not have a significant effect |
Table 20.
Percentage improvement in warpage compared to the reference.
Table 20.
Percentage improvement in warpage compared to the reference.
| | Combination | |
|---|
| | A | V | G | R |
| (°C) | 220 | 260 | 220 | 240 |
| (bar) | 30 | 40 | 50 | 50 |
| (s) | 2 | 2 | 4 | 6 |
| 0° orientation | - | −11.69% | −22.69% | −6.2% |
| 45° orientation | - | 2.36% | 15.72% | −20.6% |
| 90° orientation | - | 56.33% | 50.75% | −1.5% |
| Average | - | 15.67% | 14.59% | −9.4% |
Table 21.
Improvement in mechanical properties and warpage of the worst combination, the best combination, and the combination with the lowest warpage.
Table 21.
Improvement in mechanical properties and warpage of the worst combination, the best combination, and the combination with the lowest warpage.
| | A | V | G | R |
|---|
| - | 17.6% | 67.5% | 46.6% |
| - | −24.6% | −27.3% | −22.7% |
| UTS | - | −8.6% | 6.5% | −2.2% |
| Flexural strength | - | −0.9% | 0.5% | - |
| Flexural modulus | - | 4.4% | −18.1% | - |
| Warpage | - | 15.7% | 14.6% | −9.4% |

