1. Introduction
The use of thermoplastics in diverse applications has increased since the discovery of polymer compounds. There are several applications for thermoplastics in the chemical, medical, aerospace, and automotive industries. Polymers are replacing metals due to their lower weights and corrosion-resistant properties in recent decades; researchers are attempting to evaluate and improve their machining processes. Many advanced types of biomaterials are thermoplastic-based, and are converted into the required products by the process of grinding. However, there are a few studies that have reported the machining performance evaluation of polymers like PEEK and acrylic-based resin grindings [
1,
2,
3,
4]. In polymer-based material machining, much investigation is required to ensure a superior quality of machining.
Among conventional machining techniques, the grinding process enables a higher accuracy and considerably improved surface finish; it is utilized in various medical and industrial applications [
4]. The grinding tool used is known as the grinding wheel, with three components, the abrasive grains, the bonding substance, and the empty spaces (pores), between the bonded grains. The pores not only evacuate the generated heat during the grinding process but also reduce the cutting forces during the grinding process [
5]. Usually, grinding is performed on hard materials; however, sometimes, whenever a soft material is being ground having a lower melting temperature, it behaves like a gummy/sticky material. During the grinding process, a considerable amount of heat is generated, exceeding the temperature of the grind zone and the glass transition temperature of the material. At the glass transition temperature, the ground particles become stuck on the wheel surface, increasing the wheel load and increasing the cutting force, which is accompanied by a poor ground surface [
6,
7,
8]. In this situation, there is a mandatory requirement for grinding wheel dressing to expose a fresh layer on the wheel, which has sharp teeth and clearer pores [
9,
10,
11].
The dressing process not only causes interruptions in production but also reduces the diameter of the wheel, resulting in a reduced tool (wheel) life [
12]. The control over the grind zone temperature is especially important to ensure the elimination of these abovementioned problems and the degraded products resulting from higher temperature grinding processes [
13]. Moreover, during grinding, a higher temperature also results in chemical affinity between the workpiece and wheel materials [
14,
15]. To overcome these problems, many times, a coolant is utilized for reducing the grind zone temperature; however, this increases the processing cost and is accompanied by environmental concerns regarding lubricant disposal [
16,
17]. In this current research, a dry grinding process of an acrylic-based resin with a low melting temperature is proposed. This resin has a glass transition temperature of 58 °C. The grind zone temperature was controlled by the careful selection of the grinding parameters (spindle speed, feed, depth of cutting/grinding, and grain size of wheel) through a detailed literature review. The temperature of the grind zone was monitored utilizing a calibrated thermal imager and thermocouples.
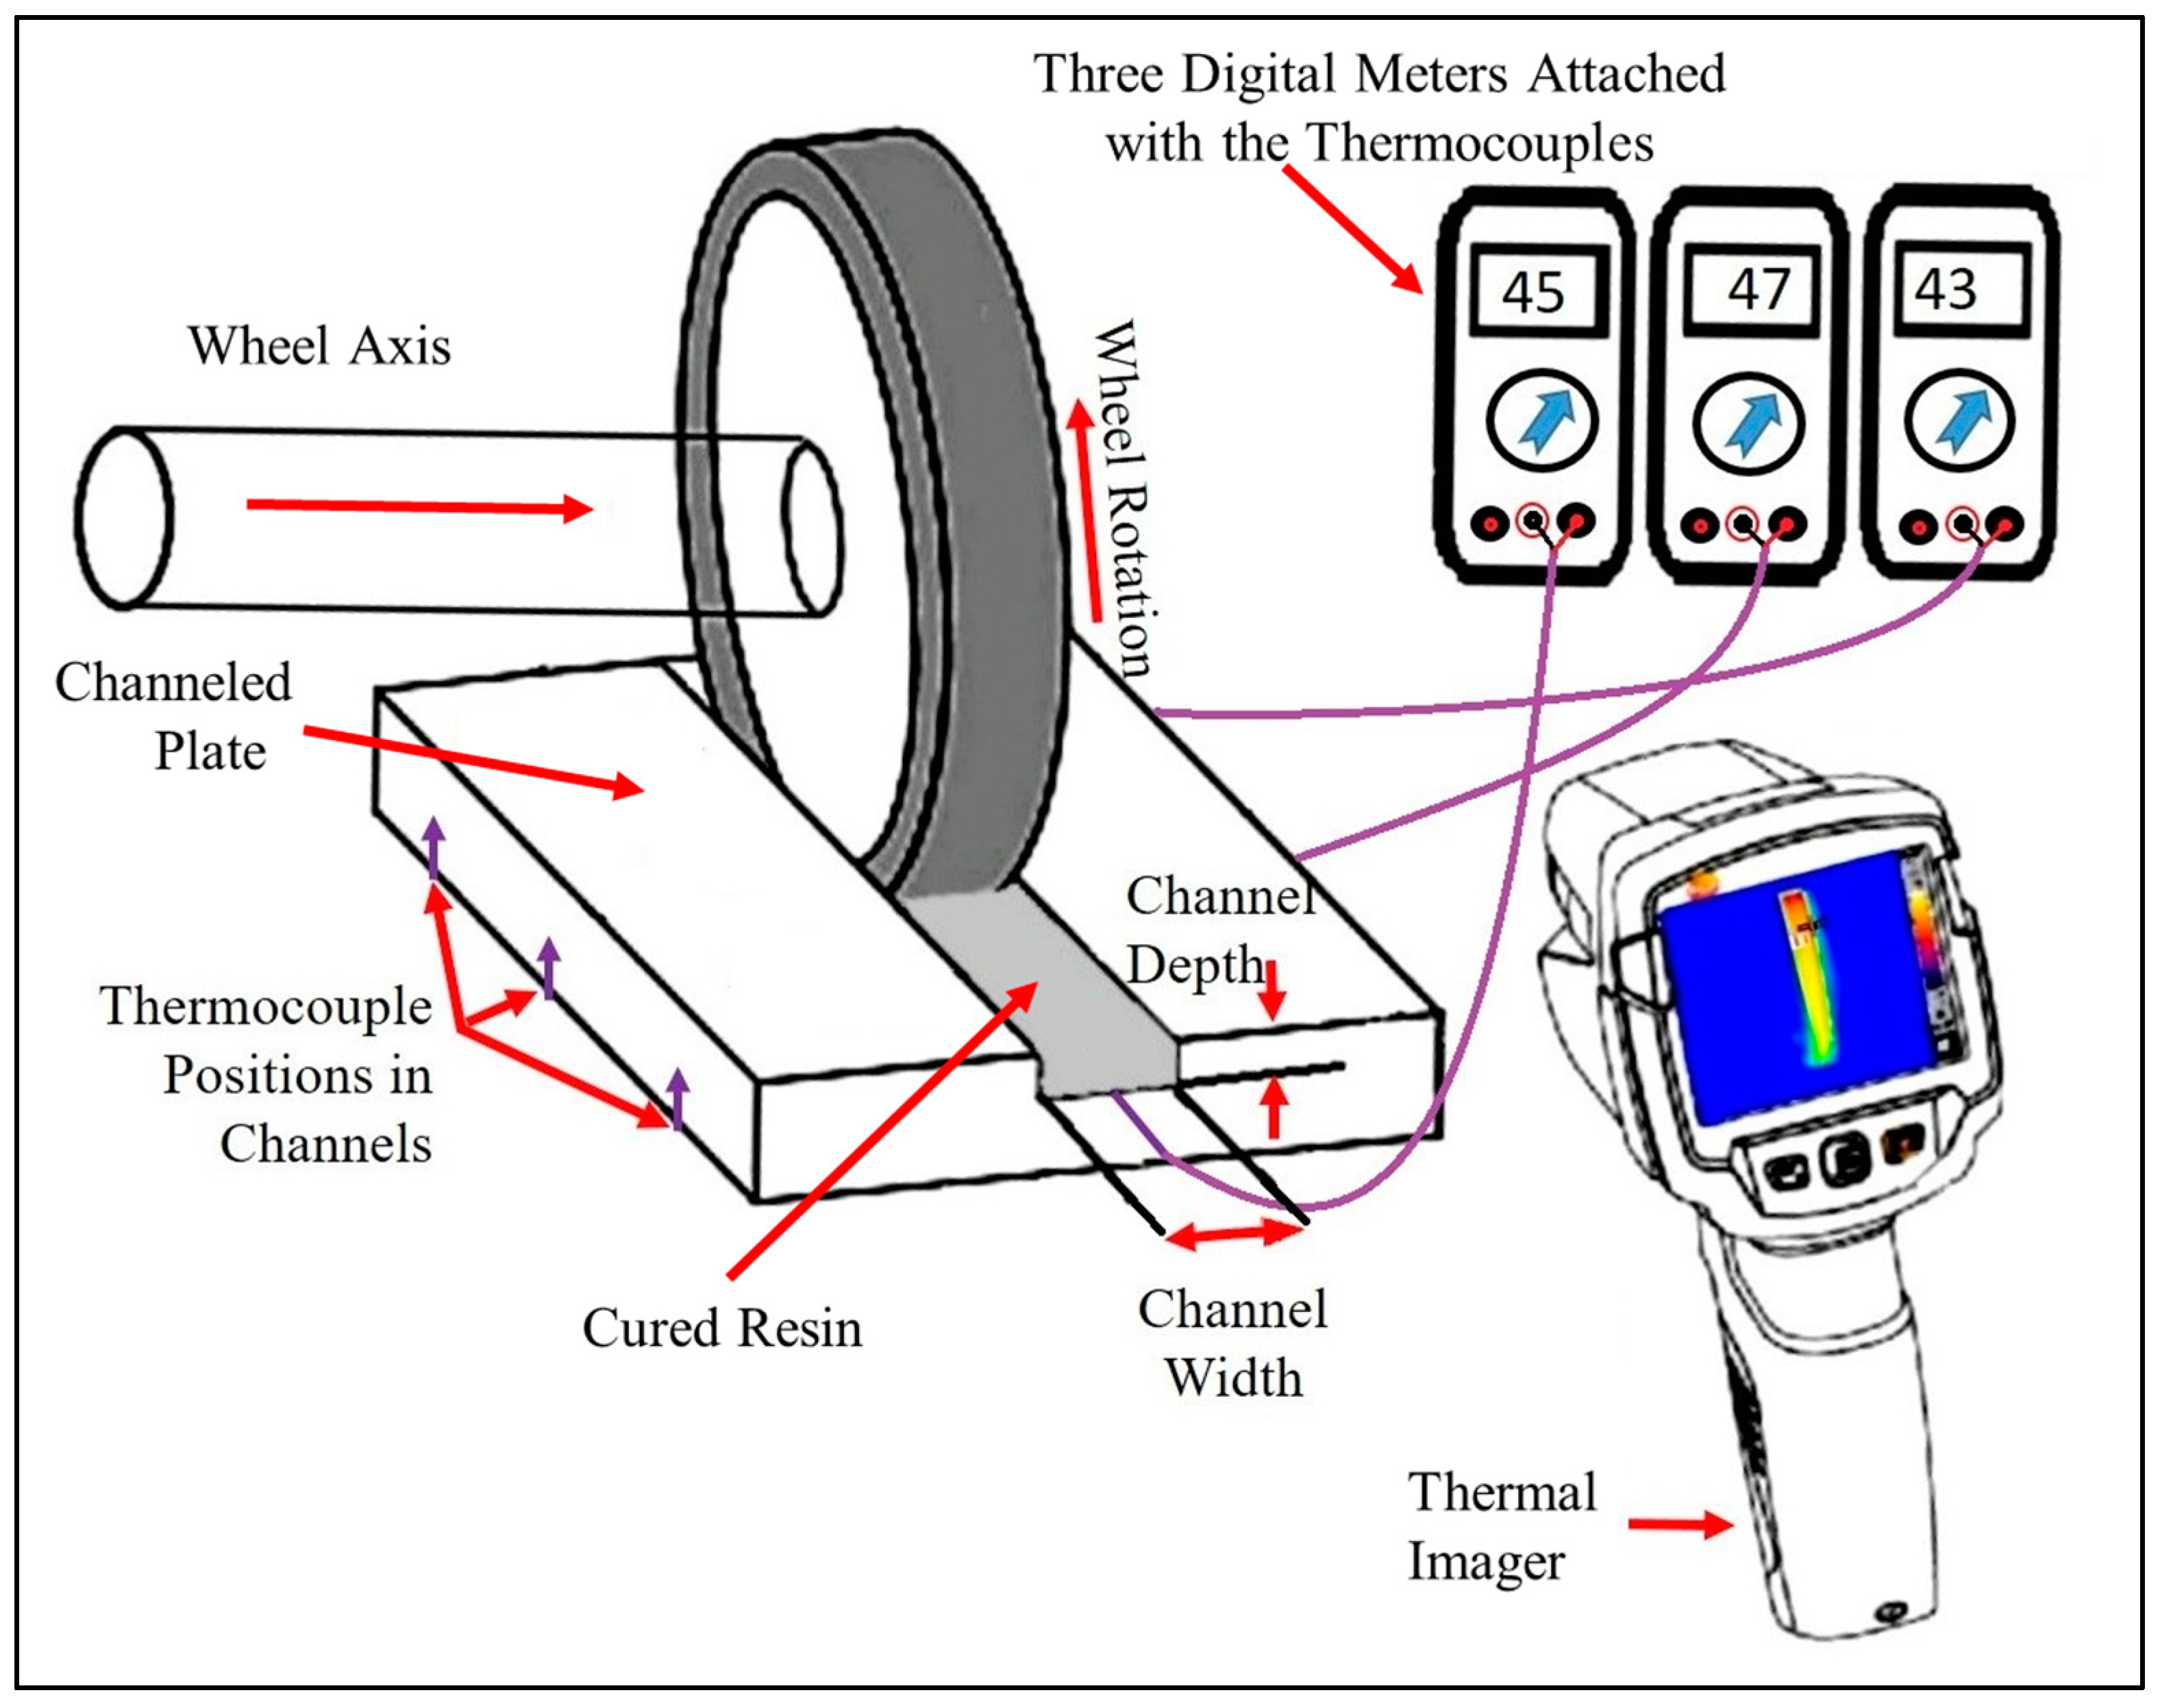
Figure 1 represents the schematic illustration of the experimental procedure. The arrows in
Figure 1 explains the different components, the channel plate filled with resin, the grinding wheel orientation, the position of the imager, the location of the thermocouples, and the location of the digital meters for temperature measurement.
Kumar et al. [
18], in their work, found that the filling of pores of the grinding wheel increases the surface contact between the wheel and the workpiece surface, resulting in an increase in frictional forces, cutting forces, and vibrational effects. Different methods were used to reduce wheel loading, such as adding a solid lubricant in the grinding wheel construction, high-pressure lubrication, and ultrasonic vibrations. The most common methodology is the application of fluids through nozzles for the removal of the generated heat from the grind zone to avoid the subsequent wheel loading. However, the higher utilization of coolants has environmental concerns. Furthermore, many products are required to be ground under dry conditions due to their susceptible nature regarding coolants, which obstructs the application of coolants during their manufacture [
19,
20]. To address these problems, many grinding wheel manufacturers are attempting to optimize the design of their tools via the phenomenon of self-lubrication to reduce the loading of wheels. Azarhoushang et al. [
21], in their work, analyzed the effect of graphite powder addition in the structure of the grinding wheel to enable the self-lubrication property in the grinding process for load reduction. It was found that the availability of graphite powder in lower porosity wheels during the grinding process results in the lowering of grinding forces. As the frictional effect was reduced, the ground products were produced with a better surface finish; moreover, the requirements of the dressing were also reduced, resulting in a longer tool life.
Salmon [
22] made an effort to analyze the effects of coatings on the grains of wheels on subsequent loadings. In his work, CBN grains were coated with Ti-Al-N, and a solid lubricant, molybdenum disulfide (MoS2), was utilized. It was found from his work that coatings on grit reduce the wheel loading effectively. Furthermore, it was also found that the nature of the material that is being ground has a direct relation to the wheel loading [
23]. It has been observed that a material having a lower hardness has more wheel loading value due to large-sized chip production during the grinding process [
24]. Additionally, the chemical composition of the workpiece is also an important parameter in wheel loadings during the grinding process. The presence of even lower amounts of lead in iron-based or copper-based alloys can lead to improved machinability, but conversely, the grinding load will increase due to its increased ductility. Similarly, cast iron also has a better machinability but has higher loading in the grinding process due to larger-sized chip production [
25].
Sasahara et al. [
26] analyzed the phenomenon of loading during the surface grinding of composite-based materials under dry conditions and under internal and external coolant supply. From their experimental results, it was found that the internal coolant supply effectively reduces wheel loading. For temperature measurements, the thermocouple methodology was utilized in their work to measure the generated heat and heat removal through the application of a coolant. The application of coolant ensured a lower grinding temperature to avoid reaching the glass transition temperature of the polymer material. Furthermore, it was also found that the grinding forces are increased due to an increase in wheel loading under dry conditions; however, the application of an internal coolant effectively reduces the grinding temperature and loading of the grinding wheel.
Adibi et al. [
27] performed grinding of Inconel 738 and described an analytical methodology for wheel loading. This technique consisted of processing the digital images using MATLAB toolbox to determine the loaded areas on the surface of the grinding wheel. A CBN vitrified grinding wheel was utilized in their research. Experiments were also performed to validate the applied technique and scanning electron microscopy was utilized for verification. Their technique enabled them to analyze the effects of grinding parameters on the wheel loading during the grinding process. Liu et al. [
28] established a method for analyzing the adhesion of the work material to the grains of the wheel, along with an imaging process for material adhesion. Gopan et al. [
29] also applied an image processing methodology to measure the wheel loading during the grinding process. In their method, reflections produced by the wheel loading affected the image processing results, and an embedded system was utilized for this methodology.
Zhang et al. [
30] in their experimental research utilized an environmentally friendly coolant named cryogenic air nanofluid. In their work, a model of convective heat transfer was validated by grinding Ti-6Al-4V alloy. From the experimental results, it was found that during the supply of cold air at a proportion of 0.35, nanofluids had a lower specific grinding energy (66.03 J/mm
3) and a higher viscosity value (267.8 cP). The lowest grind zone temperature value, which was measured, was 183.9 °C. Therefore, a model of heat generation and transfer was designed to understand the heat transfer to the workpiece and to the surroundings [
31,
32,
33,
34,
35]. For reliable measurements, the methodology is very important; there are several thermometry techniques that are utilized for the measurement of the temperature of grinding processes, including thermal imagery, thermocouples, and optical fibers [
36,
37,
38,
39,
40]. Many researchers have utilized the methodology of thermocouples for the measurement of the temperature of the grind zone, as this method is not only cost-effective but also provides a reliable temperature measurement under specified conditions [
14,
41]. Rowe et al. [
42,
43,
44] in their research demonstrated the temperature distribution in the grind zone, by designing a model and utilizing the thermocouple temperature measuring technique. They also concluded that thermocouples have a limitation of real-time temperature monitoring besides the workpiece surface. Hebber et al. [
45] also revealed the in accuracies of the thermocouple methodology in the temperature measurement of grind zone.
Xu and Malkin [
46] made a comparison of temperature measuring techniques by utilizing an embedded type of thermocouple, a foil/workpiece-type thermocouple, and a two-color type of IR sensor attached to an optical fiber. These three methodologies were utilized to measure a particular part of the grind zone’s temperature. From the results, it was found that all these methodologies have an almost similar kind of response profile for each part of the grind zone’s temperature. Thermocouple and IR sensor measuring methodologies are reliable; however, these are spot temperature measuring techniques for any temperature zone. This emphasizes the requirement of temperature measuring techniques for the simultaneous measurement of a grind zone. Boothroyd [
47] utilized the methodology of infrared films for measuring the temperature of two-dimensional cutting. Infrared film photographs of the workpiece, machining tool, and generated chip were taken. The emitted radiation intensity of the impinged films was measured by a microdensitometer. For the certainty of the results, a comparison was drawn with the calibrated results obtained from the surface of a flat plate heated to a known temperature, which showed that the methodology was reliable.
After studying the available literature on thermometry techniques, it has been found that the most common temperature measuring techniques are thermocouples and thermal imagery. The methodology of thermocouples is relatively inexpensive; however, it has the drawback of calibration drifts, along with a slower response time. This limits the use of thermocouples for capturing instantaneous temperature changes, during high-speed operations [
48]. Conversely, thermal imaging has a reasonable capability to capture a detailed image of a temperature zone within a small fraction of time [
49]. However, the limitation of thermal imagery is that the amount of transferred heat underneath the surface of the workpiece cannot be precisely measured, which highlights the importance of thermocouple temperature measurement. Regarding the abovementioned aspects, it can be concluded that for a comprehensive analysis of the grind zone, a combination of thermal imagery and thermocouple methodologies should be implemented together.
Furthermore, from the literature review [
1,
2,
3,
17] on the grinding process, it has been found that the effect of the spindle speed for grinding polymers is similar to that used for metals, as at higher spindle speeds, a decrease in the grind zone temperature is reported. Similarly, the depth of the cut has the same effect when grinding polymers as when grinding metals; at a higher depth of cut, a higher temperature is measured at the grind zone. However, for the feed variations, a different type of behavior was reported in polymer grinding, as in metal grinding, the higher values of feed result in a higher temperature of the grind zone, whereas in polymer grinding, an increase in the feed values showed a reduction in the grind zone temperature due to the quick transfer of heat to the wheel from the surface. These parametric effects will be analyzed and verified for acrylic-based resin in this study. Moreover, it has been found that the grinding process of any material at a lower temperature, like 58°C, has not been reported in the available literature. However, a part of this research has been published [
3], in which the focus was the temperature of the grind zone via thermal imagery.
This current research aims to overcome the shortcomings of previously published studies. In this study, thermocouple temperature measurement has been included in addition to thermal imaging; an analysis of the surface quality of ground resin has been performed; and lastly, the adhesion of resin particles on the surface of the grinding wheel is also studied. Grinding coolants were eliminated to avoid contamination of the ground surface and for environmental sustainability. Moreover, the surface roughness analysis also reveals the quality of machining according to the material properties [
50,
51]. From the obtained results, it has been concluded that a low-melting-point material can be effectively machined/ground under dry conditions. For successful control over the grind zone temperature and ground surface quality, grinding parameters (spindle speed, feed, depth of cutting/grinding, and grain size) should be selected precisely. Consequently, in the controlled temperature of the grind zone, the ground material surface not only has an acceptable roughness but also the adhesion of the ground particles on the wheel surface can be avoided successfully.
2. Materials and Methods
In this experimental research, the adopted methodology consisted of temperature measurement during the grinding process and surface quality evaluation of the ground material afterward. For temperature measurements, a thermal imager (Testo 868) was utilized to measure the surface temperature of the grinding wheel and resin. Moreover, three K-type thermocouples connected to the digital display meters were also utilized to measure the heat transfer into the bulk of the material. The beads of thermocouples were placed just beneath the surface of the resin by making holes in the D2 steel plate. As the grinding wheel passed over the surface of the cured hardened resin grinding the upper layer, the temperature variations on the upper surface were measured by the thermal imager, whereas the heat transferred into the lower layer was measured by the thermocouples.
K-type thermocouples are quite suitable and stable for smaller periods corresponding to specific temperature values. K-type thermocouple measurement could drift on very high-temperature values; for example, at 1000 °C, a value of +5 °C can be observed. However, in this experiment, the temperature values were lower than 58 °C, so temperature measurement data from the thermocouples were accurate. Furthermore, each thermocouple and the digital meter were calibrated before the start of the experiment with a known accurate thermocouple in the laboratory. Additionally, for enhancing the response rate and measurement accuracy, the thermocouples were placed with an exposed junction of wires.
Figure 1 shows a schematic diagram of the temperature monitoring process during the grinding of the acrylic-based resin. As the grinding wheel passes over the surface of the acrylic-based cured hardened resin, it removes the solid acrylic layer by grinding the material into a fine powder. During the grinding process, the thermal imager captures the temperature details of the grinding zone (grinding wheel + resin surface), whereas the thermocouples just beneath the surface of the acrylic layer being ground measure the heat that is being transferred from the grinding zone to the bulk material.
Secondly, a thermal imager (testo 686) was utilized for thermal imaging (temperature measurement). This imager has the capability to visualize temperature differences of 0.08 °C, making it very suitable for measuring accurate temperature variations. Furthermore, it has 19,200 temperature measuring points along with infrared image resolution values of 160 × 120 pixels, which can be extended to 320 × 240 pixels for an image of super-resolution. Moreover, the minimum focus distance of this imager is <0.5 m, which was ensured before capturing the thermal images of the grind zone. Lastly, the thermal imager was recently procured for experimentation, and it was working in excellent condition. For reliability, the measured temperature readings were compared with the known temperature readings. All these aspects ensured the accurate temperature measurement of the grind zone and measured data were found to be authentic and reliable.
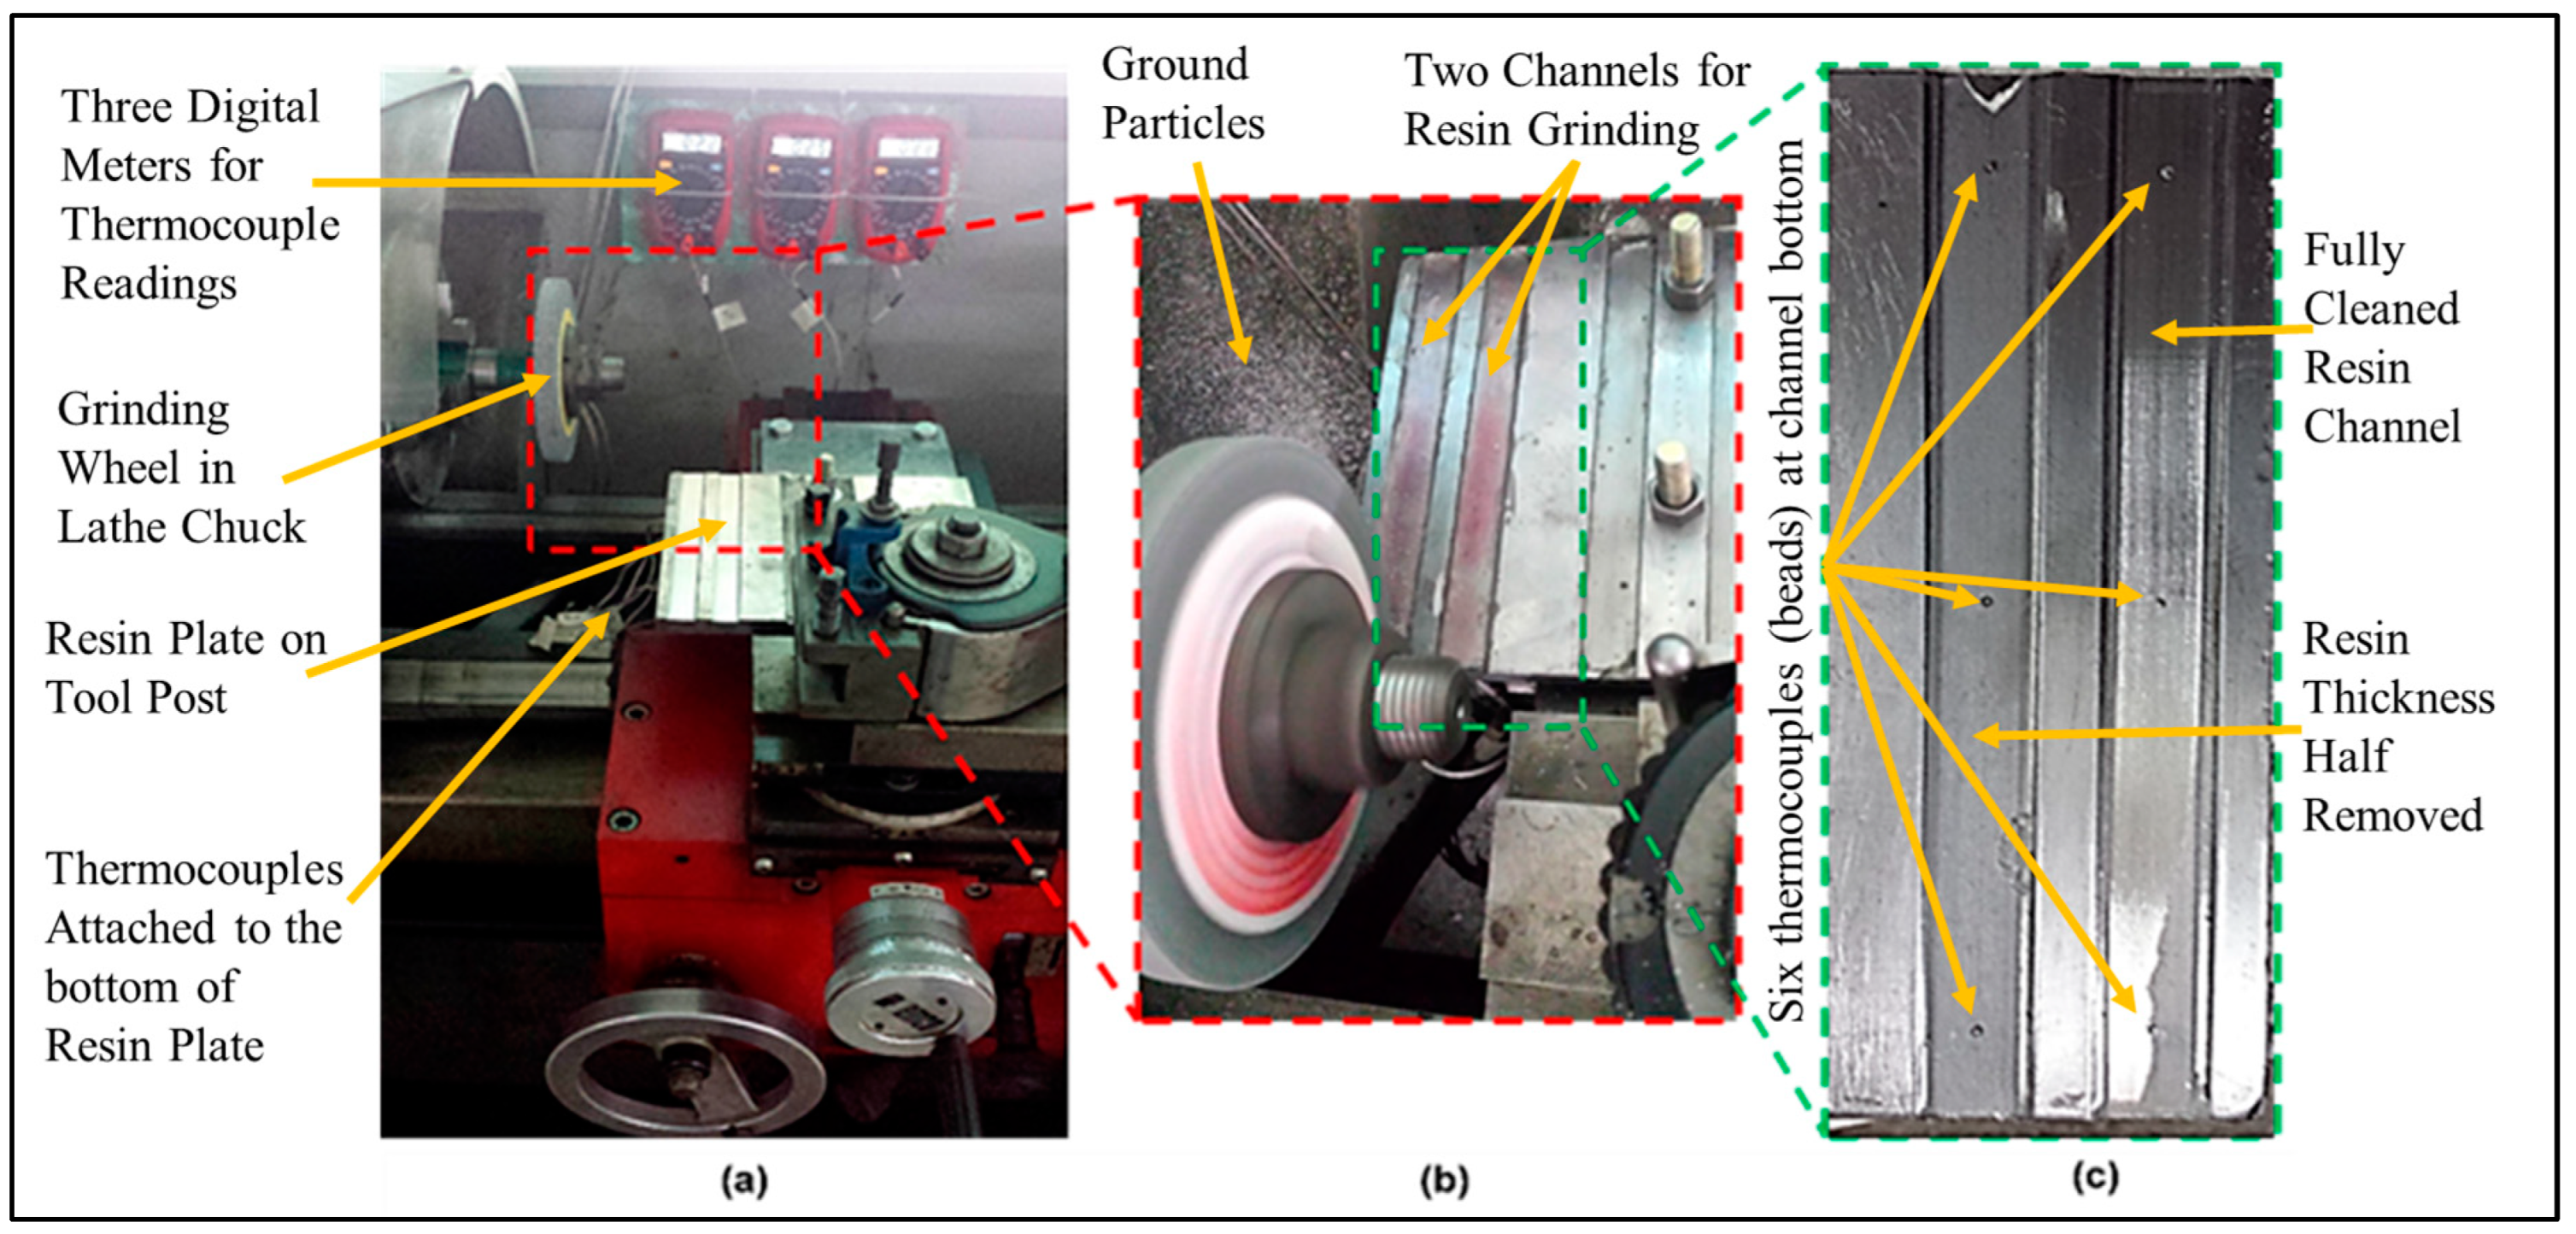
Figure 2 shows the assembly of the resin grinding process. In
Figure 2, the actual components of the grinding process are displayed, including the resin plate’s position on the lathe, the grinding wheel’s orientation, the thermocouple attached to the resin plate and digital meters, and the resin channels before and after the grinding process.
As was recommended in previously published papers [
1,
2,
17] on aggressive parameters of grinding, a lowering of the temperature in the grind zone is expected. So, this research was performed under two sets of grinding experiments: the first was one step higher and the second was two steps higher regarding the grinding parameters utilized in previous research.
Table 1 presents the grinding parameters used for the experiments.
Another additional grinding parameter included in this study was the change in grain size. Two different grain-sized wheels (46/Ø 0.35 mm and 80/Ø 0.18 mm, K-prix Korea) were selected for the grinding process. The abrasive material of the wheels was regular aluminum oxide, grey in color, having a higher porosity, working temperature up to 1200°C, and highly rigid structure due to vitrified bonding. The wheels were mounted on the lathe machine using a centered mild steel shaft and were dressed via a single diamond-tipped dressing tool to prevent any eccentricity on the surface; the active thickness of the dressing tool was 0.9 mm. The wheels were dressed at a spindle speed of 820 rpm/10.31 m/s with a small manual infeed of 0.03 mm to advance the dressing tool towards the grading wheels till the completion of the dressing operation. Additionally, a feed value of 0.185 mm/rev was selected for the dressing. The overlap ratio calculated for the wheel was ~5, which is usually selected for standard grinding processes. Each wheel was dressed till the outer diameter reached the nominal value of 120.1 mm, whereas the width of both wheels was 12.7 mm. Grinding parameters, spindle speed, feed, DOC, and grain size are presented in
Table 1.
Two rectangular channels were grooved into the D2 steel plate via end milling with a length of 152.4 mm, width of 14.5 mm, and channel depth values of 1.3 mm and 1.5 mm. The different depths of channels were to ensure precise temperature measurement via thermocouples under different depths of grinding so that the distance between the grinding wheel and thermocouple remained the same;
Figure 2c represents thermocouple positions.
The material to be ground in the experiment was a light-activated resin (Loctite AA 3926), a multipurpose adhesive and acrylic-based resin having a strength value of 19 MPa. The resin was deposited in each channel in the viscous liquid state, filling up the channel; leveled; and cured under the ultraviolet light lamp. The curing of the resin was also ensured by a hardness test (shore D = 56). Detailed properties of the resin are presented in
Table 2.
The girding experiment was performed on a precision lathe machine (EMCO-MAT 17-D) properly maintained to avoid any machining inaccuracies. The channeled D2 steel plate was placed on the cross slide of the lathe machine with the help of an adjustable fixture capable of maintaining different levels of heights. The adjustable fixture was specially designed to provide different depths of cuts/grinding during the grinding experiments with an accuracy of 0.1 mm. Through the application of the adjustable fixture, the precision lathe was converted into a precision surface grinder. Before the experiment, the complete experimental setup was calibrated by utilizing a dial caliper and a dial gauge to avoid any inaccuracy. Additionally, after each grinding experiment, the depth of the cutting/grinding was also verified by the dial caliper. In
Figure 2a, the complete experimental assembly of the grinding process is represented.
For thermometry, the thermal imager was placed 1 m meter away from the grinding zone, whereas three thermocouples were already attached to the bottom surface of each channel. There were three through-holes made via drilling into each channel: one at the middle point, and two at a distance of 25.4 mm away from the ends of the D2 steel plate. In thermal imagery, thermal images were captured during the grinding process, and in thermocouple temperature measurement, whenever the grinding wheel passes over the thermocouple, it measures the generated heat during the grinding process. For the evaluation of the machined surface quality produced via the grinding process, a roughness texture meter (Taylor Hobson Surtronic S-128) was utilized. The finished surfaces from each experiment were evaluated in terms of roughness values by the texture meter; moreover, the visual inspection of each ground surface was also performed by eye and under the optical coordinate measuring machine (CMM) for magnified views.
2.1. Ground Surface Quality
For the grinding evaluation of the acrylic resin, twenty-four experiments were designed to grind the resin under different values of grinding parameters. A full factorial design of the experiment was employed for this current research. For certainty, experiments were repeated three times, resulting in the comprehensive experimental study of the acrylic grinding process. From the literature [
19], aggressive parameters were recommended, which were used in the current research, along with two different grain (dia.) sizes of the wheel. During the grinding process, temperature monitoring was performed, and after the completion of each experiment, the quality of the ground surface was analyzed via visual inspection and by the corresponding roughness values. As a magnified view was observed under the coordinate measuring machine of each ground surface, it was much easier to inspect the surface quality for any debris attached or potential irregularities. The roughness meter (Taylor Hobson Surtronic S-128) was also utilized to ensure the acceptable quality of surface finish from the experiments.
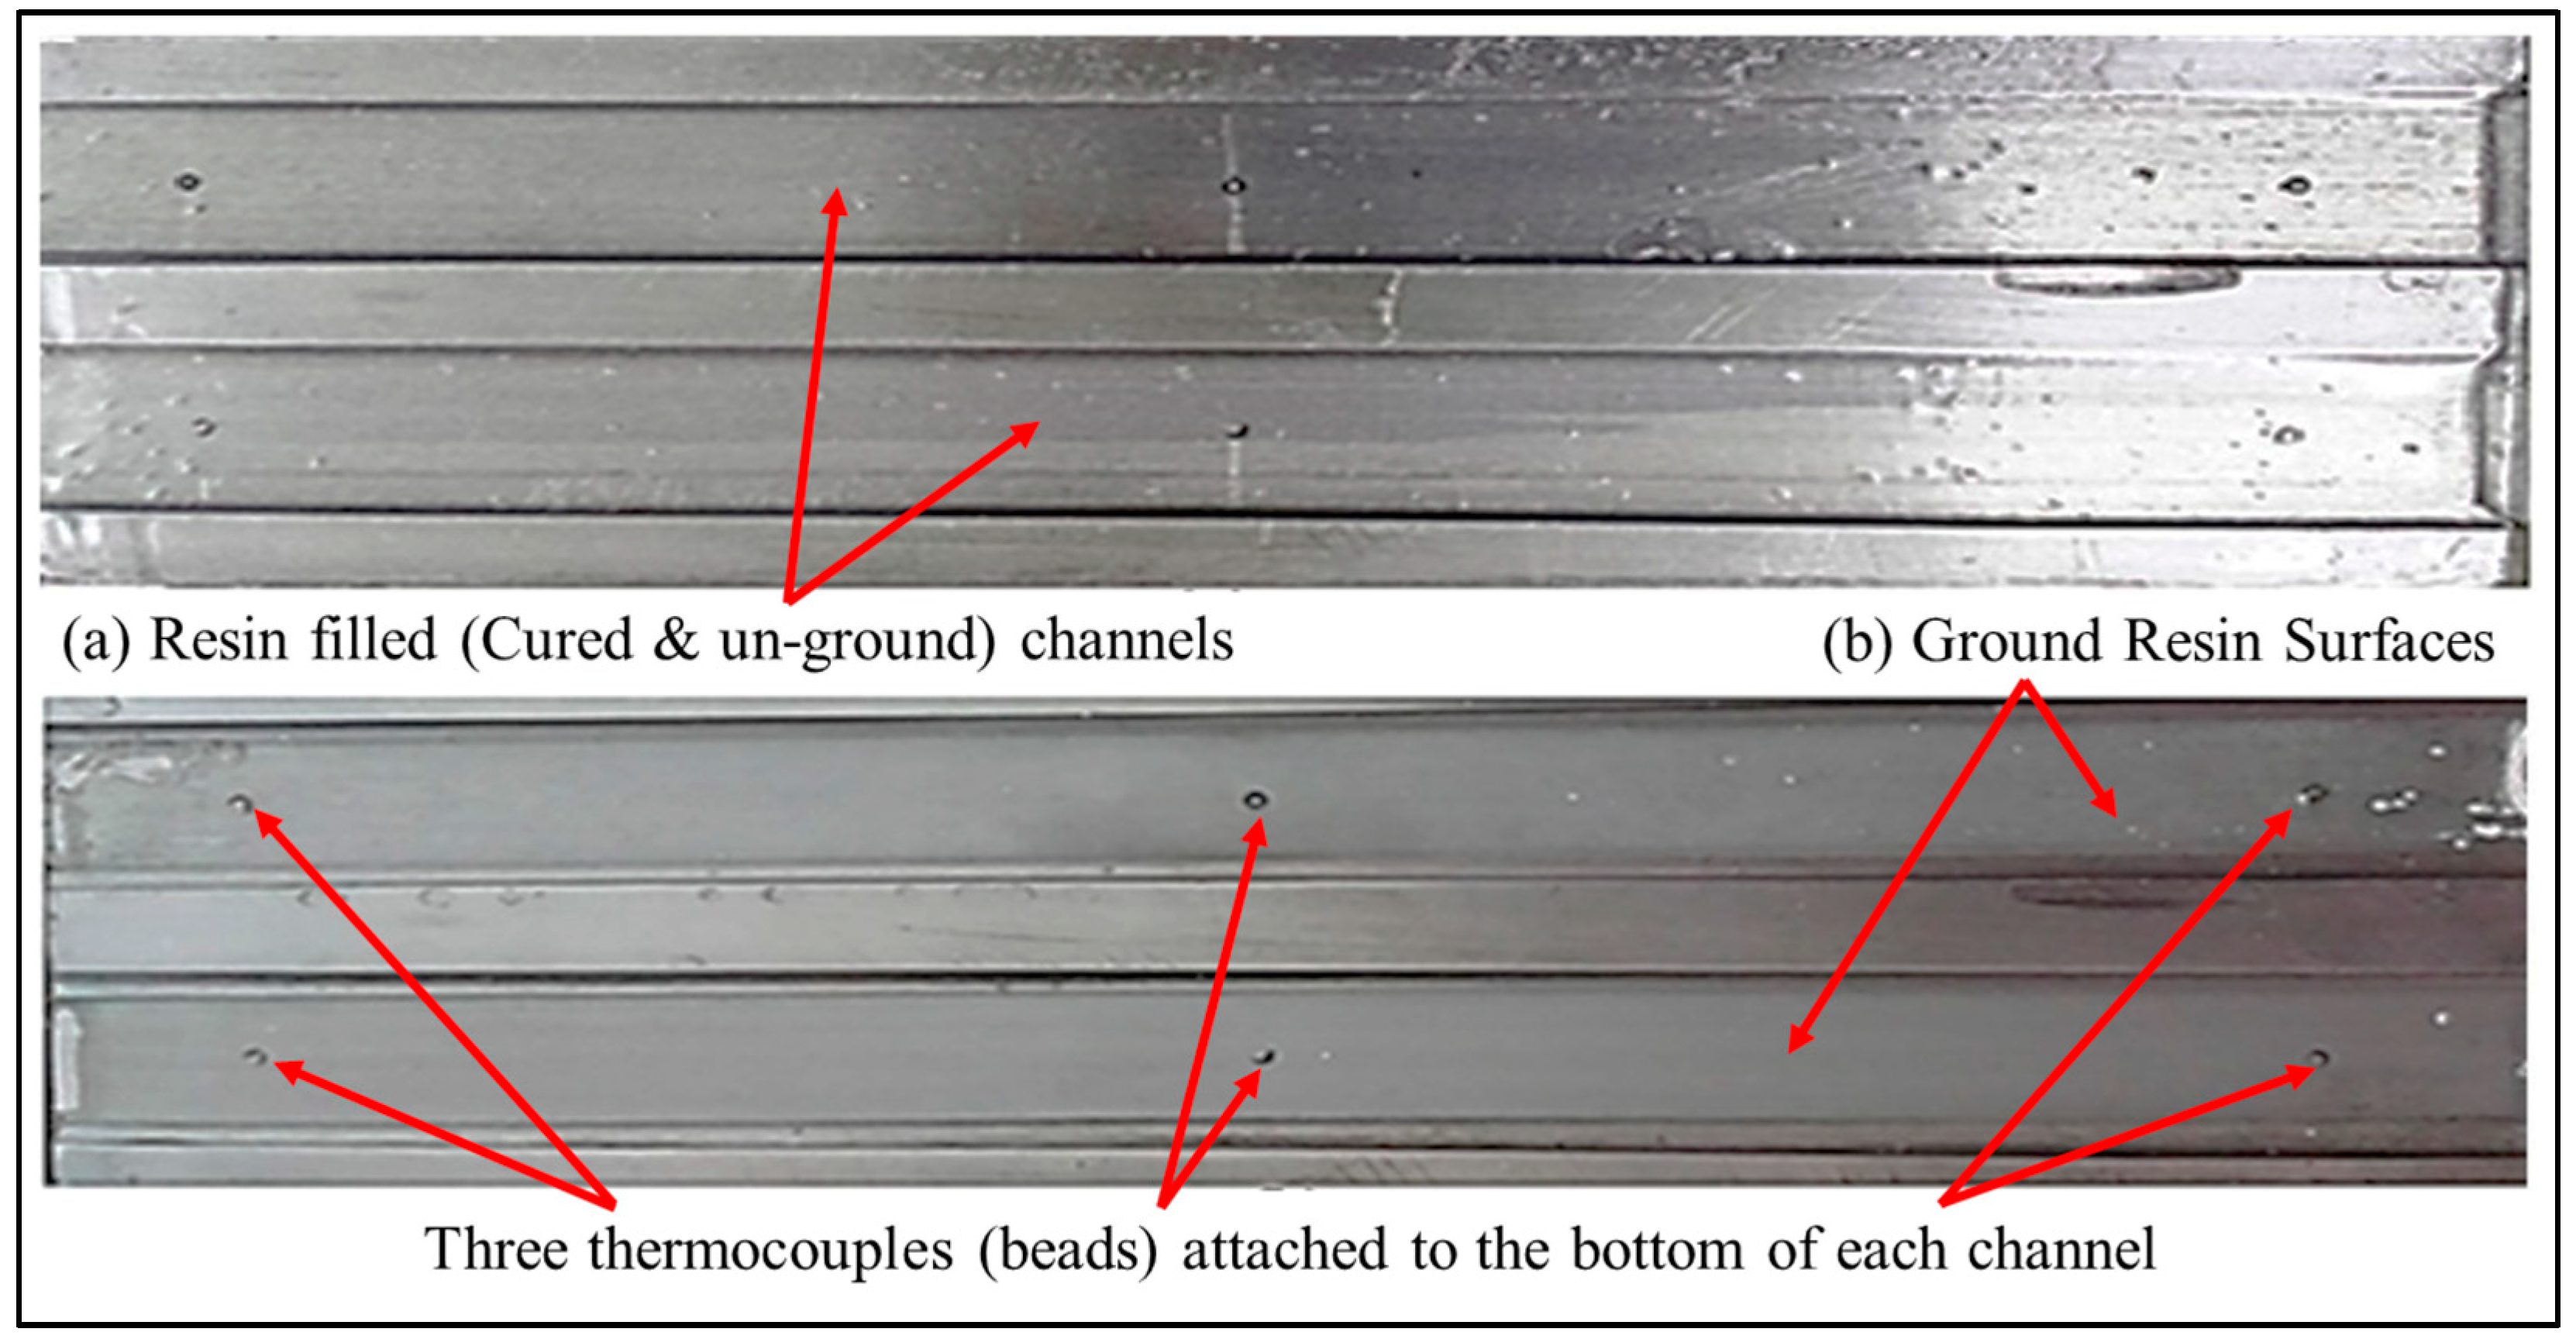
Figure 3 shows resin-filled channels before and after the grinding process. In
Figure 3a the channels are filled with cured resin and are in unground condition, whereas in
Figure 3b resin channels are ground. Moreover, in
Figure 3b the beads of thermocouples are also displayed in each channel.
The acrylic grinding methodology comprised the following steps: (a) placement of a measured quantity of liquid resin in the D2 steel plate channels, (b) curing of resin under the application of ultraviolet light, (c) placement of D2 channeled plate on the fixture attached to the cross slide of precision lathe, (d) adjustment of level and alignment of D2 steel plate on the fixture for the required depth of cut, and (e) execution of grinding process, starting from the rotating grinding wheel entering from one side of the resin-filled D2 steel plate channel and exiting from the other end by completing the experiment.
Figure 3 represents the resin-filled (cured) channels before and after the grinding process.
2.2. Thermometry of the Grinding Process
For thermometry and thermal analysis, a thermal imager and three thermocouples connected to digital meters were utilized. In the thermal imaging process, the measured temperature is displayed on the screen of the thermal imager. The captured colored image shows the different temperatures of the grinding zone in different colors for easier distinction. Additionally, thermal imagers can also produce an analog signal from captured (infrared) images for process management. In
Figure 1, the temperature measurement from a thermal imager (testo 868) is illustrated. The imager has the ability to take rapid thermal images during the grinding process with an accuracy of 0.08 °C. Moreover, this imager also has 19,200 temperature measuring points for highly precise temperature monitoring [
52]. In this current research, the thermal imager was set to its super-resolution (320 × 240 pixels) value. Additionally, the testo 868 thermal imager also has the capability of capturing an actual image along with the infrared image.
The other thermometry technique which was utilized for temperature monitoring in this research was thermocouple temperature measurement. During grinding, whenever the grinding wheel passed over the layer of acrylic resin above the thermocouple, the transferred heat was measured and displayed via digital meter.
3. Results and Discussion
3.1. Grind Zone Thermometry
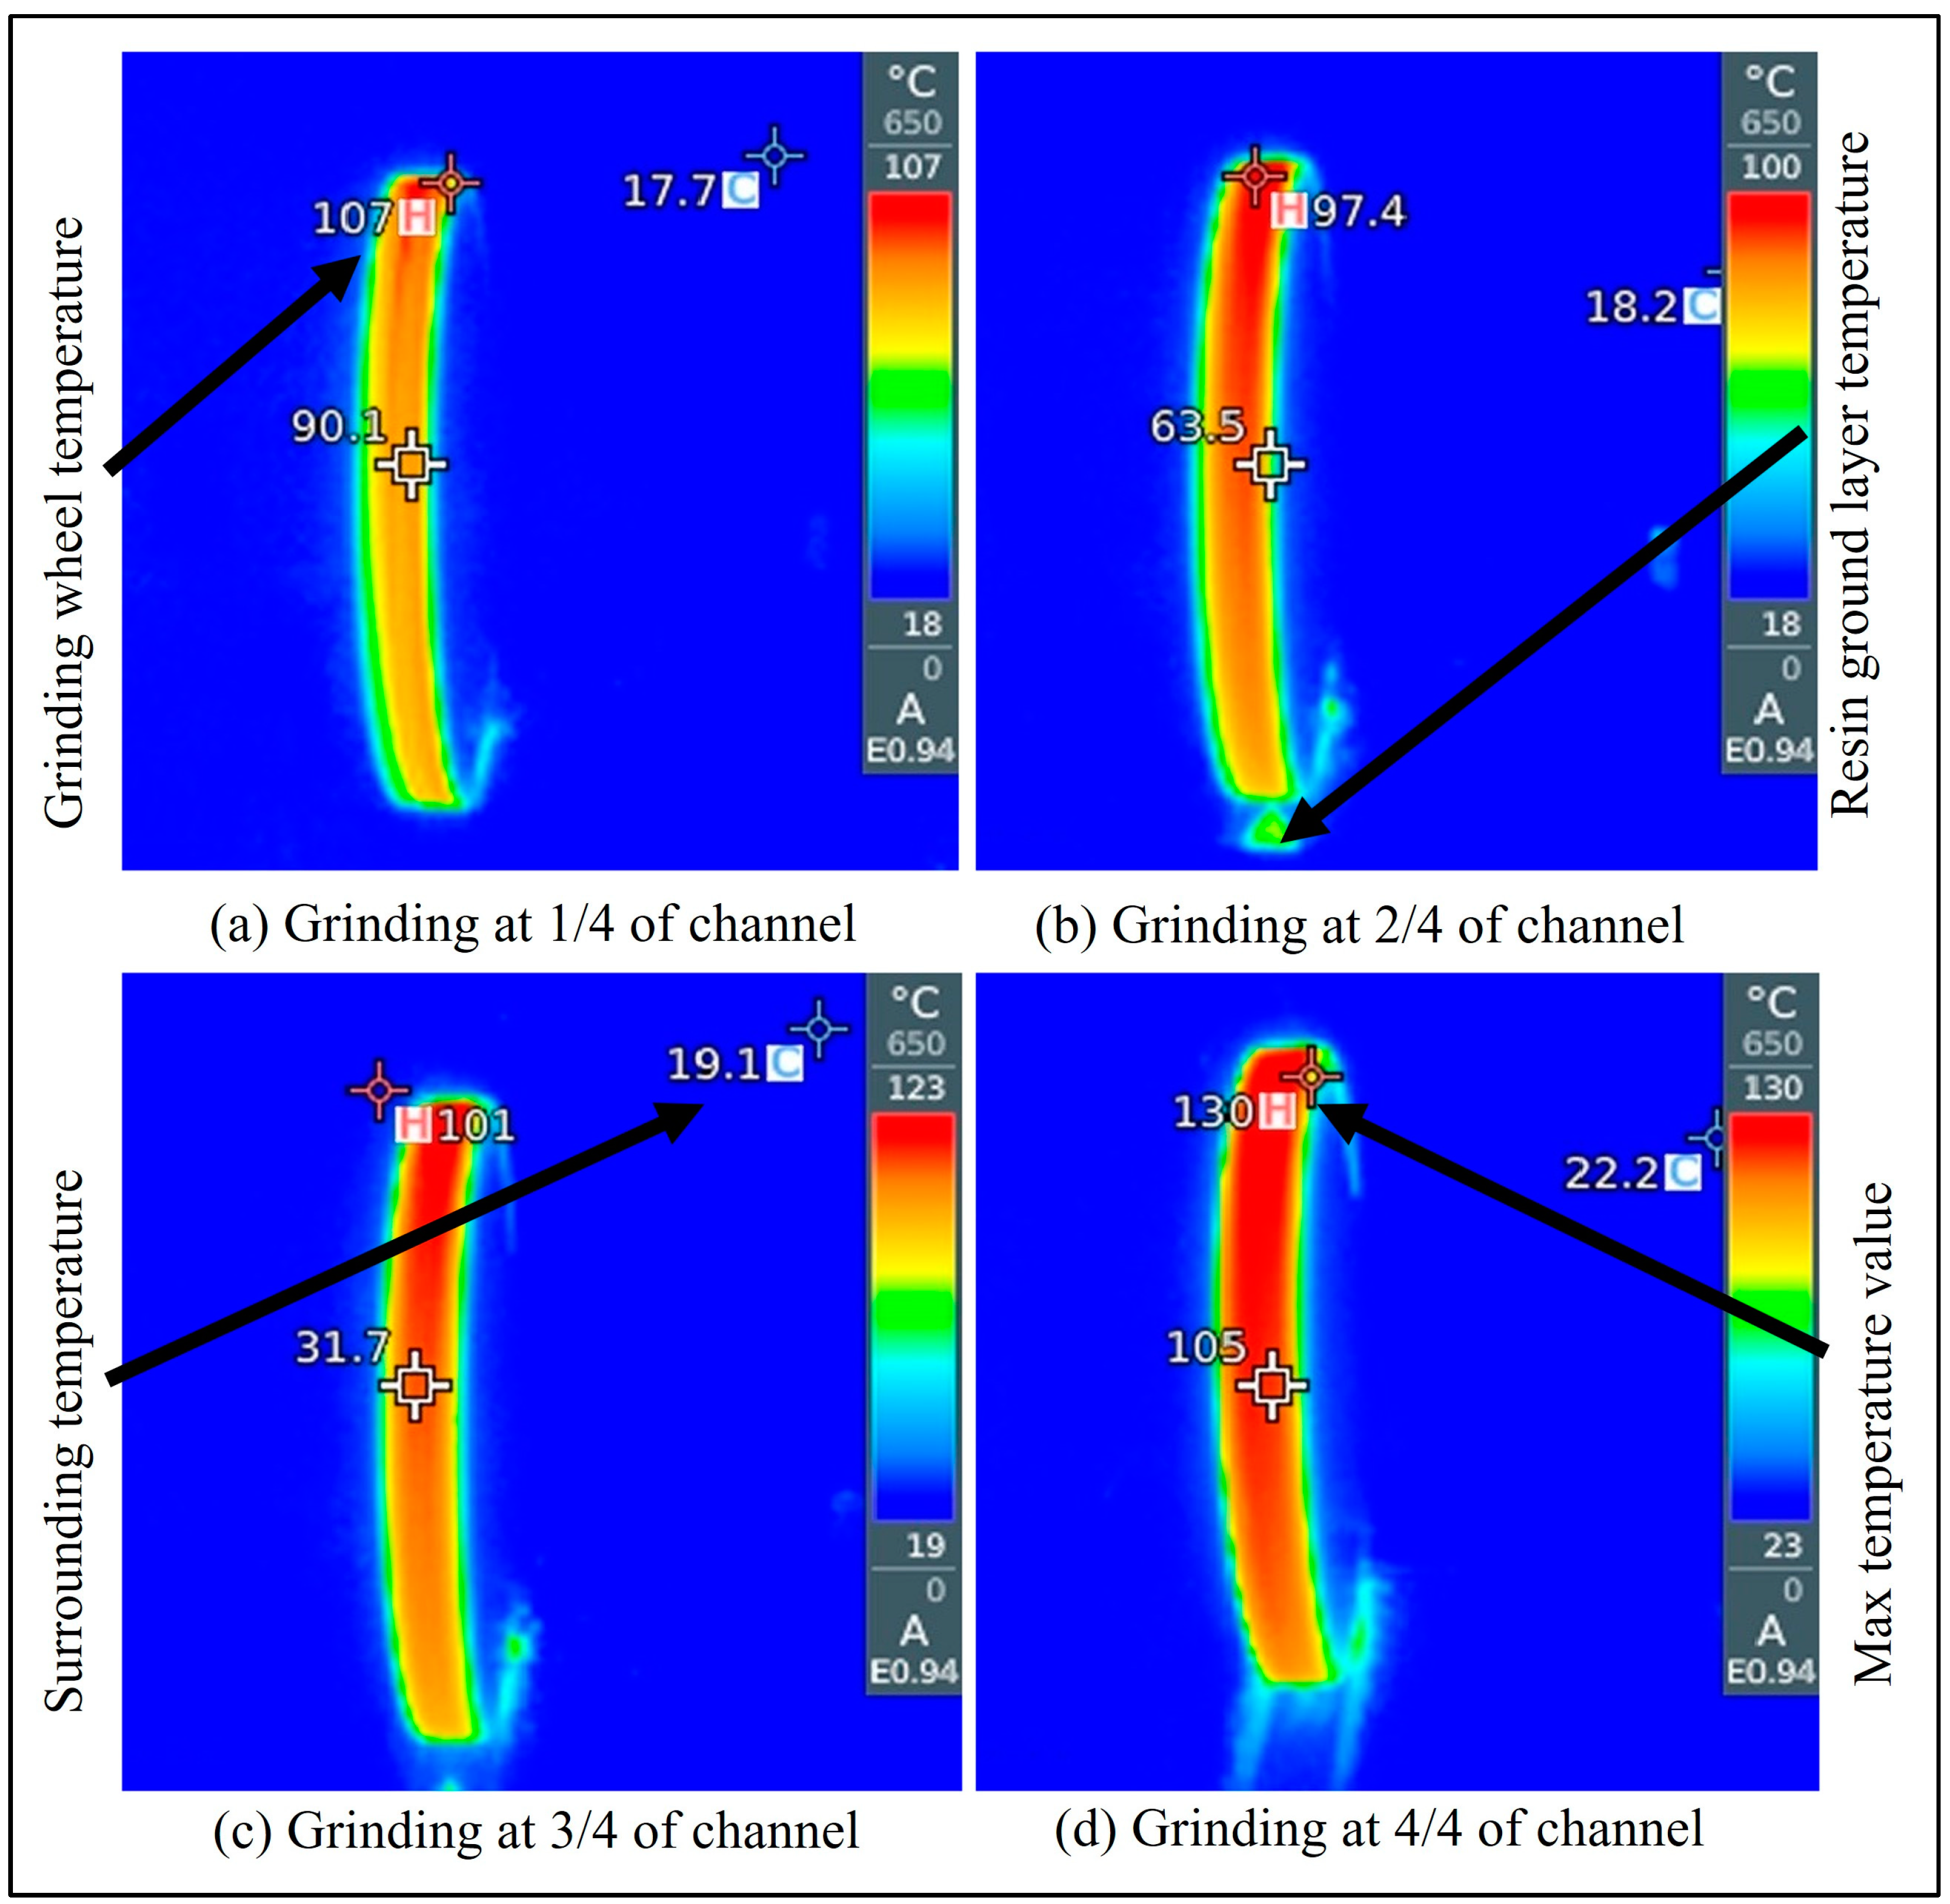
The captured infrared images of the grind zone were analyzed after the experiments. From each thermal image, along with the labeled temperature points of the middle, highest, and lowest values, there was also the option to find the temperature values of any other point in the image by selecting that point and entering the emissivity value of that material. A software suite provided by testo (online) enabled the measurement of different temperature points in any captured thermal image. The thermal images were opened in the software suite and were analyzed in detail. For each experiment, a minimum of eight thermal images were captured from the start to the end of the grinding process of the channel. Four of the captured thermal images (at the start, at the middle, and the end) of the grind zone during the resin grinding process are presented in
Figure 4.
Figure 4 represents the thermal imagery of the grind zone. There is a temperature range represented in the form of colors, changing from blue to red corresponding to the lowest and highest values of the grind zone. There is a white square pointer representing the center of the thermal image, a blue cross representing the lowest temperature location and value in the image, and a red cross representing the highest temperature location and value of the thermal image. The highest value of the temperature is measured on the wheel surface, and the lowest temperature corresponds to the surrounding temperature, along with these the temperature of the ground resin surface is represented by the arrows. In
Figure 4 there are four sub-figures, (a) at the start of the griding process, (b) at 2/4 part of the channel, (c) at 3/4 position of the channel, and lastly (d) at 4/4 part of the channel.
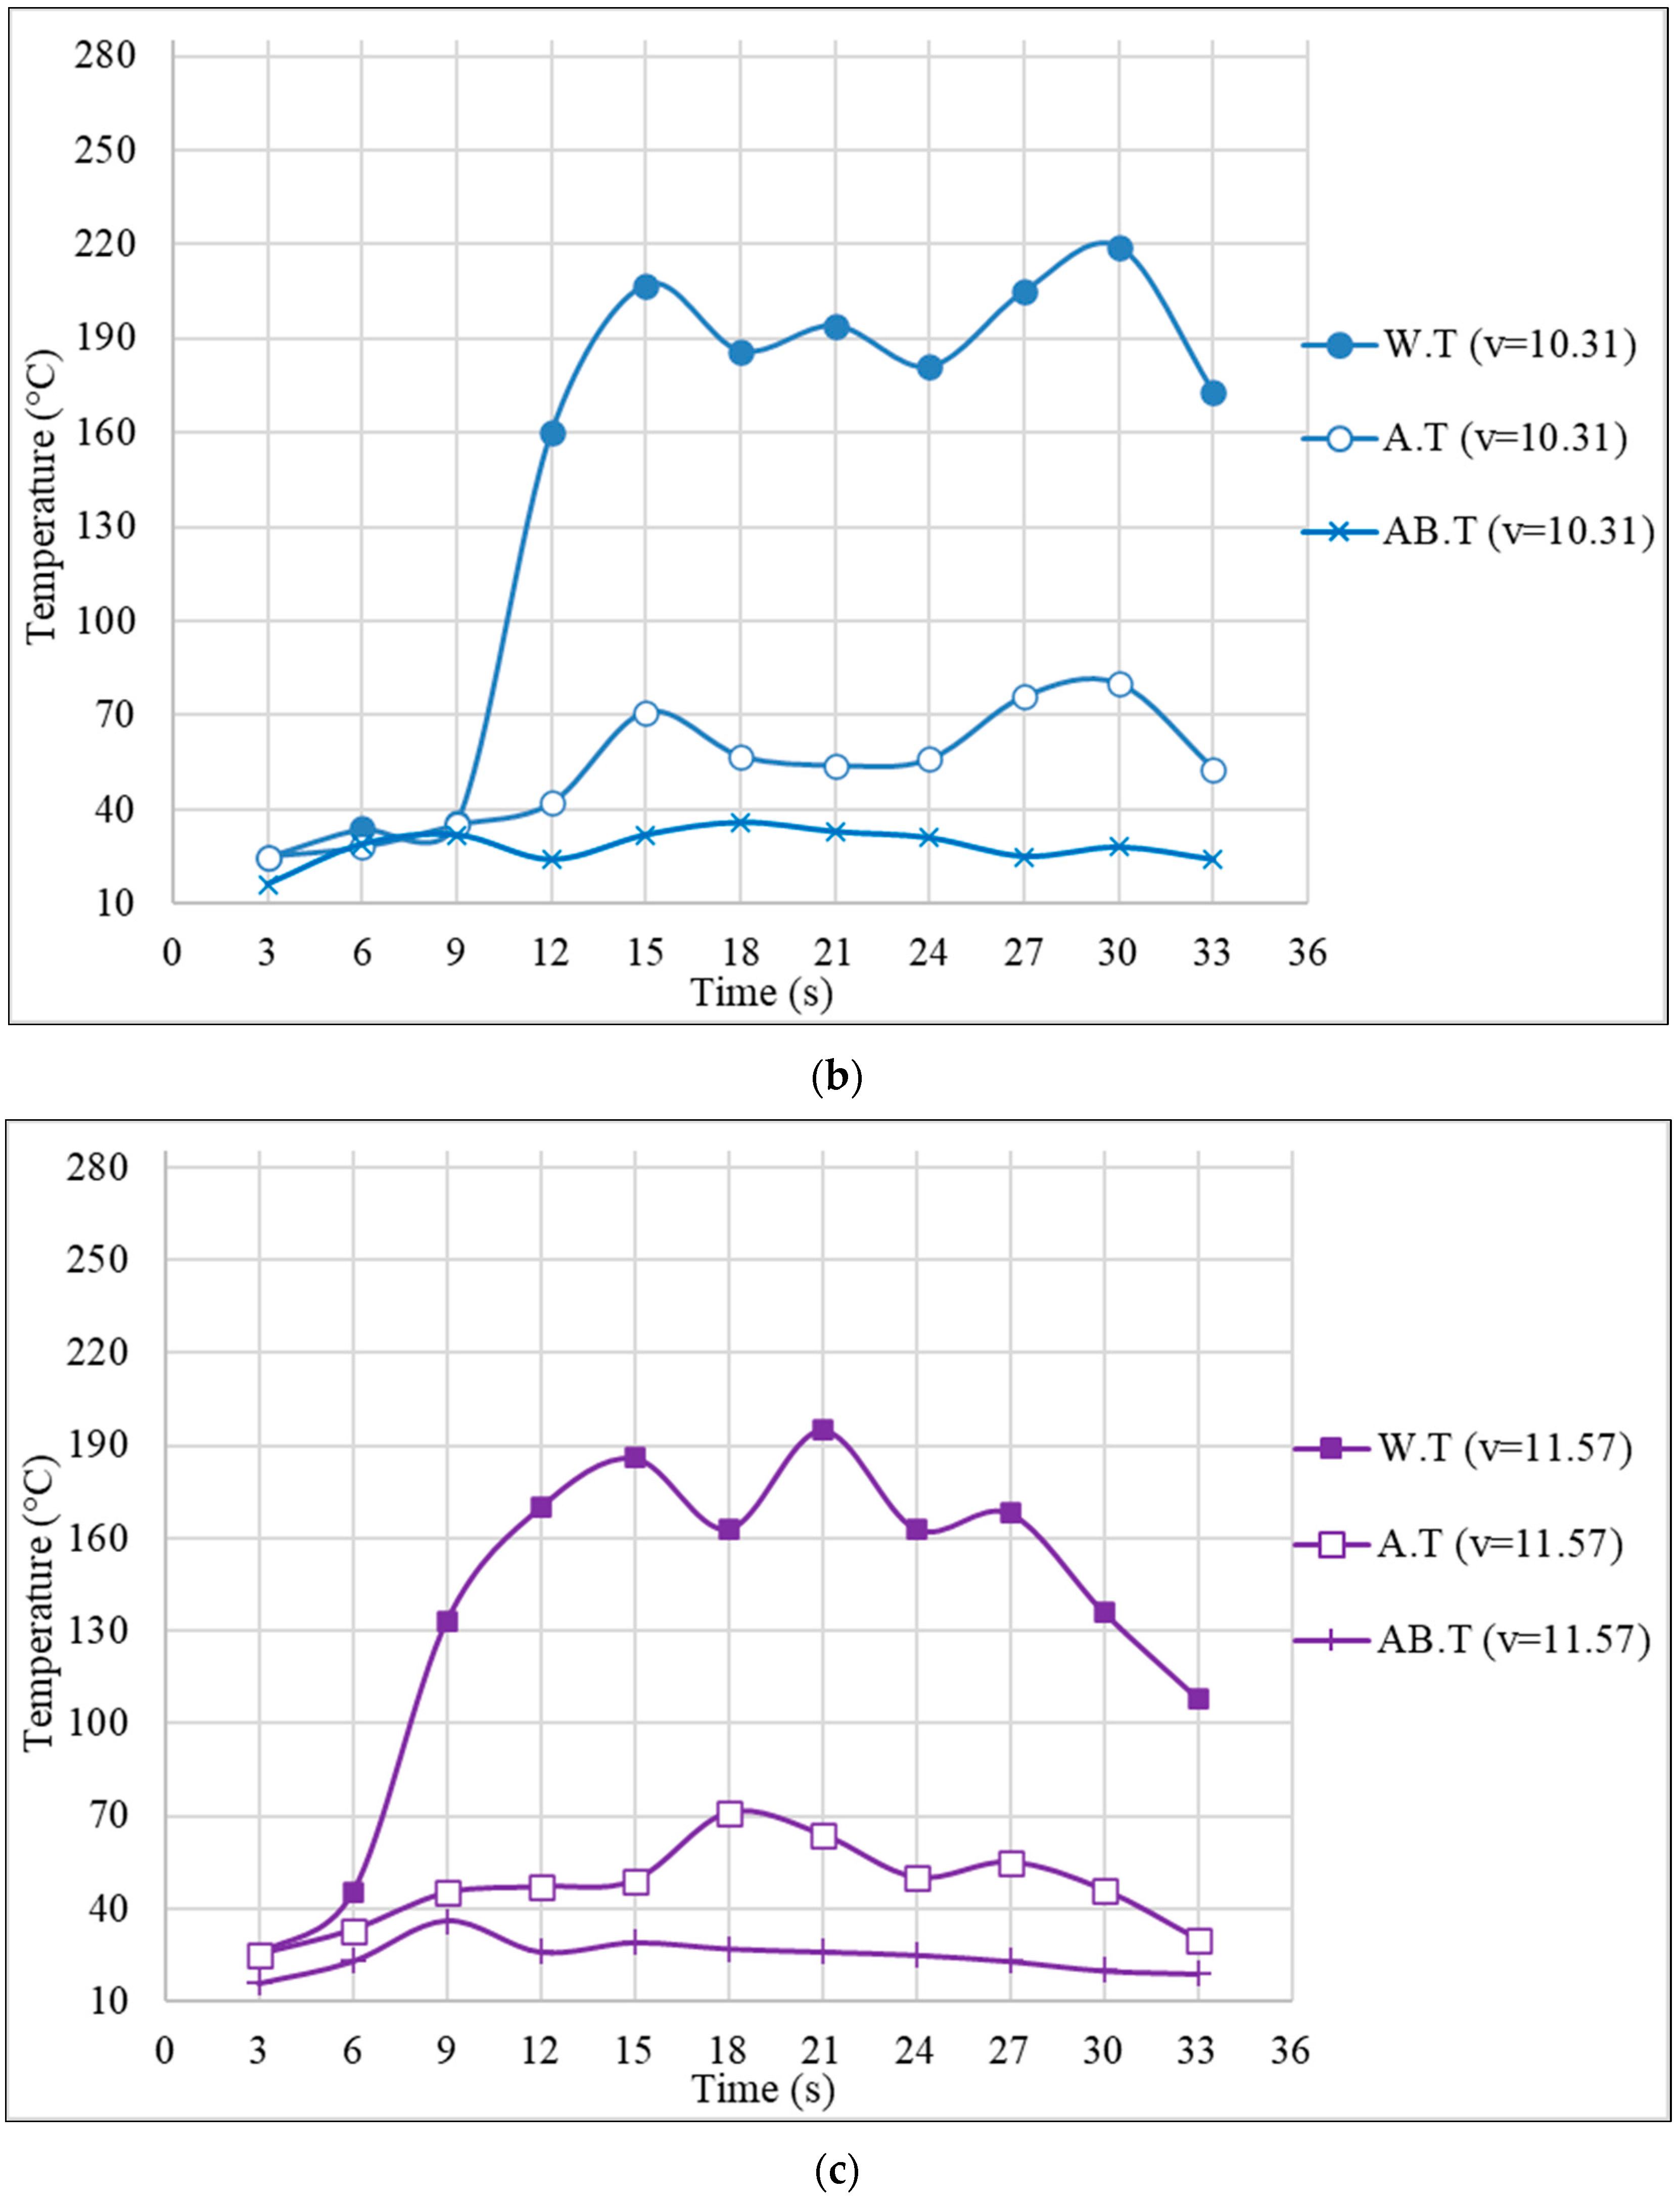
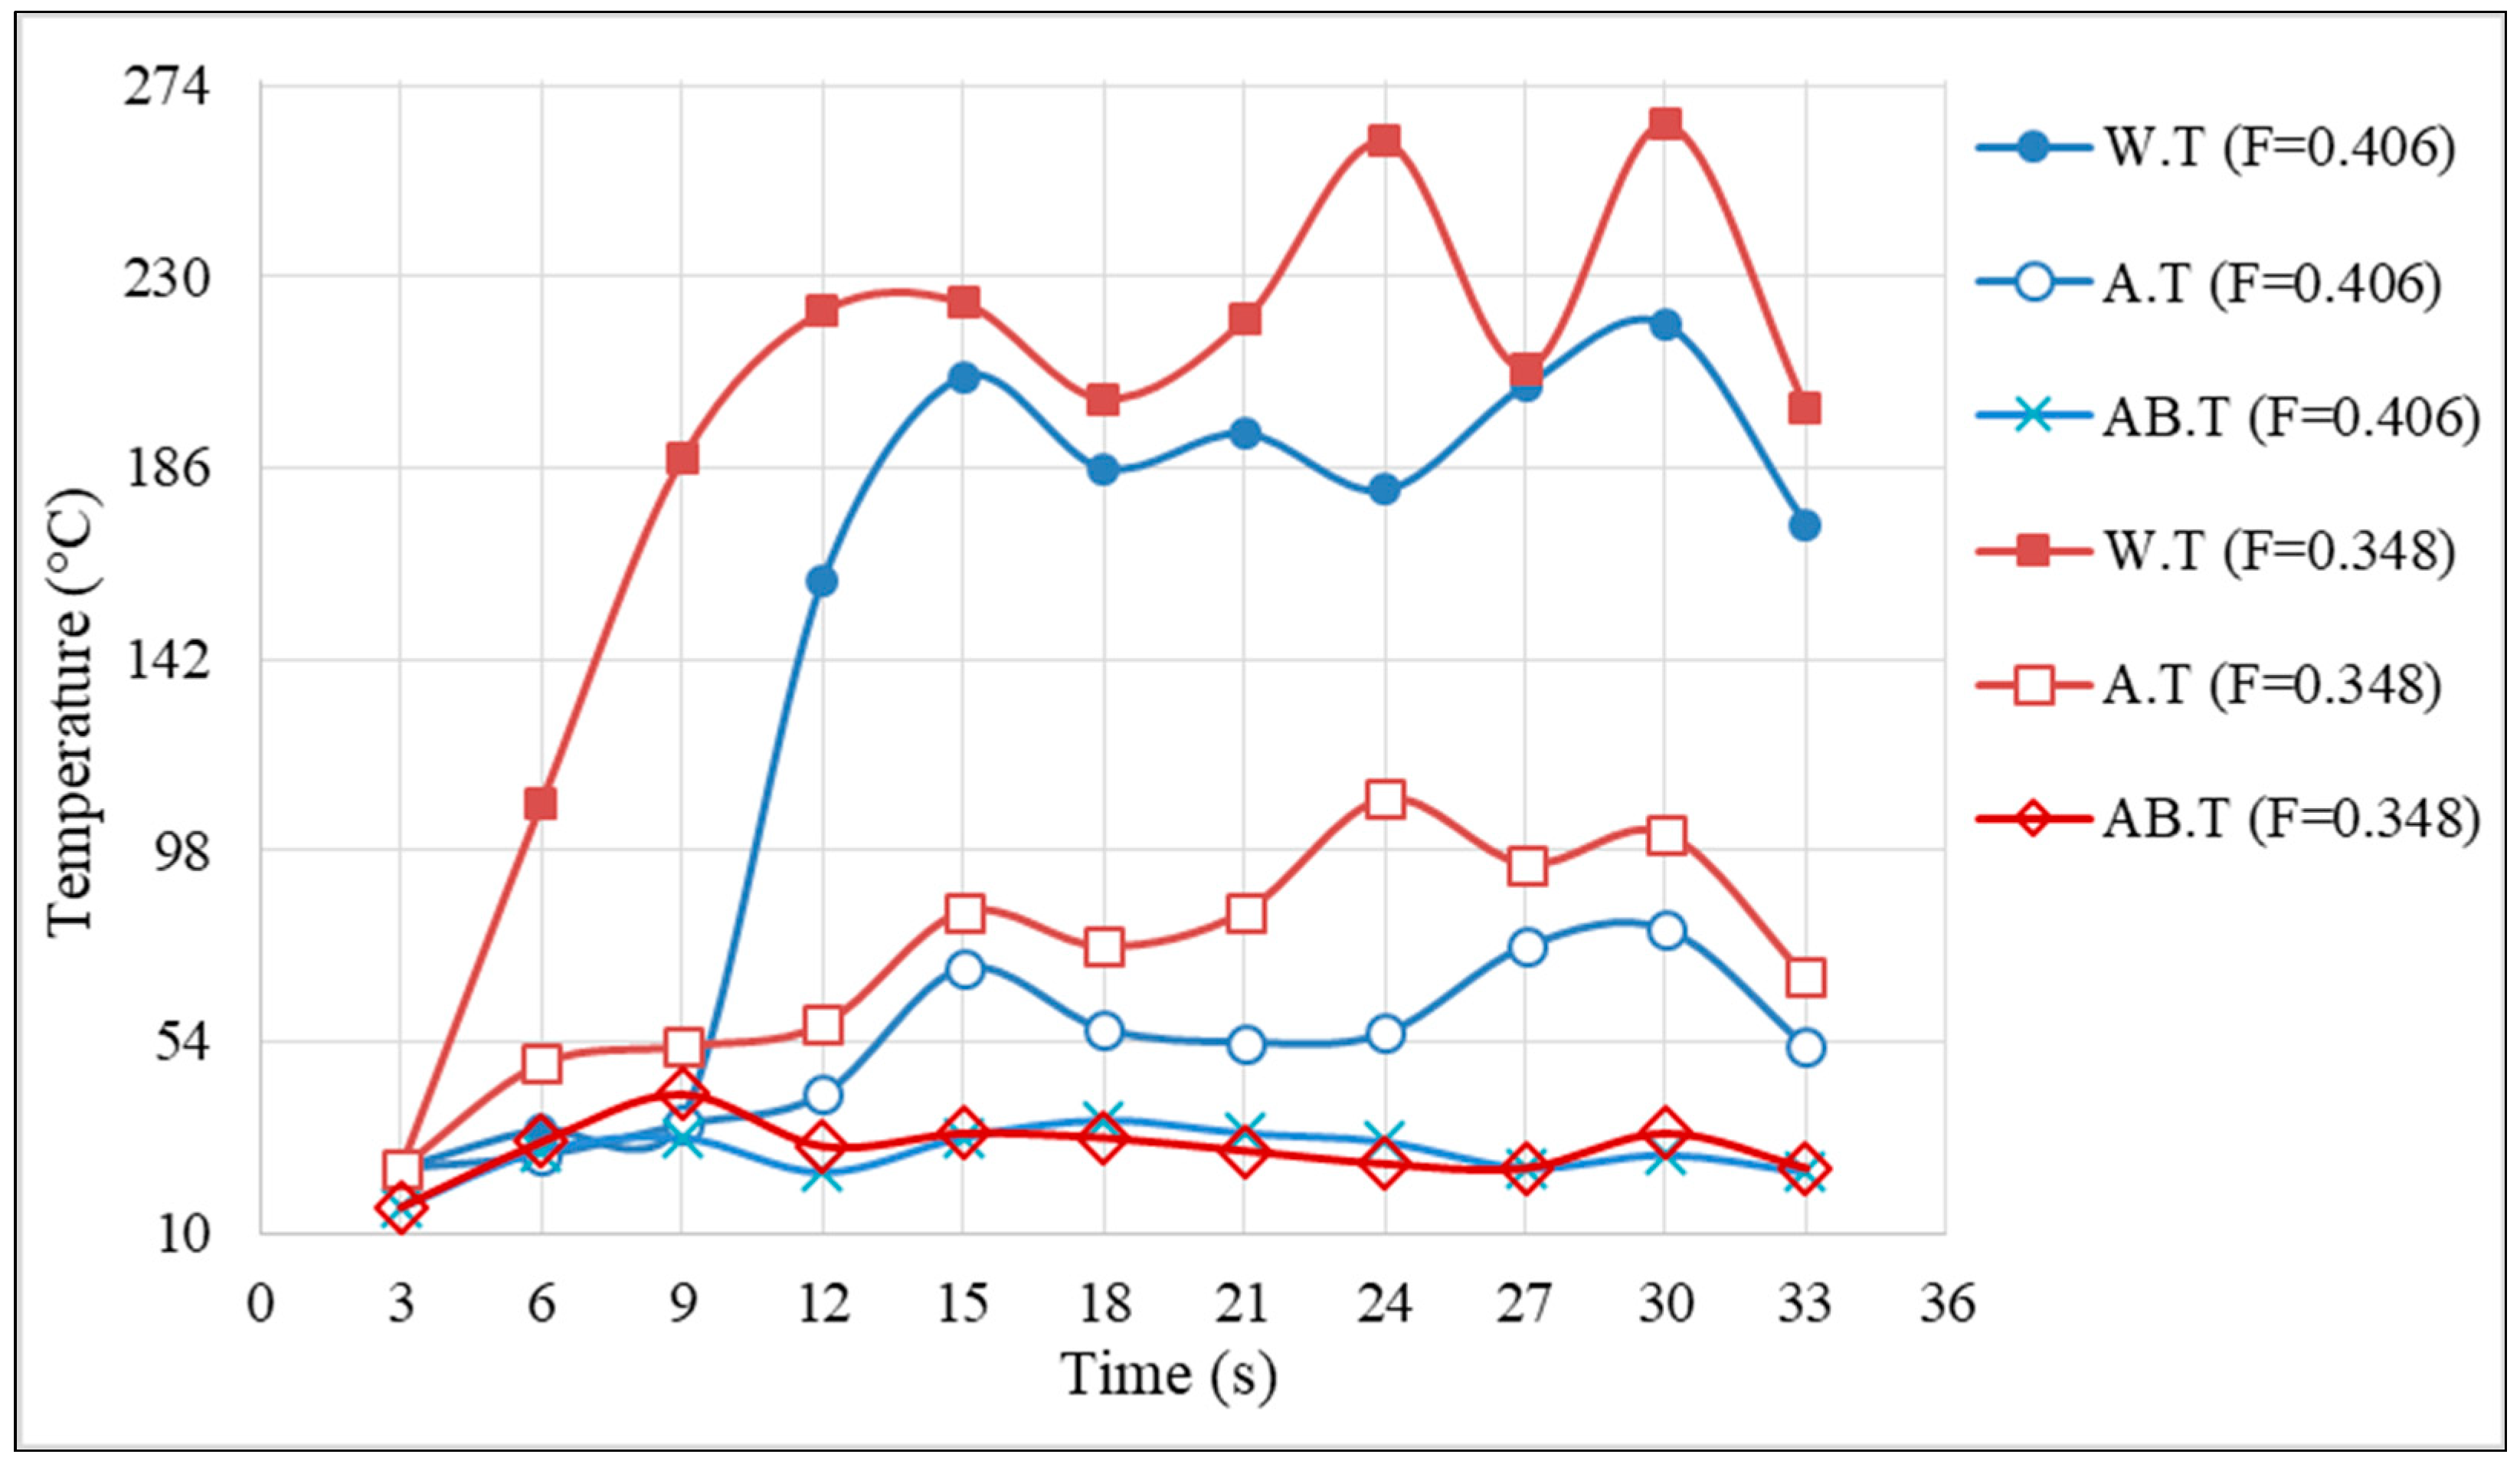
The thermometry revealed that the higher spindle speed (11.57 m/s), higher value of feed (0.406 mm/rev), lower value of depth of cutting/grinding (1.0 mm), and bigger grain size (46/Ø 0.35 mm) of the grinding wheel resulted in the lowering of the grind zone temperature. As the spindle speed increased from 9.055 m/s to 10.31 m/s and 11.57 m/s, the grind zone temperature reduced noticeably; however, the change in the feed from 0.348 mm/rev to 0.406 mm/rev did not result in a very evident change in temperature as there was not very much difference in the feed values.
Figure 5 represents the temperature measurement data of the grind zone when the value of the spindle speed was varied from 9.055 m/s to 10.31 m/s and 11.57 m/s. Additionally, the heat transfer from the top surface of the ground resin layer to the bottom surface was also measured via thermocouples placed just beneath the resin surface. It is very obvious from the results that an increase in the spindle speed results in a decrease in the grind zone temperature. Furthermore, the thermocouple temperature measurement data also reveal that there is an average temperature difference of 22 °C to 45 °C of the upper and bottom layer of ground resin, depending upon the set of grinding parameters resulting in the lowest to highest values of the grind zone temperature. In the following figures, the grinding wheel temperature (W.T) has the highest value; afterwards, the resin (ground layer) temperature (A.T) has the second highest value due to the direct contact with the grinding wheel, and lastly, the resin bottom temperature (AB.T) has the lowest measured values.
Figure 5 shows the variations in the grind zone temperature under varying spindle speeds.
Figure 6 represents the thermometry data of the grinding zone, measured under varying values of feeds, from 0.348 mm/rev to 0.406 mm/rev. As there is not much difference in the values in these feeds, the temperature difference is not noticeable; however, as a higher feed results in the quicker movement of the grinding wheel from the resin layer, a lower amount of heat is transferred to the ground layer [
2]. Similarly, the thermocouple data also provide positive evidence of lower heat transfer to the bottom of the resin (AB.T) when the value of feed is higher (0.406 mm/rev).
Figure 6 shows the effect of variations in the values of feed on the grind zone temperature.
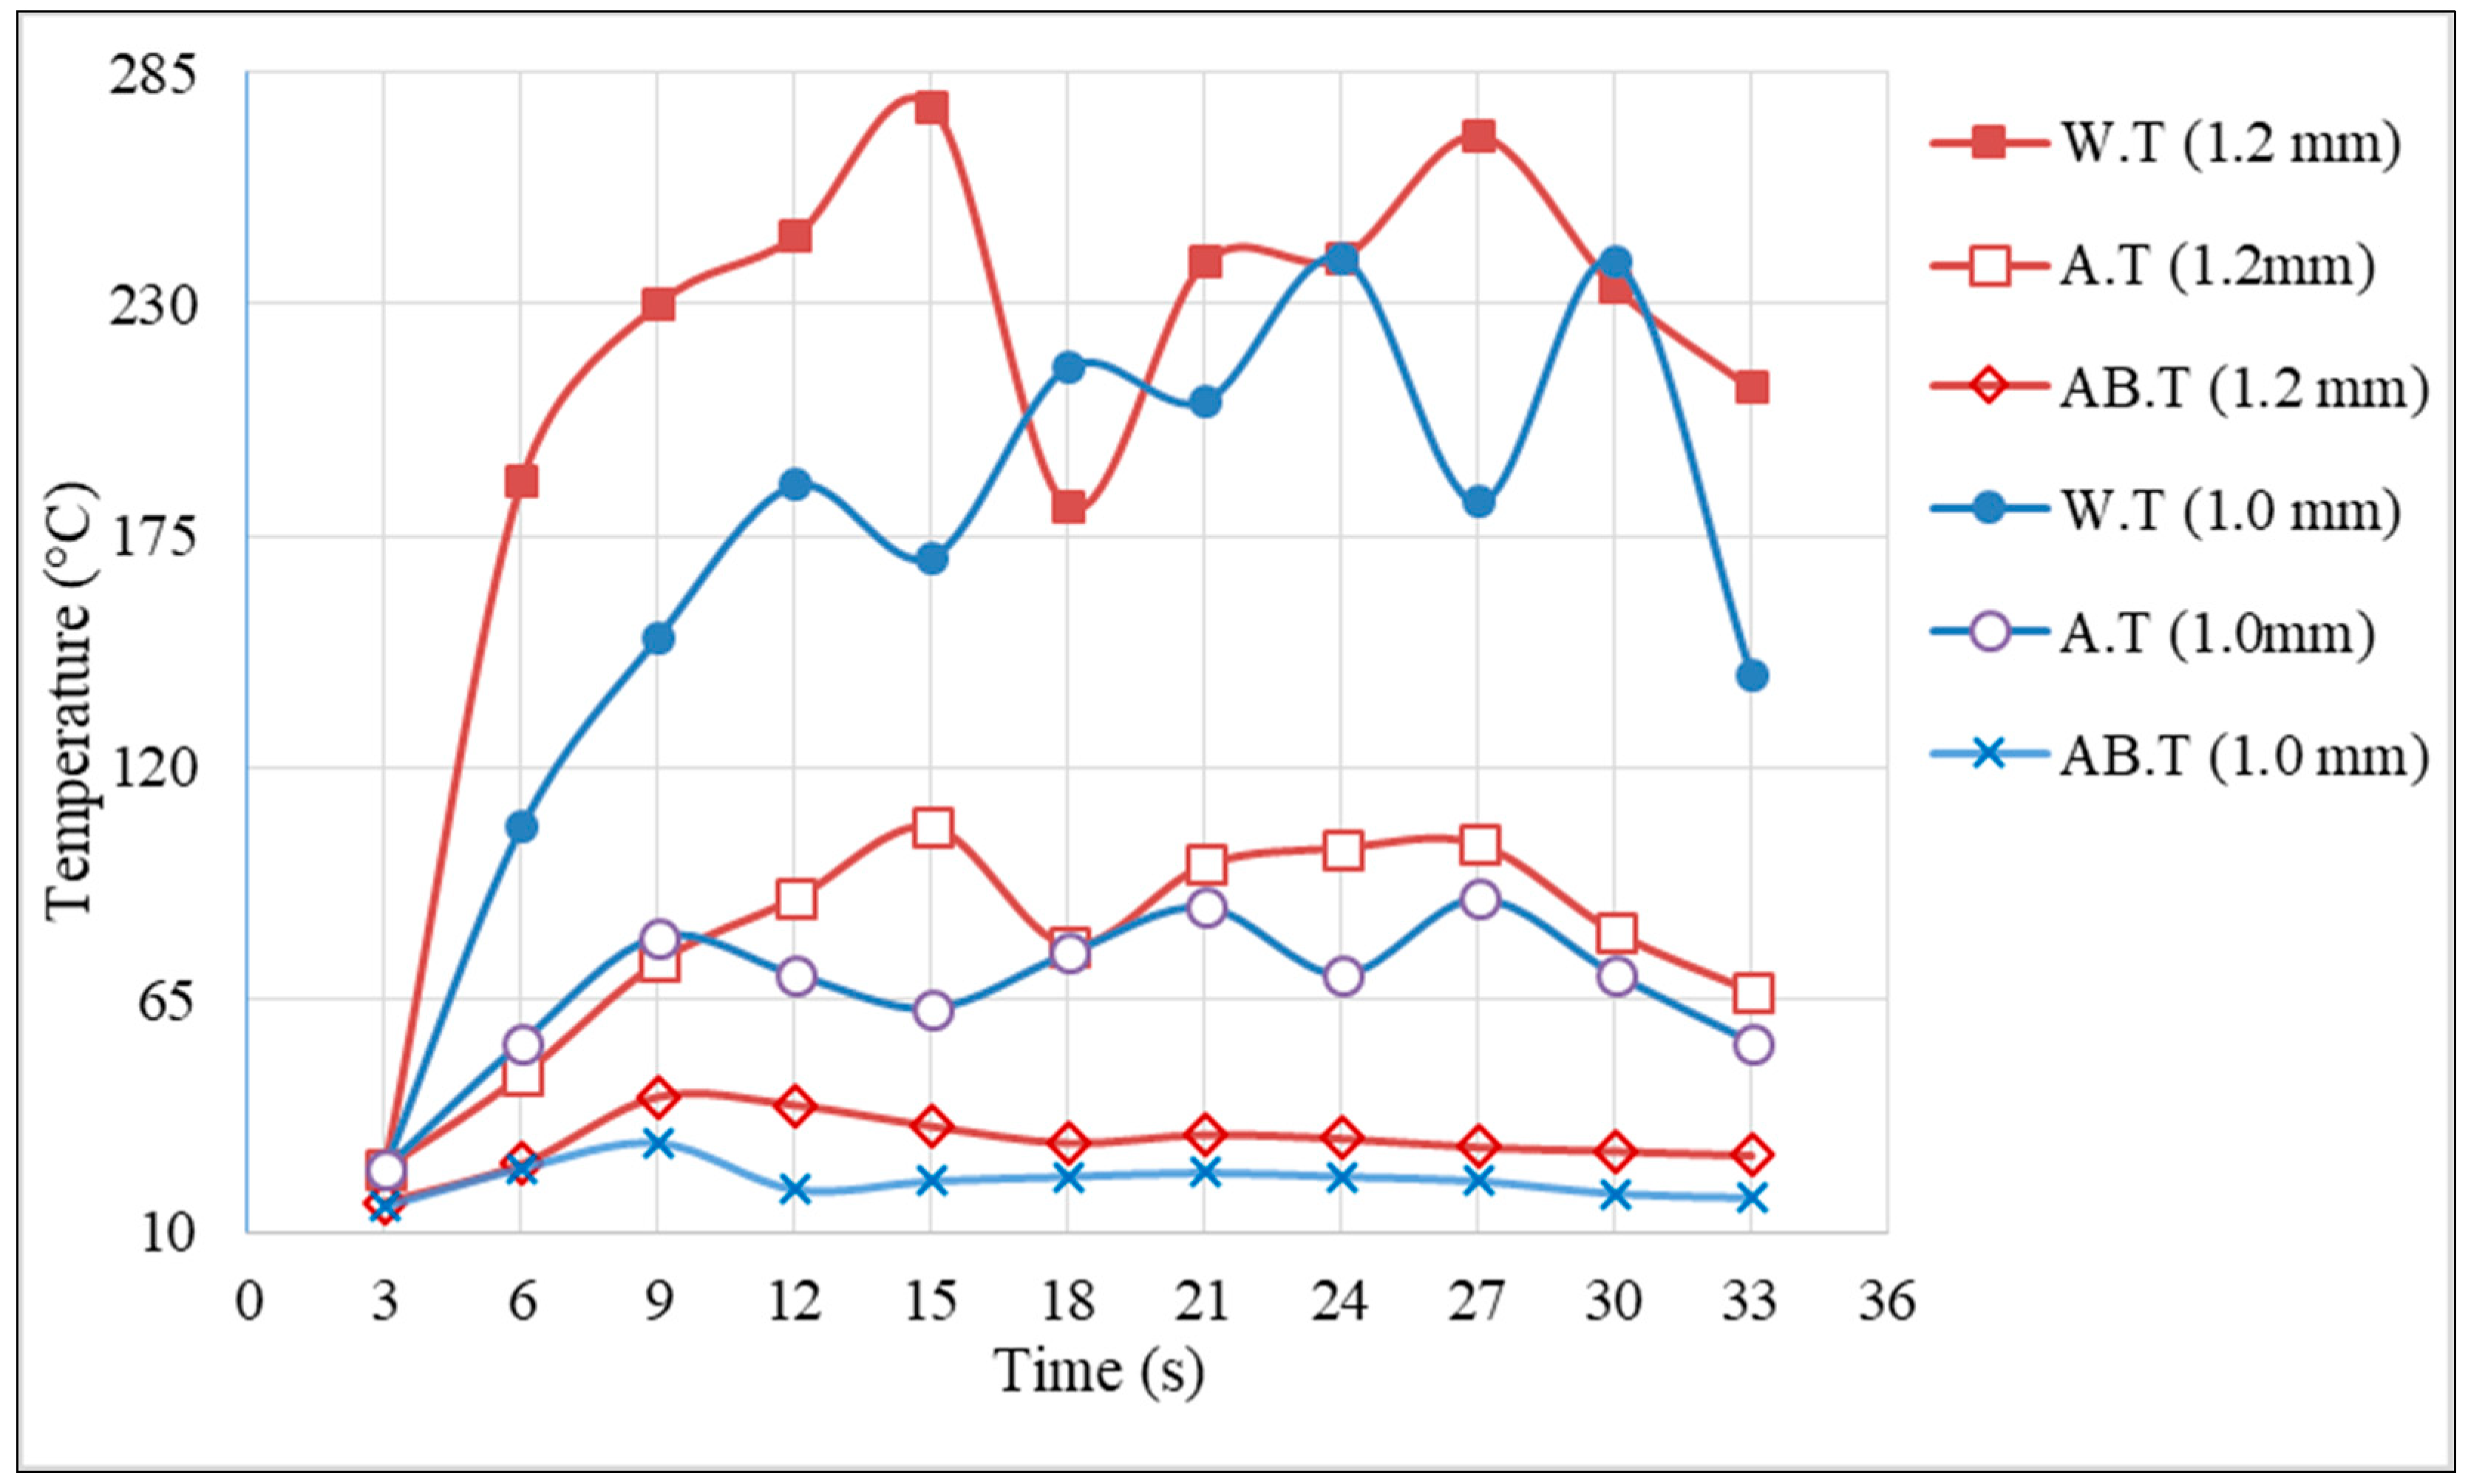
Furthermore, the change in the depth of the cutting/grinding resulted in a considerable change in the temperature of the grind zone, as the depth of grinding has an obvious effect on the generated heat during the grinding process; moreover, there is a reasonable change in the depth of the cutting/grinding from 1.0 mm to 1.2 mm; however, when a higher depth of cutting/grinding (1.2 mm) was implemented with higher values of speed (11.57 m/s), feed (0.406 mm/rev), and grain size (46/Ø 0.35 mm), this also resulted in an acceptable temperature range. Conversely, the lower depth of the cutting/grinding (1.0 mm) was also acceptable when it was being implemented with higher values of spindle speed (11.57 m/s) and feed (0.406 mm/rev) and a smaller wheel grain (80/Ø 0.18 mm). As the decrease in the depth of the grinding considerably reduces the grind zone temperature, a lower depth of grinding can also be utilized with smaller-grained wheels.
Figure 7 represents the effect of the change in the depth of the cutting/grinding on the grind zone temperature.
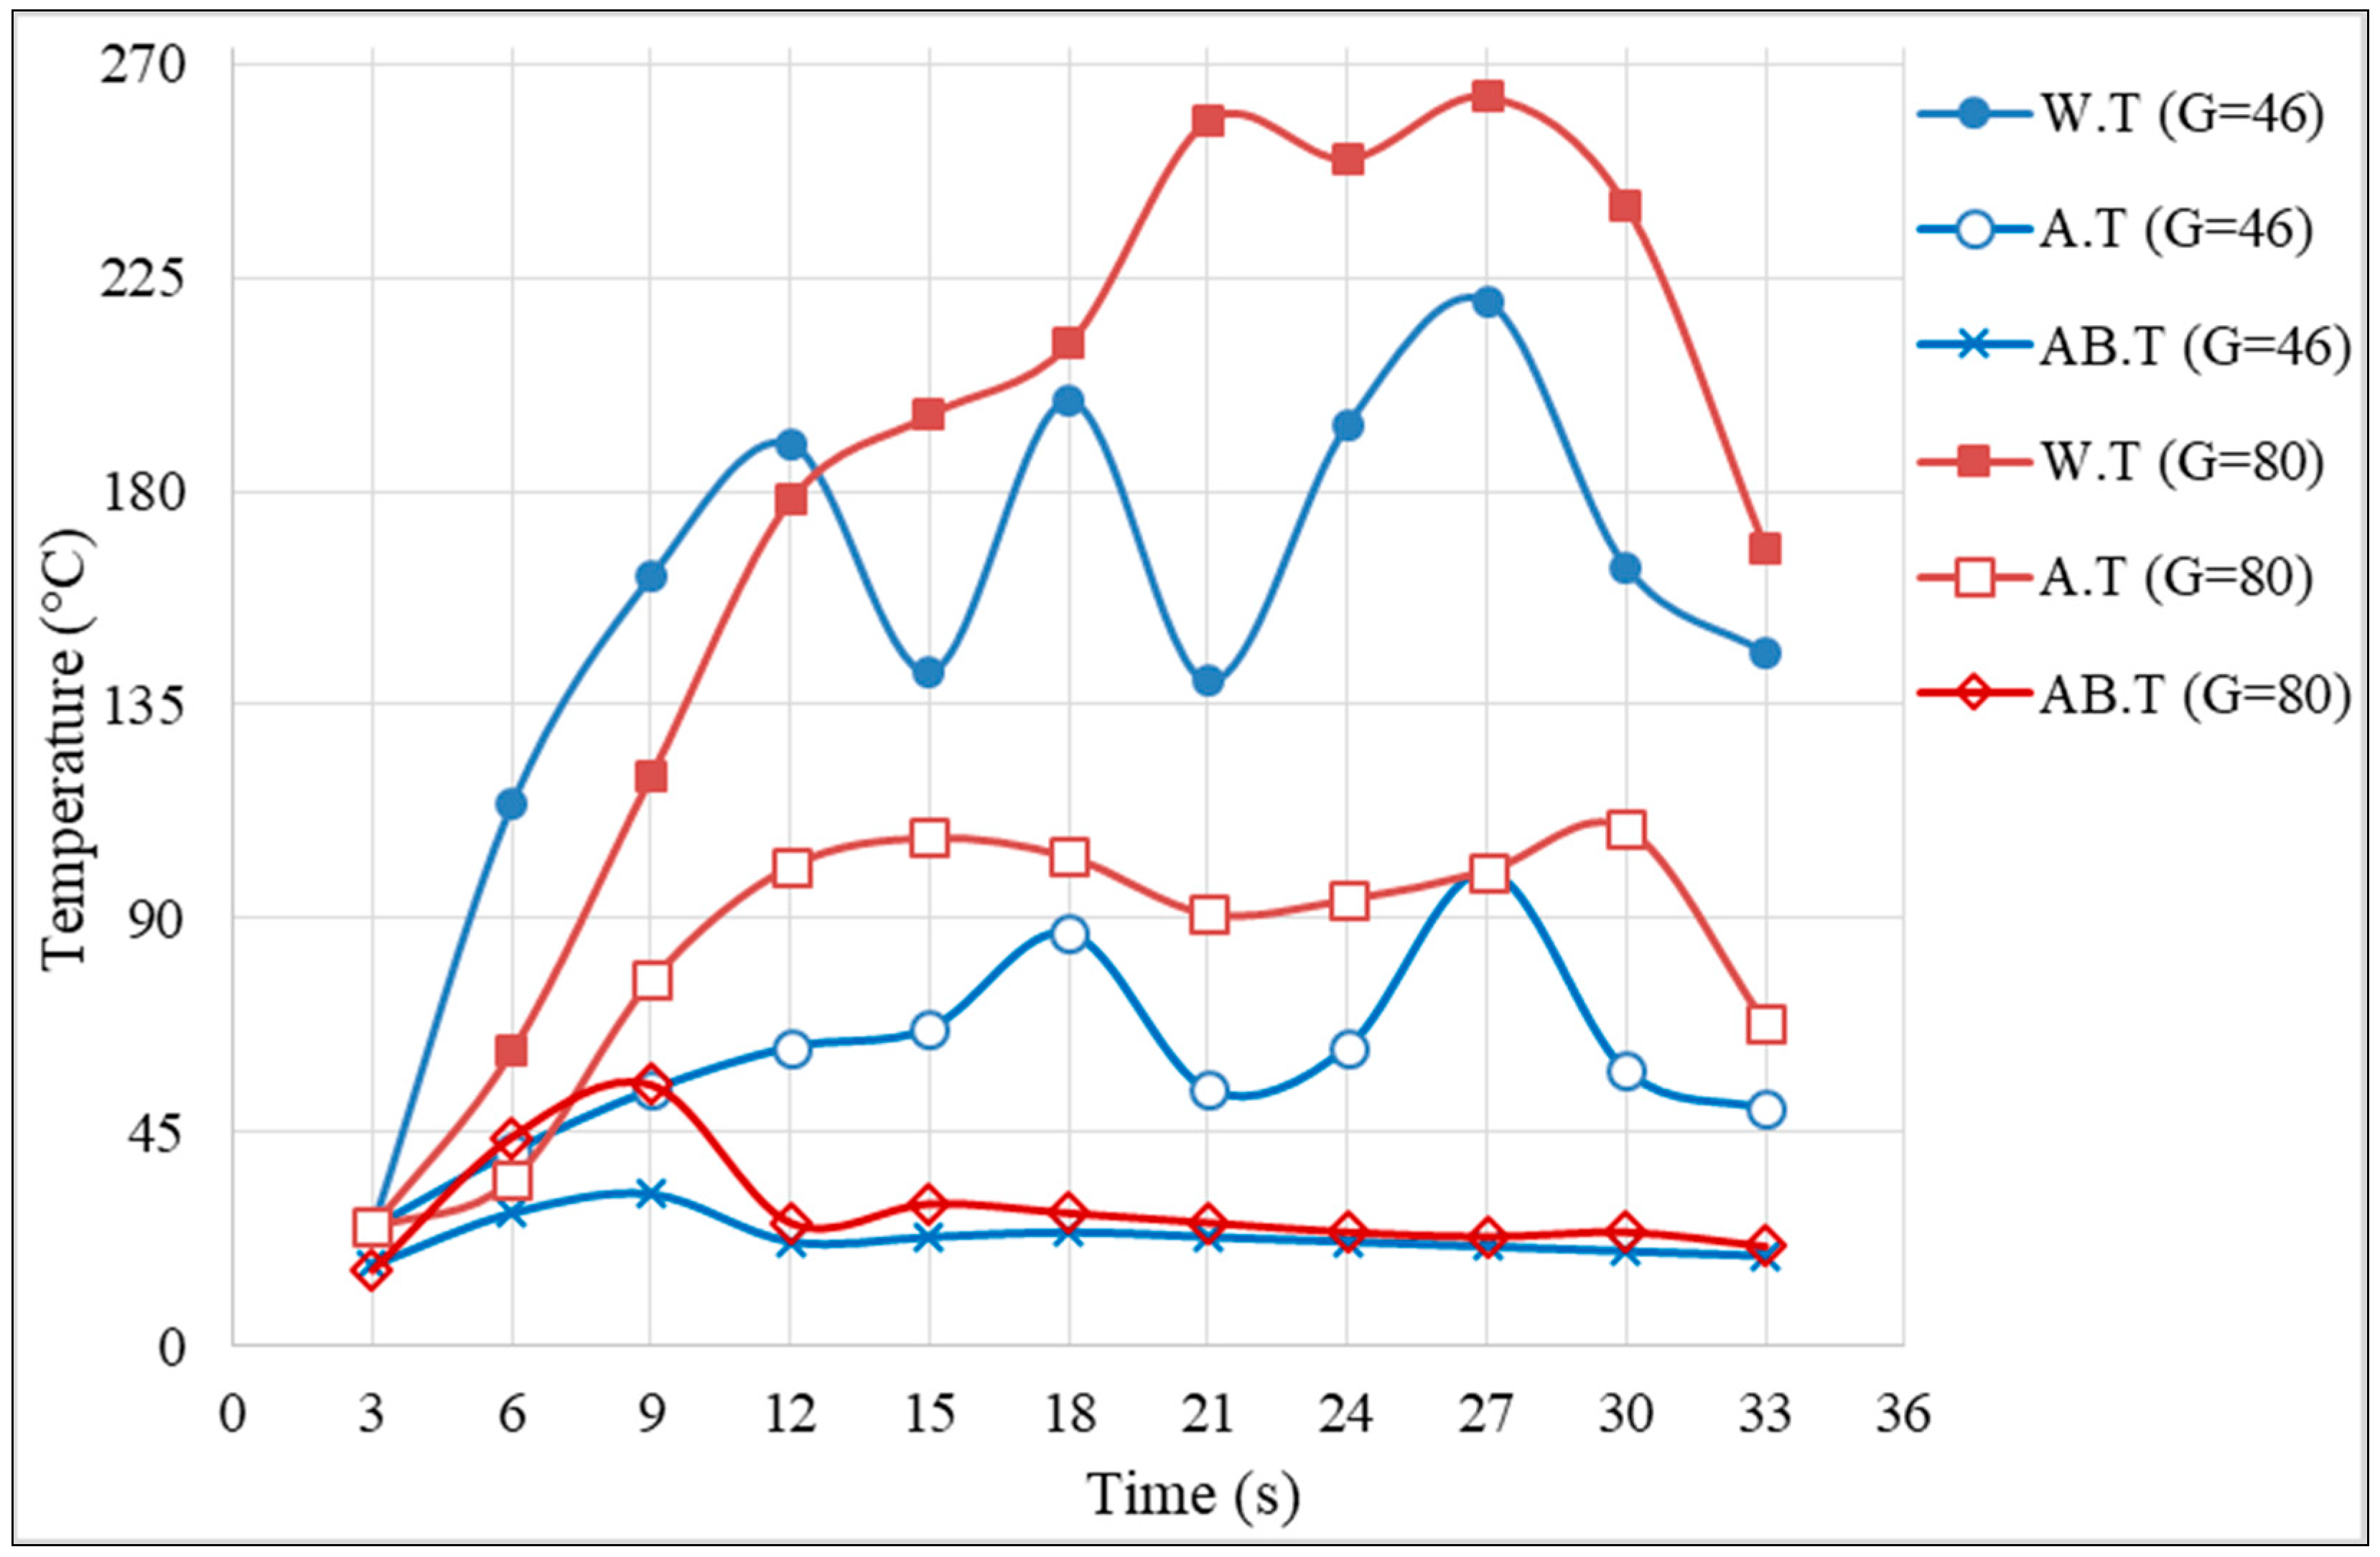
Lastly, the effect of the grain size was also obvious regarding the change in the grind zone temperature; the bigger wheel grain (46/Ø = 0.35 mm) resulted in a lower temperature of the grind zone in comparison to the smaller wheel grain (80/Ø = 0.18 mm). Bigger wheel grains have higher porosity, leading to more convective cooling of the wheel.
Figure 8 represents the effect of change in the grain size of the grinding wheel; the lowering of the grind zone temperature is noticeable when the other grinding parameters are kept constant and only the grain size of the wheel changes from 46 to 80. In
Figure 8, the effect of the grain size variation on the grind zone temperature is represented.
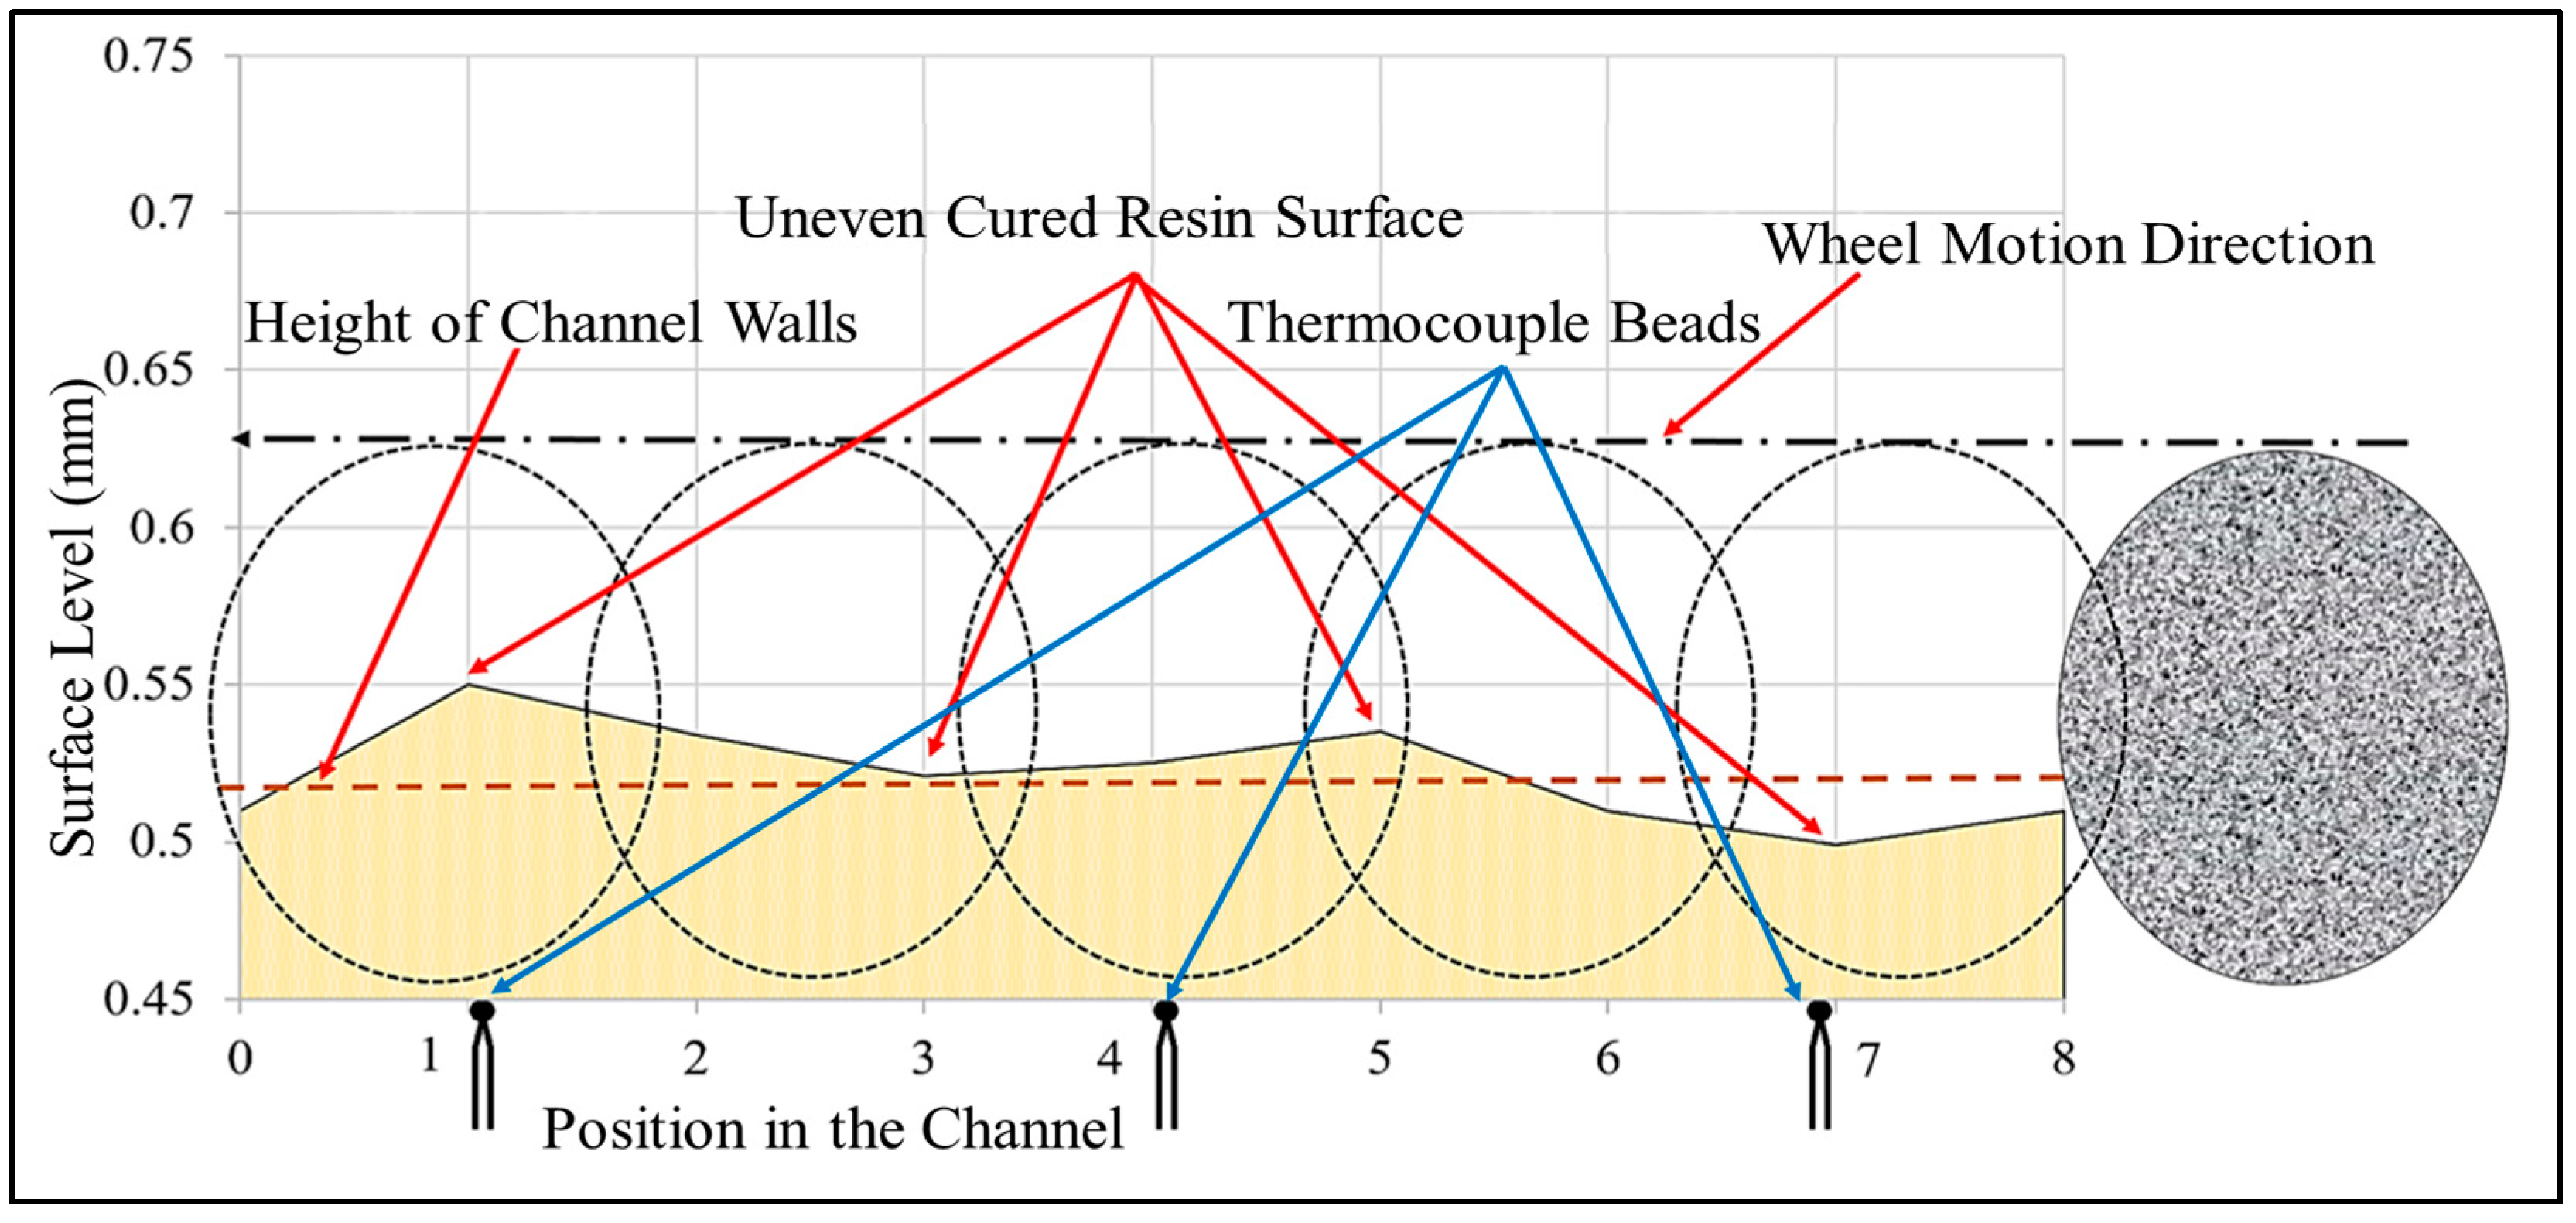
After completing all the grinding experiments, it was also observable that there was no steady increase or decrease in the grind zone temperature from the start point to the end of each resin-filled channel. This phenomenon was understood when a cured surface level was measured via a probe of a coordinate measuring machine (CMM); it measured different points on the surface to generate the surface level. Initially, as the resin was filled in the channel in a viscid liquid state, it was precisely leveled, but after curing, it had an uneven surface, leading to the finding that as the resin cures, it undergoes nominal shrinkage [
3,
9]. This curing shrinkage [
3,
9] resulted in an uneven surface. And when an uneven surface was ground, the different surface level resulted in a different quantity of heat generation.
Figure 9 illustrates the grinding process of the cured resin, which has an uneven upper surface, regarding the height of the channel wall, the positions of thermocouple beads at the channel bottom, and the direction of the grinding wheel during the grinding process represented by arrows.
Whenever this surface was ground, there were always variable temperature readings recorded by the thermal imager as well as by the thermocouples attached to its bottom. However, as the depths of both channels were 1.5 mm and 1.3 mm, the average value of the depth of the cutting/grinding in the 1.5 mm deep channel was higher than the depth of grinding in the channel of 1.3 mm depth.
This phenomenon was observed in both thermometry techniques, thermal imaging, and thermocouple temperature measurement, with both representing a variable pattern of temperature measurement.
3.2. Surface Quality
The ground surface was also evaluated for quality purposes. The value of the surface roughness values and the presence of burrs and stickered ground resin on the cleaned surface were also inspected. For this purpose, the first surfaces were inspected visually for their cleanness; moreover, for precise surface roughness values, a roughness tester (Taylor Hobson Surtronic S-128) was utilized. This device has a moving probe, which moves relative to the surface, for which roughness values are required to be measured. After each experiment, when the complete resin surface was ground, the surface quality was also analyzed.
Not only was the lowering of the grind zone temperature the objective, but a lower value of the ground surface roughness was also required to ensure an acceptable quality of machining. In this work, it was mandatory that during the grinding process, the resin temperature must not reach the glass transition temperature of 57 °C, to ensure the resin did not re-stick to the ground surface or the surface of the grinding wheel, making it unusable for further grinding. Thus, for the surface quality evaluation of the ground surface, only the experiments having a temperature range of resin lower than 57 °C were considered. Using this criterion, the three most suitable experiments were selected for the surface quality evaluation. As the experiments were repeated three times, the consistency of the results also provided confidence regarding the acceptable temperature range of the grind zone.
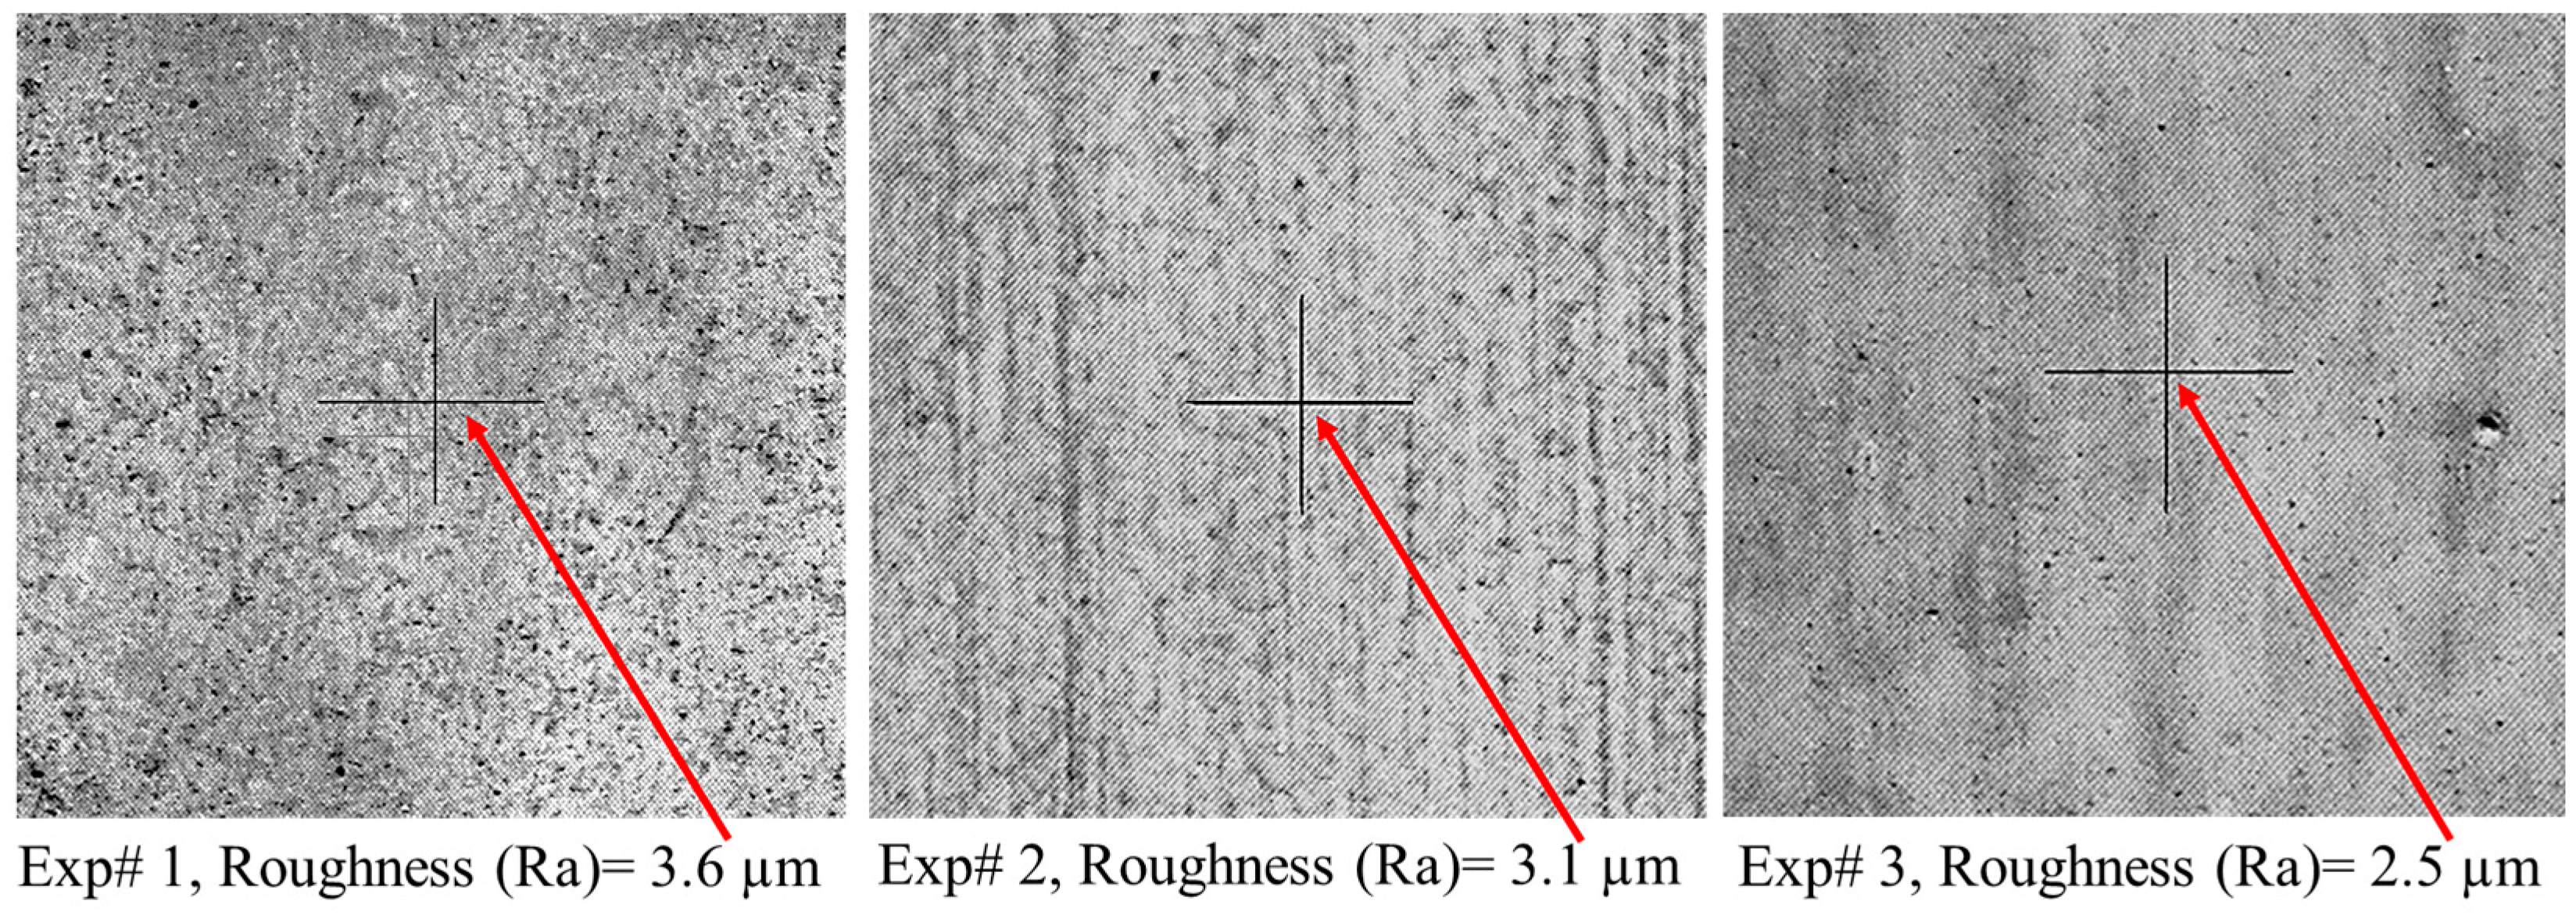
After the grinding of the hardened cured resin, there was a thin layer ~ 3 mm thick left in the bottom of the channel, which was first evaluated by the naked eye for any burrs and resin particles re-sticking; secondly, it was observed under a coordinate measuring machine camera in 35× magnified view for better inspection and image capturing. After visual inspection, the surfaces were evaluated for surface roughness via a roughness texture meter. For the visual analysis and understanding of the ground surface textures, the images captured via the coordinate measuring machine (CMM) are represented in
Figure 10. The images captured from the selected experiments are represented as Exp# 1, Exp# 2, and Exp# 3, in
Figure 10. Thanks to the 35× magnification, the surface roughness of each experiment is clearly seen in the captured images. For the certainty of the measured values of roughness, measurements were made at three positions of the ground resin channels. First, roughness was measured at 10 mm from the start of the channel, it was then measured at the midpoint of the channel, and lastly, the roughness was measured at 10 mm before the end of the channel.
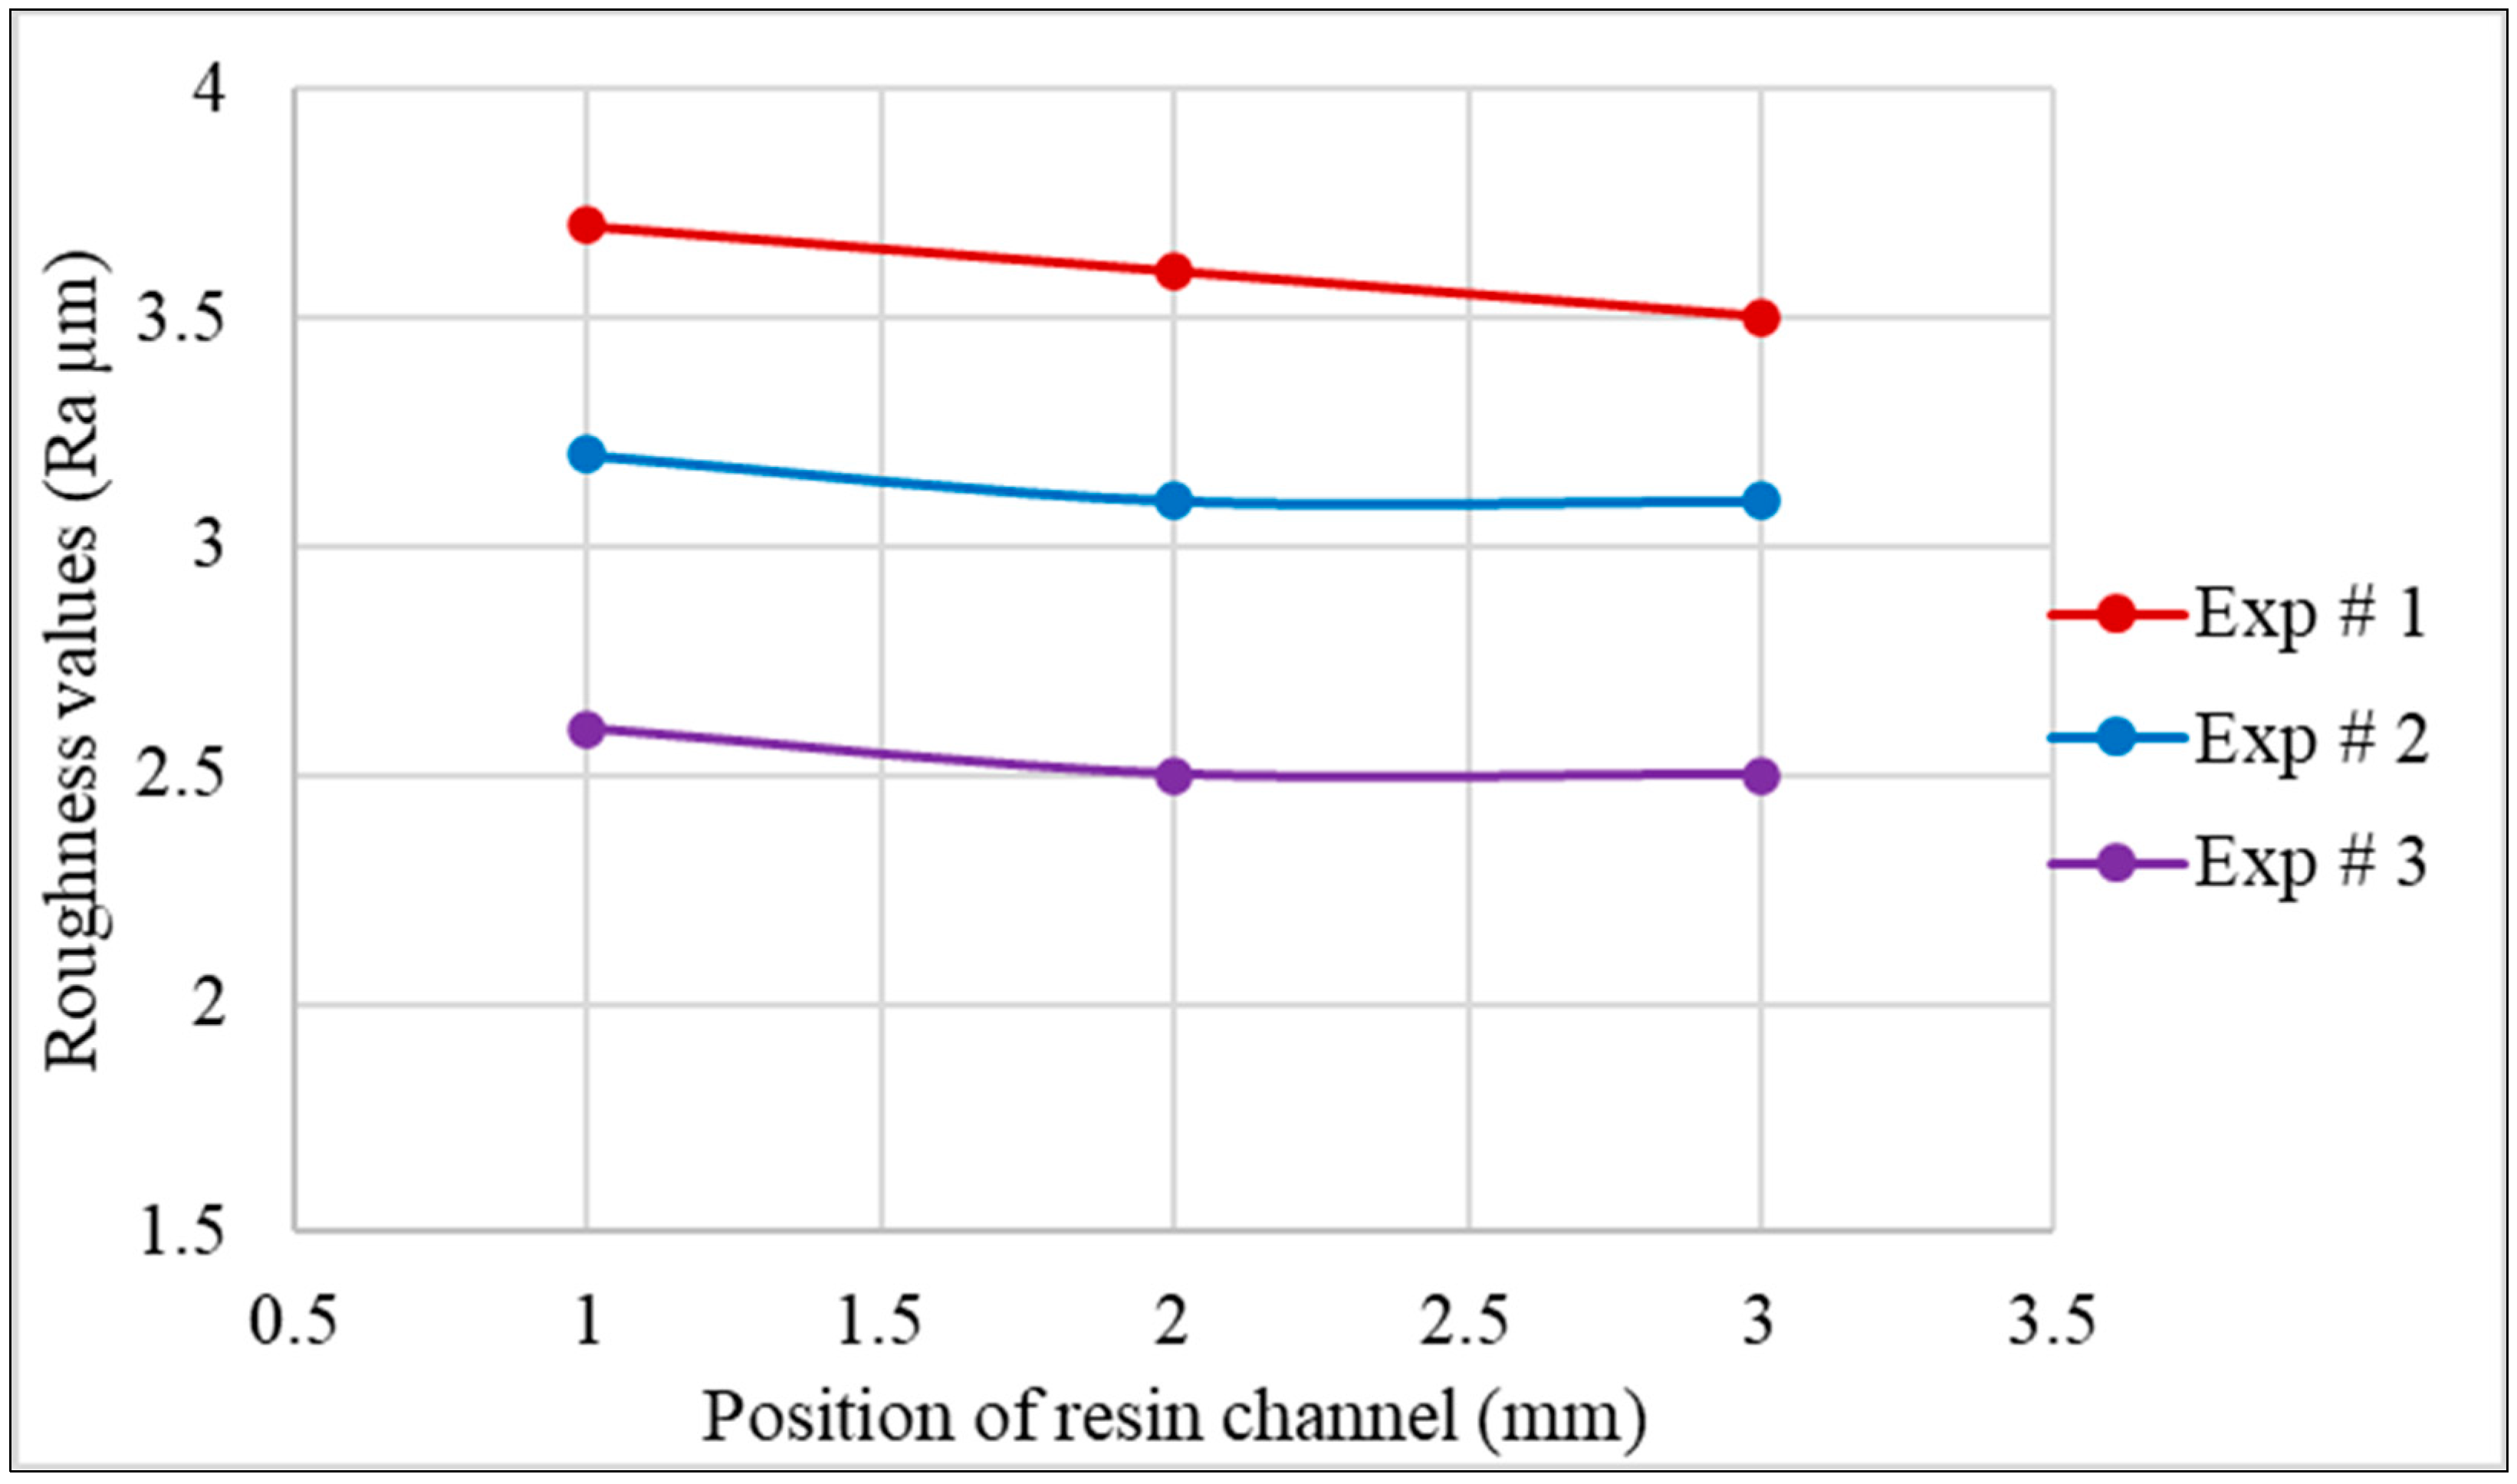
In exp# 1, the grinding parameters were the highest of all, which were the spindle speed = 11.57 m/s, feed = 0.406 mm/rev, DOC = 1.2 mm, and grain size = 46/Ø = 0.35 mm; the measured surface roughness values of this experiment were Ra = 3.7 µm (average roughness value), Rt = 33 µm and Rz = 22.3 µm at the start of channel, Ra = 3.6 µm (average roughness value), Rt = 27 µm and Rz = 20.6 µm at the midpoint, and Ra = 3.5 µm (average roughness value), Rt = 25.3 µm and Rz = 19.5 µm at the end of the channel. In
Figure 10 the arrows represent the areas where the surface roughness were measured by the probe of the tester.
On the other hand, the grinding parameters of exp# 2 were as follows: spindle speed = 11.57 m/s, feed = 0.406, and grain size 46/Ø = 0.35 mm. The only difference was the lower depth of the cuts, which was 1.0 mm and resulted in comparably lower values of surface roughness, which were measured as Ra = 3.2 µm, Rt = 23 µm, and Rz = 16.2 at the start of the channel, µm Ra = 3.1 µm, Rt = 21.6 µm, and Rz = 17.8 µm at the midpoint, and Ra = 3.1 µm, Rt = 20.7 µm, and Rz = 17.1 µm at the end of the channel. This makes it clear that lowering the depth of the cut not only reduces the temperature of the grinding zone but also results in a better surface finish of the ground surface.
Lastly, exp# 3, which resulted in the highest surface finish out of all the experiments, consisted of the following grinding parameters: spindle speed = 11.57 m/s, feed = 0.406 mm/rev, DOC = 1.00 mm, and a smaller grain size (80/Ø 0.18 mm). The surface roughness values measured from this experiment were Ra = 2.6 µm, Rt = 21.3 µm, and Rz = 14.6 µm at the start; Ra = 2.5 µm, Rt = 20.4 µm, and Rz = 14.1 µm at the midpoint; and Ra = 2.5 µm, Rt = 22.1 µm, and Rz = 14 µm at the end of the channel.
From the available literature on CNC machining, it has been shown that the acceptable surface roughness after standard CNC machining ranges from Ra = 3.2 μm. This value of 3.2 μm Ra is the recommended maximum surface roughness for making moving parts under lower load and in slower motion applications [
53,
54]. Usually, the grinding processes produce a surface roughness ranging from Ra = 6.25 to 0.025 μm depending upon the selected parameters [
55,
56,
57]. For a finer surface finish, the recommended depth of cutting/grinding in surface grinding ranges from 0.0245 to 0.2 mm [
58,
59]. Since, in this work, the material was not considerably hard (shore D = 56), and a higher depth value of the cutting/grinding (1–1.2 mm) was utilized, this in turn resulted in a lower surface finish (Ra = 3.1–2.5 μm). Additionally, the overlap ratio that was selected for this experiment was ~5, which was aimed for to achieve a higher material removal rate; this overlap ratio can be increased to 12 to attain a higher surface finish. Lastly, a finer-grained wheel (>80/0.18 mm) can be utilized for a higher surface finish, as the ground surface range for a grit size of 80/0.18 mm is Ra = 1.5–2.5 μm [
60]. The selection of the grinding parameters is dependent upon the surface finish requirements, as different types of plastics are produced under the surface roughness range of Ra = 0.025–12.5 μm [
61].
The measured surface roughness proved that the lower depth of cutting/grinding and smaller grain size are more suitable for maintaining a higher-quality surface finish. However, as a smaller grain (80/Ø 0.18 mm) was not very helpful in maintaining a lower grind zone temperature under a higher depth value of cutting/grinding (1.2 mm), there would be some tradeoff between the grind zone temperature and surface finish in terms of the grain size and depth of the grinding selected. The measured surface roughness values from acceptable results of thermography are presented in
Figure 11.
A part of this research has already been published [
3], in which the temperature of the grind zone was the main consideration. From the outcomes of the research, it was found that a wheel with a bigger grain size (46/Ø = 0.35 mm) was more suitable for maintaining a lower grind zone temperature. However, the surface quality was not evaluated in that work. In this current work, the surface roughness analysis revealed that the wheel with a smaller grain size was more suitable under the same values of spindle speed and feed (v = 1157 m/s, f = 0.406 mm/rev) by reducing the depth of the cut from 1.2 mm to 1 mm. Additionally, in this work, the heat transfer from the grind zone to the bottom of the resin was also included for a comprehensive analysis.
For analyzing the effect of the grain size on the surface roughness values of the ground surfaces, it was found that a wheel with a smaller grain (80/Ø = 0.18 mm) was more suitable. However, a wheel with a smaller grain size limits the depth of the grinding to 1.00 mm from 1.2 mm to avoid reaching the glass transition temperature of the resin (57 °C). At a 1.2 mm depth of grinding, a grain size = 80/Ø = 0.18 mm reaches above the glass transition temperature of resin, changing the hard solidified material into a viscous gummy substance, sticking on the grinding wheel and re-depositing on the ground surface, making the process and wheel non-effective.
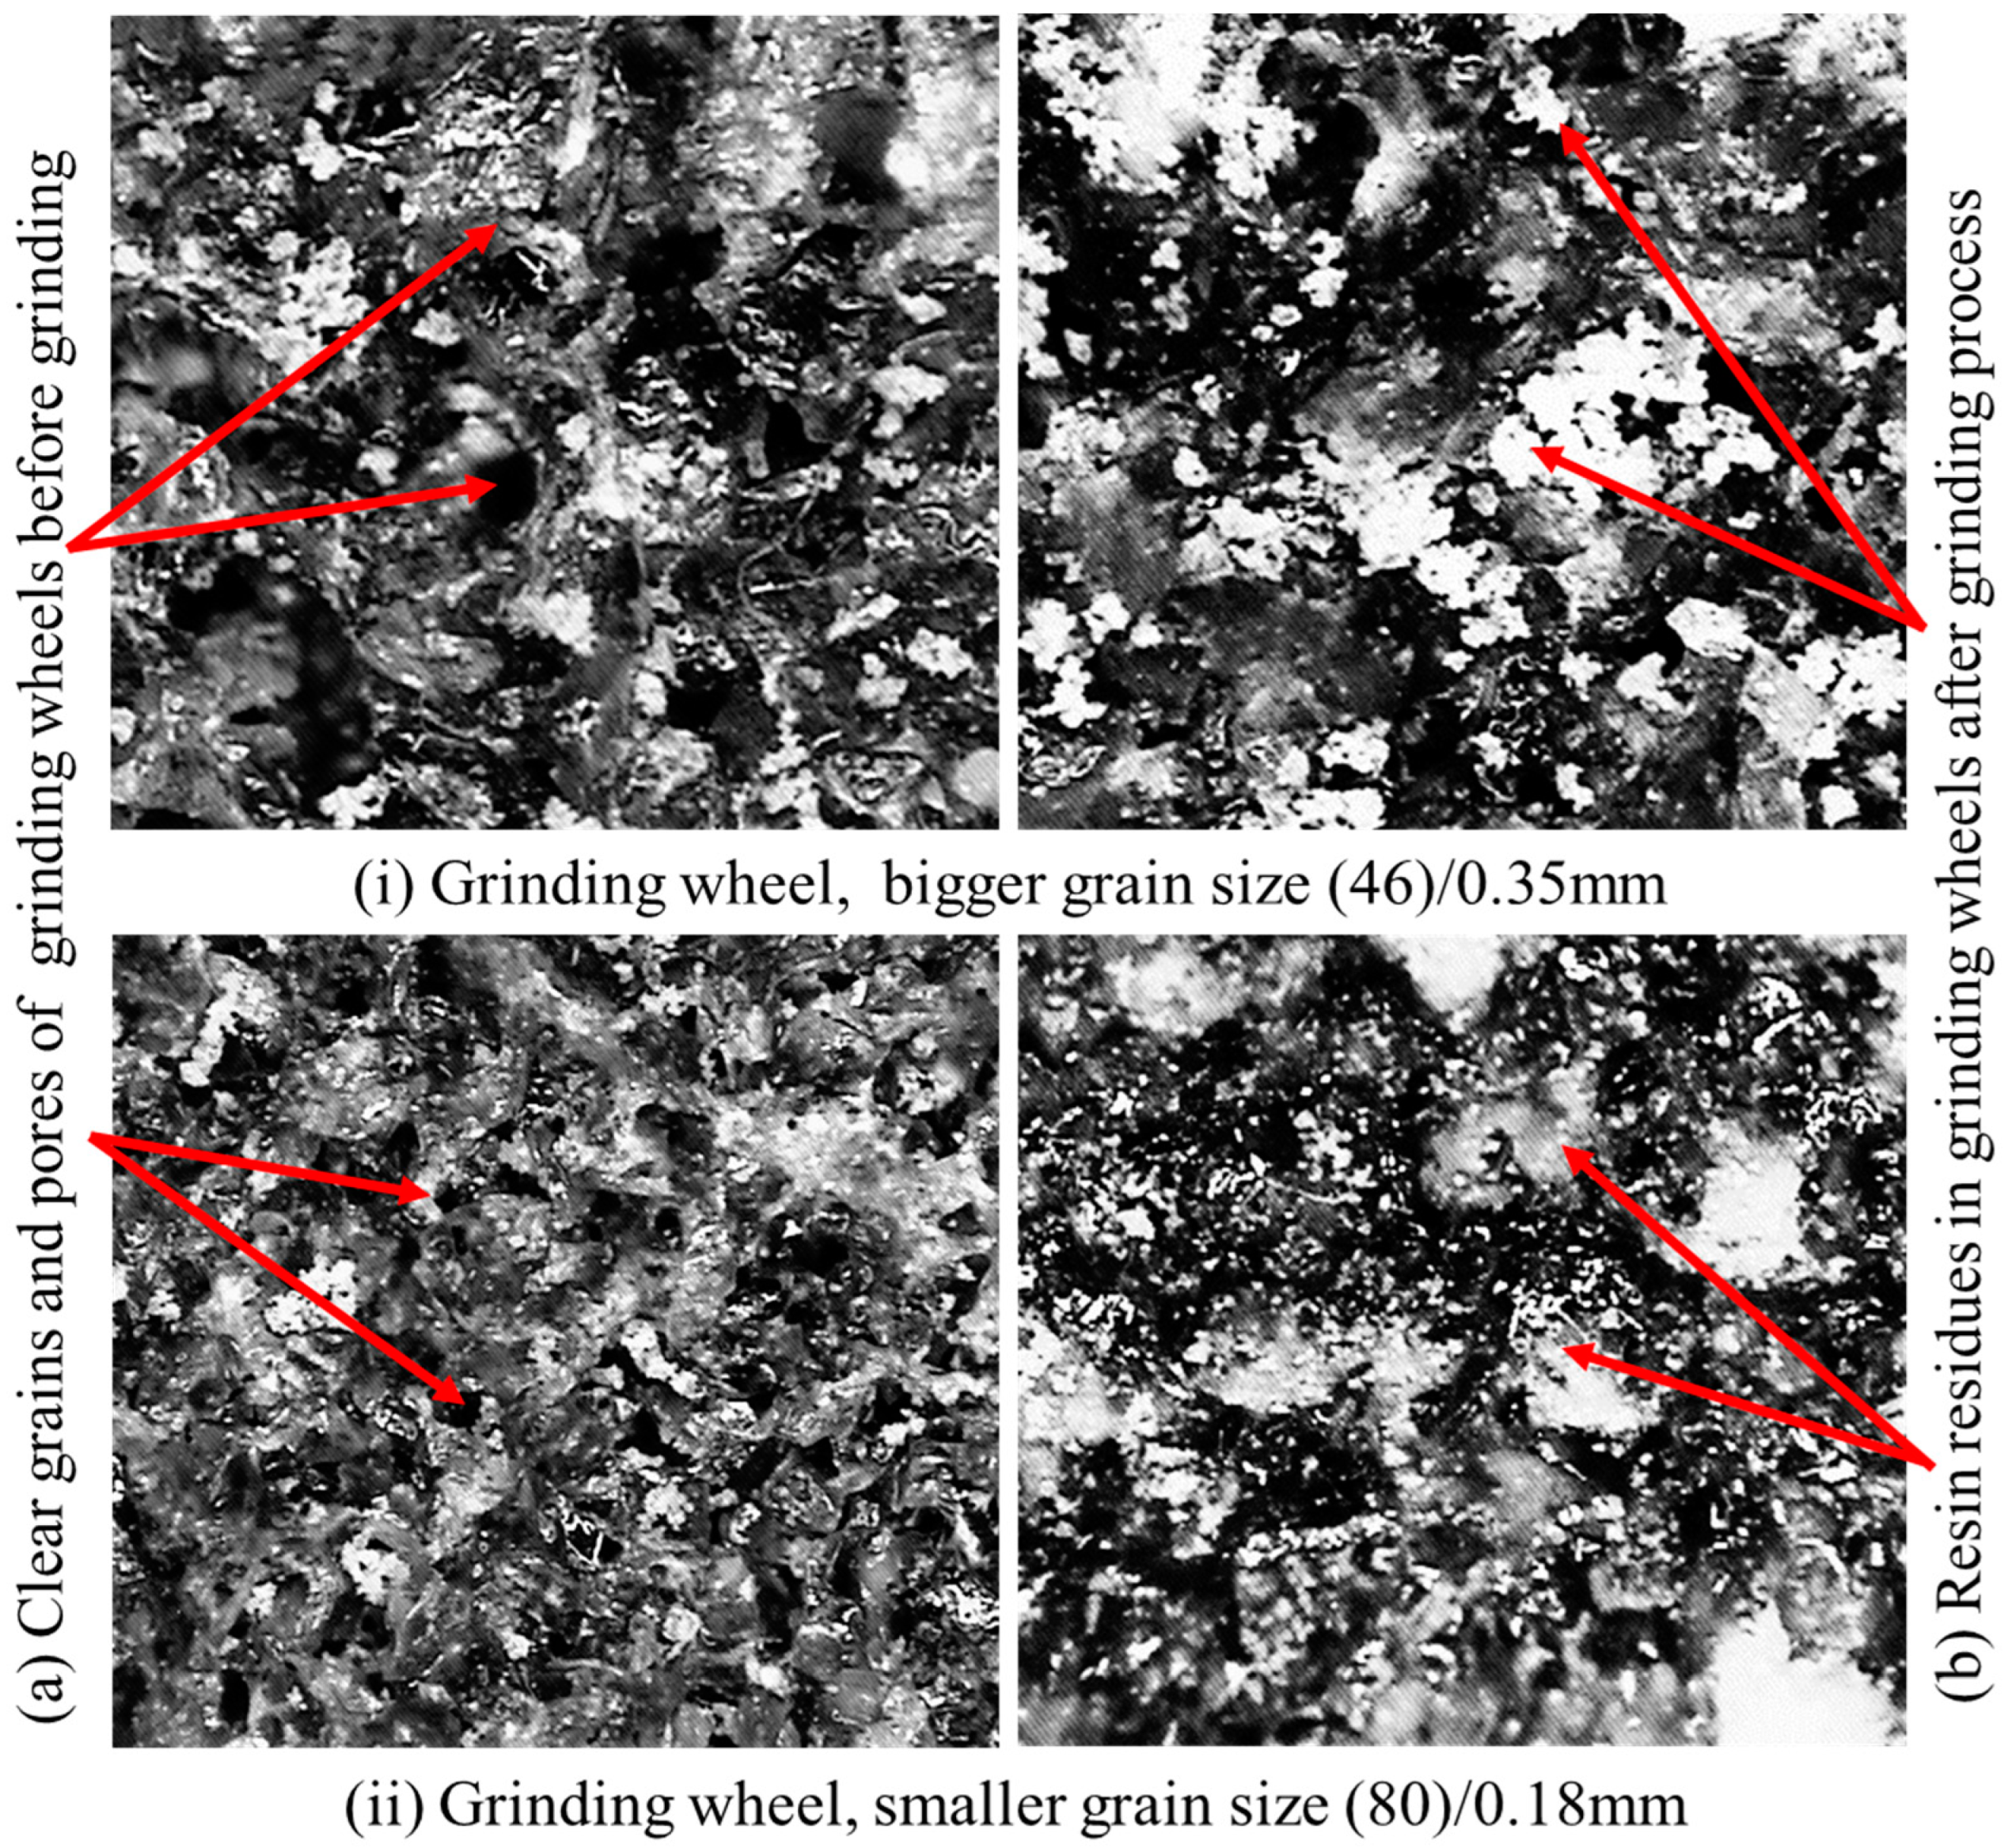
Figure 12 presents the grain structure, porosity, and resin particles on the grinding wheels, with 35× magnified images captured through the coordinate measuring machine. Both grinding wheels (i: 46/Ø = 0.35 mm and ii: 80/Ø 0.18 mm) were observed before performing any grinding experiments and also once all the grinding experiments were performed. The arrows on the left side of both sub-figures i and ii represent the clean grains and pores of both wheels, whereas the arrows on the right side indicate the resin residues in both wheel structures.
The magnified views revealed that after completing the whole experiment, by cleaning the 36 resin-filled channels and removing the 5486.4 mm (152.4 mm × 36) resin layer, both wheels were not fully clogged by resin particles and could have been further utilized, ensuring the sustainability of the process. Moreover, it is also obvious from
Figure 12 that the ground resin particles left in the pores of the wheels with a smaller grain size (80/Ø 0.18 mm) are much finer in comparison to the resin particles in the bigger wheel grain (46/Ø = 0.35 mm), this also supports the phenomenon of a better surface finish being produced by a smaller wheel grain.
