Abstract
This paper investigates the residual stresses induced by a longitudinal turning operation in 15-5PH martensitic stainless steel. An experimental investigation has quantified the sensitivity of residual stresses to cutting speed, feed, tool geometry and tool flank wear. In parallel, a 3D hybrid model, previously developed, has been applied to each case study. This modelling approach consists of replacing tooling and chipping by equivalent thermal and mechanical loadings. These equivalent loadings are moved onto the machined surface to compute the final residual stress state. It has shown that tool geometry and tool flank wear have a dominant effect on residual stresses compared to cutting speed and feed rate. However, cutting speed influences the intensity of the compressive peak, to some extent, whereas feed influences the affected depth. This work has also shown that the 3D hybrid model is able to predict residual stresses, as well as the sensitivity to cutting parameters, with reasonable agreement.
1. Introduction
Mechanical industries have to improve the fatigue life of their safety engineering components. As shown by several papers and books [1,2,3], fatigue is directly influenced by several parameters such as surface roughness, residual stress and microstructure. The concept of ‘surface integrity’ [4] is commonly used to name this group of parameters. Surface integrity features affect the endurance of components [5,6,7,8,9,10,11]. Among them, residual stresses play a primary role. The residual stress state in the external layer is strongly determined by cutting processes. There is a general consensus that near surface compressive stresses contribute to improve the fatigue strength [2,12]. On the contrary, high tensile residual stresses at the surface seems to be detrimental to fatigue life [13]. The residual stress state in the external layer depends on the thermomechanical loadings induced by all of the previous manufacturing operations (forging, heat treatment, rough cutting, …). However, the last finishing cutting operation has the main responsibility as shown by [2,14].
As far as the state of the art is concerned, a large number of models have been developed to predict the residual stress state induced by cutting operations. Initially, 2D analytical models were the most popular [15,16]. Such models facilitate a good understanding of phenomena involved in residual stress generation thanks to fast computational duration. Unfortunately, severe assumptions do not provide quantitative results. Recently, numerical models have been developed thanks to the development of computational capabilities. References [17,18,19,20,21] have used a 2D numerical Lagrangian formulation in orthogonal cutting by assuming a 2D plain strain. However, such models face two main limitations. The first issue comes from the high strain around the cutting-edge radius (separation) that leads to severe mesh distortions [19]. The second issue comes from the weak modelling of friction at the boundaries of two moving Lagrangian meshed solids [7]. So, 2D Arbitrary Lagrangian Eulerian (A.L.E) formulations have been used to improve mesh distortion and contact modelling issues [22]. Unfortunately, these works are based on an explicit time integration algorithm, that leads to difficulties in modelling the relaxation time. This point is crucial for residual stress prediction. Finally, interest from industry relates to the 3D surfaces generated by a large number of revolutions, and not to 2D models. For instance, turning, a cutting tool has to make several revolutions around the part. It is obvious that the tool relaxes part of the residual stress state induced during the previous revolutions, and at the same time, it induces its own residual stresses. This phenomenon has been revealed by [23]. As a consequence, a steady state can be reached only after several revolutions. Some authors, such as [24], proposed to couple two Lagrangian plane models: simulation containing the cutting direction (orthogonal cutting) and another simulation considering an indentation-like configuration of a corner radius into the machined surface. Recently [25] proposed to use a 3D Lagrangian formulation (DEFORM software) to predict residual stresses induced in longitudinal turning. The main limitation of this work comes from the explicit and Lagrangian formulations previously discussed. Moreover, the computational time is very long that makes it difficult for an industrial use.
An alternative approach, proposed by [23], consists of modelling the residual stress generation by removing the chip formation and replacing it with equivalent thermomechanical loadings (Figure 1).

Figure 1.
Principal of the 3D hybrid model [23].
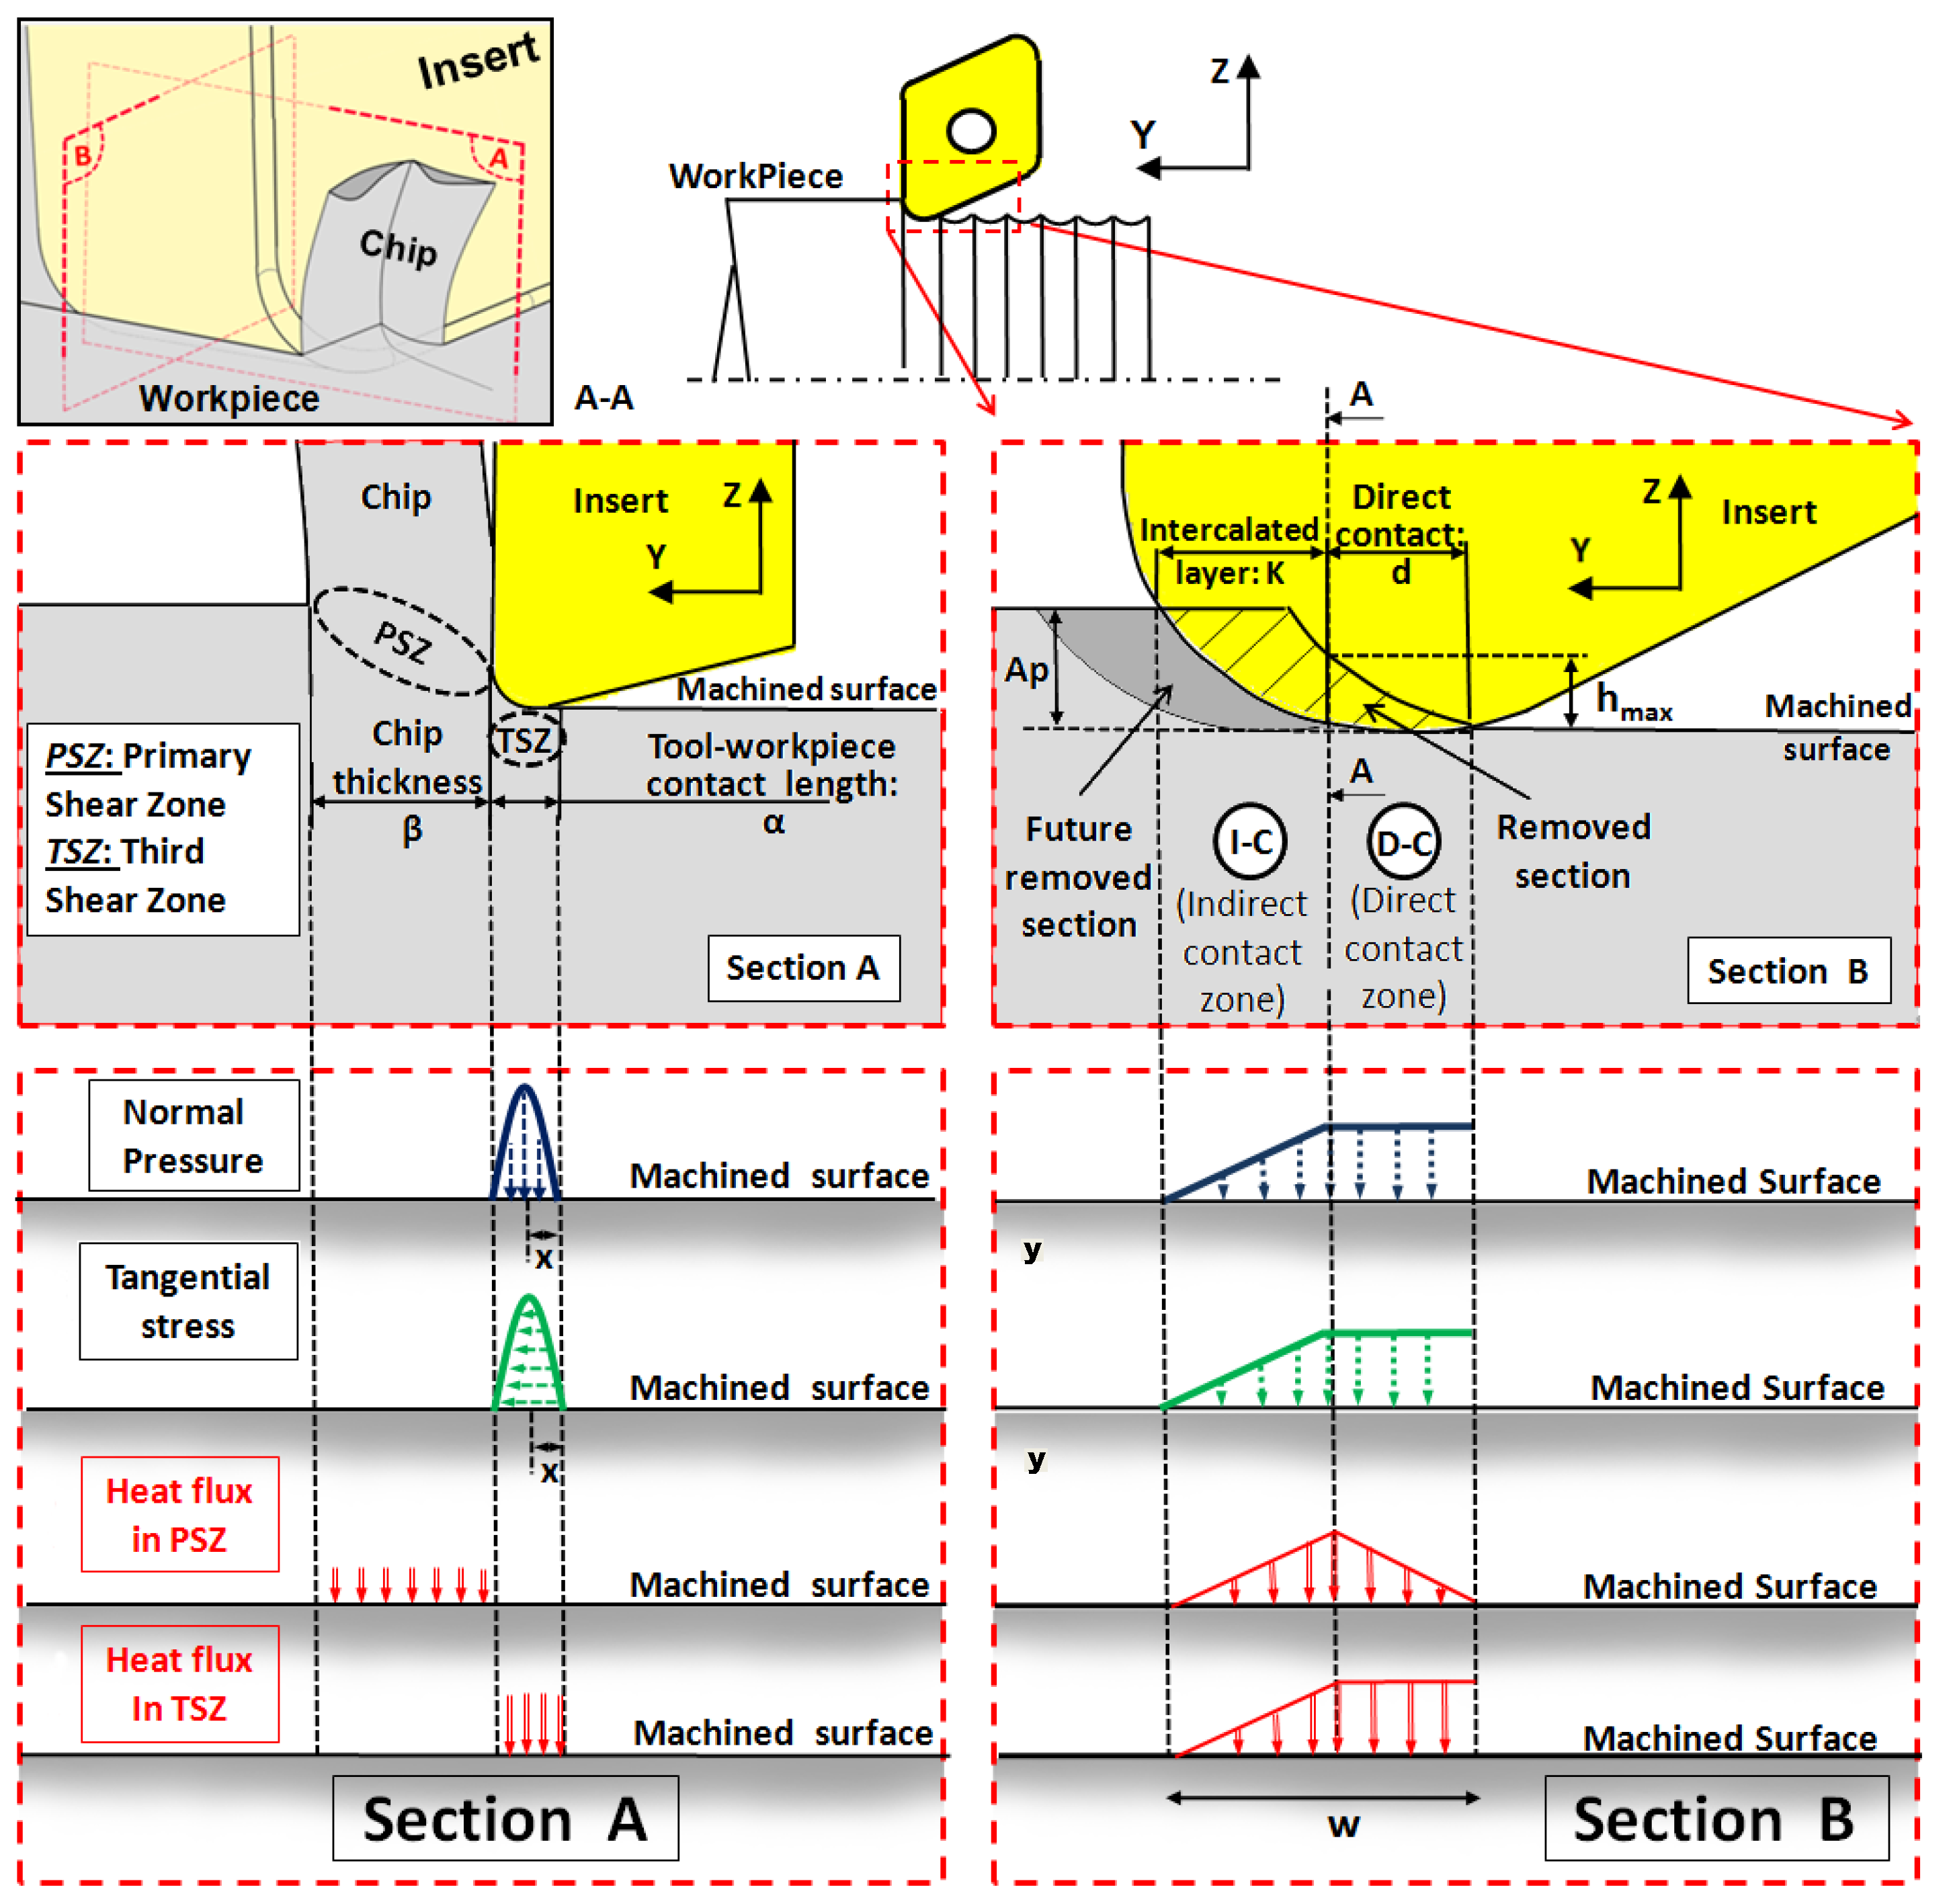
The thermal and mechanical loadings have various shapes depending on the active area, such as the primary shear zone (PSZ), in front of the cutting tool, or the third shear zone (TSZ), below the flank face. The magnitude of the thermomechanical loading is calibrated by means of preliminary experimental tests: friction tests and orthogonal cutting tests, as described by [23]. The combination of simple thermo-mechanical distributions of loadings with experimental parameters (force, chip thickness, contact length, etc.) is the origin of its name: the 3D hybrid model (hybrid means experimental data and numerical calculation). These equivalent loadings are moved onto the machined surface with a velocity equal to the cutting speed. After several revolutions (enabling a 3D steady state), this model makes the prediction of 3D residual stress fields possible (Figure 2). This hybrid model for residual stress prediction, based on an implicit formulation in the SYSWELD software, presents advantages like the absence of highly distorted mesh, the possibility of 3D multi-revolution simulations and accurate mechanical equilibrium computation after the cooling phase. A good agreement is obtained between the predicted and analyzed residual stress profiles (X-ray diffraction method) for a finished, longitudinal turning operation on 15-5PH martensitic stainless steel [23]. However, this work has only been validated for a single case study and for 3 feed rates.

Figure 2.
Modelling simplification of a whole turning operation through an elementary volume [26].
This paper relates to longitudinal turning operations. The objective consists of investigating the reliability of this 3D multi-revolution numerical model, by proposing a sensitivity study of cutting speed, feed rate, cutting tool geometry and cutting tool flank wear. The paper starts by presenting the experimental study, then the numerical model is introduced. Finally, for any parameter, numerical results are compared with the measured ones.
2. Experimental Database and Residual Stresses Measurements
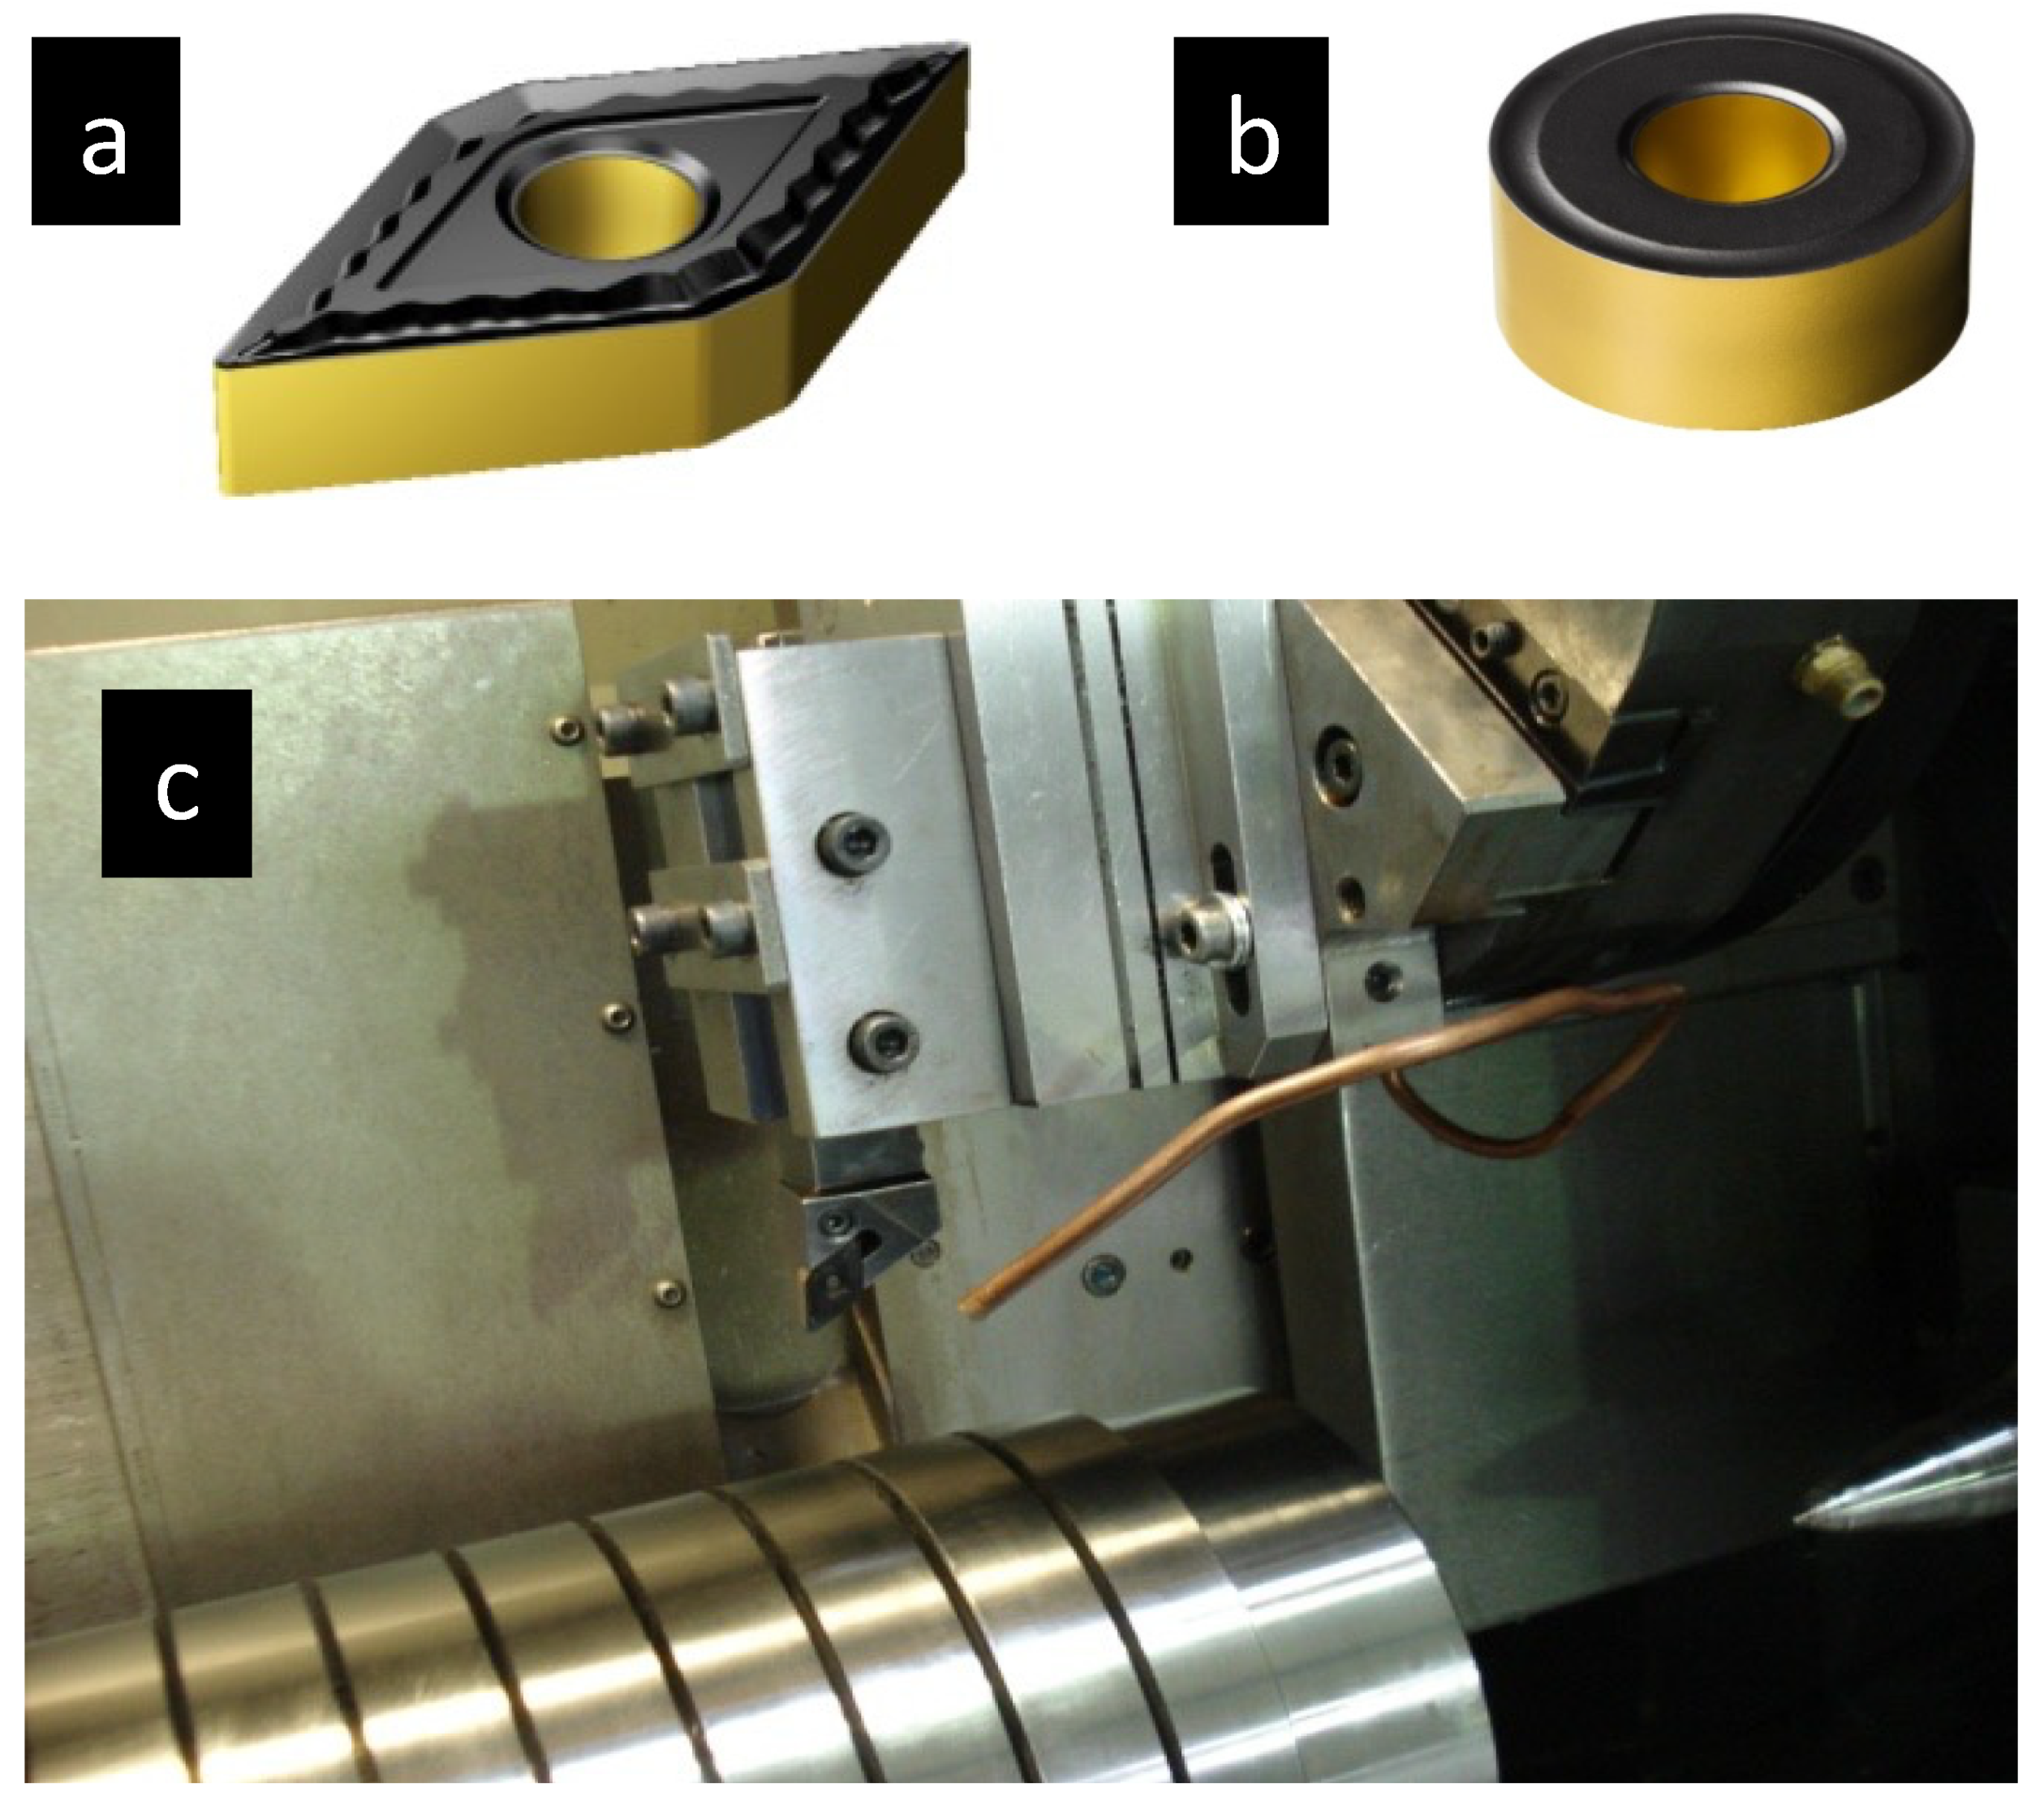
Initially, the sensitivity study was performed experimentally. The longitudinal turning operations were performed on a 15-5PH (i.e., X5CrNiCu15-5) martensitic stainless-steel cylinder, as shown in Figure 3. This material is used in the aircraft industry for safety components that should stand high mechanical cyclic loadings such as transmission shafts. In this work, the material was in its H1025 state. As this material has not been widely investigated in the scientific literature, the mechanical properties have been characterized by tensile stresses. All the results are available in [26] (yield strength ~1000 MPa —ultimate tensile strength ~1100 MPa—hardness ~331 HB).
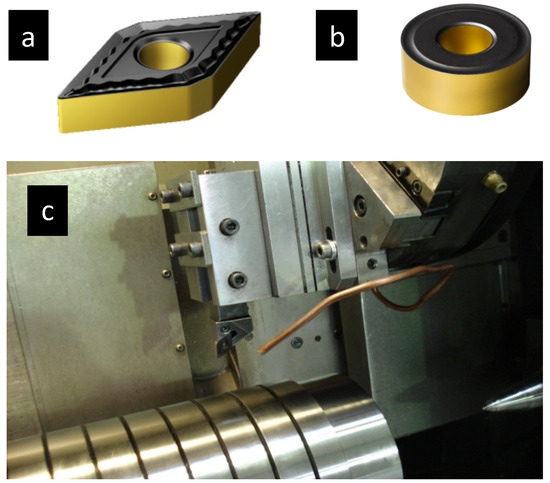
Figure 3.
(a) DNMG insert—(b) RNMG insert—(c) Overview on the instrumented experimental set-up.
As the objective of the paper is to investigate the sensitivity to cutting speed, feed rate, cutting tool geometry and cutting tool flank wear, a reference case study corresponding to the investigated industrial case study (test n 2 in Table 1) has been considered. Apart from this reference, the strategy consisted of varying a single parameter. In practice, 2 additional cutting speed have been investigated (a smaller and a higher one in test n 1 and n 2, respectively). In a similar way, two additional feed rates have been investigated (a smaller and a higher one in test n 4 and n 5 respectively). The sensitivity to tool flank wear has been investigated by comparing a new tool (VB = 0 mm) and a worn tool (VB = 0.2 mm) in test n 1 and n 6, respectively. Finally, the influence of cutting tool geometry was focused on the sensitivity to tip radius with a reference value of Rε = 1.2 mm (test n 1) and an additional tool having a larger value Rε = 4.5 mm (test n 1).

Table 1.
Testing conditions.
NB: The DNMG 15 06 12 QM 4215 insert has a tip radius Rε = 1.2 mm and edge length of 15 mm and is composed by a carbide substrate coated with Al2O3/TiCN on the rake face (Figure 3a). The insert RNMG 09 03 00 QM 4215 has a tip radius Rε = 4.5 mm—and is composed by a carbide substrate coated with Al2O3/TiCN on the rake face (Figure 3b). Both are commercial tools provided by SANDVIK (Sandviken, Sweden).
As a summary, 7 testing conditions were considered and reported in Table 1. The depth of cut was kept constant, and tests have been performed under constant lubrication conditions.
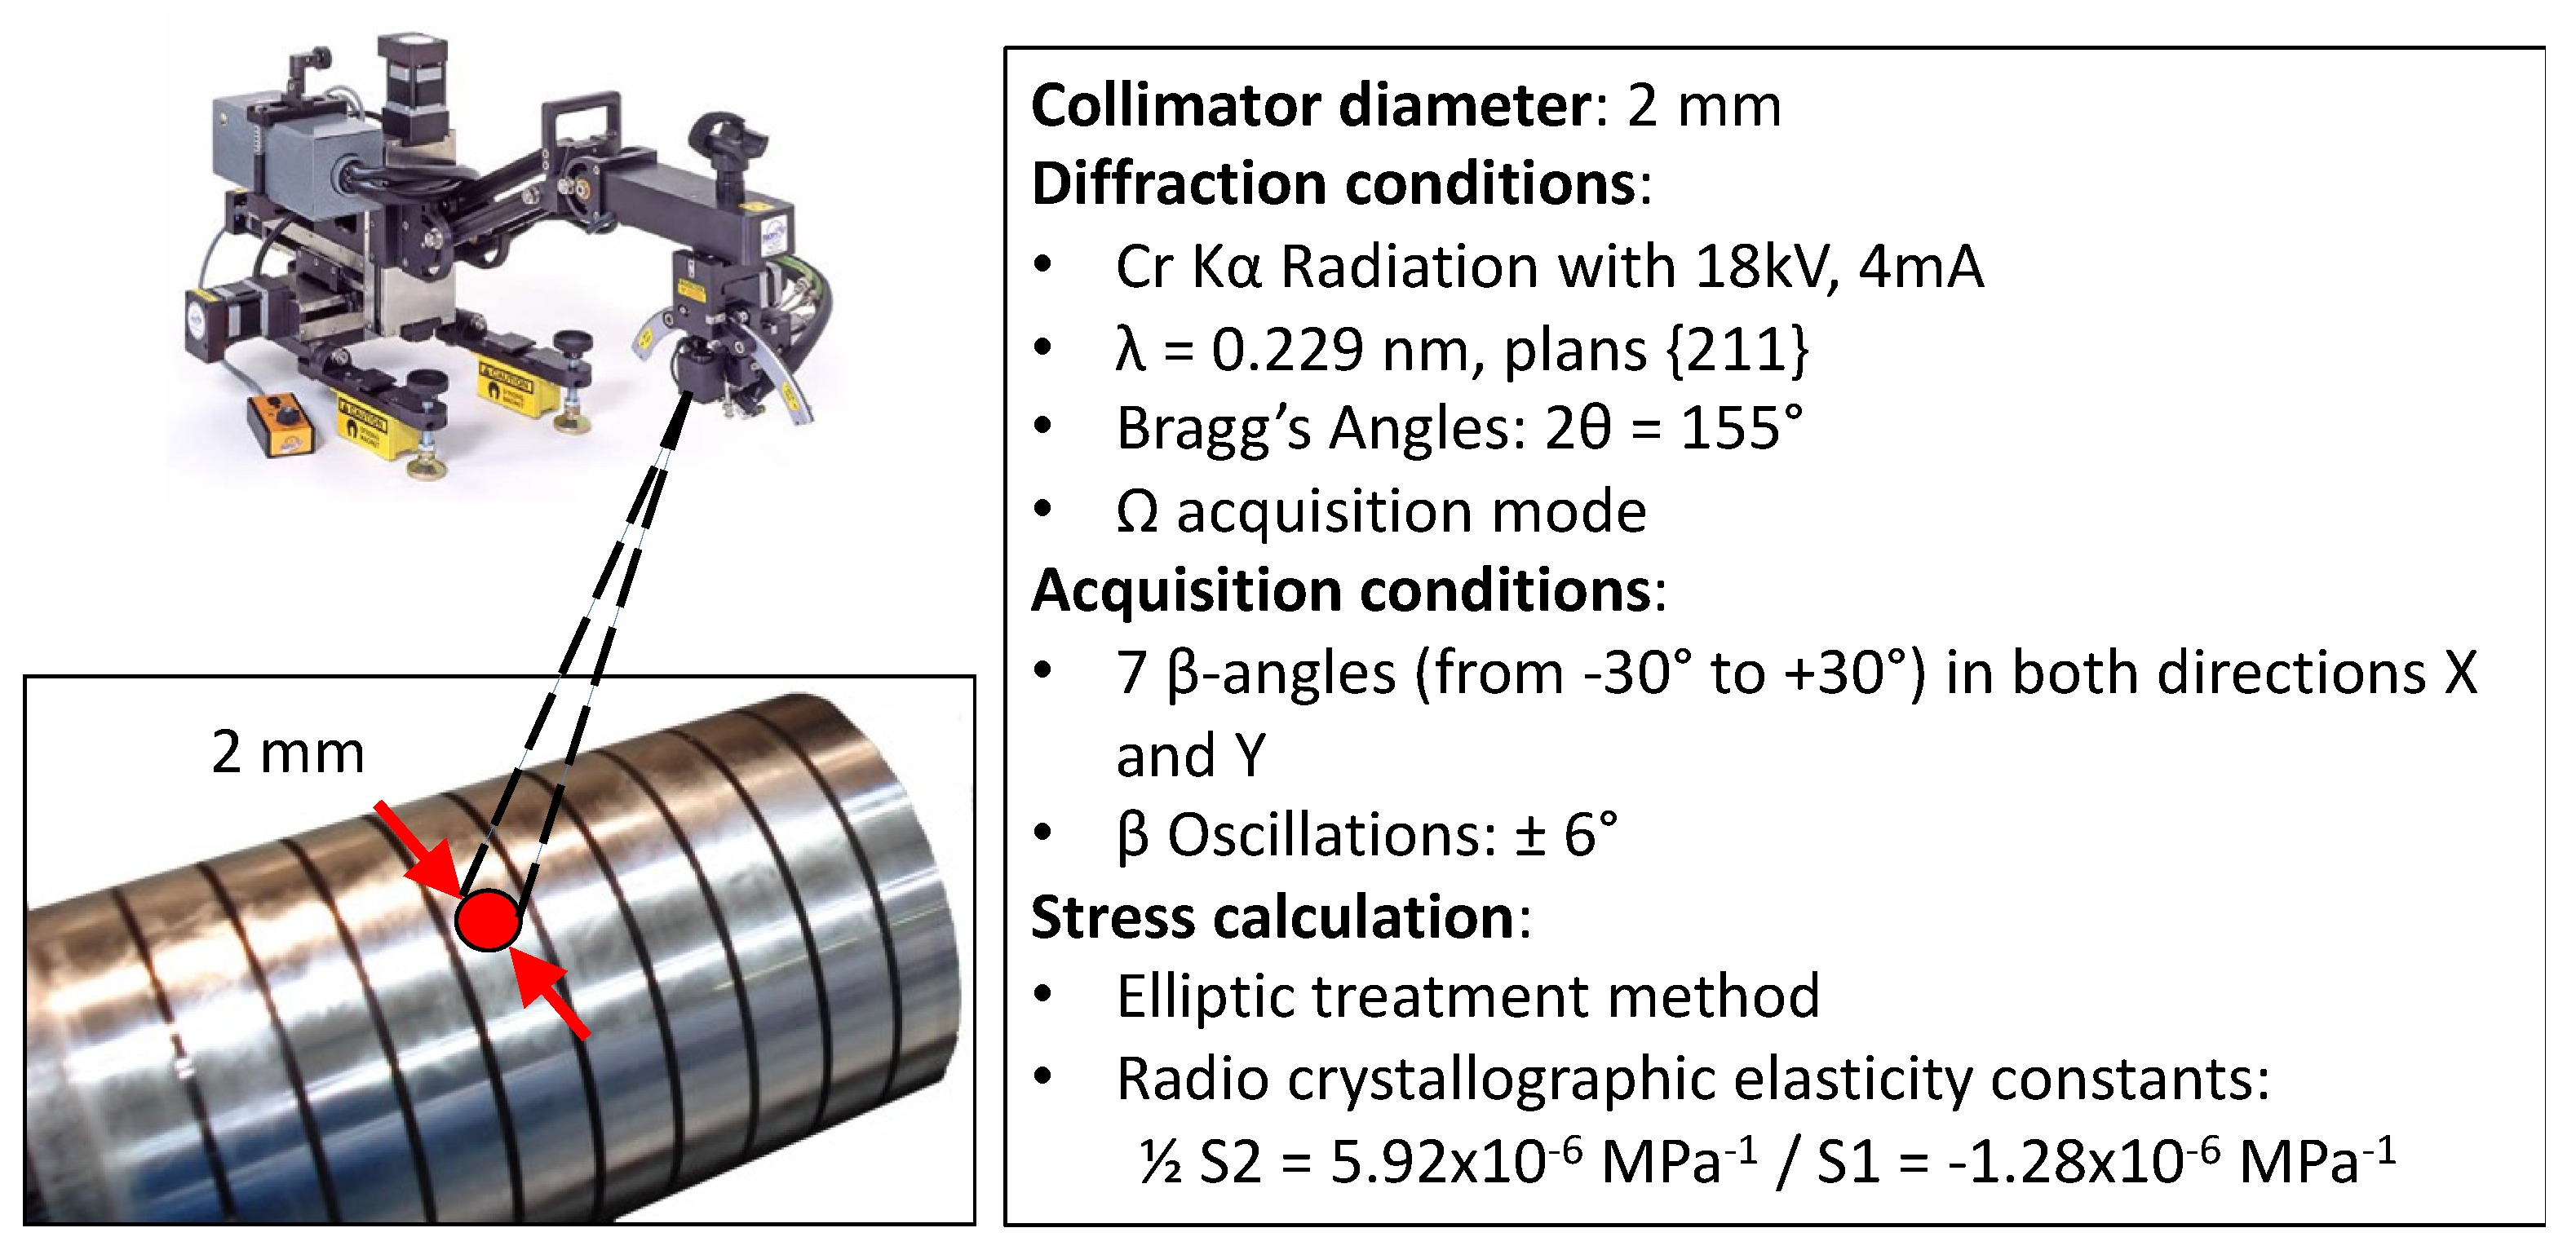
The residual stress gradients were measured using the X-ray diffraction method (PROTO XRD). The diffraction parameters and elasticity constants for 15-5PH are indicated in Figure 4. A detailed description of this measuring technique is available in [3].

Figure 4.
Measuring conditions of residual stresses by X-ray diffraction.
3. Hybrid Model Computation
3.1. Principle of the 3D Hybrid Model
The 3D hybrid method was developed by Mondelin et al. for 15-5PH steel [23]. This numerical approach, developed in SYSWELD, focuses on the imprint of the cutting process, in terms of the thermomechanical solicitations applied to the surface. It does not simulate the chip formation or the material separation around the cutting edge, in order to avoid numerical problems (Figure 1). The key issue in this model relies on the estimation of the equivalent thermomechanical loadings and their application to the surface model, to reproduce the loading sequence during several revolutions. The cylindrical workpiece is simplified to a parallelepiped shape (Figure 2). This assumption only makes sense when large diameters (compared to the chip formation volume) are involved.
Figure 4 presents the distribution of the thermomechanical loadings. The simplified shapes of the thermomechanical loadings were obtained by several numerical investigations using Abaqus/Explicit, as presented by [23]. The influence of the primary shear zone (PSZ) was modelled by using a heat flux having a triangular distribution over a surface with a length equal to the actual chip thickness β and a width W coming from a geometrical construction (Figure 5). The mechanical load on this area was neglected.

Figure 5.
Modelling of the equivalent thermal and mechanical loadings on the machined surface [23].
The influence of the third shear zone (TSZ) was also modelled by a heat flux with a more complex distribution over a surface, taking into account the contact length α on the flank face and the same width W (Figure 5). In addition, the mechanical loadings (normal and tangential stress) were modelled with a density distribution combining a parabolic and triangular shape over the same surface. Details on the justification of these simplified thermomechanical loadings are presented in [23]. The calibration of their intensities will be discussed in the next section.
3.2. Numerical Model Design
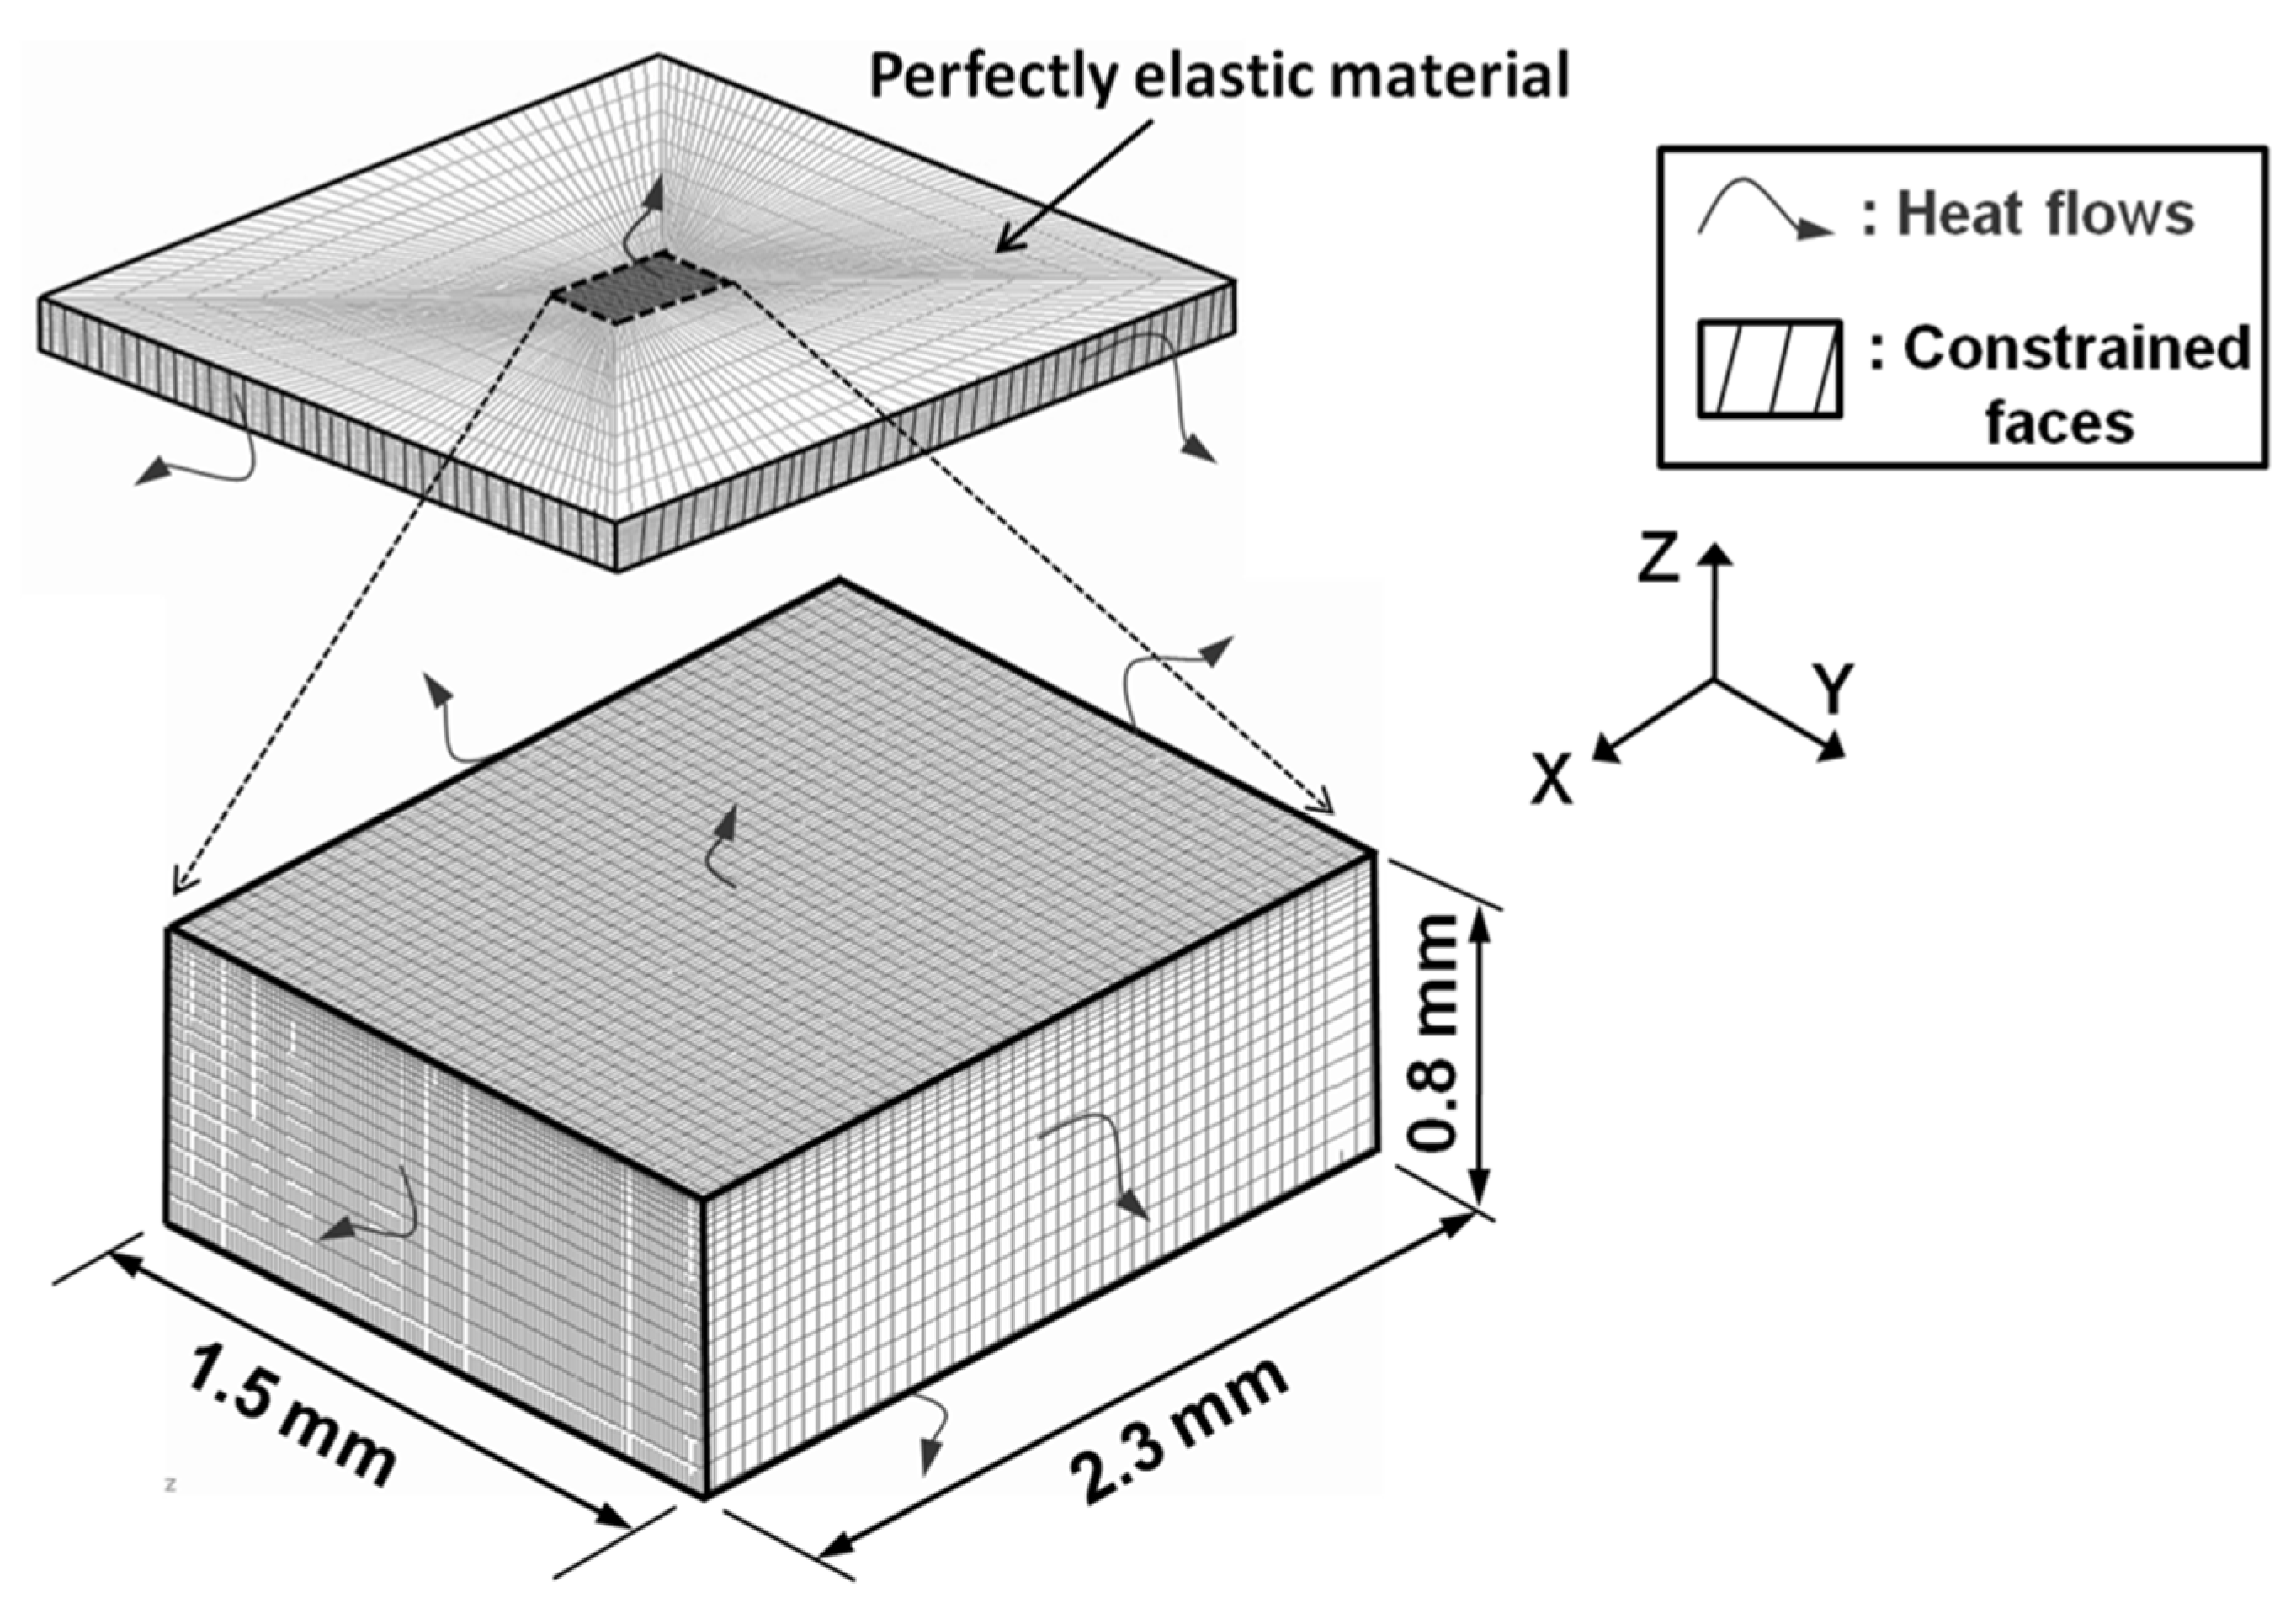
The model considers the part as a parallelepiped (Figure 6) having the following dimensions: 1.5 mm × 2.3 mm × 0.8 mm. The top surface of the parallelepiped corresponds to the machined surface on which the thermomechanical loadings are applied. Its dimensions are wide enough to avoid any influence of the borders in its center where residual stresses are estimated. The dimensions are also wide enough to simulate several turning revolutions. This parallelepiped is divided into two volumes. A small volume in the center having comprehensive thermo-plastic properties. It is embedded in a perfectly elastic and larger parallelepiped, that enables to reduce calculation duration. Five sides of the parallelepiped are in contact with the rest of the workmaterial and heat exchanges are possible.

Figure 6.
3D model geometrical parameters [25].
The mesh is a quadrangle and linear. A fine mesh is required on the top surface (0.003 mm, 0.4 mm, 0.0125 mm), where the thermo-mechanical loadings are applied (machined surface), that induces strong residual stress gradients. On the contrary, a coarse mesh is used below the surface. This variation of the mesh size has been iteratively investigated in order to minimize the calculation duration without disturbing the accuracy. It is assumed that the residual stresses are relieved before the turning operation.
The same thermophysical properties of the workmaterial (Table 2, Table 3 and Table 4) and of the cutting tool as the one used by [23].

Table 2.
Thermophysical properties of the 15-5PH workmaterial.

Table 3.
Thermophysical properties of the cutting tool workmaterial.

Table 4.
Flow Stress model—Armstrong-Frederick kinematic hardening law parameters for the 15-5PH [23].
NB: The machined surface can also exchange heat with the emulsion flow, h = 105 W m−2 K−1 according to [23].
The flow stress model commonly used in finite element simulation is the Johnsson-Cook model. This model is not adequate to predict residual stresses in longitudinal turning as several revolutions have to be considered. As a consequence, the machined surface has to withstand cyclic thermo-mechanical loadings/unloadings. A von Mises elastoplastic behavior (Equation (1)) associated with an Armstrong-Frederick kinematic hardening (Equation (2)) determined in a previous paper [23] from cycling tests is thus implemented. Table 4 gives the needed parameters for implementing the corresponding model:
where C and γ are the workmaterial parameters, σy the yield strength and p the cumulative plastic strain defined in Equation (3):
3.3. Input Data for the Model
As this model is called ‘hybrid’, it requires some experimental data so as to calibrate the intensities of the thermomechanical loadings. The input data required to compute the residual stresses induced by longitudinal turning operations, belong to three groups:
- Experimental parameters, measured during and after orthogonal cutting tests;
- Tribological parameters;
- Geometrical parameters.
3.3.1. Experimental Parameters
During orthogonal cutting tests, a dynamometer enables measurement of the cutting force Fc and the feed force Ff. After the tests, some parameters were measured (Figure 4):
- The average chip thickness: β;
- The contact length on the flank face in the TSZ: α.
Seven orthogonal cutting tests were performed. The values of the experimental parameters are presented in Table 5, for each orthogonal cutting test

Table 5.
Physical parameters measured during experimental cutting tests.
3.3.2. Tribological Parameters
Friction tests were required to identify a friction model μ and a heat partition model Λ3 depending on the sliding velocity Vs. This enabled the estimation of the ratio between the normal stress and the shear stress at the tool/work material interface, as well as the amount of heat transmitted to the machined surface. These tribological identifications were made using the tribometer developed by [27]. The previous work of [23] has already presented these characterizations for the Al2O3/TiCN coated carbide 15-5PH.
The friction model is:
- μ = 2.12Vs − 0.45 with 10 m/min < Vs < 300 m/min
- μ = 0.15 with 300 m/min < Vs
The heat partition coefficient is:
- Λ3 = 0.25 with Vs < 25 m/min
- Λ3 = 2.3Vs − 0.63 with 25 m/min < Vs < 300 m/min
- Λ3 = 0.08 with Vs > 300 m/min
Because of the seven orthogonal cutting tests, it was possible to measure the average chip thickness. This enabled the calculation of the average chip compression ratio as well as the average sliding velocity of the chip on the rake face. As a result of these models, the values of friction coefficient on the primary shear zone (μPSZ) and on the third shear zone (μTSZ), as well as the heat partition coefficient Λ3 on the TSZ, are presented in Table 6, for each orthogonal cutting test.

Table 6.
Friction and heat partition coefficients extracted from the tribological tests.
3.3.3. Geometrical Parameters
Some geometrical parameters (d, k, hmax in Figure 4) can easily be determined as they depend on the depth of cut ap, feed per revolution f, and insert radius Rβ during longitudinal turning operations. The values of the geometrical parameters are presented in Table 7, for each orthogonal cutting test.

Table 7.
Cutting conditions for orthogonal tests and geometrical parameters measured during experiments.
Finally, based on the work of [23], the calculation of the equivalent thermomechanical loadings, for the 7 case studies in the PSZ and the TSZ, are reported in Table 8. An overview of the values shows that all the parameters are influenced by the various cutting configurations.

Table 8.
Maximum values of equivalent thermomechanical loadings.
Some trends are observable. For instance, as far as heat flux transmitted to the machined surface is concerned, tool wear and cutting speed have a clear effect in the TSZ. The chip thickness also has a clear influence on the heat flux in the PSZ.
As far as mechanical loadings are concerned, the normal stress is mainly affected by tool wear, whereas the tangential stress is mainly sensitive to very low cutting speeds.
At this step of the modelling procedure, it was difficult to predict the trend of the residual stresses for each case study, as the generation of residual stress is a combination of thermal and mechanical mechanisms. It is only possible to suggest that pure thermal loadings are usually responsible for tensile stresses in the external layer, whereas pure normal loadings are more prone to generating compressive stresses [2]. As these thermal and mechanical mechanisms are strongly coupled through the flow stress model, it is not possible to assume the residual stress state for each case without making a complex simulation. This is the aim of the next section.
4. Simulation of Numerical Residual Stresses and Comparison to Experimental Values
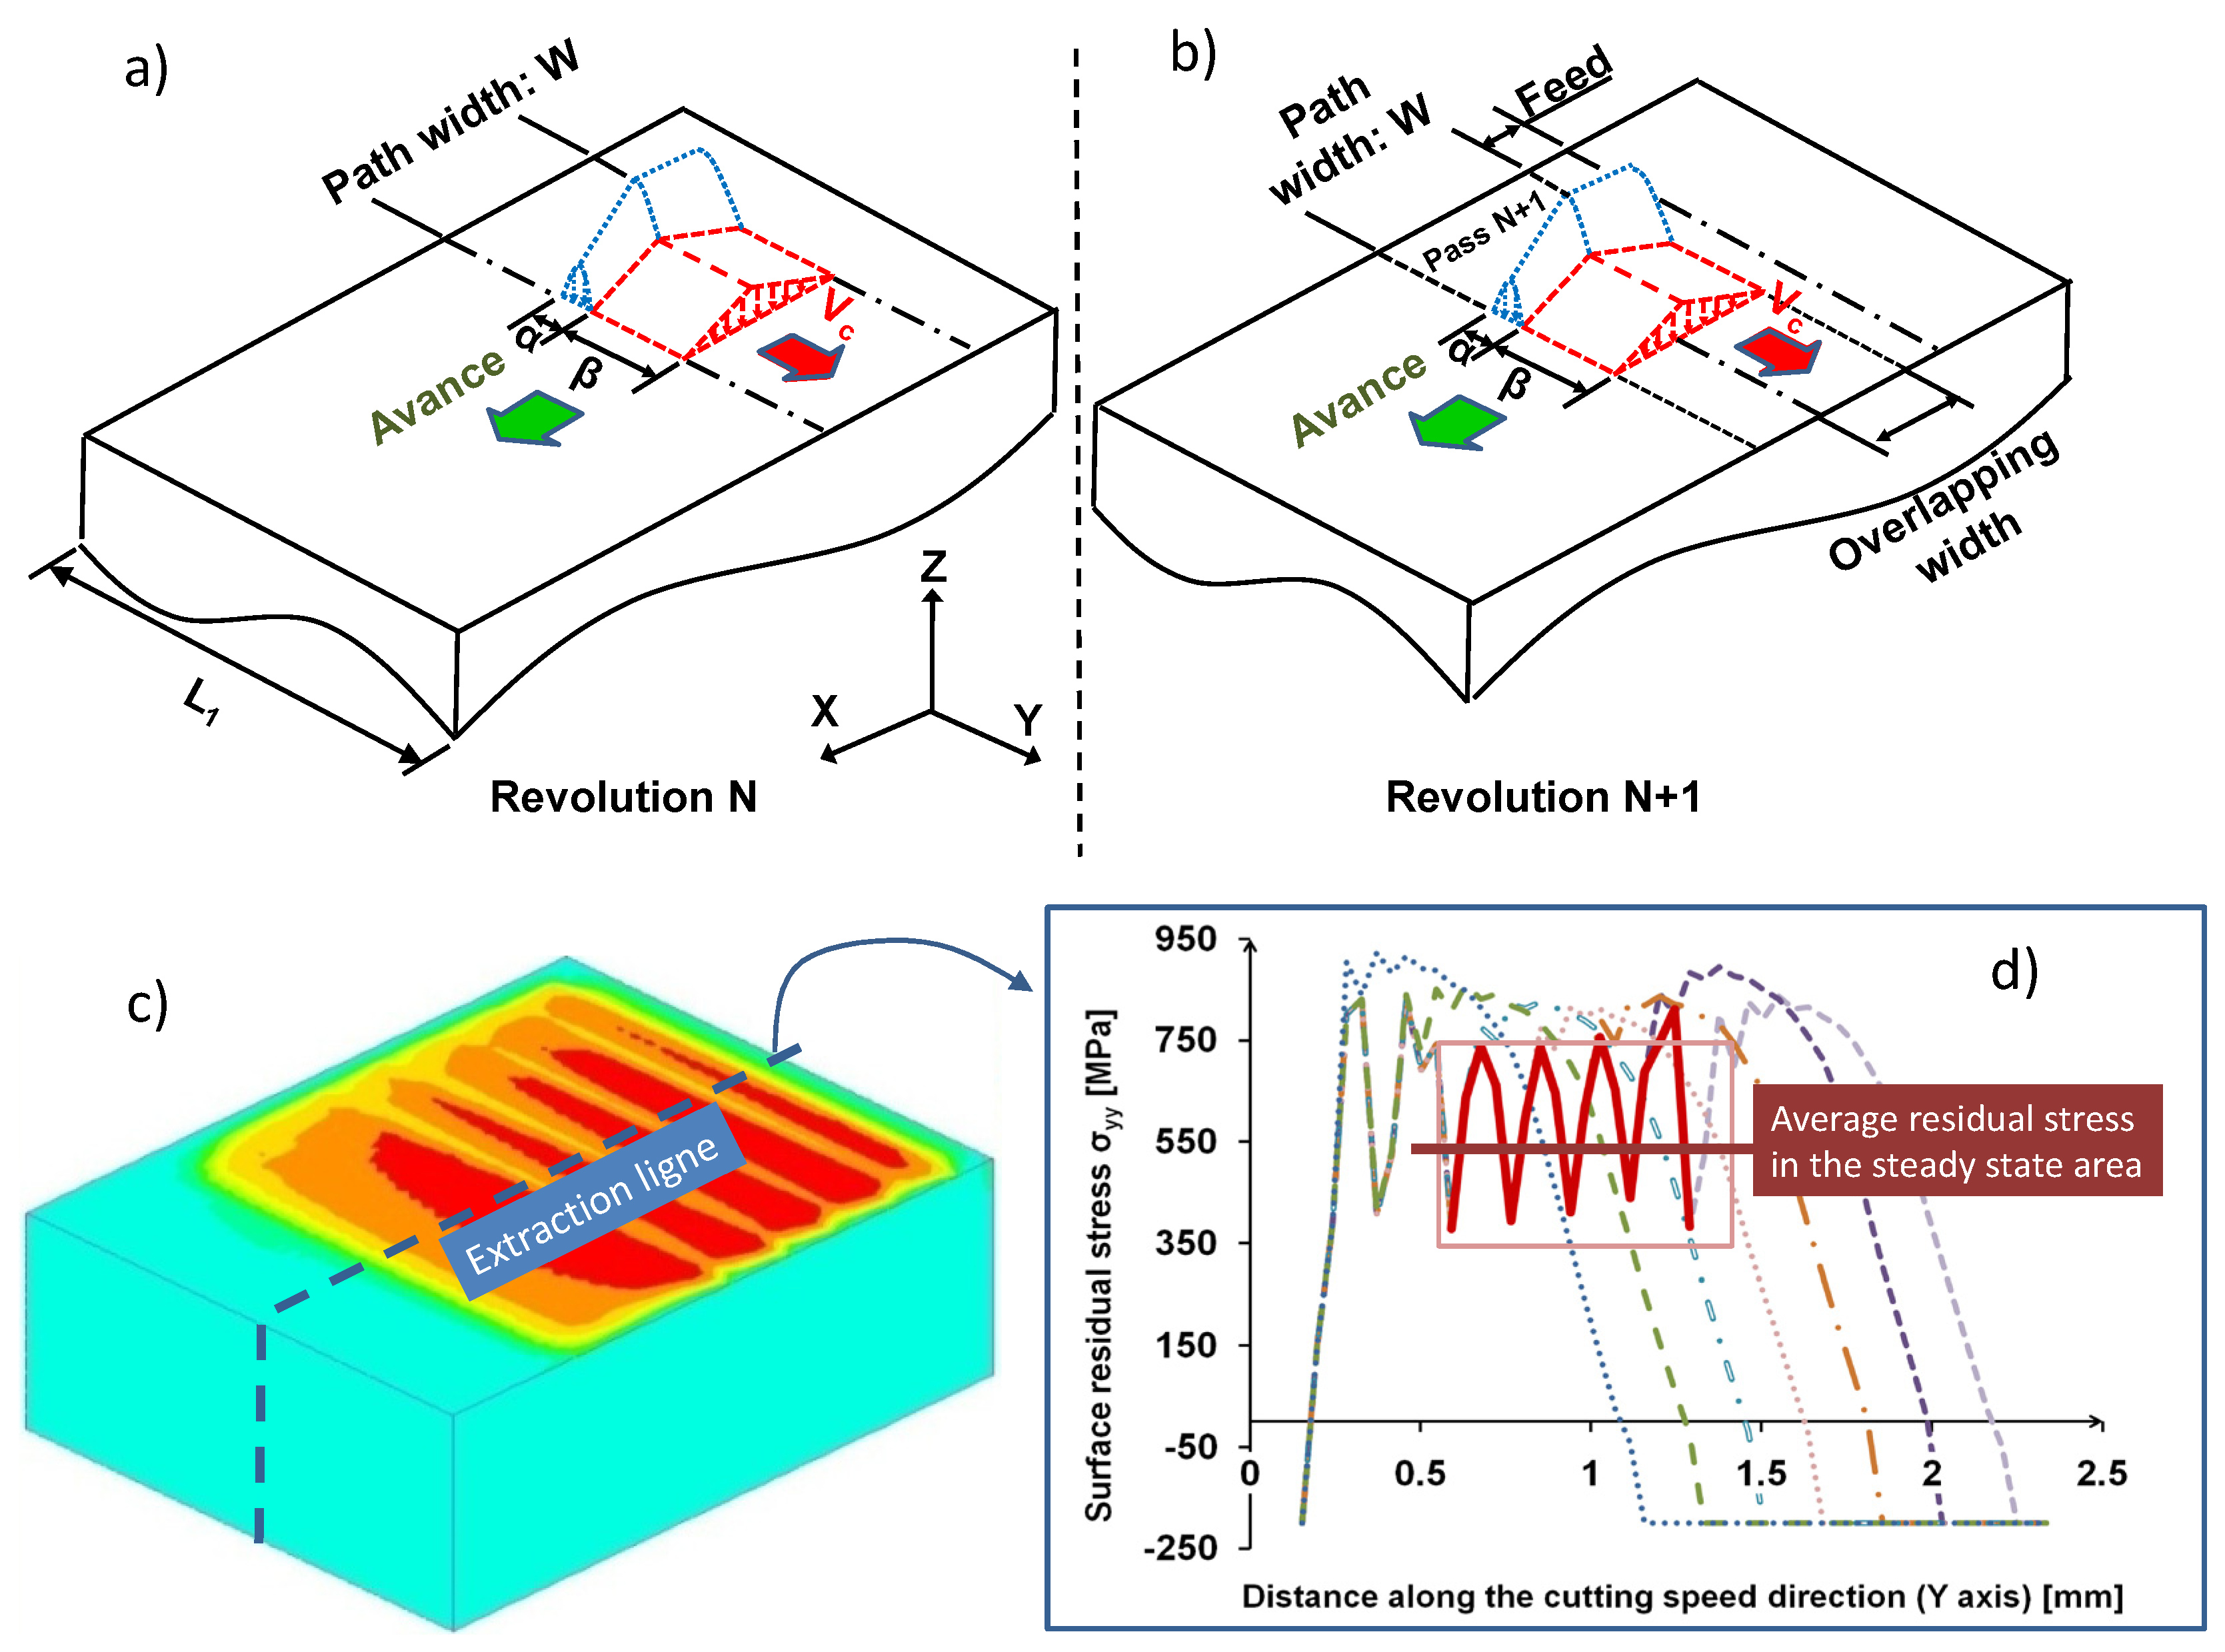
Based on the previous equivalent thermomechanical loadings, a simulation was launched for each case study, using the routine developed in SYSWELD. The equivalent thermomechanical loadings were moved over the machined surface at a velocity corresponding to the cutting speed Vc (Figure 7a). Between two revolutions, the equivalent loadings were shifted along the feed axis, with a value corresponding to the feeds per revolution f of the cutting tool (Figure 7b). Five revolutions were usually required to generate a stabilized residual stress (Figure 7c). 2D residual stress profiles were then extracted from the 3D model along the extraction line for each level (Figure 7c). At least 10 levels were considered, starting from the surface to the bulk. It can be stated that residual stress profiles vary along the extraction line in a period corresponding to the feed per revolution f. In the steady-state area (the center of the 3D model), the average value was calculated (Figure 7d). It was mandatory to average the residual stress profile in this steady-state area before making a comparison with experimental values because the collimator of the X-ray source was 2 mm in size and provides the average values of experimental residual stress over a wide surface. The next section compares experimental and numerical results for each case study.
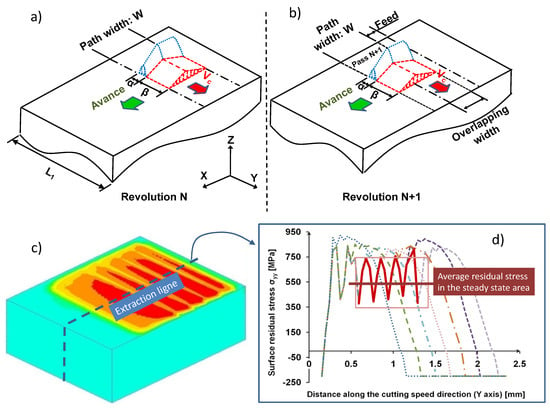
Figure 7.
Movement of the thermomechanical loadings during revolution N (a) and N + 1 (b) Example of extraction of the residual stress profile (c) Average value of the residual stress in the steady-state area (d) Evolution of residual stress along the axis.
4.1. Sensitivity to Cutting Speed
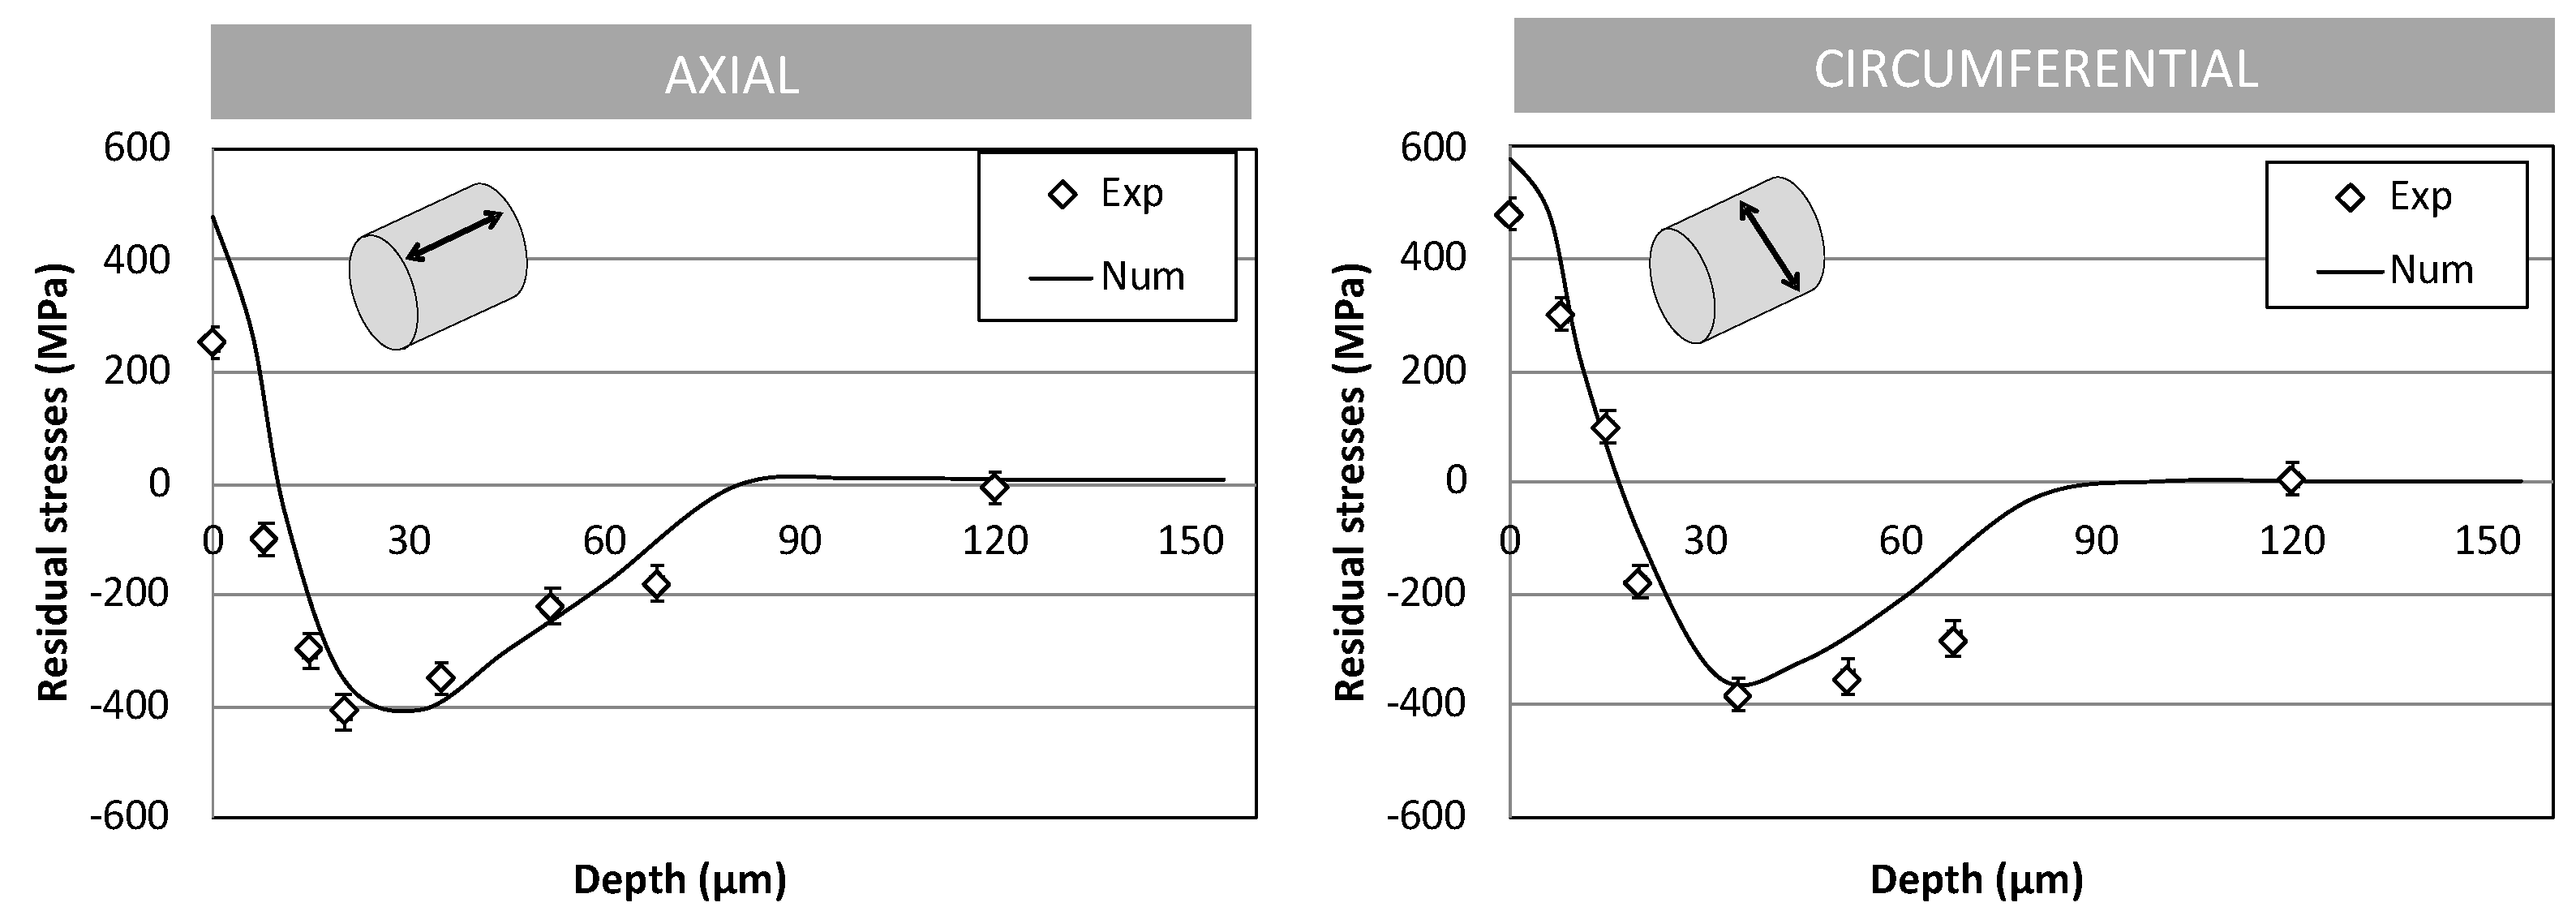
Figure 8 compares the residual stress profile predicted by the numerical model with the one measured by X-ray diffraction, for the reference case study at Vc = 150 m/min. These curves have a typical hook shape. This profile is produced by a combination of thermal and mechanical loadings on the machined surface [2]. The tensile stress state in the external layer reveals a dominant thermal loading on the surface, whereas the deep compressive stress below the surface reveals the dominant mechanical loading in the subsurface. This kind of hook shaped curves, is typical for turning operations on ductile materials, as shown by [23].

Figure 8.
Comparison between experimental and numerical results.
For the reference case study, the affected depth was about 120 μm. The external residual stress state was between +(300–600) MPa, depending on the direction (axial ⬄ circumferential), and the peak of the compression was about −400 MPa, at a distance of 20 to 40 μm below the surface.
The numerical model predicts the same trend with a reasonable agreement. The peak of compression is the same order of magnitude (between 20 to 40 m below the surface). Its intensity is also around −400 MPa. The predicted affected depth is something less than the experimental one (80 ⬄ 120 μm). As far as the external residual stress state is concerned, a tensile stress is predicted, but the model overestimates its magnitude by 100−200 MPa. This was also observed by [23]. Indeed, the first five microns are always disturbed due to the presence of modified microstructure [26] showed that martensitic grains are divided into numerous smaller ones (dynamic recrystallization). This microstructural evolution leads to a release of residual stresses in the external layer. As the model does not consider these metallurgical phenomena, it necessarily overestimates the residual stress state. However, below this very thin layer, the physical phenomena considered by the model are relevant.
Figure 9 presents the evolution of the axial and circumferential residual stress gradient corresponding to the 2 cutting speeds (Vc = 50 and 250 m/min) around the nominal reference case study at Vc = 150 m/min. It seems that an increase of cutting speed leads to a deeper compressive peak and a larger affected depth. The 3D hybrid model is able to predict the effect on the peak of compression, but it does not reveal the evolution of the affected depth.
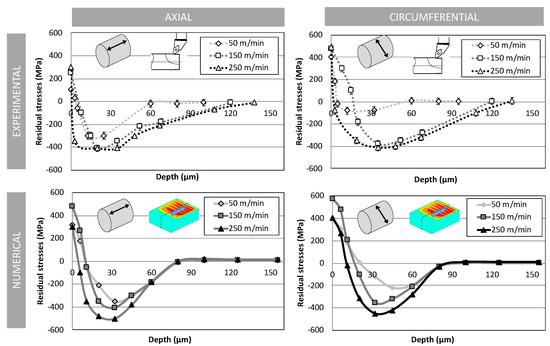
Figure 9.
Effect of cutting speed on residual stresses.
By analysing the thermomechanical loadings for the 3 case studies, it is not easy to clearly explain this trend. Indeed, it can be seen that the tangential stress is sensitive to cutting speed, as well as the heat fluxes in the PSZ and TSZ. However, it difficult to give an evident explanation as the mechanical and thermal phenomena are strongly coupled.
It should be noted that there is no clear trend of external residual stress, neither from an experimental point of view, nor a numerical one.
4.2. Sensitivity to Feed
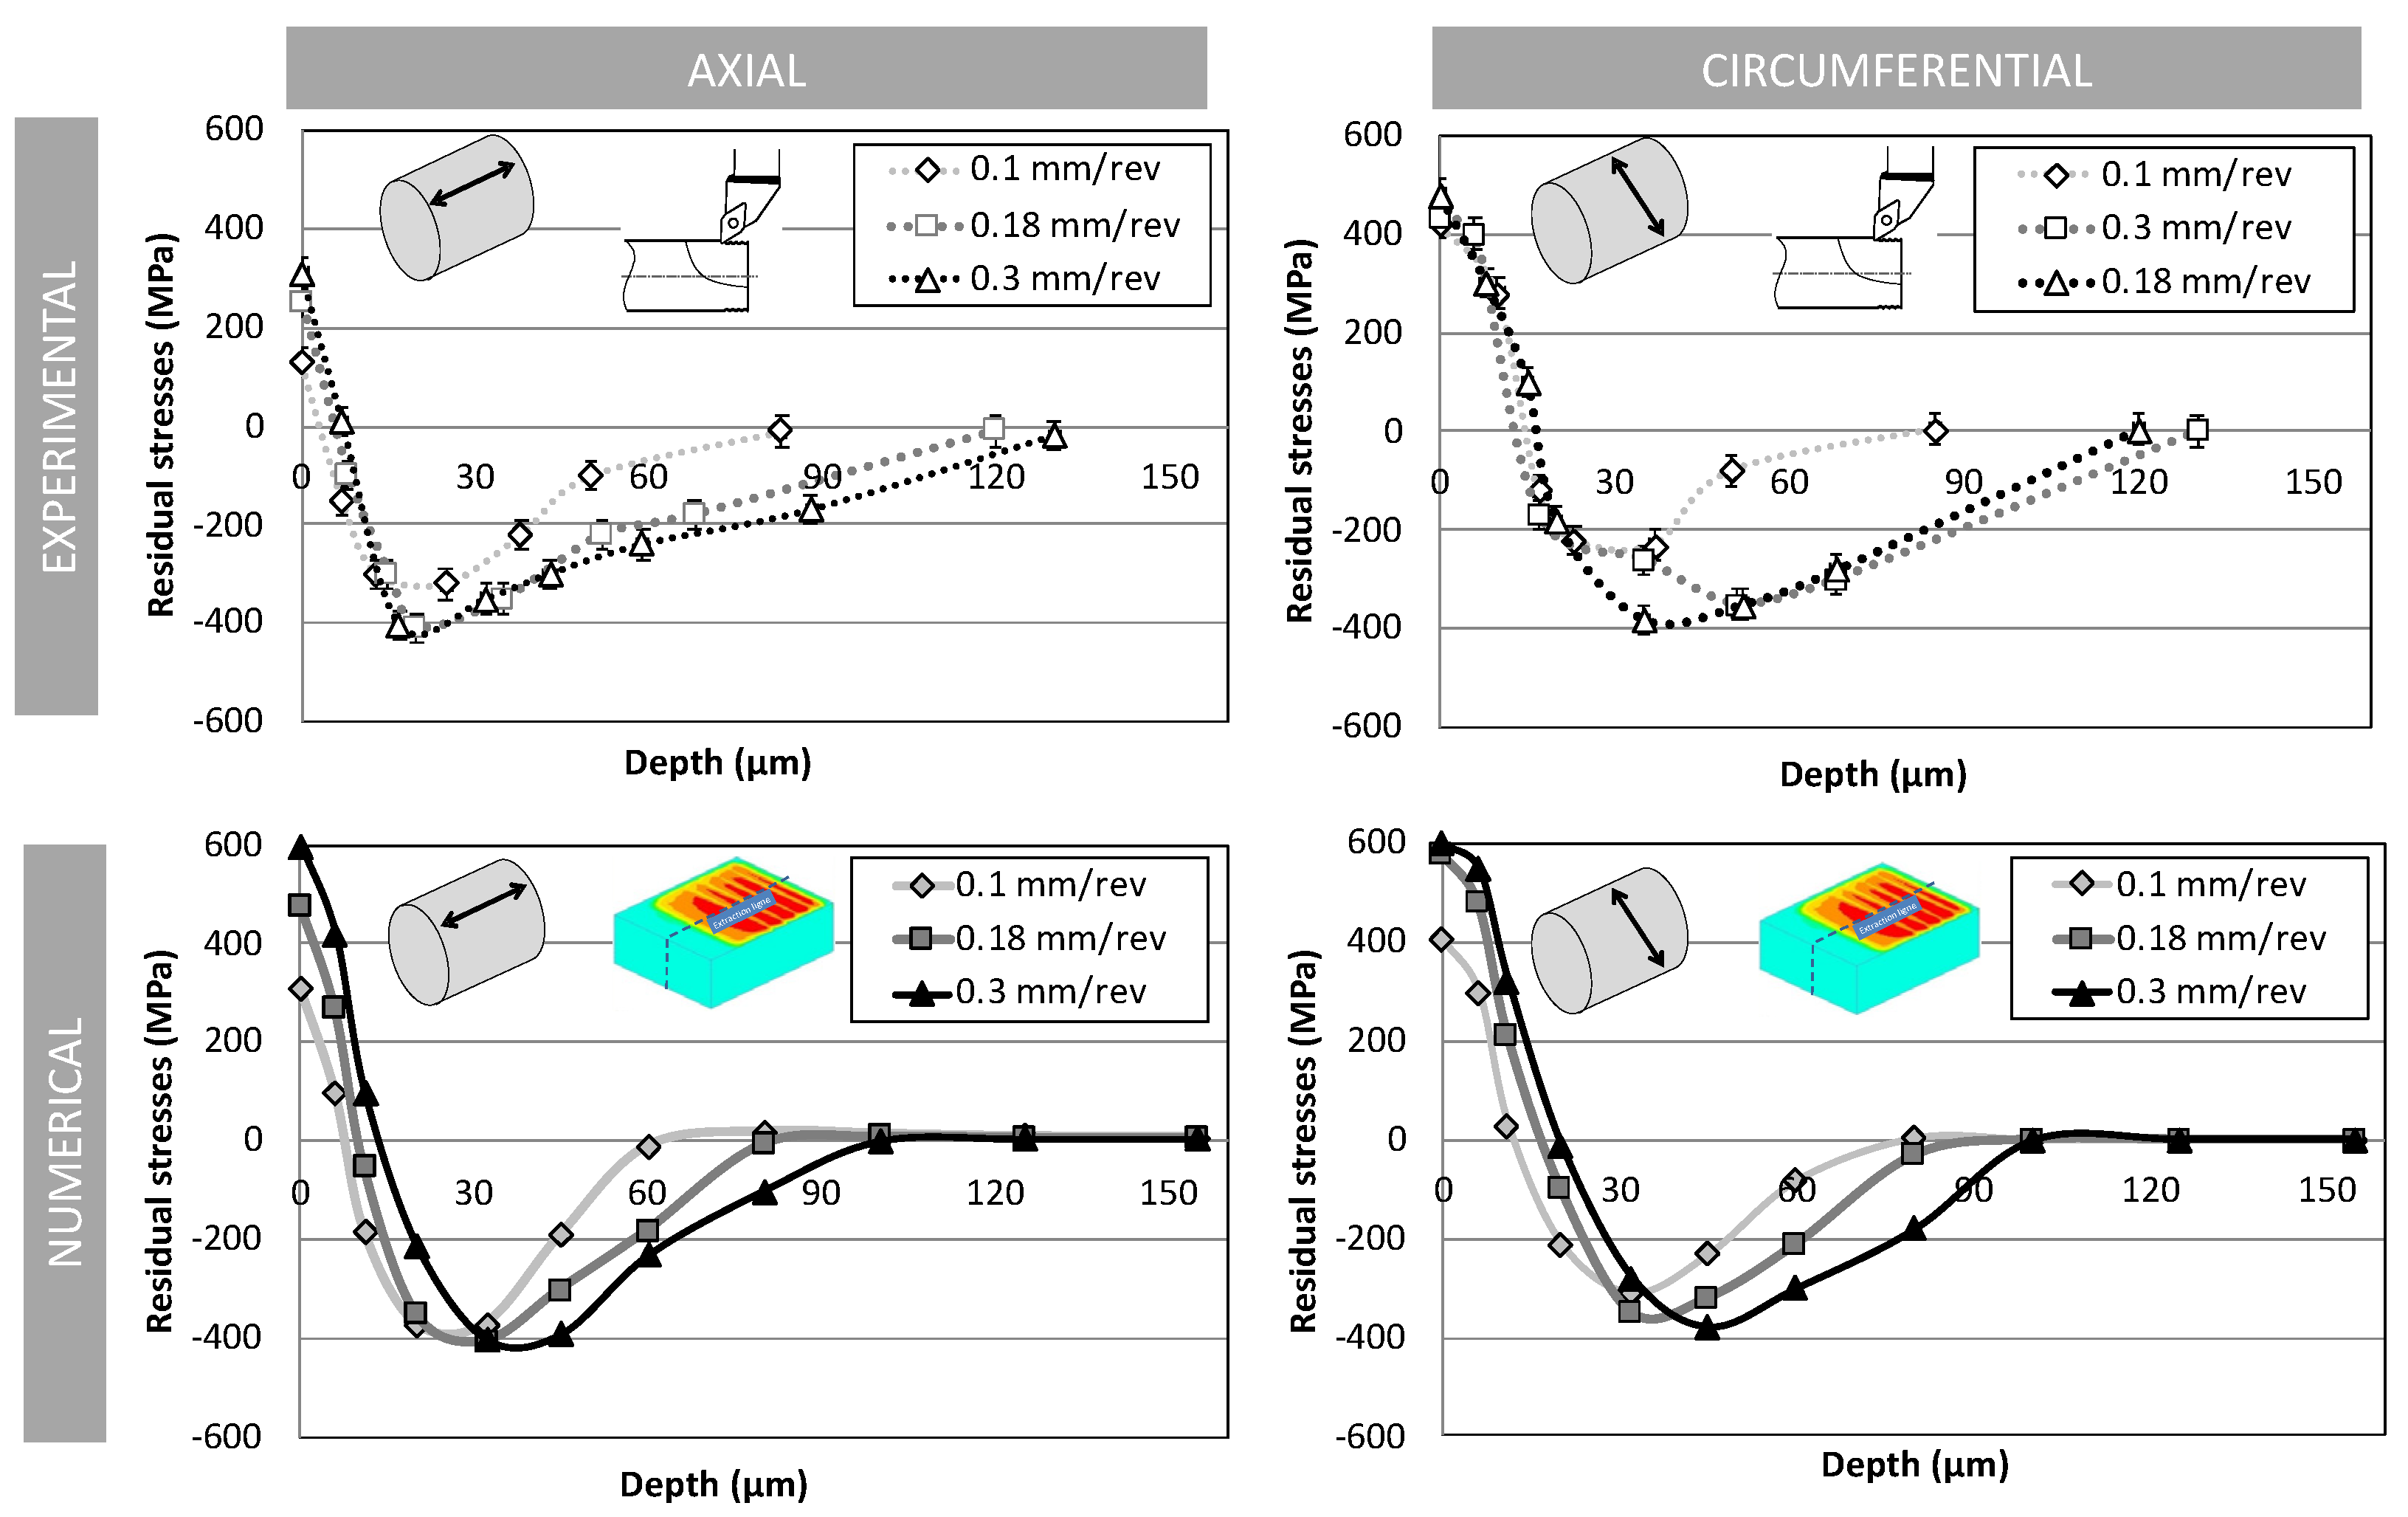
This section deals with the sensitivity to the feed per revolution f, which mainly influences the uncut chip thickness. Three values were selected: 0.1, 0.18 and 0.3 mm/rev. The observations of the experimental residual stress profiles (Figure 10) show a correlation with the affected depth. A larger feed induces a higher affected layer. The magnitude of the peak of compression does not seem to be affected; it only shifts deeper with an increase in the affected depth.
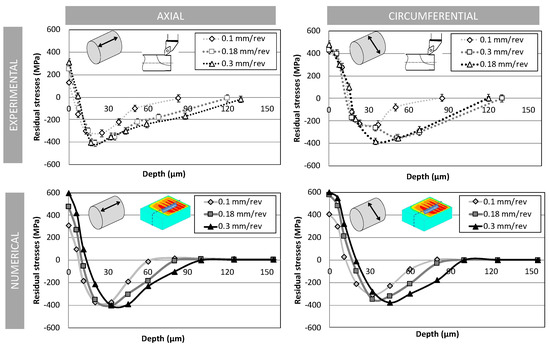
Figure 10.
Effect of feed rate on residual stresses.
The model predicts the shape and the magnitude of the profiles rather well. In addition, there is good correlation between the depth of the affected layer and the feed. The observations in Table 8 seem to indicate that an increase in feed tends to increase all thermal and mechanical loadings, which leads to this larger affected depth.
Once again, it should be noted that there is no clear trend in the external residual stress, from an experimental point of view. On the contrary, the numerical model predicts an increase. As discussed previously, the model does not model microstructural modifications (dynamic re-crystallization), which leads to an overestimation of the true residual stress value in the external layer.
4.3. Sensitivity to Insert Geometry
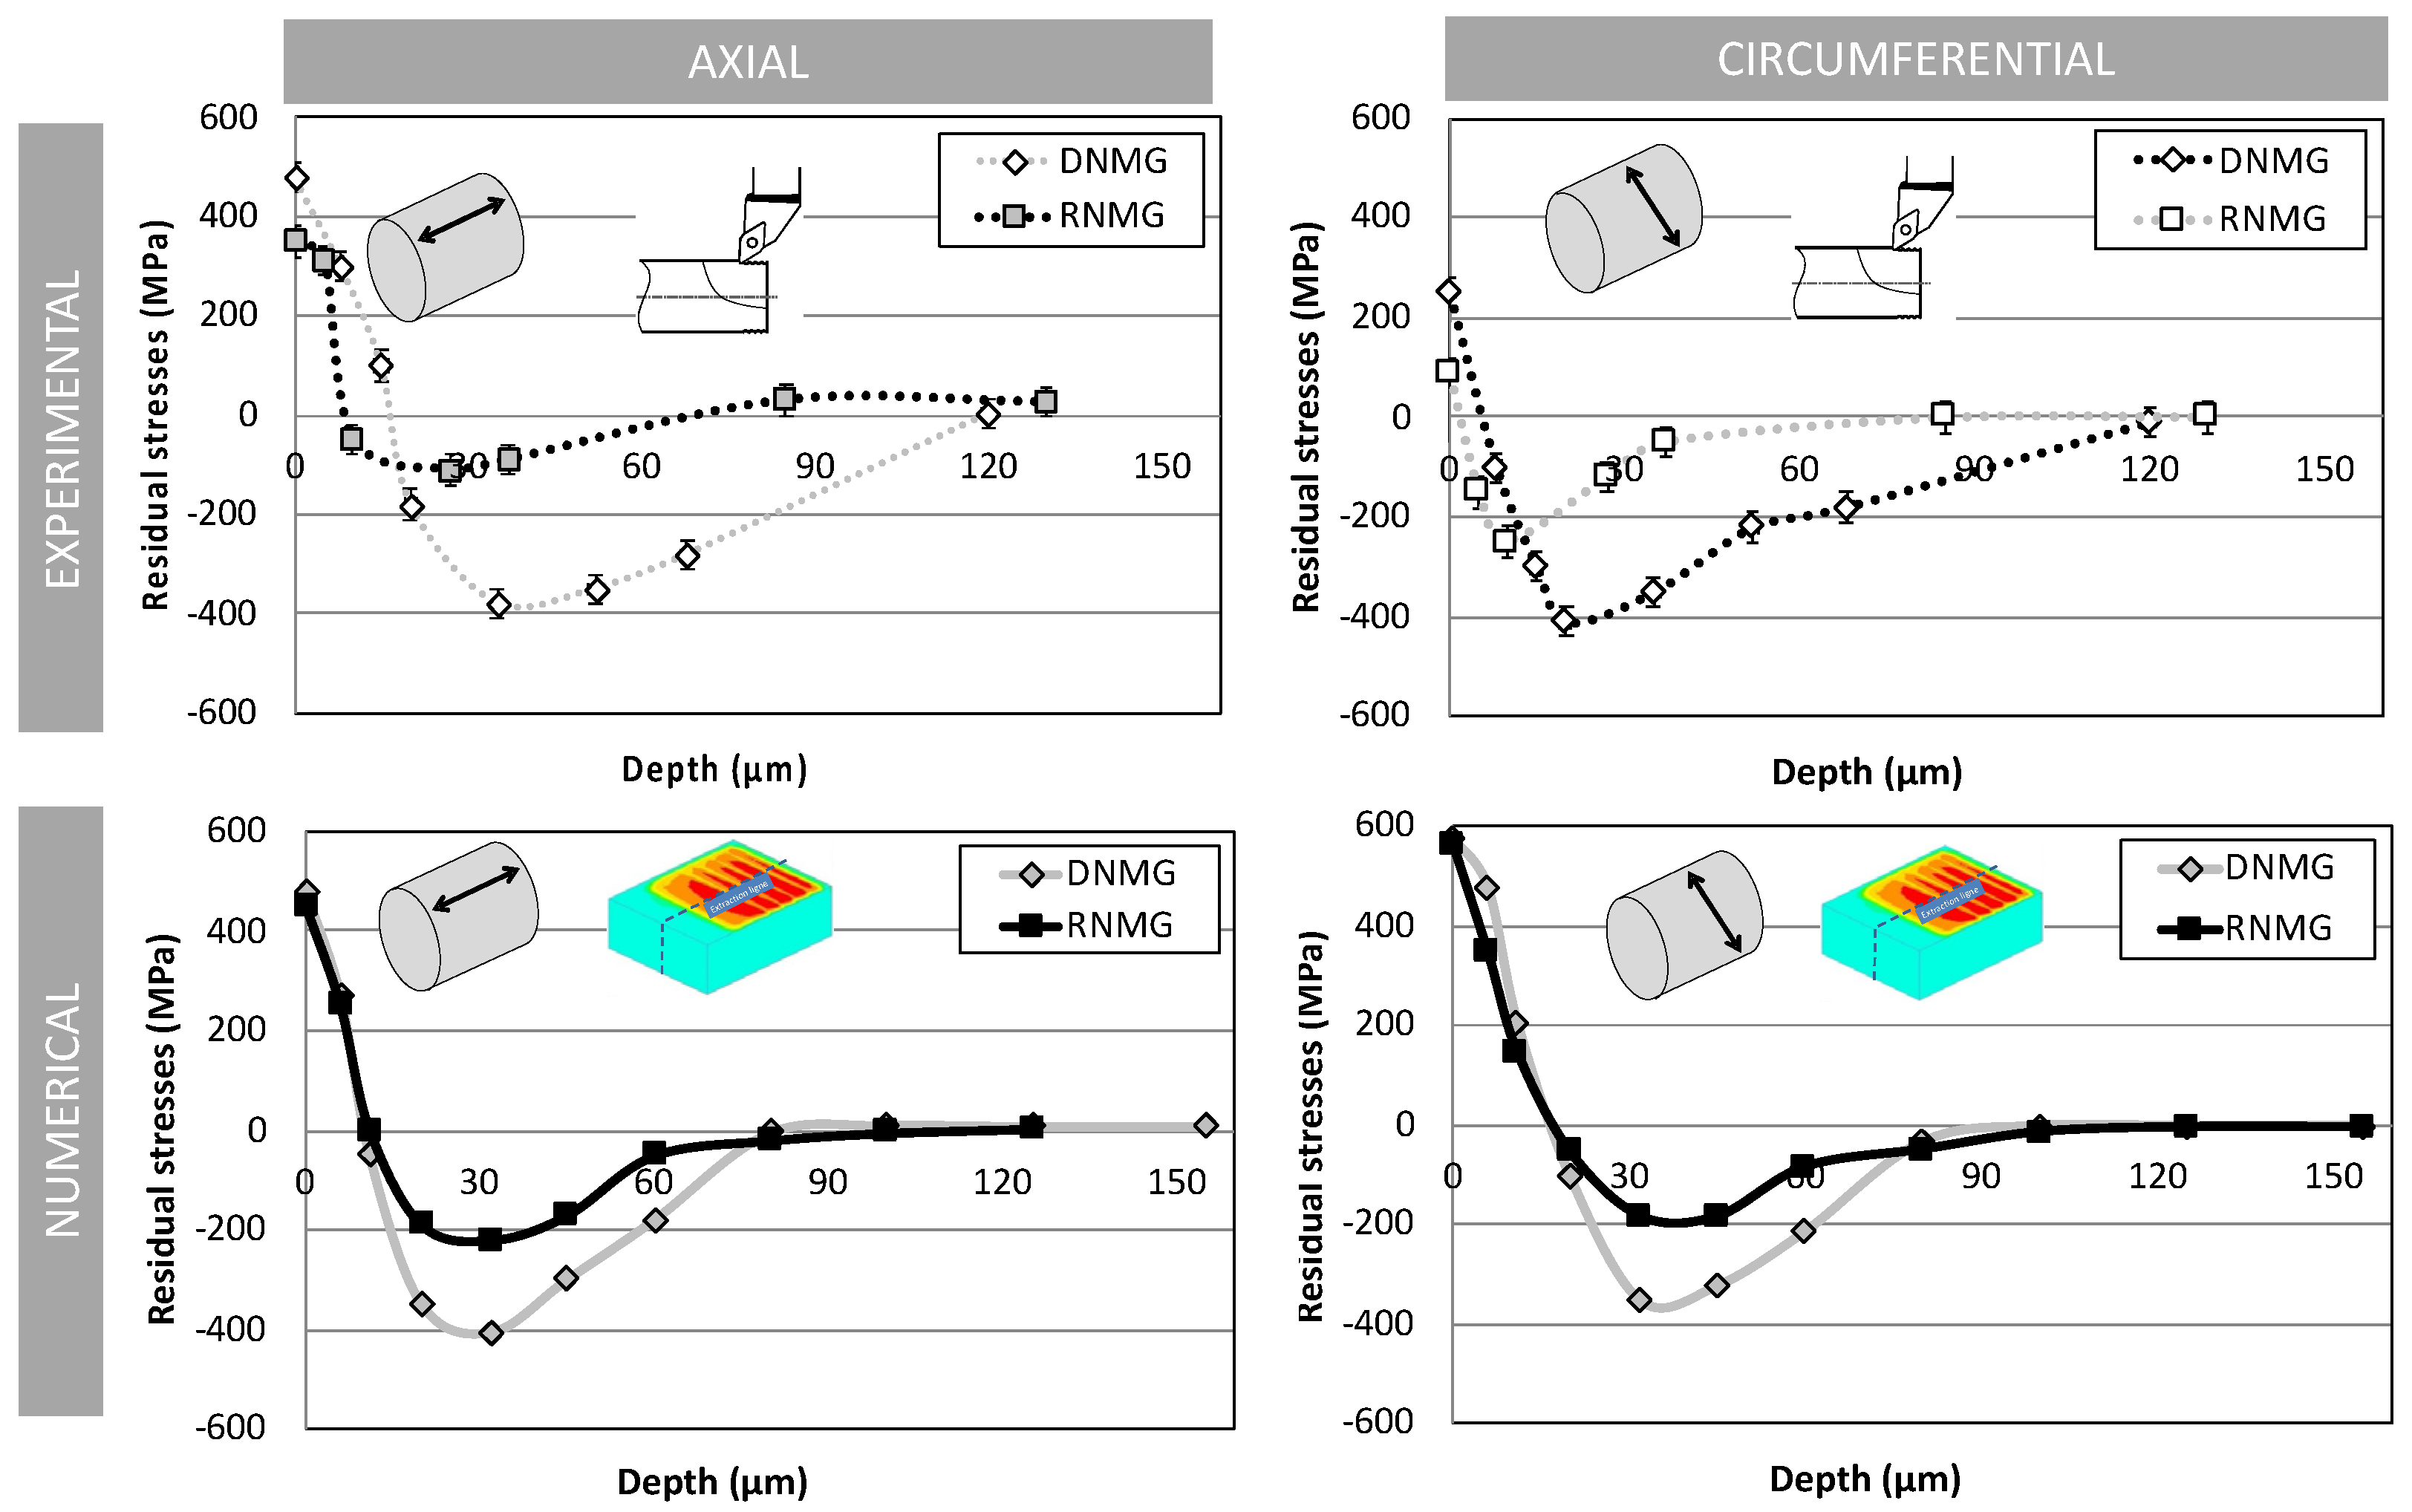
This section investigates the influence of an insert through a variation of the tool tip radius (Rε = 1.2 ⬄ 4.5 mm—Figure 3a,b). Indeed, this induces several modifications in the model, such as the uncut chip thickness and the geometrical parameters (d, hmax). These two case studies differ, to a large extent.
The observations in Figure 11 show that the round insert leads to a completely different residual stress field. The round insert tends to decrease the intensity of the peak of compression, as well as the affected depth. The model also predicts this trend, even if the magnitude should be improved. However, the model confirms the experimental observation indicating the dominant role of tool geometry over cutting speed and feed.
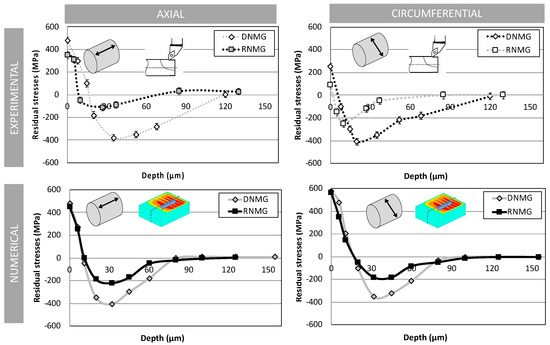
Figure 11.
Effect of insert geometry on residual stresses.
The observations in Table 8 indicate that a larger tip radius Rε leads to a decrease in all of the thermal and mechanical sources, which induces this smoother residual stress state. It should be noted that there is no clear trend in external residual stress, neither from an experimental point of view, nor from a numerical one. This statement is important, because it reveals that the external residual stress state cannot be a relevant indicator of the residual stress state below. Therefore, it is hazardous to use this parameter for monitoring purposes, although it is common practice in industry, as this value is easily accessible by non-destructive instruments (X-ray diffraction, Barkhausen noise, etc.).
4.4. Sensitivity to Tool Wear in the Flank Face
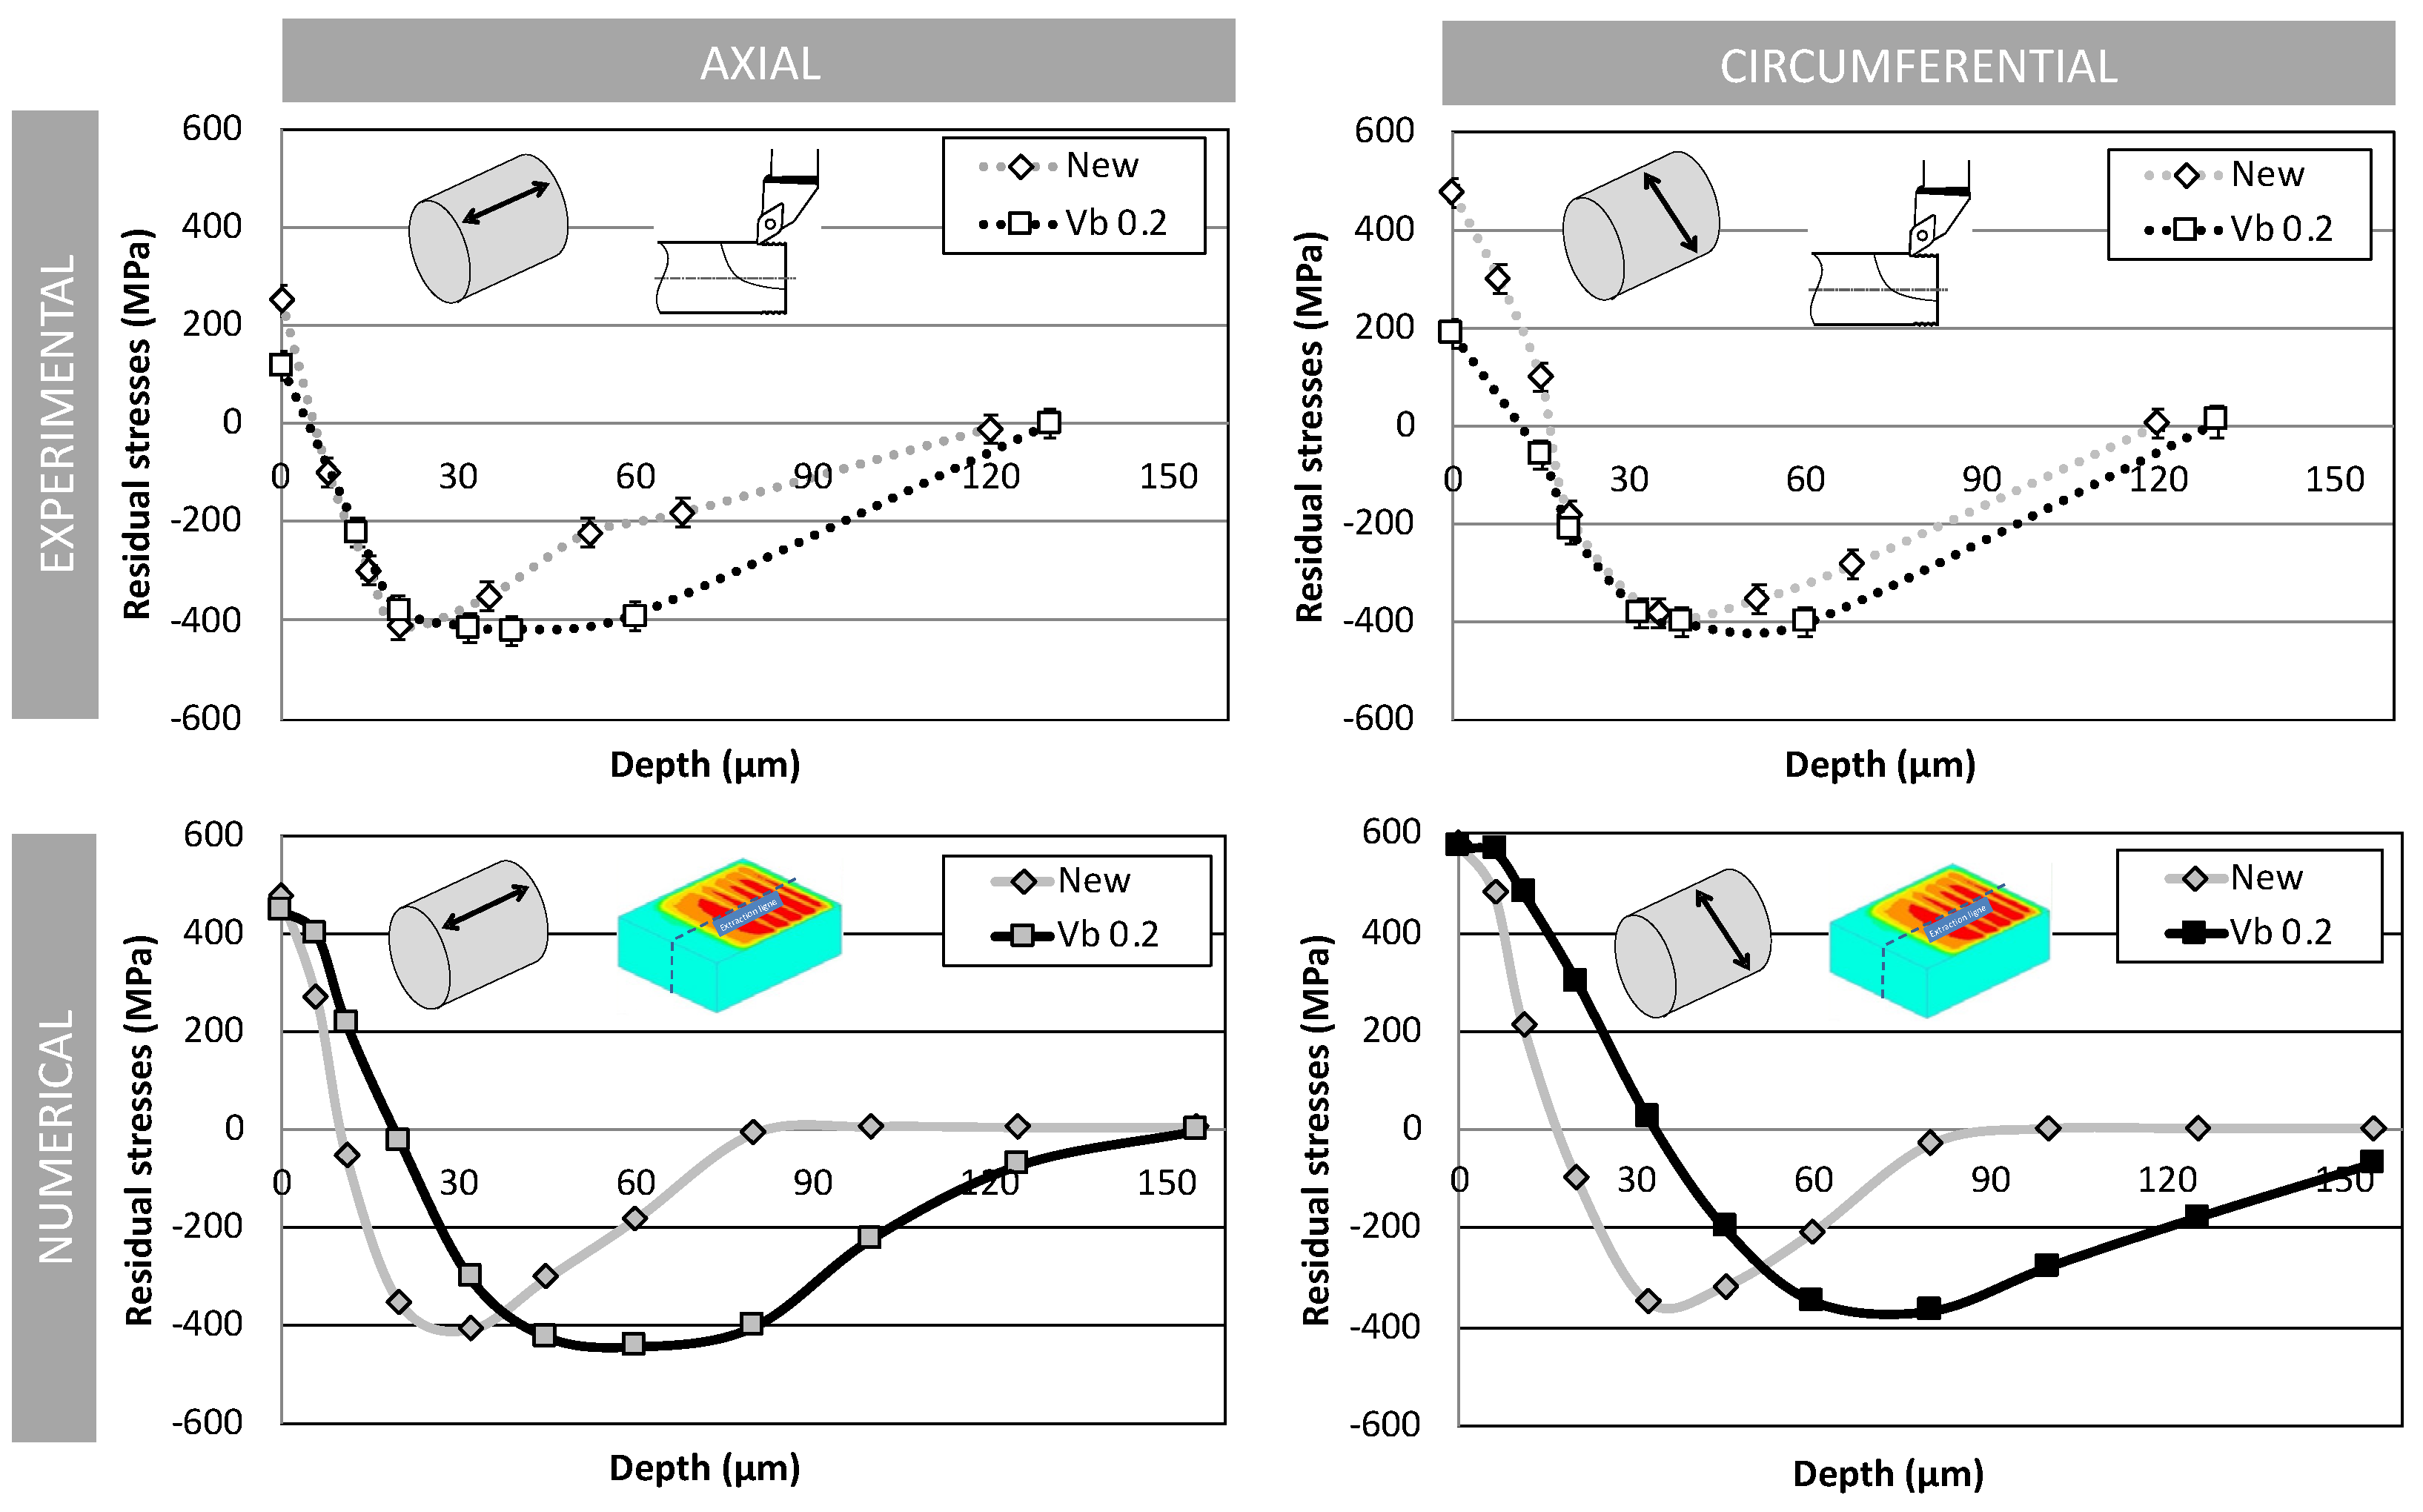
This section investigates the influence of flank wear on the residual stress state. Figure 12 reveals that flank wear has a very significant influence on the residual stress profiles. It tends to increase the affected depth in both directions. On the contrary, the intensity of the compressive peak is not affected. This shows that the residual stress state is strongly determined by the contact area in the flank face. This was expected from the work of [28] and is considered by the model through the contact length α. So, the 3D hybrid model predicts the same trend, even if the magnitude is somewhat more intense than in reality. The observations in Table 8 also show a significant sensitivity to the heat flux transmitted to the machined surface in the TSZ.

Figure 12.
Effect of tool wear on residual stresses.
A modified flank face is also a modification of the geometry, as previously, but in a very narrow zone perpendicular to the previous one. However, this zone is of primary importance as it is in direct contact with the machined surface. This is an additional element that confirms the dominant role of the tool geometry on the residual stress state.
As far as the external residual stress is concerned, tool flank wear leads to a significant decrease in tensile stress in a circumferential direction, for large flank wear. It can be assumed that this is due to a more intense dynamic re-crystallization phenomenon. This cannot be predicted by the model. On the contrary, the axial residual stress state in the external layer is not affected.
5. Conclusions
This paper has investigated the residual stresses induced by a longitudinal turning operation in 15-5PH martensitic stainless steel. An experimental investigation has quantified the sensitivity of residual stresses to cutting speed, feed, tool geometry and tool flank wear. In parallel, the previously developed 3D hybrid model has been applied for each case study, to evaluate its reliability.
It has been shown in a specific case study, that tool tip radius and tool flank wear have a dominant effect on residual stress profiles, compared to cutting speed and feed rate. They mainly influence the affected depth and the peak of compression, whereas the external residual stress state is not as sensitive.
Cutting speed influences the intensity of the compressive peak to a limited extent, whereas feed influences the affected depth.
It has also been shown that the external residual stress state is a hazardous indicator of the residual stress state below the surface.
Additional works are necessary to check if these trends remain valid for other workmaterial. Finally, this work has shown that the 3D hybrid model is able to predict the hook-shaped residual stresses in both axial and circumferential directions, with reasonable agreement in most of the case studies. It also enables the prediction of the sensitivity and the trend of the investigated parameters (cutting speed, feed, tip radius, flank wear). Some improvements are still required, in terms of magnitude of the sensitivity. The shapes of the thermomechanical loadings, as well as the integration of microstructural issues in the external layer, seem to be the most obvious ways of improving the model.
Author Contributions
A.M.: Conceptualization, methodology, software, experimental investigation, formal analysis, writing. F.V.: Conceptualization, methodology, formal analysis, writing, supervision. J.R.: Resources, Conceptualization, methodology, formal analysis, writing original draft preparation, supervision, project administration. M.C.: Conceptualization, methodology, formal analysis, writing, supervision. All authors have read and agreed to the published version of the manuscript.
Funding
This research has been funded by the companies: AIRBUS HELICOPTERS, FRAMATOME and CETIM.
Data Availability Statement
The data presented in this study are available on request from the corresponding author.
Acknowledgments
Authors would like to express their gratitude to Airbus Helicopters, Framatome and Cetim for their financial support.
Conflicts of Interest
The Authors declare no conflict of interest.
References
- Smith, S.; Melkote, S.N.; Lara-Curzio, E.; Watkins, T.R.; Allard, L.; Riester, L. Effect of surface integrity of hard turned AISI 52100 steel on fatigue performance. Mater. Sci. Eng. A 2007, 459, 337–346. [Google Scholar] [CrossRef]
- Davim, J.P. Machining-Fundamentals and Recent Advances; Springer: London, UK, 2008; pp. 59–96. ISBN 978-1-84800-213-5. [Google Scholar]
- Bissey-Breton, S.; Farr, J.; Vignal, V.; Mary, N. Impact des conditions d’usinage sur la zone du matériau affecté par le procédé. Méc. Ind. 2007, 8, 193–197. [Google Scholar] [CrossRef]
- Griffiths, B. Manufacturing Surface Technology—Surface Integrity and Functional Performance; Penton Press: London, UK, 1971; ISBN 18571-8029-1. [Google Scholar]
- Jawahir, I.; Brinksmeier, E.; M’Saoubi, R.; Aspinwall, D.; Outeiro, J.; Meyer, D.; Umbrello, D.; Jayal, A. Surface integrity in material removal processes: Recent advances. CIRP Ann. 2011, 60, 603–626. [Google Scholar] [CrossRef]
- Yang, X.; Richard Liu, C.; Grandt, A.F. An experimental study on fatigue life variance, residual stress variance, and their correlation of face-turned and ground Ti6Al4V samples. J. Manuf. Sci. Eng. 2002, 124, 809–819. [Google Scholar] [CrossRef]
- Liu, C.R.; Yang, X. The scatter of surface residual stresses produced by face turning and grinding. Mach. Sci. Technol. 2001, 5, 1–21. [Google Scholar] [CrossRef]
- Javidi, A.; Rieger, U.; Eichlseder, W. The effect of machining on the surface integrity and fatigue life. Int. J. Fatigue 2008, 30, 2050–2055. [Google Scholar] [CrossRef]
- Chomienne, V.; Verdu, C.; Rech, J.; Valiorgue, F. Influence of surface integrity of 15-5PH on the fatigue life. Procedia Eng. 2013, 66, 274–281. [Google Scholar] [CrossRef] [Green Version]
- Denkena, B.; Grove, T.; Maiß, O. Influence of the cutting edge radius on surface integrity in hard turning of roller bearing inner rings. Prod. Eng. Res. Dev. WGP 2015, 9, 299–305. [Google Scholar] [CrossRef]
- Sun, J.; Wang, T.; Su, A.; Chen, W. Surface integrity and its influence on fatigue life when turning nickel alloy GH4169. Procedia CIRP 2020, 71, 478–483. [Google Scholar] [CrossRef]
- Withers, P.J. Residual stress and its role in failure. Rep. Prog. Phys. 2007, 70, 2211–2264. [Google Scholar] [CrossRef] [Green Version]
- Guo, Y.; Warren, A.; Hashimoto, F. The basic relationships between residual stress, white layer, and fatigue life of hard turned and ground surfaces in rolling contact. CIRP J. Manuf. Sci. Technol. 2010, 2, 129–134. [Google Scholar] [CrossRef]
- Dumas, M.; Valiorgue, F.; Van Robaeys, A.; Rech, J. Interaction between a roughing and a finishing operation on the final surface integrity in turning. Procedia CIRP 2018, 71, 396–400. [Google Scholar] [CrossRef]
- Ulutan, D.; Erdem Alaca, B.; Lazoglu, I. Analytical modelling of residual stresses in machining. J. Mater. Process. Technol. 2007, 183, 77–87. [Google Scholar] [CrossRef]
- Ulutan, D.; Ozel, T. Machining induced surface integrity in titanium and nickel alloys: A review. Int. J. Mach. Tools Manuf. 2011, 51, 250–280. [Google Scholar] [CrossRef]
- Shet, C.; Deng, X. Residual stresses and strains in orthogonal metal cutting. Int. J. Mach. Tools Manuf. 2003, 43, 573–587. [Google Scholar] [CrossRef]
- Salio, M.; Berruti, T.; De Poli, G. Prediction of residual stress distribution after turning in turbine disks. Int. J. Mech. Sci. 2006, 48, 976–984. [Google Scholar] [CrossRef]
- Ee, K.; Dillon, O.; Jawahir, I. Finite element modeling of residual stresses in machining induced by cutting using a tool with finite edge radius. Int. J. Mech. Sci. 2005, 47, 1611–1628. [Google Scholar] [CrossRef]
- Guo, Y.B.; Liu, C.R. FEM analysis of mechanical state on sequentially machined surfaces. Mach. Sci. Technol. 2002, 6, 21–41. [Google Scholar] [CrossRef]
- Liu, C.R.; Guo, Y. Finite element analysis of the effect of sequential cuts and tool-chip friction on residual stresses in a machined layer. Int. J. Mech. Sci. 2000, 42, 1069–1086. [Google Scholar] [CrossRef]
- Nasr, M.N.; Ng, E.G.; Elbestawi, M. Modelling the effects of tool-edge radius on residual stresses when orthogonal cutting AISI 316L. Int. J. Mach. Tools Manuf. 2007, 47, 401–411. [Google Scholar] [CrossRef]
- Mondelin, A.; Valiorgue, F.; Rech, J.; Coret, M.; Feulvarch, E. Hybrid model for the prediction of residual stresses induced by 15-5PH steel turning. Int. J. Mech. Sci. 2012, 58, 69–85. [Google Scholar] [CrossRef] [Green Version]
- Sasahara, H.; Obikawa, T.; Shirakashi, T. Prediction model of surface residual stress within a ma- chined surface by combining two orthogonal plane models. Int. J. Mach. Tools Manuf. 2004, 44, 815–822. [Google Scholar] [CrossRef]
- Attanasio, A.; Ceretti, E.; Giardini, C. 3D FE modelling of superficial residual stresses in turning operations. Mach. Sci. Technol. 2009, 13, 317–337. [Google Scholar] [CrossRef]
- Mondelin, A. Modélisation de L’intégrité des Surfaces Usinées. Ph.D. Thesis, Ecole Centrale de Lyon, Écully, France, 2012. Available online: https://tel.archives-ouvertes.fr/tel-00838512/ (accessed on 26 September 2013).
- Rech, J.; Arrazola, P.J.; Claudin, C.; Courbon, C.; Pusavec, F.; Kopac, J. Characterisation of friction and heat partition coefficients at the tool-workmaterial interface in cutting. CIRP Ann. Manuf. Technol. 2013, 62, 79–82. [Google Scholar] [CrossRef]
- Madariaga, A.; Kortabarria, A.; Hormaetxe, E.; Garay, A.; Arrazola, P.J. Influence of tool wear on residual stresses when turning Inconel 718. Procedia CIRP 2016, 45, 267–270. [Google Scholar] [CrossRef] [Green Version]
Publisher’s Note: MDPI stays neutral with regard to jurisdictional claims in published maps and institutional affiliations. |
© 2021 by the authors. Licensee MDPI, Basel, Switzerland. This article is an open access article distributed under the terms and conditions of the Creative Commons Attribution (CC BY) license (https://creativecommons.org/licenses/by/4.0/).


