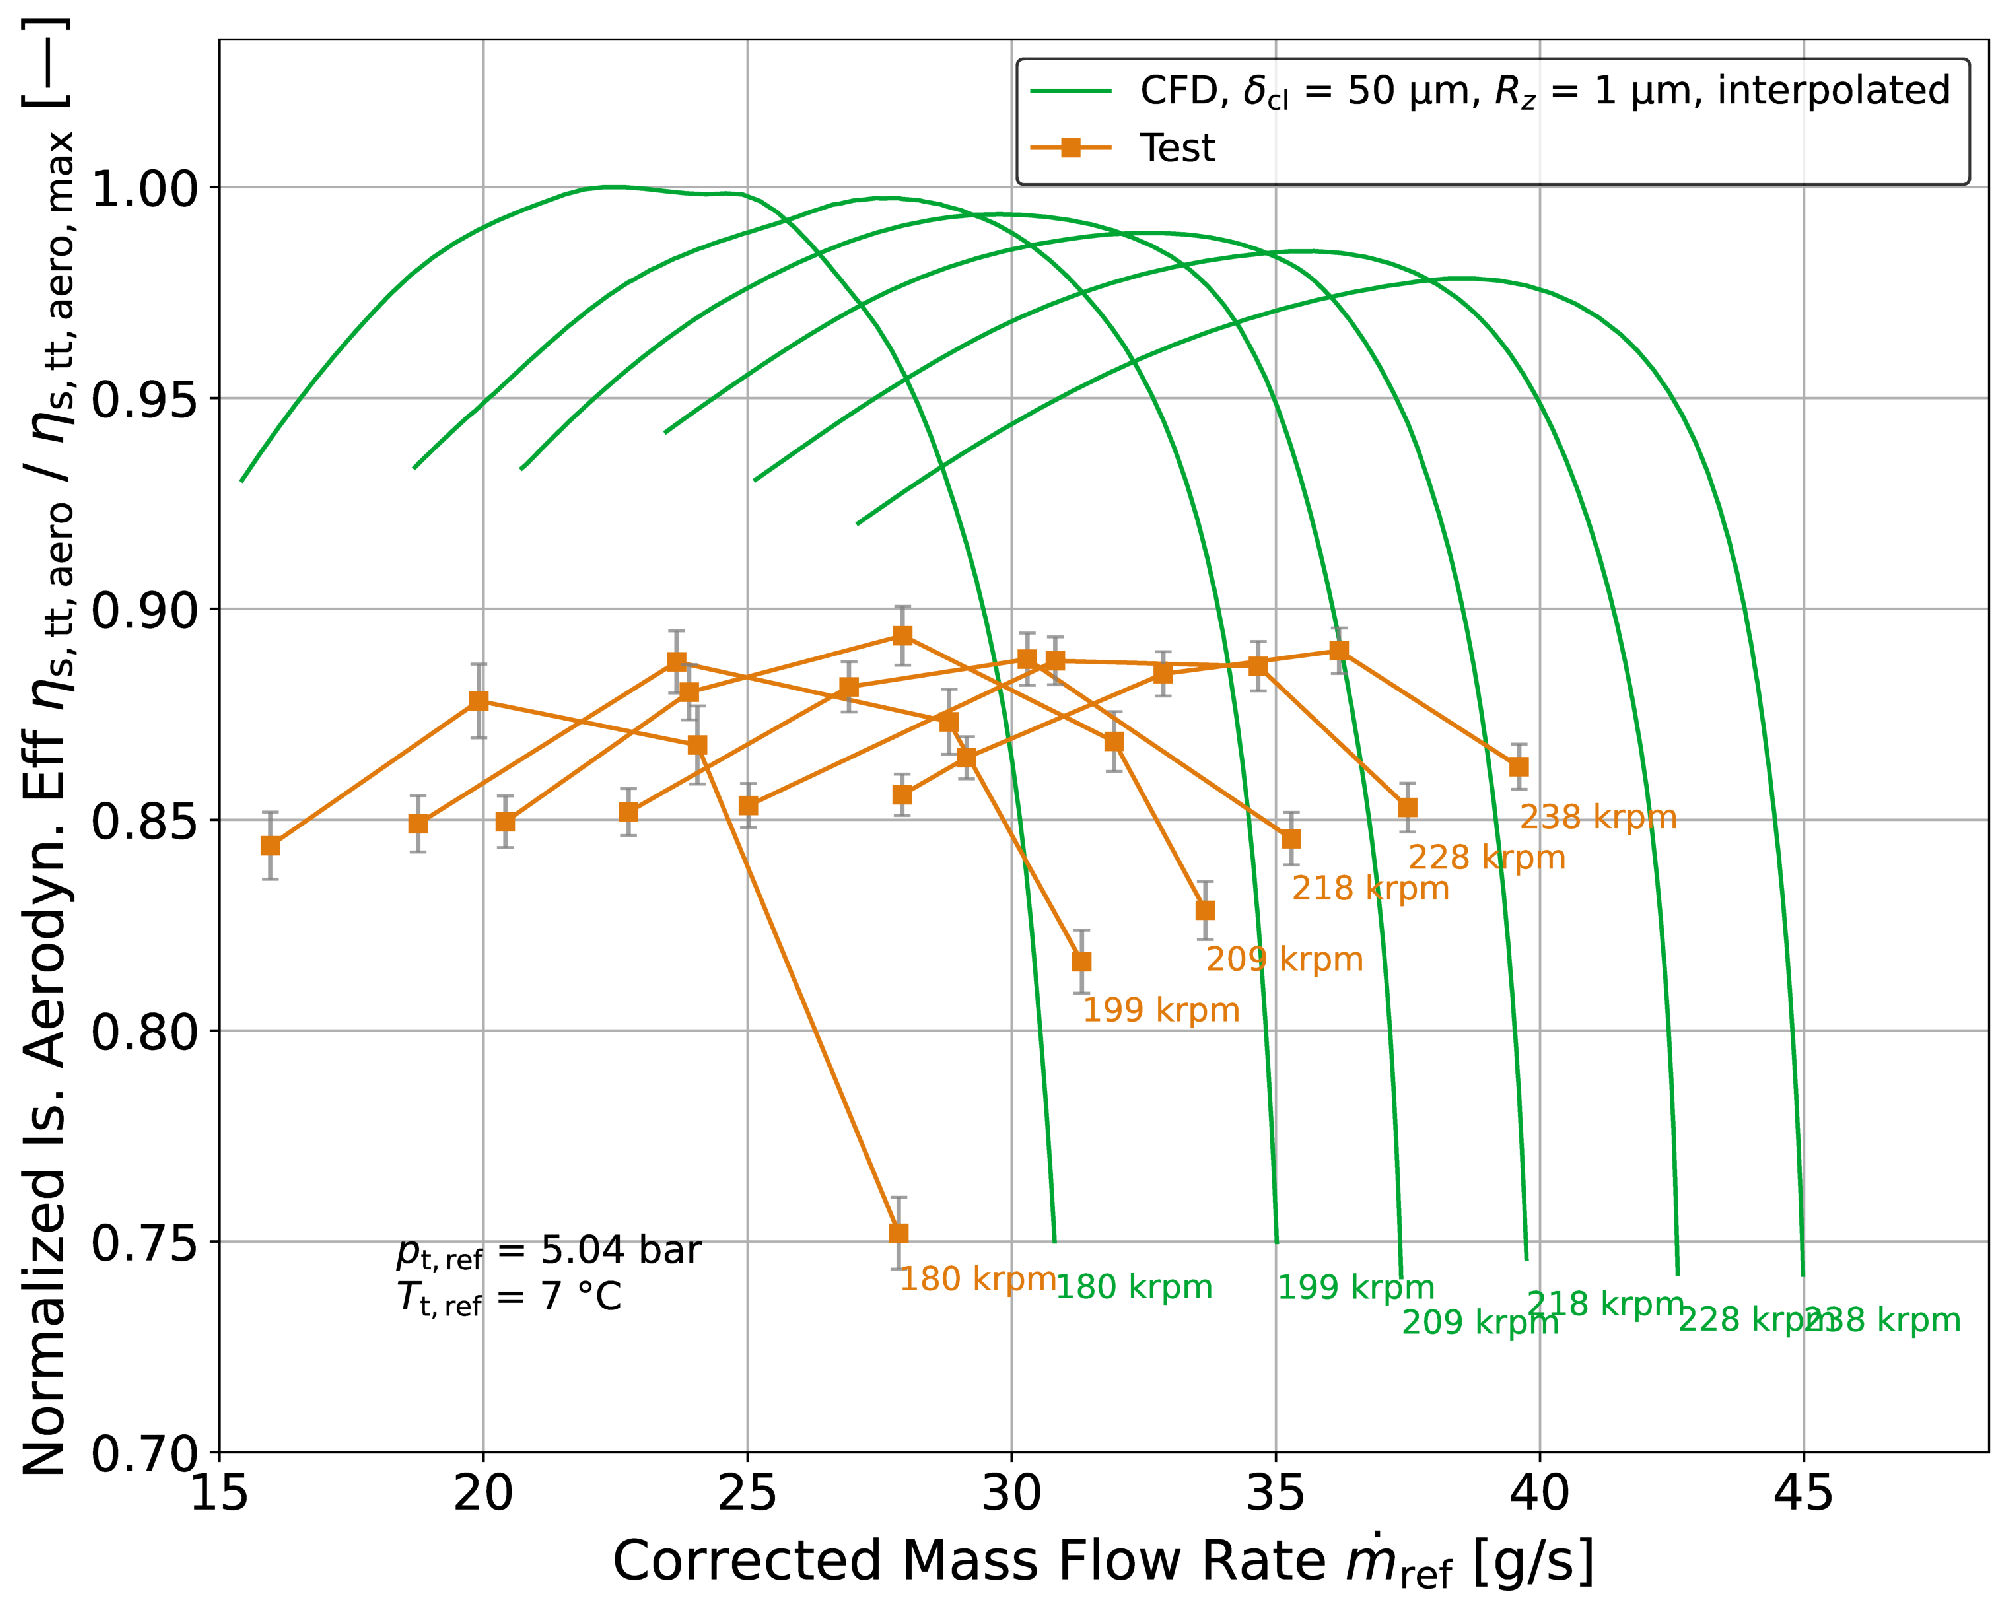
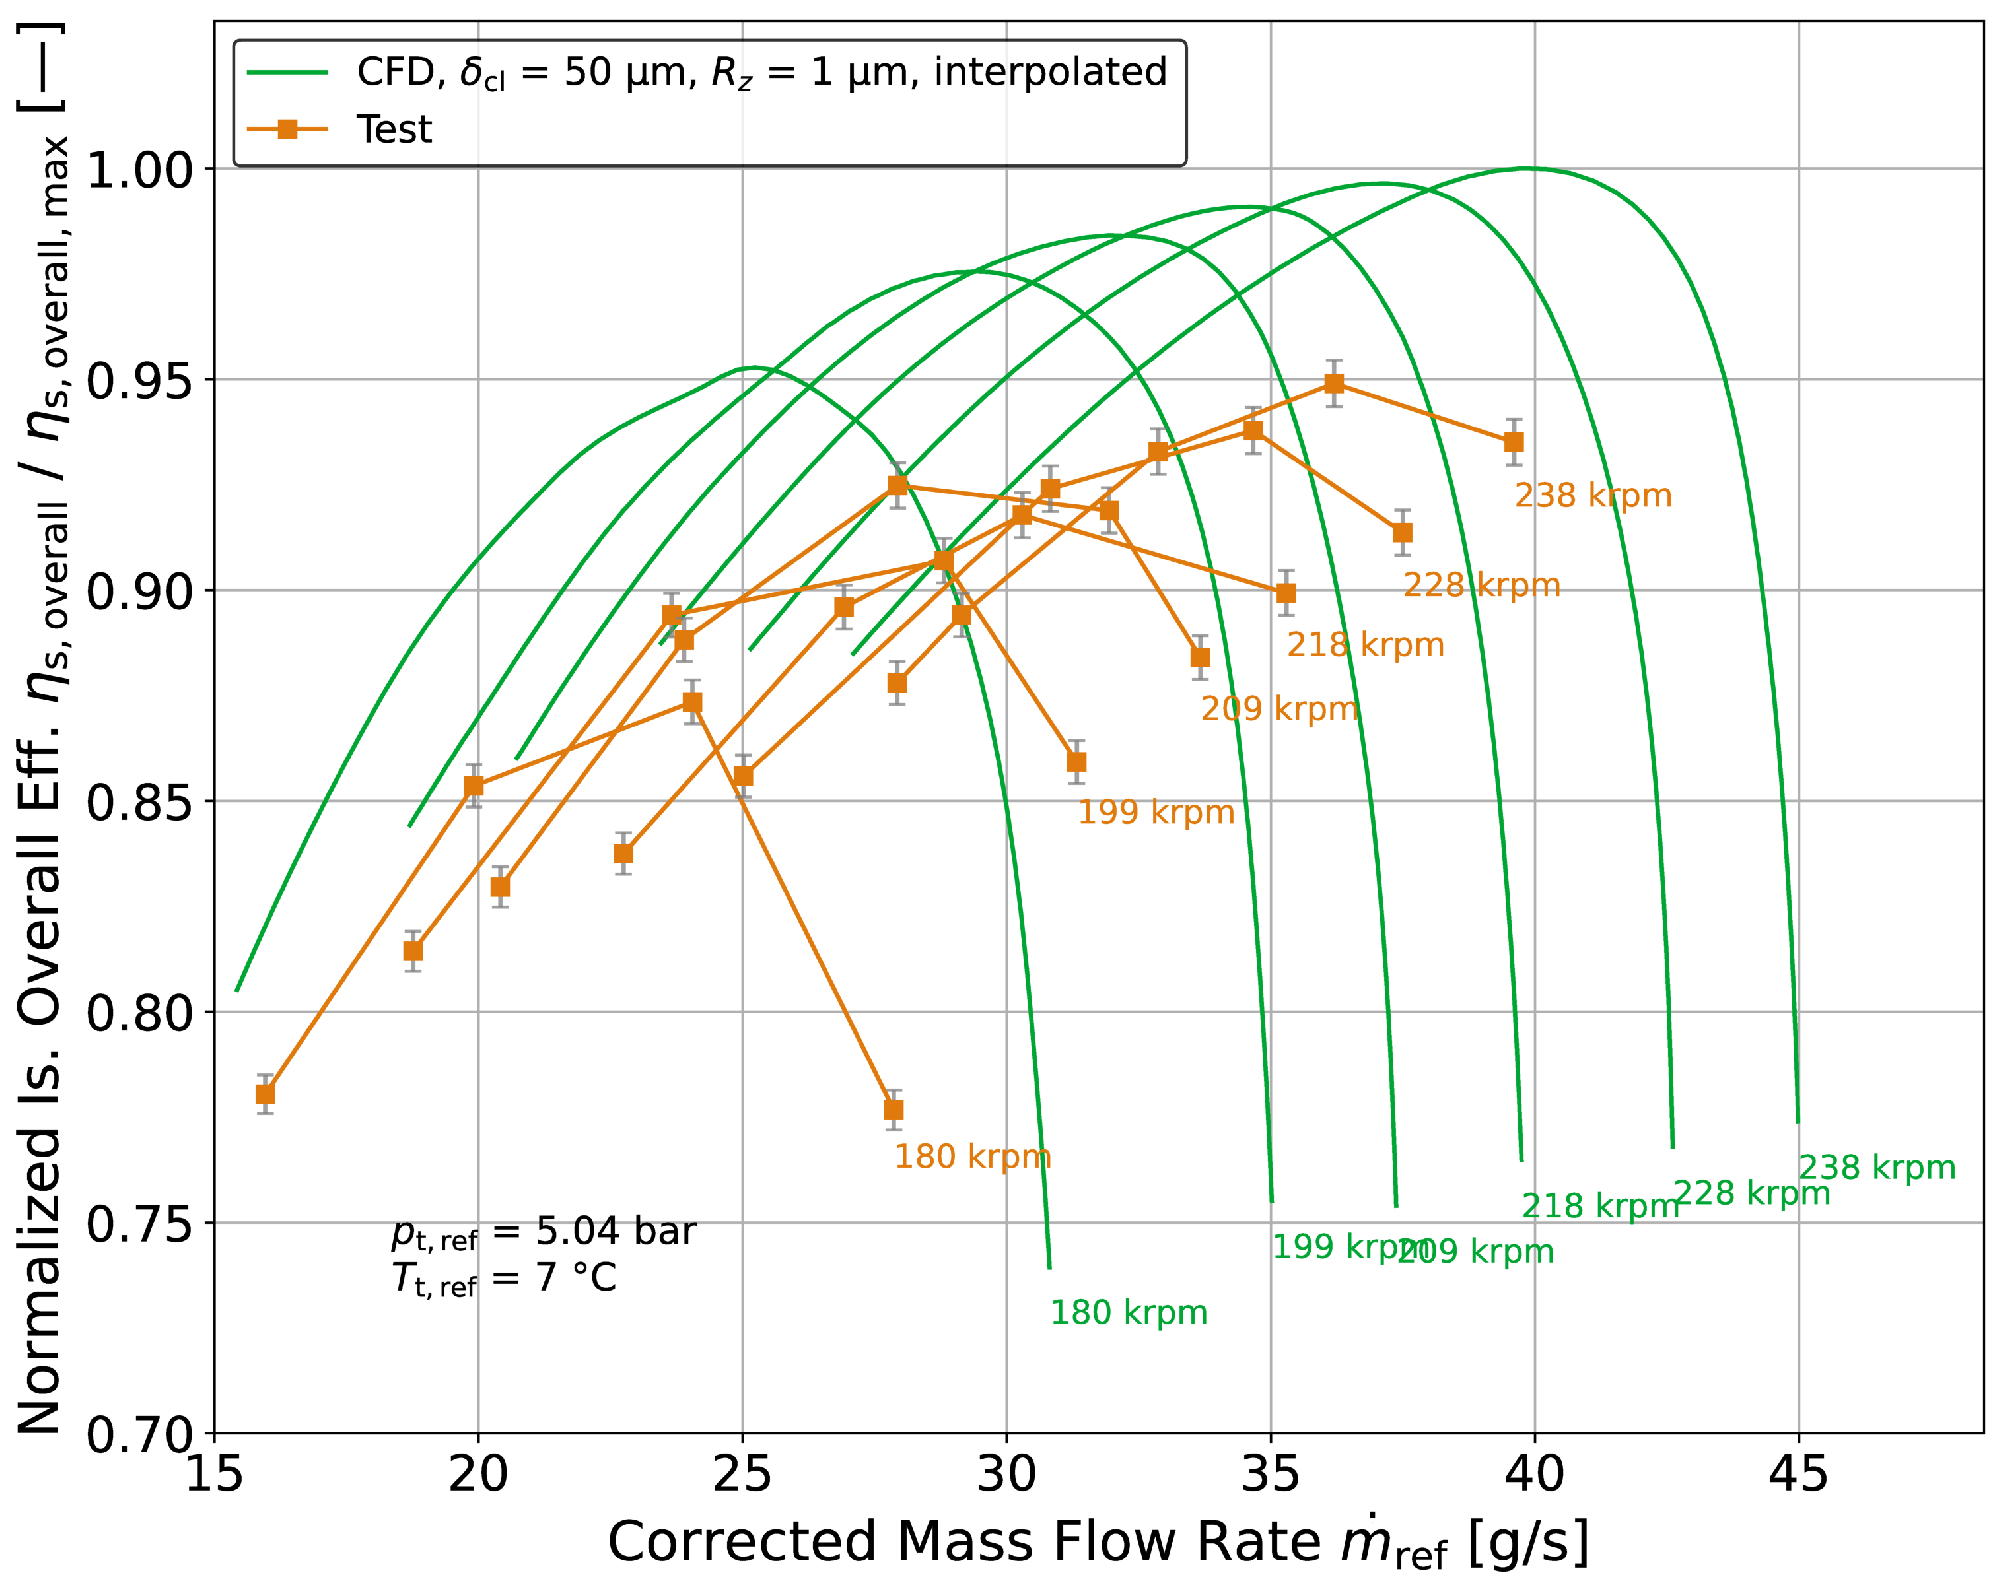
In this section, the methodology of the applied stage design procedure involving a parameterized 3D CFD optimization campaign is explained first. Subsequently, applied measures to ensure axial thrust balancing of the optimized impeller wheel and to counter seal leakage are presented. Finally, the aerodynamic stage performance is quantified with respect to sensitivities of surface roughness and impeller blade tip clearance.
3.1. Aerodynamic Stage Design Optimization
For the detailed stage design of the compressor, a multi-objective optimizer based on a genetic evolutionary algorithm is applied to a 3D CFD-based process chain. In addition to a combination of genetic operators (mutation, crossover, gradient, differential evolution), metamodels based on kriging are used for the generation of new members in this work. Two objective functions are defined seeking to maximize the total-to-total stage isentropic efficiency at design condition and the normalized slope of the total pressure ratio characteristic curve at design rotational speed according to Equation (3), respectively.
For evaluation of the latter, an off-design point (ODP) at
is specified, so that two operating points in total are simulated for each design individual. In order to satisfy the desired pressure ratio at the rated mass flow rate within a tolerable range, optimization is achieved for constraint to total pressure ratios of
The basis of the optimization is a parameterized single-stage centrifugal compressor configuration that is set up in the commercial turbomachinery design software CFturbo 2023 R1.1 [
14]. It comprises an inflow pipe, an impeller with splitter blades, a vaneless diffuser, an overhung volute, a cone diffuser, and an outflow pipe. In total, 31 optimization parameters are defined. Of these, nine are related to main dimensions, involving diameters, widths, blade angles, and the blade count. The remaining optimization parameters are related to controls of the meridional contours of hub and shroud, the leading edge positions of the main and splitter blade, as well as the blade shape. To ensure manufacturability by flank milling, the latter is controlled by two profiles, one at hub span and one at shroud span. The camber line of each profile is controlled by five Bézier points, defining the blade angle distribution and the wrap angle. Lean and rake angle are both constraint to zero degrees and a constant blade thickness is defined.
The splitter blades match the shapes of the main blades. The fixed parameters of the design are the shaft diameter and the blade tip clearance. For the latter, a constant value of 50 μm is used in the optimization campaign. This value is 10 μm larger than the actually applied value for the finalized nominal design. This is done to drive the optimizer to find designs with a broader exit width that would be necessary in the course of steering towards an efficient relative tip clearance. The broader exit width with the then reduced tip clearance to 40 μm is aimed at enabling a more robust design with regard to manufacturing tolerances. The optimization is evaluated with respect to a reference design that was designed on basis of manual parametric CFD design iterations. Its values serve as initial values within the optimization. Surface roughness is not considered in the investigated optimization scenario due to uncertainties in the achievable roughness values of manufactured components at the time the optimization was conducted. However, it is considered a posteriori in the finalized nominal design, based on indications on achievable surface roughness of sample manufactured parts.
The computational grid of the impeller flow path is generated with the commercial multi-block structured mesh generator ANSYS Turbogrid 2023 R1 [
15]. The radially lower part of the vaneless diffuser up to its radial mid-plane is incorporated into that domain. All other domains are meshed with ANSYS Fluent Meshing 2023 R1 [
16], applying an unstructured topology of tetrahedrons and prism layers. This includes the representations of the inlet pipe, the volute combined with the radially upper diffuser passage, the leakage flow path, the exit cone, and the outlet pipe. Due to the rotational periodicity, the domains of the inlet pipe and the impeller, including the radially lower part of the vaneless diffuser, are meshed as a single passage. The non-dimensional wall distance of the first grid layer is targeted to be
within all simulations of the optimization. The total mesh size counts ≈0.4 million cells for the setups used in the automated optimization process chain to ensure faster calculation times and focus on capturing the optimization trends. For speed line calculations of selected individuals, the mesh size is increased to ≈2.4 million cells.
All simulations are performed with ANSYS CFX 2023 R1 [
17]. Advective flux discretization is based on a high-resolution scheme and closure of the RANS equations is achieved through the
k-
SST turbulence model. Total pressure and total temperature are specified as inlet boundary conditions along with a unidirectional flow. Furthermore, a turbulence intensity of 5% and a viscosity ratio of 10 are imposed at the inlet. In order to account for the real gas behavior of R-290, thermophysical properties are considered through real gas property tables based on NIST REFPROP 10 data [
18]. Properties are tabulated in the range of
and
, satisfying an interpolation error of less than
. Walls are defined as adiabatic and, in the case of the optimization runs, as hydraulically smooth. For performance map calculations of the final nominal geometry, the specified mean roughness depth
is considered through conversion to the equivalent sand grain roughness based on [
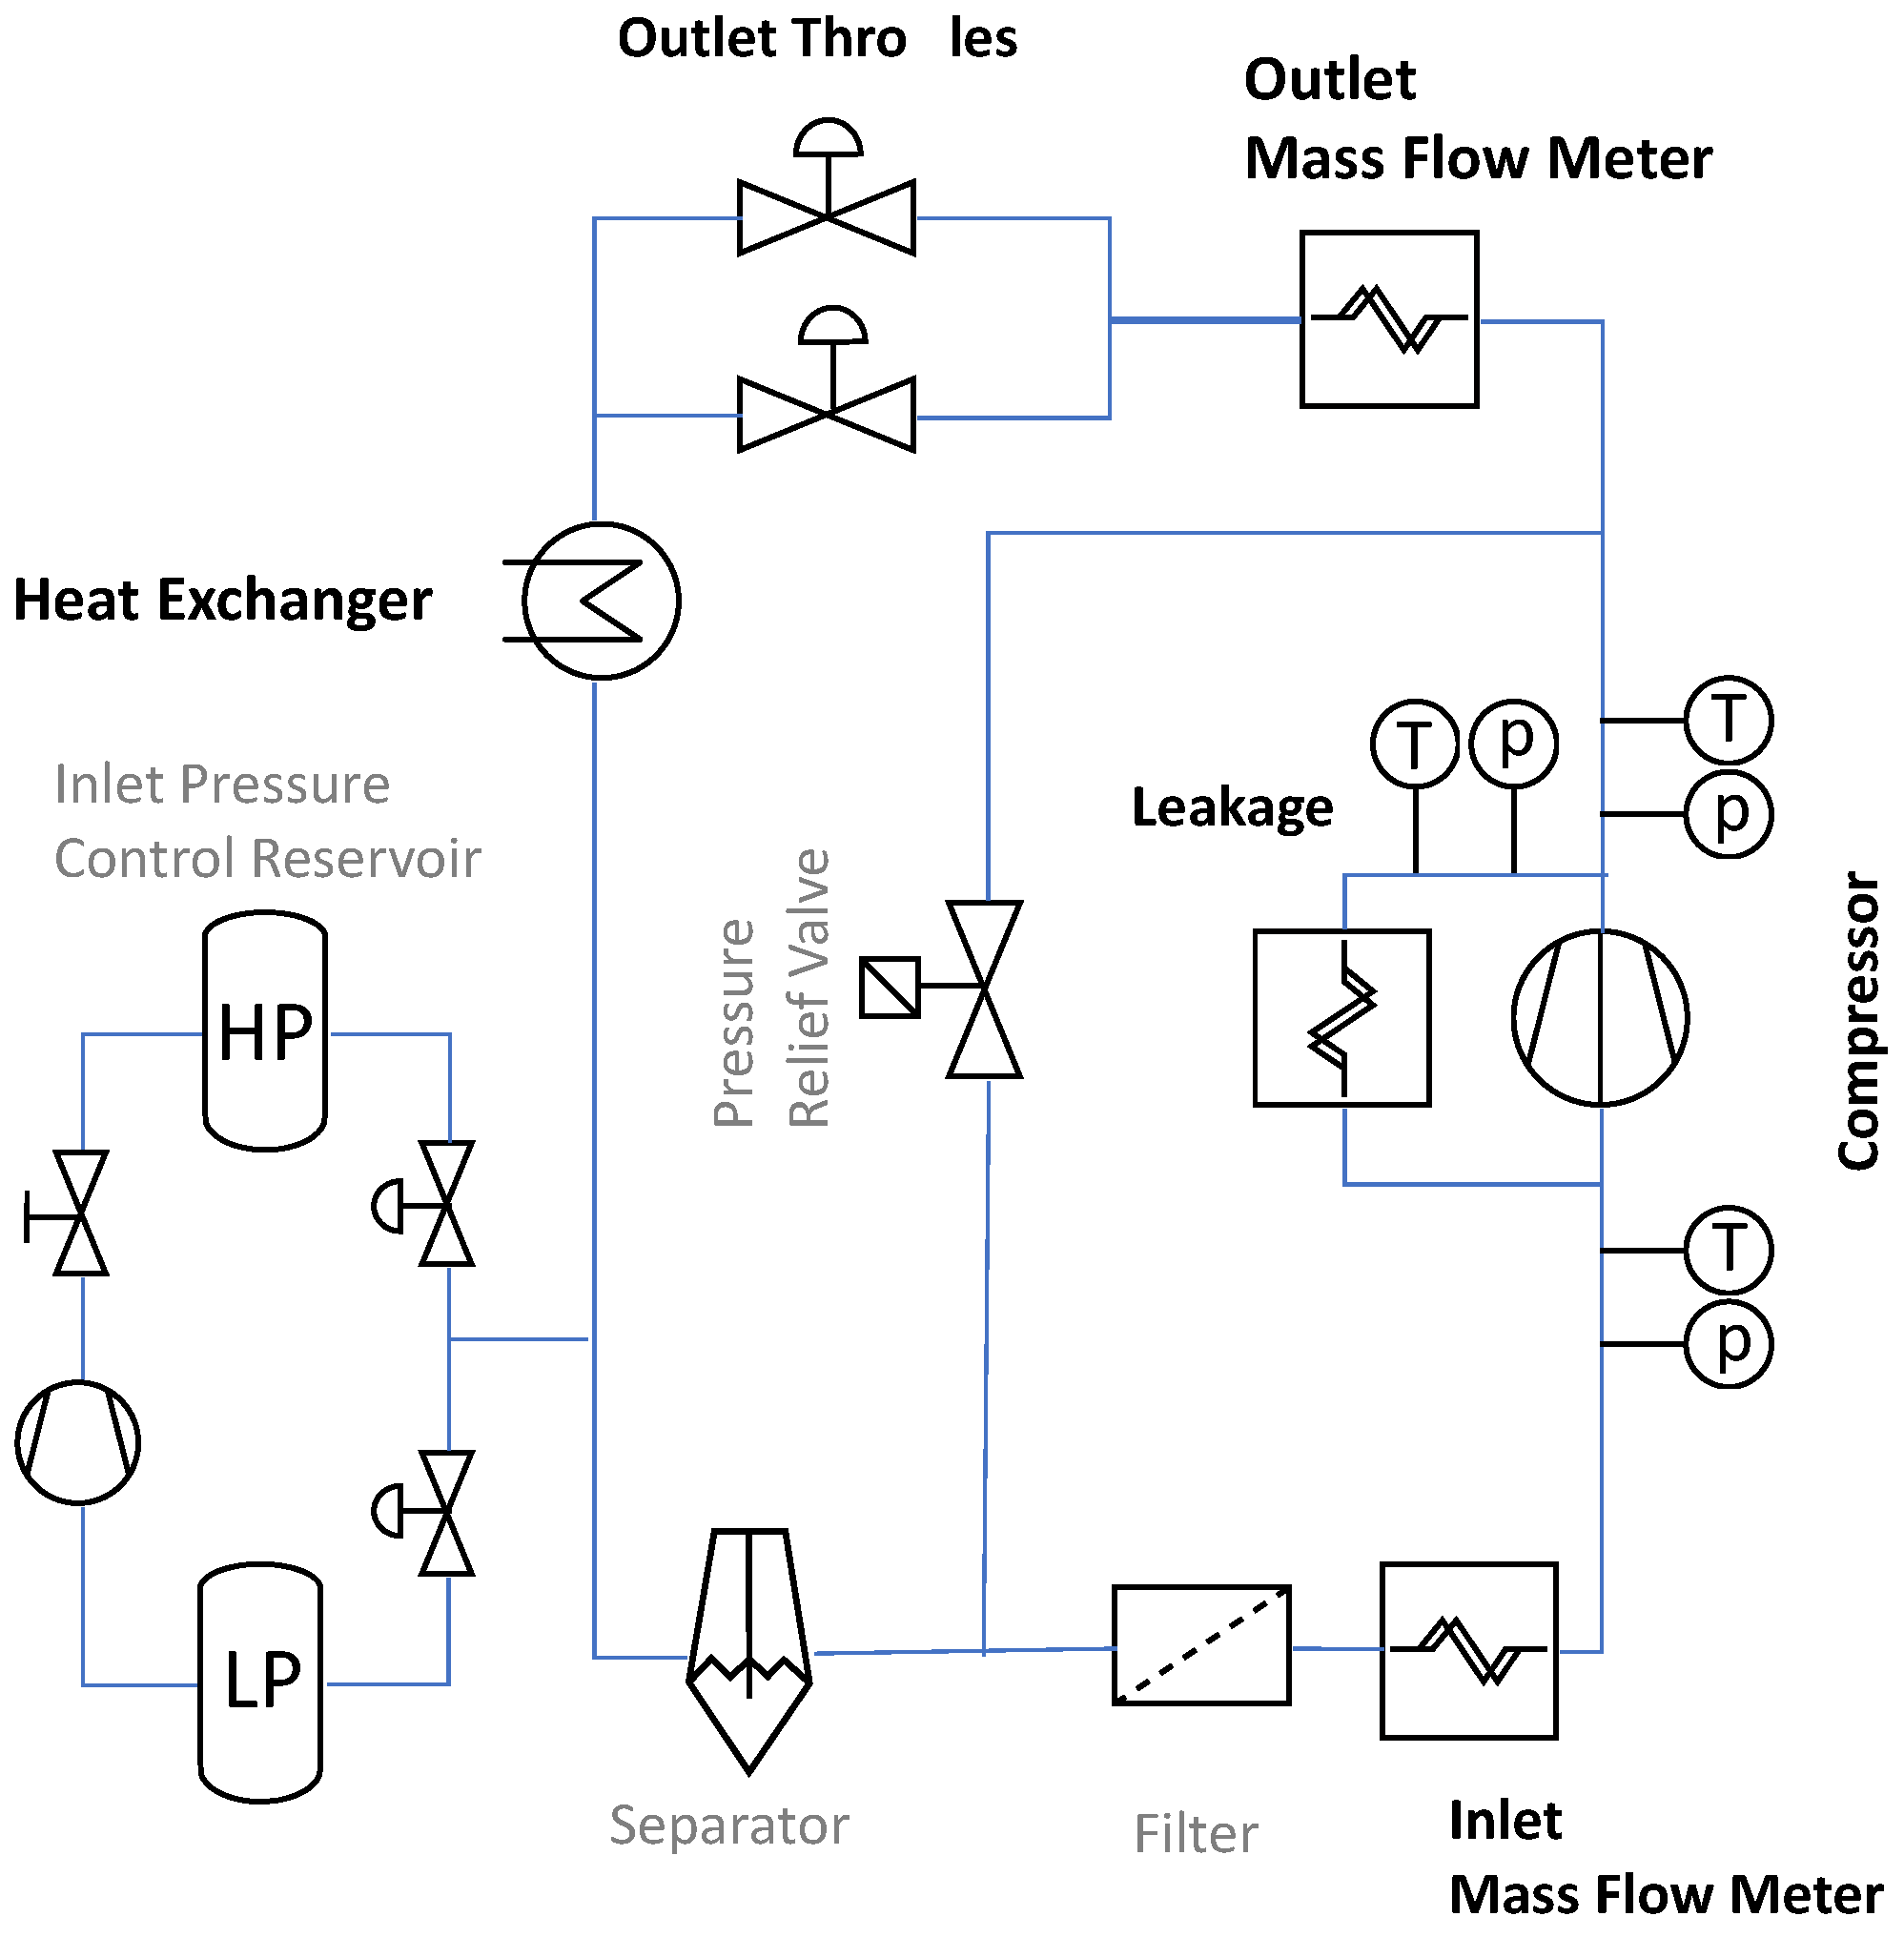
19]. At the outlet domain, a mass flow boundary condition is imposed within the optimization campaign to match the mass flow rates of the design and the off-design operating point. Depending on the position on a speed line curve, either a mass flow or a pressure outlet boundary condition is used for speed line calculations. A pressure boundary condition is imposed at the outlet of the modelled leakage flow path. The back pressure of the leakage flow path is specified with the same value as the total inlet pressure of the compressor. The purpose of this is to approximate the pressure conditions of the full leakage flow path of the test rig, which is connected to the compressor inlet.
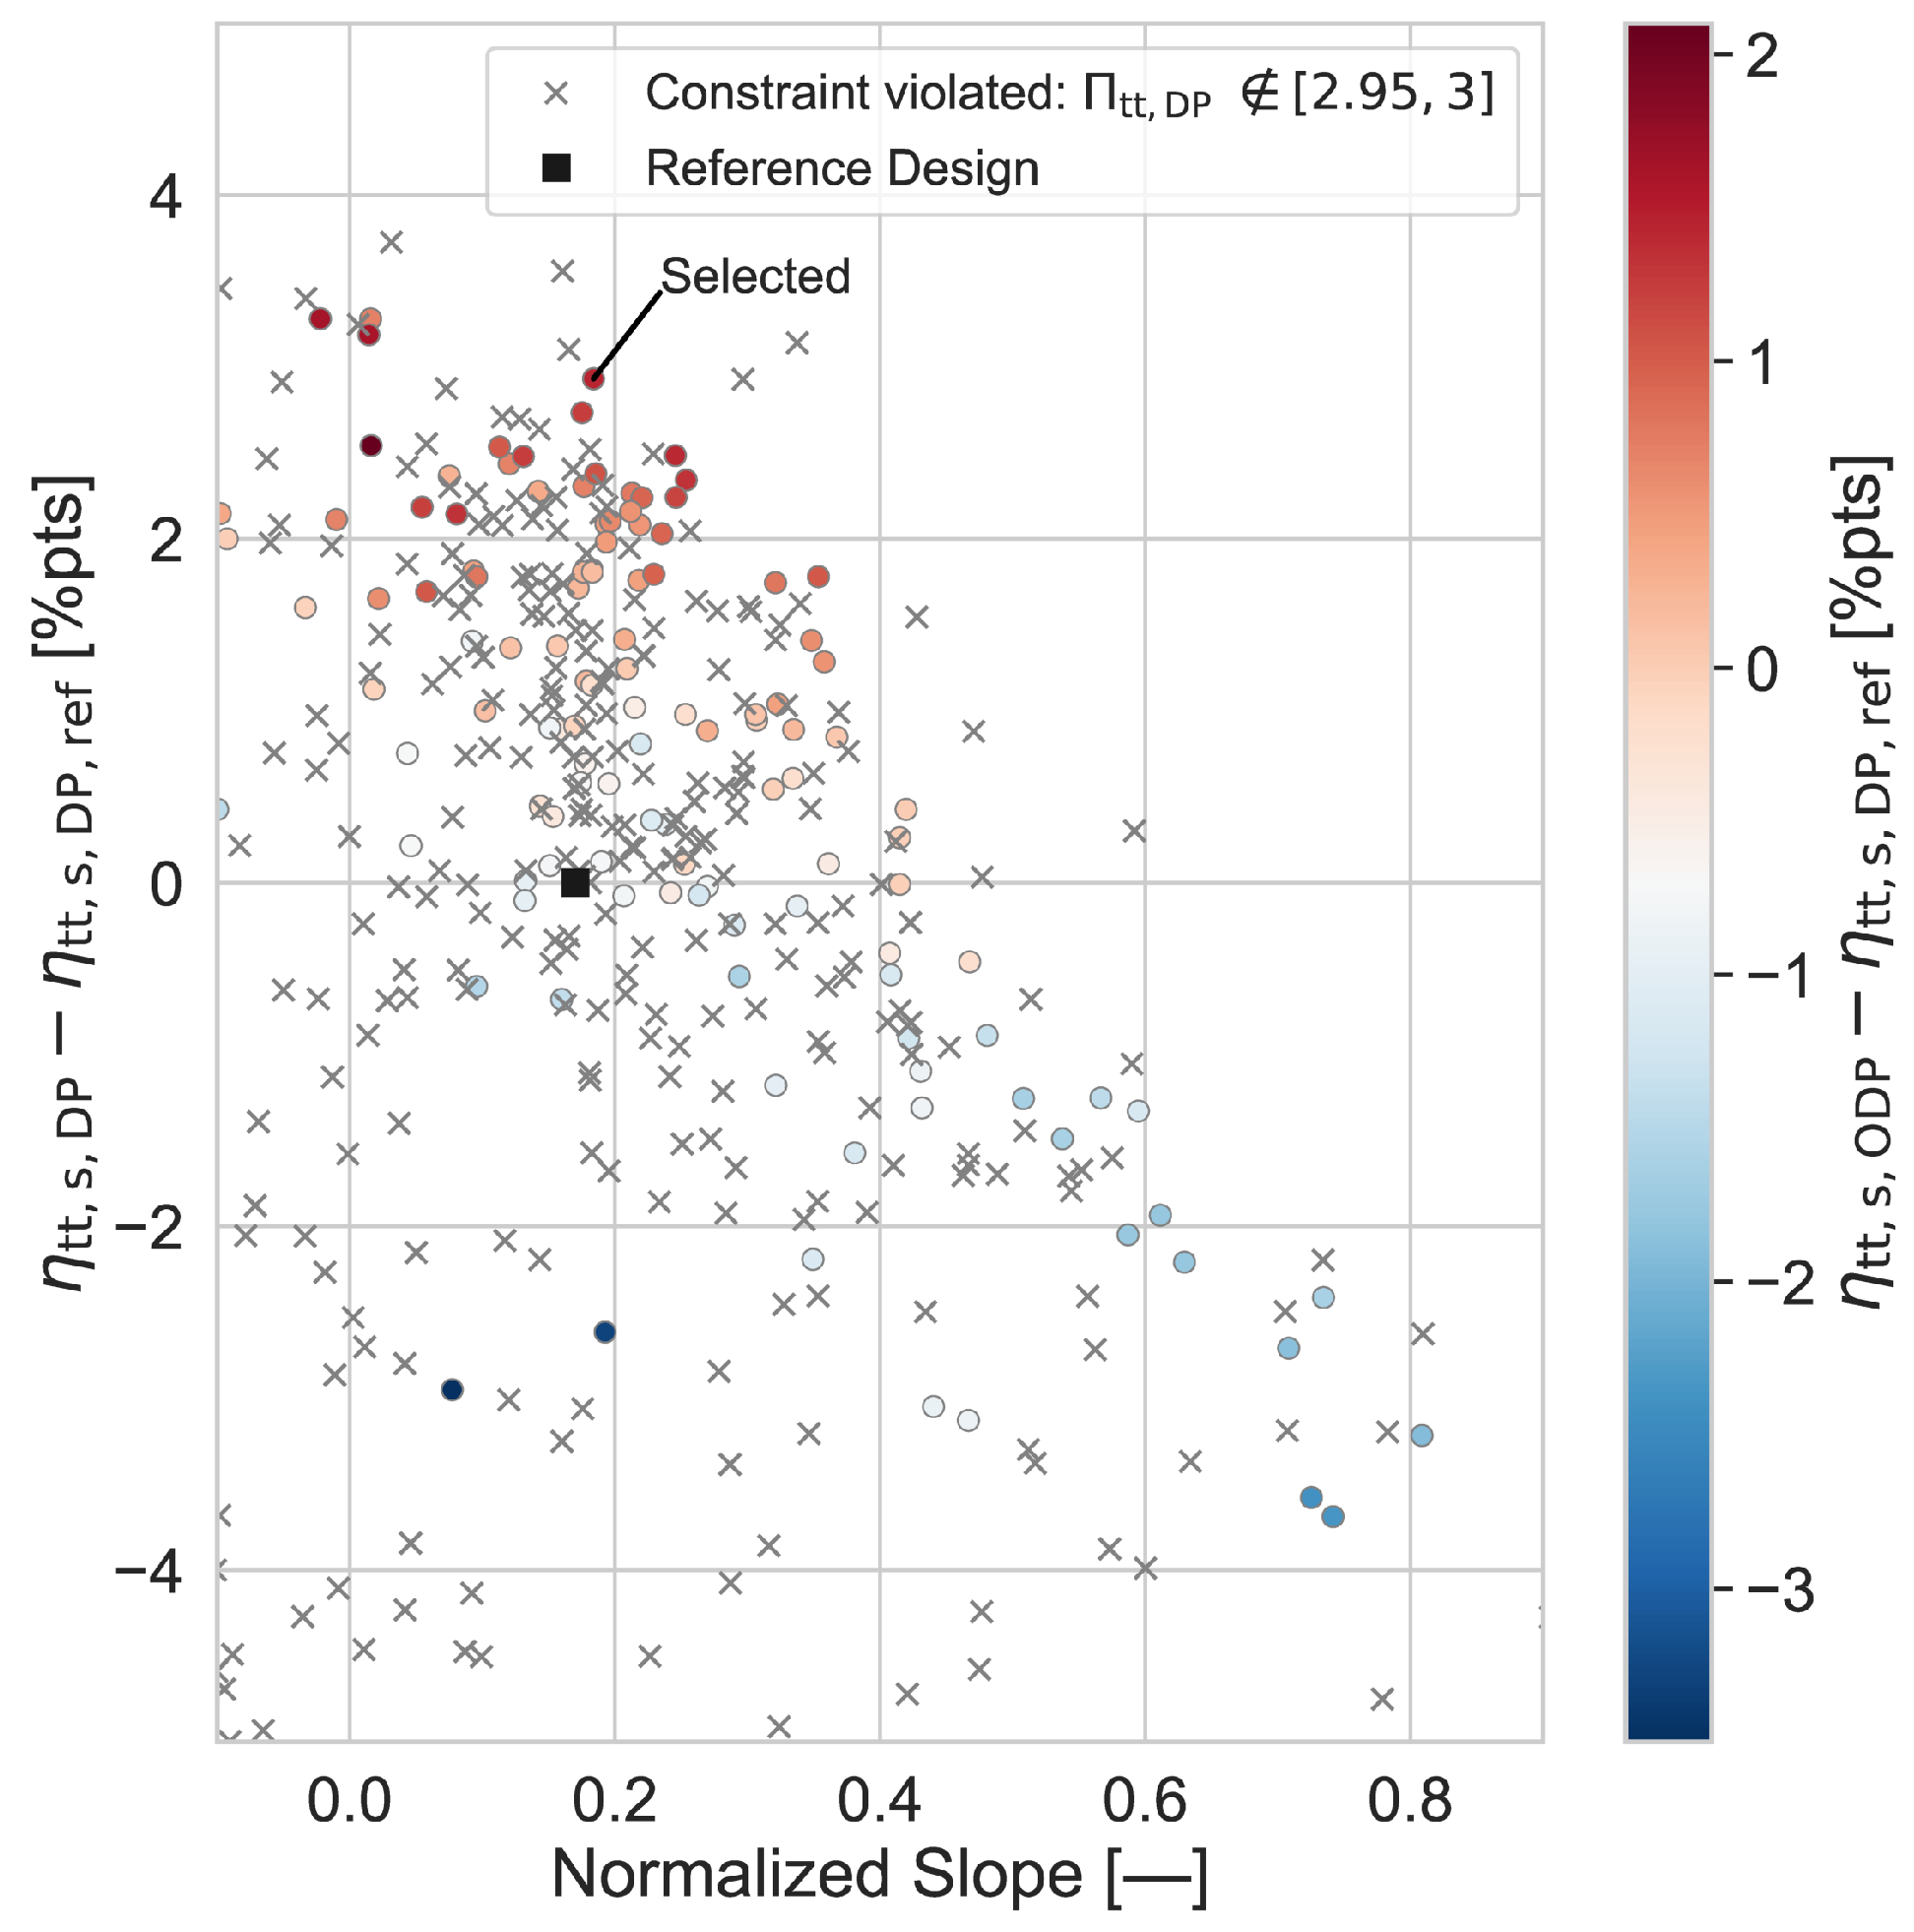
Results of the optimization with respect to the two objective functions are shown in
Figure 3. Designs that are marked with crosses do not satisfy the constraint concerning the desired pressure ratio at the design mass flow rate and are disregarded from further consideration. The remaining designs reveal a pareto front. Compared to the reference design, the individual with the best efficiency at the design point shows 3.3
efficiency surplus. However, the respective design has an undesirable normalized slope value close to zero and, thus, an expected flat characteristic curve. The other extreme shows an increase in the slope by more than a factor of four that is accompanied with efficiency decrements of more than three percentage points. It is to be noted that the design with the steepest normalized slope does not necessarily indicate the most favorable operating behavior. The reason for this is that the location of the turnover point of a speed line (change in sign of slope) remains uncertain unless a full-speed line calculation is performed. In fact, the turnover point of the design with the steepest normalized slope is reached at a higher mass flow rate than in the reference design. Based on speed line checks of selected designs of the pareto front, the highlighted design is finally selected. With a similar slope, it achieves a 2.9
higher efficiency compared to the original design.
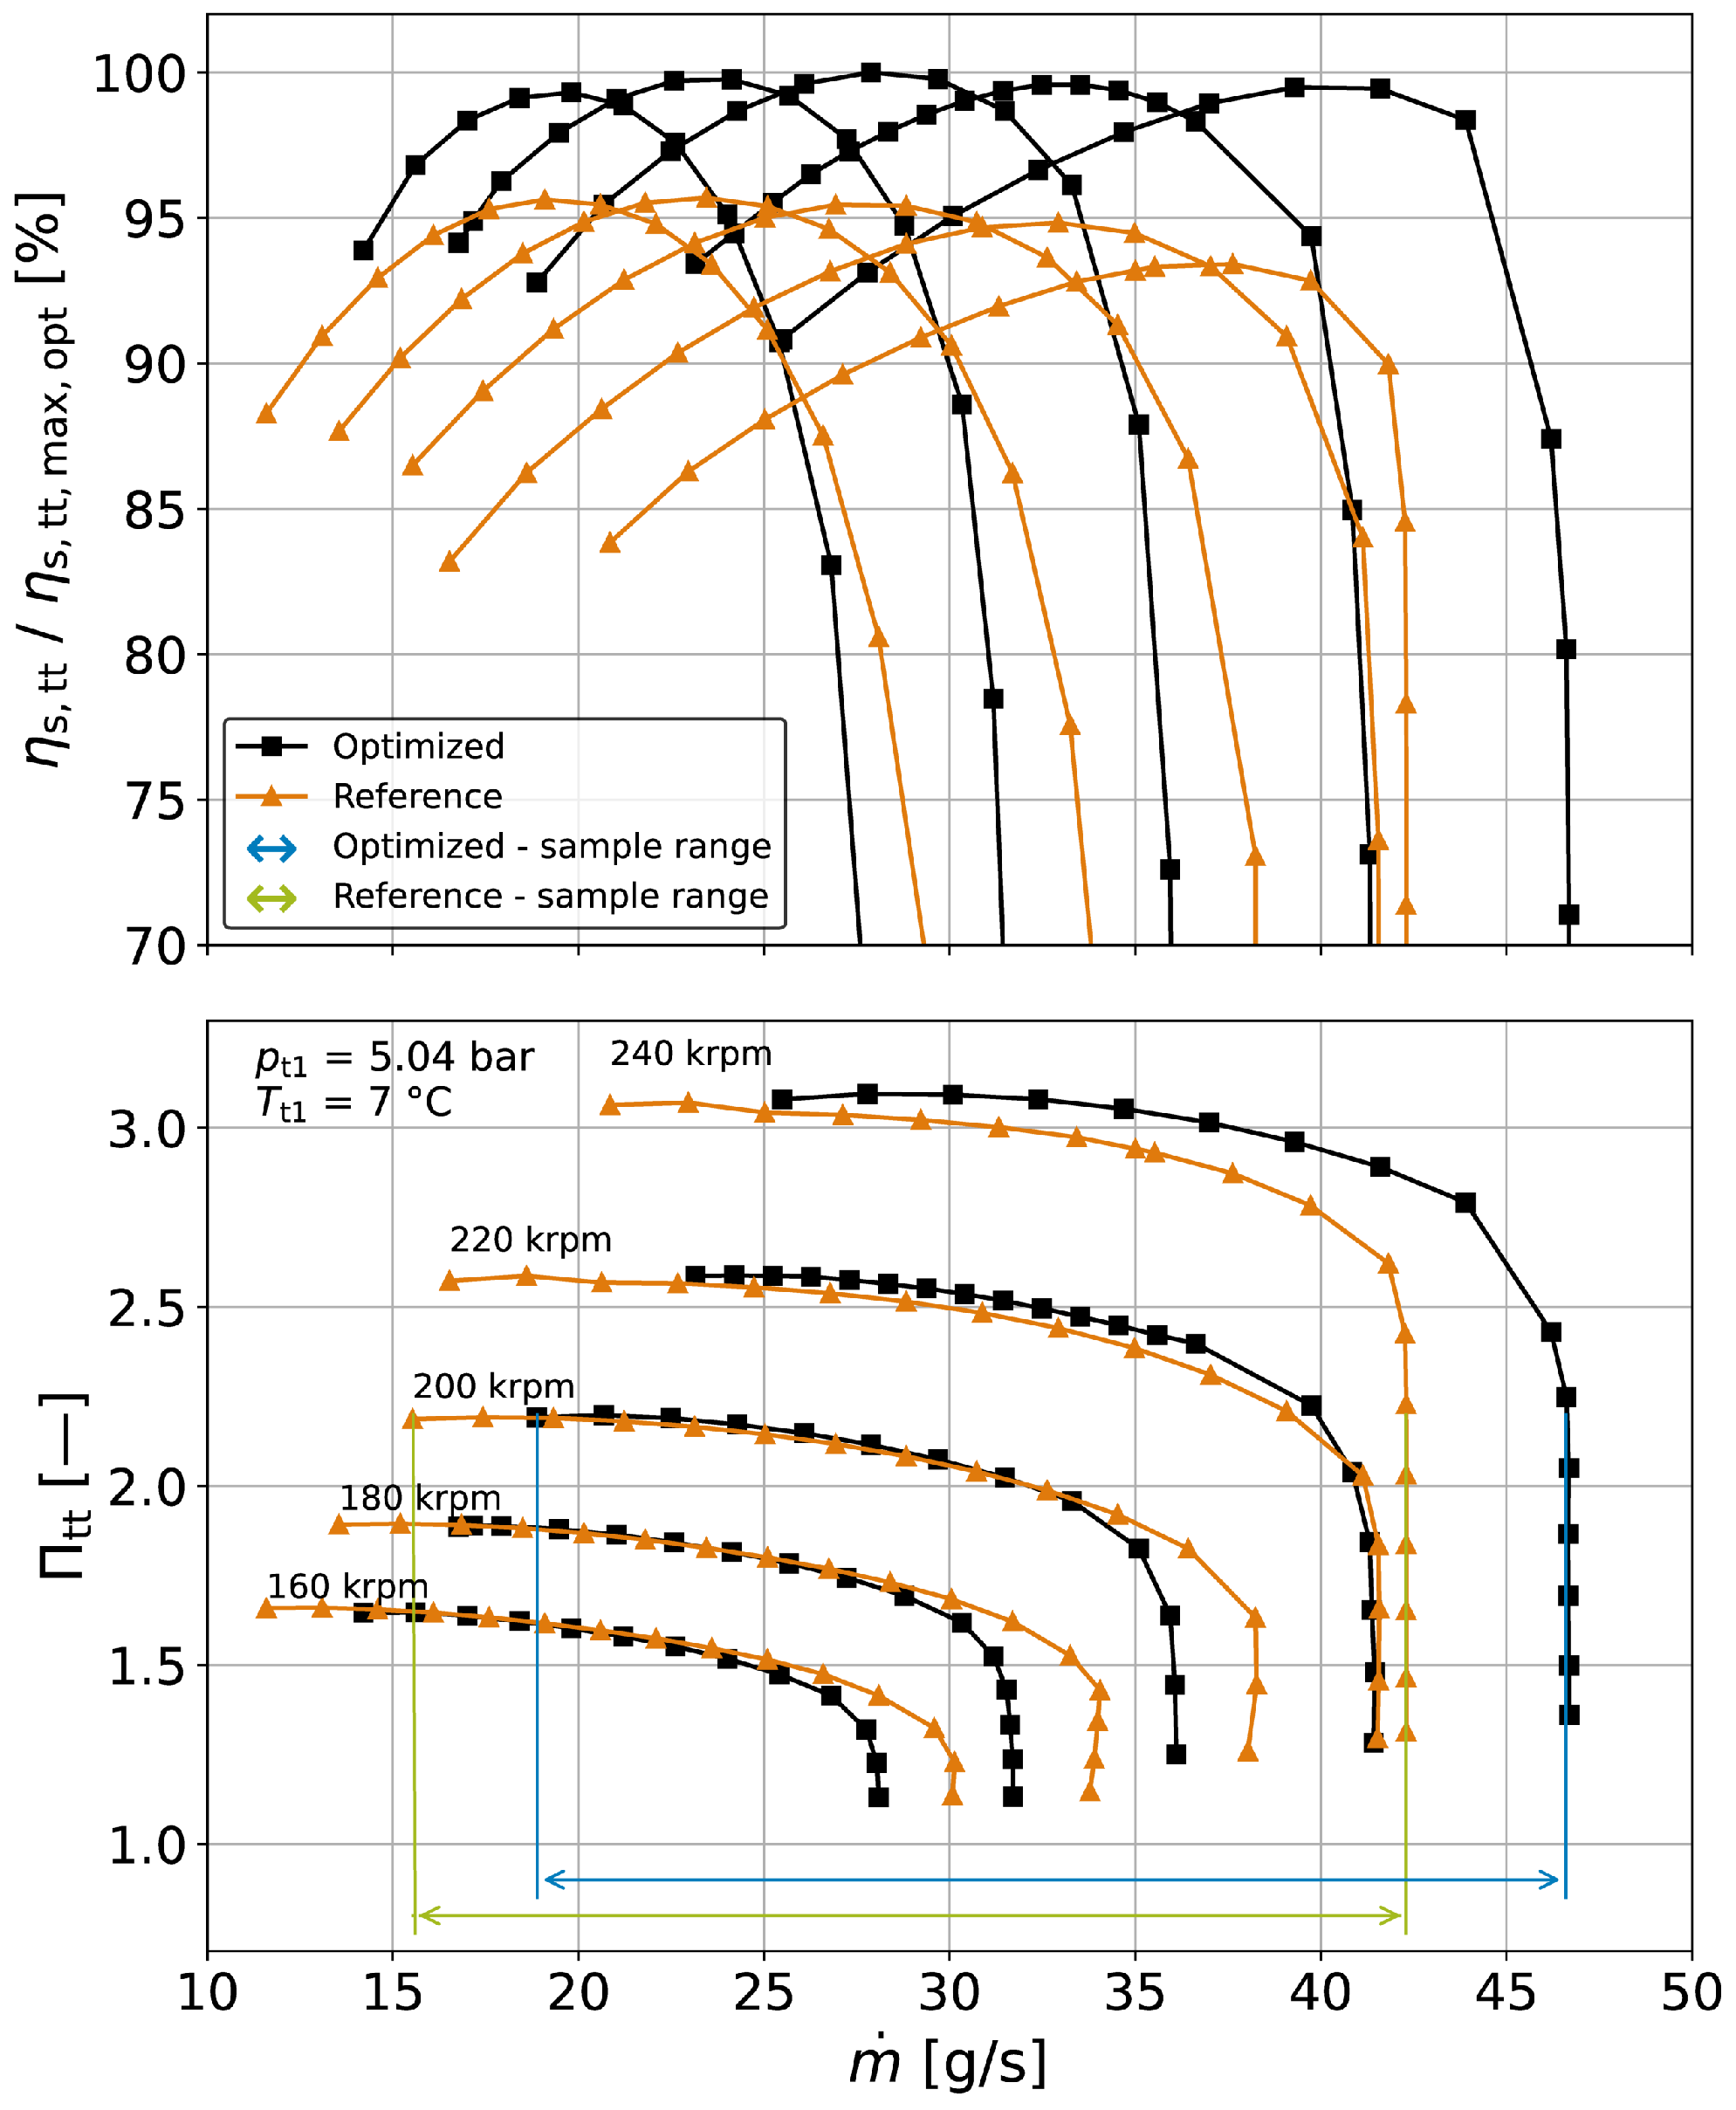
Figure 4 shows a comparison of the performance maps of both designs. The optimized design clearly leads to an efficiency gain for all speed lines. The exemplary shown turndown line for a constant pressure ratio of 2.2 indicates that the map width of the optimized stage (
) is comparable to that of the reference design (
).
The main dimensions of the selected design and of the initial reference design are given in
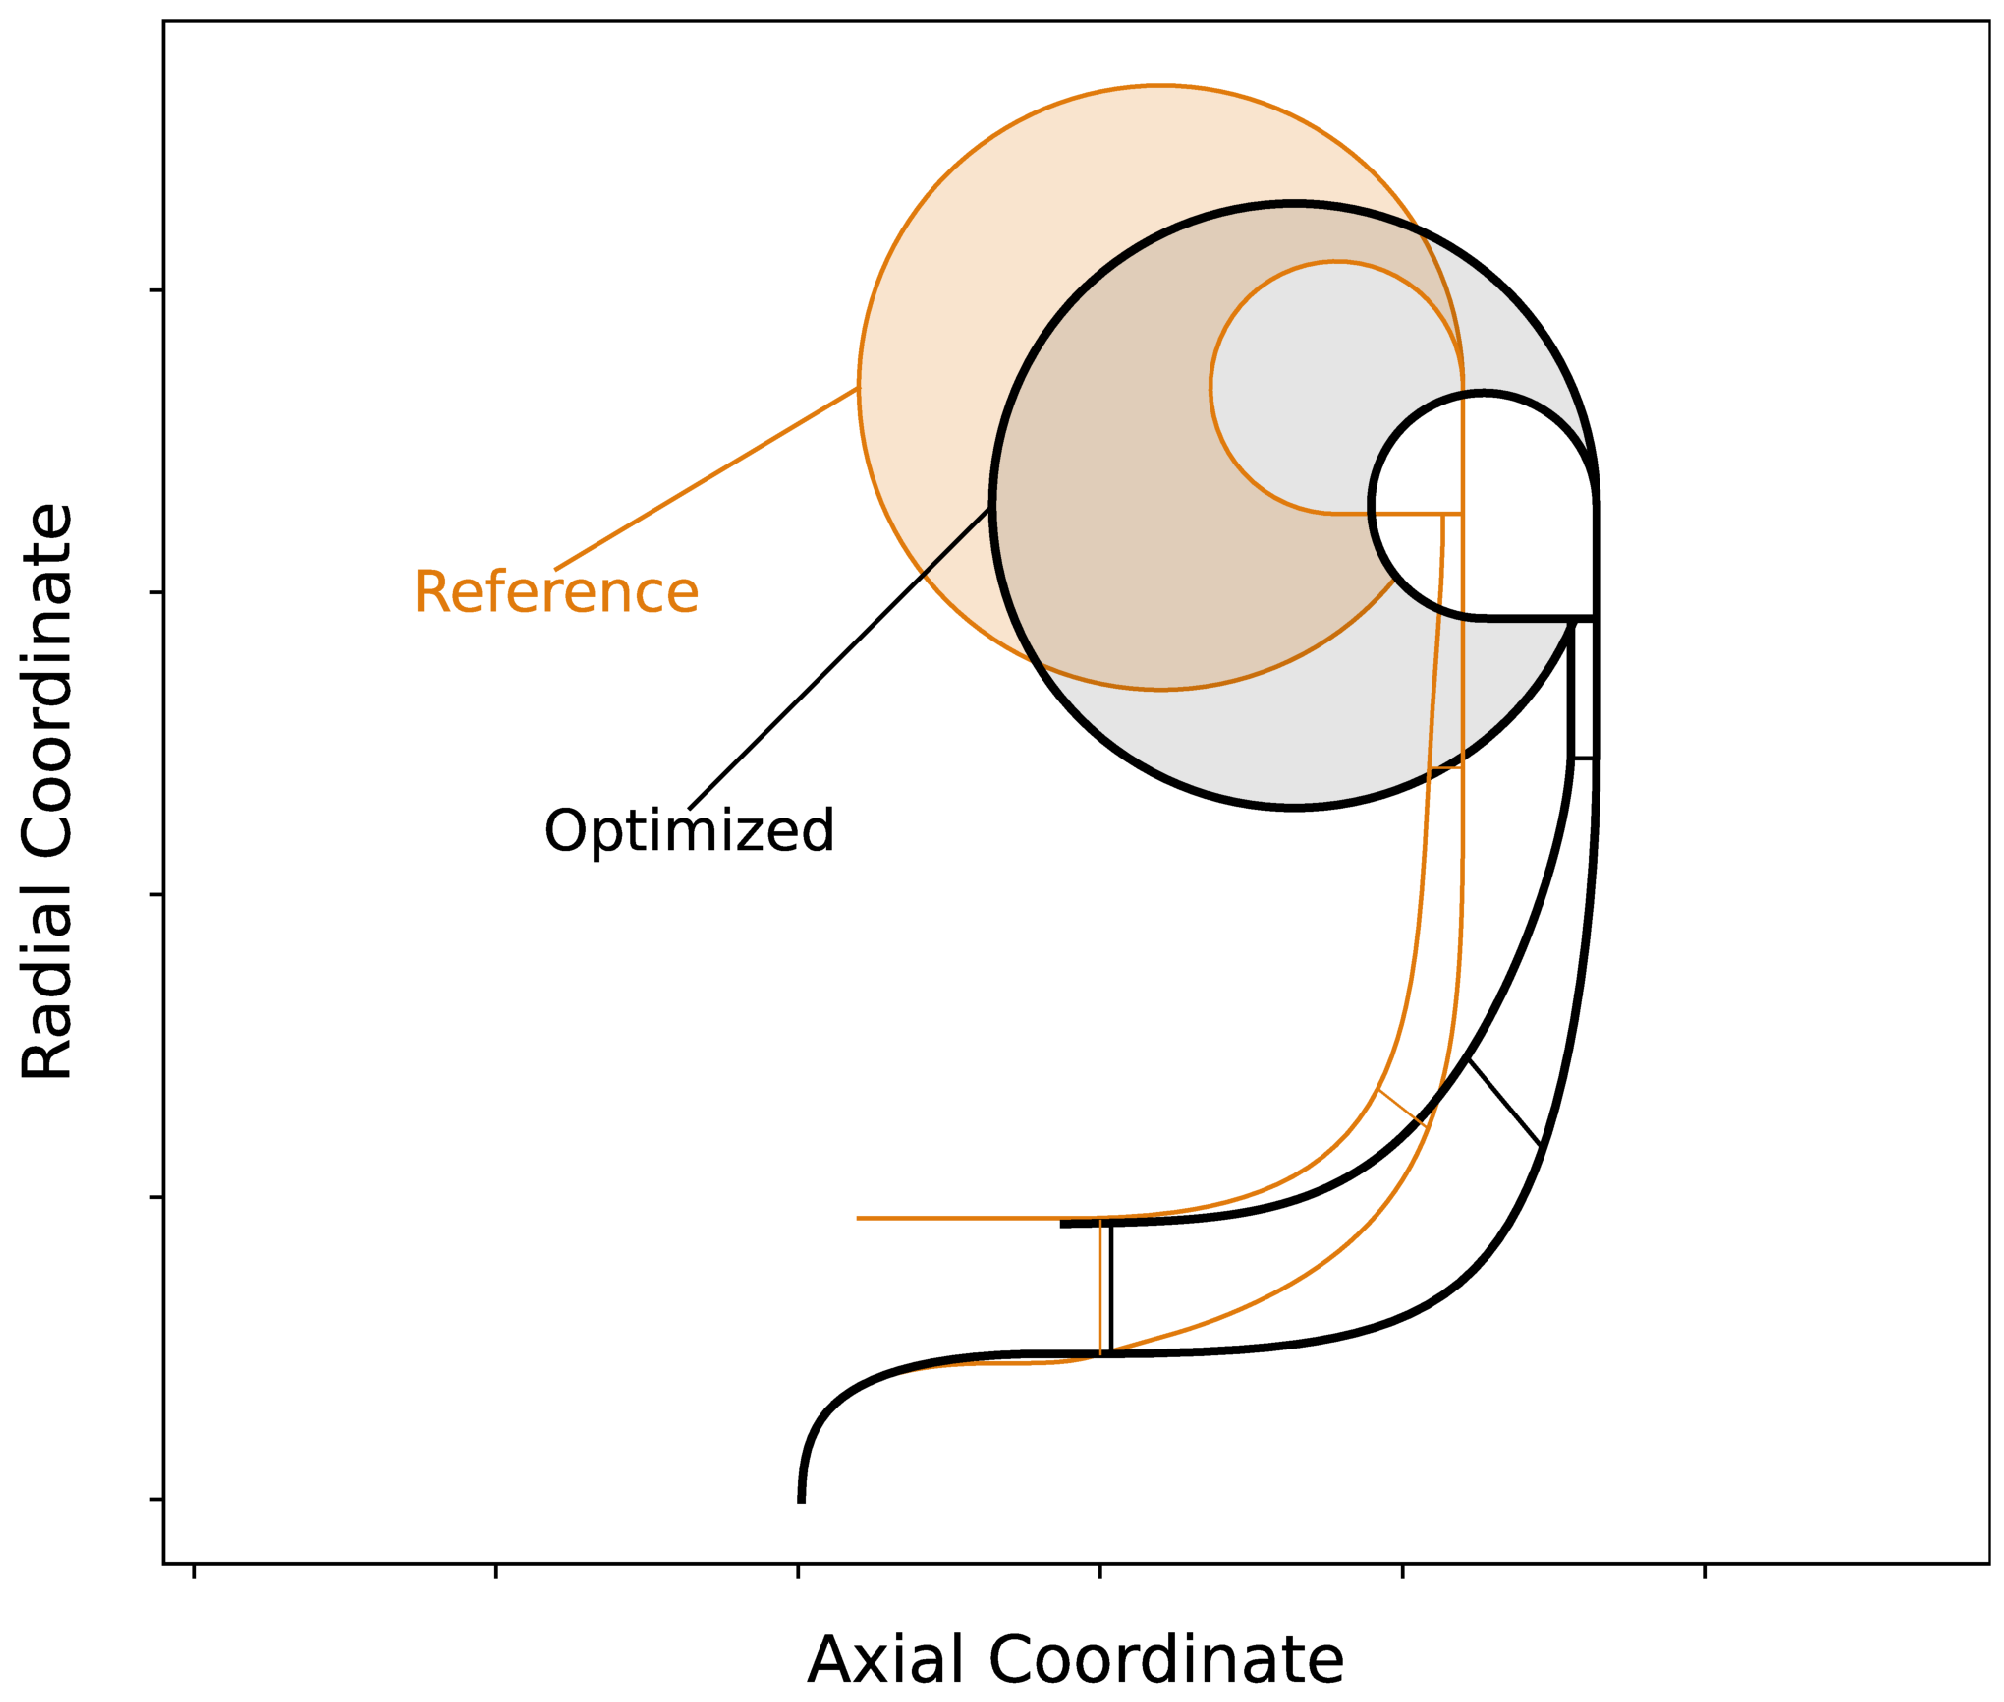
Table 2, while the meridional contours are shown in
Figure 5. One of the most striking differences is the reduction in the vaneless diffuser diameter ratio from a reference value of 1.35 to a value of 1.19 in the optimized design. This can be explained by the relatively wide exit width of both designs with respect to the impeller diameter and the flow coefficient at the design operating condition. The optimized stage design has a relative exit width of
that leads to flat absolute impeller exit flow angles around
from the tangent at the design point. These values are around the lower end of the conventional design space. Hence, a short vaneless diffuser mitigates performance losses as a consequence of a long diffuser flow path. In addition, the expectable meridional head loss in the volute will be comparatively low, as the flow is still significantly directed in tangential orientation after a very short diffusion passage. The comparatively large exit width of the impeller in both designs is crucial for reducing efficiency losses due to the large relative blade-tip clearances in the extremely narrow channels in absolute terms.
A significant degree of backsweep ( from meridional) was specified for the reference design in order to ensure a steep performance characteristic and reduced stage loading. In the optimized design, the backsweep is further enhanced by . Consequently, the impeller diameter is slightly increased. In the context of work input, the blade pairing count is increased by one, resulting in nine main and splitter blade pairings in the optimization. The accompanying reduction of impeller slip is a trade-off against potentially having surfaces with greater friction.
3.2. Axial Thrust Balancing and Seal Design
For compensation of axial forces, the compressor shaft inherits a self-acting, rigid gas thrust bearing. This allows it to operate at high-shaft-rotational speeds that reach up to 240 krpm. Since power losses due to disk friction are proportional to the third power of the thrust-bearing diameter, knowledge of the expected axial thrust is crucial for adequate sizing of the thrust bearing. One particular challenge is that the load capacity of the thrust bearing is variable and depends almost linearly on the rotational speed. Hence, expected axial thrust needs to be checked over a broad operating range.
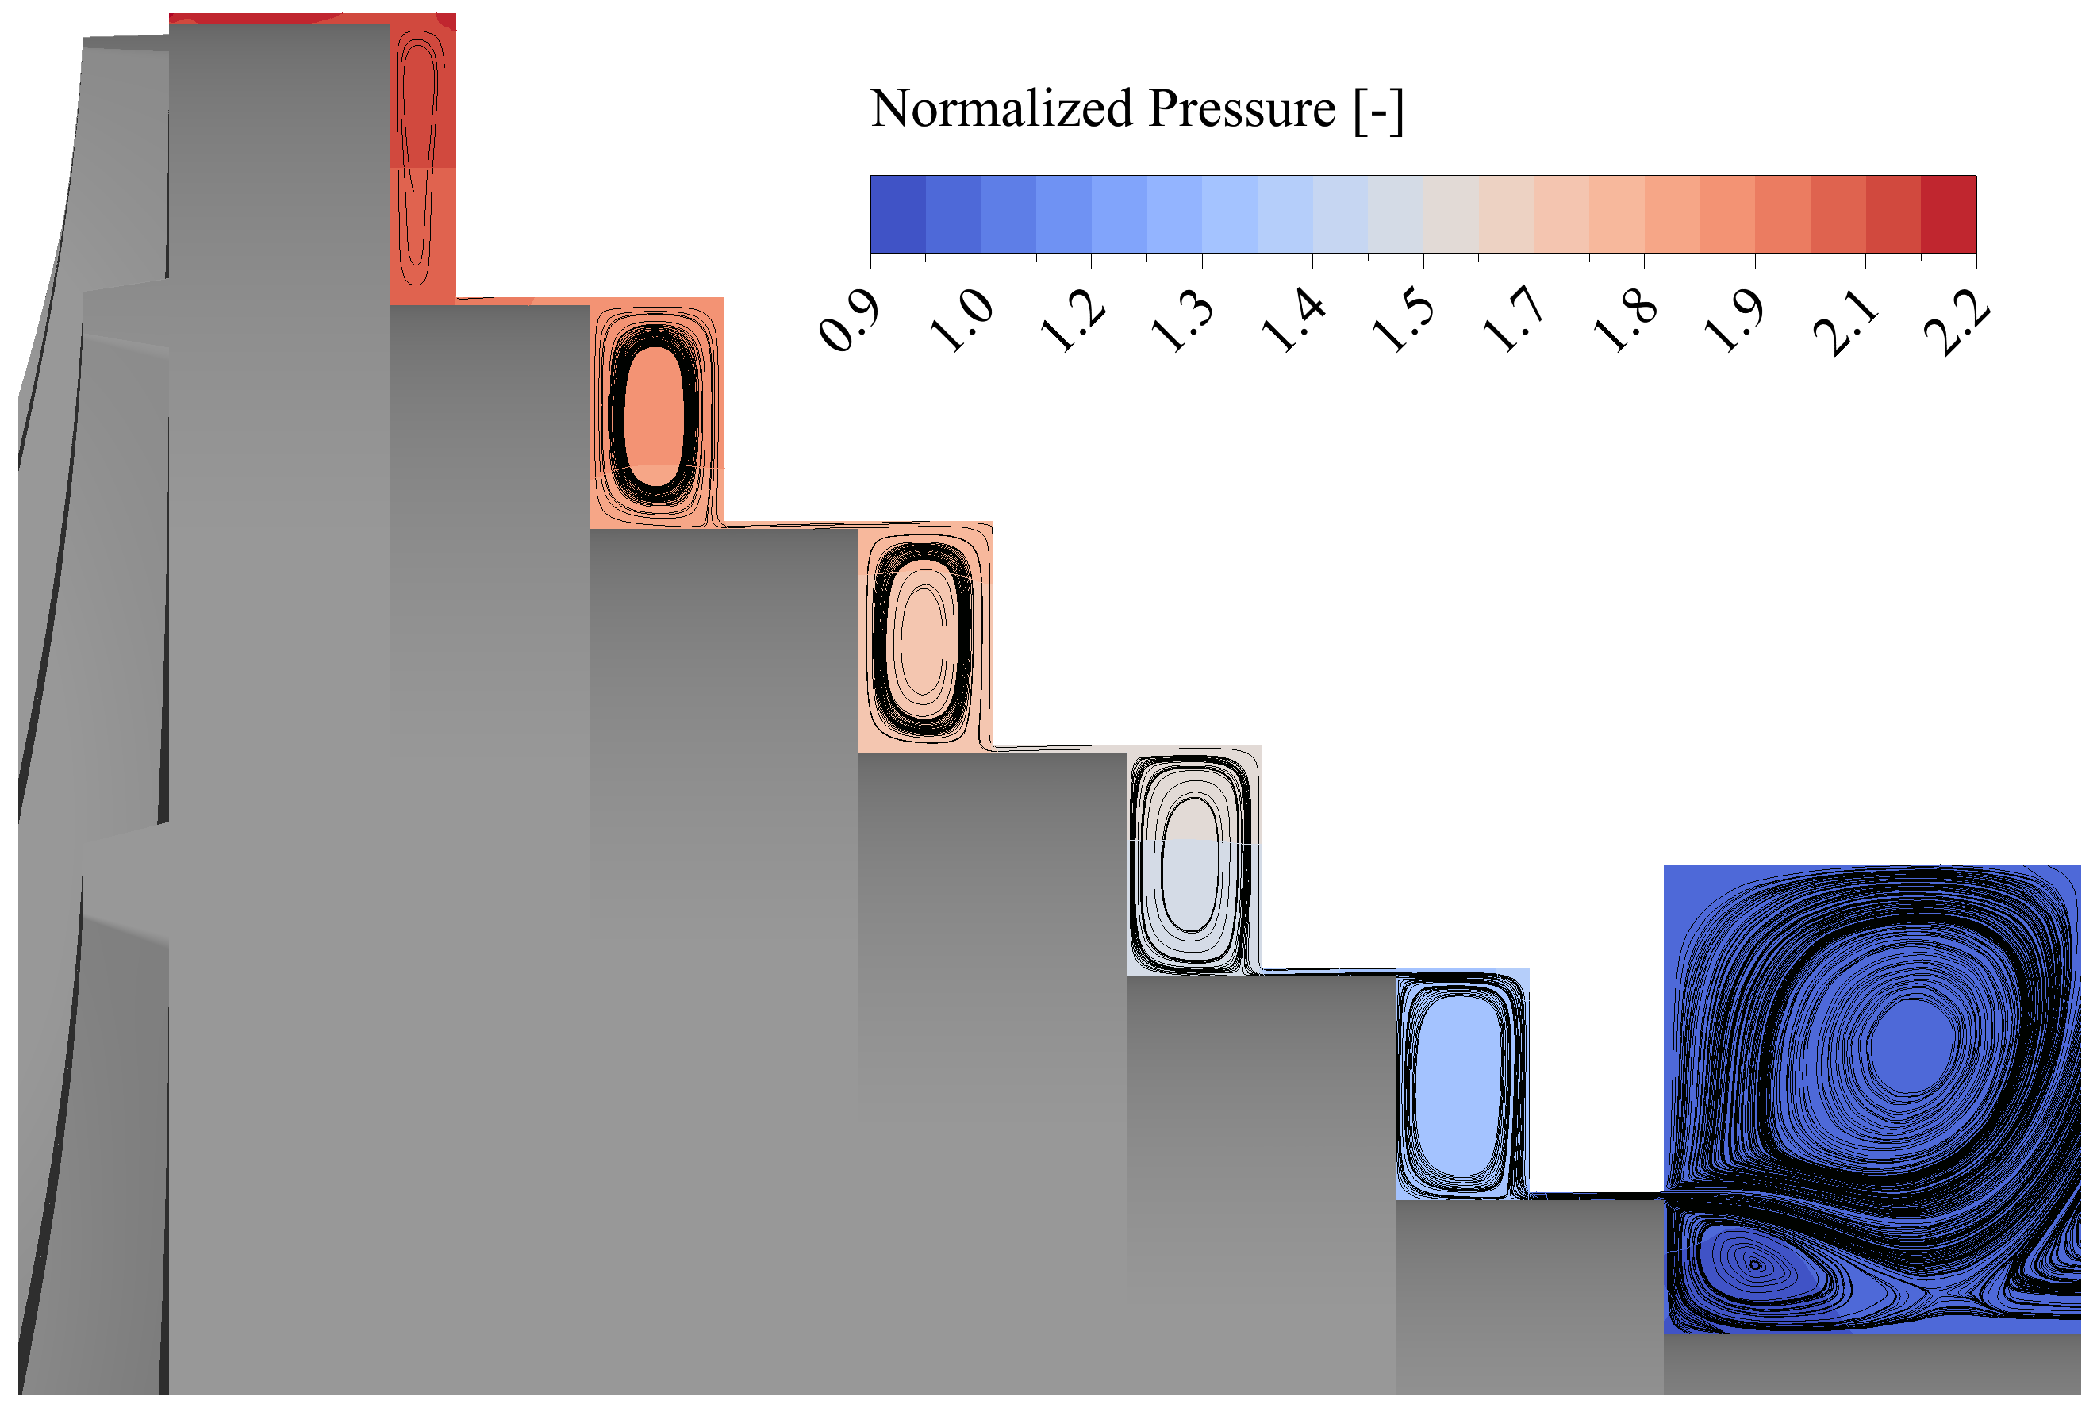
Axial thrust is the result of all flow field-related forces acting on the impeller wheel and its shaft in an axial direction. Its calculation through a CFD simulation requires a computational model that takes into account not only the flow field on the front of the impeller, but also the flow field in the rear cavity of the impeller. The magnitude and direction of the force acting on the impeller back disk as a result of the respective pressure distribution depend on the flow resistance of the rear cavity. Ideally, the rear cavity is enclosed, so that there is no leakage flow and thus a seal is not necessary. However, this will result in considerable pressure accumulation in the rear cavity, ultimately leading to a comparatively high thrust force pushing the wheel outwards of the shaft direction. Preliminary CFD investigations with an enclosed rear cavity have shown that such a design is not possible under the given operating conditions, as the resulting thrust is more than four times greater than the bearings’ load capacity at nominal operation. Therefore, a measure is taken to balance the axial thrust of the compressor by means of a stepped labyrinth seal. It comprises successive seal fins and vortex chambers, which are placed at different seal radii inside a leakage flow path.
In the applied stepped seal configuration, the leakage flow path is connected to the compressor inlet. Hence, pressure drops from the high pressure level upstream of the seal to the lower pressure region downstream of the seal, which is comparable to the compressor inlet pressure. Overall, this reduces the force acting on the back disk. A depiction of the leakage flow path throughout the stepped seal and an exemplary, CFD-derived distribution of static pressure, normalized with the compressor inlet total pressure at design operating conditions is given in
Figure 6.
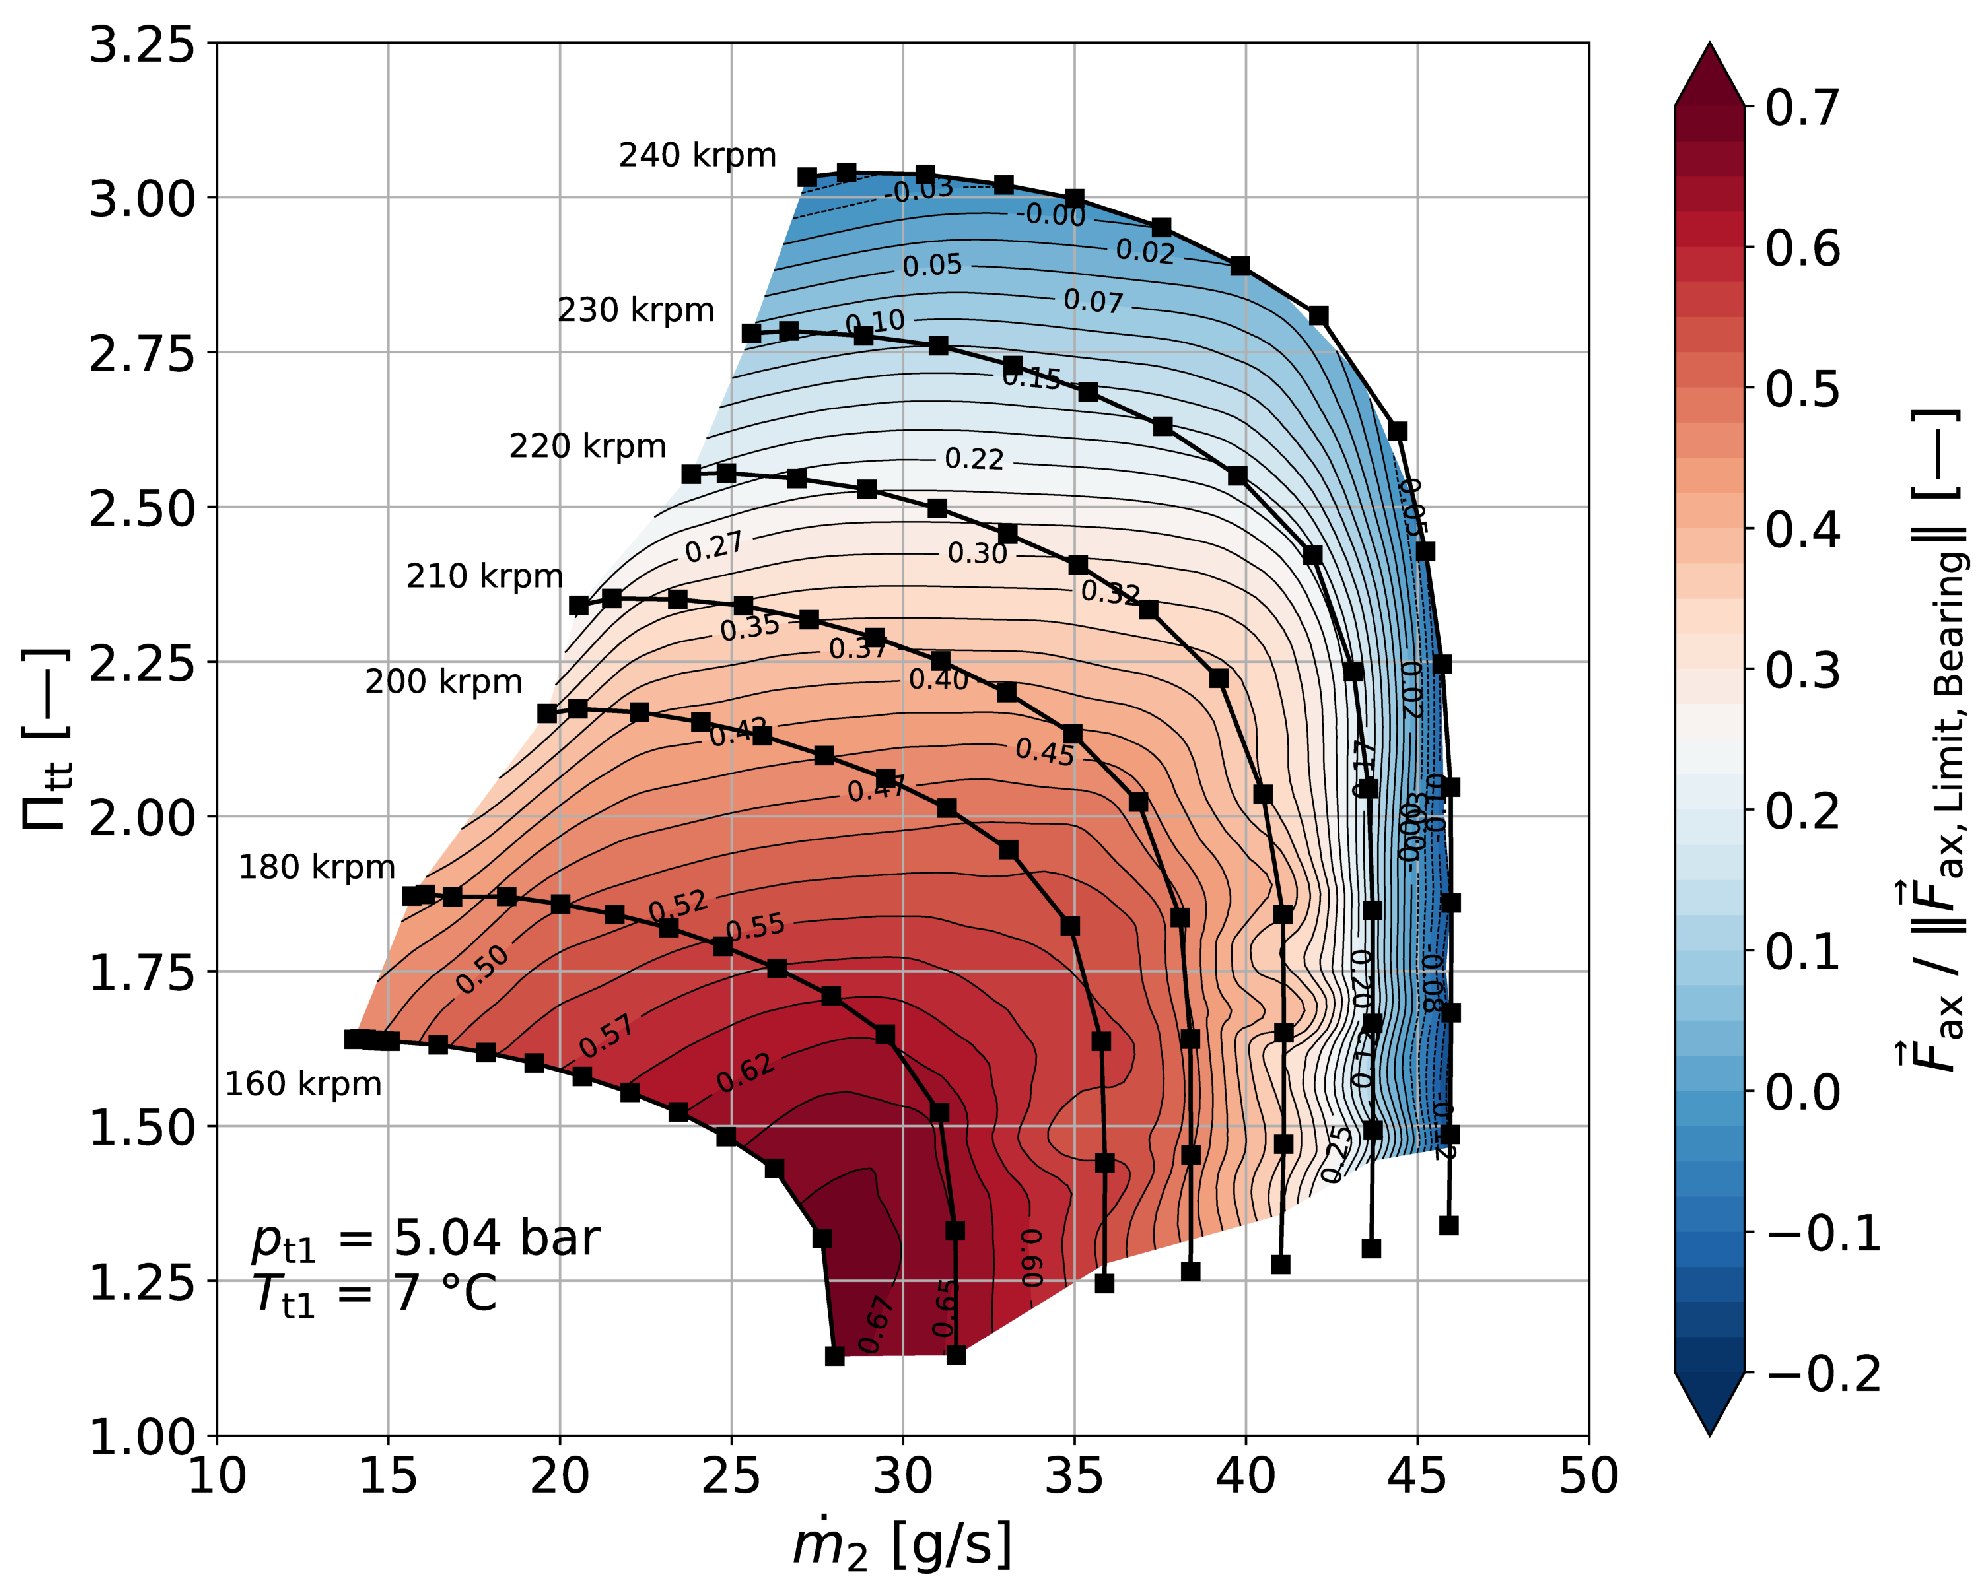
Adjustments to the inlet and outlet radius of the stepped seal are a decisive way of varying the back disk force in order to reduce the resulting thrust force. This is possible because the front disk force is comparatively insensitive with regard to changes in seal radii. The outlet of the stepped seal should be kept at a low radius to minimize the leakage areas for given seal clearances. For the applied stepped seal design,
Figure 7 shows a contour plot with the distribution of the resulting net force for the expected operating range normalized with the allowable thrust-bearing load capacity at given rotational speed. All contour maps in this work are based on data interpolation via the triangulation functionality of the Matplotlib library v. 3.10 [
20]. Please note possible sensitivities depending on the resolution and the distance from the underlying data. Overall, all resulting forces are kept well within the load capabilities of the thrust bearing. At the design point, almost a complete balance of axial forces is achieved. The highest utilization level is about 69%, which provides sufficient safety margin in the context of a demonstrator rig. It is seen for operation close to the maximum mass flow rates at low rotational speeds. For most parts of the operating map, the force vector has a positive sign, indicating that the wheel is pushed towards the shaft. Only close to the surge line at high rotational speed is it forced in outwards direction of the shaft. However, both force directions are equally viable.
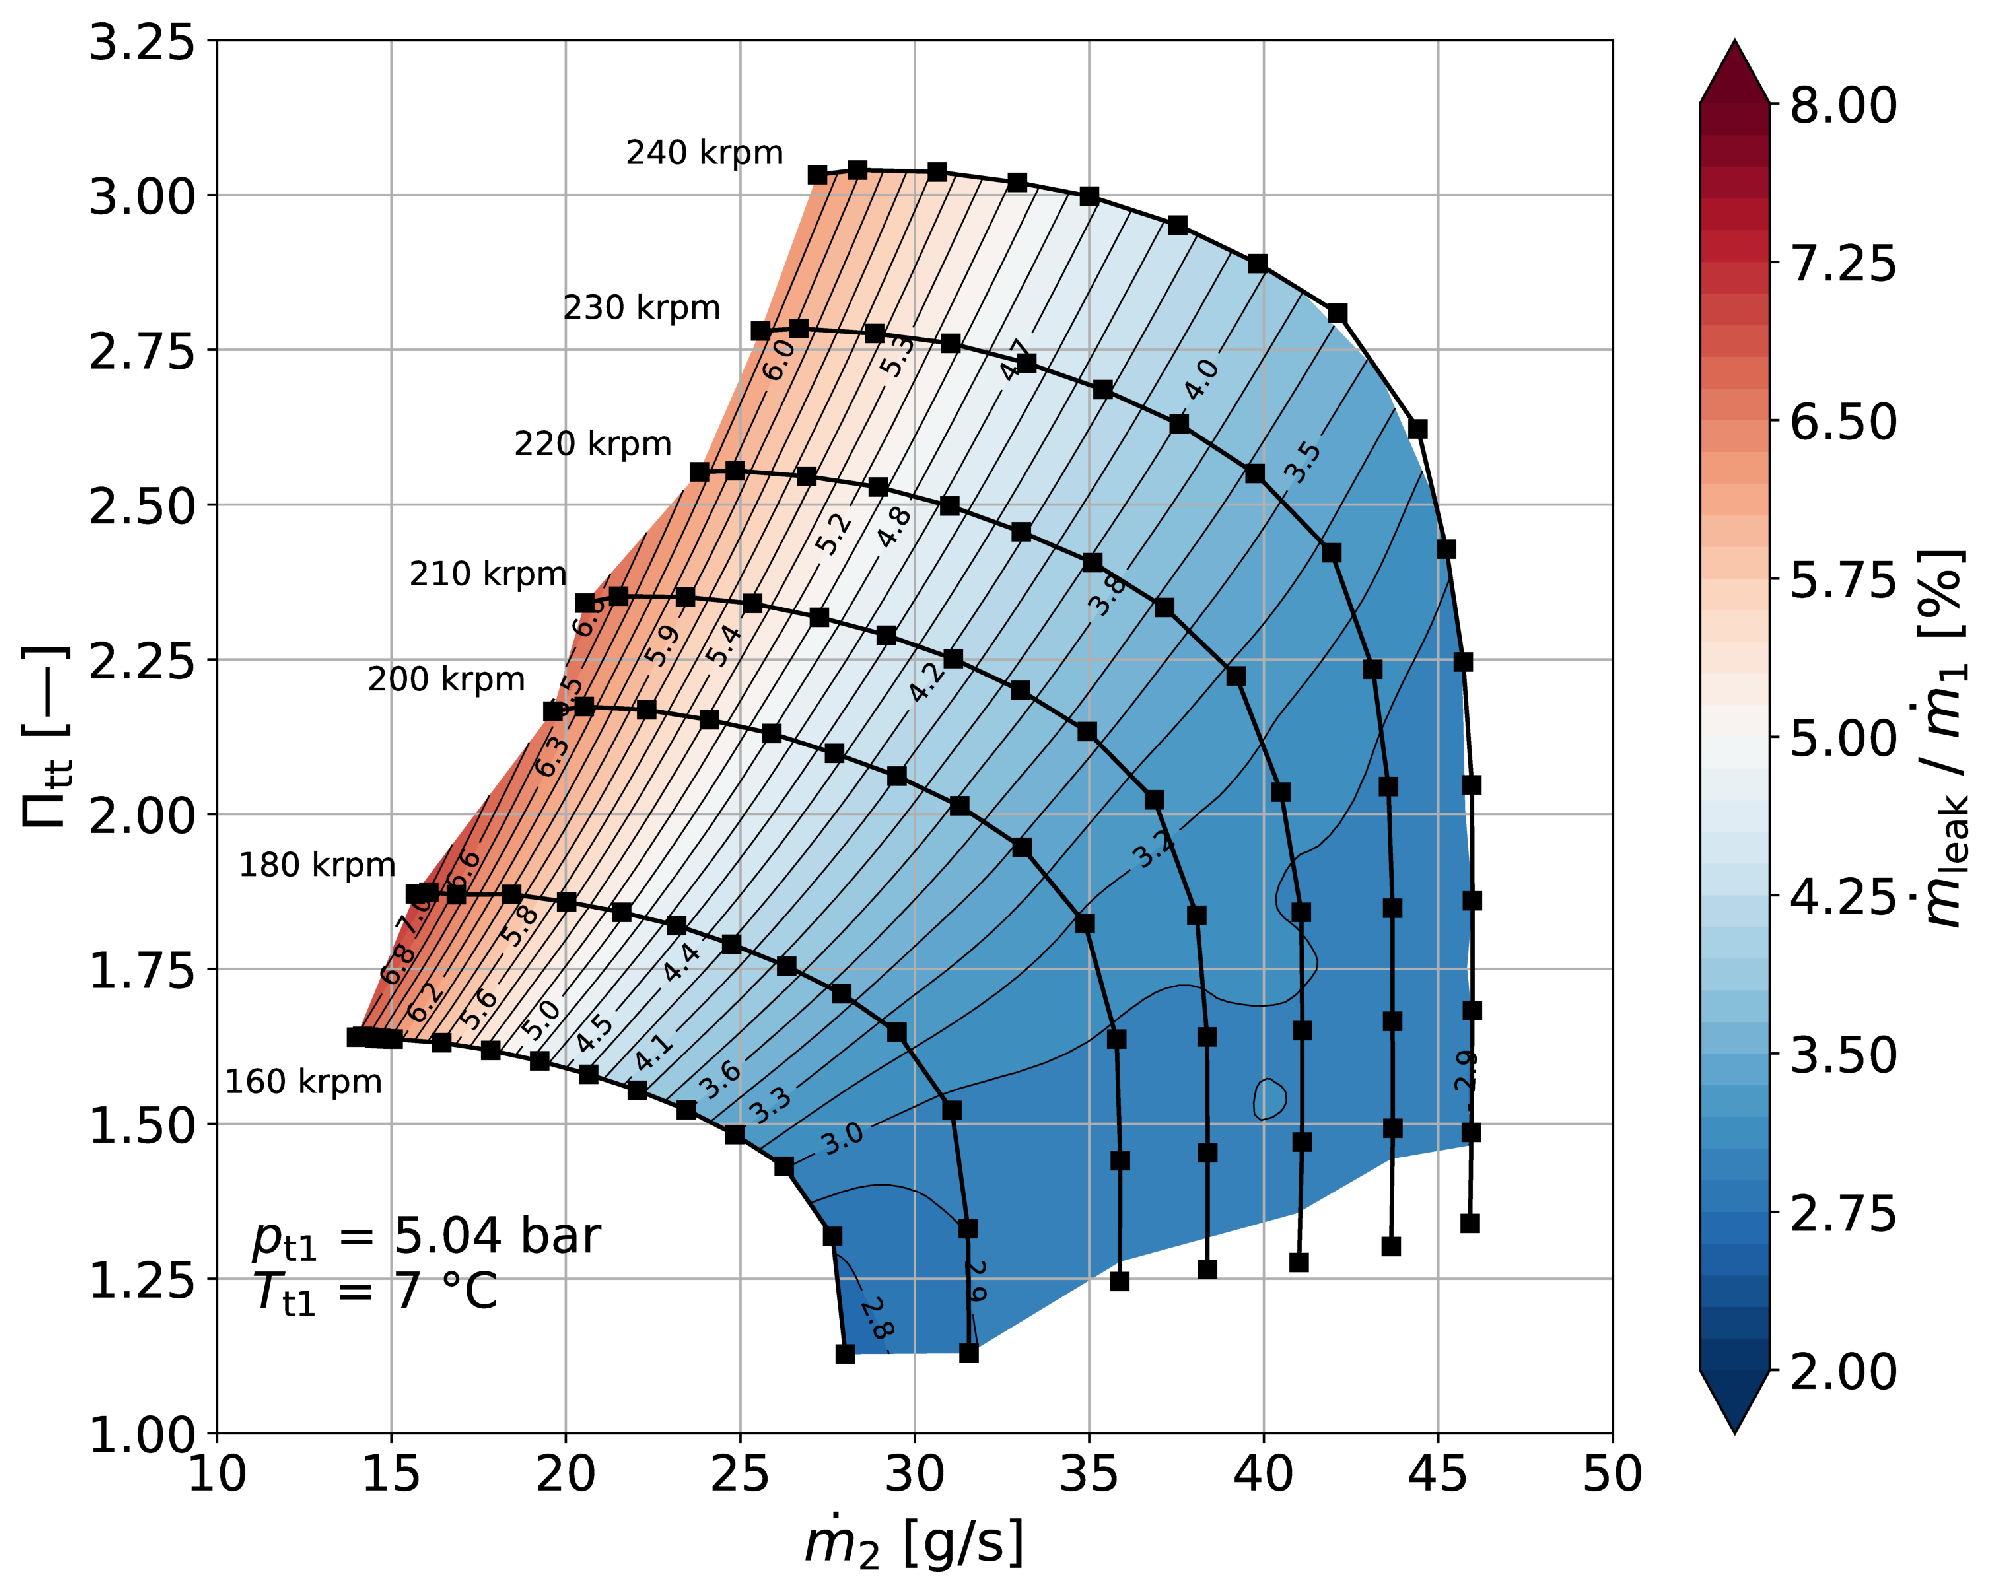
The leakage ratio
is about 4.7% at the design point. Changes in the leakage ratio across the entire operating map are shown in
Figure 8. Leakage ratios increase as the surge limit is approached due to the higher pressure levels and they decrease as the choked flow conditions are approached. A further increase in the number of vortex chambers, as well as drastic shape adaptations to the seal, such as the trial of an interlocking seal, proved unsuccessful in achieving noteworthy reductions of overall leakage rates in a practical and feasible way from the manufacturing and assembly point of view. The main identified control parameters for leakage are the seal clearance and the seal radius, which are already in the spectrum of lower-end values.
3.3. Aerodynamic Performance
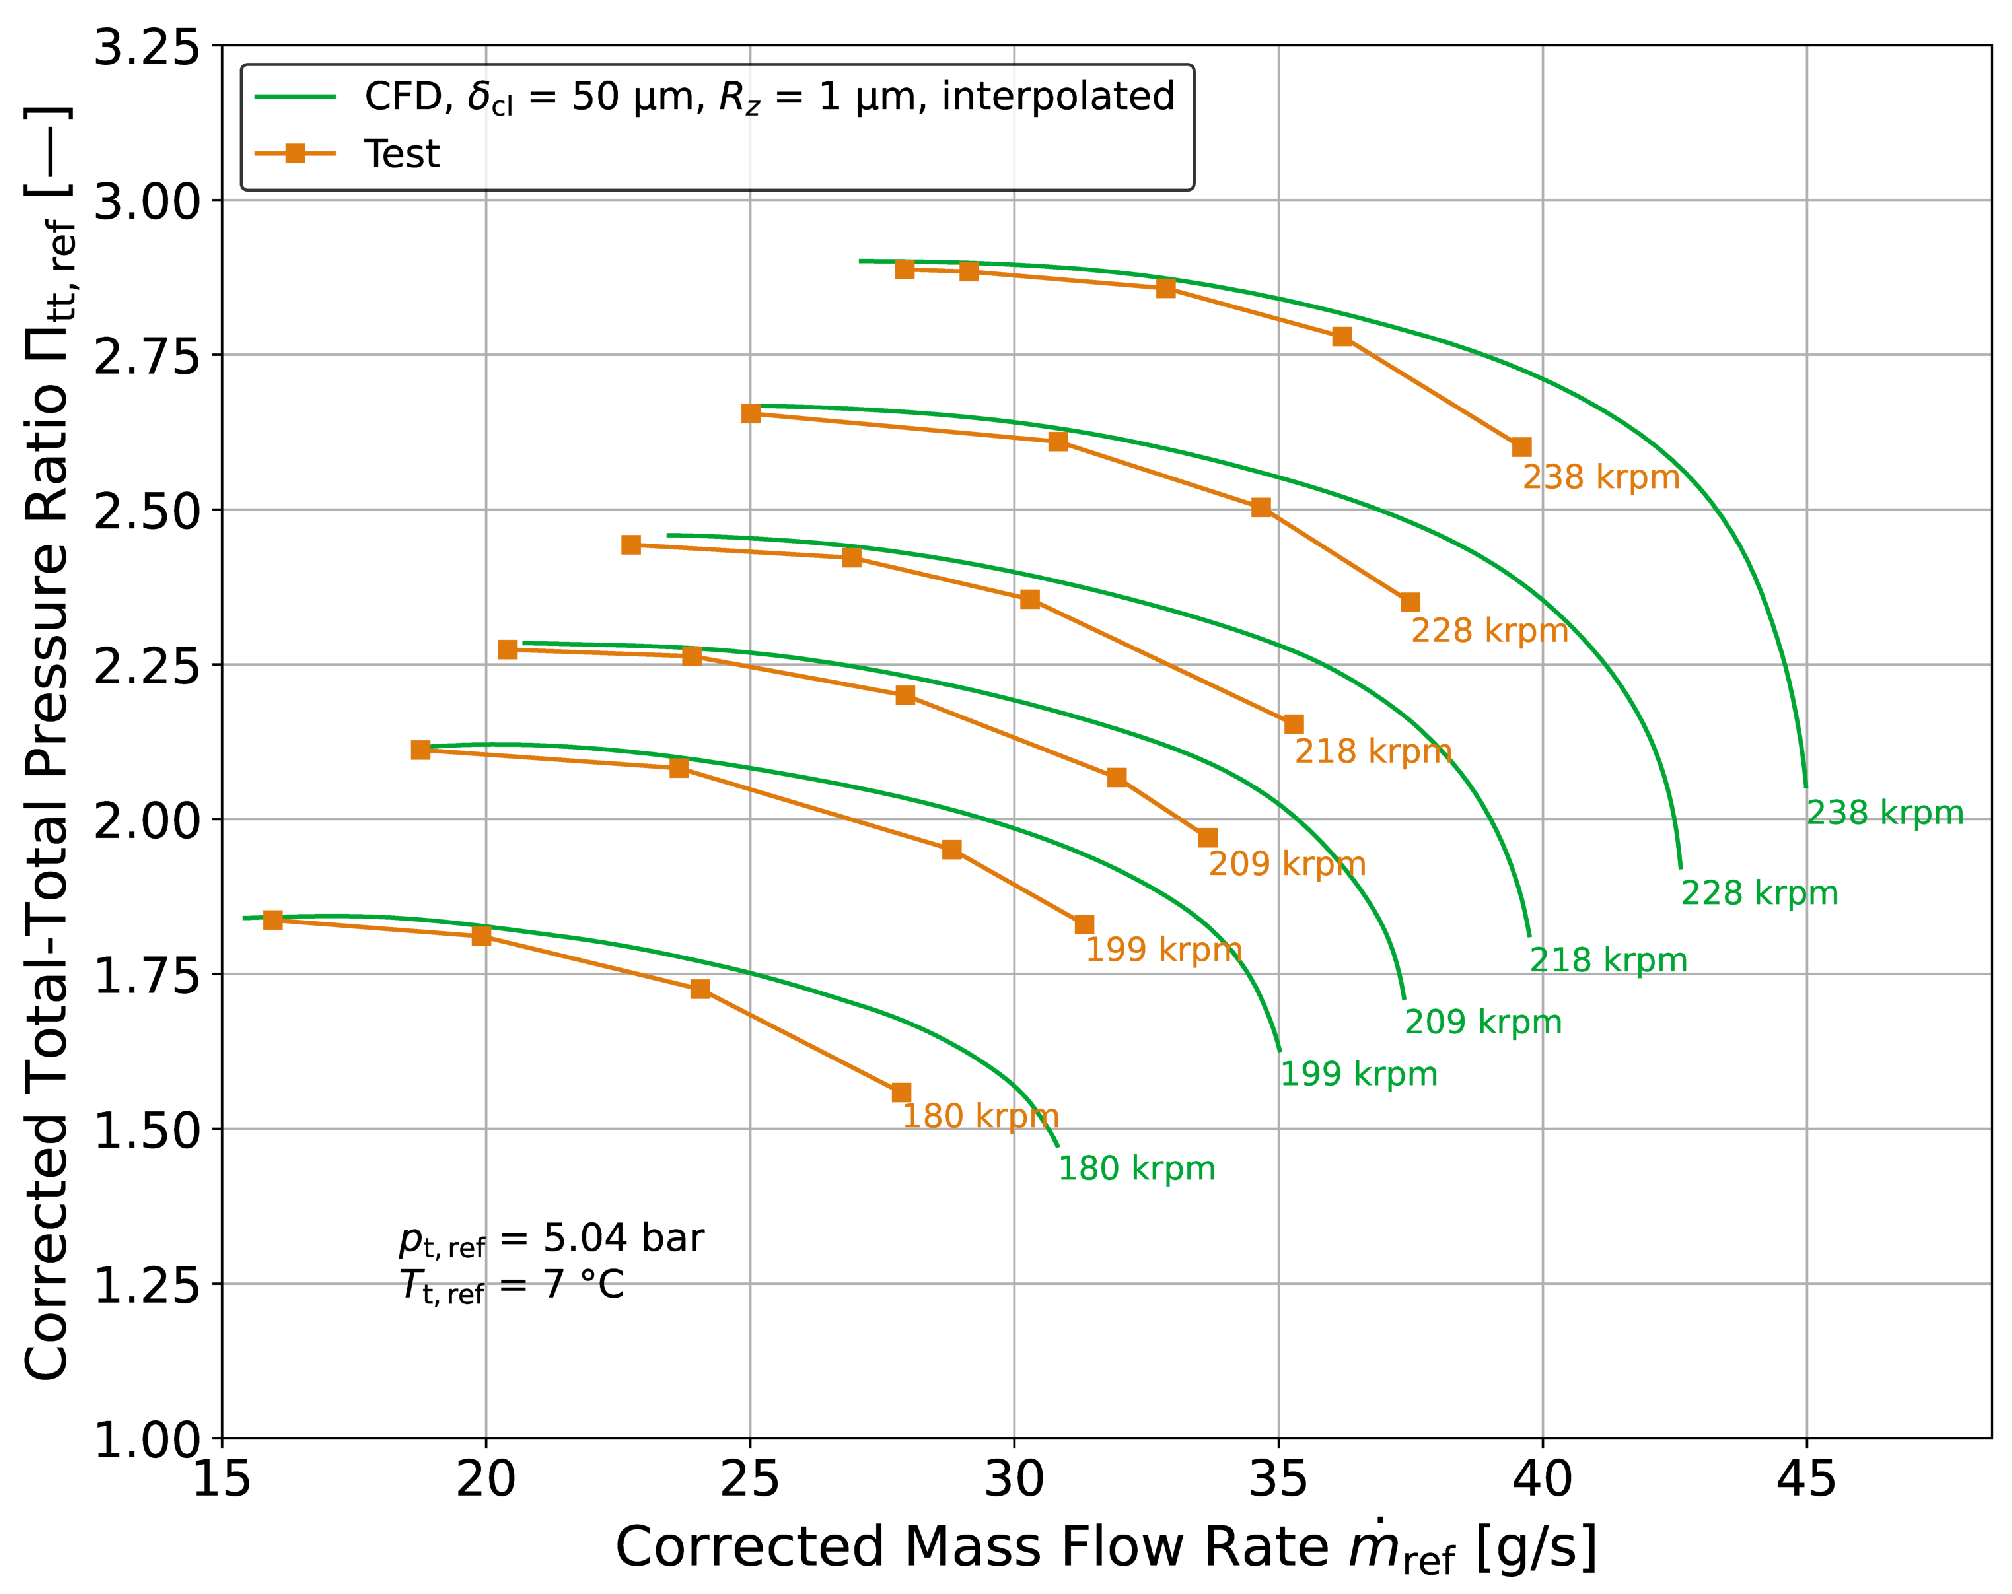
Figure 9 shows the performance map of the compressor stage, considering a nominal blade tip clearance of 40 μm (reduction of 10 μm compared to the optimization) and a mean roughness depth of 0.5 μm. As a result of the greater influence of the considered roughness opposed to the applied peak gap reduction, the characteristics are slightly shifted in the direction towards smaller pressure ratios compared to the unadapted design of the optimization. Furthermore, the characteristics are illustrated as a function of the usable outlet mass flow rate and thus show a mass flow reduction by the amount of leakage. The center of the high efficiency region is reached at a moderate speed of around 205
, indicating that the stage design is adequate for the operational speed range of the drive system.
Sensitivity assessments of the influences of mean roughness depth and blade tip clearance on peak isentropic stage efficiency as well as the corresponding pressure ratio are given through
Figure 10 and
Figure 11, respectively. Both investigations are based on speed line assessments for the maximum rotational speed of 240 krpm. In line with expectations of high-chord Reynolds numbers (see
Table 1), the performance is very sensitive to surface roughness. Compared to the idealized case of a hydraulically smooth surface, the nominal surface roughness of 0.5 μm leads to a decrement of around 4
in peak efficiency and pressure ratio. Since the decrements of the characteristics appear steep and non-linear up to a value of
≈ 1 μm, maintaining the nominal value of roughness in manufacturing is important to prevent performance deviations in the given design spectrum.
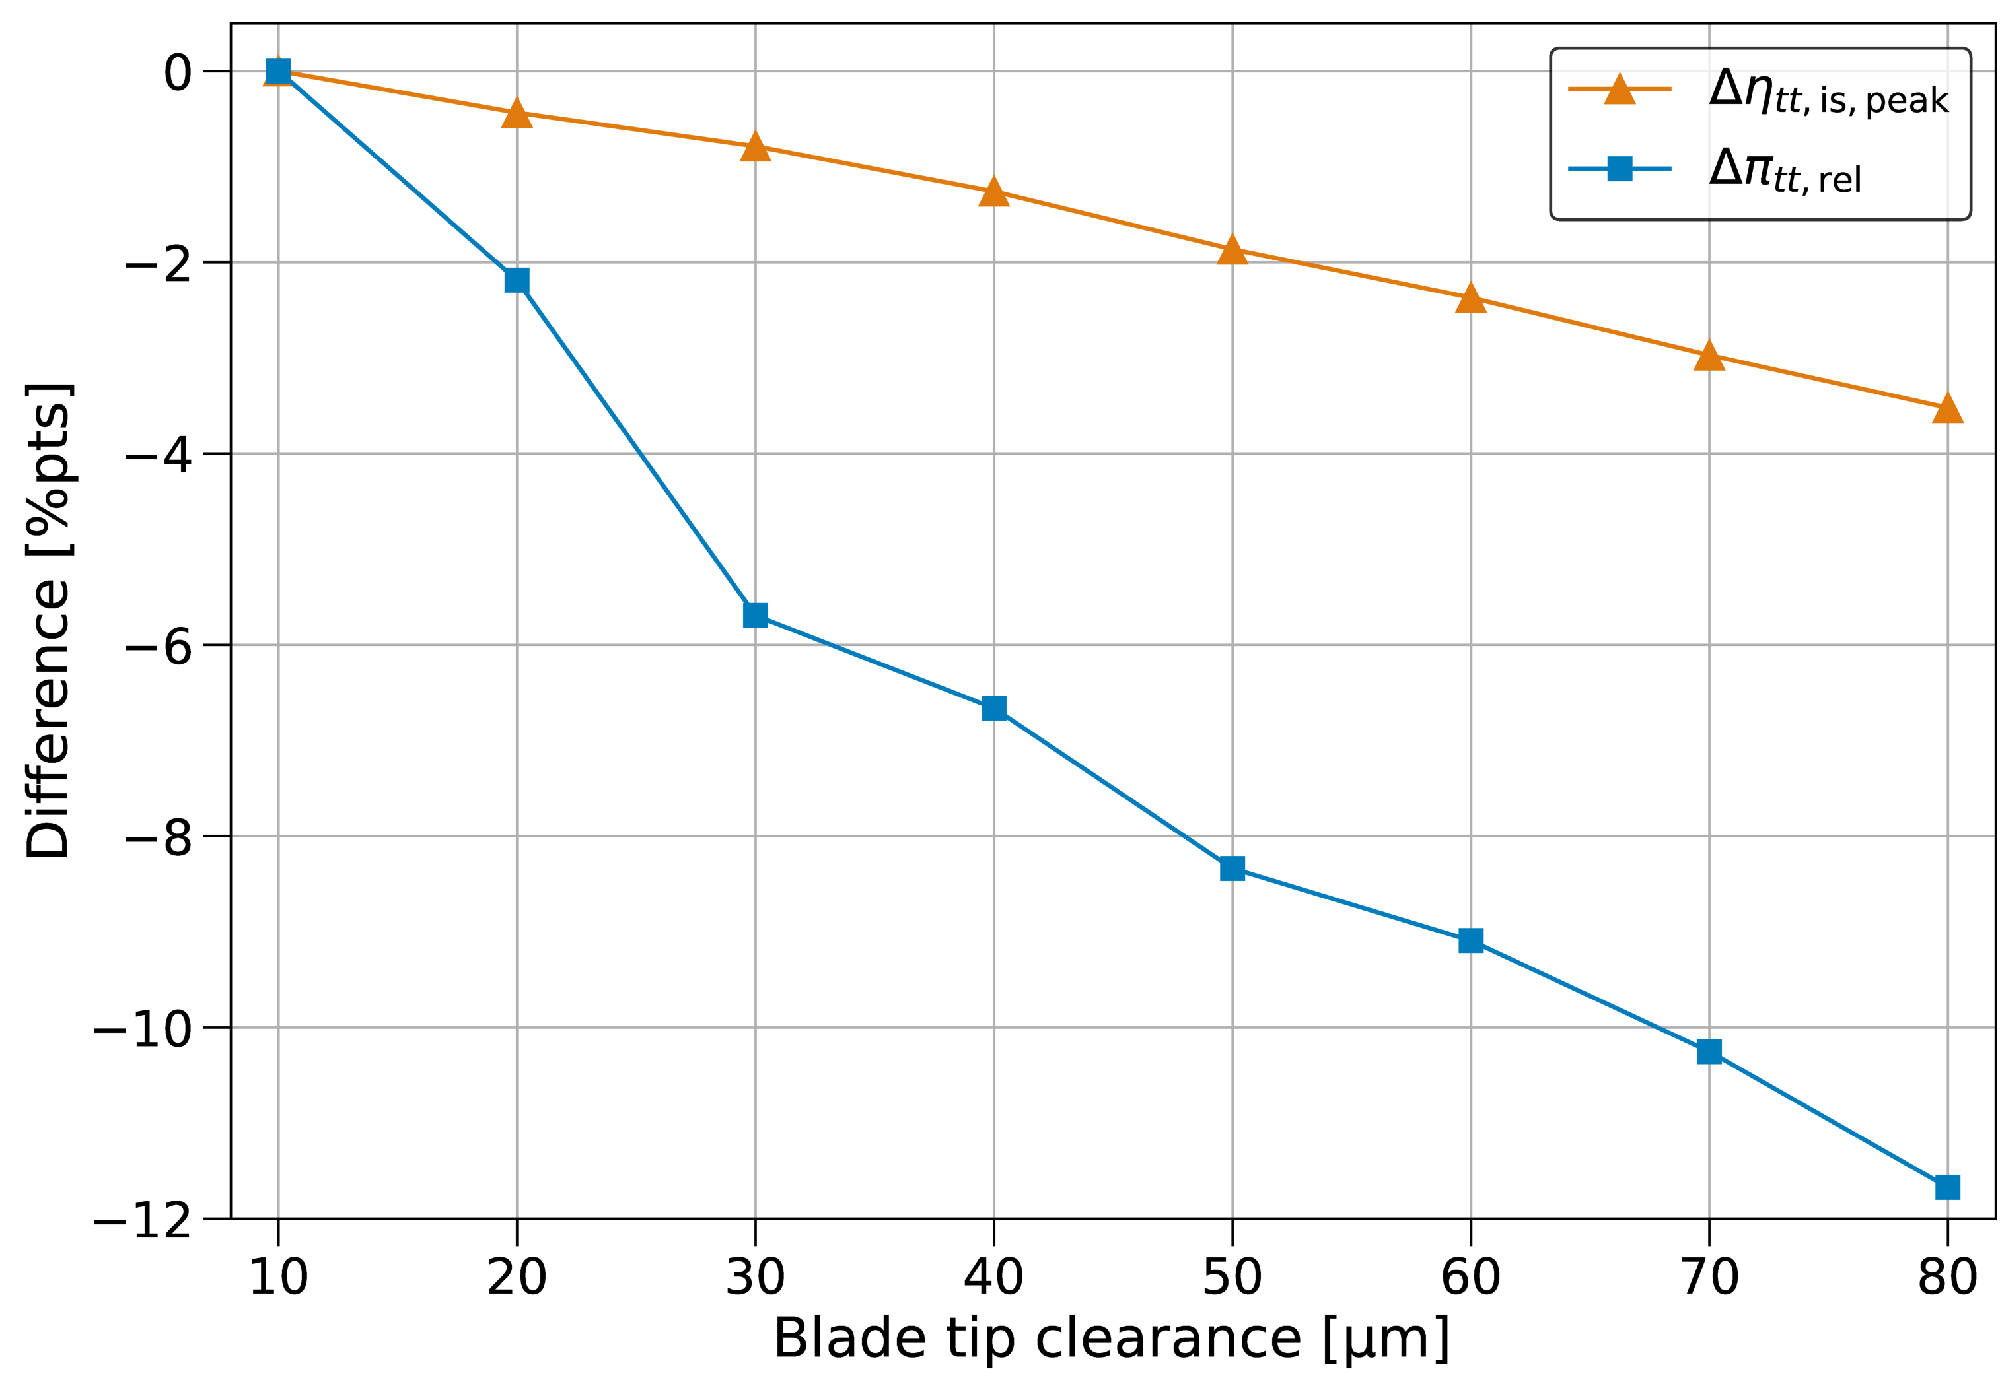
Compared to a sophisticated blade tip clearance of 10 μm, increasing the blade tip clearance by 10 μm indicates a reduction in the pressure ratio by up to 2 within the technically feasible range of clearance gaps between 30 μm and 80 μm. Considering peak efficiency, an almost linear decline of around 1 from the reference is identified for a 10 μm increase in clearance over the complete investigated range. These values give an indication of possible performance losses due to deviations from the nominal geometry in manufacturing and operation.
