2. Materials and Methods
One of the matters to which Agustín de Betancourt dedicated the greatest amount of attention concerned waterways to transport merchandise. It is known that the Spanish engineer worked on the evaluation, maintenance, and expansion of canals of peninsular Spain, such as the Imperial Canal of Aragon [
13] or the Canal of Castile. Afterwards, in 1784, he left for France to l’École des Ponts et Chaussées (the School of Bridges and Roads) to undertake studies in hydraulics and mechanics. His French stay put him into contact with the magnificent canal of Midi, an imposing engineering work that connected the Atlantic basin with the Mediterranean basin through 241 km, as well as with the French project directed by his friend Louis Becquey to create a large network of canals. In 1788, Betancourt made his first stay in England, where he witnessed the plan of canals developed in the British Isles, quite distinct from that being carried out on the continent. In his opinion, the English canals, being shallower were more efficient for transport than were the French waterways, needing a lower quantity of water to function. With all this experience, he began to develop an entire system of navigation through canals that many years later would crystallize in his report:
Sur un nouveau système de navigation intérieure (
On a New System of Inland Navigation), presented in París in 1807 [
14]. The system was developed in fine detail and was presented to the French Academy by Betancourt and Gaspard de Prony as director of l’École des Ponts et Chaussées.
This was the framework that gave rise to the invention studied in the present work. In 1793, Betancourt returned to England for a stay of three years, dedicating his time to compiling the inventions of the Real Gabinete de Máquinas del Palacio del Buen Retiro de Madrid (Royal Cabinet of Machines of the Buen Retiro Palace of Madrid) that he directed. This stay, more relaxed, led him to discover some of the drawbacks of the British network of canals, specifically the growth of canes and aquatic plants due to the shallowness of the water. To combat this, the United Kingdom spent a considerable amount of resources for cleaning, but Betancourt designed a machine built onto a boat to facilitate the cleaning tasks of the canals. This machine was presented to the Royal Society of Arts in 1795 and won a prize of 40 guineas. The invention appeared in the annual publication of the society entitled “Transactions of the Society Instituted at London for the Encouragement of Arts, Manufacture, and Commerce” [
15].
In 1796 Betancourt himself sent to Spain a color illustration of the machine similar to the one exhibited at the Royal Society of Arts and dedicated it to the prince of la Paz, Manuel Godoy [
16]. He translated the specifications into French only a few years later (1800), as part of an effort to compile a large report on a new manner of designing navigable canals [
17]. Afterwards, in 1805, a report was written comparing the machines invented by Betancourt and Lesage for use in the Midi canal, presenting the advantages and disadvantages of the respective inventions.
In the present study, to model the invention for cutting cane and aquatic plants, all the material available was consulted, but the basic document was the colored illustration without scale sent to the Real Gabinete de Máquinas del Buen Retiro de Madrid in 1796. In the upper part of this drawing, appears a multi-view projection (elevation) of the machine functioning. The lower part displays a detail of the elevation, the left view and the floor plan, and furthermore, a detailed view of one part of the instrument for cutting the plants. The descriptive report explained the functioning of the machine for a fuller grasp of certain details of construction that could not be deduced from the illustration. Nevertheless, it was inevitable to adopt some geometric and dimensional hypotheses in order to make the ensemble properly works. In addition, to build the 3D model, the methodology employed was digital restitution using Autodesk Inventor Professional 2016, parametric computer-aided software developed by Autodesk [
18].
Afterwards, the process followed in the 3D modeling is shown in detail with its geometric documentation, arguing the restrictions token and the hypotheses adopted so that the design of the machine would be consistent.
3. Results and Discussion
The modeling process was difficult for a lack of detailed information. All the parts of the machine were depicted in the illustration but the absence of scale and space made the detail insufficient for making a reliable CAD 3D model. Therefore, a graphic scale was adopted so that the dimensions of the elements would be consistent. The purpose of the illustration was not to provide precise data on the manufacturing or assembly process as there were no normalization protocols, but rather to provide conceptual representations meant to solve a technical problem. Therefore, its information gaps and even the inconsistent dimensions in some cases made it obligatory to formulate some dimensional and geometric hypotheses as much as proposals for restrictions of movement (degrees of freedom) among the different parts of the ensemble. In this model, no standardization was used, since in the period in question all the metal pieces were produced by hand. For the same reason, tolerances and plays were not calculated for the pieces that were fitted together.
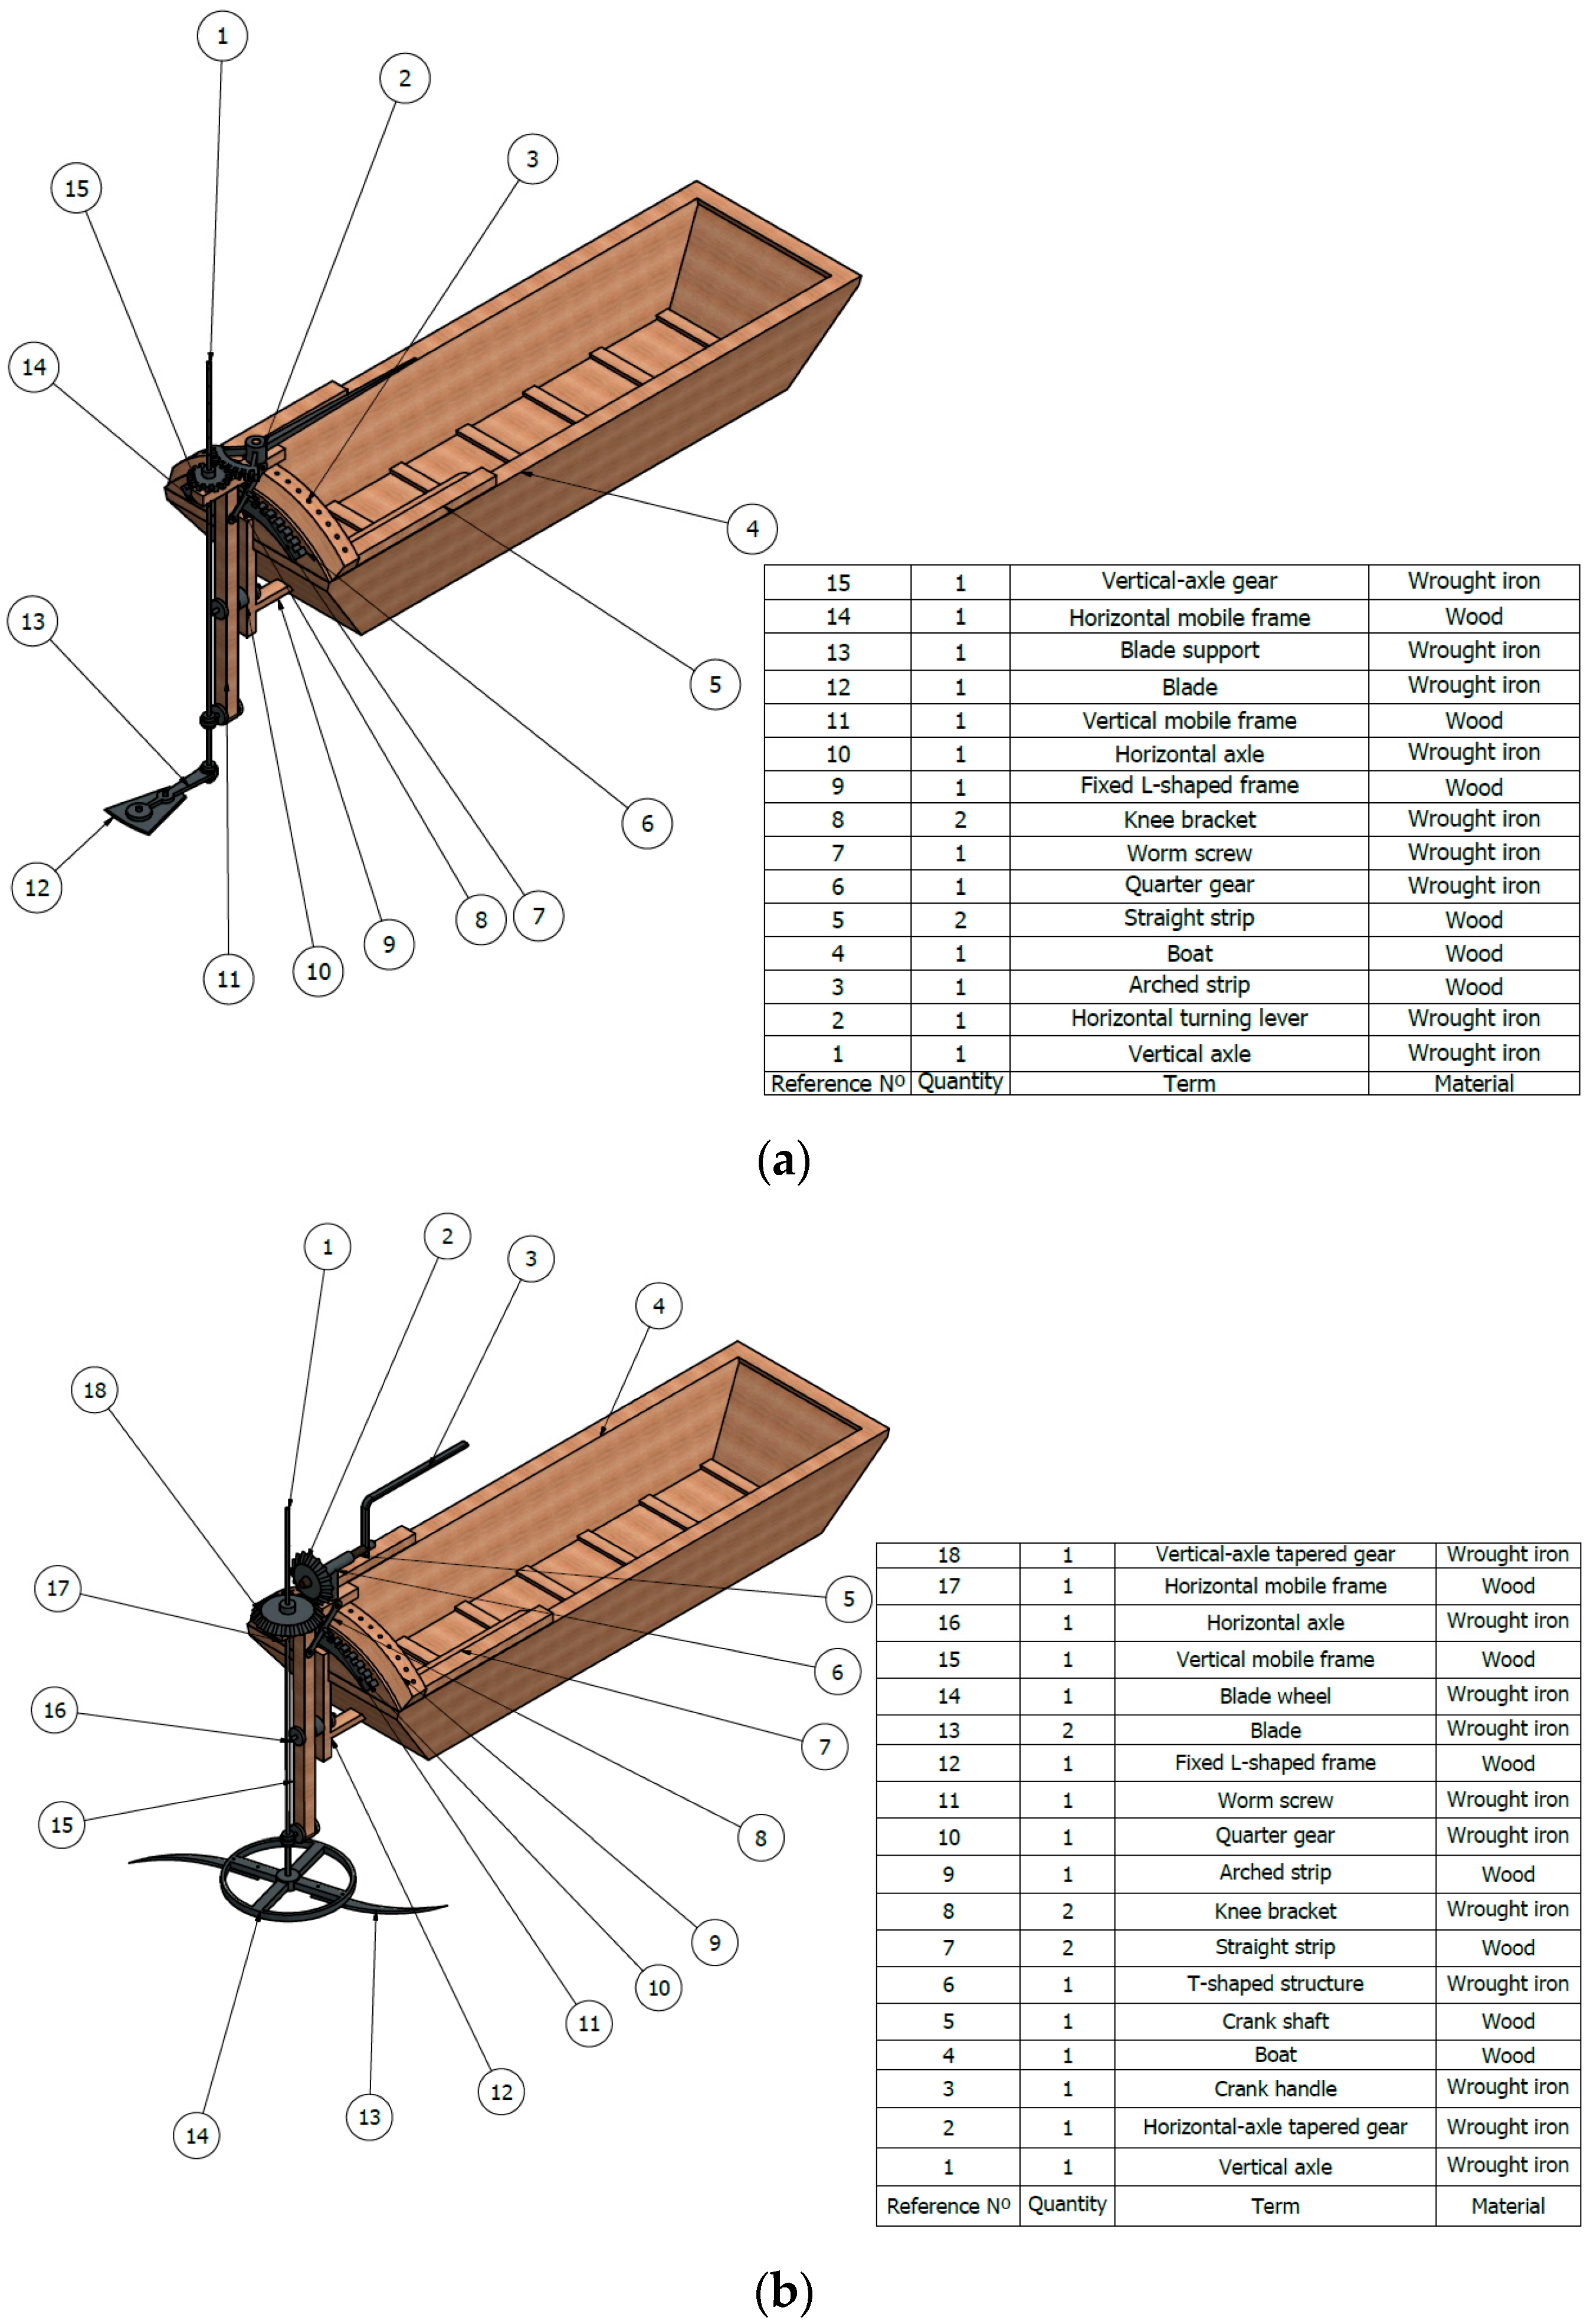
Figure 1 presents an isometric view, using CAD techniques, of the 3D model of the machine to cut canes and other aquatic plants from navigable waterways.
An examination of the invention reveals two well-differentiated parts: on the one hand, a classical boat for transport in the canals, and, on the other, the mechanism that actually cuts the canes and other aquatic plants, which is installed in the aft of the boat.
The engineer designed a versatile cutting system. That is, the blade head is interchangeable by making small adaptations to the cutting mechanism. Depending on the quantity and hardness of the aquatic plants, one blade or the other would be advisable.
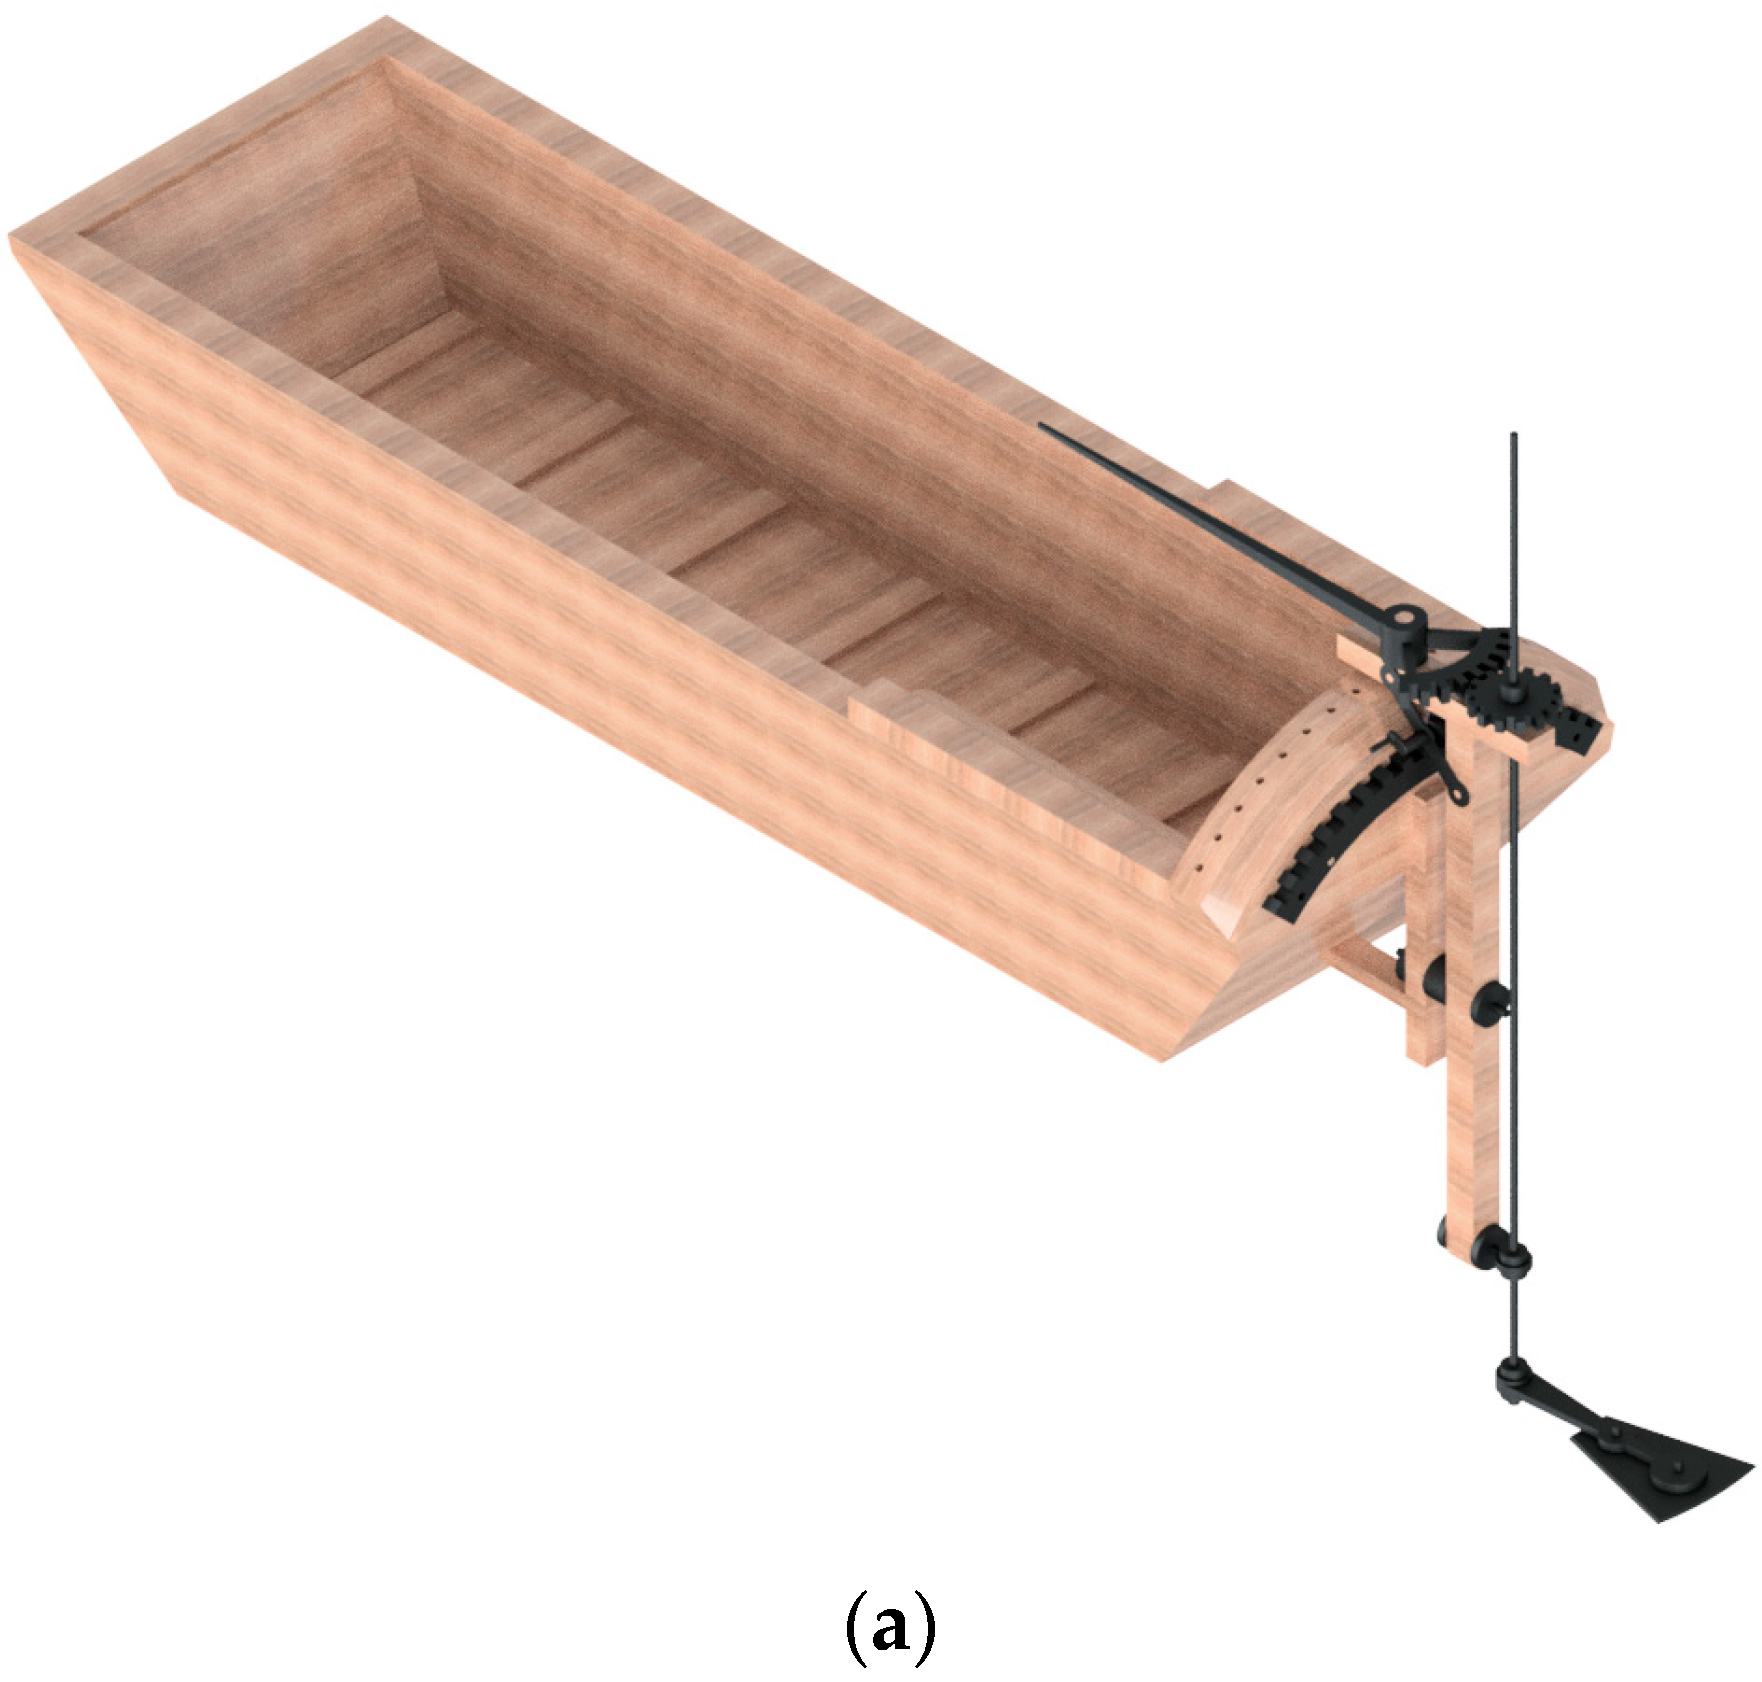
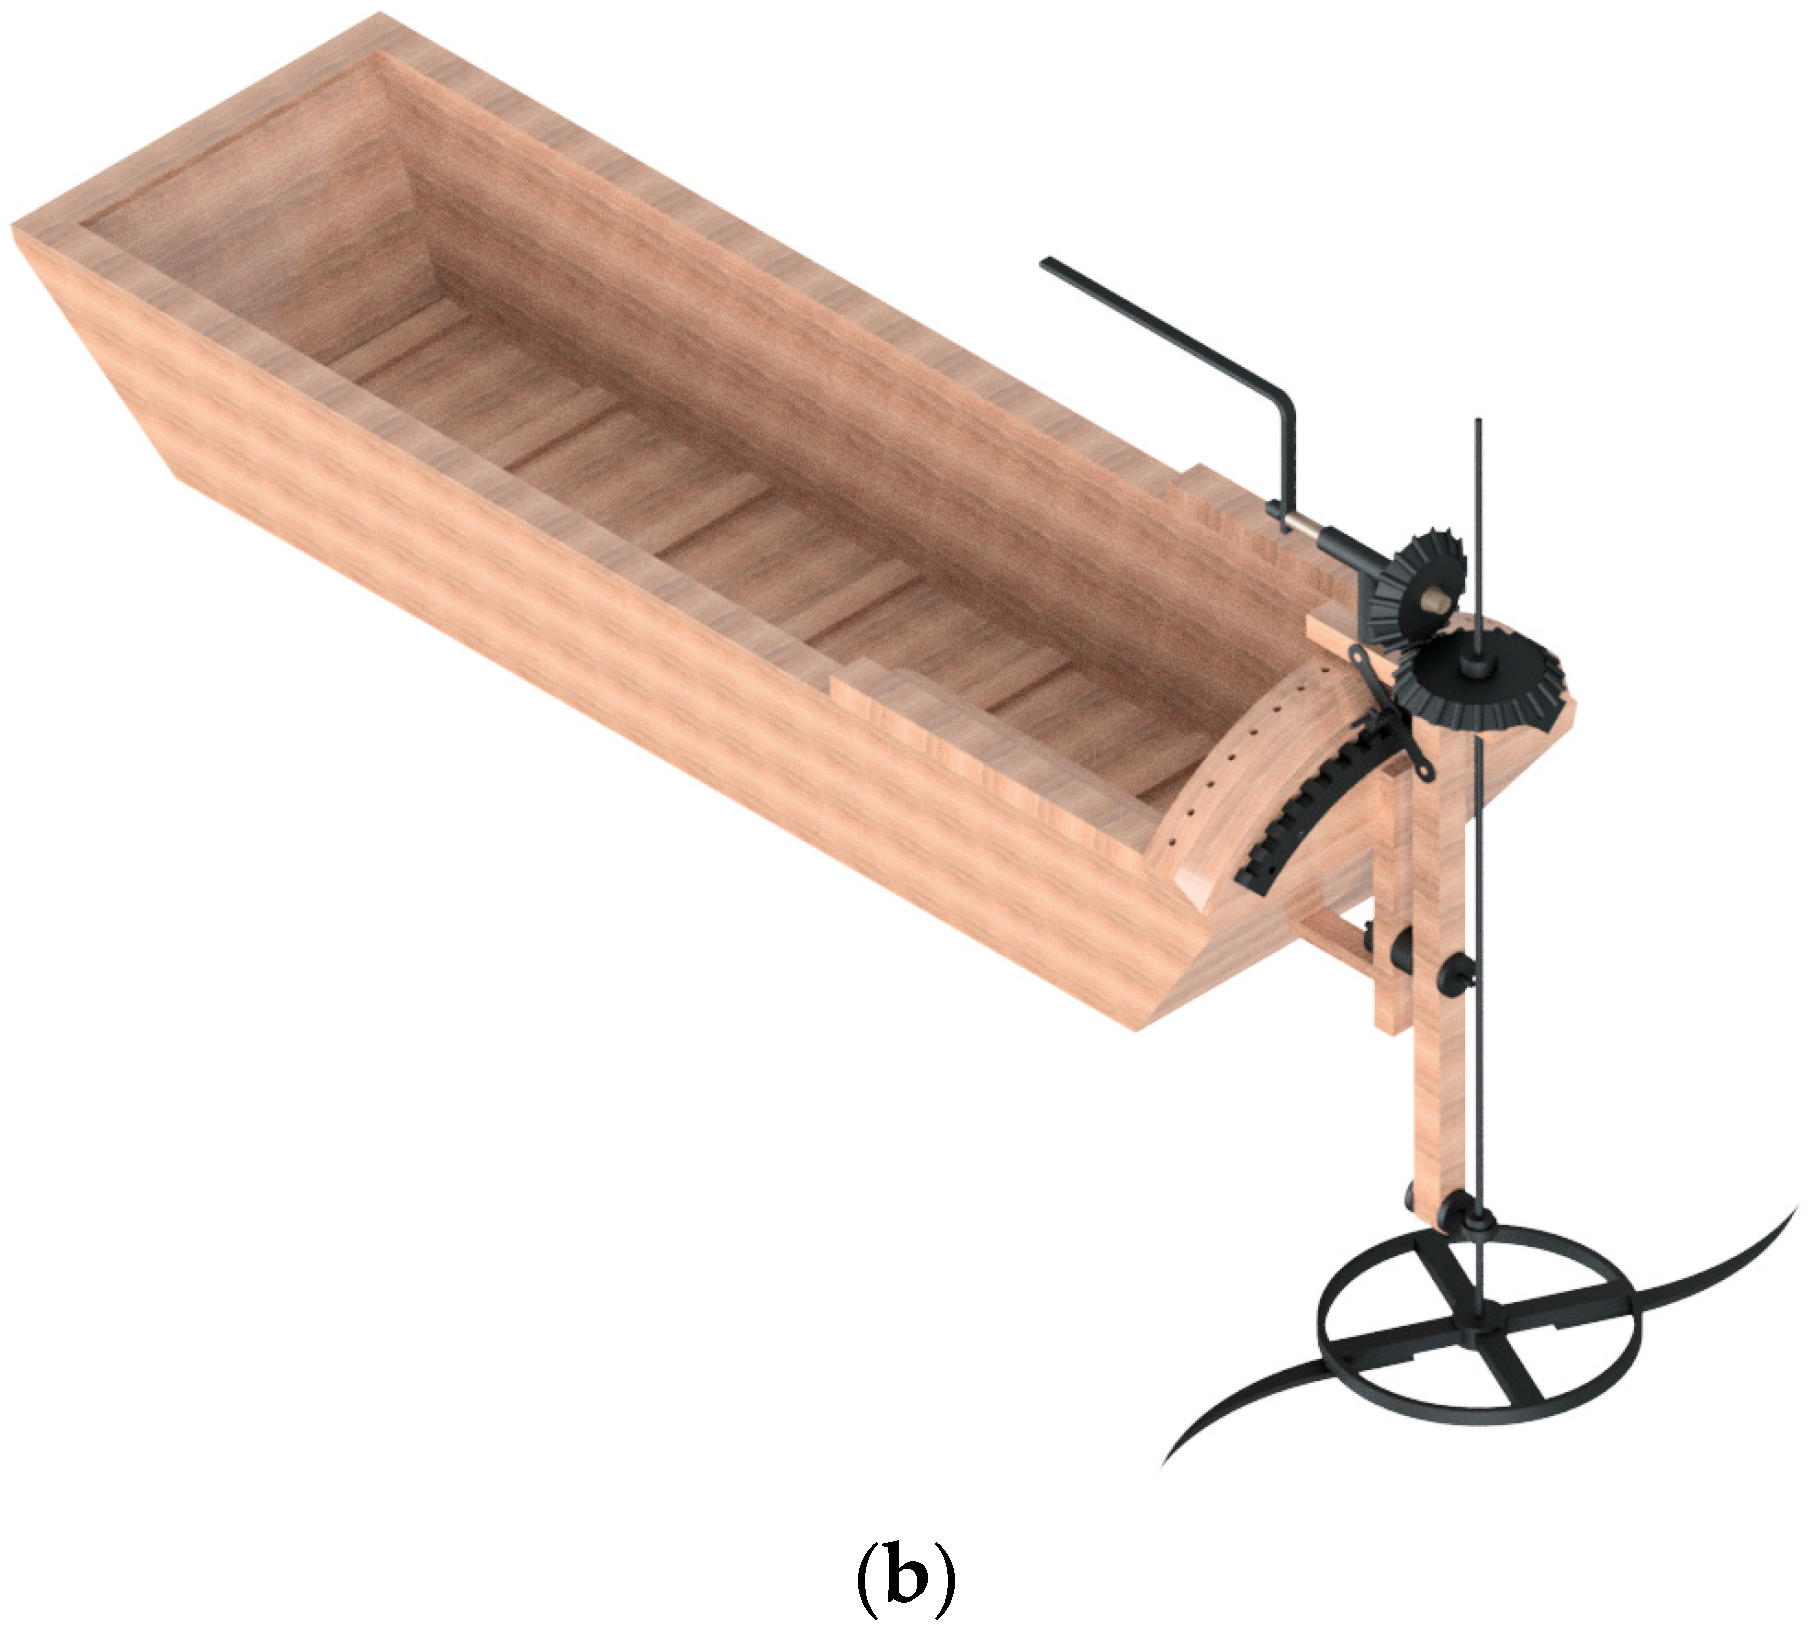
Figure 2 shows the overall plan when one blade head or the other is used.
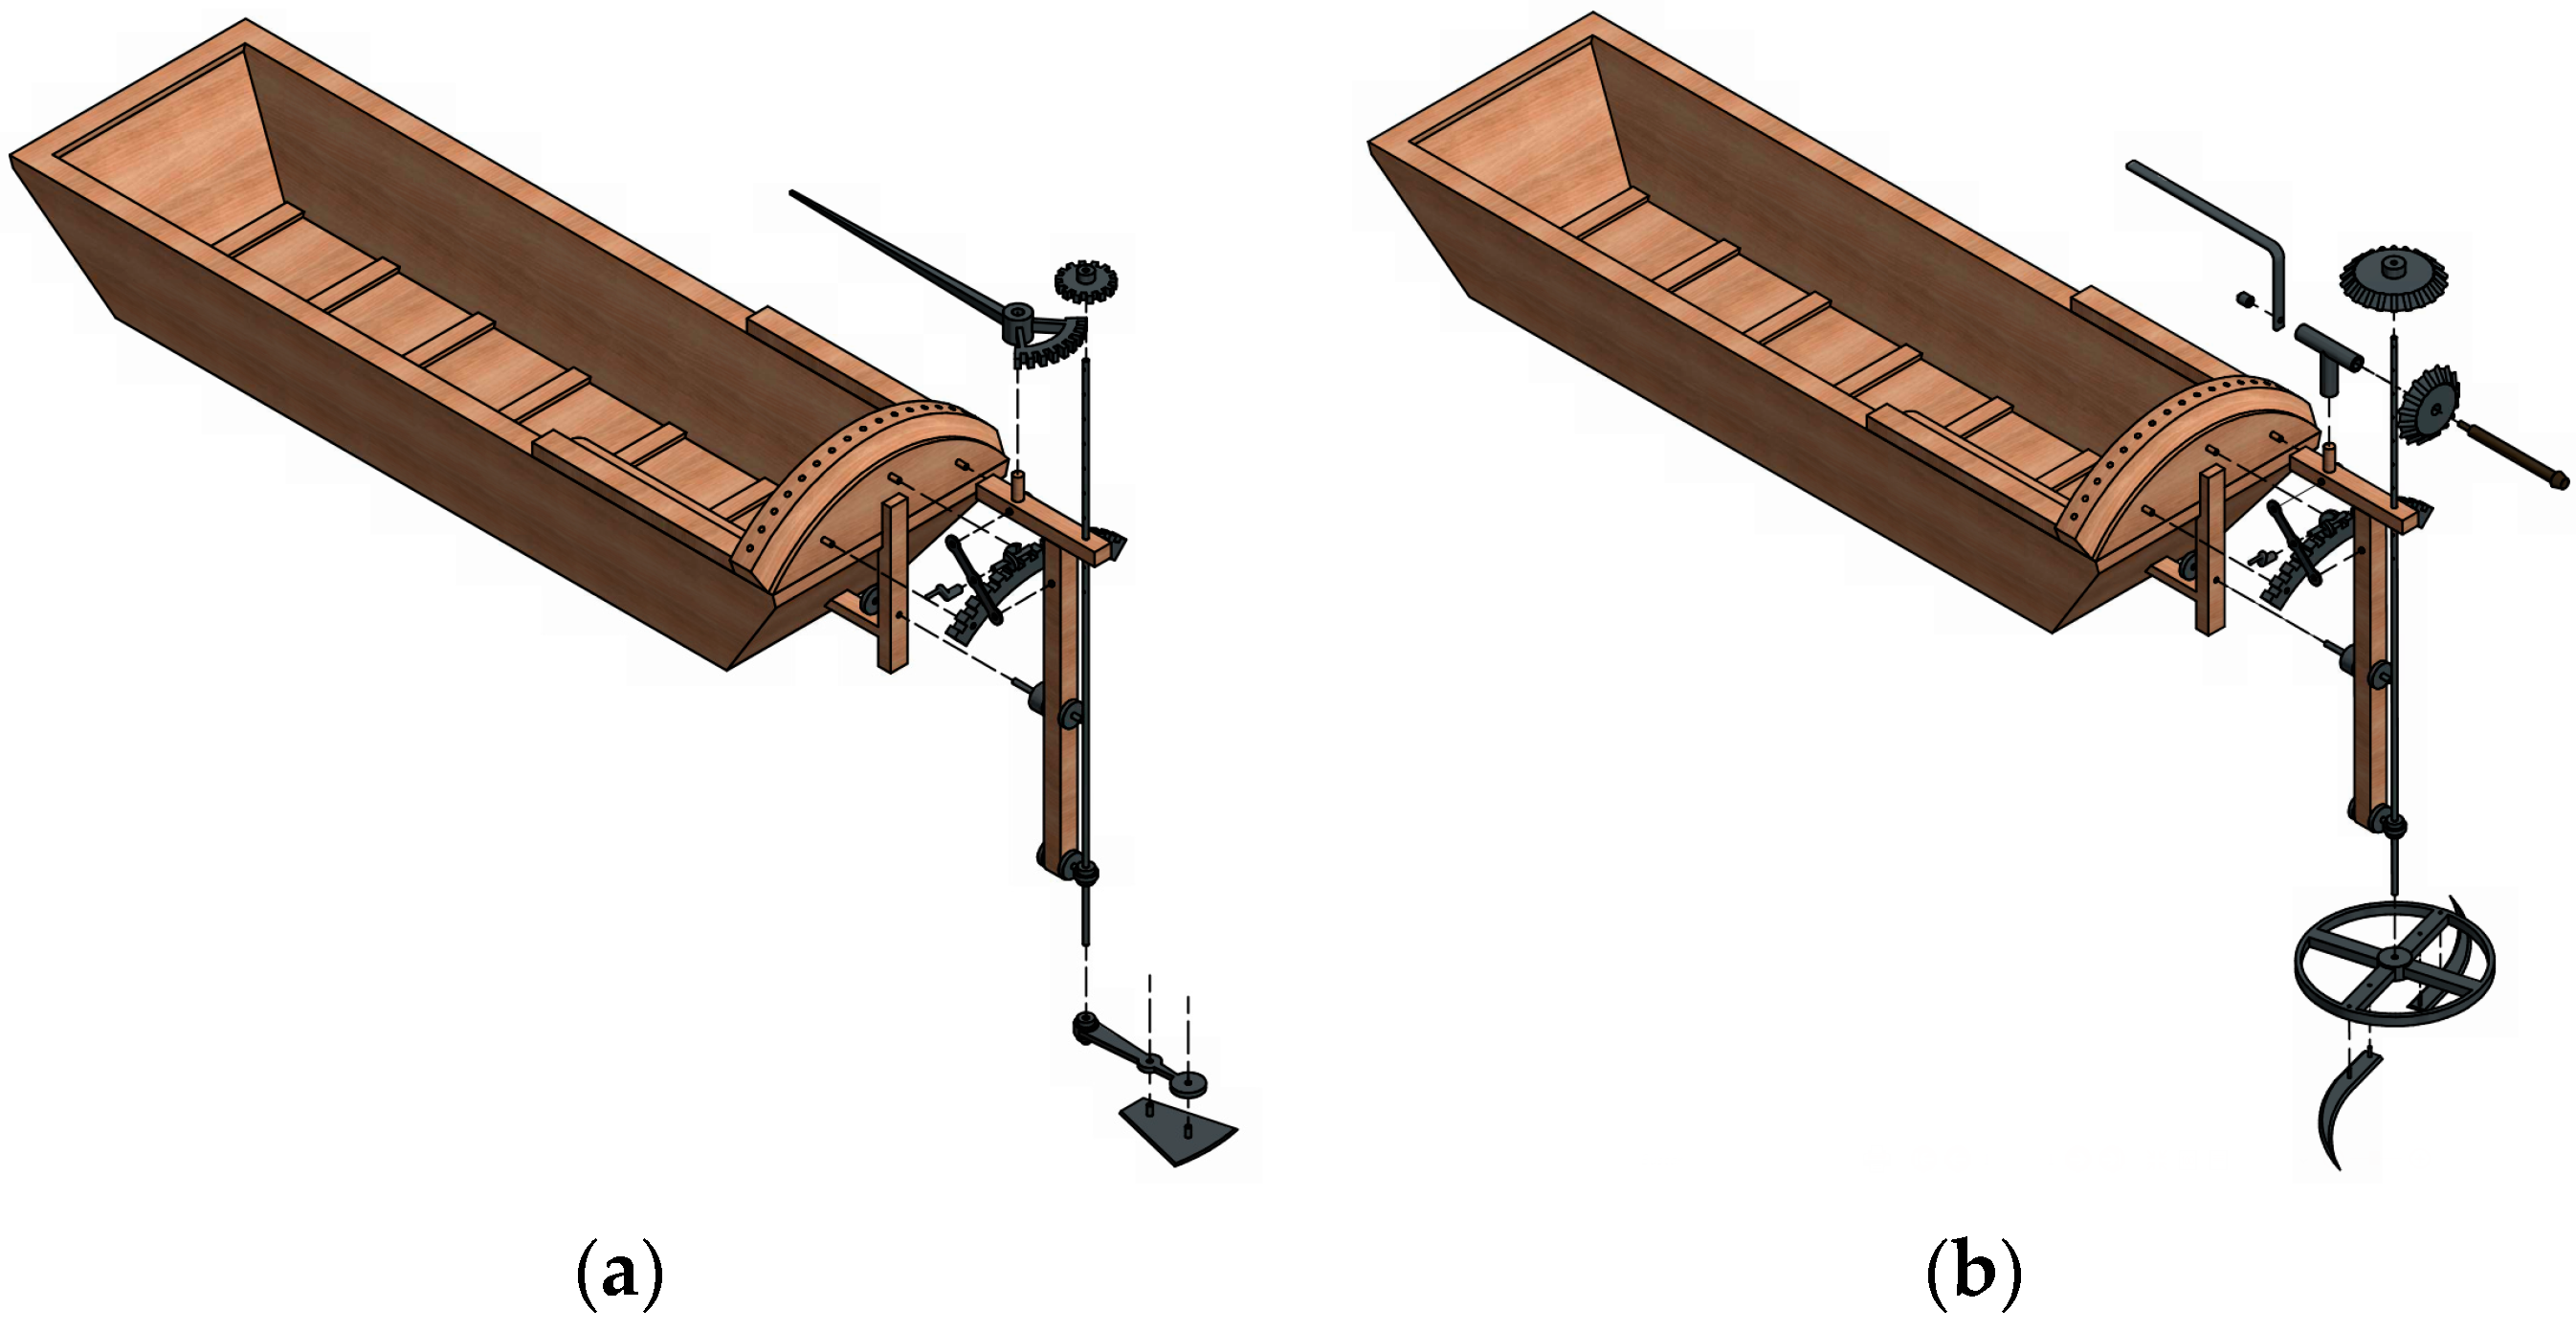
Figure 3 offers an exploded view of the overall machine, for a better understanding of the direction and order of assembly of the pieces of the invention.
As shown in
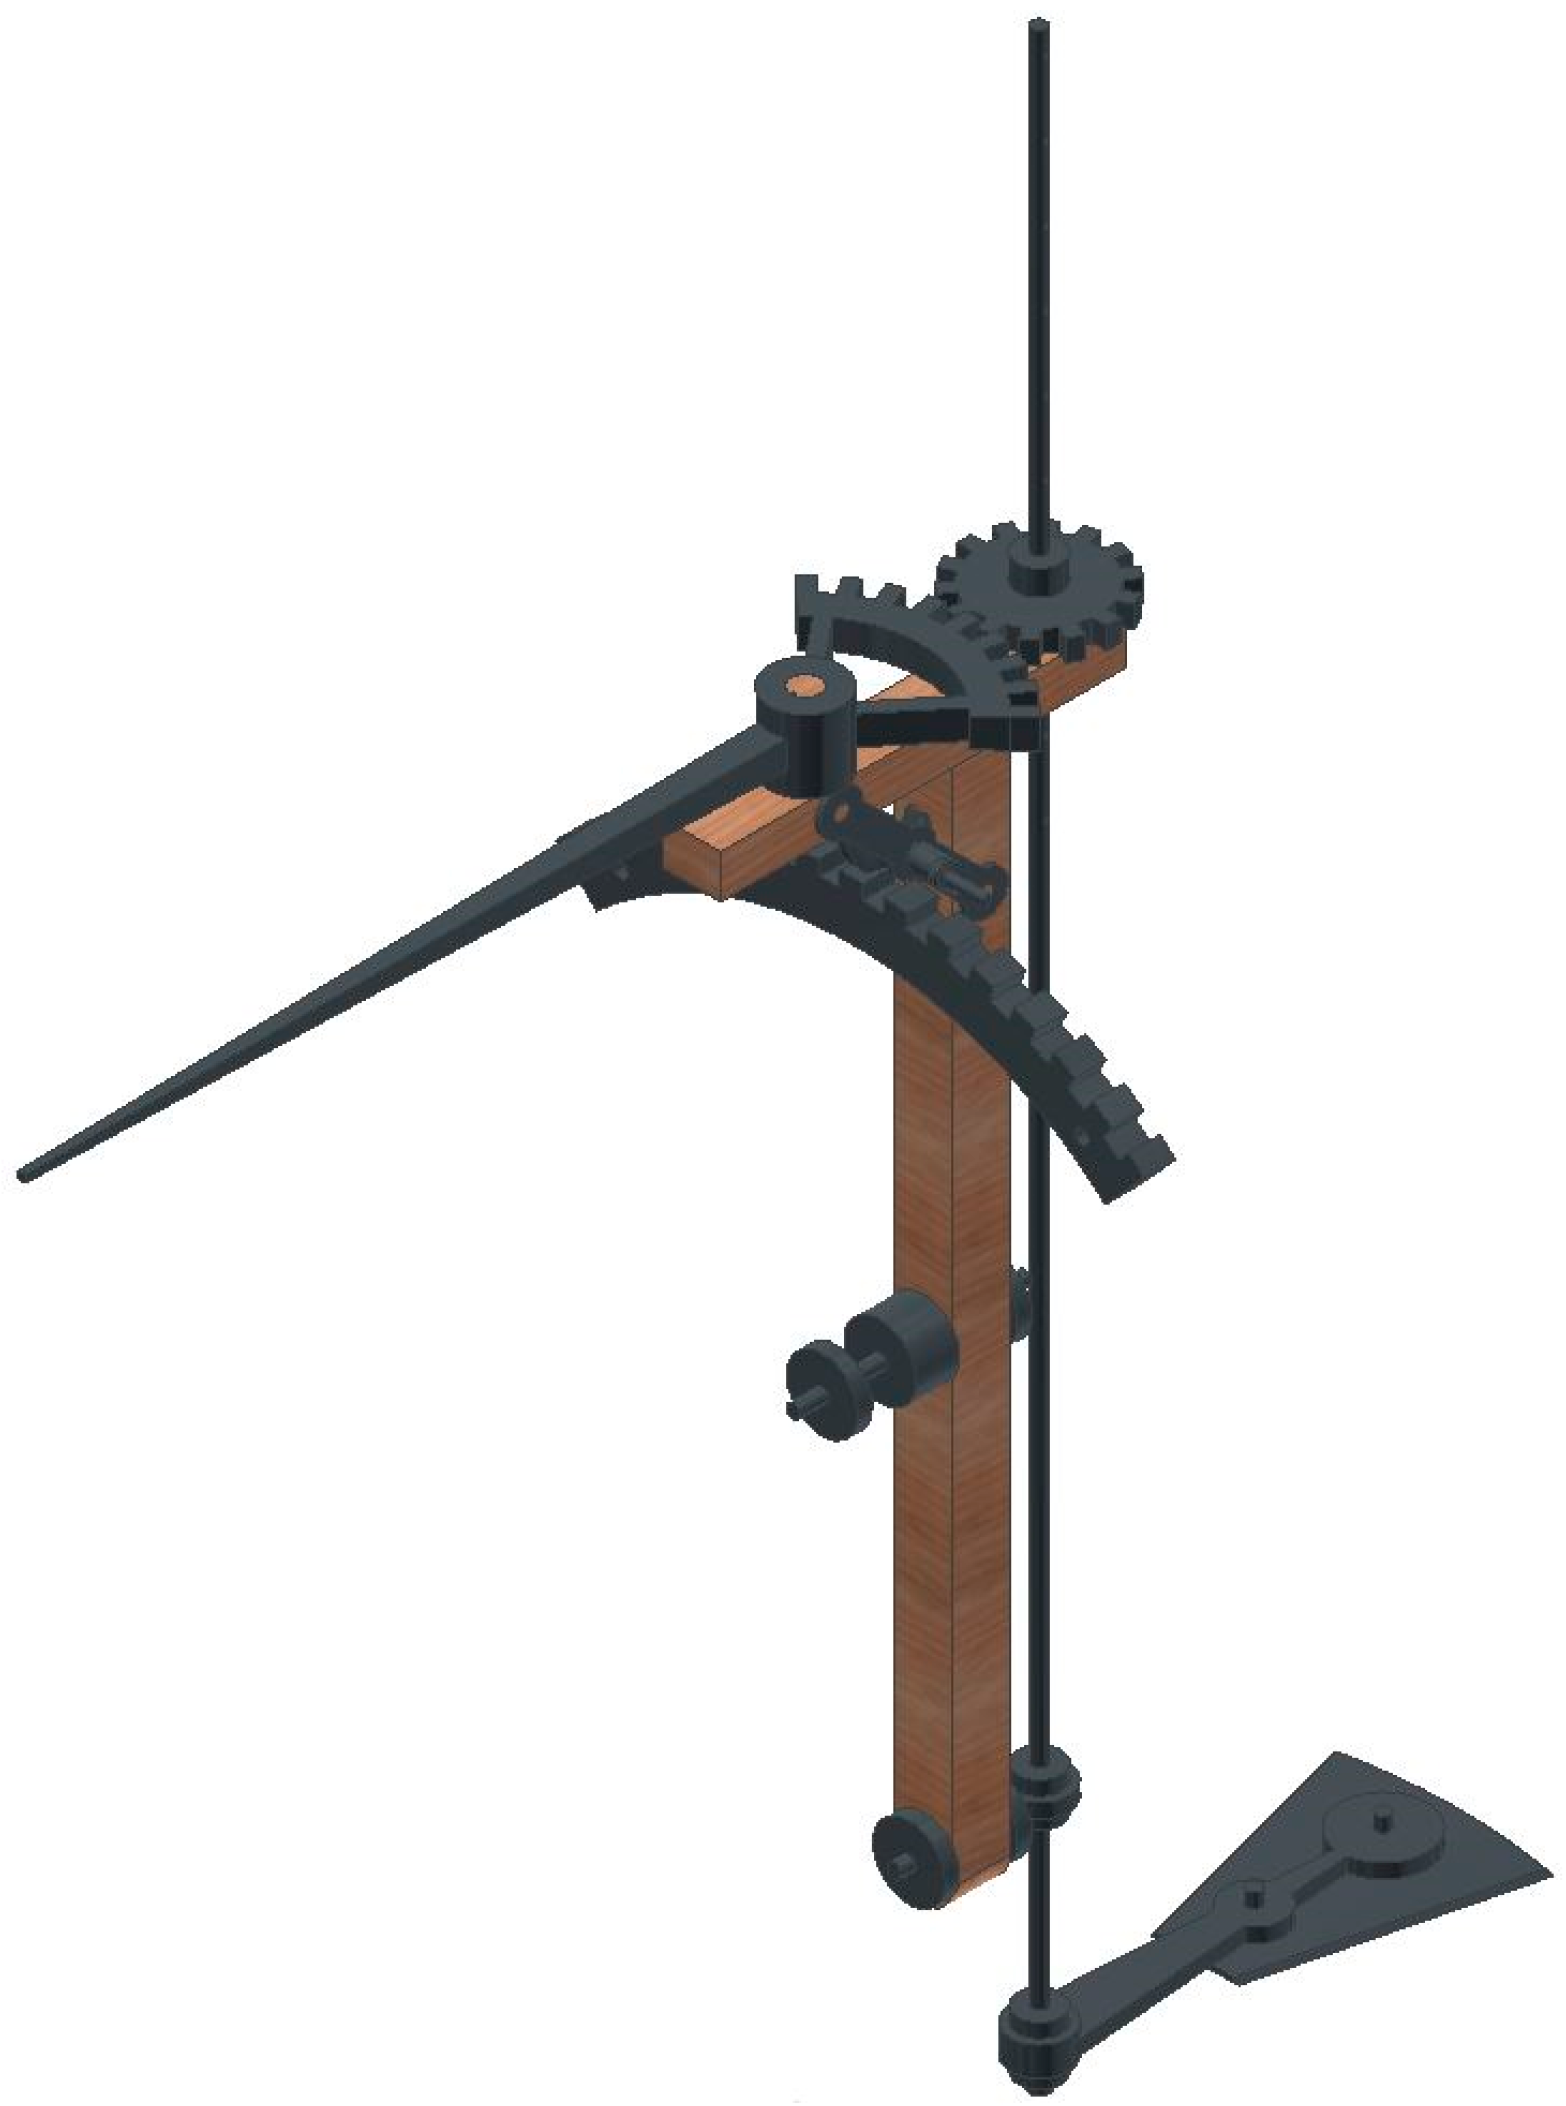
Figure 2, the cutting mechanism is installed in the back of a boat (4) and is practically the same regardless of the blade head used. The fundamental difference in the mechanism in both cases is that the double blade rotates 360° and the single blade turns only 180°, so that the mechanism should be appropriate for facilitating the movement of each head. When the head is single, the blade (12 in
Figure 2a) is fixed by a support perpendicular to the vertical axis (13 in
Figure 2a) that is connected solidly to the vertical axle (1). On the upper end of the axle is a horizontal gear (15 in
Figure 2a) that transmits the movement from a large horizontal turning lever (2 in
Figure 2a) that is used by the operator of the boat. When the blade head is double, the mechanism is somewhat more complex as the purpose is to rotate constantly and this is achieved by a crank mechanism. The two blades (13 in
Figure 2b) are fixed by a support in the form of a wheel (14 in
Figure 2b) and are joined by the support of a solidly connected vertical axle (1). On the upper end of this axle is a tapered gear (18 in
Figure 2b) which facilitates the movement of the vertical axle and thus the blades.
The blades spin propeller-like around the vertical axle. To activate the spinning movement on the vertical frame, there is a horizontal mobile frame (17 in
Figure 2b), and on this frame there is a structure in the form of a T (6 in
Figure 2b) that supports the axle of the crank (5 in
Figure 2b). The crank (3 in
Figure 2b) is solidly connected to another tapered gear (2 in
Figure 2b) which meshes with the tapered gear of the vertical axle. The vertical axle is connected to a mobile vertical frame (11 in
Figure 2a and 15 in
Figure 2b) by two clamps that allow it to turn but impede any other movements. This vertical support is not a fixed axle but rather one that turns on a horizontal axle (10 in
Figure 2a and 16 in
Figure 2b). This degree of freedom allows the blade (or blades) to be tilted for use on the banks of the canal in the form of a talus. The aft of the boat has a built-in quarter gear (6 in
Figure 2a and 10 in
Figure 2b), and this gear engages a worm screw (7 in
Figure 2a and 11 in
Figure 2b) that can be moved tangentially to the right or the left. The screw is connected by two brackets (8) to the vertical mobile frame so that its position can be shifted by turning it the degrees necessary to adapt it to the slope of the waterway bank. The endless screw is activated by a small crank from the boat.
The functioning of the machine involves several aspects. First, the operator of the boat should establish the cutting depth of the blades. For this the vertical axle has a series of holes over its length to set the vertical tapered gear at the desired height. Then, with the use of the small crank of the worm screw, the entire mechanism is moved to the right or left according to the slope of the terrain where the cane or other aquatic plants are to be cut. The position is set by inserting a peg into one of a series of holes arrayed along the surface of the arched wooden part. With this, the boat begins to move through the channel with or against the current. The machine is designed to work lineally along the channel, cutting the plants evenly while the operator of the boat has only to turn the crank constantly to transmit the motion to the blades.
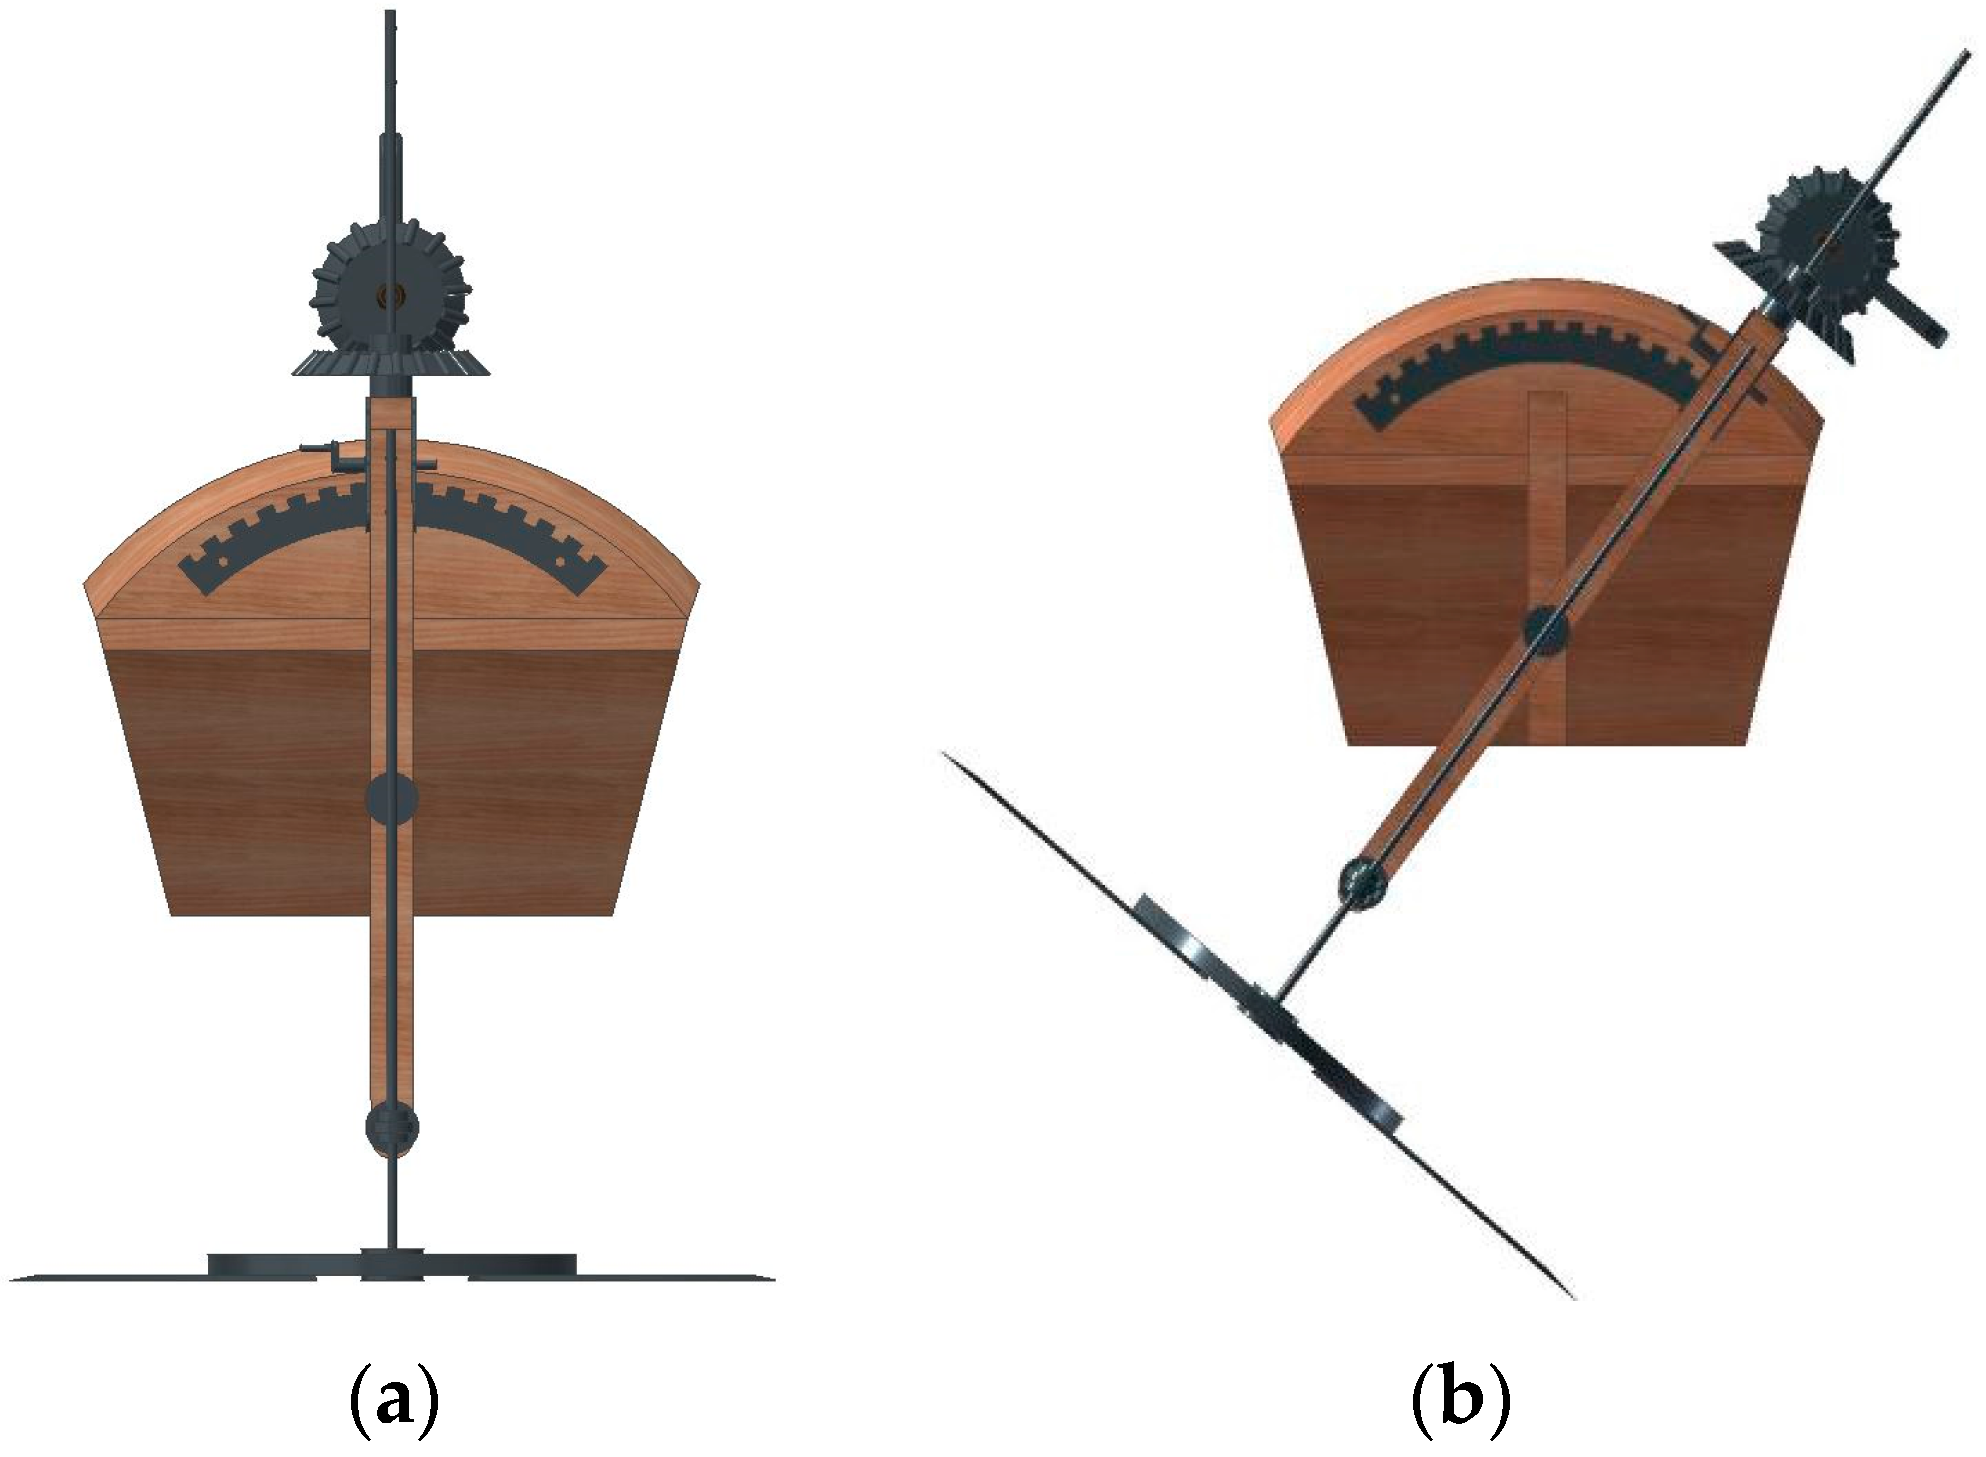
A manuscript in French dated 1805 compares the differences between the machine designed by Betancourt to cut aquatic plants and the one used by Pièrre-Charles Lesage, in preparation to use such a machine in the Midi canal, and thus it is assumed that the Betancourt’s invention was in fact put to use. The originality of this invention was that, on the one hand, the mechanism is far simpler, and on the other it can be adapted to different depths and bank slopes. Thus, it had great operational ease and maneuverability. For the study of the invention and for a further complete static analysis, two extreme positions of the mechanism needed to be considered, whether with the axle centered (as it would be if it cut plants in a flat-bottomed canal) or inclined (to cut plants on the canal banks). These two positions appear in
Figure 4.
3.1. Modeling of the Boat
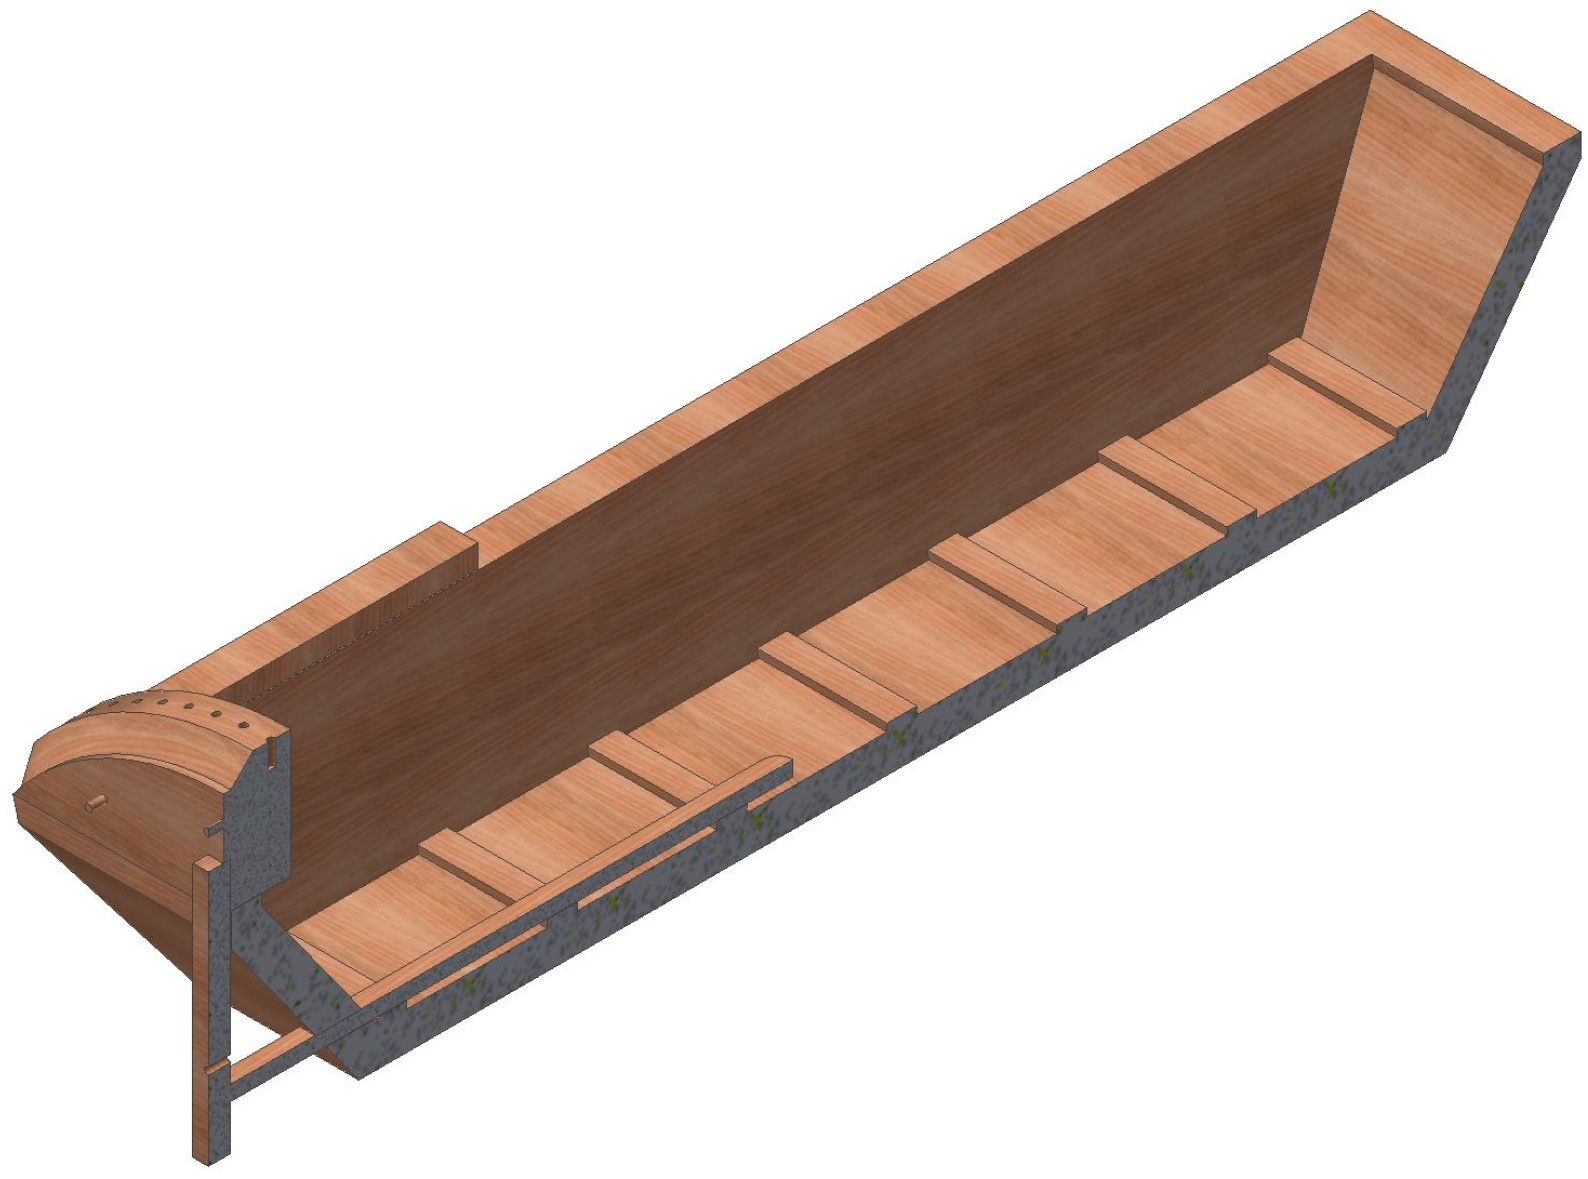
The cutting mechanism is mounted on the aft of a small boat, i.e., 5.43 m long and 1.68 m wide, designed to support little weight. Thus it has a flat bottom without a keel, with a trapezoidal section, which gives it a number of special characteristics. The boat has poor maneuverability since it is designed to be towed by animals from the shore with one or two ropes, but it was designed to present the least resistance to the water and the least depth possible so that it could be used as close as possible to the edges of the canal.
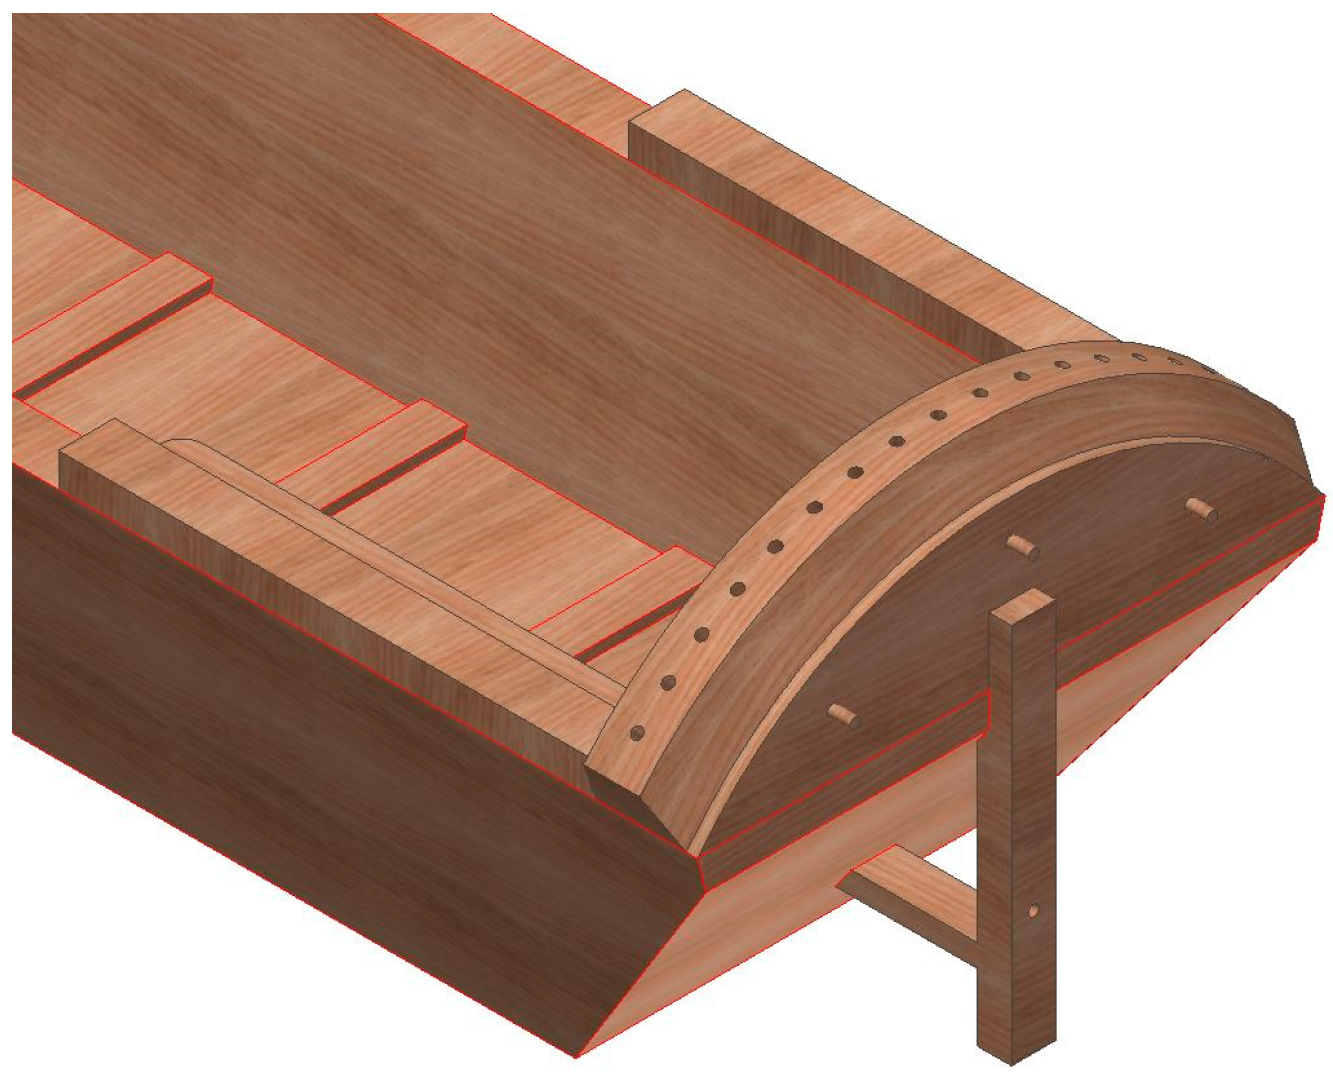
The transom of the trough-shaped boat has a semi-circular piece that rises above the level of the sides and this piece carries the cutting mechanism. For this, certain parts had to be modified for this support function. First, under the transom is a fixed wooden frame in the shape of an L that has a structural function. However, on the transom itself appear three wooden dowels on which the quarter metal gear is placed. Finally, the semi-circular segment is finished by a wooden strip in the form of an arch with holes drilled 10 cm apart that fix the cutting mechanism in a given position with respect to the vertical axle (
Figure 5).
For greater stability and strength, the L-shaped wooden frame is solidly attached to the boat by a screw placed in the lower area of the aft. The frame, in its vertical part, has a hole to connect the horizontal axle over which the machinery will pivot (
Figure 6).
Finally, it should be indicated that the boat and the L-shaped frame were modeled independently for two reasons: On the one hand, they are independent elements although they are fixed and, on the other, when a stress analysis is made, the parts could react differently and thus modeling them as a single part could affect the results.
3.2. Modeling of the Vertical Pivoting Axle
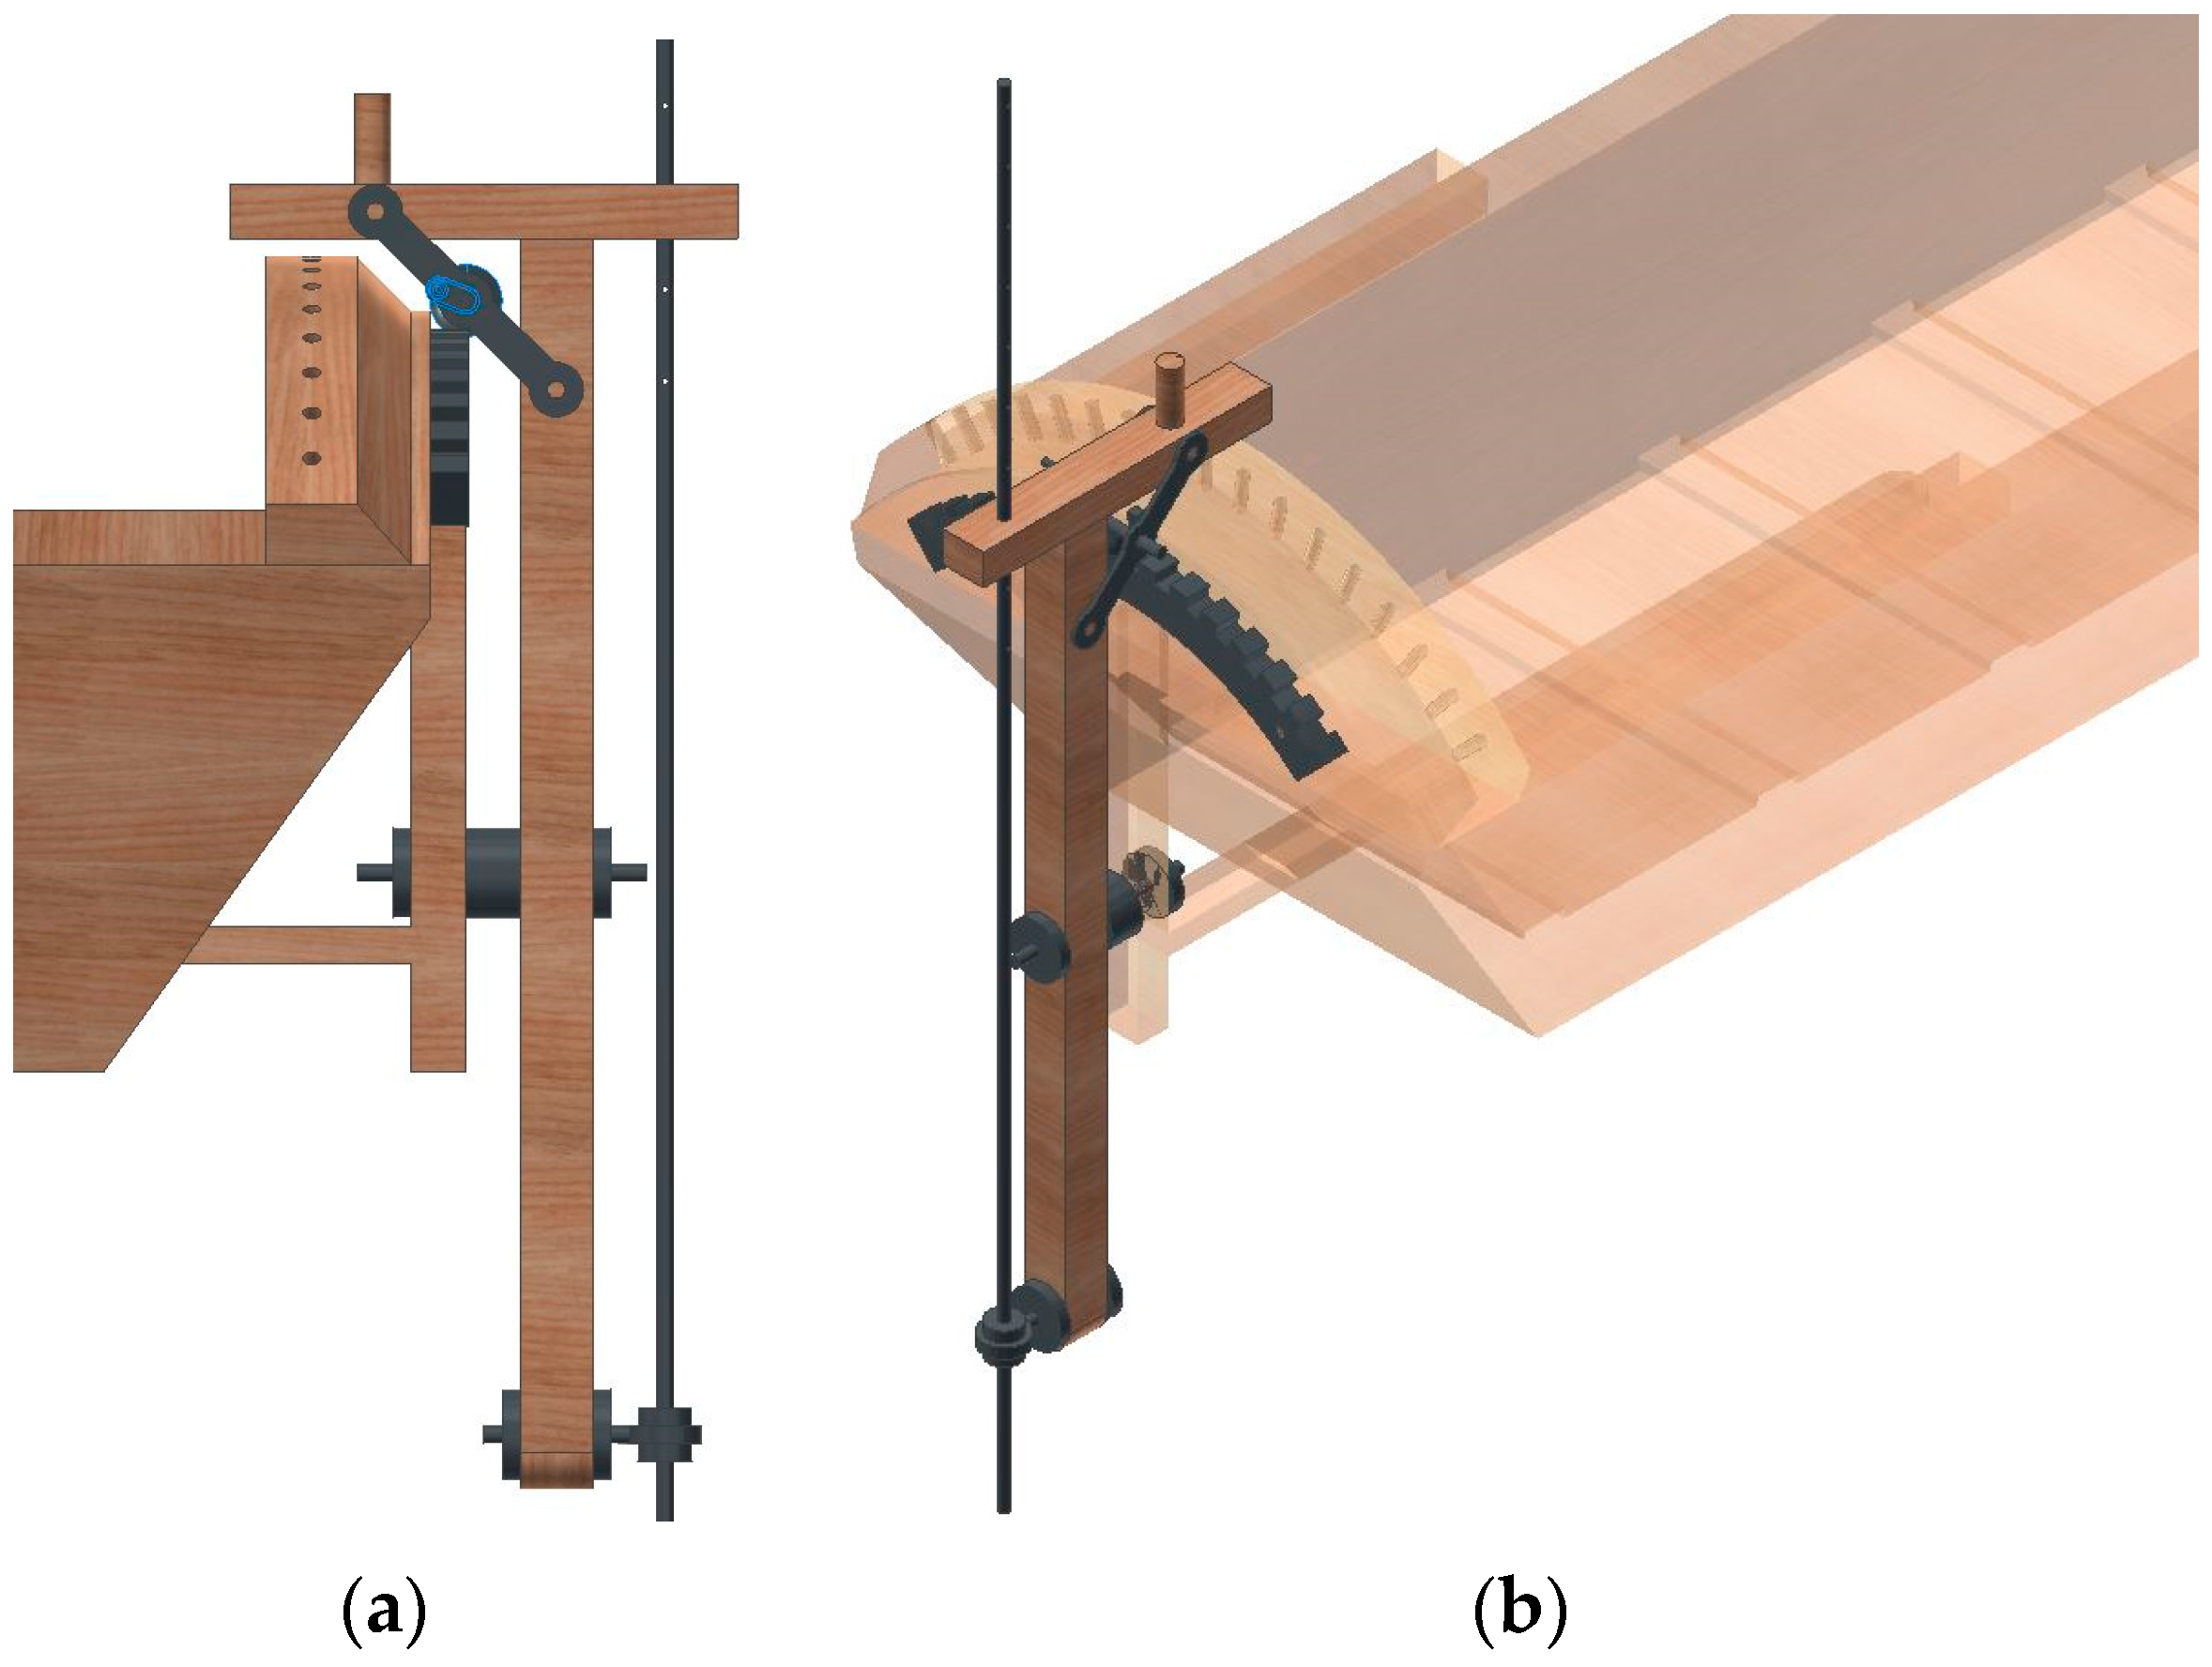
The vertical axle of the mechanism is common for the two types of cutting systems proposed by Betancourt (
Figure 7).
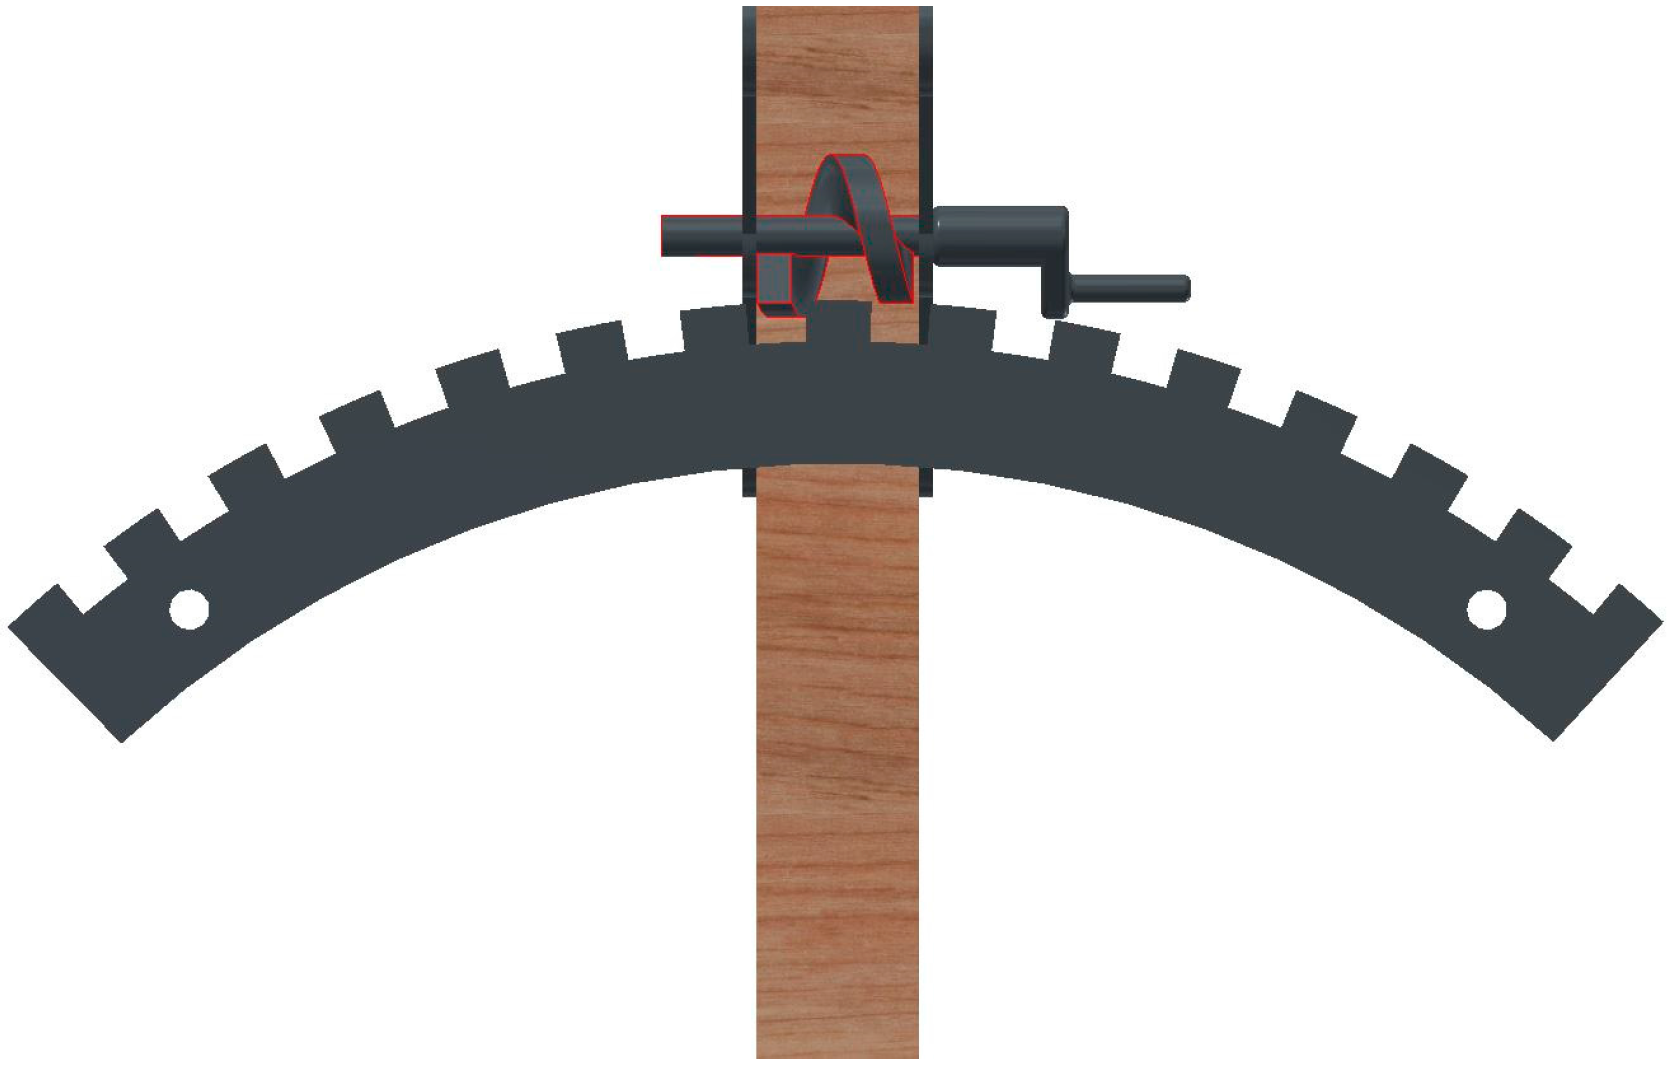
The pivotal axle consists of a main upright wooden member (vertical) placed parallel to the L-shaped frame and joined to it by a horizontal axle of metal that allows it to turn on a vertical plane. The upright piece supports a shorter horizontal wooden member fixed perpendicularly in the form of an offset T, with the function of holding the mechanism that moves the blades. On both sides, diagonally between the vertical and horizontal pieces, two metal knee braces reinforce the pivoting axle and support the worm screw. These knee braces are bolted to the two wooden members and in their middle have the worm screw running between them, which can freely turn in the holes of the two braces when operated by a small crank on one end of the screw. The worm screw, completing the design of the machine, has the specific function of meshing with the quarter gear fixed to the transom (
Figure 8) to set the inclination of the vertical axle. For this, the worm screw has to be tangent to the quarter gear. The radius of the curvature of the gear has to be centered at the same point where the vertical axle pivots, since otherwise the worm screw would not be tangent to the gear and movement would be impeded. The gear must also have precise dimensions for the worm screw to mesh correctly (90-mm space between cogs and 15 cogs on the quarter gear). Without these two conditions, the mechanism could not pivot with respect to the vertical axle (
Figure 8).
The vertical pivoting axle has, finally, two elements more. First, the horizontal wooden member has an orifice in the end opposite the boat (the short side of the offset T) to hold the metal rod that turns for the cutting mechanism. Also, the lower part of the vertical wooden piece holds a brace that supports the rod of the cutter without interfering with its spin.
3.3. Modeling of the Cutting System of the Machine
As mentioned above, Betancourt designed two cutting heads depending on the type of plants to cut in the canal. The mechanism designed up to now is the same for both heads, which have a great advantage to be interchangeable and easy to assemble and disassemble during maintenance. For the most complete study possible, both systems were modeled, as shown below.
3.3.1. Cutting Mechanism for the Double-Blade Head
This is a metal wheel having four spokes, two of which have paired holes to bolt on the two curved blades that act rigidly with the wheel. In the center of the wheel is another hole of greater diameter, through which the vertical rod is passed and solidly fixed for rotation as an axle.
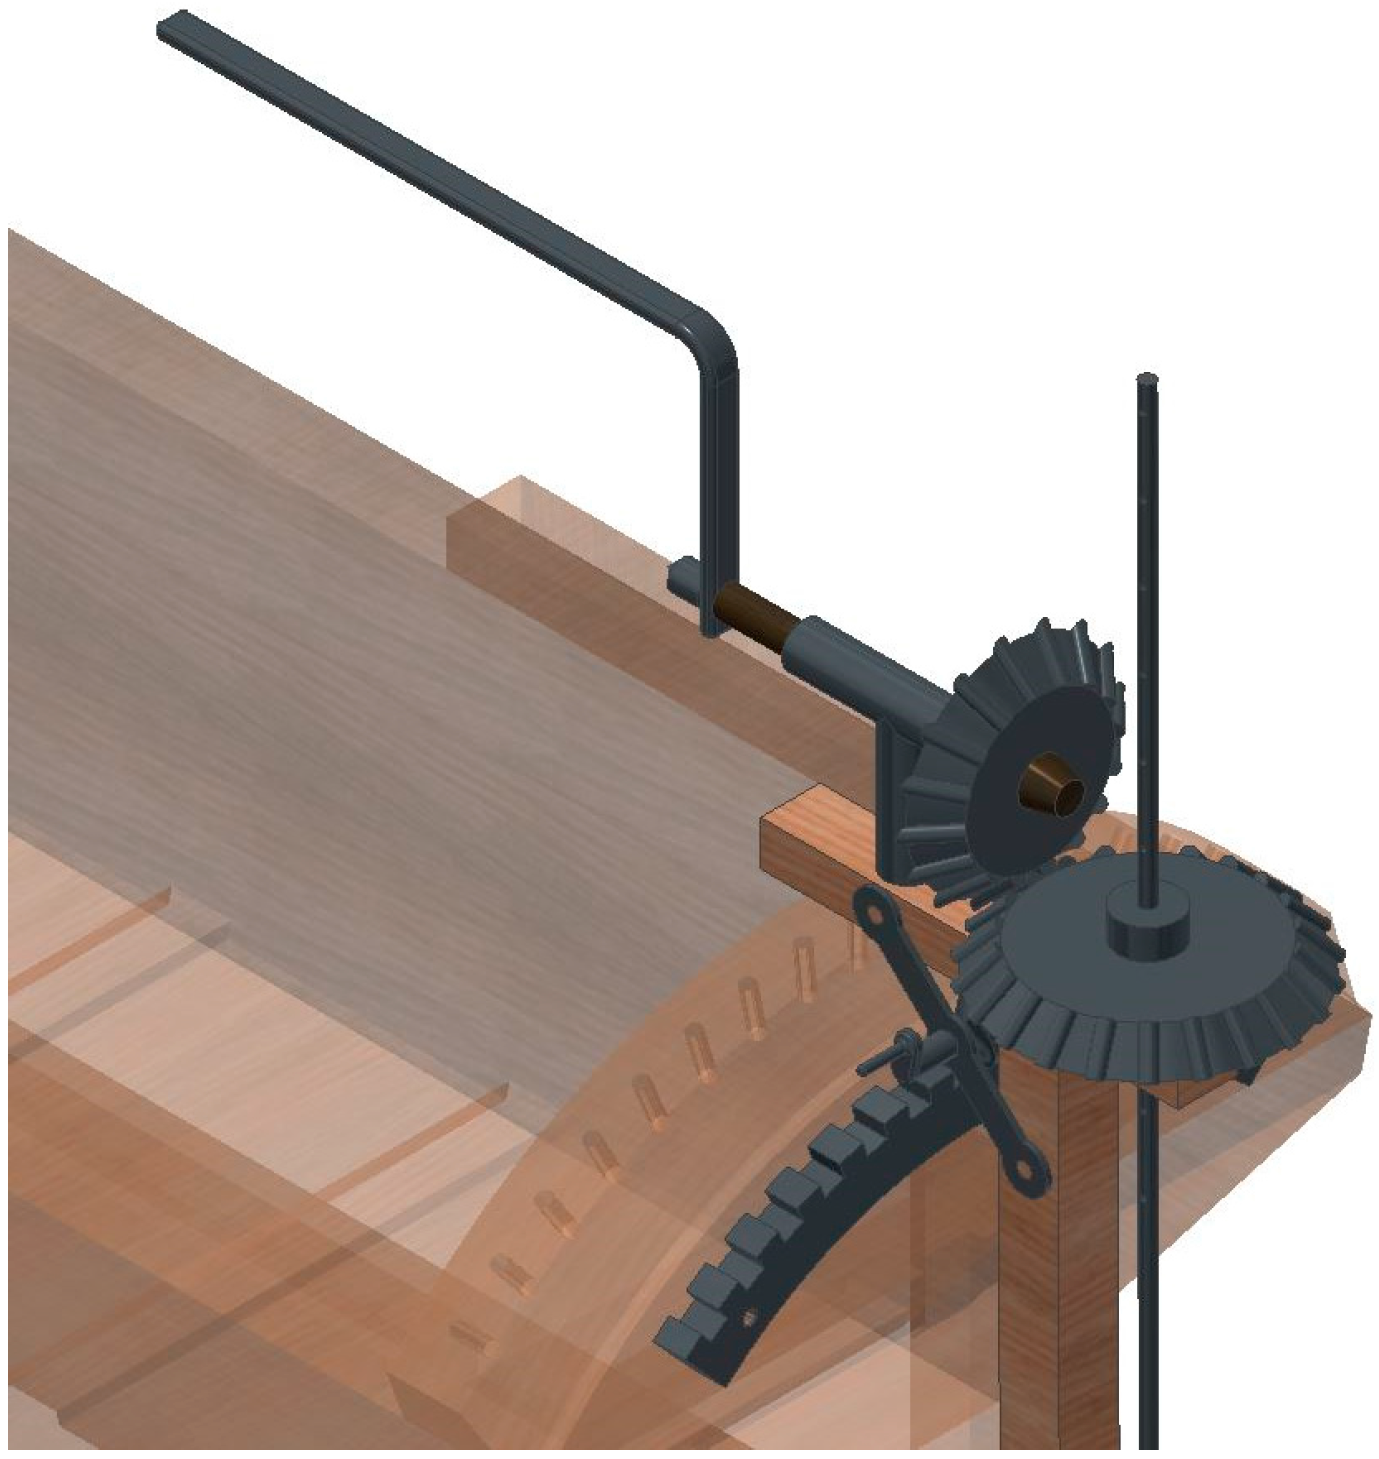
The mobile axle has the peculiarity also designed by Betancourt that every 14.5 cm it is perforated. These holes are to fix a tapered gear to the axle, for three reasons: the depth of the cutting plane can be adjusted; the center of gravity of the cutting mechanism can be situated at the height of the pivoting axle so that the boat does not rock on inclining the vertical axle to work at a given angle; and the hole nearest the bottom of the axle serves to fix the support of the blades in a rapid and simple way with a pin (
Figure 9).
The last element to model is the crank to turn the entire cutting mechanism. As indicated above, the horizontal wooden member of the pivoting axle has a wooden pin positioned to fit into a T-shaped frame that holds the crank. This crank has a wooden core but the handle is metal to prevent wear. The crank is connected to and moves tapered gear that is fixed and engages the tapered gear of the vertical rod of the cutting blades. The relation between the cogs of the tapered gears is 11:8, to facilitate the turning of the crank. Furthermore, the dimensions of the crank are appropriate to overcome the great moment of inertia of the blade wheel (
Figure 10).
3.3.2. Cutting Mechanism for the Single-Blade Head
This is a linear support with a pair of holes to be fixed to the blade shaped like a mattock, acting solidly with its support and carrying a hole in its end to insert the vertical rod. This rod, turning solidly with the blade is the same one used for the double blade and offers the single blade the same characteristics as the double.
Finally, the operation of the single blade, since it does not spin, is much less articulated than the double blade. This requires a lever that ends in a quarter gear. The lever is perforated to place it on the wooden dowel of the pivoting offset T support. However, the inertia of the single blade is far less than for the double blade and thus can be used with a much lower gear ratio than in the previous case (13:32). This signifies that a small turn of the lever moves the blade considerably (
Figure 11).
3.4. Final Assembly
The final result of the modeling and assembly of the different parts are presented in
Figure 12. This is a rendered image of the model using Autodesk Inventor Studio, an application that incorporates the software itself.
To assemble the mechanism, firstly the boat is fixed, as it will be the true support for all the machinery. The transom has three dowels and a hole to accommodate two important parts: a quarter gear and a fixed frame for the machine. Thus the quarter gear, when its holes are aligned, is fixed to the dowels and for this a restriction of coincidence is defined with respect to the holes of the gear and opposition against the contact planes. Next, the L-shaped frame is inserted into the hole of the transom, and for this, it is necessary to define, a restriction of coincidence with respect to the hole. However, as there is still a degree of freedom with respect to the longitudinal axis of the boat, so that this must be restricted by resting the vertical part of the frame against the transom. On this part, called the fixed frame, the horizontal axle on which the cutting machinery will pivot must be inserted. The axle can turn freely in the hole of the frame but its geometry prevents it from having greater freedom of movement. For this to be defined, it is necessary to define a restriction of coincidence with respect to the hole, and another of opposition against the contact planes.
Next, the pivoting axle must be assembled. Again, the restriction of coincidence is defined between the hole of the mobile vertical axle and the horizontal axle and the restriction of opposition between the contact planes. In this way, the pivoting axle turns with freedom with respect to the horizontal axle. However, there is a hole in the lower end of the pivoting wooden member, and through this point the clamp is inserted to hold the vertical rotating rod. For the clamp, again, a restriction of coincidence is defined with respect to the hole and in opposition to the planes of contact. In principle, this clamp can be freely turned, but when the rotating rod is inserted, this degree of freedom is lost.
The vertical rotating rod must be aligned first with respect to the pivoting member as this will facilitate the following operations. Again, two restrictions of coincidence are defined with respect to the hole of the clamp and the hole in the upper part of the pivoting member. These restrictions allow the axle to rotate with freedom and move freely with respect to the vertical axle.
Next, the head of the cutter is fitted to the rotating rod. Prior to this step, the aforementioned two heads are assembled. This simple assembly is also made by dowels and a restriction of coincidence is used with respect to the hole and opposition against the contact planes. This makes the blades and their supports function solidly together. As mentioned above, the blades have a hole where restriction is defined with respect to the rotating rod. From here on, the blades move solidly with respect to the vertical rotating rod.
The upper part of the mechanism is assembled next. First, the upper gear is fixed to the vertical rotating rod and for this the restriction is coincidence with the hole and opposition to the upper side of the horizontal member of the pivoting axle. This gear moves solidly with the vertical rotating rod. Furthermore, it does not matter which head is used, since the restriction is the same whether the tapered gear or the quarter gear is used.
To make the mobile axle pivot, the straight quarter gear situated on transom is used. Firstly, the two knee brackets are inserted into their position, imposing restrictions by matching their holes with the dowels that the pivoting axle has for this reason. Furthermore, to avoid movement with respect to the transverse axis, a restriction must be introduced in each bracket plus opposition with the sides in contact with the two wooden members of the pivoting axle. When the axle is defined, the worm screw must be inserted between the two brackets and for this the same restriction of coincidence is used with the holes for this purpose in the center of the brackets. The worm screw has a smaller diameter on both ends to fit the holes of the brackets. In addition, for the simulation to be realistic, a restriction of opposition of one of the ends of the worm screw must also be defined with respect to the sides of the brackets, thereby eliminating the possibility of the movement in the direction with respect to the transverse axis. In this way, the worm screw turns freely, moved by the crank, which it has on its left end.
The most delicate part of the assembly is that of simulating the movement of the worm screw with respect to the quarter gear attached to the transom. This restriction has perpendicular directions, since, while the crank turns on one plane, the gear is on another perpendicular. Autodesk Inventor Professional permits this relation of turning, but for each revolution of the worm-gear crank, the gear will turn one cog. The quarter gear has 15 cogs (and if it were a complete gear it would have 60 cogs), and thus the gear ratio is 1:60 (60 turns of the crank to turn 360 degrees of axis pivot).
Finally, the mechanism for moving the machine remains to be assembled. This part is indeed diverse, attending each type of cutting head, as commented above. If the head is simple, it suffices with the restriction of the hole in the middle zone of the lever and the dowel located in the horizontal member of the pivoting axle. The restriction would be exactly equal to those mentioned above. The only novelty in this regard is that the gears of the lever and of the upper part of the rotating rod must also function when engaged. For this, it suffices to define a restriction with respect to the turn (one clockwise and another anticlockwise) with a gear ratio of 12:32, as commented in the modeling of this piece (
Figure 11).
If the head is the double blade, then the assembly is somewhat more complex. Firstly, the T-shaped frame must be fitted onto the dowel mentioned above. To fix it, it must be restricted first by making the lower bore of the frame coincide with the dowel, but also, as it should not turn freely, the opposite sides should be restricted, and finally, in one of the vertical holes it must be restricted so that its direction is always parallel to the transom. The next step is to introduce the horizontal axle of the crank through the bore of the frame, and for this the axle is restricted to the bore. This piece, thus defined, turns freely but also has freedom of movement along the longitudinal axis. Next, the metal handle of the crank is fitted to the horizontal axle. On the end of this handle is a hole through which the axle passes, being the restricted, as in all of these cases, by the bore between the horizontal axle and the hole of the handle. This hole is not circular, to avoid turning, and thus is also restricted by opposition to the contact sides, for which the movement becomes solid.
Finally, the tapered gear is inserted. For this, the horizontal axle is restricted with the hole of the gear and afterwards movement is restricted with the surface of the T frame. In this way, both the axle as well as the gear is fixed, impeding their movement in the longitudinal direction. The last restriction that must be defined is between tapered gears. This restriction is made with respect to the turn, taking into account that the two will turn in opposite directions (as between the worm screw and the quarter gear). Therefore, the definition is made in contrary directions (clockwise and anticlockwise) and with a gear ratio of 11:8 (11 turns of the crank for 8 of the blades) as reflected in
Figure 10.
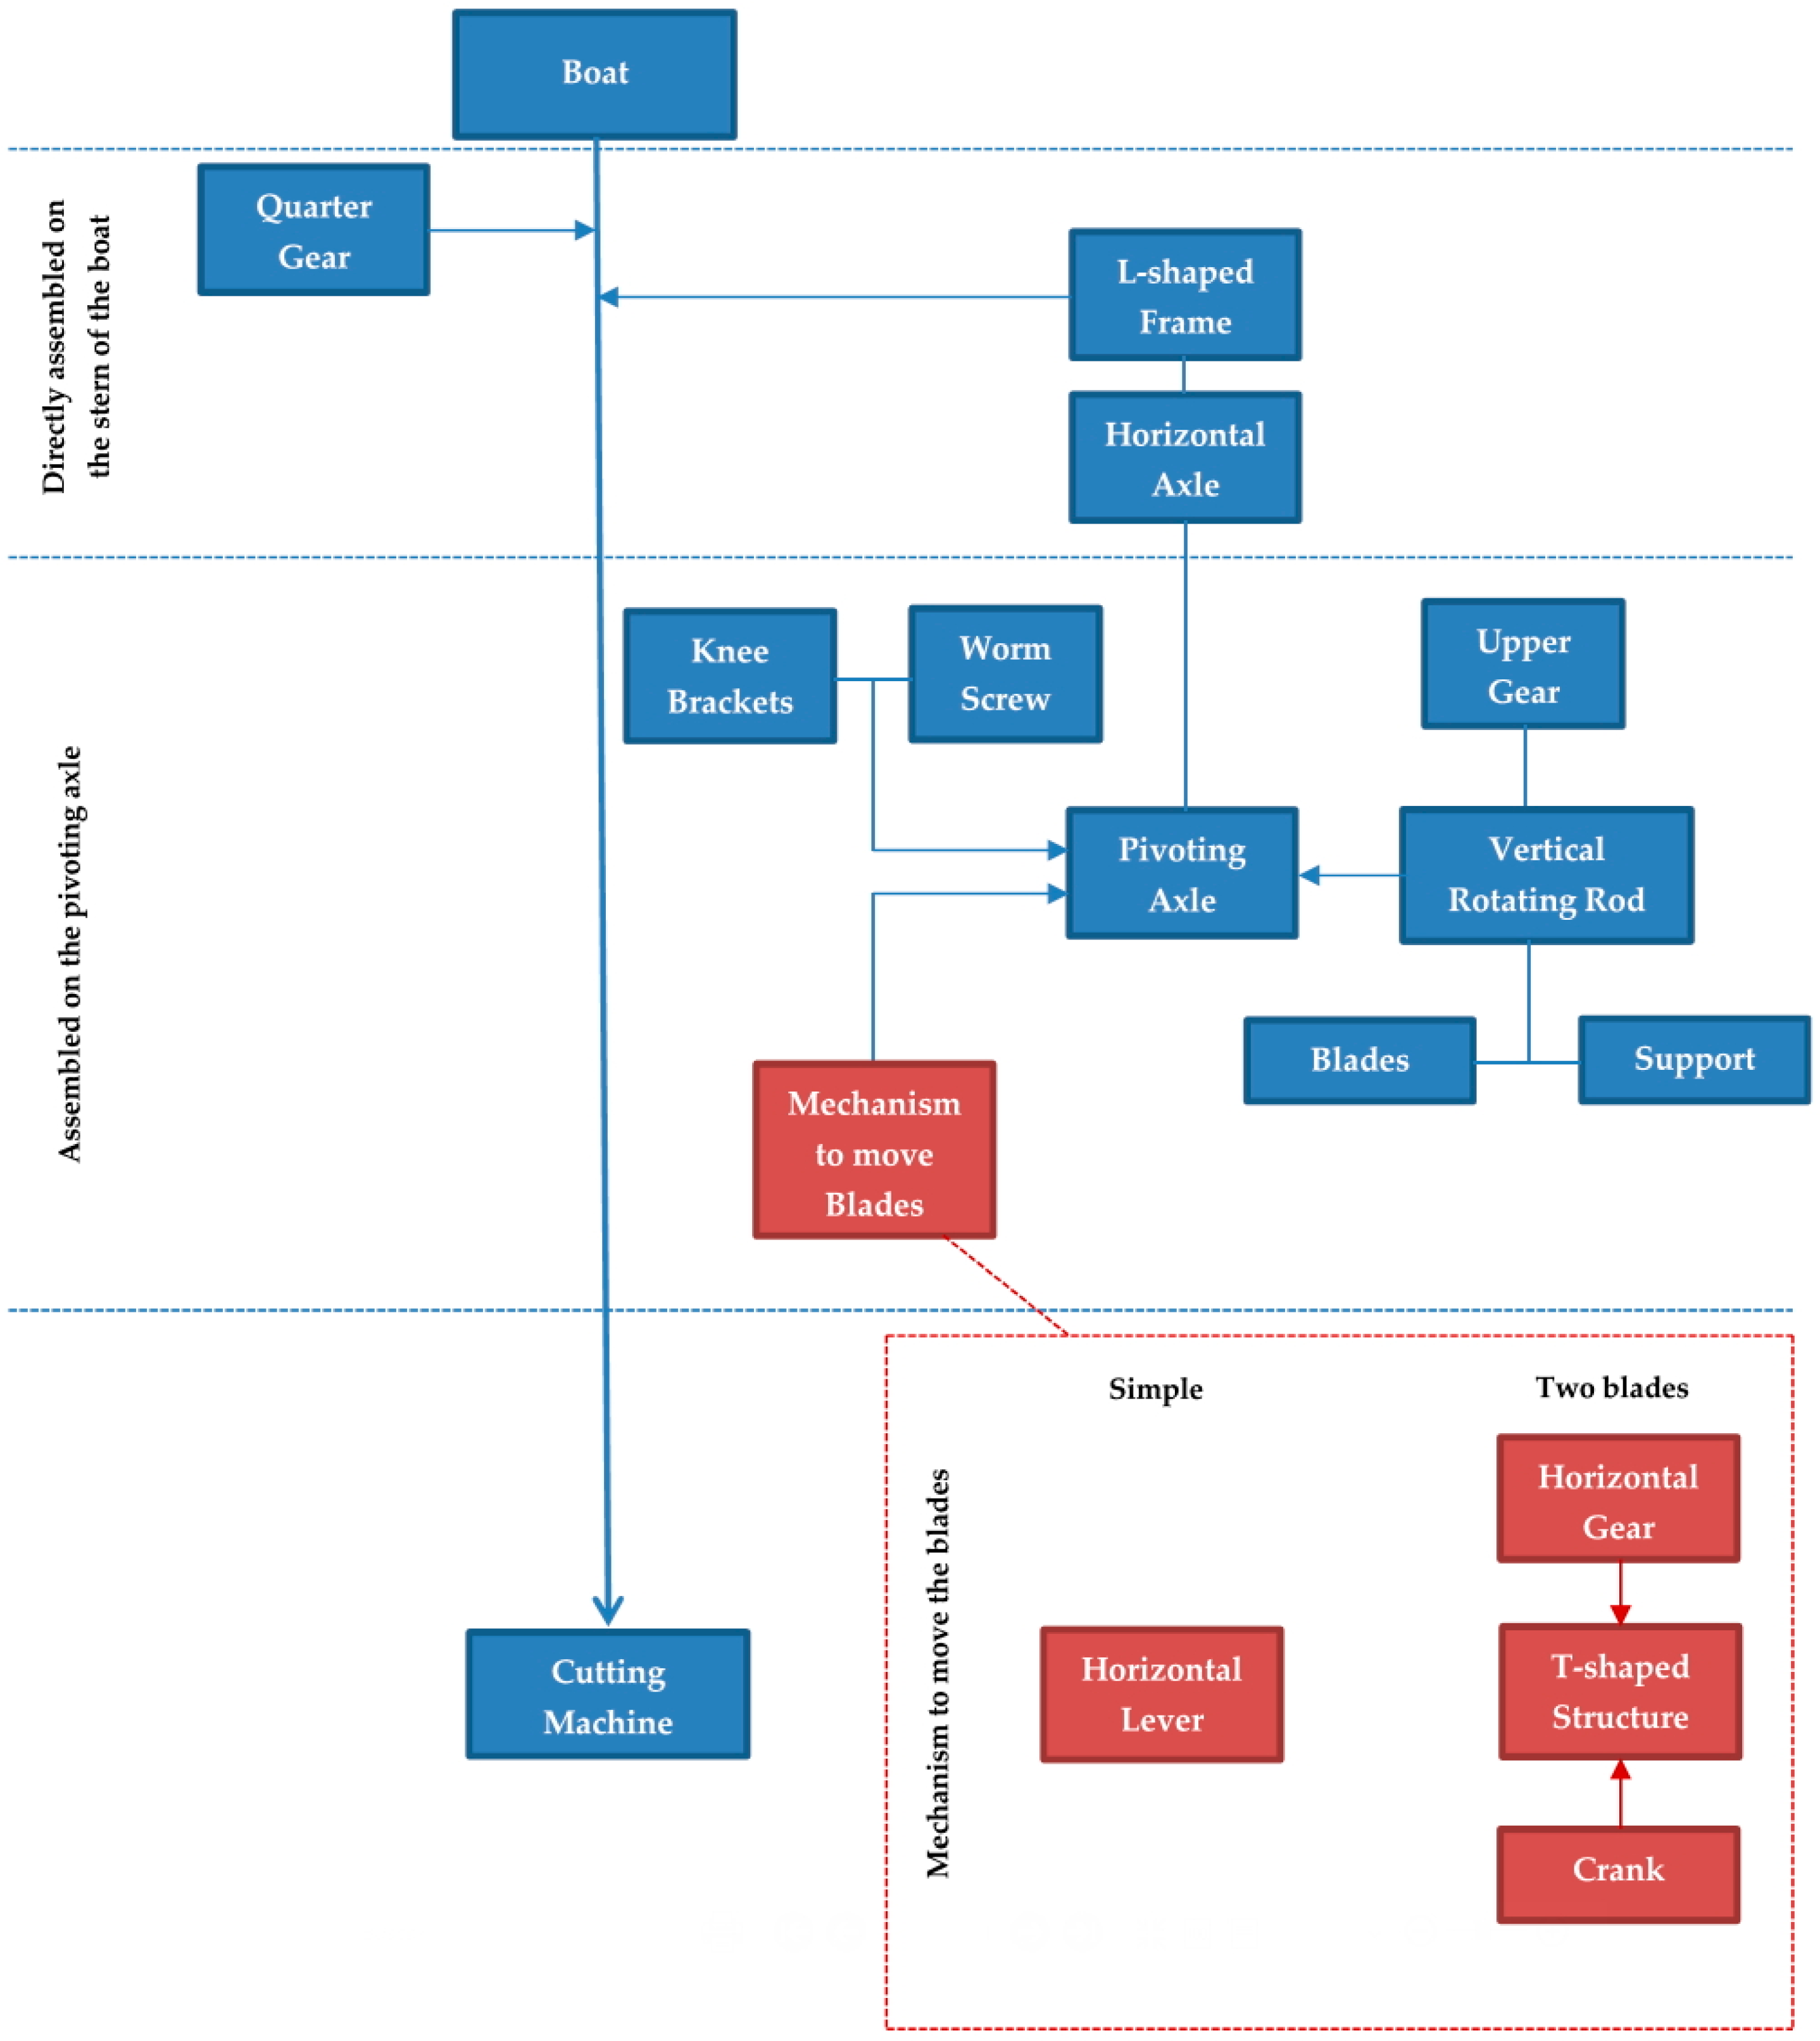
To summarize the assembly process, a scheme is shown in
Figure 13.
4. Conclusions
The present study presents the way to build a 3D model of one of the inventions of Agustín de Betancourt y Molina, the machine to cut cane and other aquatic plants in the canals and other navigable waterways, based on the scant documentation available. In this effort, computer-aided design (CAD) techniques were used from the parametric software Autodesk Inventor Professional.
As the original illustrations were not to scale, the modeling of this invention required dimensional hypotheses as well as geometrical and functional ones, which have given rise to restrictions of movement necessary to simulate the functioning of this mechanism.
The 3D modeling has served to understand, from a point of view of the design, what makes of Betancourt’s machine a singular invention. It was known that the machine had been awarded in its time, but as a result of the present article, we know the reason: easy assembly and maintenance, capable to adapt to various slopes and depths, easy to exchange the types of cutting tool, simplicity for maneuverability, and stability of the boat despite of the slope of the cutting plane.
Future studies will be based on this model in conjunction with the format STL (STereo Lithography), which permits 3D printing, since the software used in this research provides sufficient detail for such an impression of a scale model. 3D printing could be used for hydrodynamic studies that want to characterize the behavior of the fluid around the boat, as well as for the explanation of its operation from the educational point of view.
However, this work has been the starting point for the static analysis of the invention, using CAE (Computer-Aided Engineering) tools that incorporate the program, observing von Mises stresses, the coefficient of safety, and the displacements of the invention, as well as the use of methods of confirmation when needed [
19]. In this reference, it has been shown that the choice of materials and the dimensioning of the machine are correct, since the limits of resistance and elasticity are not exceeded in any point of the invention, so the execution of the machine could be carried out.

