Article

Applying the SMED Methodology to Tire Calibration Procedures

by
Vitor Santos
1,
Vitor F. C. Sousa
1,2,
Francisco J. G. Silva
1,2,*,
João C. O. Matias
3,
Rúben D. Costa
1,
Arnaldo G. Pinto
1 and
Raul D. S. G. Campilho
1,2
1
ISEP—School of Engineering, Polytechnic of Porto, 4200-072 Porto, Portugal
2
INEGI—Institute of Science and Innovation in Mechanical and Industrial Engineering, 4200-465 Porto, Portugal
3
DEGEIT, UA—Department of Economics, Management, Industrial Engineering and Tourism, 3810-193 Aveiro, Portugal
*
Author to whom correspondence should be addressed.
Systems 2022, 10(6), 239; https://doi.org/10.3390/systems10060239
Submission received: 31 August 2022 / Revised: 23 October 2022 / Accepted: 25 November 2022 / Published: 2 December 2022

Abstract

:
Due to the automotive industry’s strict demands, customers submit constant production pressure, leading to the adoption of new methodologies, techniques, and management ideas. The goal is always to minimise losses and waste. These demands also affect the maintenance department, which has to keep the balance between machines’ availability for production and ensuring that the machines’ proper running conditions translate into excellent-quality products. Thus, continuous improvement and correct management of maintenance activities are crucial for a company to maintain effective production, without defects, breakdowns, and accidents. Nevertheless, some maintenance activities should also prevent the degradation of equipment conditions in order to produce high-quality products. This paper presents an improvement of maintenance activities conducted on equipment that produces large tires. The main problems and technical difficulties of Machine Tolerance Check (MTC) activities are explored by analysing existing documents, internal knowledge, and changes to working methods. We discuss the implementation of the SMED (Single-Minute Exchange of Die) methodology in calibration procedures, as this method is commonly applied to machines’ setups to reduce downtime. At the end of the study, a 31% decrease in the duration of machine tolerance check activities was achieved, which led to a significant increase in the equipment’s availability.

1. Introduction

1.1. State of the Art

TPM (Total Productive Maintenance), the most adopted management philosophy for maintenance activities, is an alternative method that integrates maintenance concepts and quality through daily inspection performed by trained operators. Its implementation aims to eliminate the significant stoppage causes, changeovers, and breaks in production [1,2]. One of TPM’s fundamentals is focused maintenance—that is, systematic identification and mitigation of losses [3]. SMED is a mitigation loss analysis method that reduces downtime and is commonly applied to machines’ setups [4]. Lack of quality accounts for a significant amount of production losses [5]; as such, the machines’ performance must be guaranteed, thereby avoiding problems related with lack of quality. With regard to the tire industry in particular, more companies are adopting preventive and predictive calibration to avoid machine precision errors. The frequency of calibration is a commitment to balancing production pace with the need to maintain quality levels [6].
SMED is a methodology first introduced by Shingo [7] in 1985 to tackle the increasing necessity of setups due to small batch sizes and high variation in production. A setup refers to a set of activities to prepare a machine for manufacturing a product. Even though the methodology is old, recent research shows a higher volume of publications in recent years, showing that SMED is still used as a management tool for process improvement [8]. Silva et al. [4] concluded that SMED should be implemented with other lean tools such as 5S, standard work, kaizen, Overall Equipment Efficiency (OEE), total productive maintenance, poka-yoke, Value Stream Mapping (VSM), A3 methodology, and visual management in order to be effective. Moreover, the study recommended the involvement of senior management for team motivation and monitoring results for consolidation of gains. Monteiro et al. [9] conducted a study of a metalworking company that supported these claims, concluding that using just one lean tool is ineffective. They used the tool VSM to correctly identify problems, and the implementation of SMED allowed a 40% reduction in setup time [9]. Sousa et al. [10] conducted a study in the cork industry, in which they used SMED combined with VSM and an A3 model to monitor the project’s development, which led to a 43% reduction in changeover time. The DMAIC cycle was successfully applied in a recent study [11], leading to an increase in production. One of the management tools used was SMED—specifically in the improvement phase, to reduce the changeover time. This application led to a production increase of 44% in the manufacturing of wood products. One way to know whether the SMED can help is to analyse key performance indicators such as OEE and specifically availability.
Pinto et al. [12] implemented Key Performance Indicators (KPIs) in the production of parts for the automotive industry to control overall manufacturing performance, leading to the use of lean management tools. The SMED methodology was used to reduce setup time by 11% with the help of the 5S tool. An OEE of 90% was achieved, mainly due to improvements in availability. In another study [13], the application of SMED in a production process of interconnection axles increased OEE by 8%. SMED can be used for other goals as well. For example, Brito et al. [14] used it to reduce setup time and ergonomic conditions. A 46% reduction in setup time was achieved while improving ergonomic conditions. Another study focused on the application of the muscle fatigue assessment method and the Taguchi method integrated with conventional SMED [15]. The study was performed in an aluminium profile manufacturing factory, achieving a 62.5% improvement (regarding setup times), showing that integrating ergonomic risk analysis can lead to a further reduction in setup times.
Recently, a study proposed a new method called SWAN, which is the full integration between five whys analysis and SMED [16]. It consists of a practical analysis tool whose goal is to determine the problems and their causes with regard to setup and develop suitable countermeasures. Indeed, the application of this method was very successful, with a 75% reduction in the setup time of a screen-printing machine. Ahmad et al. [17] implemented five whys and SMED with positive results, reporting a 44% reduction in changeover time. The authors introduced cause-and-effect analysis at the beginning of the study, along with Ishikawa-diagram-based analysis and a conceptual decision model, which consisted of analysing each task to evaluate the chance of eliminating, converting, combining, or simplifying those tasks. When it comes to improving availability in a machine or production line, setups can represent a significant part of the total time wasted, as along with maintenance activities. Even though maintenance activities are performed to reduce downtime due to breakdowns and failures, their execution time can be reduced and optimised. For example, a study in the automotive industry implemented autonomous maintenance with the objective of improving machines’ availability [18]. The autonomous maintenance was related to cleaning operations, organisation, and daily checks that resulted in a 10% increase in availability, a reduced breakdown rate, and a decrease in MTTR (Mean Time to Repair) due to the use of visual management and assessment operations. Ribeiro et al. [19] used lean maintenance tools for problem identification, and an action plan was implemented to find the root causes of the main problems. The tools used were 5S, visual management, and a training program for the workers. The implementation resulted in an increase in the availability and improvement of other Key Performance Indicators.

1.2. Applying SMED to Preventive Maintenance Tasks

Borris et al. [20] suggested that it is possible to apply the SMED methodology to preventive maintenance tasks. They also suggested the use of RCM (Reliability-Centred Maintenance) to handle the schedule and ensure the correct execution with the use of 5S.
The main goal is to minimise the machines’ downtime; usually, this refers to a setup, but it could also be applied to other procedures. There are two main principles regarding Borris’s [20] suggestion:
  • By deciding between external and internal activities, it is possible to identify which tasks make it impossible to run the machine and which tasks can be performed during production.
  • By reviewing each action at a practical level, it is possible to identify which tasks are essential, need to be improved, or can be removed.
As seen from the aforementioned studies, SMED is a mitigation loss analysis method that, when employed correctly, can result in significant improvements with regard to reducing the time taken by various setup tasks. Indeed, SMED is mainly applied to the setup of various manufacturing processes [21]. Setup is quite an important step in production processes; however, as previously mentioned [6], maintenance and calibration procedures are also very important to the manufacturing process. These procedures guarantee the machines’ production quality, effectively reducing machine downtime due to breakdowns, and even cutting productivity losses due to the presence of defects in produced parts; this can be somewhat related to Zero-Defect Manufacturing, where the quality of the production is constantly evaluated, trying to extract useful information to improve process productivity [22]. Maintenance and calibration procedures can be quite time-consuming, and there are no specific tools to analyse and optimise these types of procedures in current research. With the capabilities of SMED, there is an opportunity to apply this management tool to these types of procedures, as they are complex and entail a lot of different tasks. As such, in the present study, the use of SMED methodology applied to a calibration procedure of a tire manufacturing machine is proposed. It was observed that the Machine Tolerance Check (MTC) procedure represents a significant impact on the machine’s downtime. This procedure was evaluated and SMED was implemented, effectively optimising the total amount of time required to perform the calibration procedure. The knowledge acquired through the realisation of this work could be useful for other researchers and people involved in the tire industry or similar industries to improve processes and procedures, reducing the downtime and increasing the overall equipment efficiency. Thus, this work does not present a new theory but, rather, extends the use of a well-known methodology in a different application, opening new horizons for people looking for improving their processes.

2. Materials and Methods

2.1. Problem Analysis

This study took place in the context of the specialised manufacture of tires for bulldozers and large agricultural vehicles. For better understanding, the production of a tire is composed of five phases:
  • Mixing, where all of the constituents (e.g., rubber, pigments, silica, etc.) are mixed;
  • Preparation, where the different components of the tire (e.g., tire beads, steel belts, inner liner, etc.) are produced by cutting and calendaring;
  • Construction, where all of the different components are put together in a precise manner;
  • Vulcanisation, where a mould under high temperature and pressure gives the final shape to the tire;
  • Final inspection, where the tires are inspected for misalignments of components, bubbles, and other possible defects.
The large tire production machines—specifically, tire construction machines—are the ones that currently represent the main bottleneck of the company’s production. The current unavailability of these machines is 44%. This percentage accounts for the following losses: development and trials, delays in production, setup of new rim sizes, and planned repair and maintenance. Planned maintenance interventions are significant contributors to this time lost—especially the MTC (Machine Tolerance Check) activities.
To analyse the causes that may contribute to the problem under analysis, a cause–effect diagram was elaborated, as shown in Figure 1. With this analysis, it is possible to determine the various causes contributing to the problem. Even though it is noticeable that the most influential causes are those related to the working method, there are other contributing factors to the problem, as listed in Table 1.

2.2. Solution Proposal

At the beginning of this study, the problem was studied by applying Ishikawa-diagram-based analysis to investigate the proposed problem’s root causes. A literature review showed that finding the root causes of the problems associated with SMED implementation led to quite satisfactory results [16]. As such, SMED was implemented for the time optimisation of MTC calibration procedures. Next, the SMED implementation was performed employing three main distinct steps [4], as shown in Table 2.
Because the MTC procedure requires many activities to be performed, they can be divided into three main procedures of MTC, applied to the main components of the tire manufacturing equipment:
  • Carcass unit (Machine Section 1);
  • Belt unit (Machine Section 2);
  • Shaping unit (Machine Section 3).

3. Results

In this section, the way in which SMED was implemented is detailed. The section is divided into three subsections, each regarding one of the SMED implementation steps shown in Table 2.

3.1. Step 1— Separation of Internal and External Activities

This phase corresponds to the situation initially found, i.e., where there is no distinction between internal and external activities. Currently, the equipment stops production to perform all of the activities.
Table 3 lists the activities performed for a section of the tire construction machine called the carcass unit (Machine Section 1). These activities are separated between internal activities—impossible to perform with the machine running—and external activities, which could possibly be converted into activities that can be performed during production. The times of the activities presented in the table are based on real data collected during an intervention.
As shown in Table 3, a total of six activities are considered to be external activities, taking up 30% of the total activity time, while the remainder are considered to be internal. These internal activities cannot be conducted while the machine is operating.
Table 4 shows the data regarding the activities performed for the belt unit (Machine Section 2).
It can be observed that only one of the nine activities for Machine Section 2 is an external activity, taking up only 10 min of total activity time.
Next, the activities performed for the shaping unit (Machine Section 3) are described in Table 5.
The entirety of the activities conducted for Machine Section 3 are internal activities; although in this section these activities cannot be converted into external ones, the gains obtained from the conversion of the other sections’ activities are quite significant, as explained Section 3.2.

3.2. Step 2—Conversion of Internal Activities into External Activities

The data show that about 37% of the time needed can be converted into activities performed during machine production. Once the carcass drum is a removable part and changed depending on the rim size produced, it is possible to perform activities 1 and 2 outside of the machine, thereby keeping the machine operational. Other small activities, such as 8, 9, 13, and 14, can be performed as autonomous maintenance by the machine operator. There are more activities throughout the construction machines, but they are impossible to convert into external activities, as shown in Table 3 and Table 4, where only one internal activity was able to be converted. However, the conversion performed for Machine Section 1’s MTC activities was quite significant.

3.3. Step 3—General Improvements in All Activities (Streamlining)

Of all of the activities performed internally, some are more time-consuming than others. Next, the modification of activities that take too long to complete or that need to be performed more than once is explained:
  • The laser spotlight check is an activity performed in five separate places and takes about 60 min for each place. The previous work method was non-intuitive and resulted in a lot of mistakes from workers (Figure 2a), involving the use of analogue equipment coupled with a complicated calibration procedure. The new proposal uses reference plates to rapidly check the alignment of the laser spotlight (Figure 2b). This implementation reduced the time required to perform this activity by about 50%.
  • Concentricity and parallelism verification between two subassemblies. One at a time, these two activities were performed with a dial gauge hooked to the machine with a strap (Figure 3a). The method represented a problem of measurement instability and loss of time. The proposed alternative was designing a tool fixture (Figure 3b) that simultaneously measured concentricity and parallelism, improving the measurement stability. Once again, the time reduction achieved was around 50%.
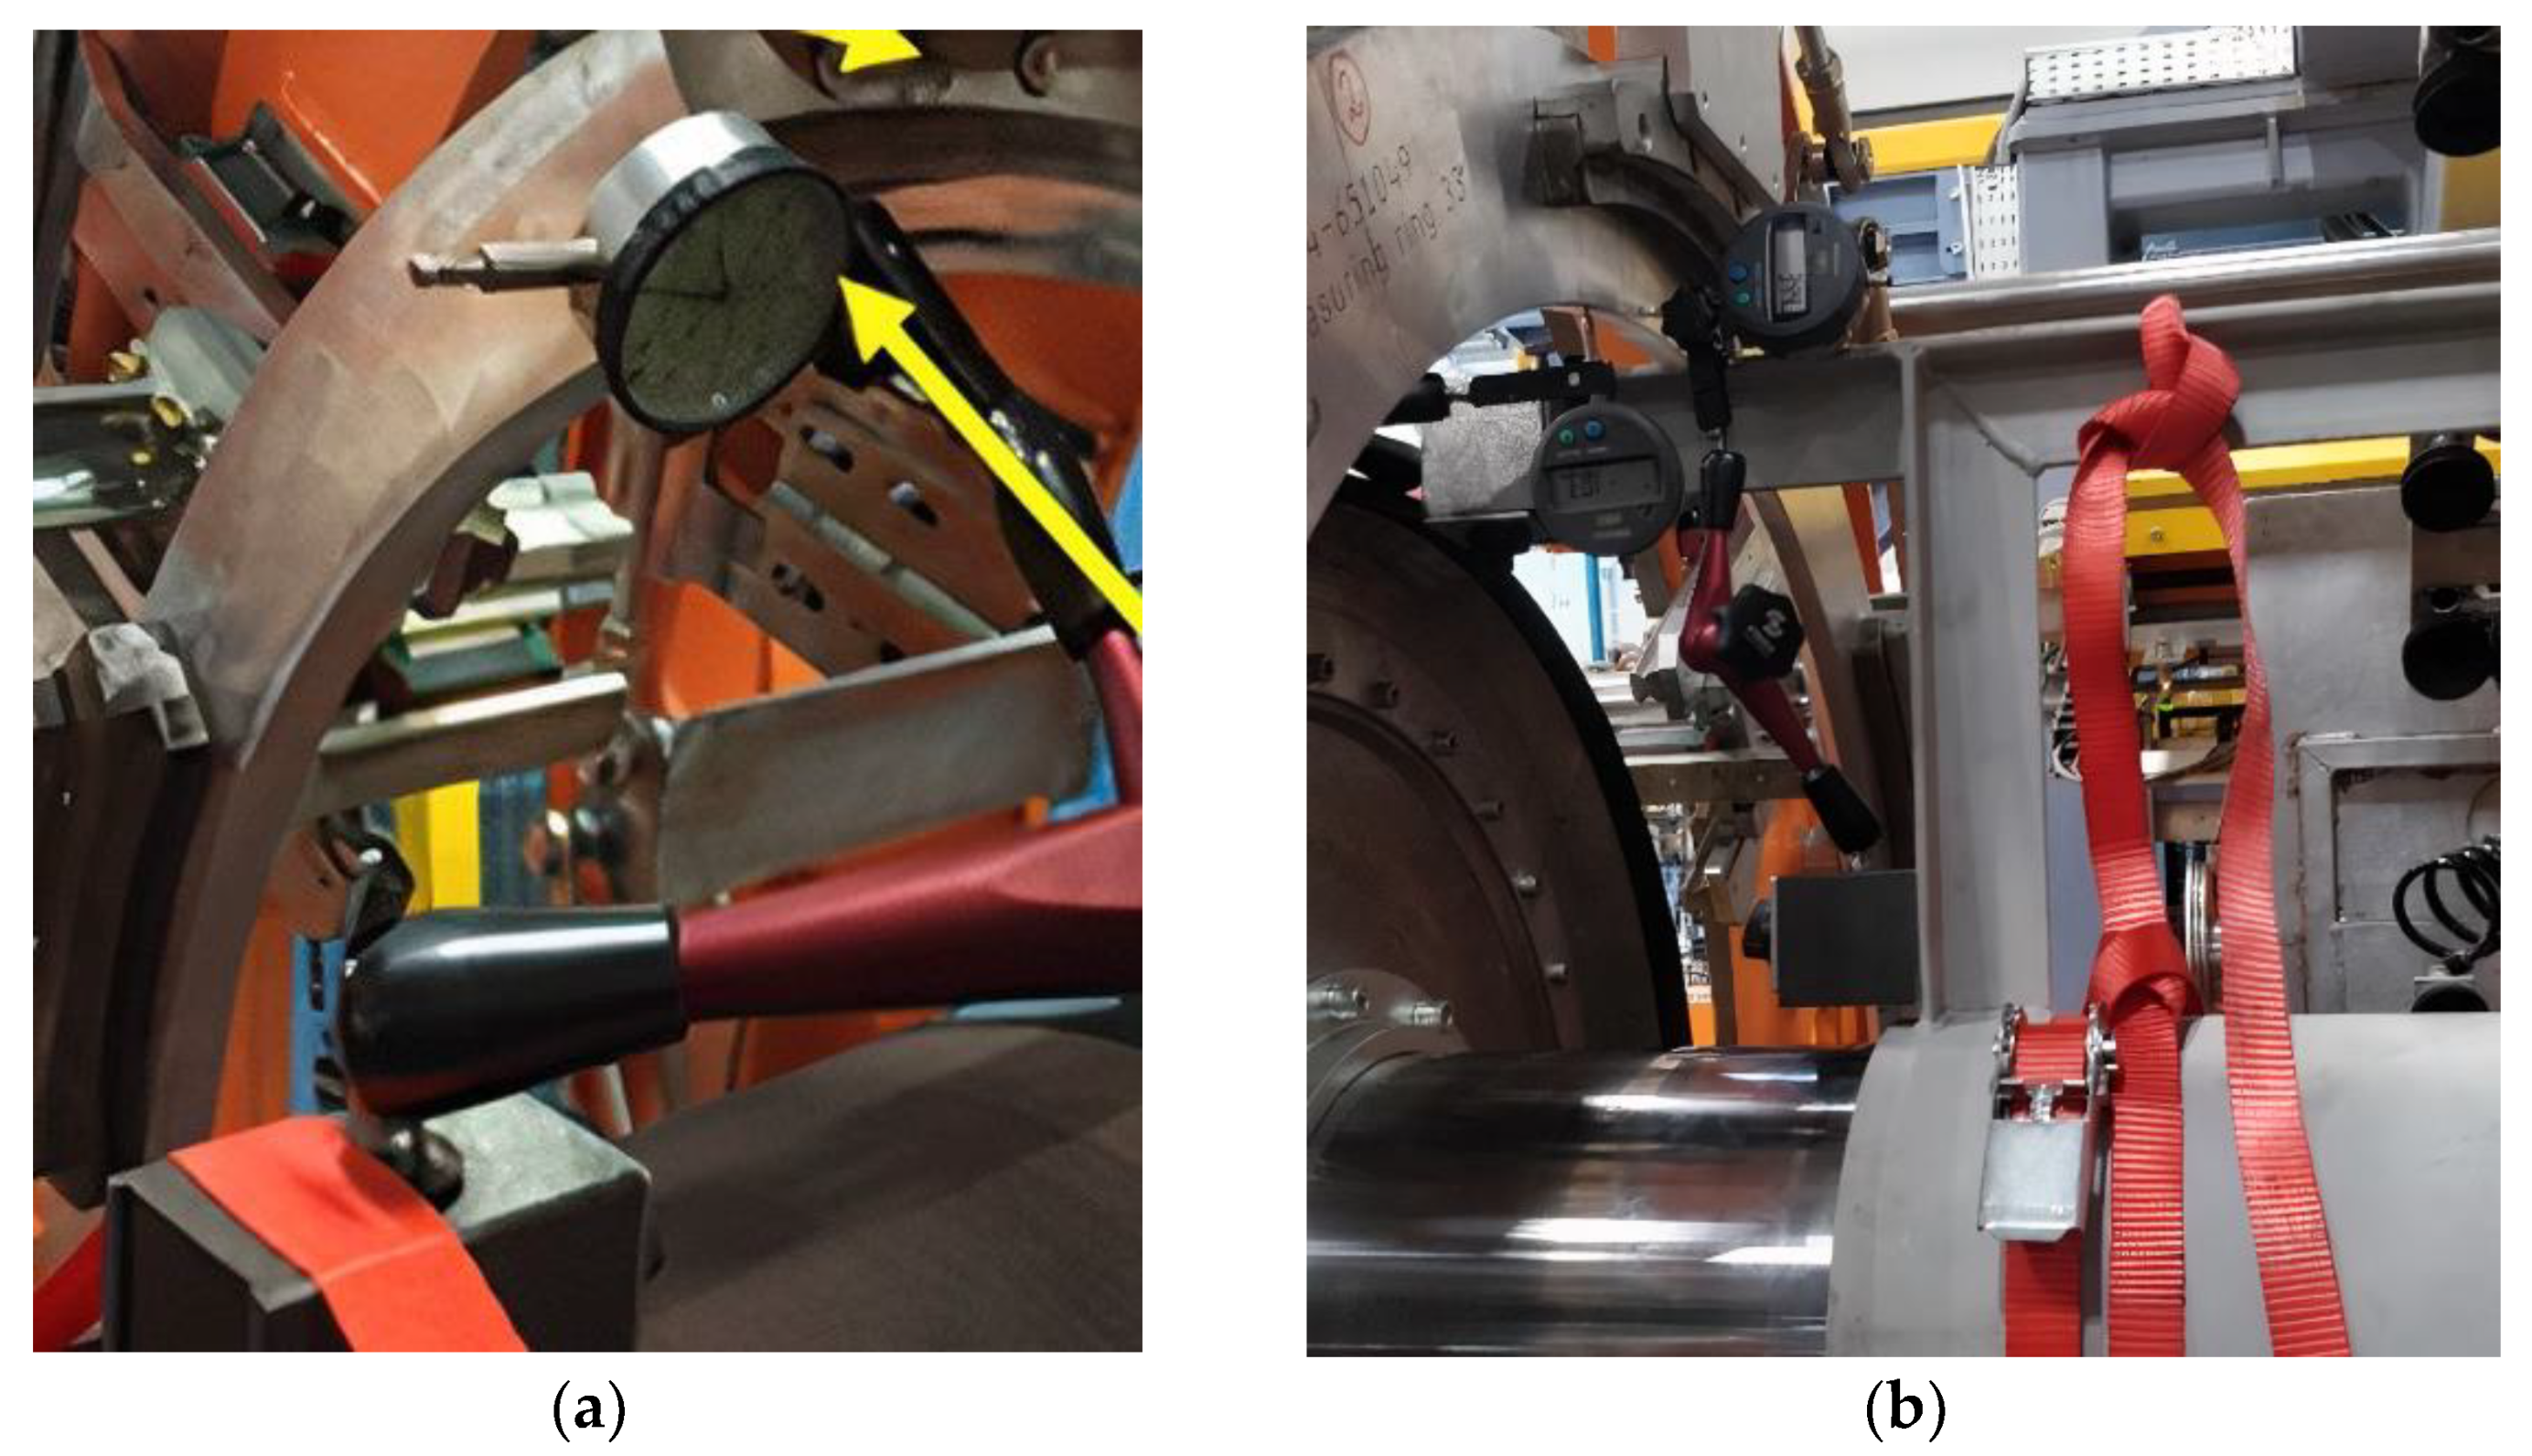
Figure 3. Parallelism check, old procedure (a). New procedure for concentricity and parallelism check (b).
Systems 10 00239 g003
Some activities suffered delays due to a lack of available tools. Thus, other suggested improvements involved the application of the 5S lean tool. All the tools needed to perform these activities can be identified and have a designated place.
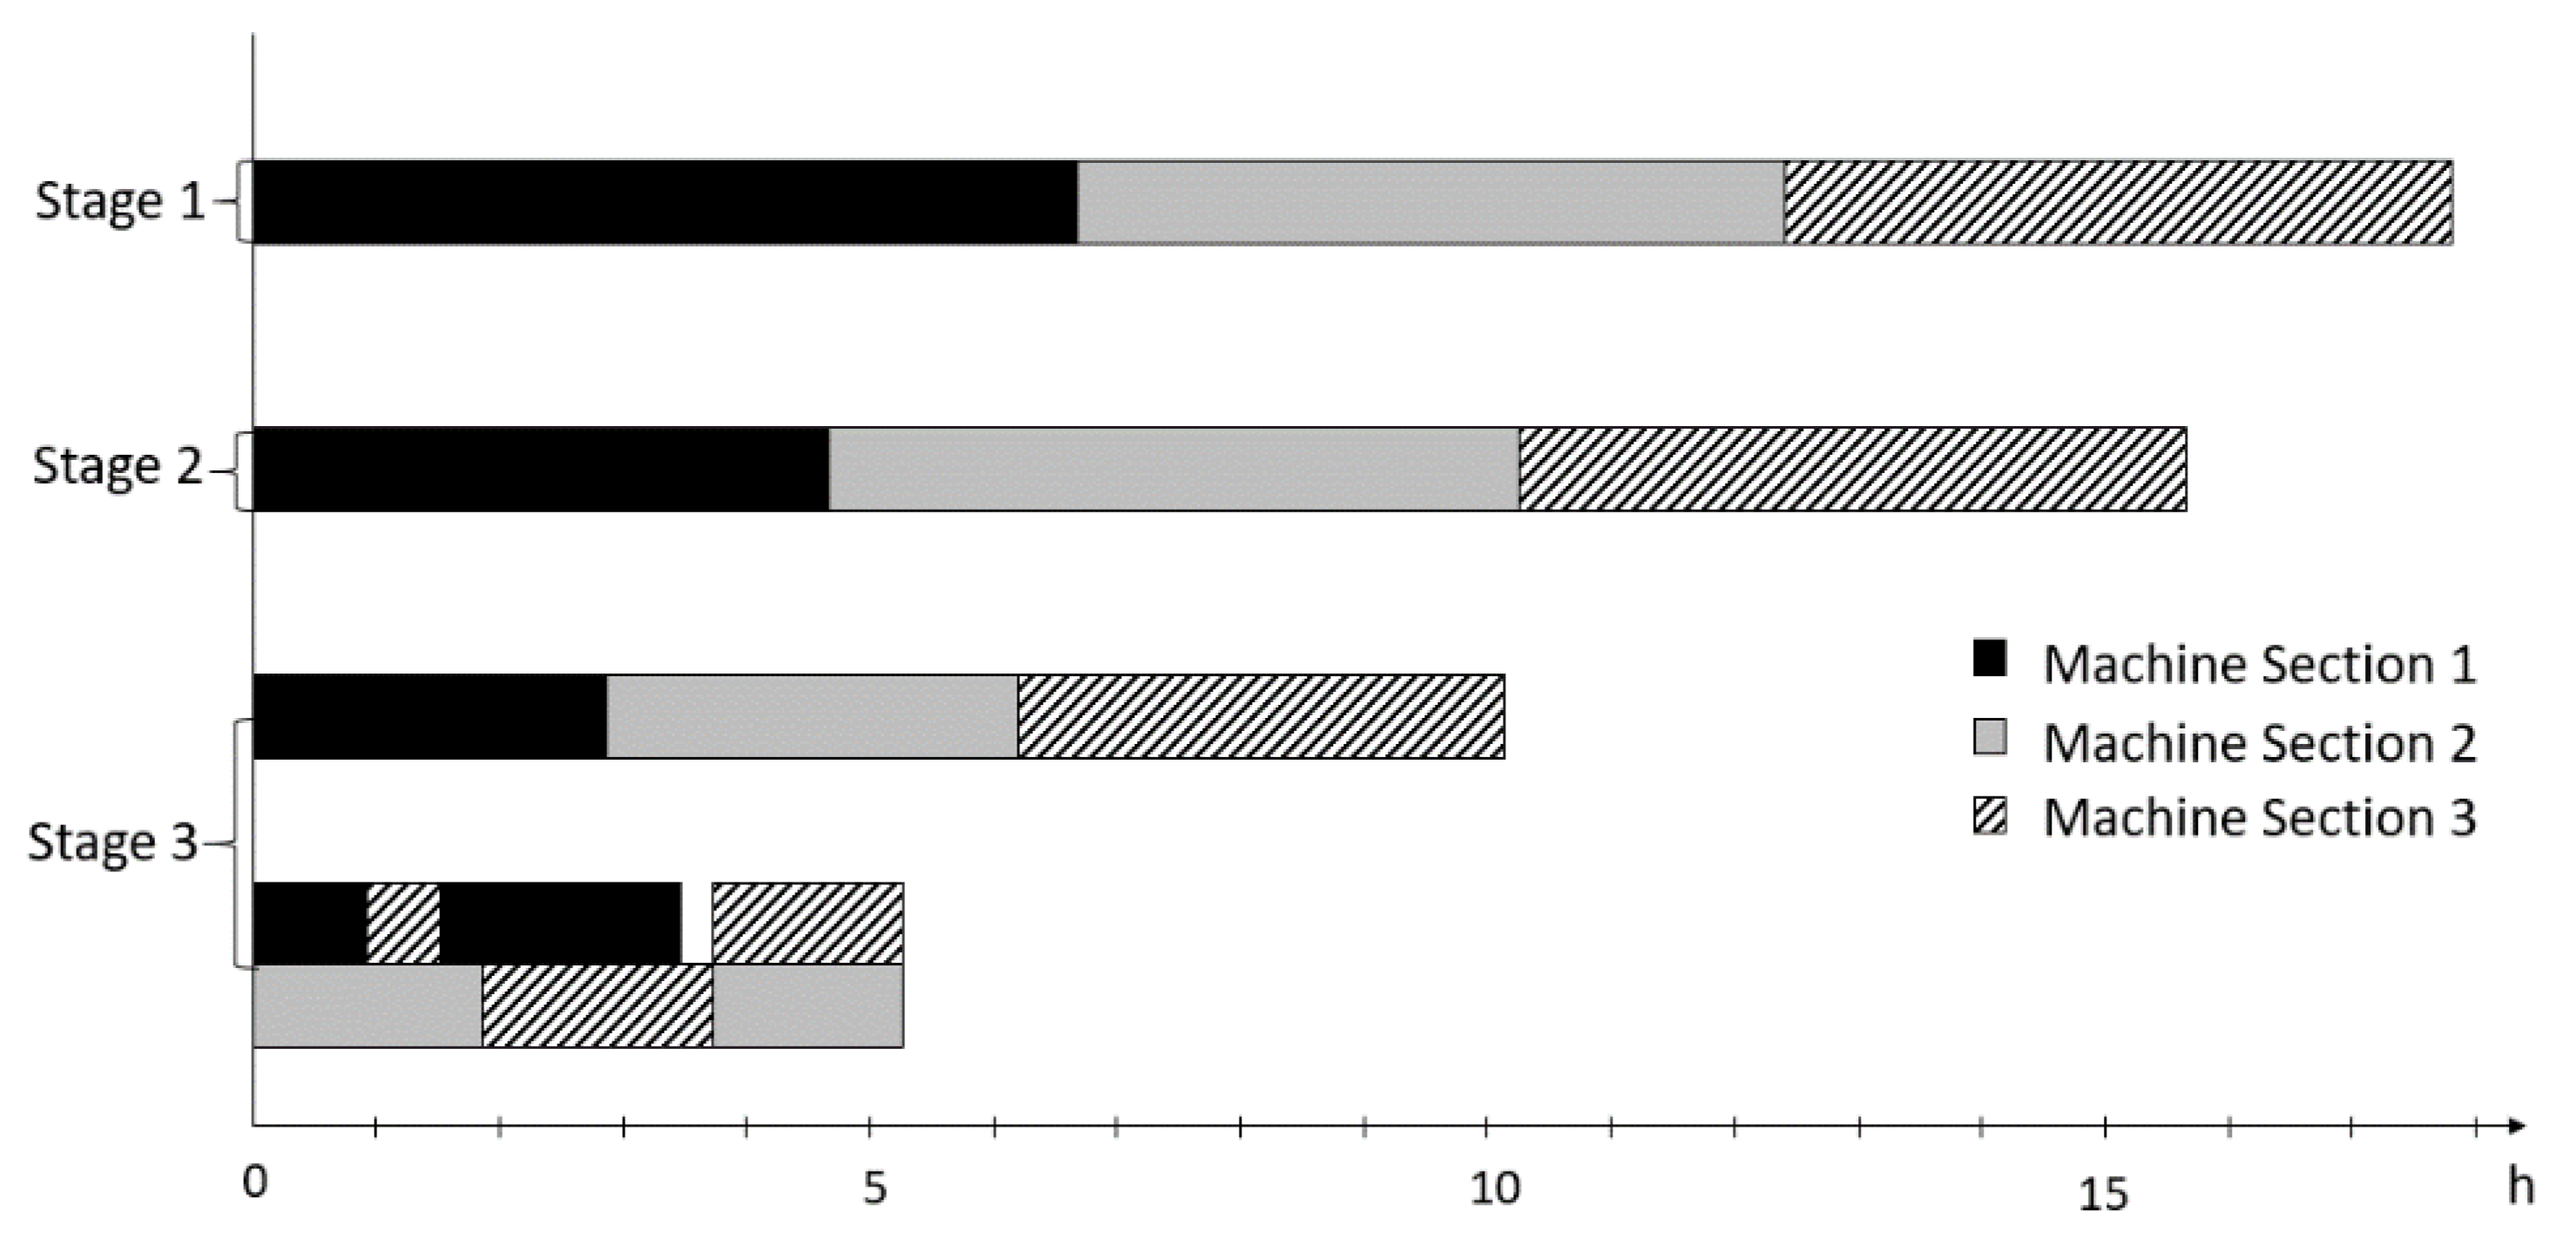
At this stage, optimisation of activity sequences was performed by using MS Project® software, 2021 version (Figure 4). Through this analysis, it was concluded that four technicians working simultaneously were the best choice in terms of cost. By overlapping the tasks that were possible to perform without compromising others, it was possible to reduce the amount of time needed even further.
The number of external activities was significantly reduced due to safety concerns. The few external activities that were left out were mainly visual inspection activities or fast and undemanding tasks. Thus, the one thing left to do was to make sure that all of the knowledge gained in the discussion of this topic was recorded as learned lessons. A standard work procedure was made to provide guidelines for future interventions and training actions.

4. Discussion

The SMED methodology is usually applied to overcome changeover operations in industrial processes—mainly when the flexibility required by the market demands low quantities of different products, which is exponentially increasing with customisation. Usually, new tools or moulds are needed to produce varied types of the same product, which requires the current production to be stopped, breaking the manufacturing cadence. The SMED methodology explores the fact that some changeover operations can be performed in parallel with the production, reducing the time wasted during the stoppage. This methodology has been successfully applied mainly for manufacturing processes, but it can also be applied to other operations. Through this work, we intended to expand the application of the SMED methodology to calibration operations for complex equipment, where a significant amount of time is spent. These operations are vital to ensuring the quality of the product, but due to their complex and time-consuming nature they merited particular study. This represents the main novelty of this work, since no previous works have described the use of SMED in calibration operations, thereby opening an opportunity to improve these procedures and expand the use of SMED methodology in other procedures.
Rosa et al. [21] applied SMED on a production line devoted to the manufacture of Bowden cables for the automotive industry, saving 58.3% in the time spent weekly in setups, promoting an increase in the production line availability and overall productivity. On the other hand, Sousa et al. [10] successfully used the SMED methodology in the production of composite cork stoppers, concluding that merely transforming internal operations into external ones was not enough to reduce setup time as needed, which implied a need to change the ways in which tools were used on certain equipment. In the end, a 43% reduction in setup time was achieved. Martins et al. [23] also needed to induce changes in the layout and production sequence, and to change some internal activities to external ones, in order to overcome the waste of time during setups in the production of electrical cables for the automotive industry. In this case, reductions of more than 50% in the setup time were obtained. Vieira et al. [24] also applied SMED in production lines of pipes for automotive air-conditioning systems. In the stamping workstations, the setup time was decreasing the availability time, harming the OEE of the production lines. The application of standard work together with the SMED methodology allowed the authors to significantly improve the process, reducing the setup time by 38% and increasing the OEE of the production lines by 7.7%. Monteiro et al. [9] used the SMED methodology together with other lean tools such as VSM and flowcharts in metalworking milling processes, achieving setup time reductions of 40% for vertical milling machines and 57% for horizontal milling machines. Vieira et al. [25] successfully applied the SMED methodology in the cold profiling process, achieving very good results in changing internal activities to external ones that did not exist in the initial stage. This enabled them to increase the OEE of the production lines by 10.8%, which translated into higher equipment availability and better productivity. Invariably, when the SMED methodology is successfully applied to manufacturing processes, setup time is reduced, thereby increasing the availability of equipment for production, allowing greater flexibility in product delivery, production management, and productivity in general. In the case of the equipment calibration procedure for the manufacture of very large tires, it was possible to reduce the time required for the calibration procedure by about 31%, with 17% of the time spent on calibration activities being carried out through external activities, while this time was null in the initial phase of observation of the process (i.e., the initial phase of this work). As in manufacturing procedures, these savings increase the availability of the equipment, allowing productivity to be improved. This factor is always important, but it becomes even more critical when the operating cost of the equipment is very high.

5. Conclusions

Even though the SMED method is often used in changeovers or setups, this study was intended to show that this methodology can be successfully extended to other industrial activities. Applying the same principles to a Machine Tolerance Check routine/procedure, the results obtained showed a very positive contribution of this work, with the time needed to perform the MTC procedure decreasing by about 31%—from a total time of 1065 min to 730 min. Initially, no time was spent on external activities but, after the implementation of the SMED methodology together with Ishikawa’s analysis and the 5S tool, it was possible to increase the time spent on external activities from 0% to 17% by the conversion of internal activities into external ones, as shown in Table 6.
This improvement represents a significant increase in machine availability. However, these results are dependent on the implementation of the 5S tool. The sequence of intervention and work method improvement requires the tools needed by the technicians to be in the right place at the right time so that they do not waste time looking for and grabbing tools [12,19]. The standard work performs a crucial role here as well. The technicians must know what to do, how to do it, and when to do it with ease. It is essential to acknowledge that implementing new tools must be paired with other crucial aspects such as the workplace environment, trust in the employers, cooperation, and leadership attitudes, cultivating a motivated workforce with a continuous improvement mindset [9,12].
Product quality is a very important aspect to consider. The machine inspection procedure has the goal of ensuring that every product constructed by the machine is produced according to specifications. The improvement of activities of this type must ensure that the activities are well performed. Quality studies, such as the implementation of statistical process control, can be performed to ensure the machines’ impact on alignments.
Recently, there have also been some findings reported that are quite useful for the improvement of maintenance activities—for example, by use of modern vision systems and neural networks. These techniques present an improvement over commonly employed techniques such as visual inspection. In a study by Papacharalampopoulos et al. [26], the authors employed a vision recognition technique to identify surface irregularities on a Parabolic Trough Collector (PTC) reflector, both during and after manufacturing. This study presents a viable solution, especially for the improvement of the process itself, in terms of both elongating the equipment’s life and improving the production quality.

Author Contributions

Investigation, V.S., J.C.O.M. and F.J.G.S.; Main Research, V.S.; Data Collection, V.S. and F.J.G.S.; Data Curation, V.F.C.S., R.D.S.G.C. and A.G.P.; Formal Analysis, V.S. (Vitor Santos), V.F.C.S. (Vitor Sousa), R.D.S.G.C. and A.G.P.; Writing—Original Draft, V.S. and V.F.C.S.; Writing—Draft and Reviewing, R.D.C.; Writing—Reviewing, F.J.G.S. and J.C.O.M.; Visualisation, R.D.C., J.C.O.M. and R.D.S.G.C.; Conceptualisation, F.J.G.S.; Supervision, F.J.G.S. and J.C.O.M.; Resources, R.D.S.G.C. and A.G.P. All authors have read and agreed to the published version of the manuscript.

Funding

This research received no external funding.

Data Availability Statement

Not applicable.

Conflicts of Interest

The authors declare no conflict of interest.

References

  1. Jeong, I.-J.; Leon, V.J.; Villalobos, J.R. Integrated decision-support system for diagnosis, maintenance planning, and scheduling of manufacturing systems. Int. J. Prod. Res. 2007, 45, 267–285. [Google Scholar] [CrossRef]
  2. Pinto, V.M. Gestão da Manutenção; IAPMEI: Lisboa, Portugal, 1994; ISBN 972-9205-57-4. (In Portuguese)
  3. Ahuja, S.; Khamba, K. Total productive maintenance: Literature review and directions. Int. J. Qual. Reliab. Manag. 2008, 25, 709–756. [Google Scholar] [CrossRef] [Green Version]
  4. Silva, I.B.; Filho, M.G. Single-minute exchange of die (SMED): A state-of-the-art literature review. Int. J. Adv. Manuf. Technol. 2019, 102, 4289–4307. [Google Scholar] [CrossRef]
  5. Patrik, J.; Magnus, L. Evaluation and improvement of manufacturing performance measurement systems–the role of OEE. Int. J. Oper. Prod. Manag. 1999, 19, 55–78. [Google Scholar]
  6. Farinha, J.T.; Galar, D.; Shagluf, A.; Longstaff, A.P. Maintenance strategies to reduce downtime due to machine positional errors. In Proceedings of the Maintenance, Performance, Measurement and Management Conference, Coimbra, Portugal, 4–5 September 2014; pp. 111–118, ISBN 978-972-8954-42-0. [Google Scholar]
  7. Dillon, A.P.; Shingo, S. A Revolution in Manufacturing: The SMED System; CRC Press: Boca Raton, FL, USA, 1985; ISBN 9780915299034. [Google Scholar]
  8. Godina, R.; Pimentel, C.; Silva, F.J.G.; Matias, J.C.O. A Structural Literature Review of the Single Minute Exchange of Die: The Latest Trends. Procedia Manuf. 2018, 17, 783–790. [Google Scholar] [CrossRef]
  9. Monteiro, C.; Ferreira, L.P.; Fernandes, N.O.; Sá, J.C.; Ribeiro, M.T.; Silva, F.J.G. Improving the machining process of the metalworking industry using the lean tool SMED. Procedia Manuf. 2019, 41, 555–562. [Google Scholar] [CrossRef]
  10. Sousa, E.; Silva, F.J.G.; Ferreira, L.P.; Pereira, M.T.; Gouveia, R.; Silva, R.P. Applying SMED methodology in cork stoppers production. Procedia Manuf. 2018, 17, 611–622. [Google Scholar] [CrossRef]
  11. Ferreira, C.; Sá, J.C.; Ferreira, L.P.; Lopes, M.P.; Pereira, T.; Silva, F.J.G. ILeanDMAIC—A methodology for implementing the lean tools. Procedia Manuf. 2019, 41, 1095–1102. [Google Scholar] [CrossRef]
  12. Pinto, G.F.L.; Silva, F.J.G.; Campilho, R.D.S.G.; Casais, R.B.; Fernandes, A.J.; Baptista, A. Continuous improvement in maintenance: A case study in the automotive industry involving Lean tools. Procedia Manuf. 2019, 38, 1582–1591. [Google Scholar] [CrossRef]
  13. Méndez, J.D.M.; Rodríguez, R.S. Set-up reduction in an interconnection axle manufacturing cell using SMED. Int. J. Adv. Manuf. Technol. 2016, 84, 1907–1916. [Google Scholar] [CrossRef]
  14. Brito, M.; Ramos, A.L.; Carneiro, P.; Gonçalves, M.A. Combining SMED methodology and ergonomics for reduction of setup in a turning production area. Procedia Manuf. 2017, 13, 1112–1119. [Google Scholar] [CrossRef]
  15. Boran, S.; Ekincioğlu, C. A novel integrated SMED approach for reducing setup time. Int. J. Adv. Manuf. Technol. 2017, 92, 3941–3951. [Google Scholar] [CrossRef]
  16. Braglia, M.; Frosolini, M.; Gallo, M. SMED enhanced with 5-Whys Analysis to improve set-upreduction programs: The SWAN approach. Int. J. Adv. Manuf. Technol. 2017, 90, 1845–1855. [Google Scholar] [CrossRef]
  17. Ahmad, R.; Soberi, M.S.F. Changeover process improvement based on modified SMED method and other process improvement tools application: An improvement project of 5-axis CNC machine operation in advanced composite manufacturing industry. Int. J. Adv. Manuf. Technol. 2018, 94, 433–450. [Google Scholar] [CrossRef]
  18. Guariente, P.; Antoniolli, I.; Ferreira, L.P.; Pereira, T.; Silva, F.J.G. Implementing autonomous maintenance in an automotive components manufacturer. Procedia Manuf. 2017, 13, 1128–1134. [Google Scholar] [CrossRef]
  19. Ribeiro, I.M.; Godina, R.; Pimentel, C.; Silva, F.J.G.; Matias, J.C.O. Implementing TPM supported by 5S to improve the availability of an automotive production line. Procedia Manuf. 2019, 38, 1574–1581. [Google Scholar] [CrossRef]
  20. Borris, S. Total Productive Maintenance; McGraw-Hill: New York, NY, USA, 2006; ISBN 978-0071467339. [Google Scholar]
  21. Rosa, C.; Silva, F.J.G.; Ferreira, L.P.; Campilho, R. SMED methodology: The reduction of setup times for Steel Wire-Rope assembly lines in the automotive industry. Procedia Manuf. 2017, 13, 1034–1042. [Google Scholar] [CrossRef]
  22. Papacharalampopoulos, A.; Petridis, D.; Stavropoulos, P. Experimental Investigation of rubber extrusion process through vibrational testing. Procedia CIRP 2020, 93, 1236–1240. [Google Scholar] [CrossRef]
  23. Martins, M.; Godina, R.; Pimentel, C.; Silva, F.J.G.; Matias, J.C.O. A Practical Study of the Application of SMED to Electron-beam Machining in Automotive Industry. Procedia Manuf. 2018, 17, 647–654. [Google Scholar] [CrossRef]
  24. Vieira, A.M.; Silva, F.J.G.; Campilho, R.D.S.G.; Ferreira, L.P.; Sá, J.C.; Pereira, T. SMED methodology applied to the deep drawing process in the automotive industry. Procedia Manuf. 2020, 51, 1416–1422. [Google Scholar] [CrossRef]
  25. Vieira, T.; Sá, J.C.; Lopes, M.P.; Santos, G.; Félix, M.J.; Ferreira, L.P.; Silva, F.J.G.; Pereira, M.T. Optimization of the cold profiling process through SMED. Procedia Manuf. 2019, 38, 892–899. [Google Scholar] [CrossRef]
  26. Papacharalampopoulos, A.; Tzimanis, K.; Sabatakakis, K.; Stavropoulos, P. Deep Quality Assessment of a Solar Reflector Based on Synthetic Data: Detecting Surficial Defects from Manufacturing and Use Phase. Sensors 2020, 20, 5481. [Google Scholar] [CrossRef] [PubMed]
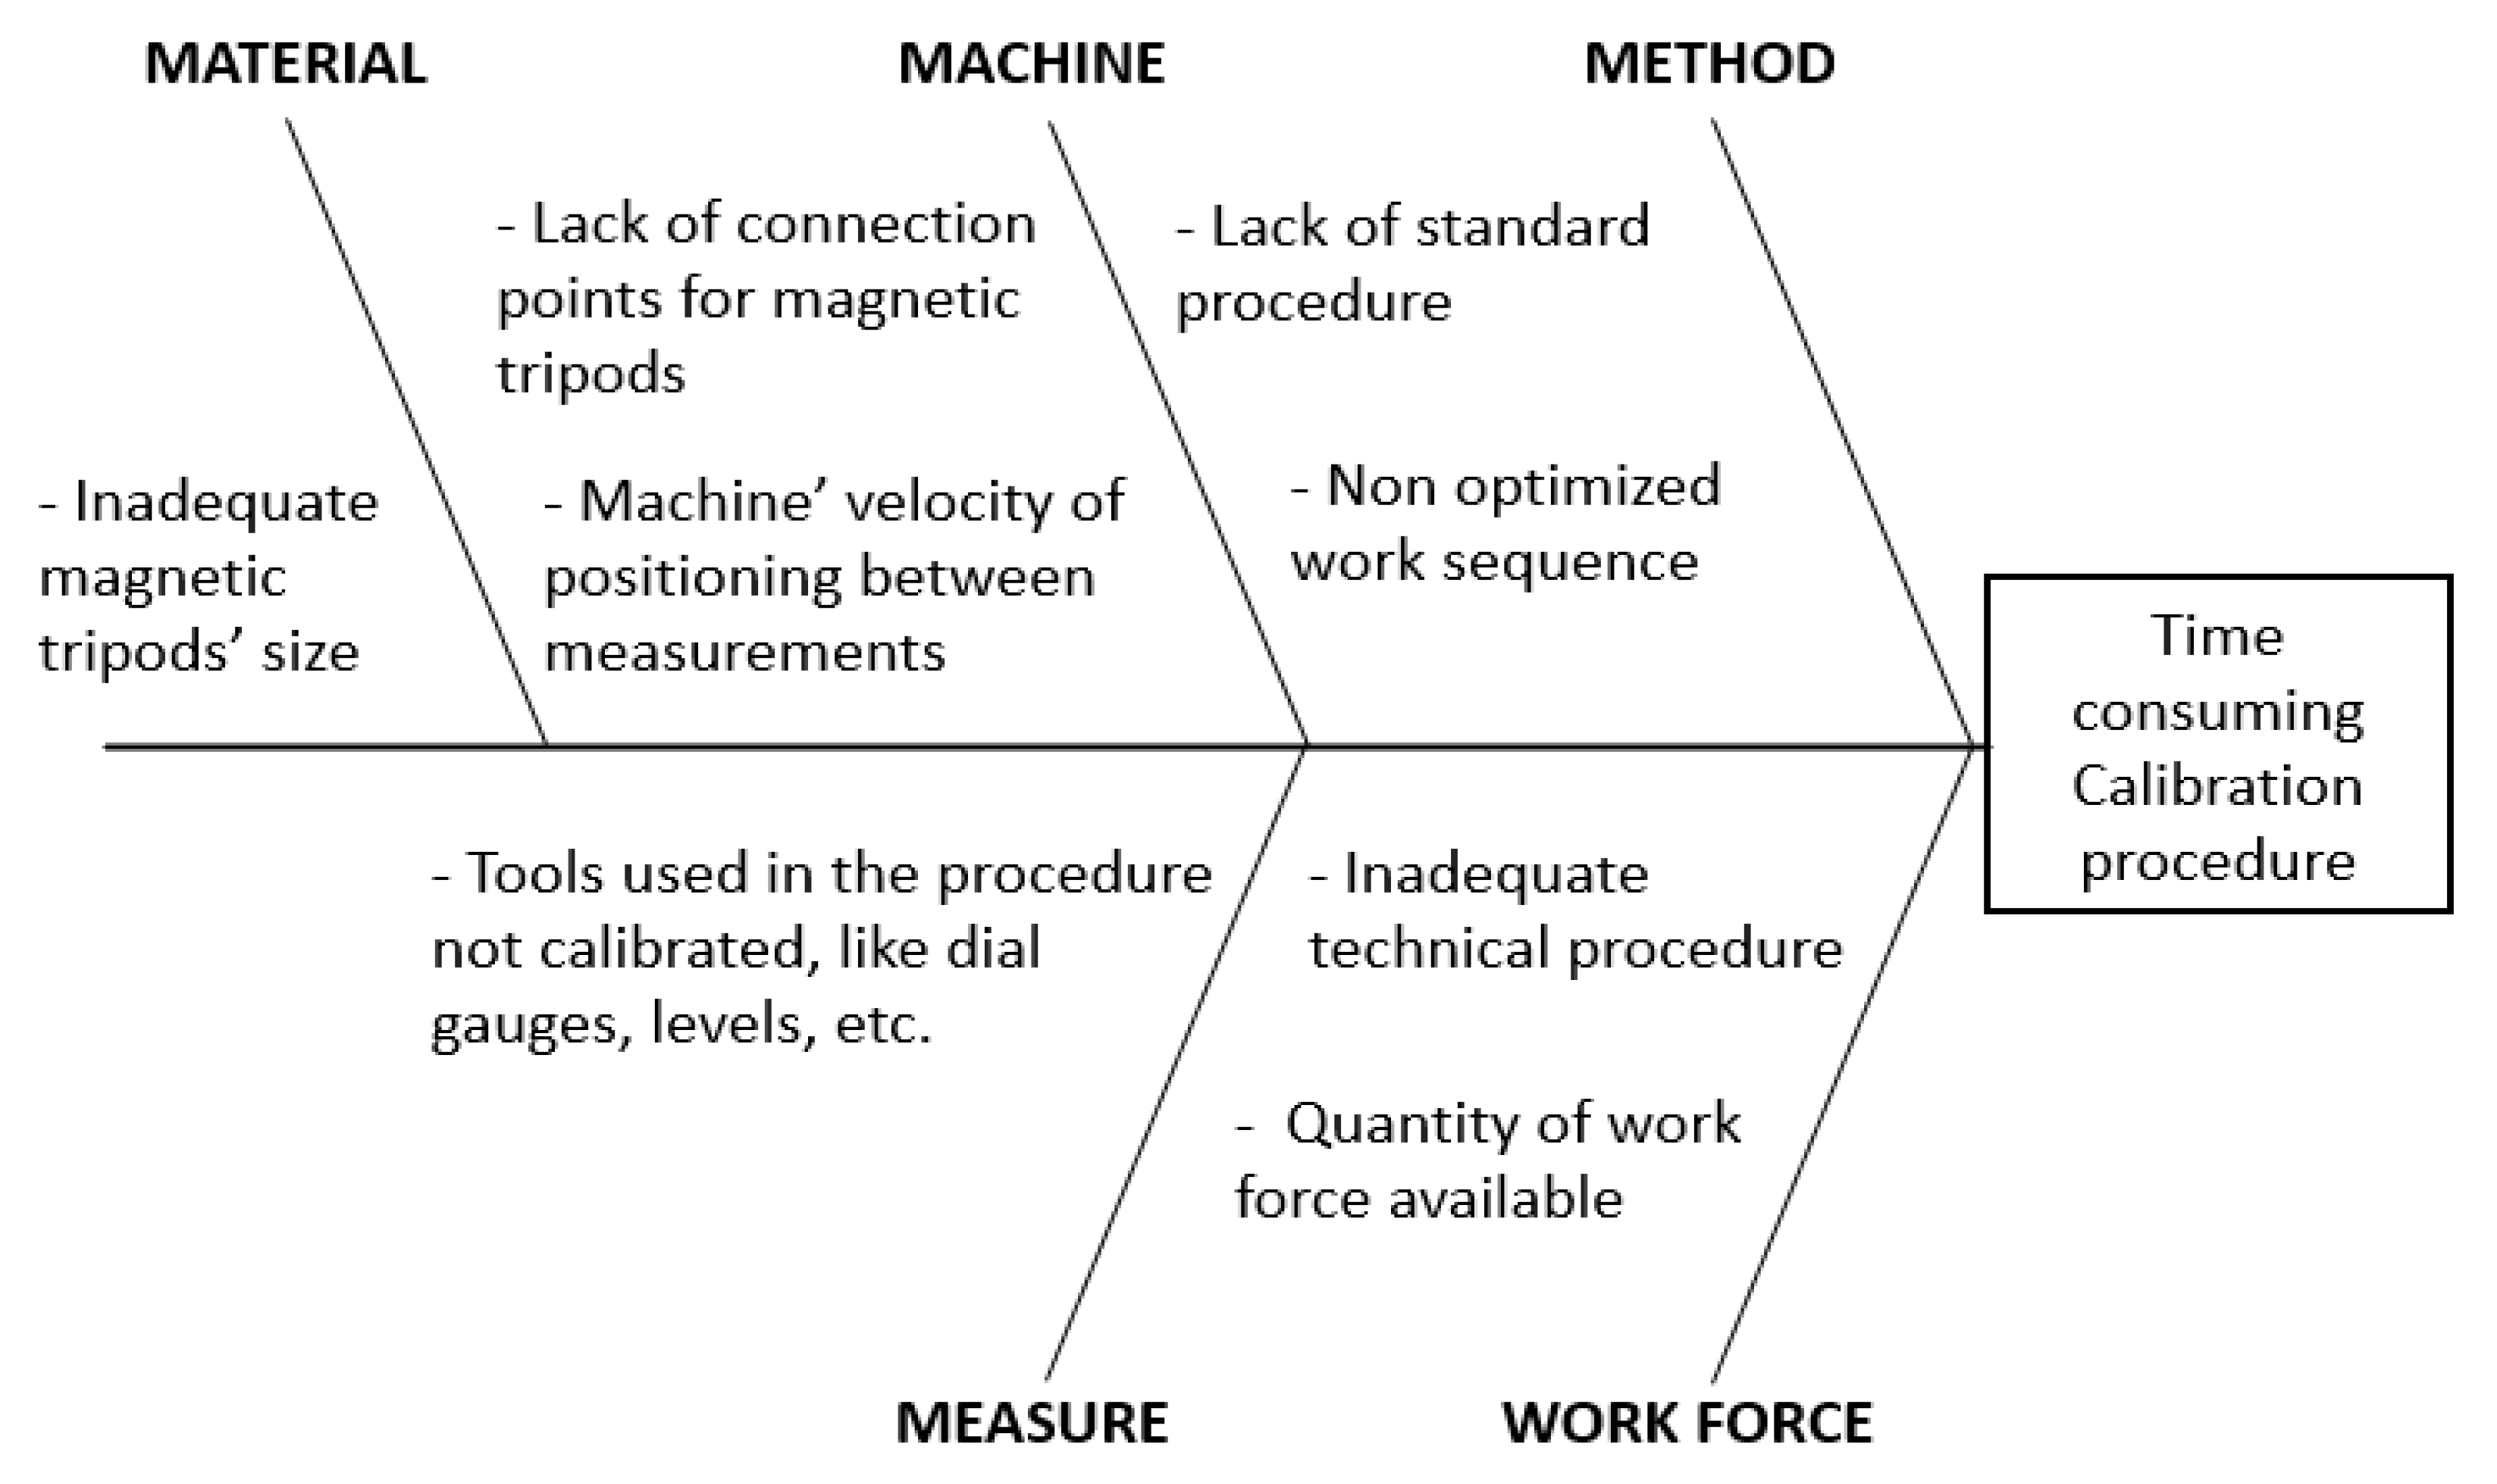
Figure 1. Ishikawa diagram analysis applied to Machine Tolerance Check activities.
Systems 10 00239 g001
Figure 2. Laser spotlight check (old procedure) (a). Laser spotlight check (new procedure) (b).
Systems 10 00239 g002
Figure 4. Time improvement with SMED implementation through all steps.
Systems 10 00239 g004
Table 1. Problem analysis and description.
Problem CategoryDescription
Problems related to the machineLack of magnetic tripod attachment points to assemble dial gauges and movement of the machine concerning the positioning of its components for measurement.
Problems related to material availabilityCauses that are related to the available materials. Available tools prove to be impractical due to the dimensions of the machine.
Problems related to labourThe number of maintenance technicians who perform the procedure affects the number of tasks that can be overlapped. Moreover, the lack of training and standard procedures of these professionals makes the procedure less effective.
Table 2. The three implementation steps of SMED, adapted to the optimisation of the MTC procedure.
StepMethod
1—Separation of internal and external activities Selection of the procedure to improve, selection of work team, measuring the execution time of the activities, and identification of internal and external activities.
2—Conversion of internal activities into external activitiesConverting all activities that can be performed during production into external ones or developing conditions to convert activities into external activities.
3—General improvements in all activities (streamlining)Reduction in time by improving, eliminating, converting, combining, or simplifying activities.
Table 3. Activities performed at Machine Section 1 (carcass unit), with times and classifications.
Sequence of ActivitiesTime Sum(Minutes)Time of Activities (Minutes)Internal ActivityExternal Activity
1—Radial run-out9090 X
2—Drum circumference verification955 X
3—Bead loader outsider check1005X
4—Bead loader inside diameter and gap between fingers11010X
5—Verification of concentricity of CTU over carcass drum17060X
6—Verification of parallelism of CTU over carcass drumX
7—Verification of centring of CTU to drum18010X
8—Verification of tangency ply to drum1855 X
9—Verification of centre of the drum to the servicer1905 X
10—Laser vertical check of inner liner21020X
11—Laser spotlight rotation position check23020X
12—Laser spotlight centre position check25020X
13—Verification of tangency ply to drum2555 X
14—Verification of centre of the drum to the servicer 2605 X
15—Laser vertical check (1st ply)28020X
16—Laser spotlight rotation position check (1st ply)30020X
17—Laser spotlight centre position check (1st ply)32020X
18—Centring of the 1st ply stitcher rollers check38060X
19—Centring profile servicer to drum check39515X
Total time of activity (min)280115
Table 4. Activities performed for Machine Section 2 (belt unit), with times and classifications.
Sequence of ActivitiesTime Sum(min)Time of Activities (min)Internal ActivityExternal Activity
1—Centring of belt drum6060X
2—Vertical alignment of belt drumX
3—Centring of belt drum655X
4—Centring of guides in the tire belt zone9530X
5—Centring of feeders in the tire belt zone15560X
6—Vertical alignment of the feeder laser21560X
7—Laser rotation in the belt feeder27560X
8—Laser centring on the belt feeder3355X
9—Verification of centre of the drum to the servicer34510 X
Total time of activity (min)33510
Table 5. Activities performed for Machine Section 3 (shaping unit), with times and classifications.
Sequence of ActivitiesTime Sum(min)Time of Activities (min)Internal ActivityExternal Activity
1—Circumference check of CTU over the shaping head6060X
2—Parallelism check of CTU over the shaping headX
3—Centring of CTU over the shaping head656X
4—Centring of BTR over the shaping head705X
5—Circumference check of BTR over the shaping head14070X
6—Parallelism check of BTR over the shaping headX
7—Check shaping head unit15010X
8—Centring of shaping heads1555X
9—Centring of guides of the shaping head17520X
10—Laser vertical alignment of the shaping head19520X
11—Laser rotation of the shaping head21520X
12—Laser centring in the shaping unit23520X
13—Check tolerances of the shaping unit’s applicator arm26530X
14—Perpendicularity check of the applicator armX
15—Centring of the applicator armX
16—Verification of the shaping unit’s sensorX
17—Check extrusion rolls pressure29530X
18—Check extrusion machine’s tolerances32530X
Total time of activity (min)3250
Table 6. Total external and internal activities, and their respective durations, before and after SMED implementation.
Type of ActivityBefore ImprovementsAfter Improvements
Percentage (%)Time (min)Percentage (%)Time (min)
Machine Section 1External0%016%115
Internal37%39523%170
Machine Section 2External0%01%10
Internal32%34527%200
Machine Section 3External0%00%0
Internal31%32532%235
Total100%1065100%730
Publisher’s Note: MDPI stays neutral with regard to jurisdictional claims in published maps and institutional affiliations.