Article

Experimental and Numerical Simulation Research on Micro-Gears Fabrication by Laser Shock Punching Process

School of Mechanical Engineering, Jiangsu University, Zhenjiang 212000, China
*
Author to whom correspondence should be addressed.
Micromachines 2015, 6(8), 969-983; https://doi.org/10.3390/mi6080969
Submission received: 11 June 2015 / Revised: 10 July 2015 / Accepted: 14 July 2015 / Published: 23 July 2015
(This article belongs to the Special Issue Laser Micromachining and Microfabrication)

Abstract

:
The aim of this paper is to fabricate micro-gears via laser shock punching with Spitlight 2000 Nd-YAG Laser, and to discuss effects of process parameters namely laser energy, soft punch properties and blank-holder on the quality of micro-gears deeply. Results show that dimensional accuracy is the best shocked at 1690 mJ. Tensile fracture instead of shear fracture is the main fracture mode under low laser energy. The soft punch might cause damage to punching quality when too high energy is employed. Appropriate thickness and hardness of soft punch is necessary. Silica gel with 200 µm in thickness is beneficial to not only homogenize energy but also propagate the shock wave. Polyurethane films need more energy than silica gel with the same thickness. In addition, blank-holders with different weight levels are used. A heavier blank-holder is more beneficial to improve the cutting quality. Furthermore, the simulation is conducted to reveal typical stages and the different deformation behavior under high and low pulse energy. The simulation results show that the fracture mode changes under lower energy.

1. Introduction

With the rapid development of the electronics industry and precision machinery, product miniaturization has become a trend in the fields of communications, electronics, micro-electromechanical systems, so manufacture of high quality micro device is a requiring problem nowadays [1].
Based on the traditional punching techniques, micro-stamping technology attracts widespread concern home and abroad [2] because of its reliability, convenience, efficiency and good quality. Yi et al. [3] used the micro-punching technology to punch a 15 µm micro-hole on the brass foils with a two-way image acquisition system and punching tools were fabricated by micro electrical discharge machining (micro-EDM). Ghassemali et al. [4] researched the feasibility of producing micro-pins with diameters of 0.3 mm, 0.5 mm and 0.8 mm successfully and effects of punch/pin diameter ratio on the pin aspect ratio using a progressive forming set-up. The maximum forming loads were also investigated. Masuzawa and Tönshoff et al. [5] used wire EDM electrode grinding technology to fabricate micro punch and micro molds, and solved the eccentric difficulties between them. Joo et al. [6] developed a high-precision guiding and detecting micro-punching system, and used tungsten carbide micro punch to punch high-quality micro-holes on brass foils. Xu et al. [2] fabricated micro punch of several hundred microns in diameter by means of micro-EDM grinding technology and punched out 100, 150 and 300 μm on SUS304 stainless steel sheets. However, there exist difficulties in manufacturing punching tools economically as well as complex alignment problems between micro punch and die in these researches, thus, Rhim et al. [7] used silicone rubber instead of the rigid punch as a pressure transmission medium, and punched array of micro-holes on copper and titanium foil successfully with the single crystal silicon die. Liu et al. [8] combined laser shock technique with punching process, and developed a new type of micro-forming technology, so that the 250 µm micro-hole was punched successfully on the copper foil of thickness between 10 and 30 µm. This technique used the intense laser beam as the micro punch rather than a traditional punch in order to solve the difficulty of complex punch-to-die alignment and punch fabrication in the process of micro punching to a great extent. Afterwards, Liu et al. [9] improved this technology, in which polyurethane soft film acted as a medium of transmitting impact pressure [7,10]. Cooperated with a machined mold, arrays of square holes were machined successfully on the Al foil of 20 µm in the thickness.
Whether the traditional micro-punching technique or the laser shock punching process, little attention has been paid to micro-gear fabrication. This paper aims to fabricate micro-gears with laser shock punching technique and conducts an in-depth research of the process parameters and its effects on the quality of micro gears.
2. Experimental

2.1. Principal of the Laser Shock Punching Process

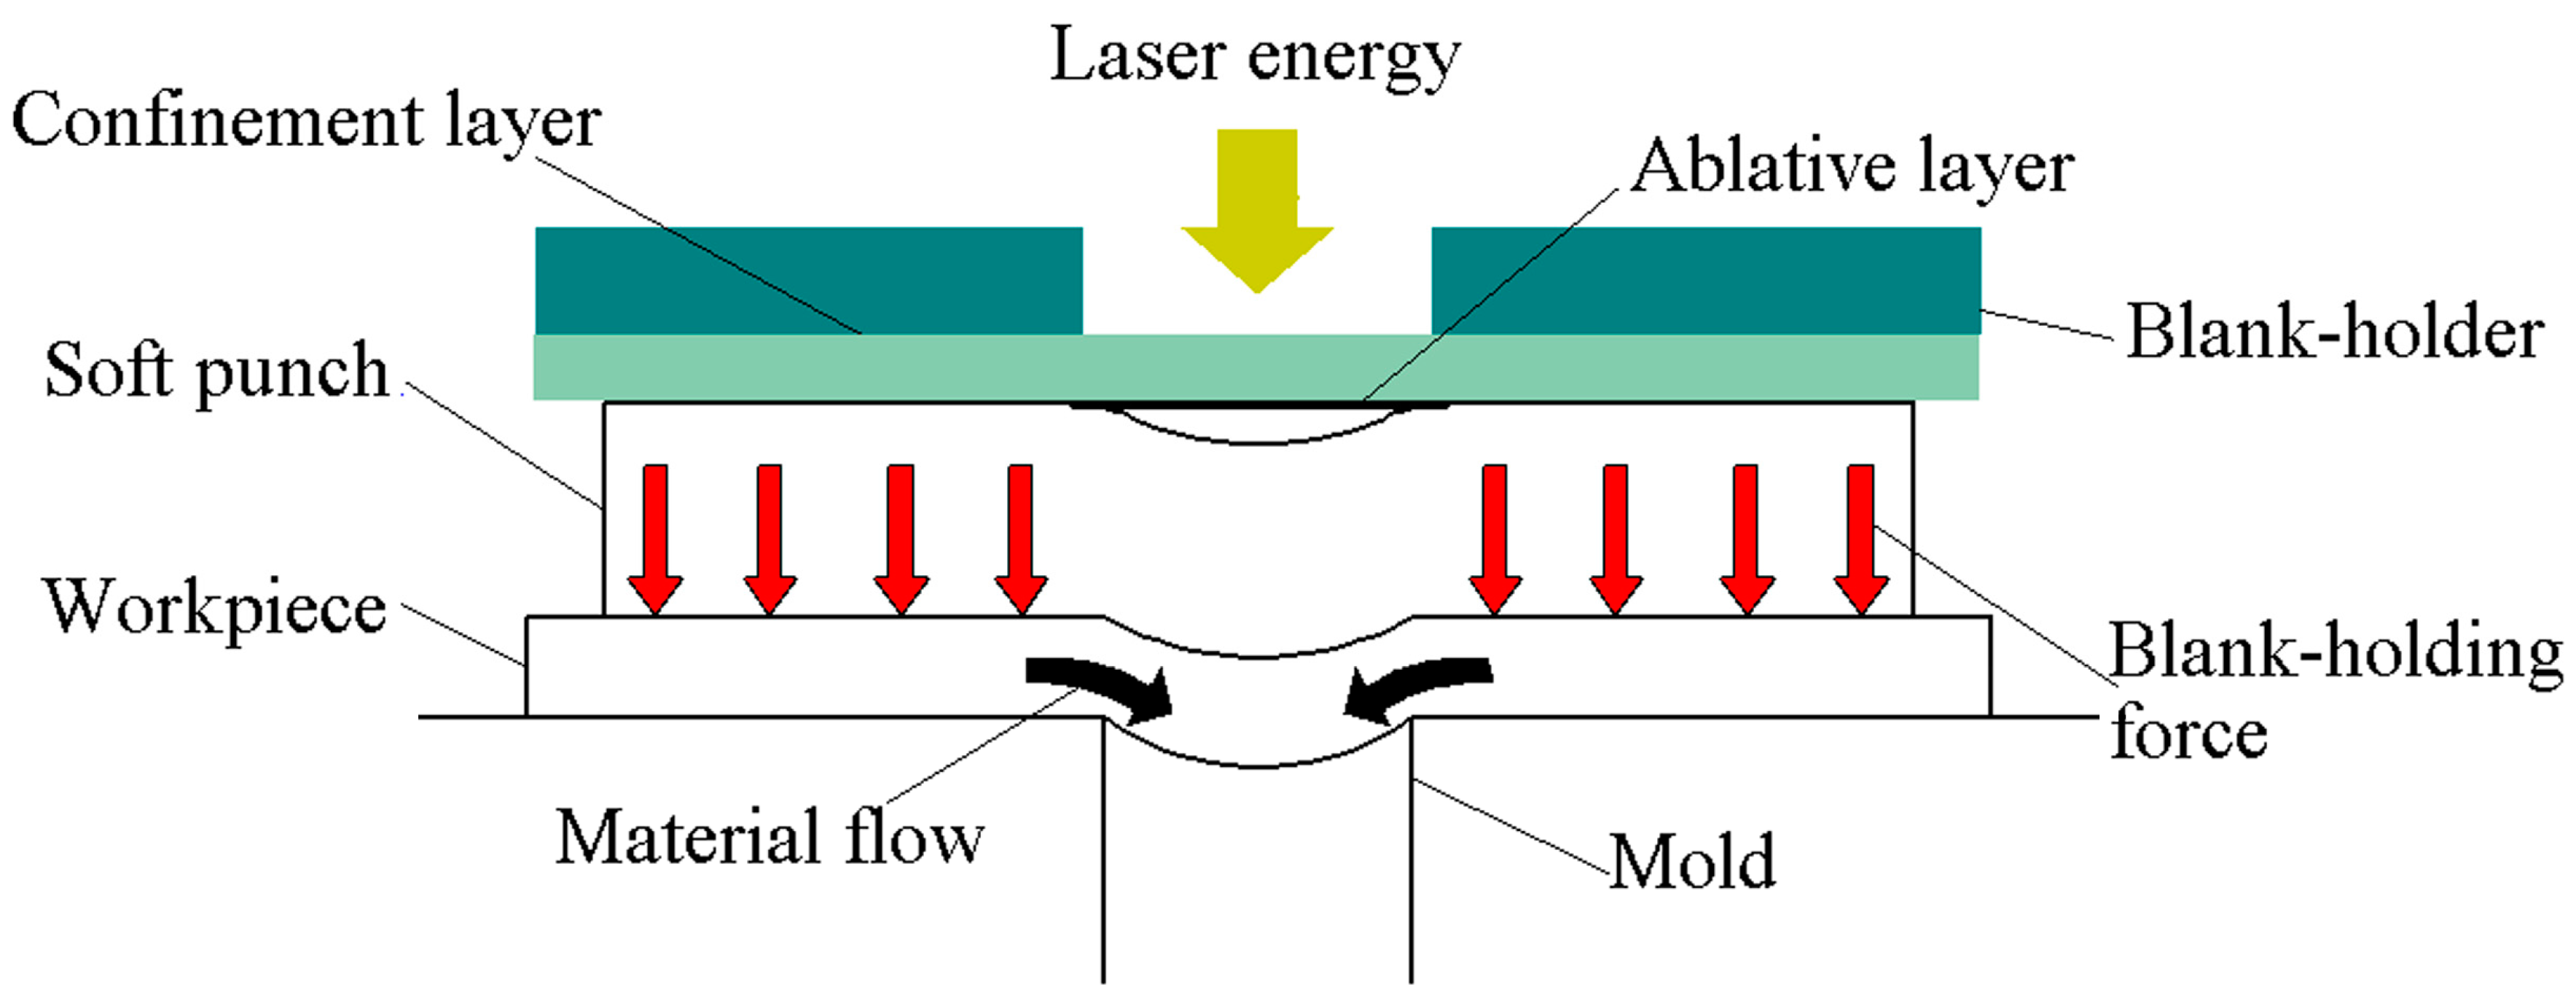
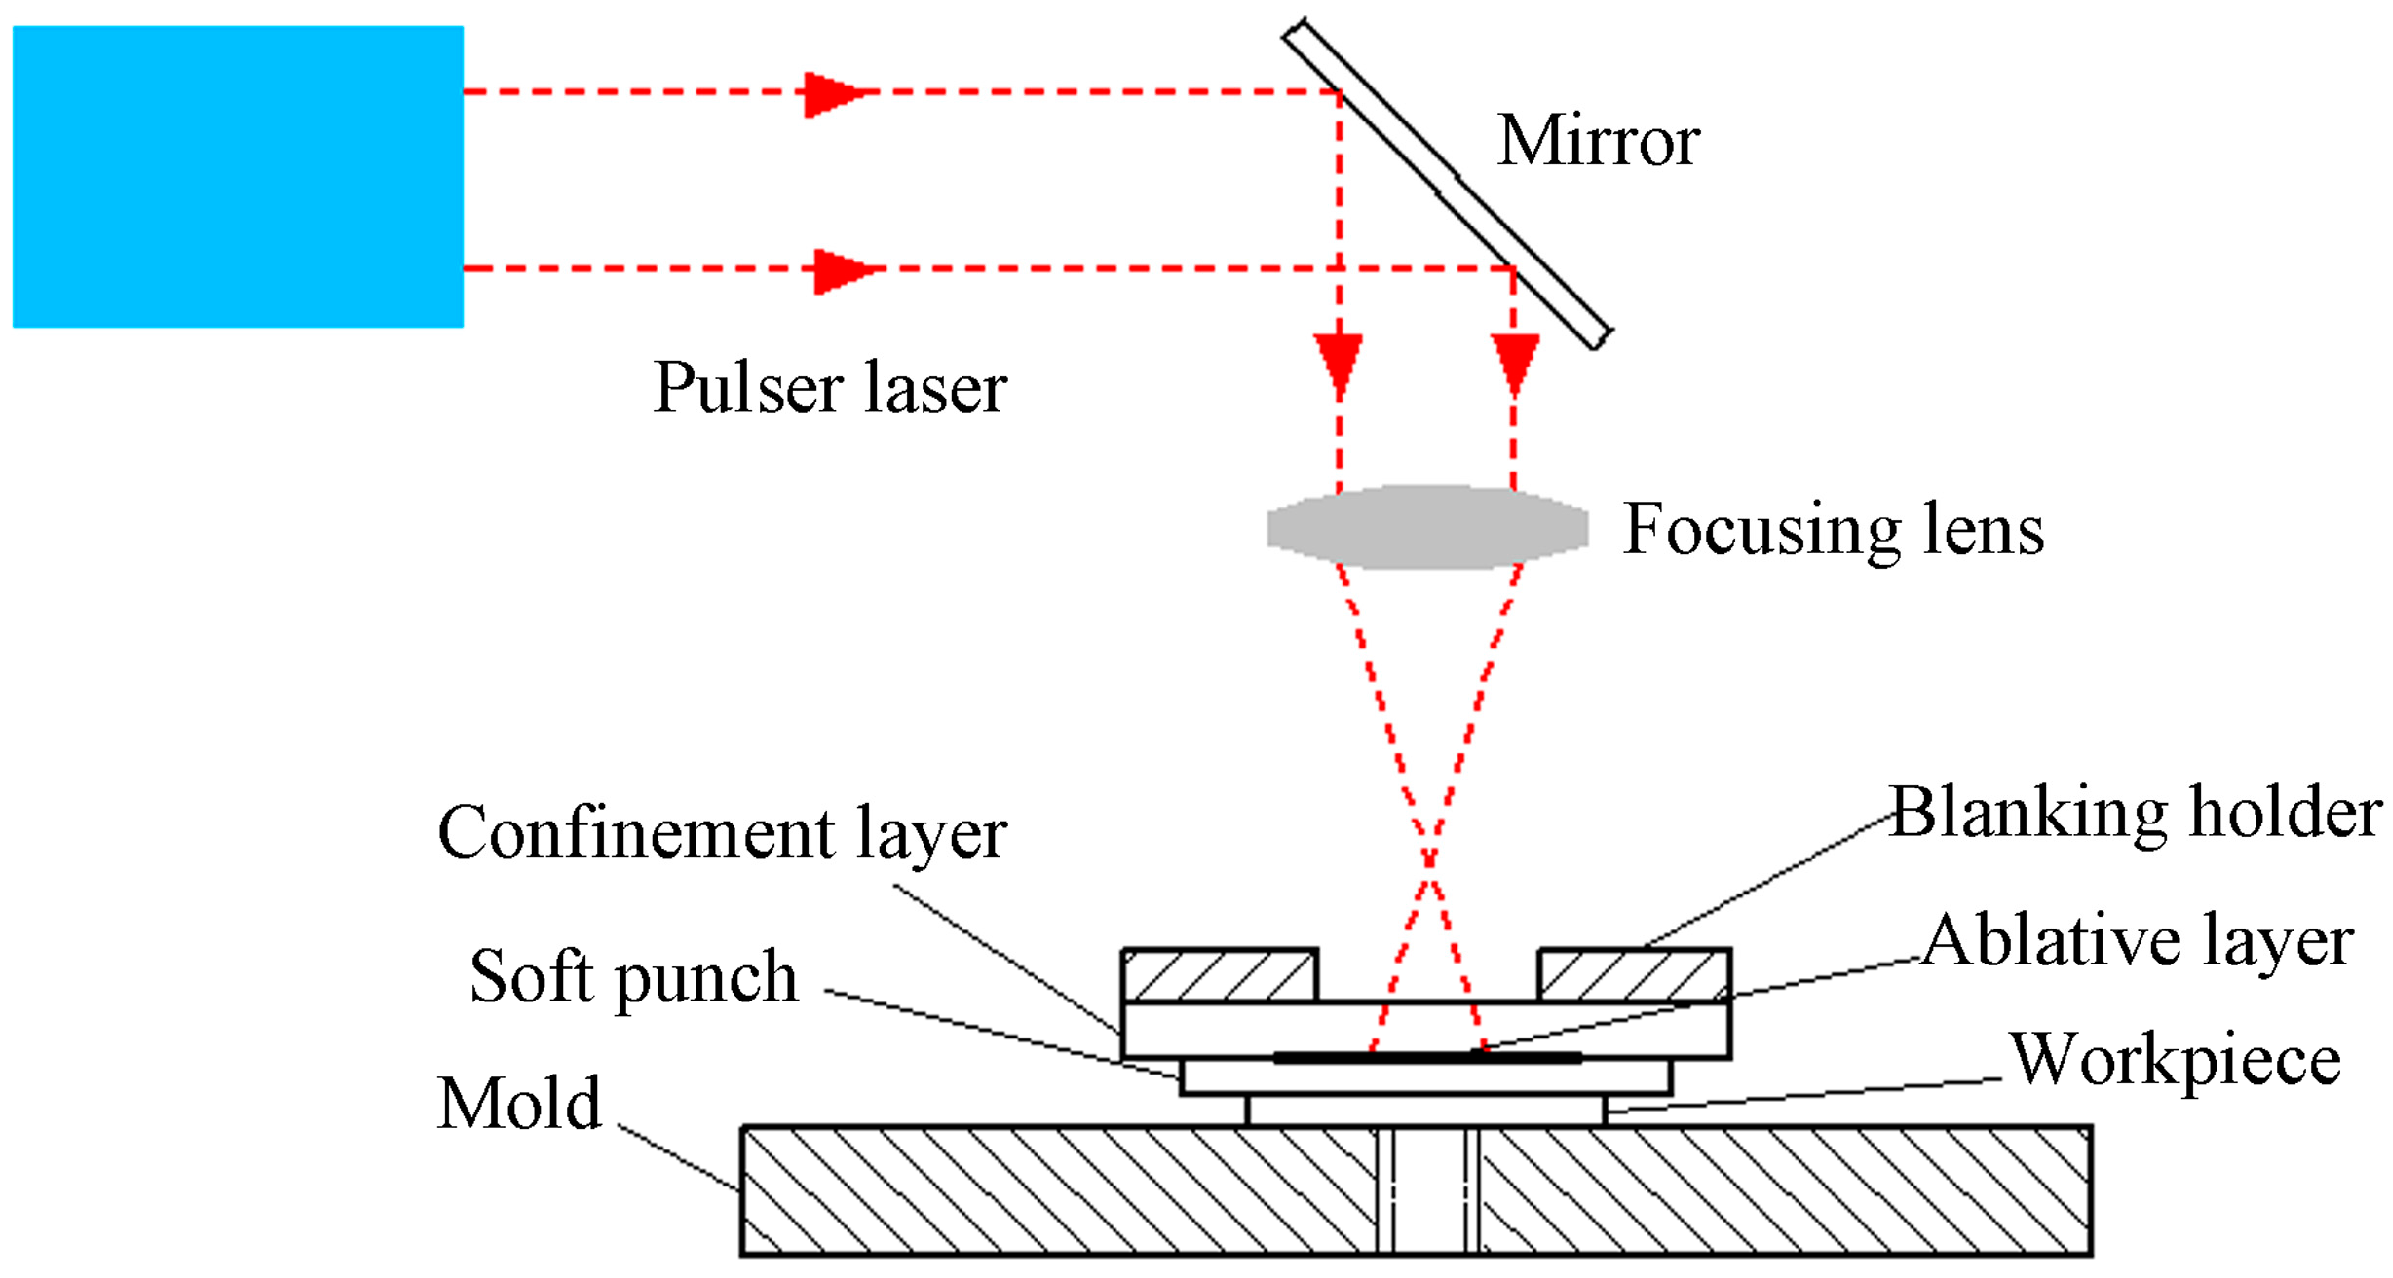
Figure 1 shows the principal of the laser shock punching process. The laser radiates the pulse laser horizontally, it rotates by 90° when it irradiates onto the mirror and then the laser focuses on a point because of the focusing lens. The ablative layer is vaporized into a high-temperature and high-pressure plasma due to the intense laser beams. The plasma continues to absorb laser energy until it changes into LSD (laser supported detonation). With the confinement of confinement layer and blank-holder, LSD exerts intense pressure on the workpiece via the incompressible and hyperelastic soft punch. Under the action of the mold, the workpiece takes the shape of the punching die. Finally, the soft punch restores to its original appearance and finishes the punching process.
Figure 1. Schematic of the laser shock punching process.
Micromachines 06 00969 g001

2.2. Experimental Preparation

Spitlight 2000 Nd-YAG Laser (InnoLas Corporation, München, Germany) is employed, the laser beam following the Gaussian distribution, and its main parameter is shown as Table 1. The 1090 powder mold steel works as the mold material due to its high hardness and high stiffness. The punching die fabricated by micro-EDM is shown in the Figure 2. The mold has a sufficient rigidity, the surface roughness being relatively small. Table 2 shows the dimensional characteristics of the mold. The dimensional accuracy of punched gears is examined by the KEYENCEVHX-1000C digital microscope (KEYENCE Corporation, Osaka, Japan). The focus of the laser beam is above the workpiece. The distance between the mold and the focus must be appropriate in order to ensure that the laser spot is larger than the mold diameter. The die is mounted on a movable platform. Titanium powder is coated onto K9 glass by magnetic sputtering serving as ablative layer and K9 class serves as confinement layer.
The workpiece is Al foil. In order to research the effects of hardness and thickness of the soft punch on the quality of the micro gear, the Shore A hardness 55° of silica gel and the Shore A hardness 70° of polyurethane films of 100, 200 and 300 µm in thickness are employed. All the workpieces and soft punches are cut into square pieces of 1 mm × 1 mm. In addition, the weights of employed blank-holders are 4 N and 12 N, respectively. In addition, different weight of blank-holders (45 steel) is employed. The detailed experimental parameters are showed in Table 3.
Table 1. Main parameters of Spitlight 2000 Nd-YAG Laser.
ParametersValues
Single pulse energy80~1900 mJ
Pulse width8 ns
Wave length1064 nm
Energy stability<±1%
Spot diameter2~5 mm
Figure 2. (a) Top view and details of the punching die; (b) sectional view of the punching die; and (c) dimension of designed tooth profile.
Micromachines 06 00969 g002
Table 2. Dimensional characteristics of the mold.
ParametersValues
Module (m)0.1 mm
Gear number (z)12
Addendum circle diameter1367.88 µm
Dedendum circle diameter1041.73 µm
Hole diameter404.20 µm
Table 3. The overview of experimental parameters.
ParametersValues
K9 class (thickness)2 mm
Ablative layer (thickness)10 µm
Soft punch (hardness)55°, 70°
Soft punch (thickness)100, 200, 300 µm
Al foil (thickness)20 µm
Blank-holding force4 N, 12 N

3. Experimental Results and Discussions

3.1. Effect of the Laser Energy

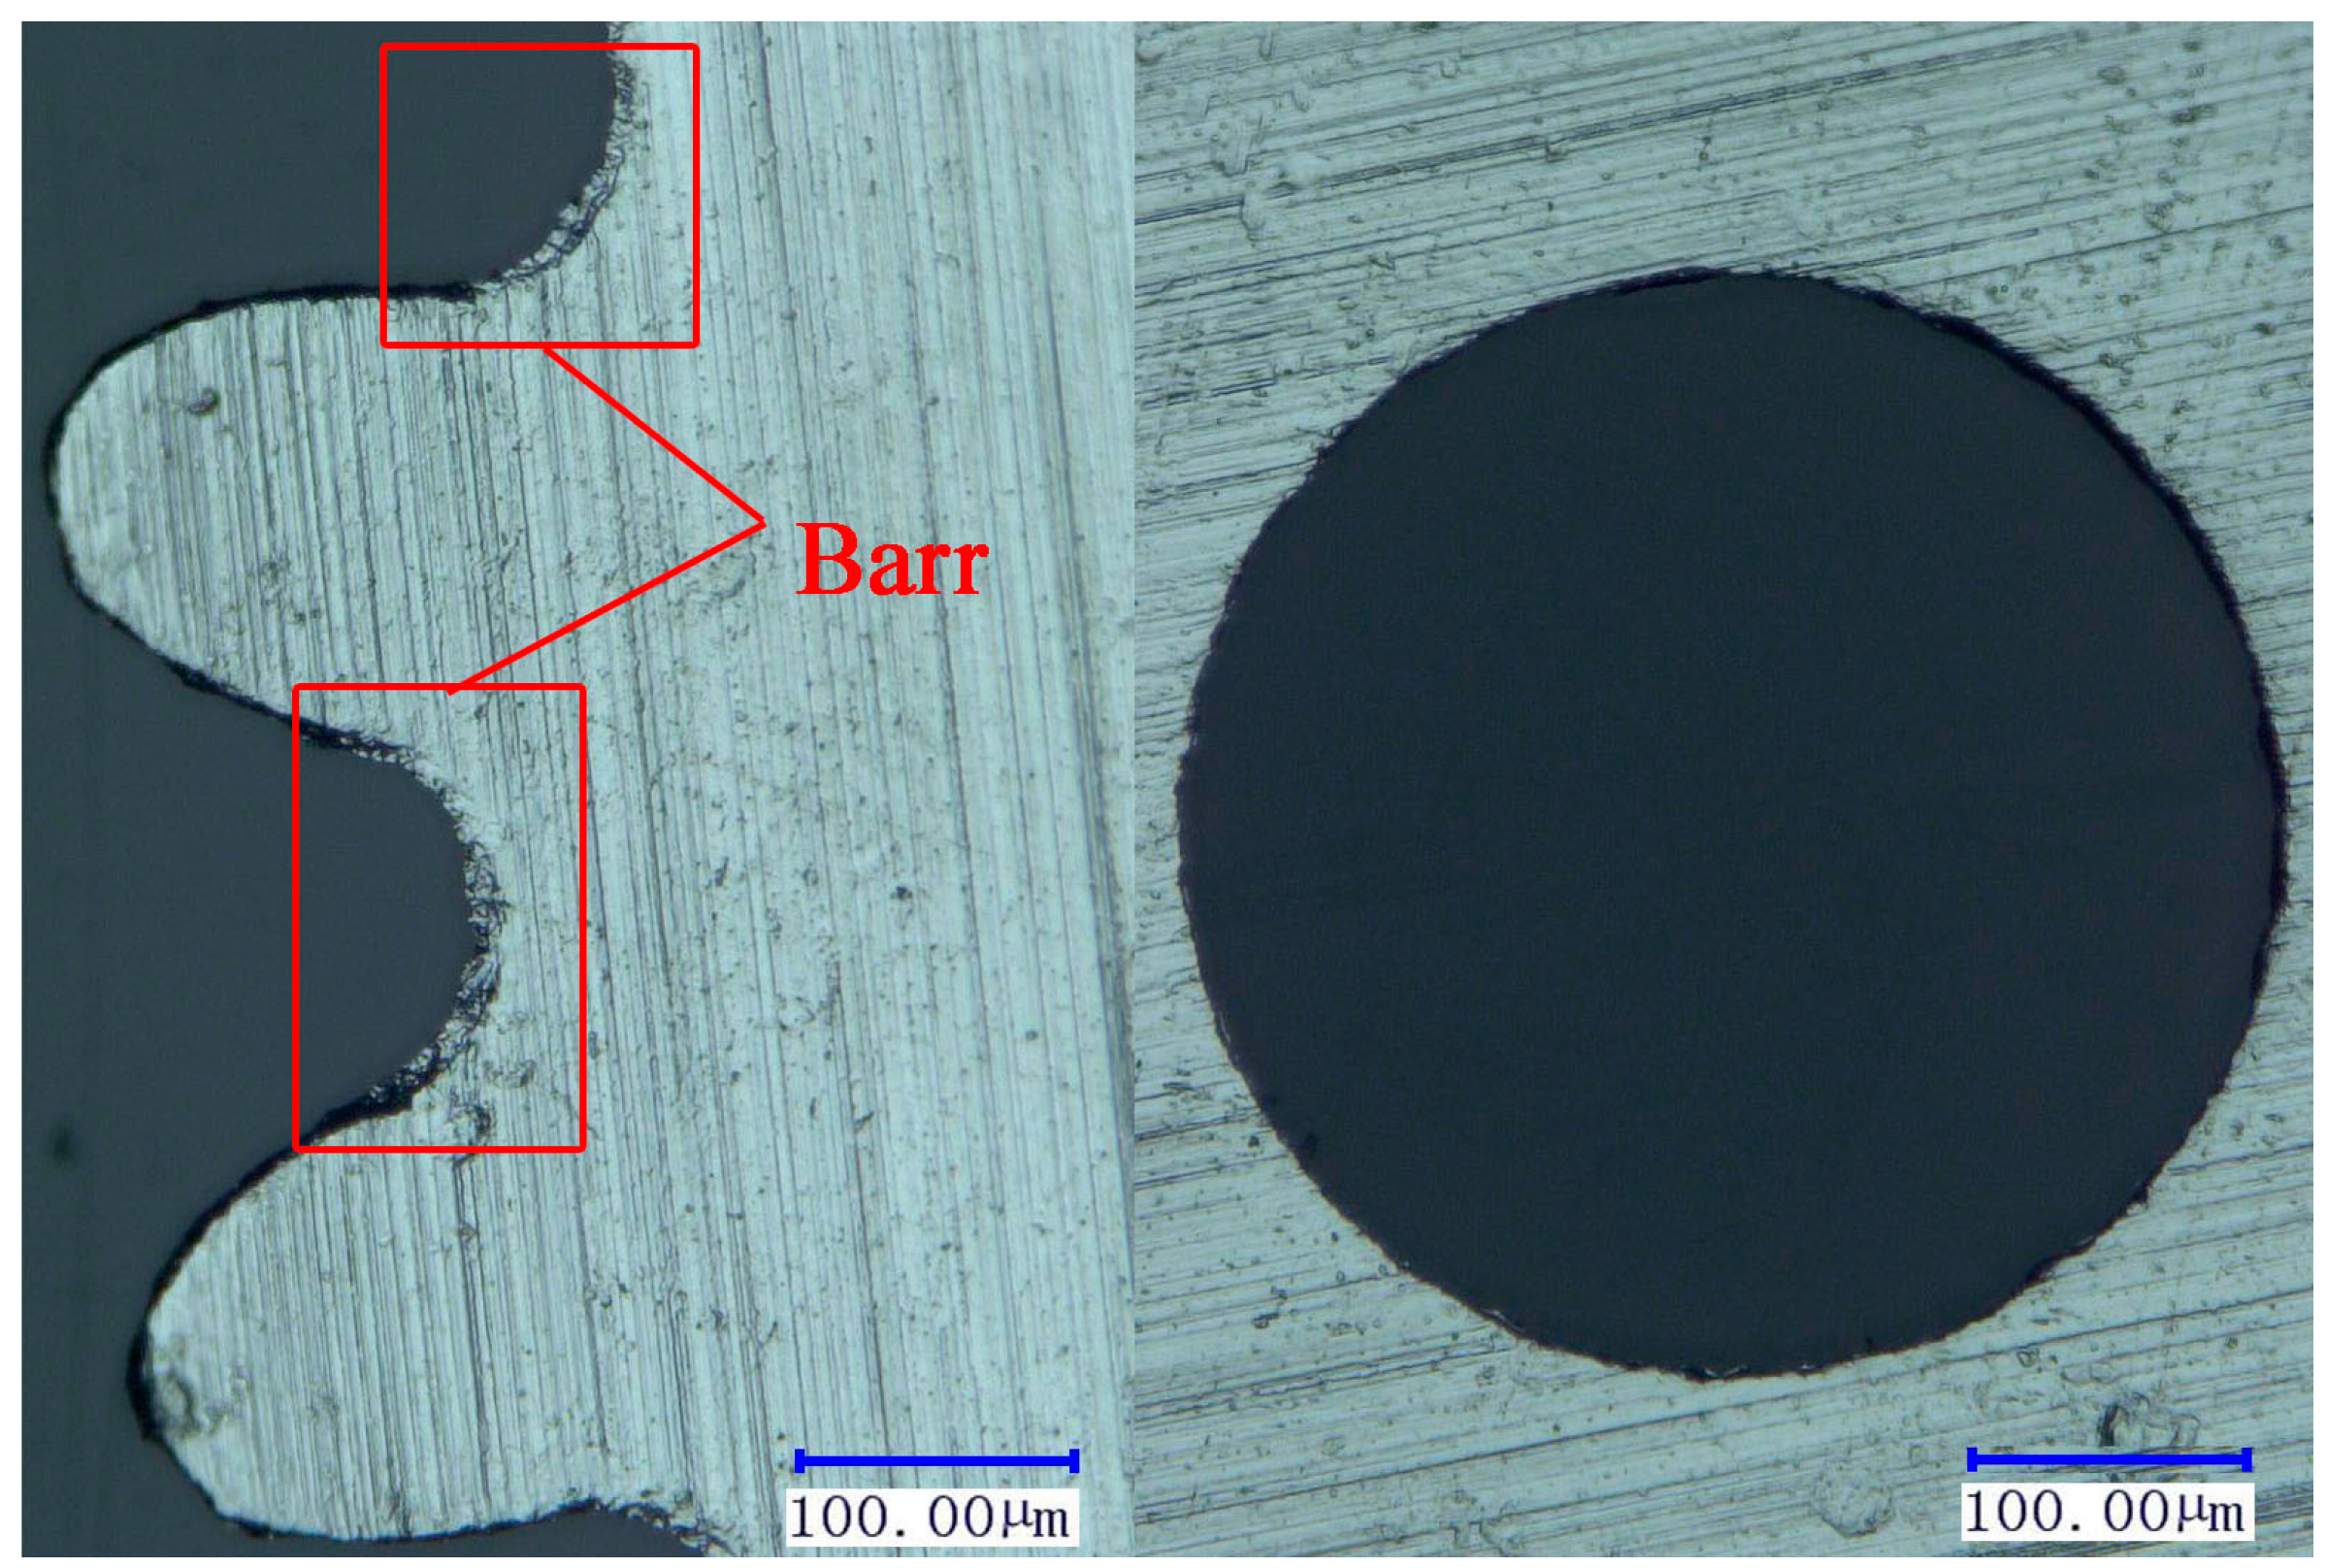
Laser energy is one of the key parameters in the process of laser shock punching. The energy is controlled by the percentage, and 70%, 80%, 90% and 100% are used in experiment, corresponding 1380, 1550, 1690 and 1900 mJ, respectively. The experiment is conducted with silica gel soft punch. The dimensional accuracy of micro-gears punched by different laser energies is observed by KEYENCE VHX-1000C digital microscope (by KEYENCE Corporation in Osaka, Japan). Figure 3 demonstrates clearly the relationship between the laser energy and the quality of the micro-gears. Obviously, the dimensional accuracy is poor when the laser energy is too high or too low. The reason might be that the blanking force of the die is not enough with low laser energy. Al foils are subjected to tensile failure under the shock effect of the soft punch instead of shearing by the die. Accordingly, the fracture surfaces are rough and the dimensional accuracy is poor. However, the laser energy is so high that it exceeds the absorption capacity of the soft punch if 1900 mJ is employed, thus the soft punch continues to move and might damage the fracture surface. In addition, punched gears tend to stick to the mold and hard to take it down when excessive energy is employed, which is detrimental to the forming precision. Figure 4 shows the detailed picture of the gears and holes. Apparently, the punching quality of holes is much better than those micro-gears, referring to not only dimensional accuracy but also the fracture surface, which is easy to understand that the gear shape is more complicated and irregular.
Figure 3. Effect of the laser energy on quality of micro-gears: (a) punched by lighter blank-holder and (b) heavier blank-holder. Error bar: Standard deviation.
Micromachines 06 00969 g003
Figure 4. The detailed top-view picture of the gears and holes.
Micromachines 06 00969 g004

3.2. Effect of Soft Punch Properties

3.2.1. Soft Punch Thickness

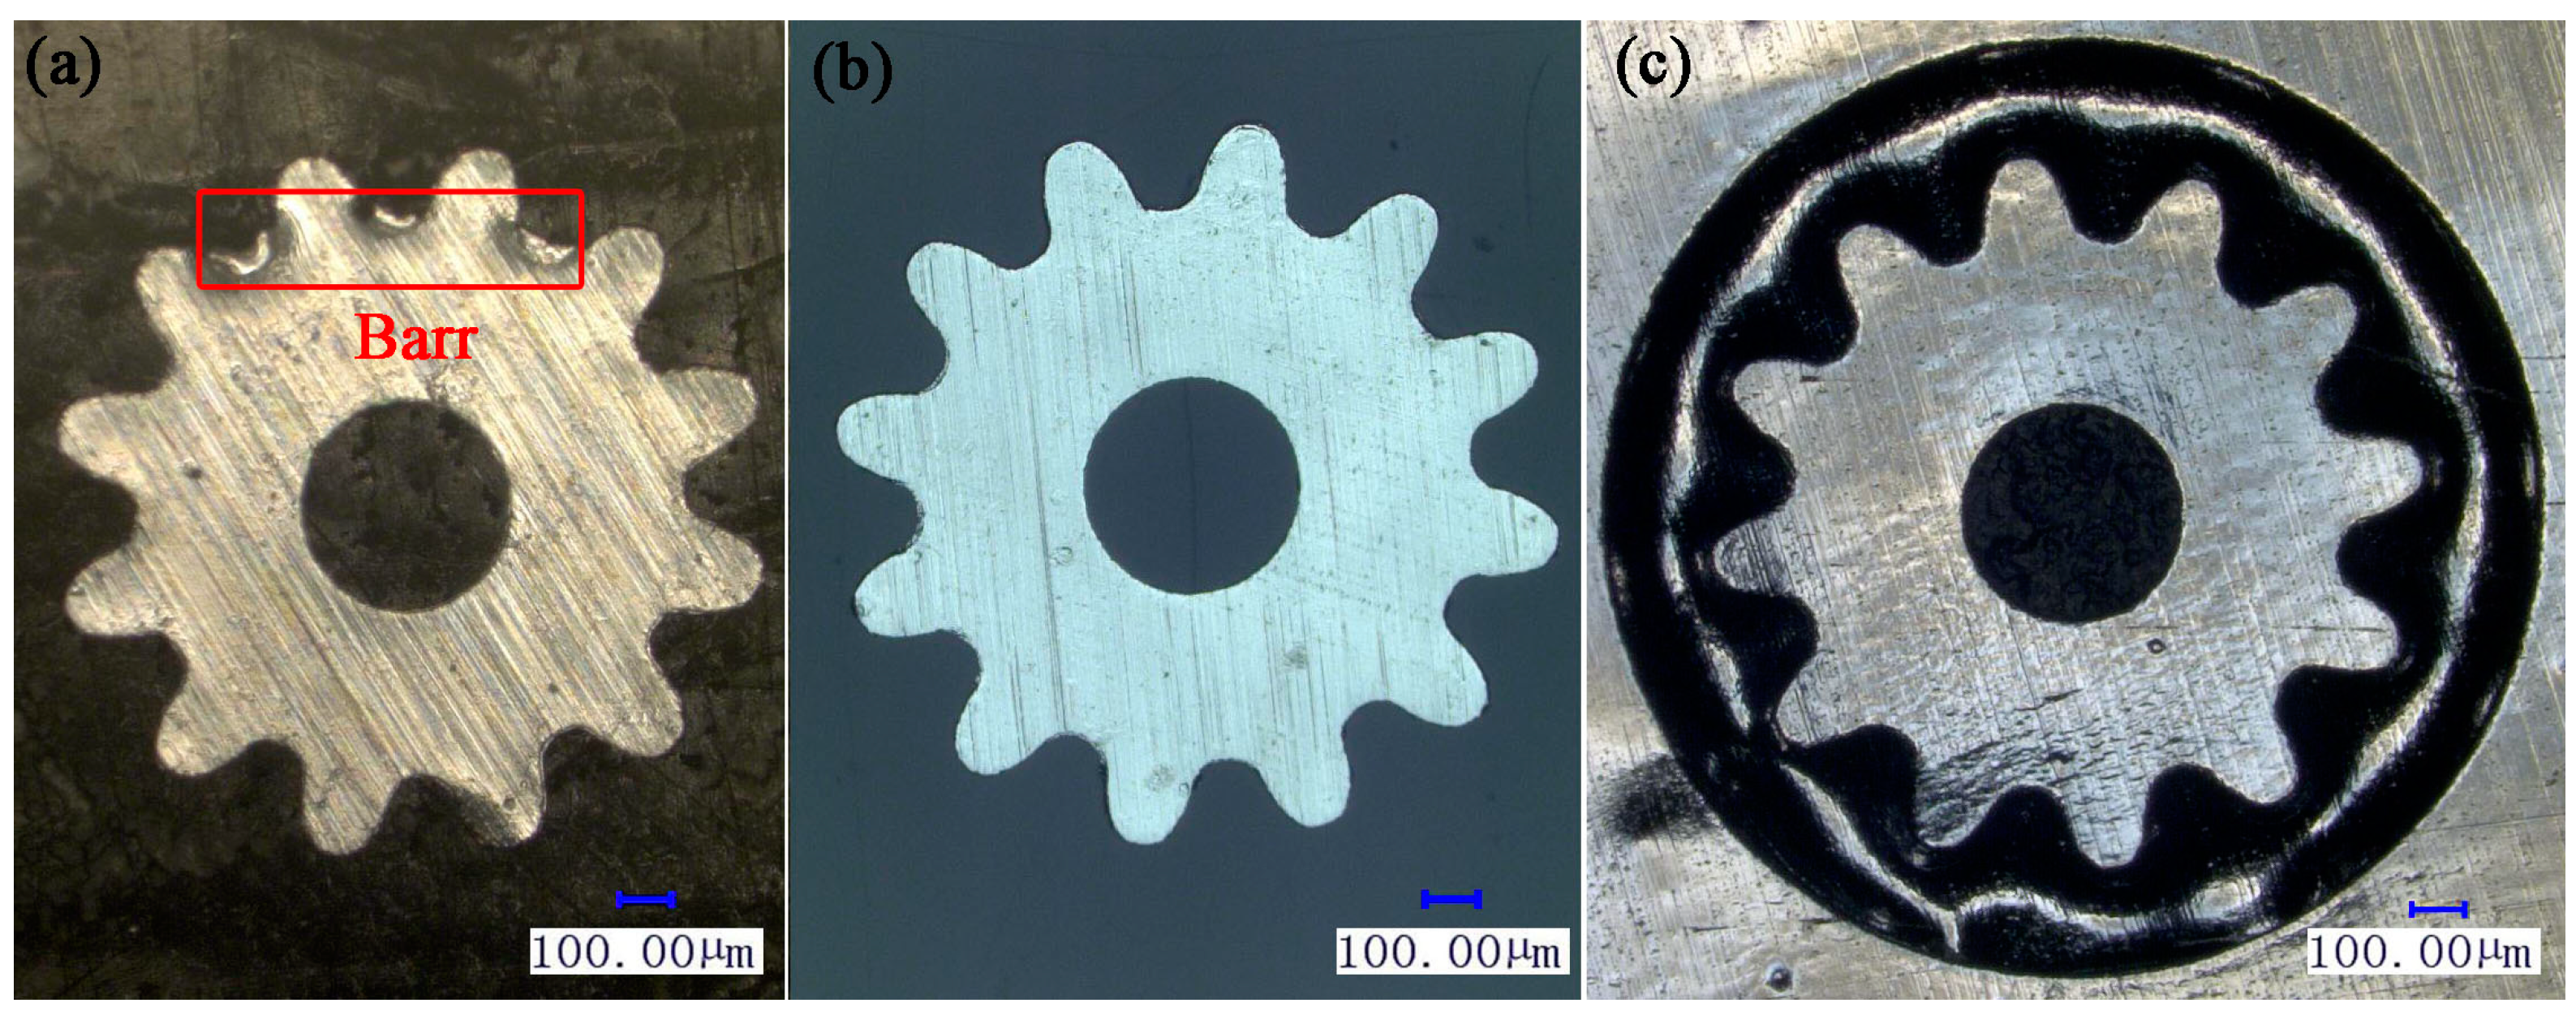
Experiments are conducted with silica gelin different thickness at 1690 mJ. The result in Figure 5 shows that the punching process can only realize with 100 and 200 µm of silica gel, while 300 µm is so thick that gears cannot be separated from a workpiece. However, micro-gears punched tend to be incomplete with 100 µm of silica gel due to the ability of homogenizing energy is relatively weak in contrast to 200 µm. The diameter of the laser spot is about 3 mm, slightly bigger than the die, so it will be more difficult to guarantee the punch-to-die alignment if 100 µm of silica gel is used.
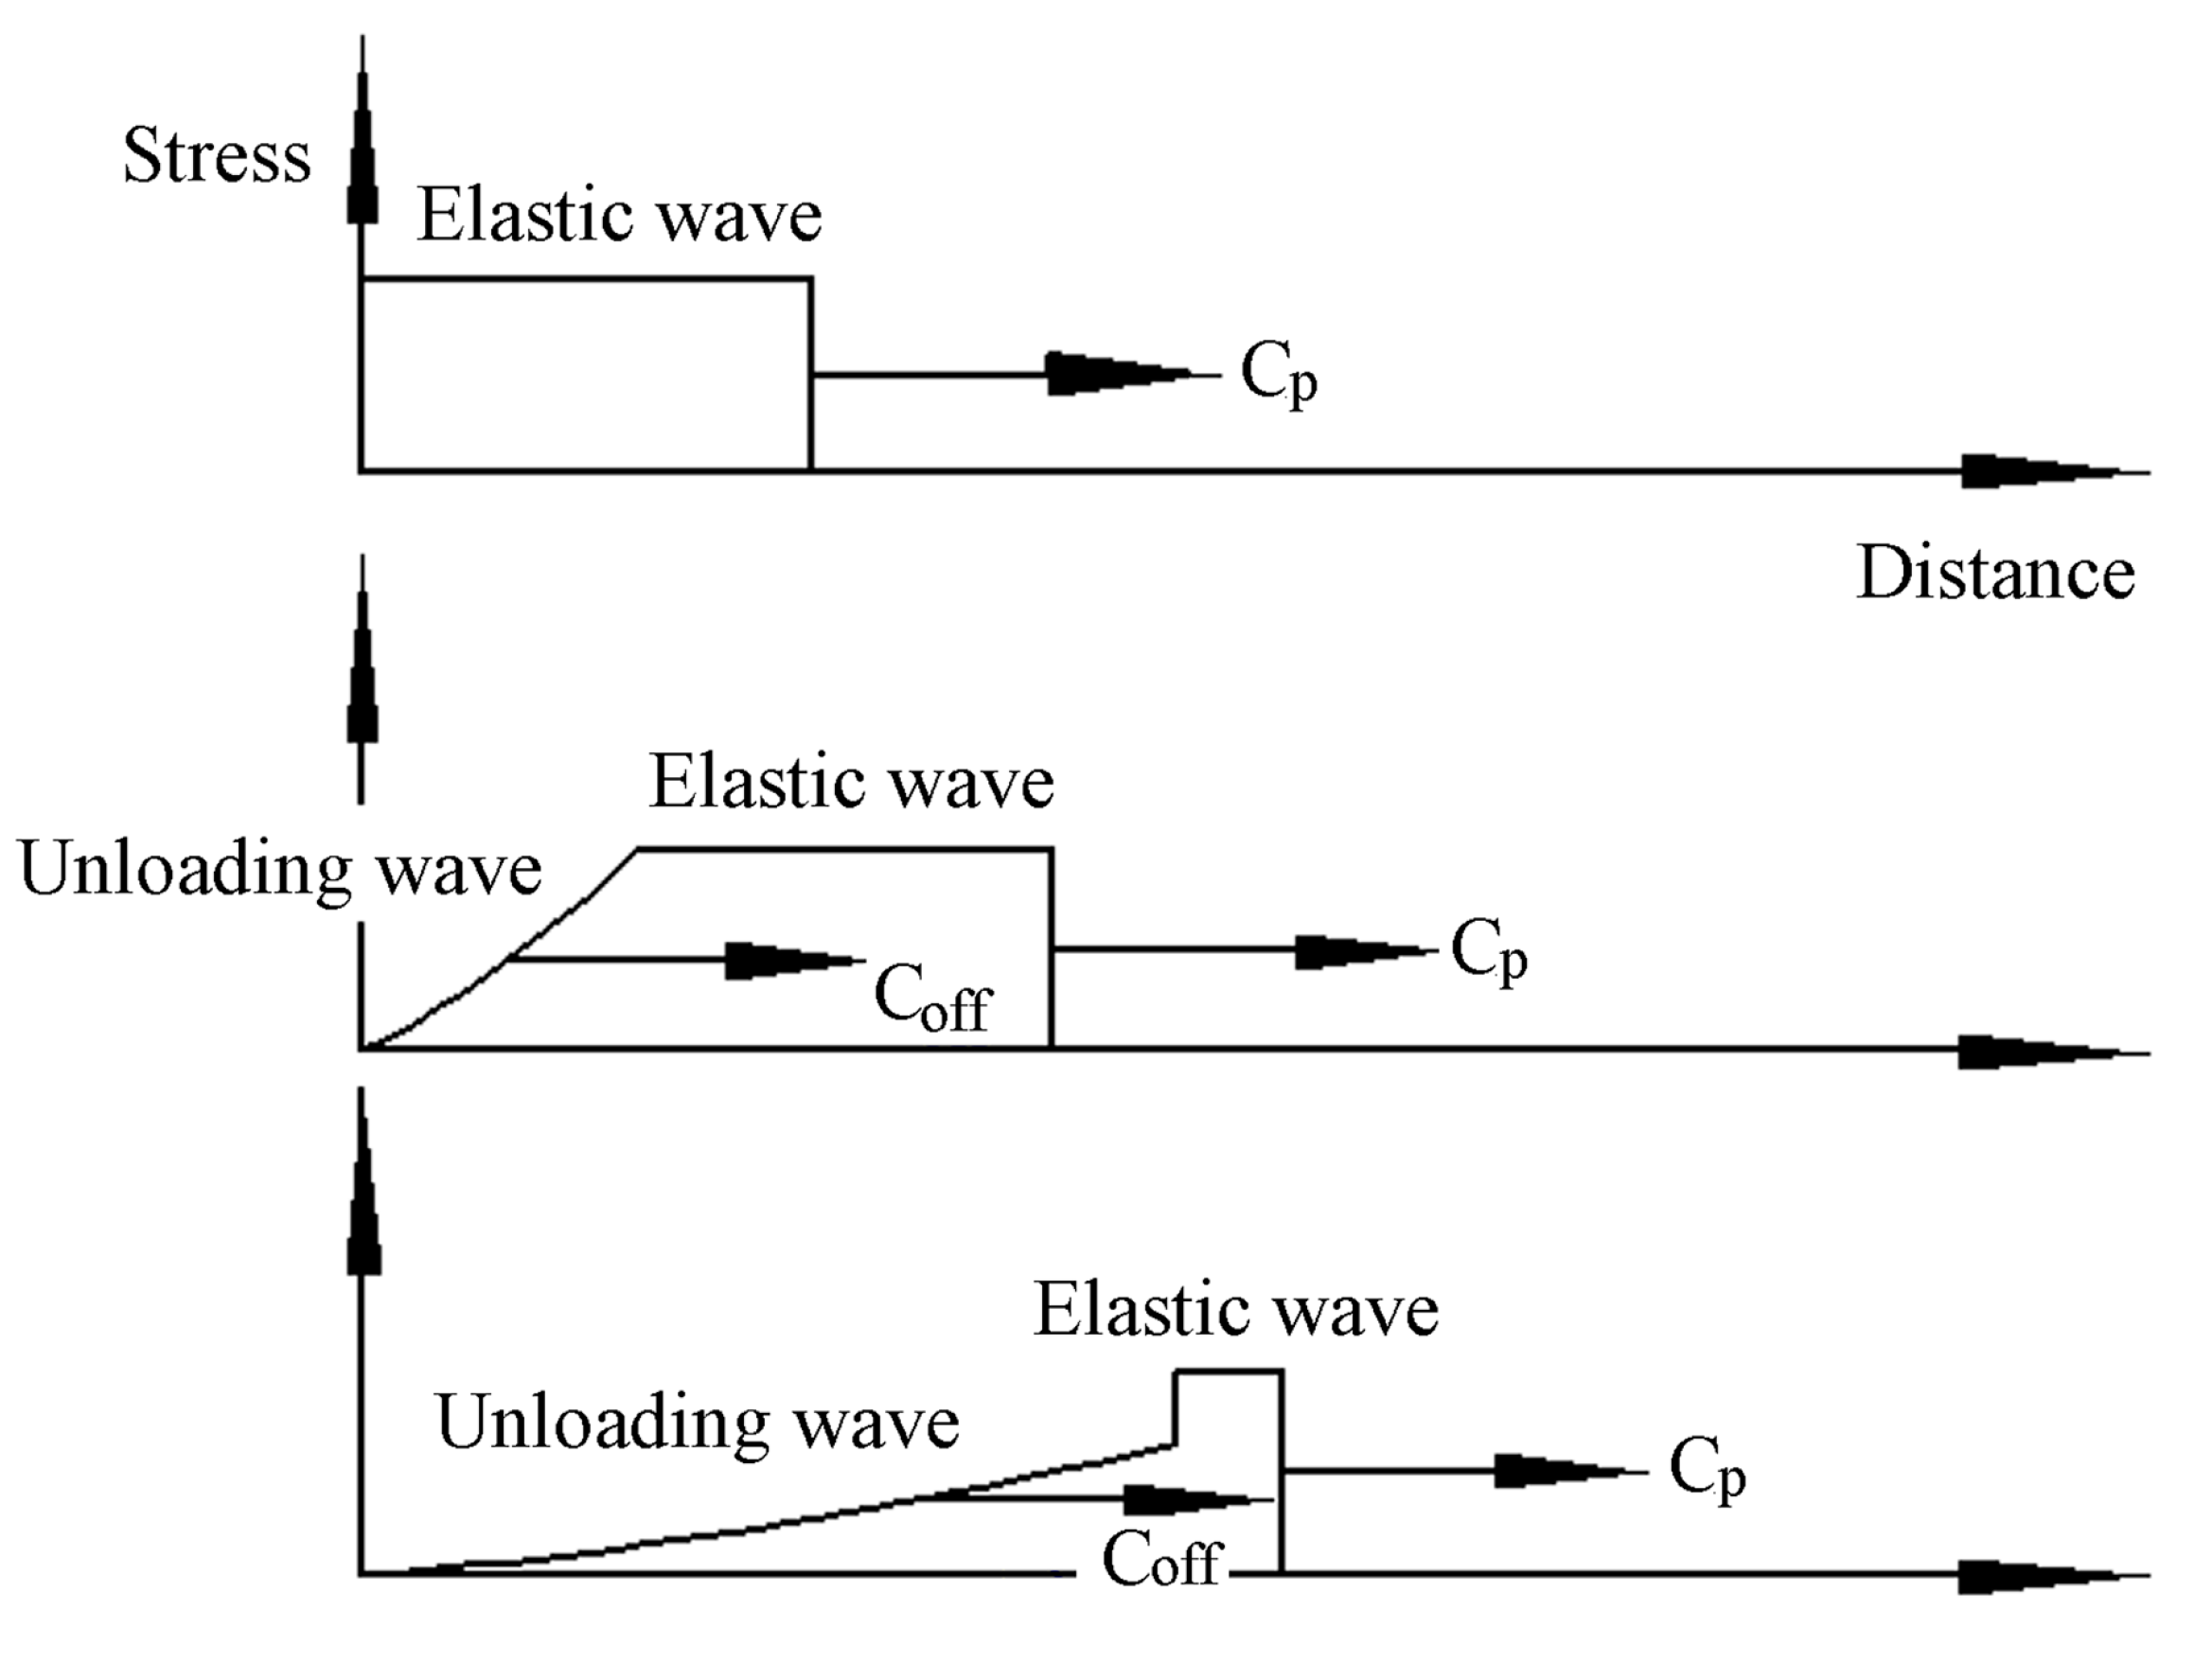
Stress waves appear as soon as LSD impacts the soft punch, mainly in the form of elastic waves. Figure 6 is the schematic propagation of elastic waves. Apparently, the velocity of unloading wave is faster than that of elastic wave, and the elastic wave will be caught up, thus, unload or decay before arriving at lower surface, so thicker silica gelgoes against the transmission of the laser induced waves. Thus it needs more laser energy to use 300 µm of silica gel. So 200 µm is suitable for process.
Figure 5. Top view of micro-gears punched by different thickness of silica gel: (a) 100 µm; (b) 200 µm; and (c) 300 µm.
Micromachines 06 00969 g005
Figure 6. Schematic propagation of elastic waves: Cp is the velocity of elastic wave; Coff is the velocity of unloading wave.
Micromachines 06 00969 g006

3.2.2. Soft Punch Hardness

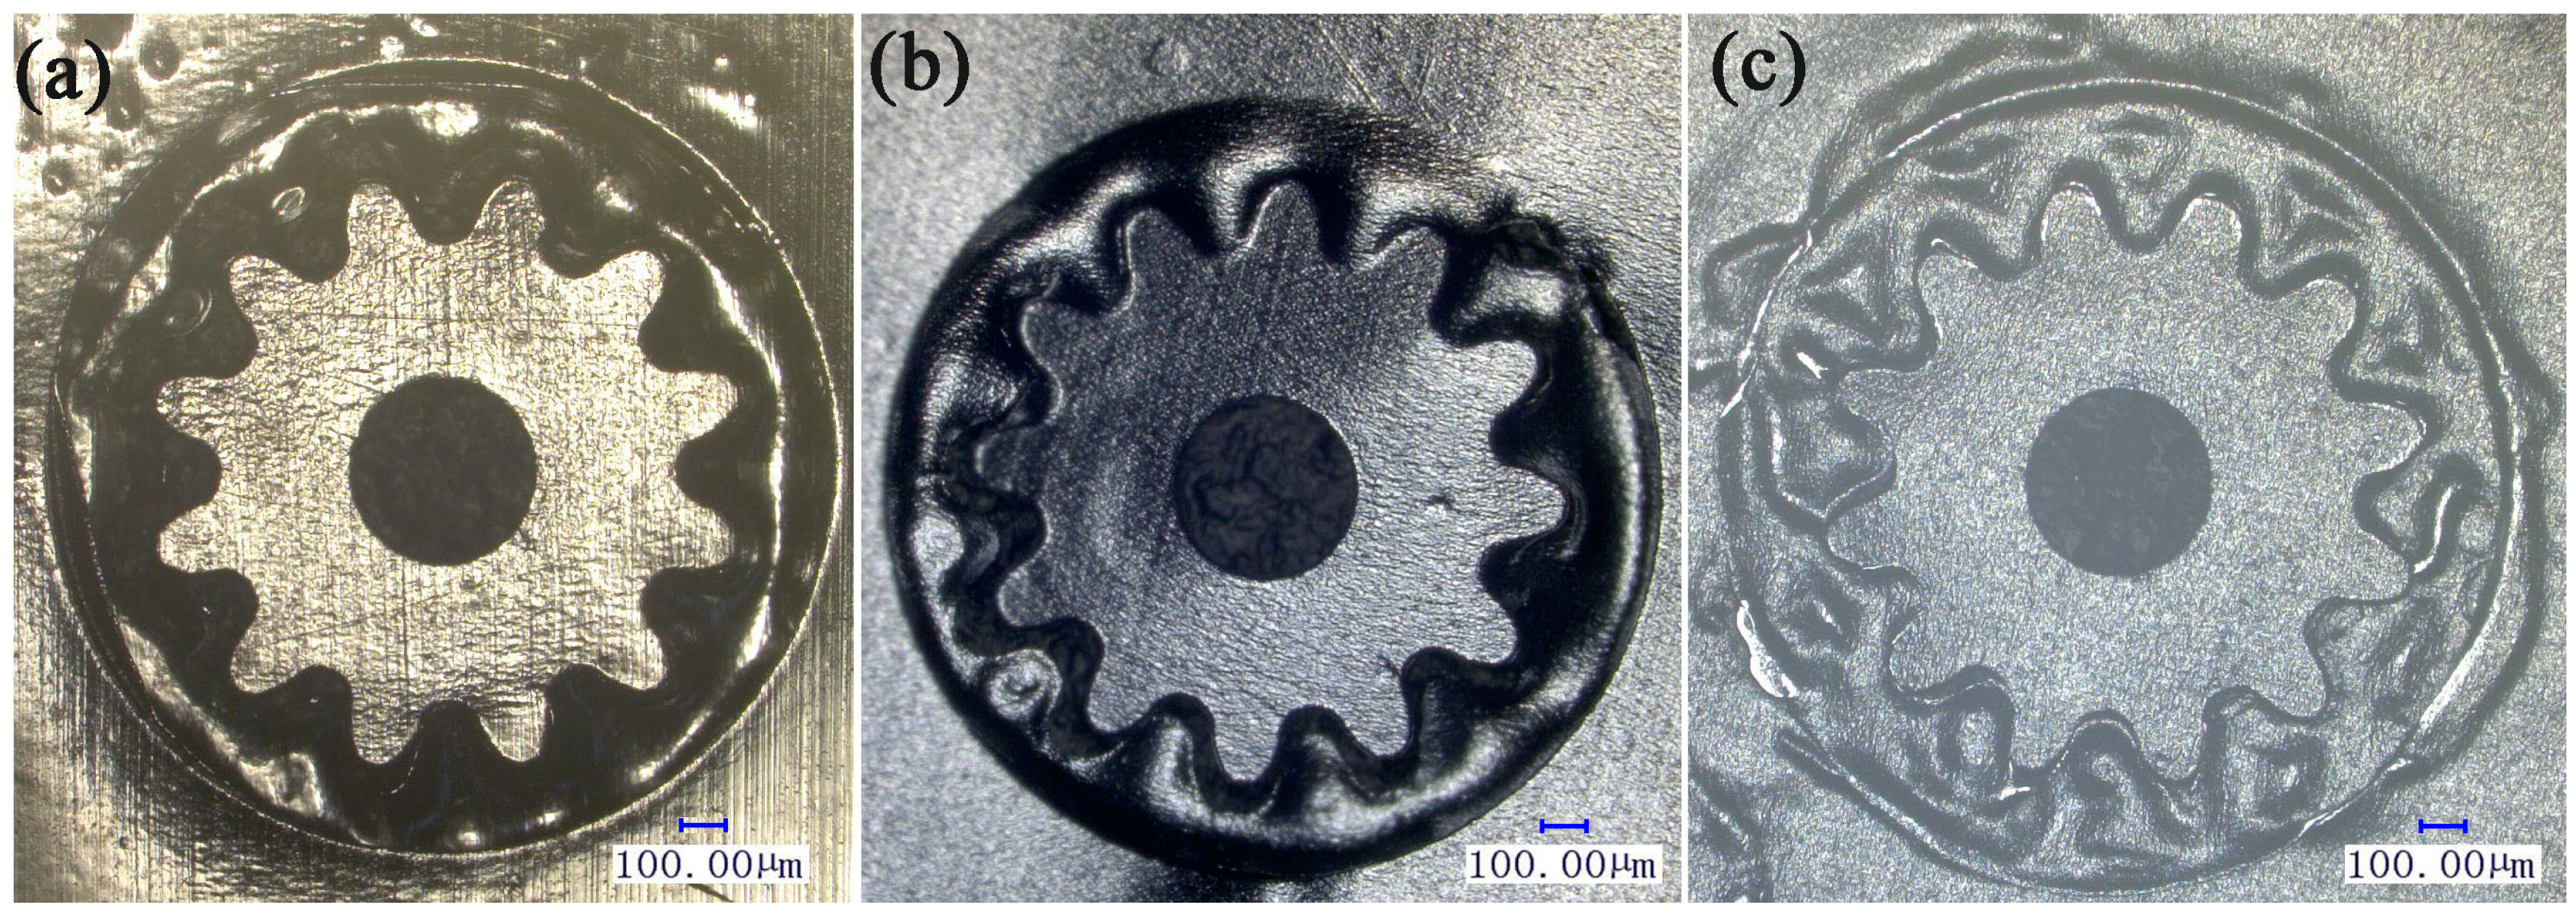
Peng et al. [11] focused on the effects of the hardness of the soft punch on the Von Mises stress distribution as well as the thickness of formed sheets. The results show it is not a decisive factor in the soft punch forming process. Different from the former research, the laser shock punching process is a high strain rate micro-fabrication technique. Figure 7 shows the results of the foils punched with polyurethane films under 1690 mJ. Compared with Figure 5, it shows that micro-gears punched with 100 µm-polyurethane film cannot even be punched completely, indicating that a harder soft punch (polyurethane films) needs more laser energy to finish the punching process than a softer one (silica gel). The reason may be explained from the perspective of the impedance mismatch effect and pressure enhancement effect [12,13].
Assuming that elastic waves propagate from medium B to A, as Figure 8 shows, the wave impedance is (ρ0C0)1 and (ρ0C0)2, respectively. The intensity of elastic waves in medium B is σ1. When the incident wavefront reaches the left side and reflects at the interface, the particle velocity increment is v1. Reflection and transmission of elastic waves occur at the interface between medium A and B, supposing the intensity of reflected wave and transmitted wave is σ2 and σ3 and the particle velocity increment is v2 and v3. M and N are the immediately adjacent points on the interface. So the velocity and stress of point M under reflected wave and incident wave is:
ν M = ν 1 + ν 2 = σ 1 ( ρ 0 C 0 ) 2 + σ 2 ( ρ 0 C 0 ) 2 , σ M = σ 1 + σ 2
On the right side of the interface, the velocity and stress of point N only by the effect of the transmitted wave is:
ν N = ν 3 = σ 3 ( ρ 0 C 0 ) 1 , σ N = σ 3
According to continuity condition, point M and N have equal speed and stress, so:
σ 3 = σ 1 + σ 2
σ 1 ( ρ 0 C 2 ) 2 σ 2 ( ρ 0 C 2 ) 2 = σ 3 ( ρ 0 C 2 ) 1
and consuming that F = ( ρ 0 C 0 ) 1 ( ρ 0 C 0 ) 2 ( ρ 0 C 0 ) 1 + ( ρ 0 C 0 ) 2 , T = 2 ( ρ 0 C 0 ) 1 ( ρ 0 C 0 ) 1 + ( ρ 0 C 0 ) 2 , by combining Equations (3) and (4), gives:
σ 3 = T σ 1 , ν 3 = ( ρ 0 C 0 ) 2 ρ 0 C 0 1 T ν 1
Elastic waves propagate from soft punch to workpiece, namely from low impedance medium (ρ0C0)2 into the high impedance medium (ρ0C0)1, so σ3 > σ1 according to Equation (8), which means the intensity of transmitted waves is larger than that of incident waves:
C 0 = E ρ 0 , ρ 0 C 0 = ρ 0 E
For polyurethane films, ρ0 = 1173 Kg/m3, E = 7.84 MPa, ρ0C0 = 3.03 MPa/m/s; and for silica gel, ρ0 = 1111 Kg/m3, E = 2.14 MPa, ρ0C0 = 1.54 MPa/m/s. It can be calculated that the pressure enhancement effect of silica gel is better than that of polyurethane films.
Figure 7. Top view of micro-gears punched by different thickness of polyurethane films: (a) 100 µm; (b) 200 µm; and (c) 300 µm.
Micromachines 06 00969 g007
Figure 8. Reflection and transmission of elastic waves.
Micromachines 06 00969 g008

3.3. Effect of Blanking-Holding Force

Lee et al. [14] presented a comparison of the straining behavior of the material between fine-blanking and conventional process. Hardness measurements were taken in fine-blanking experiments. The results showed that hardness increased in the first phase and then leveled off with the increase of the V-ring pressure. Lee obtained good cutting quality in fine-blanking process due to the exerted blank-holding force and found that large force was beneficial to improve the punching quality. Kwak et al. [15] investigated the height and position effect of V-ring indenter on the sheared surface in the fine-blanking. Fine-sheared surface products can realize with higher V-ring and closer position to the punch. All the efforts are to increase hydrostatic stress and ensure that the material is in three-dimensional compressive stress.
In order to investigate the influence of the blank-holding force on punching quality in laser shock punching process, experiments are conducted with different weights of blank-holders. The results are shown in Figure 9. It is clear that addendum circle, dedendum circle and hole accuracy of heavier blank-holder are much better than those of micro-gears punched with lighter blank-holder, which can be explained from the view of deformation behavior.
Different from the fine-blanking process, workpiece is not in three-dimensional compressive stress but unidirectional stress in the laser shock punching process, as shown in Figure 10. Under the shock effect of soft punch, workpiece is subjected to elastic compression and axial tensile firstly. Then, the upper and lower surface material surrounding mold outline flows into the mold cavity. Stress concentration occurs on the lower surface due to the shearing effect of the mold and workpiece fracture finally. In the whole punching process, blank-holder provides lateral pressure and prevents axial movement of the workpiece. According to the famous Karman test, brittle fracture occurs when the cylindrical marble samples bear only axial pressure. However, samples occur plastic deformation under the simultaneous action of the axial force and lateral pressure. Similarly, tensile stress is an unfavorable factor in the punching process, while relatively larger blank-holding force can not only fix the workpiece, but also prevent the material from lateral flow and cross section tear. Thus, heavier blank-holder is beneficial for punching high quality micro-gears.
Figure 9. Comparision of dimensional accuracy with different blank-holders: (a) addendum circle; (b) dedendum circle; and (c) hole. Error bar: Standard deviation.
Micromachines 06 00969 g009
Figure 10. The deformation behavior in laser shock punching process.
Micromachines 06 00969 g010

4. Numerical Simulation

In this paper, ANSYS/LS-DYNA, an explicit dynamic analysis program, is used to simulate the laser shock punching process. Because both the laser spot and the micro-gear are symmetric, only a quarter of the configuration is established to save CPU space and improve computation efficiency, and a non-reflect boundary is employed on the symmetric surface.

4.1. Loading

The laser beam of SpitLight 2000 follows a Gaussian distribution. Assuming that laser irradiation is uniform and the induced plasma shock pressure is one-dimensional, Fabbro et al. [16] derived the shock wave maximum pressure pmax in the confined ablation mode, and it can be calculated by the following equation:
p max = 0.01 × ( α 2 α + 3 ) 1 2 × ( 2 Z 1 Z 2 Z 1 + Z 2 ) 1 2 × I 0 1 2
where α is usually equal to 0.1, I0 being the absorbed laser intensity, Z1 being the acoustic impedance of soft punch, Z2 being the acoustic impedance of confinement layer:
I 0 = 4 β E π d 2 τ
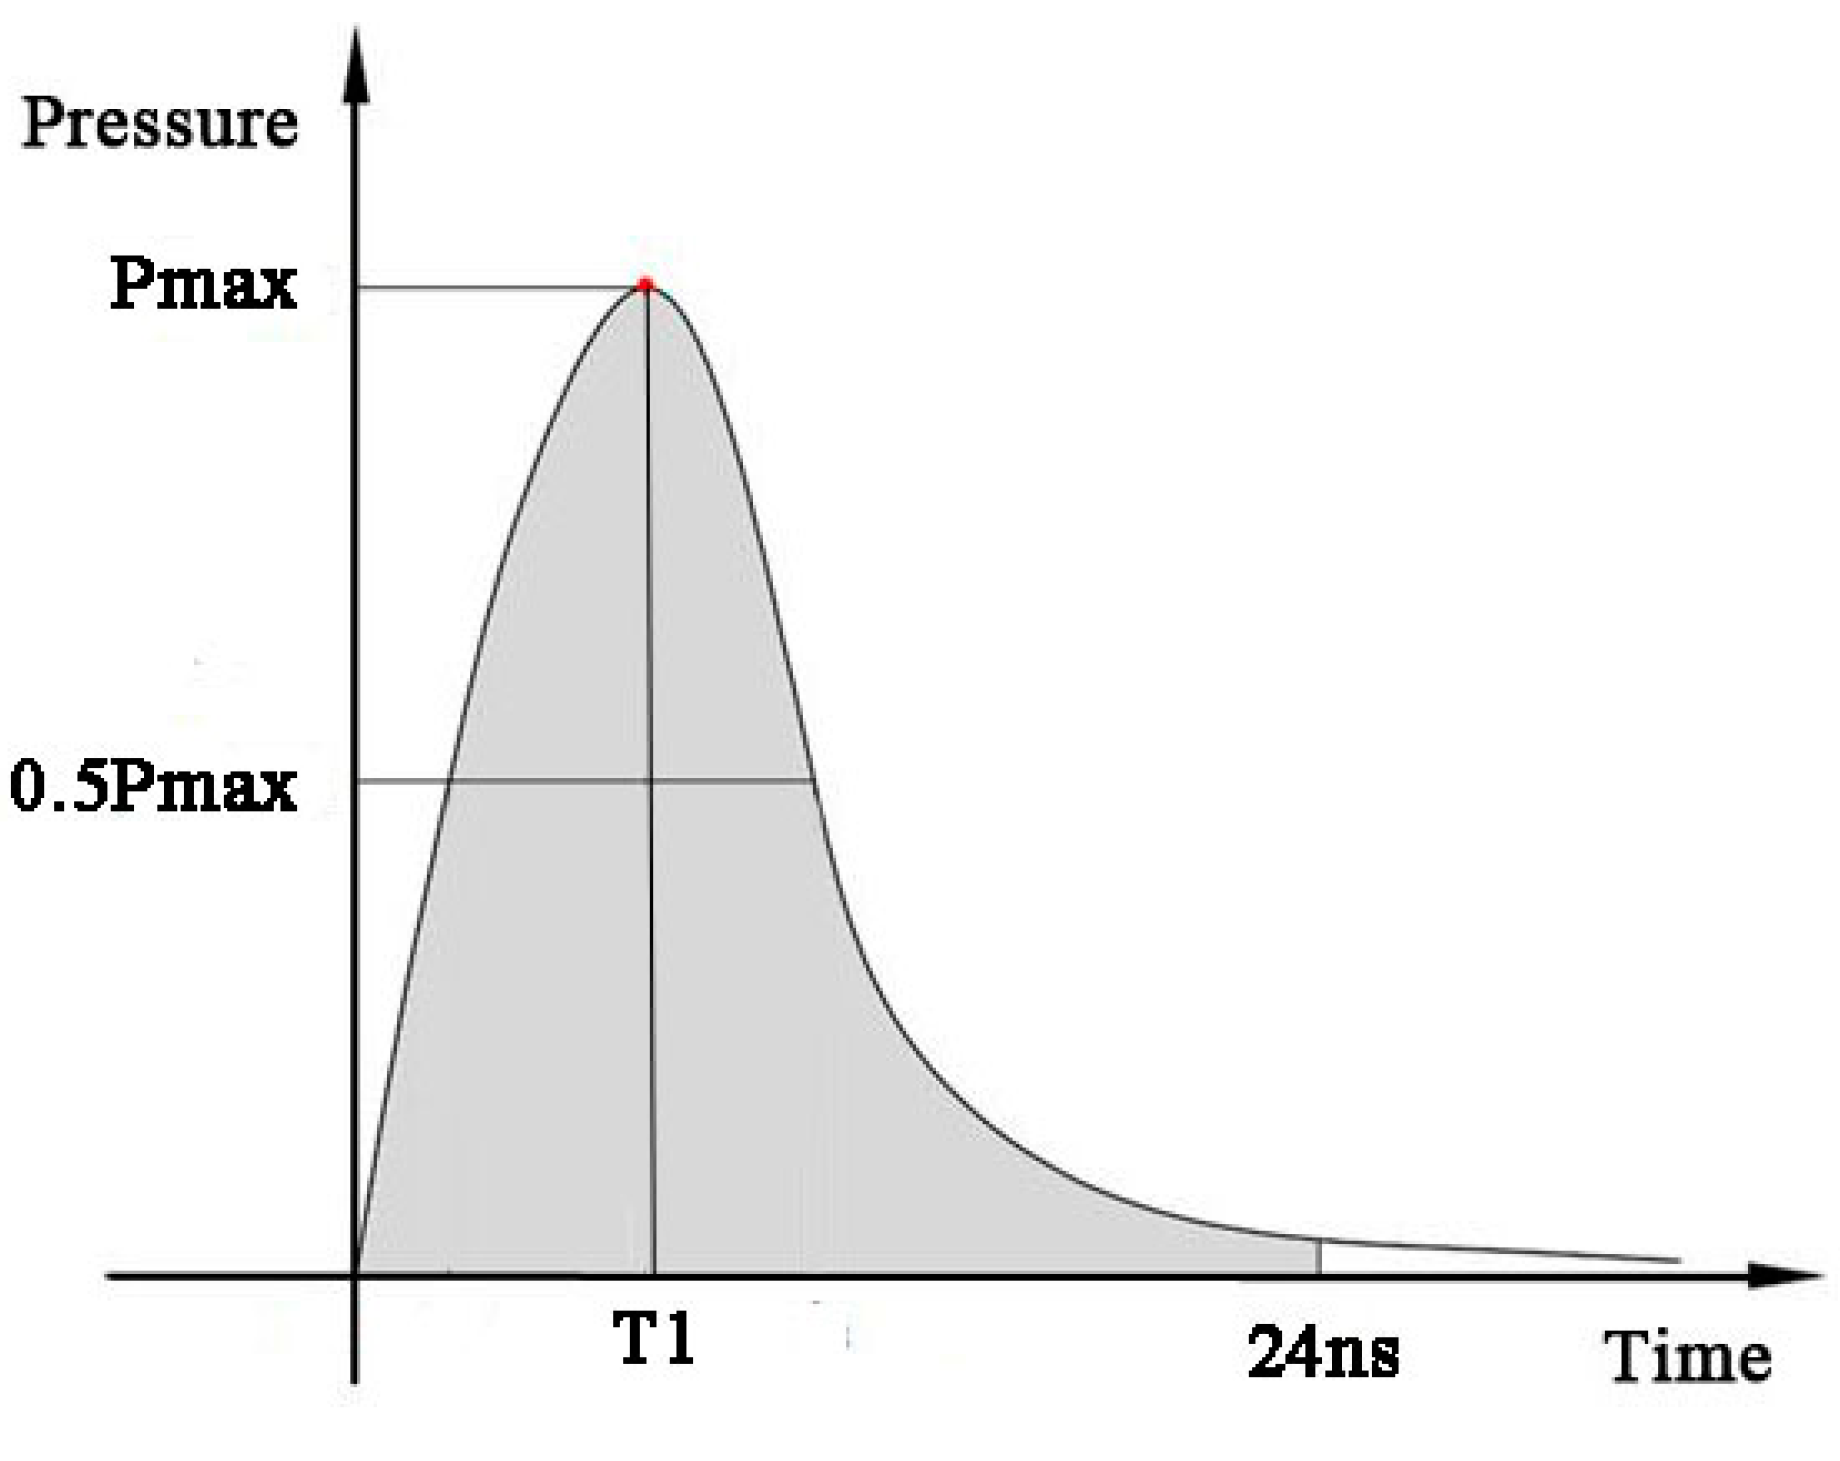
where E is the single pulse energy of incident laser beam, β is energy absorb coefficient of soft punch, d is the laser spot diameter, and τ is the laser pulse duration. In the confined ablative mode, the loading time can be three times the pulse width [17], and is set to 24 ns. According to the laser shock wave pressure measured in experiment, the pressure–time curve is shown in Figure 11.
Figure 11. The curve of load versus time.
Micromachines 06 00969 g011

4.2. Constitutive Model and the Failure Model

The laser shock punching process is characterized by ultrahigh strain rate, usually up to 106~107 s–1. Johnson–Cook model is suitable to describe the material behavior under large strain and high strain rate [9]. In addition, soft punch isolates thermal effect of the laser on the workpiece, and the Johnson–Cook model can be simplified as the following:
α = ( A + B ε n ) ( 1 + C ln ε 1 ε 0 )
where α is the equivalent yield strength, ε is the equivalent plastic strain, ε1 is the equivalent plastic strain rate, ε0 is the reference strain rate, A, B, C, and n is the material constant in solid state. Detailed values of constant are shown in Table 4.
Table 4. Parameters of Aluminum in Johnson–Cook model.
MaterialA (MPa)B (MPa)Cnε0 (s–1)
Aluminum3696840.00831.71.0
Johnson–Cook failure damage model [9] is employed because it considers the nucleation growth and coalescence of voids in ductile material at high strain rates. The transient strain is shown in Equation (13):
ε f = [ d 1 + d 2 exp ( d 3 σ * ) ] [ 1 + d 4 ln ( ε 1 ε 0 ) ] ( 1 + d 5 T * )
where εf is the strain at fracture, d1–5 are the failure parameters, σ* is the ratio of pressure to Von Mises effective stress, and T* is the homologous temperature. Relative parameters of Johnson–Cook failure mode are shown in Table 5.
Table 5. Failure damage mode parameters of Al foil.
Materiald1d2d3d4d5
Aluminum0.1120.1231.5000.0070.000
The superelastic silica gel soft punch with characteristics of nonlinear stress-strain is assumed to be incompressible. Mooney–Rivlin model is selected to define the material type [18]:
W = k + m = 1 n C k m ( I 1 3 ) k + ( I 2 3 ) m + 1 2 k ( I 3 1 ) 2
σ i j = W ε i j
where W is the strain energy per unit of reference volume, I1I3 are the strain invariants, and k is the bulk modulus. Since the rubber material is assumed as incompressible, the value of I3 is set as 1. Ckm is the hyperelastic constant, which determines the material response. Generally, two parameters (C10 and C01) are used to describe hyperelastic rubber deformation. The mechanical properties of the silica gel are given in Table 6.
Table 6. Mechanical properties of silica gel.
MaterialHardness Shore A (°)M–R Constant C10 (MPa)M–R Constant C01 (MPa)Poisson’s Ratio
Silica gel550.3820.0960.49997

4.3. Simulation Results and Discussions

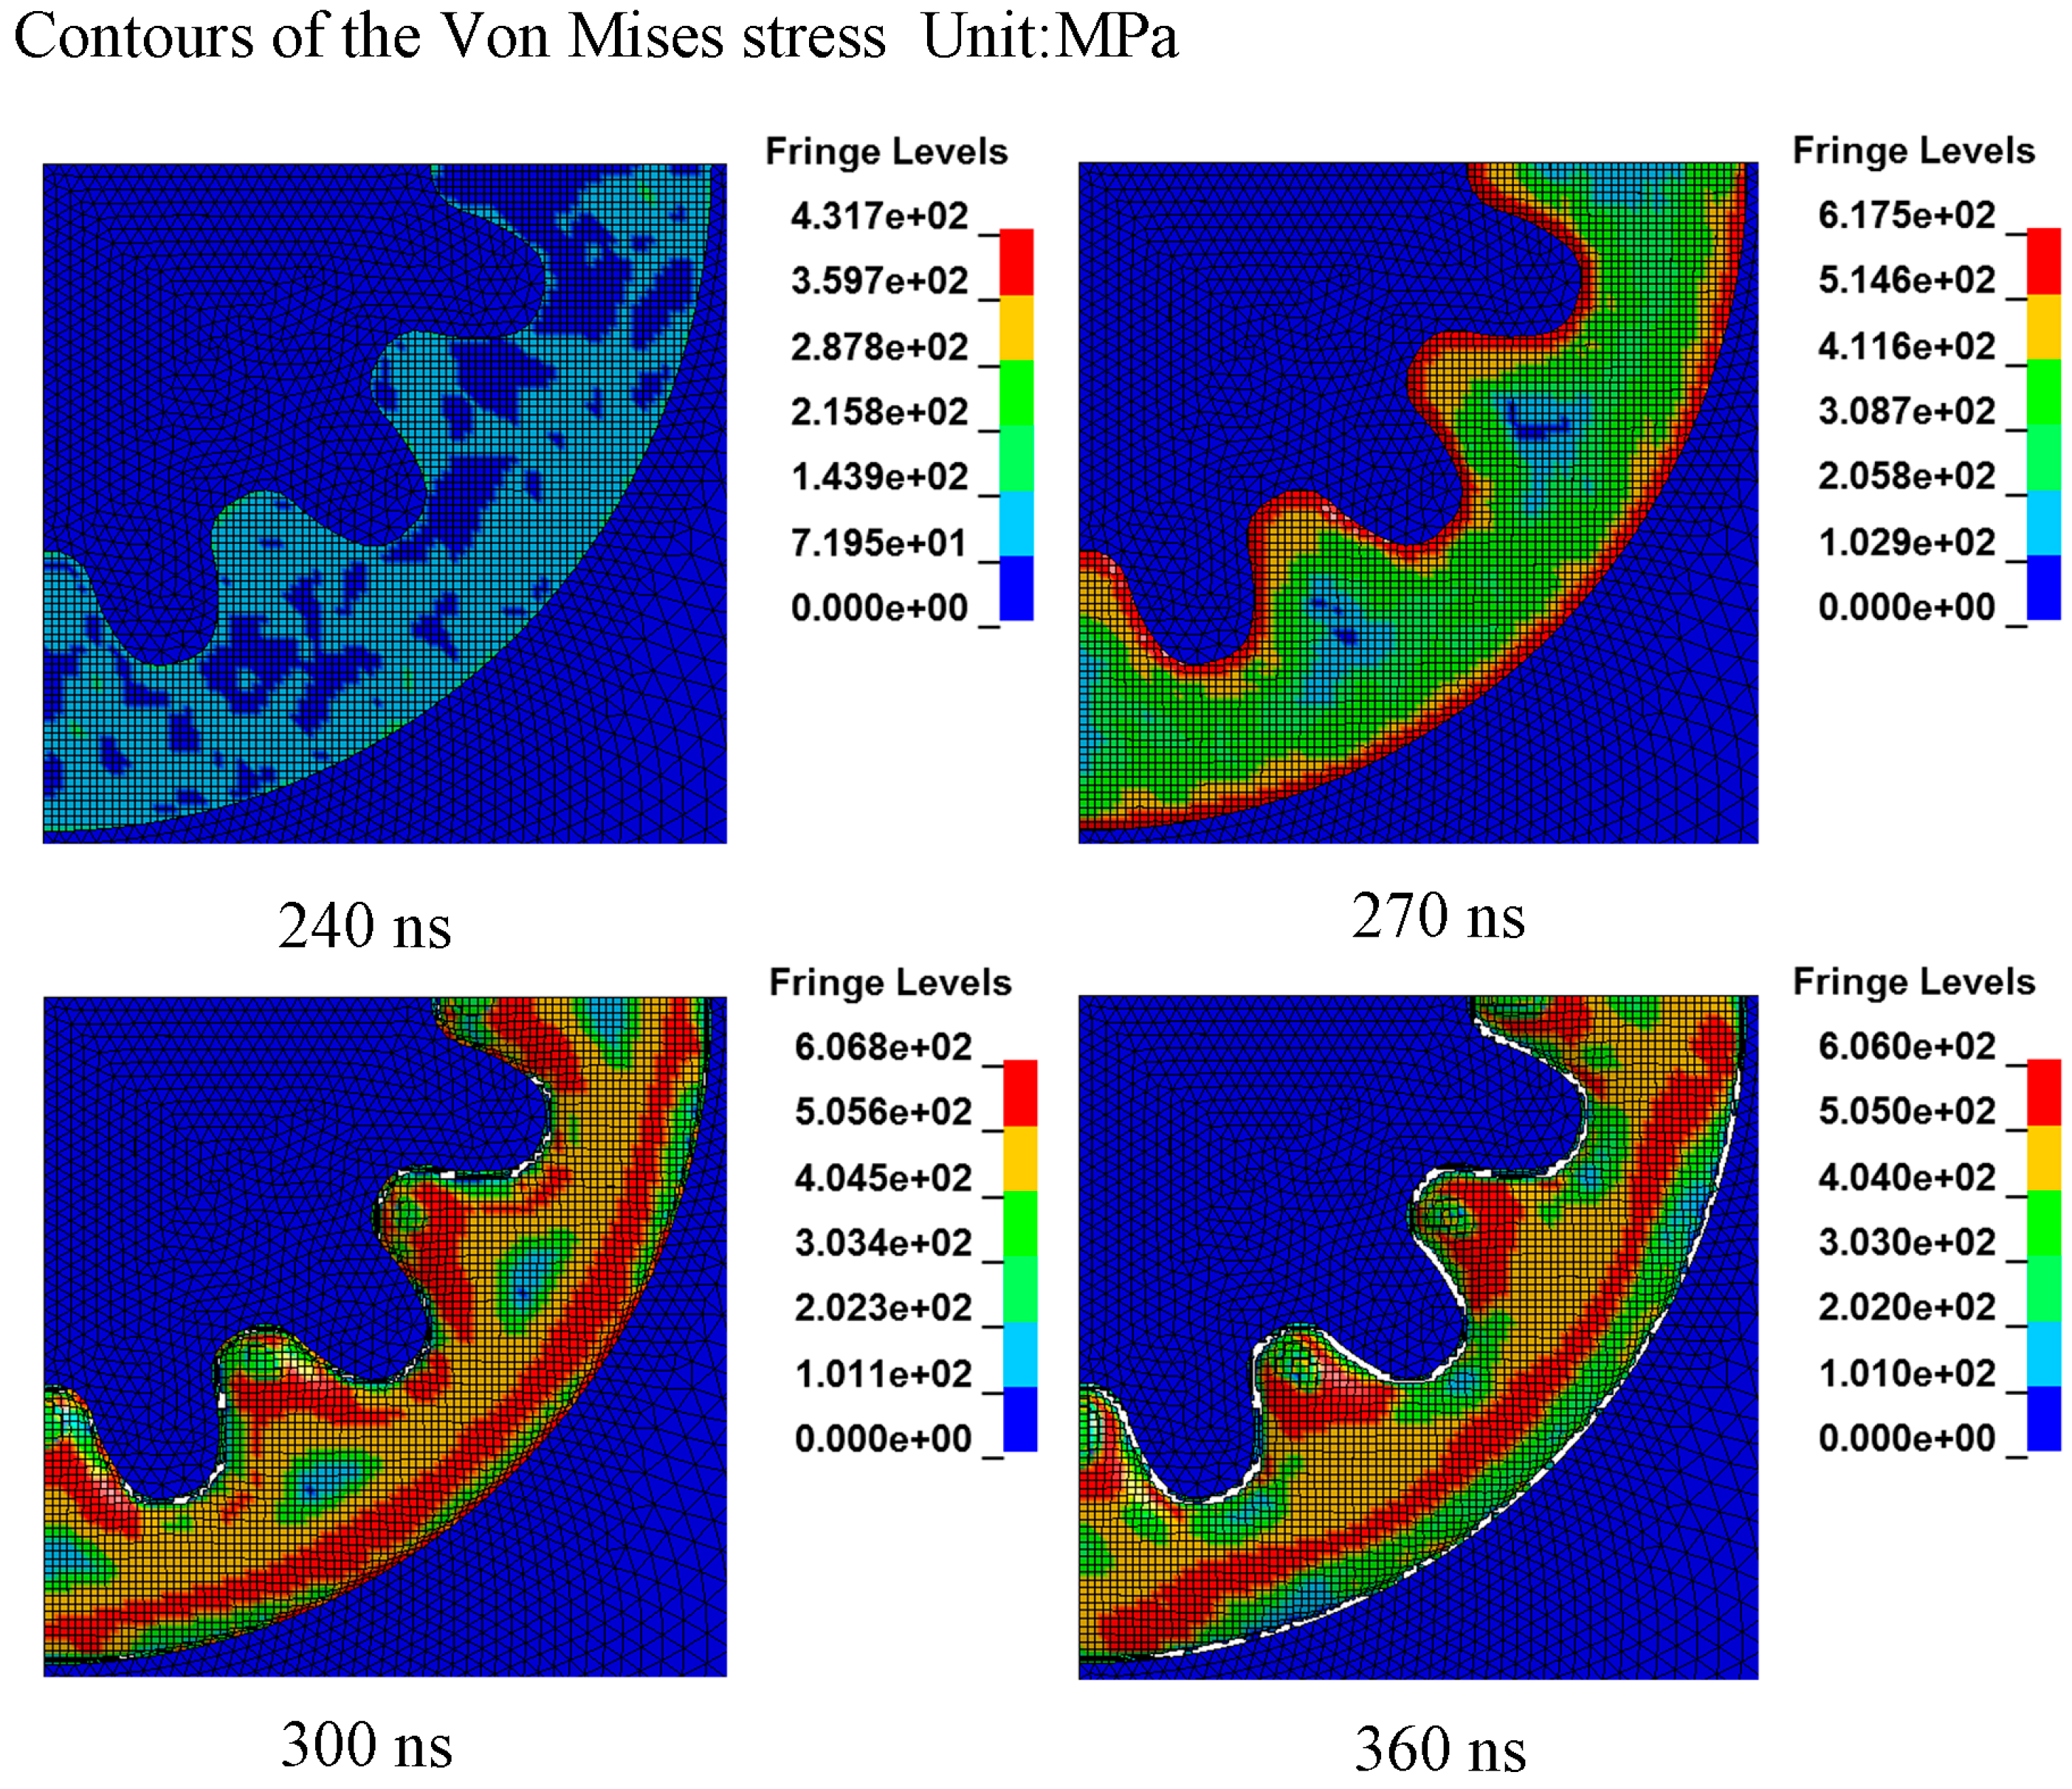
In the process of laser shock punching, the workpiece is subjected to very high pressure, and the strain rate is ultrahigh, however, there are still three more stages, namely elastic deformation, plastic deformation and fracture. Figure 12 presents the typical stages of the material behaviors with contours of the Von Mises stress distribution.
Figure 12. Typical stages of material deformation in laser shock punching process.
Micromachines 06 00969 g012
At the beginning, the laser irradiates onto the ablative layer and the black paint is vaporized into a high-temperature and high-pressure plasma. Then, plasmas turn into LSD and exert intense pressure on the upper surface of soft punch and the elastic wave starts to transmit. At 240 ns, the elastic wave has propagated to the upper face of workpiece and the workpiece begin to deform. Elastic deformation occurs at the moment. At 270 ns, soft punch continues to move and the workpiece gets a greater degree of deformation. The shearing stress that the workpiece subjected to exceeds the dynamitic yield strength and plastic deformation occurs at the moment. At 300 ns, the increasing stress climbs over the dynamic fracture strength and the lower surface of the workpiece begins to fracture. At 360 ns, the workpiece is fully punched out finally.
Figure 13 presents different deformation behavior of the cross-section profile of the workpiece under high and low pulse energy. Apparently, it takes more time for the workpiece to be shocked with lower energy to complete the whole punching process: it only needs 330 ns to punch the micro-gear out completely under high energy, while the time increases to 480 ns under low energy. This is because the absorbed laser density I0 will be smaller when lower energy is employed, causing smaller shock pressure according to Equation (10). As a result, the speed of deformation is relatively slower. Furthermore, fracture mode is different from that shown in Figure 13a when the cracks propagate from the lower surface of the workpiece to the upper surface under appropriate pulse energy, because of the shearing effect of the soft punch and the rigid mold. However, the cracking direction is reverse when the energy is lower, as shown in Figure 13b. In this case, the shearing effect of the die is too weak to exceed the dynamitic fracture strength, thus the workpiece flows into the cavity of the mold till tensile fracture occurs, which is also the reason why the punching quality is poor under lower energy.
Figure 13. Differences in material deformation between high and low laser energy in the cross section (a) high energy and (b) low energy.
Micromachines 06 00969 g013

5. Conclusions

In this paper, the laser shock punching process was adopted to fabricate micro-gears and the influence of process parameters such as the laser energy, soft punch properties and blank-holding force on dimensional accuracy and appearance was investigated. The following conclusions can be obtained:
(1) At lower laser energy, tensile facture occurred in the cross section of Al foils, which is unfavorable for surface quality and dimensional accuracy; soft punch can damage the punched gears when the energy is too high. Besides, the punching quality of holes is much better than that of gears.
(2) Silica gel with 200 μm in thickness is more suitable for realizing better punching appearance than that of 100 or 300 μm. Gears punched by 100 μm silica gel tend to be eccentric. The punching process cannot be completed with 300 μm silica gel. Polyurethane films need more energy than silica gel of the same thickness. Consequently, as the soft punch, appropriate thickness and hardness is necessary for transmitting and homogenizing the shock pressure.
(3) Heavier blank-holder is beneficial for improving plastic deformation and punching accuracy during laser shock punching process, for it can improve the plasticity by providing lateral pressure and preventing axial movement of the workpiece.
(4) Numerical simulation was conducted to present the typical stages under high and low pulse energy during the punching process. It shows that it needs more time for the workpiece punched by lower energy to finish the punching process. Generally, cracks appear firstly on the lower surface of workpiece and extend to the upper surface. However, the propagating direction is reverse and tensile fracture is the dominant fracture mode under low pulse energy.

Acknowledgements

The work is supported by the National Natural Science Foundation of China (No. 51175235), the Natural Science Foundation of Jiangsu Province (No. BK2012712) and the Natural Science Foundation of the Jiangsu Higher Education Institutions of China (No. 13KJB460003).

Author Contributions

Huixia Liu conceived and designed the experiments; Jianwen Li and Hongfeng Zhang performed the experiments; Jianwen Li and Qing Qian analyzed the data; Xiao Wang, Zongbao Shen, Huixia Liu and Jianwen Li wrote the paper. Huixia Liu, Xiao Wang and Zongbao Shen revised the manuscript. All authors have given approval to the final version of the manuscript.

Conflicts of Interest

The authors declare no conflict of interest.

References

  1. Geiger, M.; Kleiner, M. Microforming. CIRP Ann-Manuf. Technol. 2001, 50, 445–462. [Google Scholar] [CrossRef]
  2. Xu, J.; Guo, B. Micro-punching process of stainless steel foil with micro-die fabricated by micro-EDM. Microsyst. Technol. 2014, 20, 83–89. [Google Scholar] [CrossRef]
  3. Yi, S.M.; Joo, B.Y. Mechanical punching of 15 μm size hole. Microsyst. Technol. 2006, 12, 877–882. [Google Scholar] [CrossRef]
  4. Ghassemali, E.; Tan, M.J. Progressive microforming process: Towards the mass production of micro-parts using sheet metal. Int. J. Adv. Manuf. Technol. 2013, 66, 611–621. [Google Scholar] [CrossRef]
  5. Masuzawa, T.; Tönshoff, H.K. Three-dimensional micromachining by machine tools. CIRP Ann-Manuf. Technol. 1997, 46, 621–628. [Google Scholar] [CrossRef]
  6. Joo, B.Y.; Rhim, S.H. Micro-hole fabrication by mechanical punching process. J. Mater. Process. Technol. 2005, 170, 593–601. [Google Scholar] [CrossRef]
  7. Rhim, S.H.; Son, Y.K. Punching of ultra small size hole array. CIRP Ann-Manuf. Technol. 2005, 54, 261–264. [Google Scholar] [CrossRef]
  8. Liu, H.X.; Shen, Z.B. Numerical simulation and experimentation of a novel micro scale laser high speed punching. Int. J. Mach. Tools Manuf. 2010, 50, 491–494. [Google Scholar] [CrossRef]
  9. Liu, H.X.; Lu, M.M. Micro-punching of aluminum foil by laser dynamic flexible punching process. Int. J. Mater. Form. 2013, 8, 183–196. [Google Scholar] [CrossRef]
  10. Watari, H.; Ona, H. Flexible punching method using an elastic tool instead of a metal punch. J. Mater. Process. Technol. 2003, 137, 151–155. [Google Scholar] [CrossRef]
  11. Peng, L.; Hu, P.; Lai, X.; Mei, D.; Ni, J. Investigation of micro/meso sheet soft punch stamping process—Simulation and experiments. Mater. Des. 2009, 30, 783–790. [Google Scholar] [CrossRef]
  12. Wang, X.; Du, D. Investigation of microscale laser dynamic flexible forming process—Simulation and experiments. Int. J. Mach. Tools Manuf. 2013, 67, 8–17. [Google Scholar] [CrossRef]
  13. Guo, W.G.; Li, Y.L. Stress Wave Basis Concise Course; Northwestern Polytechnical University Press: Xi’an, China, 2007; pp. 52–55. [Google Scholar]
  14. Lee, T.C.; Chan, L.C. Straining behavior in blanking process-fine blanking vs. conventional blanking. J. Mater. Process. Technol. 1995, 48, 105–111. [Google Scholar] [CrossRef]
  15. Kwak, T.S.; Kim, Y.J. The effect of V-ring indenter on the sheared surface in the fine-blanking process of pawl. J. Mater. Process. Technol. 2003, 143, 656–661. [Google Scholar] [CrossRef]
  16. Fabbro, R.; Fournier, J. Physical study of laser-produced plasma in confined geometry. J. Appl. Phys. 1990, 68, 775–784. [Google Scholar] [CrossRef]
  17. Peyre, P.; Fabbro, R. Laser shock processing: A review of the physics and applications. Opt. Quantum Electron. 1995, 27, 1213–1229. [Google Scholar]
  18. Dirikolu, M.H.; Akdemir, E. Computer aided modelling of flexible forming process. J. Mater. Process. Technol. 2004, 148, 376–381. [Google Scholar] [CrossRef]